BACHMANN EUROPE PLC BACHMANN EUROPE PLC BACHMANN EUROPE PLC
Betriebsanleitung
Instruction sheet
Die kkStB U war eine Schmalspurdampflokomotive der k.k. Österreichischen
Staatsbahnen für 760 mm Spurweite. Die Reihe U gehört zu den meistgebauten
Schmalspurlokomotiven Europas. Die Lokomotiven wurden auch von zahlreichen
privaten Lokalbahnen im damaligen Österreich beschafft.
Das letzte Exemplar der Reihe U wurde erst 1922 für die StLB gebaut, als schon
längst modernere Lokomotivtypen existierten. Jene Lokomotiven der Reihe U, die
bis nach dem Zweiten Weltkrieg in den Besitz der ÖBB übergingen, erhielten ab
1953 die Reihenbezeichnung 298 mit zweistelligen Ordnungsnummern.
Aufgrund ihrer großen Stückzahl sind heute noch zahlreiche Maschinen bei Muse-
ums- und Touristikbahnen betriebsfähig im Einsatz zu erleben, einige Exemplare
wurden auch als Lokomotiv-Denkmäler aufgestellt.
The kkStB U was a narrow gauge steam locomotive of the Imperial Austrian State
Railways for 760 mm track gauge. The U series was one of the most built narrow
gauge locomotives in Europe. The locomotives were also procured by numerous
private local railways in Austria at the time.
The last U series example was built as late as 1922 for the StLB, at a time when
more modern locomotive types were long since available. Those series U loco-
motives which passed into the possession of the Austrian State Railways after the
Second World War, were given the series designation 298 with double-digit indent
numbers from 1953. On account of their large production numbers, numerous
machines can still be found running on museum and tourist tracks; some examples
were also employed as locomotive monuments.
Garantiebedingungen:
Dieses LILIPUT-Modell hat ab Kaufdatum zwei Jahre
Garantie auf Reparaturen und Teile, sofern es bei einem
autorisierten Händler gekauft wurde und dieses Zertifikat
vom Händler abgestempelt und das Kaufdatum einge-
tragen worden ist. Die Garantie umfasst nach Wahl von
Bachmann Europe Plc entweder die Beseitigung eines
eventuellen Mangels oder den Ersatz schadhafter Teile.
Weitergehende Ansprüche sind ausgeschlossen.
Beachten Sie bitte, dass für nachträglich eingebaute Teile
sowie für dadurch entstandene Schäden keine Haftung
übernommen wird.
Kaufdatum mit Händlerstempel
DEUTSCHLAND:
BACHMANN EUROPE PLC
NIEDERLASSUNG DEUTSCHLAND
AM UMSPANNWERK 5
D - 90518 ALTDORF BEI NÜRNBERG
ÖSTERREICH:
DOLISCHO MODELLSPIELWAREN
BAHNSTRASSE 4
A - 2340 MÖDLING
SCHWEIZ:
MODELLBAU UND
ELEKTRONIK
STETTBACHSTRASSE 193
CH - 8051 ZÜRICH
ALLE ANDEREN LÄNDER:
BACHMANN EUROPE PLC
MOAT WAY, BARWELL
GB - LEICESTERSHIRE LE9 8EY
Garantie-Schein
Sollte Ihr LILIPUT-Modell einen Mangel oder eine Störung aufweisen oder einmal repara-
tur-bedürftig sein, haben Sie die Möglichkeit, sich diesbezüglich entweder an den Händler,
bei dem Sie das Produkt gekauft haben oder direkt an die Kundendienstabteilung einer der
nachfolgend angegebenen Adressen zu wenden.
Warranty Coupon
Should your LILIPUT model be faulty or not work properly or require repair, you can either
contact the dealer from whom you purchased the product or contact the customer services
department directly of one of the following addresses below.
Warranty Conditions:
This LILIPUT model has a warranty of two years from the
date of purchase on repairs and parts, as long as it was
purchased from an authorised dealer and if this certificate
has been stamped with the address of the dealership and
the date of purchase has been entered. The warranty
permits Bachmann Europe Plc either to rectify any fault or
to replace the faulty parts. Further claims are excluded.
Please note that no liability can be assumed for any parts
subsequently fitted or for any damage caused thereby.
GREAT BRITAIN
AND ALL OTHER COUNTRIES
( EXEPT GERMAN SPEAKING COUNTRIES )
BACHMANN EUROPE PLC
MOAT WAY, BARWELL
GB - LEICESTERSHIRE LE9 8EY
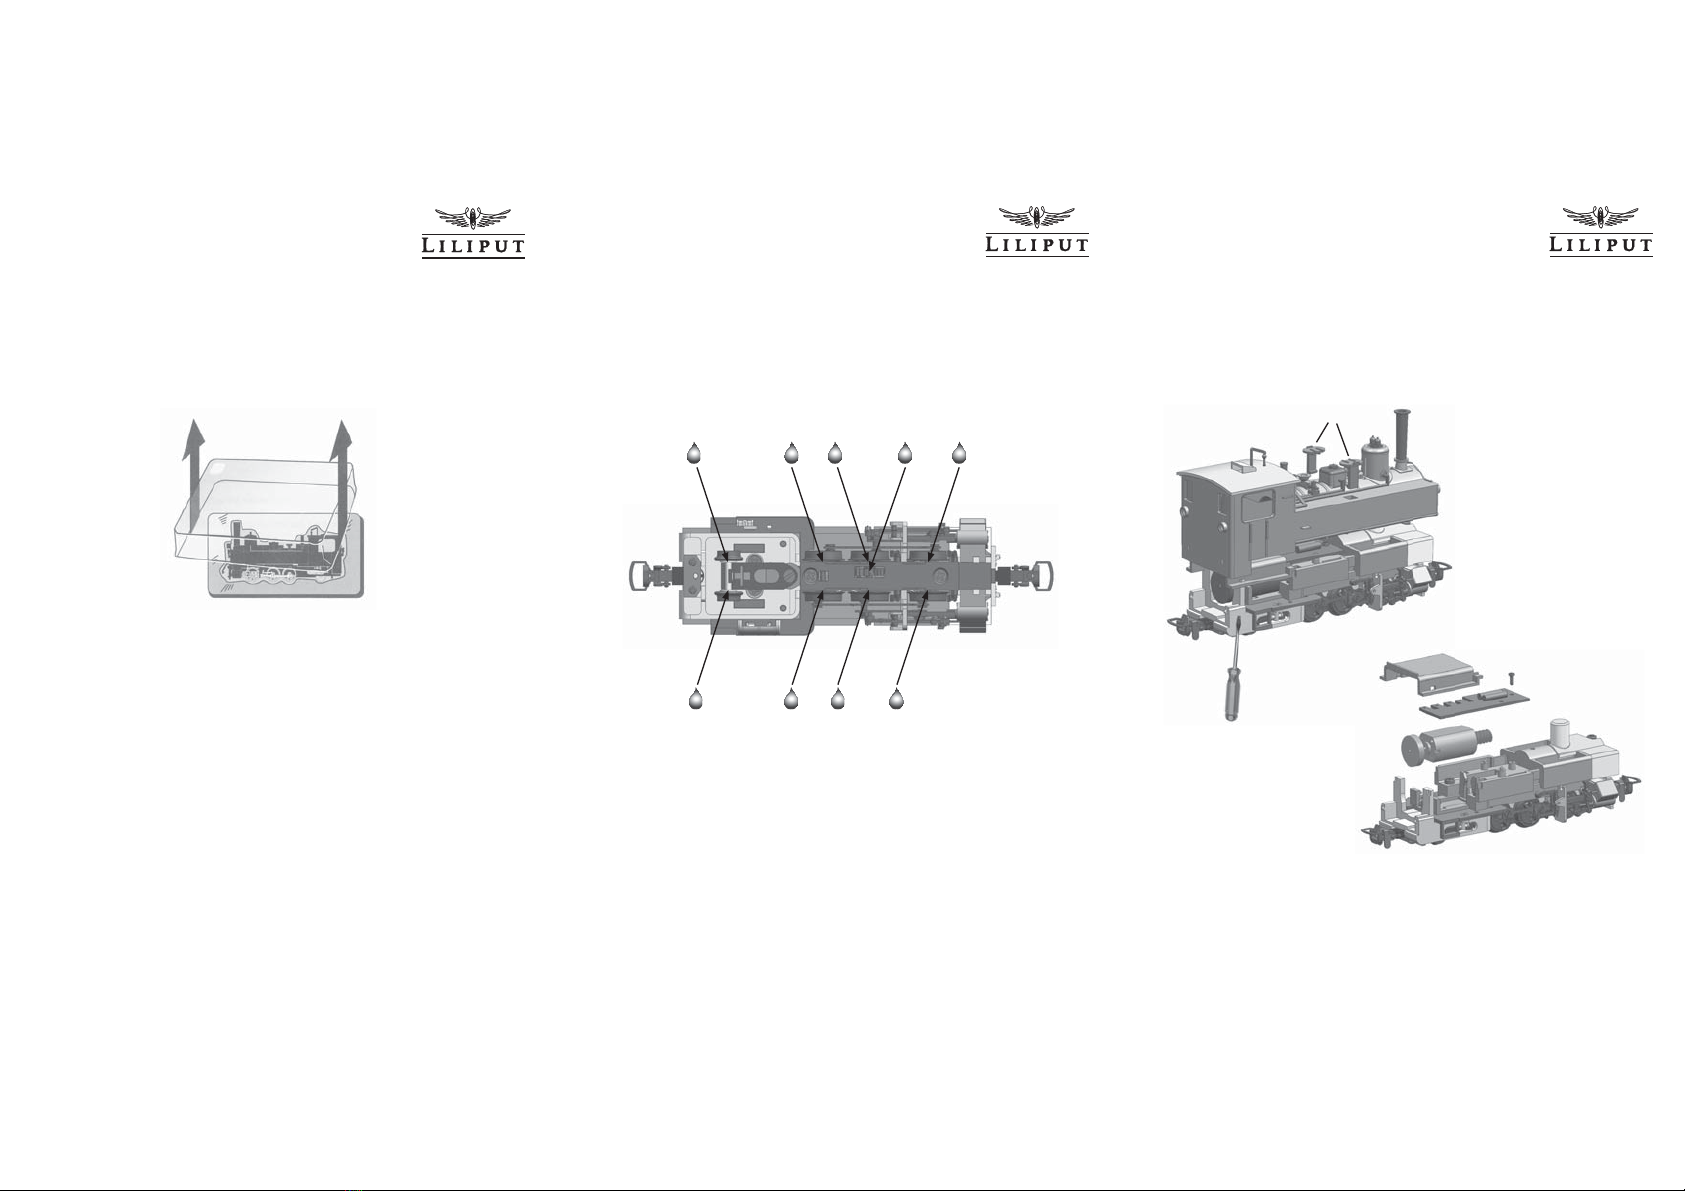
Opening the locomotive
If you wish to undertake maintenance work on the motor or on the internal gear parts, it is
necessary to dismantle the locomotive housing as shown in Pic. 3. To do this use a small
screwdriver SD to lift the housing from the running gear on both sides at the rear corner
between the coal box and chassis before removing completely. Also loosen the two lids D
on the water boxes. When fitting back together first clip the two rear snap tabs in place and
then clip in the two lids in the opening of the water boxes in the chassis. To exchange the
motor, remove the cover Aand loosen the screws SM as per Pic.4. After slightly raising the
circuit board, loosen the two motor wires by removing the clips from the circuit board and
carefully tip this to one side. You can now remove the motor Mand the two wires.
Wichtig! Wir empfehlen die Originalverpackung aufzubewahren,
sie ist der beste Schutz für Ihr Modell, wenn dieses nicht gerade
auf Ihrer Anlage unterwegs ist. Beim Betrieb der Lok auf Teppich-
böden kann die feine Mechanik durch Fasern zerstört werden.
Änderungen in Konstruktion und Ausführung vorbehalten. Bitte
bewahren Sie diese Beschreibung zum späteren Gebrauch auf.
Dieses Produkt wurde nach Vorschriften der europäischen Spiel-
zeugrichtlinien (CE) hergestellt. · Important! We recommend that
you keep the original box. It is the best place to store your model,
when it is not in use. Please be aware, that carpet fibres can dest-
roy the fine mechanism of the locomotive. Subject to changes
in design, version and technical data. Please retain these data
and instructions for further reference. This product has been ma-
nufactured according to the European toy Safety Directive (CE).
Importante! Raccomandiamo di tenere la scatola
originale. E’ il posto migliore in cui tenere il tuo mo-
dello quando non è in uso. Fibre di tappeti possono
distruggere il fine meccanismo della locomotiva.
Preghiamo di conservare questi dati ed istruzioni per
BACHMANN EUROPE Plc · Moat Way · Barwell · Leicestershire · LE9 8EY England Made in China
altre informazioni. Quest’articolo è stato prodotto in accordo con
la Direttiva Europea Sicurezza giochi (CE).
Achtung! Bei unsachmäßigem Gebrauch besteht Verletzungsge-
fahr durch funktionsbedingte scharfe Kanten und Spitzen • Atten-
tion! At an incorrect use there exists danger of hurting becauseof
cutting edges and tips • Attention! Il y a danger de blessure à
un emploi incorrect à cause des aiguilles et arêtes vives! • Voor-
zichtig! Bij ondoelmatig gebruik bestaat verwondigsgevaar door
scherpe zijkanten en uitsteeksels! • Attenzione! Un uso improprio
comporta pericolo di ferimenti attraverso punte e spigoli taglienti!
• Atencion! Un empleo incorrecto puede causar heridas debido a
las puntas y aristas agudas! • Atençao! Por utilizaçao incorrecta
existe o perigo de estragos, em virtude de cortes nas abas e nas
pontas! • Προξοχη! Η ακαταλληλη χρηοη εγκλειει
κινδυνουζ μκροτ ραυματιομων, εξ αιπαξ κοπτερων
ακμων και προεξοχωθν • Bemaerk! Ved ukorrekt
brug kan de funktionsbetingede skarpe kanter og
spidser forfolde skade!
D
SD
A
M
SM
L14148x
H0e Tenderlok
Typ U
H0e Tank loco
Type U
561
1006
Picture 3
Picture 4