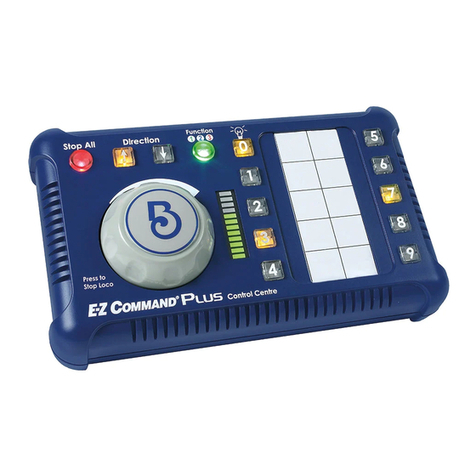
Bachmann E-Z Command Installation manual

Bachmann Trains is pl as d to bring you E-Z Command.®D v lop d in partn rship with Digital Command Control (DCC) innovator
L nz El ctronik, E-Z Command allows you to digitally control th sp d, lighting, sound, and dir ction of s v ral locomotiv s
ind p nd ntly of ach oth r. But unlik oth r DCC syst ms, E-Z Command simplifi s th programming proc ss with on -button main
track programming. Oth r f atur s includ 28 sp d st ps for smooth op ration and plug-in wiring for simpl s t up. E-Z Command
will op rat DCC- quipp d locomotiv s from many manufactur rs and off rs many of th f atur s pr viously found only on mor
xp nsiv digital syst ms. B st of all, E-Z Command has plug-and-play compatibility with all DC and NMRA-compliant DCC
syst ms.
Your E-Z Command Digital Command Control Syst m consists of th following compon nts (figur 1):
E-Z Command Control C nt r
Wall Pack Pow r Supply
1 R d E-Z Track®Track Pow r Wir
1 R d Univ rsal Track Pow r Wir
1 Black Int rconn cting Pow r Cabl (for us in combination with a DC sp d controll r)
With its uniqu plug-and-play capability, E-Z Command is asy to s t up and us , wh th r you’r op rating an xisting mod l railroad
or s tting up a n w layout. To nsur troubl -fr op ration, how v r, w r comm nd that you r ad this manual compl t ly b for
op rating your syst m for th first tim .
NOTE: DO NOT CONNECT THE E-Z COMMAND CONTROL CENTER TO THE WALL ACK OWER SU LY UNTIL
YOU HAVE MADE THE CONNECTIONS FROM THE CONTROL CENTER TO YOUR TRACK.
1
Setup and rogramming Instructions
.
.
.
.
.
CAUTION-ELECTRICALLY OPERATED PRODUCT
NOT RECOMMENDED FOR CHILDREN UNDER 14 YEARS OF AGE. AS WITH ALL
ELECTRIC PRODUCTS, PRECAUTIONS SHOULD BE OBSERVED DURING HANDLING AND USE
TO PREVENT ELECTRIC SHOCK. INPUT: 120 VAC 60Hz. OUTPUT: AC 16V 1000 A

TRACK CONNECTION
If standard DC pow r packs supply your railroad, turn th m off and disconn ct th f d r wir s to your track.
NOTE: IF YOUR LAYOUT IS SEGMENTED INTO “ OWER DISTRICTS,” TURN ALL ELECTRICAL BLOCKS ON, AS
LONG AS DOING SO WILL NOT RESULT IN A SHORT CIRCUIT. ARTICULAR CARE MUST BE TAKEN WITH
REVERSE-LOO TRACK CONFIGURATIONS.
If you ar using Bachmann’s E-Z Track syst m, plug th r d E-Z Track Track Pow r Wir into th sock t on th back of th E-Z
Command Control C nt r lab l d “TO TRACK” (figur 2) and plug th oth r nd into any standard E-Z Track t rminal r rail r (figur 3).
Wh n using a track syst m oth r than E-Z Track, choos th Univ rsal Track Pow r Wir (with th bar nds) and plug it into th
E-Z Command Control C nt r as illustrat d in figur 2. N xt, attach th bar nds of th track pow r wir to th point wh r you
pr viously suppli d pow r from your DC controll r to your layout (figur 4).
Aft r th track conn ctions ar compl t , plug th Wall Pack Pow r Supply into a standard 110 volt wall outl t (figur 5). Plug th
wir from th Wall Pack Pow r Supply into th sock t on th E-Z Command controll r lab l d “16V AC IN” (figur 6). N xt, mov
th mast r “On/Off” switch on th und rsid of th E-Z Command Control to th “On” position (figur 7).
Onc th E-Z Command Control C nt r is pow r d, th pow r LED indicator (locat d b low th “Stop” button) will b lit. On of th
“Dir ction” LEDs and th LED n xt to th addr ss “1” button will also b lit (figur 8).
If your Control C nt r do s not pow r up as shown h r , disconn ct it from th Wall Pack Pow r Supply, and l t it sit for two
minut s. This will allow th syst m to r s t its lf. Aft r two minut s, you can r conn ct th Wall Pack Pow r Supply to th Control
C nt r.
2
234
567
8

PROGRAMMING A LOCOMOTIVE TO A SPECIFIC ADDRESS
Your E-Z Command Control C nt r f atur s t n programmabl control buttons or “addr ss s.” By d fault, most n w DCC- quipp d
locomotiv s ar factory-programm d to r spond to commands on addr ss 3.
To program your locomotiv to anoth r addr ss, activat th locomotiv by running it a short distanc . N xt, pr ss and hold down
button 3, th locomotiv ’s d fault addr ss (figur 9) AND THEN AT THE SAME TIME, pr ss th “Stop” button (figur 10), th n
r l as both buttons tog th r. Th pow r LED will flash quickly to indicat you’r in programming mod .
Choos a n w addr ss for your locomotiv and pr ss th corr sponding button. Th locomotiv will mov slightly (figur 11) and th
pow r LED will flash slowly to indicat that you hav succ ssfully programm d your locomotiv to its n w addr ss. Finally, pr ss th
“Stop” button to xit programming mod .
Aft r you’v programm d all your locomotiv s, you can individually control ach of th m by pr ssing th numb r d button you hav
assign d to that particular locomotiv . A r movabl two-column sh t is locat d b tw n th numb r d buttons so you can id ntify
which locomotiv is assign d to ach button. For your conv ni nc , xtra blank sh ts ar includ d with your syst m (figur 12).
REPROGRAMMING DECODERS ITH PREVIOUSLY ASSIGNED DIGITAL ADDRESSES
You can us th E-Z Command syst m to control locomotiv s that hav a pr viously assign d digital addr ss oth r than numb r 3. If
th pr viously assign d addr ss is a numb r l ss than 10, follow th dir ctions w ’v just d scrib d to assign a n w addr ss to a
locomotiv d cod r. Just substitut th locomotiv ’s original digital addr ss numb r for th numb r 3 in th standard programming
proc dur .
How v r, if th locomotiv ’s digital addr ss is a numb r high r than 10, you can r program it by following this proc dur :
First, r mov all locomotiv s from th layout. N xt, follow th standard E-Z Command programming proc dur s as d scrib d in th
“Programming a Locomotiv to a Sp cific Addr ss” s ction (but without any locomotiv on th track), including pushing and holding
down th numb r 3 button and th “Stop” button. At this point, you’r r ady to assign a n w digital addr ss to th locomotiv .
Simply plac th subj ct locomotiv on th track and assign a n w addr ss by pr ssing a numb r d E-Z Command button (1 to 9). Th
locomotiv will mov slightly to signal that you hav succ ssfully assign d a n w, low r addr ss. Finally, push th “Stop” button to
xit th programming mod and b gin op rating your locomotiv at its n w digital addr ss.
3
910
11 12

PROGRAMMING FOR ARD AND REVERSE OPERATION
With E-Z Command and oth r DCC syst ms, forward and r v rs trav l is r lativ to th locomotiv and not th track. To assign a
dir ction that th train will r cogniz as b ing “forward,” first activat th locomotiv by running it forward a short distanc . N xt,
pr ss and hold th locomotiv ’s curr nt addr ss button AND th “Stop” button, th n r l as both buttons simultan ously. Th LED
pow r indicator will flash quickly to signal that your Control C nt r is in programming mod . Pr ss th dir ction button you wish to
assign as “forward” (figur 13). Finally, pr ss th locomotiv ’s addr ss button, th n pr ss th “Stop” button to xit programming mod .
Onc dir ction programming is compl t , you can chang th r lativ dir ction of trav l of your locomotiv at any tim by bringing
your locomotiv to a compl t stop and pr ssing th appropriat dir ction button.
RUNNING MULTIPLE LOCOMOTIVES
To run multipl locomotiv s simultan ously, follow th instructions d scrib d in th “Programming a Locomotiv to a Sp cific
Addr ss” s ction. For illustration purpos s, l t’s assum you’v assign d on locomotiv to addr ss 1 and a s cond locomotiv to
addr ss 2.
To b gin, pr ss th addr ss 1 button and turn th control knob clockwis to pow r up th corr sponding locomotiv . Th r d LED
n xt to button 1 will b lit, indicating that control of th locomotiv assign d to that addr ss is activ .
To activat th locomotiv on addr ss 2, simply pr ss th addr ss 2 button. At this point, th r d LED n xt to addr ss 2 will b lit,
and th locomotiv on addr ss 1 will carry on running at its last sp d and dir ction s tting (w call this “running in background”).
To activat locomotiv numb r 2, simply turn th controll r knob slightly. Now, locomotiv 2 is activ and you can d t rmin its
sp d and dir ction s ttings ind p nd ntly of locomotiv 1. Turn th controll r knob to s t th d sir d sp d. With up to 10 addr ss s
at your disposal, you can switch among multipl locomotiv s in this fashion.
NOTE: THE 1AM TRANSFORMER SU LIED WILL RUN TWO LOCOMOTIVES AT ANY ONE TIME. O ERATION
OF MORE THAN TWO LOCOMOTIVES WITH THE E-Z COMMAND CONTROLLER CAN AFFECT THEIR
ERFORMANCE AND MAY REQUIRE ADDITIONAL OWER IN UT. E-Z COMMAND 5AM OWER BOOSTER
(ITEM NO. 44910) MAY BE REQUIRED.
ELECTRIC MOMENTUM
Wh n using th sp d control knob to start and stop your locomotiv , your E-Z Command syst m allows your trains to op rat with a
r alistic acc l ration and coasting ff ct call d “El ctric Mom ntum.” Rath r than starting or stopping abruptly, th ngin will
acc l rat and slow mor gradually, r plicating th charact ristics of a prototyp locomotiv and cars. R m mb r to plan car fully
wh n slowing or stopping your train.
EMERGENCY STOP
Th syst m r li s on you to pr v nt crash s. To avoid a collision, pr ss th “Stop” button to stop all train motion. Trains will r sum
th ir xisting sp ds and dir ction wh n th “Stop” button is pr ss d for a s cond tim , so it is important that you tak th appropriat
st ps to pr v nt a crash whil in “Em rg ncy Stop” mod . Though som pot ntial collisions may r quir you to physically r ori nt
your trains in ord r to b av rt d, ou can also send preventive digital commands (e.g. changing speed or direction) to our locomotives while the
are in “Emergenc Stop” mode. Onc th appropriat commands hav b n nt r d, pr ss th “Stop” button again and r sum op ration.
Should a collision occur, simply pr ss th “Stop” button. Cl ar locomotiv s and rolling stock as n d d and plac th m back on th
track. Pr ss th “Stop” button a s cond tim to r sum op ration.CONSISTING
4
13

With E-Z Command, you can also simulat a r al railroading practic call d “consisting.” Plac two or mor DCC- quipp d
locomotiv s on your layout (as shown in figur 14, for xampl ). N xt, simply assign th locomotiv s to th sam addr ss according to
th instructions d scrib d in th “Programming a Locomotiv to a Sp cific Addr ss” s ction.
NOTE: IF YOU CHOOSE TO ARRANGE YOUR CONSIST SO THAT ONE ENGINE IS RUNNING FORWARDS AND
THE OTHER IN REVERSE, ONE ENGINE MUST BE ROGRAMMED TO O ERATE IN REVERSE AS SHOWN IN THE
“ ROGRAMMING FORWARD AND REVERSE O ERATION” SECTION.
PROGRAMMING USER-INSTALLED DCC DECODERS
A s parat low-curr nt programming track is n d d only for first-tim programming of locomotiv s with us r-install d d cod rs.
The low current to the programming track protects the decoder if the installation was performed incorrectl .
To cr at a programming track, conn ct a r sistor in s ri s with on track wir to an isolat d s ction of track (figur 15). A 100 ohm
10W 5% Wir wound R sistor (Radio Shack Catalog # 271-135) is r comm nd d.
Onc you’v construct d your isolat d programming track, you’r r ady to program a locomotiv quipp d with an NMRA-compliant,
us r-install d DCC d cod r.
First, turn th throttl knob count rclockwis fully until it stops. N xt, pr ss and hold th k y for th addr ss you wish to assign to
th n w locomotiv . In this xampl , w will us addr ss button 7. Now, pr ss and r l as th “Stop” button, th n r l as th addr ss
button 7. Th pow r LED will blink fast, indicating that you ar in programming mod .
Plac th locomotiv with th n w us r-install d d cod r on th programming track. N xt, pr ss and r l as button 7. Th pow r
LED will now blink slowly and th programm d locomotiv will mit a s ri s of small clicks indicating that th programming was
succ ssful. If you do not h ar th clicking sounds, pl as ch ck to nsur that your d cod r is install d prop rly.
Now, pr ss and r l as th “Stop” button again. Th pow r LED will stop blinking altog th r and will b lit constantly. You can
ch ck th op ration of th d cod r on th programming track by turning th sp d knob. If th locomotiv r sponds prop rly, th
installation and th programming was don succ ssfully and you can mov th locomotiv to th main layout.
5
14
15

FUNCTION MODE
Lik most DCC syst ms, E-Z Command f atur s a function mod that nabl s you to control f atur options that som manufactur rs
includ with th ir DCC locomotiv or d cod r products.
To activat sound and lighting f atur s, b gin by pr ssing th “Function” button (figur 16). Th LED n xt to th locomotiv addr ss
button that is curr ntly activ (numb r “2,” for xampl ) will blink, indicating that you ar now in th function mod . You will still
b abl to control th sp d and dir ction of th activ locomotiv , but in function mod , addr ss buttons 1 through 8 (id ntifi d h r
as F1 through F8 to indicat op ration in function mod ) will allow you to control th optional sound and lighting f atur s that may
b includ d with your d cod r. F10 controls th lights on your locomotiv . It’s important to r m mb r that whil you hav th
E-Z Command controll r in function mod , you will NOT b abl to program any n w locomotiv addr ss s. To xit th function
mod , simply pr ss th “Function” button again.
NOTE: DUE TO THE ARRAY OF DCC DECODERS AND VARYING LEVELS OF SO HISTICATION, CONTROL OF
SOME FUNCTIONS MAY BE LIMITED. CONSULT THE MANUFACTURER’S INSTRUCTIONS THAT CAME WITH
YOUR DECODER TO DETERMINE WHICH FUNCTIONS ARE CONTROLLED BY WHICH NUMBER BUTTONS.
STANDARD DC LOCOMOTIVE OPERATION
E-Z Command allows you to control up to nin digital locomotiv s and will also accommodat your favorit non-digital DC
locomotiv s (without DCC d cod rs). How v r, only ONE DC locomotiv can b run at any on tim on addr ss button 10.
To op rat a DC locomotiv through your E-Z Command syst m, plac a standard non-digital locomotiv on th track. N xt, pr ss
addr ss button numb r 10 button (figur 17) to activat th DC locomotiv and b gin op ration.
NOTE: WHEN O ERATING A DC LOCOMOTIVE ON ADDRESS "10," BE SURE TO MONITOR IT CLOSELY. SOME DC
MOTORS ARE SUBJECT TO OVERHEATING AND DAMAGE WHEN O ERATING FOR LONG ERIODS OF TIME
ON DCC SYSTEMS.
Using th black int rconn cting pow r cabl provid d, you can also conn ct a Bachmann DC controll r to your E-Z Command Control
C nt r as shown in figur 18. Wh n conn ct d, addr ss 10 automatically conv rts from its original DC (analog) assignm nt to DCC
(digital). Thus, a t nth digital addr ss b com s availabl , and th conn ct d DC controll r will allow you or a fri nd to control a DC
locomotiv in conjunction with your E-Z Command syst m. Th Bachmann #44212 pow r pack, availabl from hobby r tail rs, is
id ally suit d to this application (figur 19).
NOTE: MAKE ALL THE CONNECTIONS BETWEEN YOUR DC CONTROLLER, THE E-Z COMMAND CONTROL
CENTER AND THE TRACK BEFORE CONNECTING THE WALL ACK OWER SU LY. AS THERE IS CONSTANT
AC OWER TO THE TRACK, WE RECOMMEND THAT YOU DO NOT LEAVE A DC LOCOMOTIVE STATIONARY
ON THE LAYOUT FOR EXTENDED ERIODS.
6
16
17 18 19

TROUBLESHOOTING AND OPERATING TIPS
If your train do sn’t r spond to commands, mak sur :
all wiring is corr ctly install d as shown in figur 2 (s pag 2)
th transform r is plugg d into th wall sock t and th mast r “On/Off” switch is in th “On” position
r d LED pow r indicator is lit and NOT blinking (i. . not in "Function" or "Programming" mod )
th corr ct addr ss button for th train you wish to op rat is activ (ch ck addr ss LEDs)
th “Stop” button is not pr ss d
NOTE: This equipment has been tested and found to comply with the limits for a Class B digital device, pursuant
to art 15 of the FCC Rules. These limits are designed to provide reasonable protection against harmful
interference in a residential installation. This equipment generates, uses, and can radiate radio frequency energy
and, if not installed and used in accordance with the instructions, may cause harmful interference to radio
communications. However, there is no guarantee that interference will not occur in a particular installation. If
this equipment does cause harmful interference to radio or television reception, which can be determined by
turning the equipment off and on, the user is encouraged to try to correct the interference by one or more of
the following measures:
Reorient or relocate the receiving antenna.
Increase the separation between the equipment and receiver.
Connect the equipment into an outlet on a circuit different from that to which the receiver is connected.
Consult the dealer or an experienced radio/TV technician for help.
7
20
.
.
.
.
.
.
.
.
.
Never connect another controller to a track section controlled by an E-Z Command unit. Separate “power districts”
can be created using separate units, but they ust be double-isolated so that no train can bridge the joints between
sections.
Never use an electronic track cleaner near your E-Z Command syste .
Only plug a Bach ann E-Z Command device, or other device specifically approved by Bach ann, into the I/O port
shown in figure 20. Other devices ay have the sa e connector but are not necessarily co patible.
DCC-equipped loco otives will run on a DC-controlled layout, but don’t use a feedback-type DC controller. Check
your DC controller anufacturer’s instructions to deter ine what type of DC controller you’re operating.
When using a Bach ann 44212 DC controller with the E-Z Command Control Center, the power is always connected
through the DC controller as shown in figure 18 (see page 6).

For mor t chnical information about DCC and oth r ar as of mod l railroading,
visit th National Mod l Railroad Association w b sit at www.nmra.org.
Bach ann Industries, Inc.
1400 East Erie Avenue
Philadelphia, PA 19124 USA
www.bach anntrains.co
Telephone: 800-356-3910 (toll fr within th Unit d Stat s and Canada only)
Telephone: 215-533-1600 (for all countri s)
E- ail: s rvic @bachmanntrains.com
Bachmann Trains… now that’s the way to run a railroad!®
IN THE EVENT YOU HAVE ANY DEFECTIVE OR DAMAGED PARTS, PLEASE DO NOT RETURN
THIS PRODUCT TO THE STORE WHERE IT WAS PURCHASED. AFTER CHECKING ALL ASSEMBLY
AND OPERATING PROCEDURES LISTED ON THIS SHEET,
CALL US TOLL FREE AT 1-800-356-3910 (non-US r sid nts should call 1-215-533-1600) Monday-Friday 8 A.M. - 4 P.M., East rn Tim ,
THEN RETURN ONLY THOSE PARTS REQUIRING SERVICE TO:
BACHMANN SERVICE DEPARTMENT; 1400 EAST ERIE AVENUE; PHILADELPHIA, PA 19124-5698; USA.
TOLL FREE NUMBER FOR SERVICE ASSISTANCE
Print d in China
Table of contents
Other Bachmann Controllers manuals
Popular Controllers manuals by other brands

V2
V2 WES-ADI instruction manual

Apache Labs
Apache Labs PiHPSDR Assembly manual

Aprilaire
Aprilaire Zoned Comfort Control 6202 installation instructions

Woodward
Woodward 723PLUS Installation and operation manual

Soyal
Soyal AR-721U user guide

Galil Motion Control
Galil Motion Control DMC-18 2 Series user manual