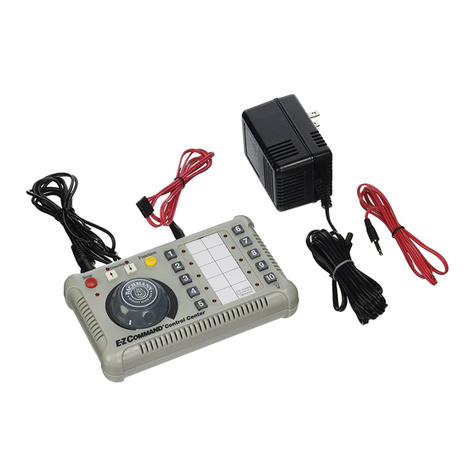
Bachmann E-Z Command Plus Installation manual

Bachmann Trains is pleased to bring you E-Z Command® Plus. With E-Z Command®, digital control of speed, lighting, sound, and
direction of multiple locomotives is possible, as well as remote control of Bachmann’s E-Z Command® DCC-equipped turnouts.
E-Z Command® simplies the programming process for locomotives with one-button, on-track programming. Other features include
128-speed steps for smooth operation and plug-in wiring for simple setup. E-Z Command® will operate all DCC-equipped Bachmann
locomotives as well as NMRA compliant DCC-equipped locomotives from many other manufacturers.
Your E-Z Command® Plus Digital Command Control System consists of the following components:
• E-Z Command® Plus Control Center
• 1 Red E-Z Track® Track Power Wire
• Wall-pack Power Supply
With plug-and-play capability, E-Z Command® is simple to set up and use, whether you’re operating an existing model railroad or building
an entirely new layout. To ensure trouble-free operation, we recommend that you read this manual completely before using your system for
the rst time.
Important Notice
Do not connect the E-Z Command® Plus Control Center to the wall-pack power supply until you have connected the control center to
your track. Multiple dial turns required to bring locomotive up to speed.
Setup and Programming Instructions
CAUTION-ELECTRICALLY OPERATED PRODUCT
NOT RECOMMENDED FOR CHILDREN UNDER 14 YEARS OF AGE. AS WITH ALL
ELECTRIC PRODUCTS, PRECAUTIONS SHOULD BE OBSERVED DURING HANDLING AND USE
TO PREVENT ELECTRIC SHOCK. INPUT: 120 VAC 60Hz 22W. OUTPUT: DC 16V 1000mA 16VA
1

TRACK CONNECTION
Before beginning, if standard DC power packs supply your railroad, turn them o and disconnect the feeder wires to your track. If your
layout is segmented into “power districts”, turn all electrical blocks on, as long as doing so will not result in a short circuit. Particular
care should be taken with reverse-loop track congurations. To avoid complicated reverse loop wiring, see Bachmann’s E-Z Command®
Automatic Reverse Loop Module (Item No. 44912).
If you are using Bachmann’s E-Z Track®
system, plug the red E-Z Track® Track
Power Wire into the socket on the back
of the E-Z Command® Plus Control
Center labeled TO TRACK and rmly
plug the other end into any standard E-Z
Track® terminal rerailer.
When using a track system other than E-Z
Track®, you will need to cut the square plug
o of the E-Z Track® Power Wire. Use a
wire stripper to expose bare wire at the cut
point, and plug the other end into the E-Z
Command® Plus Control Center. Next,
attach the bare ends of the power wire to
the points where you previously supplied
power from your DC controller to your
layout.
Aer the track connections are complete, plug the Wall Pack Power Supply into a standard
110-volt wall outlet. Plug the wire from the Wall Pack Power Supply into the socket on the
E-Z Command® Plus Controller labeled 16VDC IN.
Once the E-Z Command® Plus Control Center is powered, the STOP button will be lit. One
of the DIRECTION buttons and the button for address 3 will also be lit. If your Control
Center does not power up as shown here, disconnect it from the Wall Pack Power Supply,
and let it sit for two minutes. is will allow the system to reset itself. Aer two minutes,
you can reconnect the Wall Pack Power Supply to the control center.
PROGRAMMING A LOCOMOTIVE TO A SPECIFIC ADDRESS
Your E-Z Command® Plus Control Center features nine programmable control buttons or
“addresses”. By default, most new DCC-equipped locomotives are factory-programmed to
respond to commands on address 3.
Your E-Z Command® Plus Control
Center will program the new address of
any locomotive on track to which it is
connected. erefore, when programming
the locomotive address, it must be the
only locomotive on the track, or on an electrically isolated track section. [You can make
a temporary programming track by using a separate terminal re-railer section with extra
straight tracks (depending on the length of the locomotive)]. If you are programming a
DCC equipped steam locomotive, please be sure to place both the locomotive and tender on the track with any supplied wiring between
the locomotive and tender connected.
2

To program your locomotive, press and hold down any address button from 1 though 9, and press the STOP button, releasing both
buttons at the same time. e STOP button will ash quickly to indicate that you are now in programming mode. You can now choose a
new single-digit address for your locomotive by pressing the corresponding address button from 1 through 9. Once your chosen address
has been selected, the locomotive MAY move slightly, and the STOP button will ash slowly. is indicates that the programming was
successful. You can now press the STOP button again to exit programming mode.
If you wish to cancel the process while programming a locomotive, simply press address 0 or the FUNCTION button and then the STOP
button at any time to exit. Your locomotive will remain at its original address. Aer your locomotives have been programmed, they will be
available for individual control by pressing the numbered button assigned to them.
A removable two-column sheet is located between the numbered buttons so you can identify which locomotive is assigned to each button.
For your convenience, extra blank sheets are included with your system.
Please note that you can only assign single-digit numbers to your DCC-equipped locomotives with E-Z Command® Plus. If you have more than
9 locomotives to program, you can use the same address for multiple locomotives, providing they are either working in consist (see below) or not
operating at the same time.
CONSISTING LOCOMOTIVES
With E-Z Command® Plus, you can simulate a real railroading practice known as “consisting”, where multiple locomotives are coupled
together to operate a single train. You can replicate this practice on your layout by assigning multiple locomotives to the same address as
described in the PROGRAMMING A LOCOMOTIVE TO A SPECIFIC ADDRESS
section above.
By default, all locomotives in a consist will face the same direction to operate together.
However, if you wish to run locomotives back-to-back as can be found in some
prototype operations as demonstrated in this image, take the locomotive(s) you wish to
operate facing forwards o your layout, and follow the steps in the next section for the
locomotive(s) still on the track ONLY. Once you have completed this process, you can
add the forward-facing locomotive(s) back to your consist.
PROGRAMMING FORWARD AND REVERSE OPERATION
With E-Z Command® Plus and other DCC systems, forward and reverse travel is relative
to the locomotive, and not the track. Usually, your locomotive will be programmed
by the manufacturer with forward and reverse directions already assigned correctly,
but there may be occasions when you want to change this, such as when running two
locomotives back-to-back in a consist, as described in the previous section.
To change the direction that the locomotive will recognize as being “forward”, rst
activate the locomotive by running it forward a short distance. Next, press and hold the
locomotive’s current address button and the STOP button, then release both buttons
simultaneously. e STOP button will
ash quickly to signal that your control
center is in programming mode. Now press the UNLIT direction button. Finally, press
the locomotive’s address button, then press the STOP button to exit the programming
mode. Once direction programming is complete, you can change the direction of travel
for your locomotive or consist at any time by bringing it to a complete stop and pressing
the appropriate direction button.
3

RUNNING MULTIPLE LOCOMOTIVES
To run multiple independent locomotives simultaneously, follow the instructions in the PROGRAMMING A LOCOMOTIVE TO
A SPECIFIC ADDRESS section to rst assign their addresses. For illustrative purposes, let’s assume you’ve assigned one locomotive
to address 2 and a second to address 4. To begin, press the address 2 button and turn the control dial clockwise to power up the
corresponding locomotive (multiple dial turns required to bring locomotive up to speed). Button 2 will now be lit, indicating that you are
in control of this locomotive.
To aquire the locomotive on address 4, simply press the address 4 button. is button
will now be lit, and the locomotive on address 2 will carry on running at its last speed
and direction setting. To activate locomotive number 4, simply turn the control dial
clockwise. Now locomotive 4 is active, and you can determine its speed and direction
independently of locomotive 2. is process can be repeated for all additional
locomotives you wish to operate at the same time.
If you experience performance issues when operating multiple locomotives or larger scales,
you can use the Bachmann #44910 E-Z Command® 5 Amp Power Booster to increase the track current. is will allow a greater number of
DCC locomotives to operate on your railroad, and is required for operation of O or Large scale trains.
ELECTRIC MOMENTUM
When using the speed control dial to start and stop your locomotive, your E-Z Command® Plus system operates your trains with a realistic
acceleration and coasting eect called “Electric Momentum”. Rather than starting or stopping abruptly, the engine will accelerate and slow
more gradually, replicating the characteristics of a prototype train. Make sure to plan carefully when slowing or stopping your locomotive,
giving yourself enough distance to come to a safe stop.
USING THE EMERGENCY STOP FEATURES
With the potential for multiple trains to operate independently of each other at the same time, the system relies on you to prevent crashes.
To avoid a collision, simply press the STOP button to halt all trains currently in motion (the
STOP button will ash slowly). Trains will resume with the same speed and direction when
the STOP button is pressed for a second time, so it is important that you take appropriate
steps to prevent a crash while you are in the “emergency stop” mode. ough some potential
collisions may require you to physically reorient your trains for a crash to be averted, you
can also send preventative commands to your locomotives, such as adjusting their speed
or direction of travel, while they are still in “emergency stop” mode. Once the appropriate
commands have been entered, you can press the STOP button again to resume operation.
If you only require one locomotive to stop, rather than all trains in motion, simply select
the desired locomotive from the address buttons, and press down on the speed control
dial. is will send the selected locomotive only into “emergency stop” mode (the speed
indicator will show zero power). While your locomotive is stopped you can change
direction if nessesary to resume operation of this locomotive, and turn the dial clockwise
to bring the locomotive back up to speed.
4

PROGRAMMING A USER-INSTALLED DCC DECODER WITH A PROGRAMMING TRACK
While locomotives purchased with DCC decoders installed can be programmed on the main
track, a separate low-current programming track is required for programming locomotives
with user-installed decoders. e low current of the programming track will protect the
decoder if the installation was performed incorrectly.
To create a programming track, connect a resistor in series with one track wire to an
isolated section of track. A 100ohm 10W 5% Wire-wound Resistor is recommended.
Once you’ve constructed your isolated programming track, you’re ready to program your
locomotives with user-installed NMRA-compliant DCC decoders, using the same process
as described in the PROGRAMMING A LOCOMOTIVE TO A SPECIFIC ADDRESS
section.
FUNCTION MODE
Like most DCC systems, E-Z Command® Plus features a function mode that enables you to control extra features such as sound and
lighting eects that may be included with DCC locomotive or decoder products. ere are 28 possible functions (plus headlight control)
that can be activated for locomotive addresses 1 through 8, with 8 possible functions when operating under address 9 (plus headlight
control). e number of usable functions will vary depending on the locomotive or decoder. See the back cover for a function chart.
To activate sound and lighting features, begin by pressing the FUNCTION button. e locomotive address which is currently active will
blink, indicating that you are now in function mode. You will still be able to control the speed and direction of the active locomotive while
in this mode.
You can now use the address buttons to select the various functions that may be available on your locomotive. If you are unsure which
button activates the feature you are looking for, consult the instructions included with
your locomotive.
ere are three function pages, each denoted by a dierent color of the function button.
e button will light up either green, blue, or red, depending on the selected page. If
the function you are looking for has a value higher than 9, you can press and release the
button up to three times to cycle through each page.
If the function you wish to use is assigned to the same number as the locomotive you are
operating, you can still access this function. Once the master FUNCTION button has
been pressed, you can select the same number button as assigned to the locomotive to
access the function associated with it. e button will begin to ash between bright and
dim, indicating that you are now using the function, in addition to the locomotive assigned to this number.
Please note that you will not be able to program a new locomotive or switch control to a dierent locomotive while in function mode. To exit
function mode, press and release the FUNCTION button to scroll through the three colors until the light is OFF.
STANDARD DC LOCOMOTIVE OPERATION
E-Z Command® Plus allows you to control up to nine DCC-equipped locomotives at the same time, and will also accommodate one of
your favorite DC (analog) locomotives at a time. To operate a DC locomotive through your E-Z Command® Plus system, place it on the
track, press address button 0 to activate it, and begin operation.
Please note: Only one DC (analog) locomotive can be operated at a time. Be sure to monitor this locomotive closely, as some DC motors can be
subject to overheating and potential damage when operated for long periods of time on DCC systems. Once you have nished operating your
DC locomotive, it should be removed om your layout as it will continue to draw current and may overheat if le on the track. All lights on the
model will be illuminated at all speeds, regardless of direction, while under E-Z Command® control.
5

OPERATING EZ COMMAND® TURNOUTS
Up to eight individual Bachmann E-Z Command® Turnouts (or groups of turnouts) can be controlled with E-Z Command® Plus. Press
address 9 on your control center, followed by the FUNCTION button to access turnout control mode. e FUNCTION button will
light up green. Turnouts (or turnout groups) programmed to addresses 1 through 8 can now be toggled by pressing the assigned button.
Note: ese instructions apply to Bachmann E-Z Command® Turnouts only, available for purchase separately.
Please visit www.bachmanntrains.com to browse our full range of E-Z Command® DCC-equipped turnouts.
PROGRAMMING YOUR E-Z COMMAND® TURNOUTS
Note: To avoid derailments, stop all locomotives on the track before beginning the programming process. Also remove any locomotive with
address 9 om the track.
e factory preset address for all E-Z Command® DCC turnouts is address 3. If you wish to program the DCC turnout to a dierent
address, the procedure is as follows:
1. Press address 9, then press the FUNCTION button once. e FUNCTION button will turn green, indicating that your
control center is in turnout control mode.
2. To access the programming button on your E-Z Command® Turnout, remove the programming button cover as shown in
gure 1. Use a pen to press the programming button (gure 2) for two seconds. e turnout will toggle twice to indicate that
it is in programming mode.
3. Choose an address from 1 through 8 that you wish to assign to your turnout. Once you have decided on an address, press the
corresponding number button four times. e turnout will toggle four times to indicate that it has been programmed to
this address.
4. If you have entered programming mode and cannot continue the programming process within two minutes, the turnout will
toggle twice to indicate that the programming has been canceled. e turnout will retain its original address.
Note: To cancel the turnout programming process while using your E-Z Command® Plus control center, simply press the STOP button. e
turnout will retain its original address. To exit turnout control mode and return to locomotive control, press the FUNCTION
button once.
DEFAULT TURNOUT POSITION
e default position is the turnout position when the E-Z Command® Plus Control Center is turned on. For all E-Z Command® Turnouts
other than the #5 Wye Turnout (Item No. 44134) the factory-preset default position is the diverging track. For the #5 Wye Turnout, the
factory preset default position is to the right. Please refer to the instructions included with your E-Z Command® turnout for a full list of
default turnout positions.
If you wish to change the default position, the programming procedure is as follows:
1. Press address 9, then press the FUNCTION button once. e FUNCTION button will turn green, indicating that your
control center is in turnout control mode. From here, select the turnout you wish to program by pressing the associated
number button.
6
1 2

7
2. To access the programming button on your E-Z Command® Turnout, remove
the programming button cover as shown in gure 1. Use a pen to press the
programming button (gure 2) for two seconds. e turnout will toggle twice
to indicate that it is in programming mode.
3. Press the UNLIT direction (arrow) button on your E-Z Command® Plus Control
Center (gure 3). en press the turnout’s assigned address button four times.
e turnout will toggle three to ve times to reset the turnout to its new default
position. Once the position has been programmed, you can control the turnout
or select dierent turnouts with address buttons 1-8. You can return to
locomotive control mode by pressing the FUNCTION button once.
Note: e direction buttons are only used to program the default position of the
E-Z Command® turnout and will not toggle the position of the turnout.
MANUAL TURNOUT OPERATION
All E-Z Command® Turnouts can also be toggled manually at any time by throwing the
switches indicated in gure 4.
USING THE WALK-AROUND COMPANION
For exibility of movement around larger layouts, you can use the separately available Bachmann #44907 Walk-Around Companion
alongside your E-Z Command® Plus Control Center. Simply use the I/O cable included with the Walk-Around Companion to connect to
your control center.
Please note that when using the Walk-Around Companion, you will be limited to 28-speed steps and functions FO-F4 for all 9 addresses.
TIPS & TROUBLESHOOTING
If your train doesn’t respond to commands, make sure that:
• all wiring is correctly installed as shown
• the transformer is securely plugged into the wall socket
• the emergency stop button is lit (indicating that the control center is receiving power)
• the correct button for the train you wish to operate is active (button is lit)
• the control center is not in “emergency stop” mode (STOP button blinking)
• the speed control knob has been rotated clockwise if you used it to stop an individual locomotive
Never connect another controller to track controlled by an E-Z Command® Plus unit. Separate “power
districts” can be created using separate units, but they must be double-isolated so that no train
can bridge the joints between sections.
Never use an electronic track cleaner near your E-Z Command® system.
Only plug a Bachmann E-Z Command® device, or other devices approved explicitly by
Bachmann, into the I/O port shown in this image. Other devices may have the same connector
but are not necessarily compatible. If any device not designed for this port makes contact with the
I/O port, it could damage your control center.
2
3
4

For more information about DCC and other aspects of model railroading,
visit the National Model Railroad Association website at www.nmra.org
Bachmann Industries, Inc.
1400 East Erie Avenue
Philadelphia, PA 19124 USA
www.bachmanntrains.com
Telephone: 215-533-1600 (for all countries)
E-mail: service@bachmanntrains.com
Bachmann Trains… now that’s the way to run a railroad!®
Printed in China H4933-IS001
Function Button LED Off
(Select Address)
Green
(Function Page 1)
Blue
(Function Page 2)
Not for Address 9
Red
(Function Page 3)
Not for Address 9
Button 0 Analog Locomotive
Operation Light Function F10 F20
Button 1 Loco Address 1 F1 F11 F21
Button 2 Loco Address 2 F2 F12 F22
Button 3 Loco Address 3 F3 F13 F23
Button 4 Loco Address 4 F4 F14 F24
Button 5 Loco Address 5 F5 F15 F25
Button 6 Loco Address 6 F6 F16 F26
Button 7 Loco Address 7 F7 F17 F27
Button 8 Loco Address 8 F8 F18 F28
Button 9 Turnout Control or
Loco Address 9
F9
Not for Address 9 F19 N/A
Table of contents
Other Bachmann Controllers manuals