BakerStone PIZZA User manual

Important, Retain for Future Reference: Read Carefully
Important, le conserver pour référence ltérieure: Lisez attentivement
Importante, Guarde para referencia futura: Lea atentamente
Product Guide • Guide D'Utilisation • Guía de Productos
WARNING: Read Product Guide before using your Pizza Oven Box. Failure to follow the safety
precautions, clearspace guidelines and instructions could result in serious injury and/or
property damage. Not for use on electric or induction cooktops.
NOTICE: All suaces including gas range top suace and cooking grates must be cleaned
prior to each use of the Pizza Oven Box. Exhaust fan above the gas range/stove top must be
turned on to the highest speed while using the Pizza Oven Box.
AVERTISSEMENT : Lisez le Guide du produit avant d’utiliser votre Boîte-four à pizzas. Ne pas
suivre les instructions de sécurité et les directives concernant les dégagements pourrait
causer de graves blessures et/ou dommages matériels. Ne pas utiliser sur des plaques de
cuisson électriques ou à induction.
REMARQUE : Toutes les suaces, y compris la suace supérieure de la cuisinière à gaz et les
grilles de cuisson, doivent être nettoyées avant chaque utilisation de la Boîte-four à pizzas. Le
ventilateur d’extraction au-dessus de la cuisinière doit être allumé sur la vitesse la plus élevée
pendant l’utilisation de la Boite-four à pizzas.
ADVERTENCIA: Lea el Manual del Producto antes de utilizar su Horno Caja para Pizza. En caso
de no seguir las precauciones de seguridad, y las instrucciones y directrices sobre el espacio
libre pueden producirse lesiones graves y/o daños a la propiedad. No debe utilizarse en
placas de cocción eléctricas ni de inducción.
AVISO: Todas las supeicies incluidas la supeicie superior de la cocina a gas y las parrillas
de cocina deben limpiarse antes de cada utilización del Horno Caja para Pizza. El extractor
ubicado arriba de la cocina a gas/placa encimera debe encenderse a la velocidad máxima
mientras se utiliza el Horno Caja para Pizza.
www.bakerstonebox.com - (855) 657 OVEN (6836)
La peormance du feu de bois chez vous
Pour plaques de four
Boîte de four à pizza
Wood fired peormance at home
The Stove Top
Pizza Oven Box

English
Français
Español
1
17
34

To minimize the risk of serious burn injuries or property damage, follow the safety precautions
below when using the Pizza Oven Box:
EXHAUST FAN ABOVE THE GAS RANGE/STOVE TOP MUST BE TURNED ON TO THE HIGHEST
SPEED WHILE USING THE PIZZA OVEN BOX. ALL SURFACES MUST BE CLEANED PRIOR TO EACH
USE OF THE PIZZA OVEN BOX.
ALWAYS TURN YOUR HOOD/FAN ON TO HIGH PRIOR TO USING YOUR PIZZA OVEN BOX, AND
LEAVE IT ON UNTIL AFTER YOUR PIZZA OVEN BOX HAS COOLED COMPLETELY.
Always wear heat resistant oven mitts or gloves when handling the Pizza Oven Box.
DO NOT TOUCH THE PIZZA OVEN BOX UNTIL IT HAS COMPLETELY COOLED. The metal housing
can reach temperatures of 400°F(200°C) +/- during use.
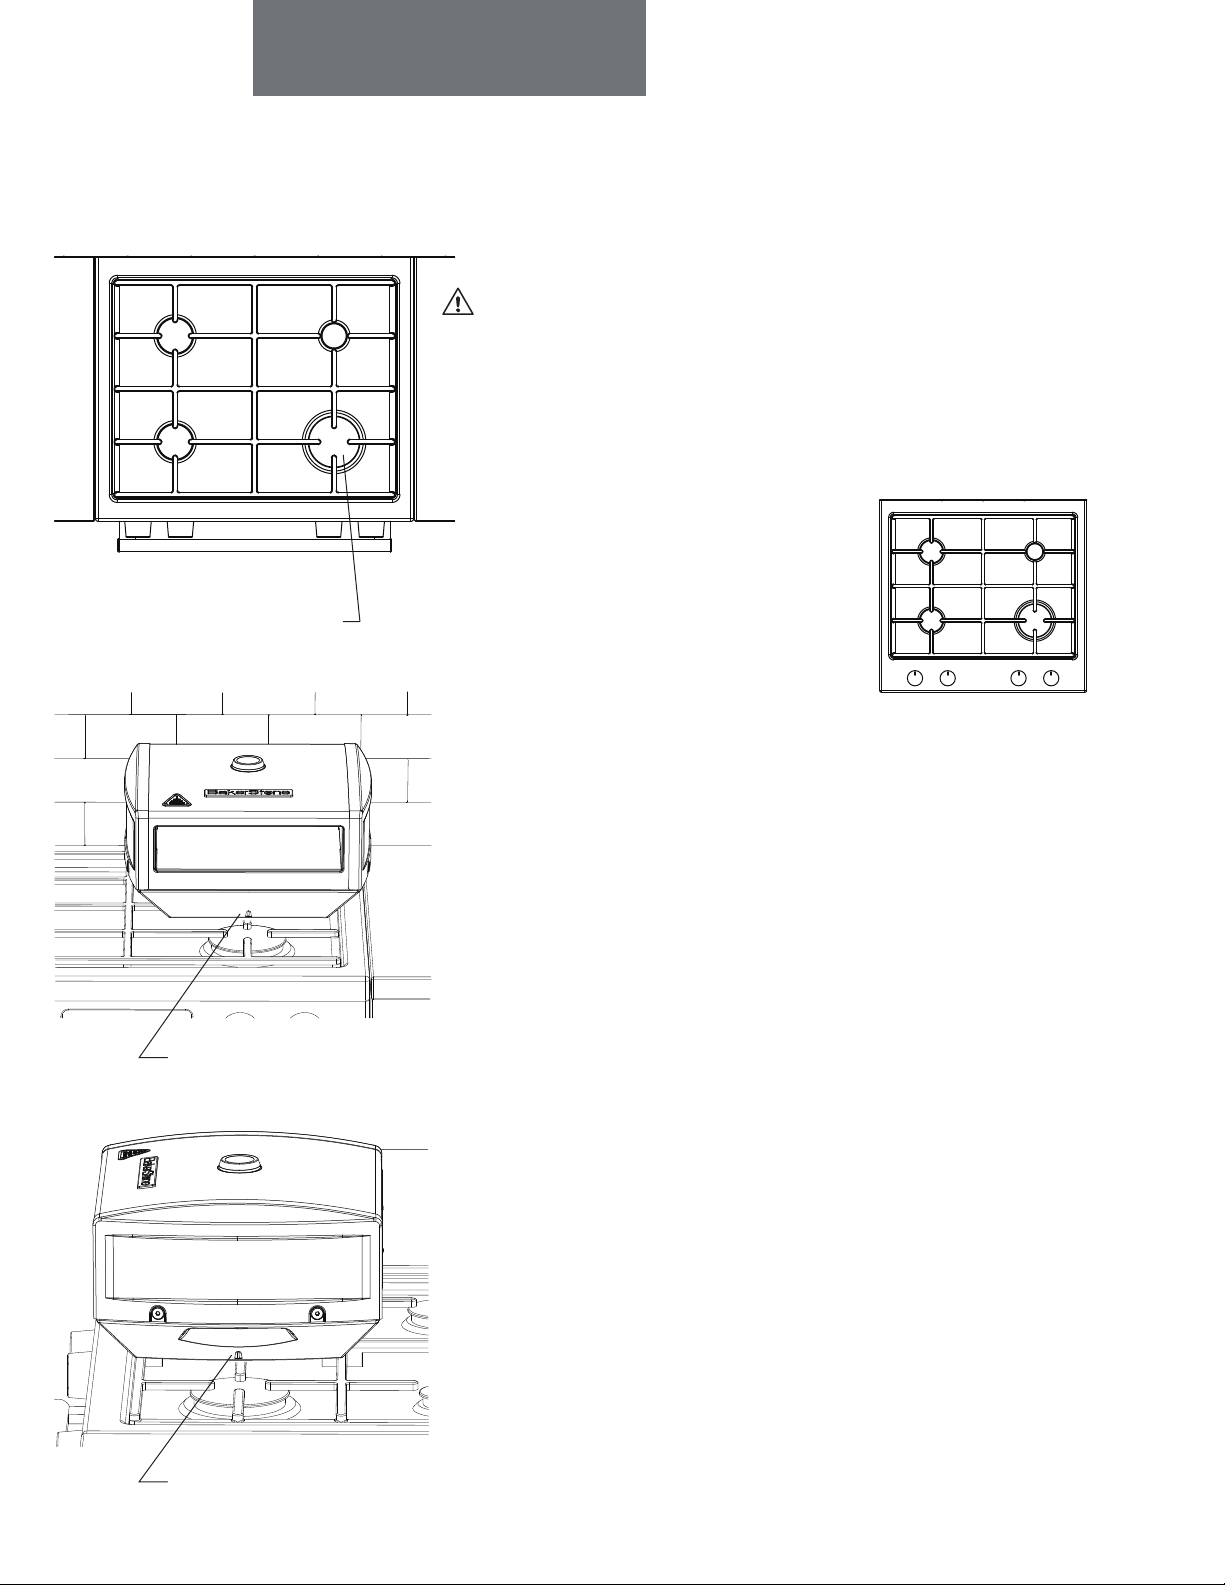
Do not turn on or preheat the gas range/stove before placing the Pizza Oven Box over the
burner.
Do not leave the Pizza Oven Box unattended or allow unsupervised children nearby.
Use only appropriate bake-ware or utensils while baking and cleaning your Pizza Oven Box.
Do not use plastic, silicone or glass.
Do not allow food other than Pizza or Bread Dough to contact the stones. Any foods that
contain fat, oil or butter (meats, items coated with olive oil, cookies, biscuits, etc.) should
not contact the stones directly. These items should be baked in a metal baking pan, on a
metal baking sheet or in a cast-iron skillet as the stones will absorb the fat, oil and butter
which can cause smoking, odors, staining, and can impart rancid flavors to items that you
bake in the future.
Stones are fragile and can break if dropped. THE PIZZA OVEN BOX BECOMES EXTREMELY
HOT, DO NOT TOUCH THE STONES OR ANY OTHER PART OF THE PIZZA OVEN BOX WHILE IT IS IN
USE.
To clean stones, heat the Pizza Oven Box for 15 minutes aer food is cooked and scrape o
any remaining residue. Do not use any cleaning agents or other liquids to clean the stones.
DO NOT REMOVE PIZZA OVEN BOX FROM THE GAS RANGE/STOVE UNTIL IT IS COMPLETELY
COOL. Allow at least 90 minutes aer turning o gas range/stove to remove. Do not use
water or other solvents to aid in cooling the Pizza Oven Box aer use.
Do not place gasoline, alcohol, wood products, charcoal or any other
combustible material in the baking chamber.
The Pizza Oven Box must never be used for heating purposes.
Ensure proper safety clearances are checked prior to use of the Pizza Oven Box. The Pizza
Oven Box and adjacent suaces can become extremely hot.
1
Safety Precautions – read before using Pizza Oven Box
Warnings

Product Guide
What’s in the package
Assembly of the Pizza Oven Box
Assembly of the Pizza Turner
How To Use the Pizza Oven Box
Care Instructions
Customer Service
Basic Dough Recipe
Pizza Sauce Recipe
Margherita Pizza Recipe
Roasted Pork Loin Chops Recipe
3
4
7
8
12
12
13
14
15
16
Table of Contents Page
2

A x1
Upper Housing B x1
Lower Housing C x1
Clean-out Panel
Included tool
required for assembly:
M4 Hex Key
H x1
Vent Catch I x4
M6 Cap Screw J x1
Wooden Peel
Before assembling your Pizza Oven Box, ensure that all parts below are included.
F x2
Side Stones
D x1
Top Stone E x1
Base Stone G x1
Rear Stone
3
Have a question?
Please Do Not Return This Product To The Store. Contact us first!
1-
855-657-6836 or email
support@bakerstonebox.com
K x1
Pizza Turner
Handle
L x1
Pizza Turner
Body
M x2
M4x12
Countersunk
Screws
Product Guide

4
Assembly of the Pizza Oven Box
STEP 1 Place the Upper Housing (A) carefully upside
down on a clean, so suace. NOTE: Failure to do so
may result in scratching or denting the Pizza Oven Box.
A
STEP 2 Identify the Top Stone (D), this is the largest stone
in the box. NOTE: There are notches on both sides of this
stone. Gently fit the Top Stone (D) into the Upper Housing
(A).
A
D
Product Guide
A
G
STEP 3 Identify the Rear Stone (G) and insert into the
Upper Housing (A).
F
D
STEP 4 Identify the two Side Stones (F) and fit into the
notches of the Top Stone (D). NOTE: The flat end of the
Side Stones faces the front of the oven.

STEP 5 Identify the Base Stone (E) and fit into the
notches of the Side Stones (F).
STEP 6 Identify the Vent Catch (H) and fit into the
opening between the Base Stone (E) and Rear Stone (G).
STEP 7 Identify the Lower Housing (B) and fit into the
Lower Housing (A).
STEP 8 Secure the Upper Housing (A) to the Lower
Housing (B) with four M6 Cap Screws (I).
F
E
H
B
A
I
A
B
G
E
Product Guide
5

STEP 9 Turn the Pizza Oven Box over and insert the
Clean-out Panel (C).
STEP 10 Place on a gas range/stove top when ready to
bake. NOTICE: Remove all stickers before placing on
range/stove top.
NOTICE: All surfaces including gas range top surface
and cooking grates must be cleaned prior to each use
of the Pizza Oven Box. Exhaust fan above the gas
range/stove top must be turned on to the highest
speed while using the Pizza Oven Box.
NOTE: Before using your Pizza Oven Box for the first time,
wipe the base stone with a damp cloth to remove any
packaging debris.
6
C
Product Guide

7
STEP 1 The Pizza Turner requires assembly prior to use.
Locate the Turner Handle(K) and Turner Body(L) in the
Accessory Kit box.
STEP 2 Insert the Turner Body(L) into the Turner Handle(K).
Ensure the holes in the Turner Body(L) line up with the
holes in the Turner Handle(K).
STEP 3 Install the two Countersunk Screws(M) into the
bottom side of the Turner Handle(K), tighten until snug.
K
L
K
L
Pizza Turner Assembly
K
M
Product Guide

STEP 2 Place the Pizza Oven Box over the highest
output burner at the front of the gas range/stove top.
Align the Pizza Oven Box over the burner by centering
the alignment indicators on the Lower Housing with
the center of the burner.
WARNING: Please completely read all safety
precautions at the beginning of and throughout this guide
before using your Pizza Oven Box. The Pizza Oven Box
becomes extremely hot and can cause burns. Failure to
follow precautions when using the Pizza Oven Box can
result in serious injury and/or property damage.
How to use your Pizza Oven Box
STEP 1 Locate the highest output burner on the front of
your gas range/ stove top. This is usually the largest
diameter burner. WARNING: Only use the Pizza Oven
Box on burners located towards the front of the gas
range / stove top.
NOTICE: All surfaces including gas range top surface
and cooking grates must be cleaned prior to each use
of the Pizza Oven Box. Exhaust fan above the gas
range/stove top must be turned on to the highest
speed while using the Pizza Oven Box.
WARNING: Do not use the
Pizza Oven Box on a gas
range / stove top with top
surface control knobs. The
control knobs and valves
can overheat and may
result in serious injury
and/or propey damage.
Example shown at right.
NOTE: Gas range / stove top burner output can be
found in the gas range / stove top manual or on the
inside face of an oven or warming tray door.
8
NOTE: Alignment
indicator in Lower
Housing.
Front
Note: Larger diameter burner
is usually the highest output.
NOTE: Alignment indicator
in Lower Housing.
Top surface control knobs
Product Guide

STEP 3 With proper spaces surrounding the Pizza Oven Box,
light the burner under the Pizza Oven Box as
instructed by the gas range / stove top manufacturer. Set
the burner to HIGH and preheat the Pizza Oven Box for 20
minutes.
NOTICE: Be sure to keep at least 10in (25cm) of
clearspace around the oven to prevent nearby items from
being damaged by the heat of the Pizza Oven Box.
WARNING: Failure to leave the spaces indicated above
and failing to turn on the gas range/stove top exhaust fan
to the highest speed may result in serious injury and/or
property damage.
STEP 4 Adjust the burner setting on the gas range / stove top
to obtain the desired temperature range for the foods that
are being baked. NOTE: It will take 15 minutes for the
temperature range indicator to function.
For baking items such as Breads and Cookies, adjust the
burner so that the indicator reads in the baking zone.
For Pizza and Roasting Meats and Vegetables, adjust the
burner so that the indicator reads in the baking zone.
STEP 5 Dust a Wooden Pizza Peel with flour
(approximately 2 Tbsp of flour) and spread around
board to evenly coat the entire peel. Then, holding the
peel at a 45 degree angle over a sink, gently tap the
peel to remove the excess flour. NOTE: This will ensure
that the pizza does not stick to the peel when launching
the pizza into the Pizza Oven Box.
STEP 6 Place a hand-stretched or rolled-out pizza
dough on the floured Pizza Peel. Create your pizza
using your favorite sauce and toppings.
Temperature Range
Indicator
NOTE: Temperature range indicator is not an accurate measuring instrument.
9
Product Guide

NOTE: Do not allow food other than Pizza or Bread Dough to
contact the stones. Any foods that contain fat, oil or butter
(meats, items coated with olive oil, cookies, biscuits, etc.)
should not contact the stones directly. These items should
be baked in a metal baking pan, on a metal baking sheet or
in a cast-iron skillet as the stones will absorb the fat, oil and
butter which can cause smoking, odors, staining, and can
impa rancid flavors to items that you bake in the future.
STEP 7 Using the pizza peel, launch your pizza into the Pizza
Oven Box.
NOTE: This can be accomplished by placing the pizza peel
just over half-way into the Pizza Oven Box, and using a quick
back and foh shaking motion while sliding the peel out of
the Pizza Oven Box. See www.bakerstonebox.com website for
a video demostration.
WARNING: Failure to use pizza peel to insert pizza can result
in serious injury.
STEP 8 Bake the pizza for 1 minute* to allow the crust to set.
STEP 9 Aer 1 minute*, use a long spatula or Pizza Turner to
rotate the pizza 1/4 to 1/3 turns roughly every 45 seconds*. Bake
your pizza for approximately 2-4 minutes*, being careful not to
burn your pizza.
NOTE: The Pizza Oven Box is hottest in the back.
Periodically rotate your pizza to ensure it is baked evenly.
WARNING: Touching the Pizza Oven Box anywhere with your
bare hand or skin could cause serious injury.
STEP 10 Using a Pizza Turner or Metal Pizza Peel, remove the
fully cooked pizza from the Pizza Oven Box and
transfer to a cutting board or serving tray and allow to
cool.
NOTE: The pizza will be very hot when you remove it from the
Pizza Oven Box. WARNING: Removing the pizza with
anything but a pizza turner or metal pizza peel could result
in serious injury.
10
*Cooking times are provided as basic guidelines. Times can vary
depending on gas range / stove top performance and BTU output
of burner used.
Product Guide

STEP 11 When finished baking, turn the burner on the gas
range / stove top to the o position and allow to cool for a
period of at least ninety (90) minutes.
WARNING: Serious injury can occur if the gas range / stove
top and Pizza Oven Box are not allowed to
completely cool and you touch them.
Aer baking your final pizza, you can clean the Base Stone by letting the burner remain on
high for approx 15 minutes. Any residue should burn o and debris can be pushed to the back
of the oven. NOTE: Exhaust fan above the gas range/stove top must remain on to the highest
speed.
Aer allowing the Pizza Oven Box to cool for at least ninety (90) minutes, remove the
Clean-out Panel from the back. Hold the Pizza Oven box over a waste bin and rotate so that
all debris falls into the waste bin.
11
Clean-out Panel
Product Guide

Care & Cleaning
Let the Pizza Oven Box cool completely before removing from gas range / stove top.
Do not use household cleaners or liquids on stones.
Do not use household cleaners on metal housing.
Wipe outer housing with a so damp cloth only when completely cooled.
Aer baking your final pizza, you can clean the Base Stone by letting the burner remain on
high for approx 15 minutes. Any residue should burn o and debris can be pushed to the back
of the oven. Aer allowing the Pizza Oven Box to cool for at least ninety (90) minutes, remove
the Clean-out Panel from the back. Hold the Pizza Oven box over a waste bin and rotate so
that all debris falls into the waste bin.
Darkening of the stone from ingredients or excess flour will occur over time and will not aect
baking peormance of the Pizza Oven Box.
NOTE: Do not allow food other than Pizza or Bread Dough to contact the stones.
Any foods that contain fat, oil or butter (meats, items coated with olive oil, cookies, biscuits,
etc.) should not contact the stones directly. These items should be baked in a metal baking
pan, on a metal baking sheet or in a cast-iron skillet as the stones will absorb the fat, oil and
butter which can cause smoking, odors, staining, and can impa rancid flavors to items that
you bake in the future.
Customer Service
For general inquiries, please email us at support@bakerstonebox.com
or call (855) 657-6836.
For North American customer service needs, such as replacement parts and warranty claims,
please email us at support@bakerstonebox.com or call (855) 657-6836.
For customer service needs in Australia please contact:
Freephone: 1800 839 842 / www.bakerstonebox.com.au
customercare@bakerstonebox.com.au
For customer service needs in New Zealand please contact the New Zealand
distributor: Riverlea Group Ltd. / Freephone: 0800 438 274
email: customercare@riverleagroup.co.nz
website: www.riverleagroup.co.nz
For customer service needs in Europe please contact:
12
OutTrade B.V.
+31 (0)529 48 28 08
info@outtrade.eu
www.outtrade.eu
OutTrade GMBH
+49 (0)211-93 67 60 18
info@outtrade.eu
www.outtrade.eu
Product Guide

Recipes
13
INGREDIENTS:
8 Cups (1000g) - Flour (50/50 mixture of All purpose and Bread Flour)
21 oz. (600mL) - Water (cool not cold tap water)
1/2 tsp. (2.8g) - Fresh Yeast
or 2 tsp. (2.2g) - Active Dry Yeast**
or 2 tsp. (2.2g) - Instant Dry Yeast**
2 Tbsp. (28g) - Finely ground Sea Salt
DIRECTIONS (Stand Mixer Method):
STEP 1 Pour the WATER in the mixing bowl and add the YEAST. If using FRESH YEAST, work the YEAST
with WATER in your palm until it dissolves. For ADY** or IDY**, mix into water and stir to
dissolve. Let rest for 5 minutes.
STEP 2 Attach dough hook and turn on to the lowest setting; slowly incorporate 70-80% of the flour
into the WATER & YEAST mixture - approximately 3 minutes. Once combined, remove bowl
from the mixing stand, cover with a damp towel or plastic wrap and let stand for 30 min-
utes. Then, return bowl to mixing stand on the lowest setting and slowly incorporate the
remaining FLOUR & SEA SALT into the dough - approximately 2 to 3 minutes.
STEP 3 Continue mixing on the lowest setting for 10 minutes, If dough forms a ball around the
dough hook, stop mixer and remove dough from the hook, then resume mixing. If the dough
feels too warm, stop mixer for 30 seconds to 1 minute and resume mixing.
STEP 4 Place the dough on a clean counter and form a 2 to 3 inch (5cm to 7.6cm) thick rectangular
mass, cover it with a damp towel or plastic wrap. Let the dough rest for 1½ to 2 hours.
STEP 5 To create the dough balls cut the mass of dough into 2 strips. Hold the end of one dough
strip in one hand, and using the thumb and fore-finger of your other hand, slowly tighten
them around the base of the dough ball where you want to cut through the dough. Do not
rip or tear the dough. You should get 4 dough balls out of each strip.
STEP 6 Place the dough balls into a lightly dusted container(s) and cover with lid or plastic wrap.
STEP 7 Choose from one of these two FERMENTATION METHODS:
1.) Warm Ferment: let your dough rest on the counter in a cool dry place
(around 70°F/21°C) for 4 to 6 hours, and then you're ready to make pizza!
2.) Cold Ferment: let it rest in the refrigerator for anywhere from 12 hours up to 3 days. The
longer that you let the dough rest, the more complex the flavor development becomes.
*NOTE: If you use the cold ferment method, make sure to take your dough out of the refrig-
erator 2 to 3 hours prior to baking pizzas so the dough will stretch more easily.
Experiment with the dierent methods to determine your favorite type of crust.
BASIC PIZZA DOUGH - makes: 6 to 8 Dough Balls
EQUIPMENT:
Stand Mixer
Measuring cup
Measuring spoons

14
INGREDIENTS:
One 28 oz. (793g) - Can of Whole Peeled Tomatoes
San Marzano Tomatoes are the preferred style of tomatoes but you can use your favorite
brand of whole peeled tomatoes or whole peeled tomatoes with basil. Look for a brand
that says "in puree" for best results.
1 tsp. (5.7g) - Sea Salt
A finely ground sea salt will incorporate into the sauce more evenly than a coarsely
ground sea salt. Add more to taste 1/2 tsp.(2.8g) at a time.
DIRECTIONS:
STEP 1 Open can of tomatoes and drain them, preserving the puree or liquid.
STEP 2 Place tomatoes into your Food Processor, Blender or Food Mill.
STEP 3 Add the SEA SALT to the TOMATOES.
STEP 4 FOOD MILL - Manually run your Food Mill using the Coarse Plate until only the skins
remain in the bowl of the Food Mill.
FOOD PROCESSOR - Using the PULSE setting on your Food Processor, chop until you
achieve a thick sauce-like consistency.
BLENDER - Using the PULSE setting on your Blender, blend until you achieve a thick
sauce-like consistency (you may need to add a small amount of the reserved
puree/liquid to get the contents of the Blender moving).
STEP 5 Transfer the blended sauce to a bowl and add the reserved puree/liquid to the
sauce and stir to combine.
A Food Mill with the coarse plate provides the best results as you do not have to worry
about over blending and making your sauce too thin. A Food Processor and Blender work
well, just make sure you use the PULSE setting so you can control the consistency by using
sho bursts of blending until you achieve your desired consistency.
PIZZA SAUCE - makes: 28 oz.(793g) Pizza Sauce
EQUIPMENT:
Food Processor
Blender
Food Mill
Recipes

INGREDIENTS:
One - Pizza Dough Ball 7oz (180 gram)
2 oz. (59g) - Pizza Sauce
3 oz. (85g) - Fresh Mozzarella, torn
6-10 - Fresh Basil Leaves, torn
1/2 - 1 cup (62.5-125g) - Flour for dusting the peel and coating the Pizza Dough
Sea Salt (fine or coarse are acceptable)
Extra Virgin Olive Oil
DIRECTIONS:
STEP 1 Preheat the Pizza Oven Box for 15 to 20 minutes.
STEP 2 Before you begin dust the Pizza Peel (Wooden) with flour.
STEP 3 Coat pizza dough with flour on both sides and brush o the excess.
STEP 4 Hand-stretch or use a Rolling Pin to roll the pizza dough into a 10 inch disk.
STEP 5 Place your stretched pizza dough onto the Pizza Peel (Wooden) and then rub a
small amount of Extra Virgin Olive oil over the edge of the crust for even browning.
STEP 6 With a ladle or large spoon, add the pizza sauce and spread evenly around the
pizza.
STEP 7 Add the Mozzarella cheese generously and evenly over the pizza sauce.
STEP 8 Sprinkle the Sea Salt over your pizza.
STEP 9 Lightly drizzle Extra Virgin Olive Oil over your pizza, beginning in the center and
using a circular/spiral motion moving towards the outer edge.
STEP 10 Launch your pizza into your Pizza Oven Box and cook for 1 minute, then Rotate 1/4 to
1/3 turn.
STEP 11 Rotate your pizza using a 1/4 to 1/3 turn every 30 to 45 seconds to evenly brown your
pizza.
STEP 12 Remove the pizza with the Metal Pizza Peel (approx 2 1/2 to 3 min*) and add the
fresh Basil leaves over the pizza. Return it to the oven and cook for another 30 to 45
seconds.
STEP 13 Remove and enjoy!
MARGHERITA PIZZA - makes: One 10”(25cm) Pizza
EQUIPMENT:
Pizza Peel (Wooden)
Ladle or Large Spoon
Round Pizza Turner or Spatula
Metal Pizza Peel (Optional)
Rolling Pin (Optional)
*Peormance may vary.
15
Recipes

Recipes
16
DIRECTIONS:
STEP 1 Preheat the Pizza Oven Box on High for 15 to 20 minutes.
STEP 2 Season the Pork Chops with Lemon Pepper, Garlic Powder, Salt, and Pepper.
STEP 3 Lightly coat the Haricots Verts & Grape Tomatoes with Olive Oil and add Salt &
Pepper to taste.
STEP 4 Place the Pork Chops onto the Cast Iron Plates or Skillet and arrange the Haricots
Verts & Grape Tomatoes around the Pork Chops.
STEP 5 Using the High Temperature Oven Mitts, carefully place the Cast Iron Plates or Skil-
let into the Pizza Oven Box and roast for 4 to 5 minutes.
STEP 6 Using the High Temperature Oven Mitts, carefully rotate the Cast Iron Plates or
Skillet 180 degrees (if the Skillet handle prohibits this, then use the Tongs to rotate
the Pork Chops instead) and continue roasting another 4 to 5 minutes, or until the
Meat Thermometer reads (145°F/62.8°C) when inserted into the middle/center of the
thickest section of the Pork Chops.
STEP 7 Using the High Temperature Oven Mitts, carefully remove the Cast Iron Plates or
Skillet from the Pizza Oven Box and place upon a heat-resistant suace.
STEP 8 Using the Tongs, carefully remove the Pork Chops from the Cast-Iron Plates or Skillet
and place them upon a cutting board, serving platter or plate and allow to rest for
3 to 5 minutes.
STEP 9 Aer the resting period, serve with Haricots Verts & Grape Tomatoes and enjoy!
INGREDIENTS:
2 Center Cut Pork Chops 1.5”(4cm) thick
15 to 20 Grape (or Cherry) Tomatoes
1/2 Lb. (225g) - Haricots Verts (or Green Beans)
1 Tbsp. (15mL) - Extra Virgin Olive Oil
Lemon Pepper
Garlic Powder
Salt
Pepper
ROASTED PORK LOIN CHOPS with HARICOTS VERTS & GRAPE TOMATOES
serves: 2 to 3
EQUIPMENT:
2 Oval Cast Iron Steak/Fajita Plates
or 1 Cast Iron Skillet 8” to 10” (20cm to 25cm) diameter
High Temperature Oven Mitts
Metal or Heat-Resistant Tongs
Meat Thermometer
*Peormance may vary.

17
Pour réduire les risques de brûlures graves et de dommages matériels, respecter les
précautions de sécurité ci-dessous lors de l'utilisation de la Boîte de four à pizza.
LE VENTILATEUR D’EXTRACTION AU-DESSUS DE LA CUISINIÈRE DOIT ÊTRE ALLUMÉ SUR LA
VITESSE LA PLUS ÉLEVÉE PENDANT L’UTILISATION DE LA BOÎTE-FOUR À PIZZAS. TOUTES LES
SURFACES DOIVENT ÊTRE NETTOYÉES AVANT CHAQUE UTILISATION DE LA BOÎTE-FOUR À PIZZAS
ALLUMEZ TOUJOURS VOTRE HOTTE/VENTILATEUR SUR UNE VITESSE ÉLEVÉE AVANT D’UTILISER
VOTRE BOÎTE-FOUR À PIZZAS ET LAISSEZ-LA/LE FONCTIONNER JUSQU’APRÈS QUE VOTRE
BOÎTE-FOUR À PIZZAS AIT COMPLÈTEMENT REFROIDI.
Portez toujours des gants isolants résistant à la chaleur lorsque vous manipulez la
Boîte-four à pizzas.
NE TOUCHEZ PAS LA BOÎTE-FOUR À PIZZAS JUSQU’À CE QU’ELLE AIT COMPLÈTEMENT REFROIDI.
Le compartiment métallique peut atteindre des températures allant jusqu’à environ 400° F
(200° C) pendant l’utilisation.
N’allumez pas la cuisinière à gaz et ne la préchauez pas avant de placer la Boîte-four à
pizzas sur le brûleur..
Ne laissez pas la Boîte-four à pizzas sans surveillance et tenez-la éloignée des enfants
sans supervision.
N’utilisez que des plats à cuisson ou des ustensiles appropriés lorsque vous utilisez et que
vous nettoyez votre Boîte-four à pizzas. N’utilisez pas de plastique, de silicone ou de verre.
Ne laissez pas d’autres aliments que des pizzas ou de la pâte à pain entrer en contact
avec les pierres. Tous les aliments qui contiennent de la graisse, de l’huile ou du beurre
(viandes, aliments enduits d’huile d’olive, cookies, biscuits, etc.) ne doivent pas entrer en
contact direct avec les pierres. Ces aliments doivent être cuits dans un plat de cuisson en
métal, sur une plaque de cuisson en métal ou dans une poêle en fonte car les pierres
absorberaient la graisse, l’huile et le beurre, ce qui pourrait causer des fumées, des odeurs,
des taches et conférer un goût rance aux aliments que vous cuisineriez à l’avenir.
Les pierres sont fragiles et peuvent se casser si elles tombent au sol. LA BOÎTE-FOUR À
PIZZAS DEVIENT EXTRÊMEMENT CHAUDE, NE TOUCHEZ PAS LES PIERRES NI AUCUNE AUTRE
PIÈCE DE LA BOÎTE-FOUR À PIZZAS PENDANT SON FONCTIONNEMENT.
Pour nettoyer les pierres, faites chauer la Boîte-four à pizzas pendant 15 minutes après la
fin de la cuisson des aliments et grattez tout résidu visible. N’utilisez pas d’agents nettoy-
ants ou d’autres liquides pour nettoyer les pierres.
N’ENLEVEZ PAS LA BOÎTE-FOUR À PIZZAS DE LA CUISINIÈRE À GAZ TANT QU’ELLE N’A PAS COM-
PLÈTEMENT REFROIDI. Attendez au moins 90 minutes après avoir éteint la cuisinière à gaz
pour l’enlever. N’utilisez pas d’eau ou d’autres solvants pour refroidir la Boîte-four à pizzas
après utilisation
Ne placez pas d’essence, d’alcool, de produits du bois, de charbon ou tout autre matériau
combustible dans la chambre de cuisson.
La Boîte-four à pizzas ne doit jamais être utilisée pour chauer une pièce.
Assurez-vous que des dégagements de sécurité adéquats sont respectés avant d’utiliser la
Boîte-four à pizzas. La Boîte-four à pizzas et les suaces adjacentes peuvent devenir
extrêmement chaudes.
Avertissements
Précautions de sécurité – Lire avant d'utiliser la Boîte de four à pizza
Avertissements

Guide D'Utilisation
Ce qu’il y a dans l’emballage
Assemblage de la Boîte de four à pizza
Assemblage du tourneur de pizza.
Utilisation de la Boîte de four à pizza
Consignes d’entretien
Service à la clientèle
Pâte à pizza simple
Sauce pour pizza
Pizza margherita
Côtelettes de porc rôties avec
Haricots verts et tomates cerises
19
20
23
24
28
28
29
31
32
33
Table des matières Page
18
Other manuals for PIZZA
2
Table of contents
Languages:
Other BakerStone Kitchen Appliance manuals