VEVOR JYC-1100 User manual

版 本 B/0
技术要求
1. 说明书展开尺寸(长X宽) 288×210mm,成品尺寸(长X宽)144×210mm,偏差±1mm;
2. 材质:128g双铜纸 工艺:16P,单色印刷(黑色),装订成册;
3. 外观:保证内容清晰,以及正确性、完整性,规格准确。避免退货,请勿出现不良情况;
4. 材质及油墨必须符合Rohs要求;
封面样板 底面样板
变 更 说 明
A
B
C
128g双铜纸
批 准 工艺会签 审 核 标准化 设 计 制 图
材 质
处 理
加 工
视图画法
部品名
部品号
第一角法
比 例
数 量
代表机种
1:1
变更号 变更时间 处数
EZL-10S-产品说明书-产品说明书-Rohs
麦金全
2022.9.29
汤金喜周新龙
郭佳
刘军 麦金全
1
105008980002
2022.9.292022.9.292022.9.292022.9.292022.9.29

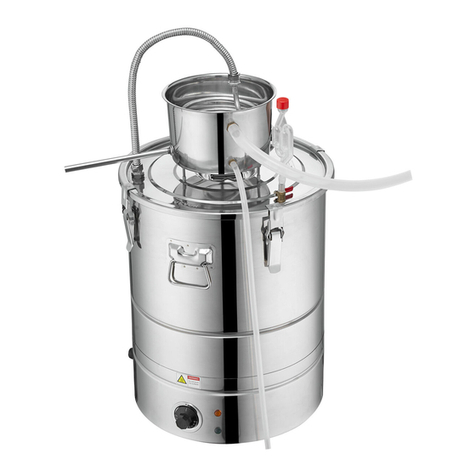
ALCOHOL STILLER MANUAL


01
ALCOHOL STILLER
MANUAL
NEED HELP? CONTACT US!
to contact us:
This is the original instruction,Please read all manual instructions carefully before operating.
arance of the product shall be subject to
the product you received. Please forgive us that we won't inform you again if there is any technology or
software updates on our product.
10L/30L/50L/70L

Safety instructions of the submersible aquarium pump
The manipulation and utilization of our pump are ve simple and convenient.
The user just needs to pour a suitable height level of water and link the pump
with the outlet water pipe and then connect the pump with power supply in
accordance with the mark on the label.
Thus, the pump can run well.
To reduce risk of electric shock
• Always unplug the pump from the electric outlet before cleaning and
handling.
• Use with clean water only. Do not place it in other liquid. Never let the pump
run d.
• OPTION-The pump is supplied with ground in conductor and a grounding
type attachment plug, and must be connected only to a proper ground outlet
to reduce the risk
of electric shock (Europe standard only).
• The use of liquid temperature can not be higher than 35℃
• Prevent the water from running into the electrical outlet down the cord.
• Do not lift , car, or pull the pump by the power cord.
• Do not replace the pump cord. Stop using the pump if it sustains damage
(Option for pump with safe low voltage).
Technical data
02
Model JYC-1100
Rating voltage 110-120V~ 220-240V~
Rating Frequency 60Hz 50Hz
Rating power 8W 8W
Protection type IPX8 IPX8
Max. supply height 110cm 110cm
Max. conveying amount 450L/h 450L/h

• Always use the transformer provided to run the water pump or consult with
your electrician before other transformer is connected
• Do not connect the transformer provided to other appliance.
• Always unplug the power transformer from the electrical outlet before any
cleaning and handling.
• Indoor use only. Place the transformer away from re, moisture & direct
sunlight. (Option for pump with light)
• The supply cord cannot be replaced. If the cord is damaged the appliance
should be scrapped.
To clean the pump
• Unplug the pump from electrical outlet. Use a small soft brush or place it
under water stream to remove debris.
To keep water clean
• Periodically change water to prevent water from becoming sticky and
forming microorganisms.
Troubleshooting
if the pump fails to run, the following should be checked,
• Check the circuit breaker, or t a dierent outlet to make sure that the pump is getting electrical
power. NOTE-Always disconnect the pump from electrical outlet before Checking.
• Check the pump discharge and tubing for kinks and obstructions.
• Algae buildup can be ushed out with a garden hose.
WARNING !!! the water pump must be fully soaked or it will be damaged!
Disposal information
This product is subject to the provision of European Directive 2012/19/EC. The symbol showing a
wheelie bin crossed through indicates that the product requires separate refuse collection in the
European Union. This applies to the product and all accessories marked with this symbol. Products
marked as such may not be discarded with normal domestic waste, but must be taken to a collection
point for recycling electrical and electronic devices.
03

04
BOM
This user manual applies to the distiller series products.
Please read this manual carefully before using the product.
Item
1
2
3
4
5
6
QTY
1pcs
1pcs
1pcs
1pcs
1pcs
1pcs
Condenser Keg
Lid
Boiler Barrel
Stainless Steel Steam Grid
Silicone Gasket
Exhaust Valve
Picture

05
Ball Valve
Thermometer
Thermometer
Alcohol Meter
Water Inlet Pipe
Water Outlet Pipe
7 1pcs
8 1pcs
9 1pcs
10 1pcs
11 1pcs
12 1pcs

06
Measuring Cup
Long Measuring Cup
Silicone Gasket
Wine Pipe
13 1pcs
14 1pcs
15 1pcs
16 1pcs
User Manual19 1pcs
Gauze17 1pcs
Slag Separation Bag18 1pcs
Water Pump20 1pcs

07
Product Introduction
• Stainless steel fermenters concentrate steam by heating to boiling and then cooling. In addition, the
entire alcohol distillation unit is made of 304 food-grade stainless steel, which is durable and easy to
clean.
stainless steel spiral tube, which has
At the same time, it has a large
contact area with the condenser keg and provides a relatively low distillation temperature.
• Full Set of Accessories: The set comes with a thermometer (0-150°C/32-302°F) for easy real-time
monitoring of alcohol temperature. Also includes a one-way vent valve and adds 2/3 water to it to help
release air (only gas out) when the grain is fermented. Our distillation kits also include an alcohol meter
kit for accurate measurement of wine strength.
• Multiple Heating Methods: This wine boiler is compatible with various stoves including gas stove, coal
beer, brandy, whiskey, wine, and
seasonings such as soy sauce and vinegar.
The following are the reference data, the yield is mainly determined by the fermentation, distillate time
Fermenter Capacity
10L
30L
50L
70L
Fermenter Size
Φ250x250 mm
Φ350x350 mm
Φ400x400 mm
Φ450x450 mm
Condensation Barrel Size:
Φ250x313 mm
Φ250x313 mm
Φ250x313 mm
Φ250x313 mm
Alcohol Steaming Time
1-2 h (including Heating Time)
2-3 h (including Heating Time)
Installation and Use of Distiller Equipment
Distiller units are installed from bottom to top.
ing to the appropriate capacity, cover
the lid, and fasten the lid with a tool.
2.Place the gasket 15 on the concave platform.
3.Adjust the cooling position, put a silicone pad 5 on the joint, turn the joint clockwise to tighten.
4.Fasten the tool buckle.
5.Install the temperature gauge, ball valve, and one-way exhaust valve.
6.Connect the wine outlet pipe to the wine outlet of the condensing tower, connect one end of the
water inlet pipe to the water pump, the other end to the water inlet, and connect the water outlet pipe
to the water outlet.


08
mly with the bucket iron clip. Adjust the
position of the condenser keg on the barrel cover, and the conn
cket cover iron clip, install the ball
valve, the one-way exhaust valve and the thermometer, and tightly connect the condensing tower and
the wine outlet pipe, and then install the water inlet pipe and the water outlet pipe in sequence. The
or the gap between the liquid receiving
Installation Notes
Boiler Barrel
Stainless steel steam grid
Lid
Ball value
Exhaust valve
Wine pipe
Condenser Keg
Silicone gasket
Thermometer
Silicone gaskets

09
Equipment Cleaning and Maintenance
1. The exhaust gas channel can discharge graded impurities and improve the quality of wine. For
example, for methanol, acetaldehyde, ethyl acetate, ethyl formate, etc., they all have lower boiling
and will be discharged upward with the
2. Exhaust gas path can help load the wine anaerobically to reach a better quality of wine. The lid is
Condensing coilers
The lid sealed
with a small
Six-coil coilers have
One coil
Two coils
There coils
Four coils
Five coils
Six coils

10
Pipe Connection Diagram for Tap Water
can be controlled. The temperature of
ensure that is close to the cooling
water temperature.
Pipe Connection Diagram for Circulating Water via a Water Pump
When using circulating water, if the water temperature exceeds 35°C, it is recommended to change the
water. The maximum temperature cannot exceed 40°C, as the produ
determined by the input cooling water temperature.
Water

11
How to Use
Distill Liquor
1. Choose good common rice for steaming, add the steamed rice in the ratio of 500g grain, 1kg water
ntation.
2. Fermentation temperature of 20-25 ℃, stirring once a day, fermentation 10-20 days.
r the liquid produced during the
fermentation process directly into the barrel. Then place the bag containing the grain directly on the
grate (to prevent gumming up the pot). After installation, the
submersible pump is connected to the power supply for cooling water circulation when there is heat at
the outlet.
Distill Hydrolat
1. Choose the petals or other plants you like.
2. Soak the petals in pure water for 3-5 cm for 8 hours (only for dried petals).
3. Take out the petals and place them in a matching strainer ba
petals on the grate, pour the soaked water into the bucket, ins
Distill Brandy
1. Crush grapes, and add ingredients such as pectinase, yeast , fermentation promoter and tannin in
proper order.
2. Add white sugar in the next day of fermentation, and generally separate peels and residues after
fermentation for 7-10 days.
cation.
bag on the grate and add water at the
bottom of the barrel. The distilled spirit is brandy.
Ferment Wine
1. Crush grapes,and add sulfur regulating tablets to prevent microbial contamination.
2. Add pectinase to decompose pectin and increase juice yield.
3. Add yeast, ferment for 7-10 days, and increase juice yield.
out 1 month, and put the wine in a bottle.
5. Store the wine in a cool place after bottling.

12
Manufacturer: DEAGeneralAviationHoldingCo., Ltd.
Add: GongyeAvewest, SongxiaIndustrialPark, Songgang,Nanhai, Foshan, Guangdong, China.
Impoer: WAITCHX
Address: 250 bis boulevard Saint-Germain 75007 Paris
Impoer: FREE MOOD LTD
Address: 2 Holywell Lane, London, England, EC2A 3ET
EUREP UK LTD
UNIT 2264, 100 OCK STREET, ABINGDON
OXFORDSHIRE ENGLAND OX14 5DH
UK REP
EUREP GmbH
Unterlettenweg 1a, 85051
Ingolstadt, Germany
EC REP


Table of contents
Other VEVOR Kitchen Appliance manuals

VEVOR
VEVOR YD-302C-B-Z User manual

VEVOR
VEVOR DH805 User manual

VEVOR
VEVOR ZH-PT-21M User manual

VEVOR
VEVOR C113 User manual

VEVOR
VEVOR RSHPGZ20YC User manual

VEVOR
VEVOR MHTJJPZY02 User manual

VEVOR
VEVOR MHTJJPZY01 User manual

VEVOR
VEVOR G-SKU1 User manual

VEVOR
VEVOR NP08001SEC User manual

VEVOR
VEVOR SP354003S User manual