Quinny 1473 User manual

Spanish Guide Included
Guía en español incluida
01473
User Guide
Guía del Usuario

Contents
Warnings
i
Contents
Warnings . . . . . . . . . . . . . . . . . . . . . . . . . . . . . . . . . . . . . . i-1
Parts List /Features . . . . . . . . . . . . . . . . . . . . . . . . . . . . . . . 2
To Use as a Carrier . . . . . . . . . . . . . . . . . . . . . . . . . . . . . . . 3
To use the restraint system
Tocarry
To fold the canopy and carrying handle
To use the DreamiTM in the BuzzTM stroller
To Use as a Carriage . . . . . . . . . . . . . . . . . . . . . . . . . . . . . . 4
To install carrier onto stroller
To remove carrier from stroller
WHEN USING YOUR BUZZ DREAMI AS A BASSINET:
WARNING – Failure to
follow these warnings and
instructions could result in
serious injury or death.
FALL HAZARD –
To help prevent falls, do not use this product when
the infant begins to push up on hands and knees or
has reached 15-LBS (7-kg), whichever comes first.
SUFFOCATION HAZARD –
Infants can suffocate:
•In gaps between an extra pad and side of
the bassinet
• On soft bedding.
•NEVER add a mattress, pillow, comforter, or
padding. Use ONLYthe pad provided by
manufacturer.
•Use ONLYthe bedding provided by the manufacturer.
•If a sheet is used with the pad, use only the one
provided by the bassinet manufacturer or one
specifically designed to fit the dimension of the
bassinet or cradle mattress.
•To reduce the risk of SIDS, pediatricians
recommend healthy infants be placed on their
backs to sleep, unless otherwise advised by
your physician.
•Strings can cause strangulation! Do not place
items with a string around a child’s neck, such as
ahood string or pacifier cords. Do not suspend
strings over a bassinet or attach strings to toys.
•CHECK your child frequently, accidents can
happen quickly.
•DO NOT place more than one infant in the bassinet.
To Use the Bug Net & Rain Shield
..................5
Care & Maintenance . . . . . . . . . . . . . . . . . . . . . . . . . . . . . . 6
Toremove mattress
To remove the lining
To attach the mattress and lining
Warranty . . . . . . . . . . . . . . . . . . . . . . . . . . . . . . . . . . . . . . 6

Warnings
C
1
•DO NOT allow children to play on or around
bassinet.
•DO NOT use bassinet in a motor vehicle.
•DO NOT USE bassinet if any parts are missing or
broken. Contact Consumer Relations for replacement
parts and instructional literature if needed.
•NEVER use plastic shipping bags or other plastic
film as a mattress cover. They are not sold or
intended for that purpose as they can cause
suffocation.
WHEN USING YOUR BUZZ DREAMI AS A CARRIER:
WARNING
•Use only with children who weigh between 5-15
LBS (2.3-7kg) and whose height is a maximum of
27 inches.
•NEVER leave child unattended.
•Suffocation Hazard: Infant carrier can roll over on
soft surfaces and suffocate child. NEVER place
carrier on beds, sofas, or other soft surfaces.
•Strangulation Hazard: Child can strangle in loose
restraint straps. NEVER leave child in carrier when
straps are loose or undone.
•Fall Hazard: Child’s movement can slide carrier.
NEVER place carrier near edges of counter tops,
tables, or other elevated surfaces.
•Infant carrier not intended for use as infant
restraint devices in motor vehicles.
•NEVER use this carrier as a means to transport
an infant in a motor vehicle.
•Do not use the infant carrier if it is damaged
or broken.
WHEN USING YOUR BUZZ DREAMI AS A CARRIAGE:
WARNING:NEVER
LEAVE CHILD UNATTENDED.
FOR THE SAFETY OF YOUR CHILD, PLEASE READ
THE FOLLOWING WARNINGS AND ASSEMBLY
INSTRUCTIONS AND KEEP FOR FUTURE REFERENCE.
•CARRIAGE is only for use with children up to
15-LBS. (7-kg).
•NEVER LEAVE CHILD UNATTENDED. ALWAYS keep
child in view when in carriage.
•AVOID SERIOUS INJURYfrom falling or sliding out.
ALWAYS use seat belt. Check frequently to make sure
it is secure.
•This product will become unstable if a parcel bag or
rack is used when there is no provision for one.
•This product may become unstable if a parcel bag,
other than the one recommended by the manufacturer
is used.
•This product will become unstable if the manufacturer’s
recommended load is exceeded.
•DO NOT carryadditional children, goods or
accessories in or on this product except as
recommended by the manufacturer’sinstructions.
•ALWAYS keep fingers away from moving parts when
folding, unfolding or adjusting stroller to prevent
finger entrapment.
•ALWAYS make surecarriage is FULLYOPEN AND
LOCKED before using.

Warnings
Parts List / Features
W
2
•Keep these instructions for future use.
•Lay out and identify all parts.
•Do not return this product to the
place of purchase. If any parts are
missing, call Consumer Relations at
(800) 951-4113. Or visit our website at
www.quinny.com.
•Include the model number and
manufacture date and a brief
description of the part.
The
manufacturing date code is on the
back of the wash and care label.
a Canopy
b Window
c Lining
d Release buttons (to release
from stroller)
e Control buttons for canopy
f Cover
gSide handles
h Adapter opening
i Restraint system
jMattress
k Carrying handle
l Bug net and rain shield
mAdapters
n Blanket
NOTE: The DreamiTM can be used for multiple purposes.
In this User Guide the following three terms are used:
Bassinet – The DreamiTM used for infant to sleep in.
Carrier – The DreamiTM used to carryinfant.
Carriage – The DreamiTM used on the BuzzTM stroller.
•ALWAYS use the brakes when carriage is stopped.
•ALWAYS remove protective material and poly bags
and dispose before assembly.
•NEVER use carriage on stairs or escalators.
•NEVER allow children to play with or hang onto the
carriage.
•NEVER allow children to climb into the carriage.
Carriage may tip over and injure child.
•NEVER place or hang parcels, bags or accessories
on the handle or canopy. The carriage may tip over
or the canopy may collapse.
•ONLY use this carriage with ONE child at a time.

To Use as a Carrier
C
3
To use the DreamiTM
restraint system:
1
Place child in the Dreami
TM
with the crotch strap
between the child’s legs.
Fasten both buckles
(Figure 1).
Tighten straps snugly
around child (Figure 1a).
To tighten straps, pull out
loop 4. Feed into loop 3.
Pull on end of strap 1. To
loosen straps, pull out top
loop 4. Pull out on loop 2.
Pull out on buckle while
holding strap end. If the
straps should come out of
the buckle, rethread as
shown (Figure 1b).
WARNING
•NEVER LEAVE CHILD UNATTENDED. ALWAYS
keep child in view when in carriage.
•AVOID SERIOUS INJURY from falling or sliding
out.
Always use seat belt. Check frequently to
make sure it is secure. Belts must be threaded
exactly as shown (Figure 1b).
•Failure to follow these instructions could result in
the serious injuryor death of your child.
1
1a
1b
To carry:
2Pull the carrying handle
upward until you hear
each side “click” (Figure 2).
Make sure both sides of
the handle click into place.
To fold the canopy and
carrying handle:
3Press one of the control
buttons (on either side of
the carrier) to release the
lock (Figure 3, arrow 1).
Press button on opposite
side while pushing handle
down (Figure 3, arrow 2).
2
2a
3
The
Dreami
TM
can be
carried using the carrying
handle (the opening on
the top of the canopy)
(Figure 2a).

To Use as a Carriage
4
To install carrier onto
stroller:
1Adjust the connection
points using the button
at the center. Be sure
the connection points
are positioned straight
up (Figure 1).
2The adapters and
corresponding
connection points are
marked with an
“L”(left) and
“R” (right).
Insertthe adapter
marked “R” into
the connection
point marked “R”
until you hear a “click”
(Figure 2). Do the
same for those marked
“L”. Check to make
sure they are securely
fastened by pulling up
on them.
To remove carrier from
stroller:
4Press both release but-
tons inside canopy (1)
while pulling up on the
carrier (2) (Figure 4).
5To remove the adapters,
press the button (1) on
the inside and pull the
adapter out (2) (Figure 5).
3Position the carrier with
the foot of the carrier
toward the handlebars
as shown (Figure 3).
Place the carrier on the
adapters until you hear
a“click.”
Pull up on the carrier
handle to ensure it is
securely in place. The
carrier should not release
without pushing the
release buttons.
To use the DreamiTM in the BuzzTM stroller:
NOTE: Read the BuzzTM Stroller User Guide to remove the
seat from the stroller frame.
1
2
3
4
5

To Use Bug Net
& Rain Cover
5
To use the bug net:
The canopy must be locked
in the upright position in
order to use the bug net. Zip
bug net to the inside edge of
the canopy (arrow 1). Pull
bug net over the foot of the
carrier (arrow 2). Attach the
hooks under the canopy
flaps (arrow 3).
Touse the rain shield:
The canopy must be locked
in the upright position in
order to use the rain shield.
Pull the rain shield over the
canopy and over the foot of
the carrier.
WARNING – SUFFOCATION HAZARD
•Be sure bug net doesn’t cover the child’s face.
•Be sure rain shield doesn’t cover the child’s face.

Care & Maintenance
Warranty
T
To remove the mattress:
1Unbuckle and push the
restraint down through
three slots in the
mattress. Remove the
mattress.
To remove the lining:
2Remove the lining from
under the handles and
unhook (Figure 1).
3Pull the lining away from
the sides and foot of
the carrier to unfasten the
adhesive strips (Figure 2).
6
Care and maintenance:
One-Year Limited Warranty
Dorel Juvenile Group, Inc. warrants to the original purchaser that this product
(
Buzz DreamiTM
), is free from material and workmanship defects when used
under normal conditions for a period of one (1) year from the date of purchase.
Should the product contain defects in material or workmanship Dorel Juvenile
Group, Inc., will repair or replace the product, at our option, free of charge.
Purchaser will be responsible for all costs associated with packaging and shipping
the product to Dorel Juvenile Group Consumer Relations Department at the
address noted on the front of this document and all other freight or insurance
costs associated with the return. Dorel Juvenile Group will bear the cost of
shipping the repaired or replaced product to the purchaser. Product should be
returned in its original package accompanied by a proof of purchase, either a
sales receipt or other proof that the product is within the warranty period. This
warranty is void if the owner repairs or modifies the product or the product has
been damaged as a result of misuse.
This warranty excludes any liability other than that expressly stated previously,
including but not limited to,any incidental or inconsequential damages.
SOME STATES DO NOT ALLOW THE EXCLUSION OR LIMITATION OF
INCIDENTAL OR CONSEQUENTIAL DAMAGES, SO THE ABOVE
LIMITATION OR EXCLUSION MAY NOT APPLY TO YOU.
THIS WARRANTY GIVES YOU SPECIFIC LEGAL RIGHTS, AND YOU MAY
ALSO HAVE OTHER RIGHTS THAT MAY VARY FROM STATE TO STATE.
Washing the cover, restraint and canopy:
•Do not lubricate the moving parts on the Dreami.
•Wipe using a damp cloth. Do not use harsh cleaning
agents.
Washing the mattress, bug net and removable lining:
•Hand wash in cool water. Use only mild detergent.
DO NOT BLEACH. Line dry. Do not iron.
Washing the rain shield:
•Wipe using a cloth dampened with warm water.
4Pull lining away from the
outside and feed the
under the canopy
(Figure 3).
5Feed the restraints
through the slots on the
bottom of the lining.
To attach the mattress
and lining:
Torefasten the lining,
follow the above
instructions in reverse
2
3
1
order.Be surethat all hooks and adhesive strips are
secured in place. DO NOT use the carrier without the
lining, mattress and restraint system.

Contenido
Advertencias
i
Contenido
Advertencias . . . . . . . . . . . . . . . . . . . . . . . . . . . . . . . . . . . . i-1
Lista de piezas/Características . . . . . . . . . . . . . . . . . . . . . . 2
Para usar como portabebé . . . . . . . . . . . . . . . . . . . . . . . . . 3
Para usar el sistema de retención
Para llevar
Para plegar la capota y la manija de traslado
Para usar el Dreami™ en la carriola Buzz™
SE REQUIERE EL ARMADO POR PARTE DE UN ADULTO.
CUANDO UTILICE SU BUZZ DREAMI COMO MOISÉS:
ADVERTENCIA – El no
seguir estas instrucciones
podría resultar en lesiones
graves o la muerte del niño.
RIESGO DE CAÍDAS –
Para ayudar a prevenir caídas, este producto no debe
utilizarse cuando el bebé comience a levantarse sobre
las manos o las rodillas, o bien cuando alcance un
peso de 15 libras (7 kg), según lo que ocurra primero.
PELIGRO DE ASFIXIA – Los
bebés pueden asfixiarse:
•Enlos espacios existentes entre una almohadilla
adicional y los costados del moisés
•En ropa de cama mullida.
•NUNCA añada colchones, acolchados, almohadas o
almohadillas. Utilice ÚNICAMENTE la almohadilla
provista por el fabricante.
•Utilice ÚNICAMENTE la funda para cuna provista por
el fabricante.
•Si se utiliza una sábana junto con la almohadilla,
utilice sólo la sábana provista por el fabricante
del moisés, o bien una sábana diseñada
específicamente para las dimensiones del
colchón del moisés o cuna.
•Para reducir el riesgo de SIDS (síndrome de muerte
súbita del bebé), los pediatras recomiendan
colocar a los bebés sanos boca arriba para dormir,
amenos que su médico le aconseje otra cosa.
•¡Las cuerdas pueden provocar estrangulación! No
coloque ningún artículo que se sujete con una
cuerda al cuello del bebé, tal como capuchas,
chupetes, etc. No cuelgue cuerdas sobre el moisés
ytampoco sujete los juguetes con cuerdas.
•COMPRUEBE con frecuencia cómo está su bebé:
los accidentes ocurren muy rápidamente.
•NO coloque más de un bebé en el moisés.
•NO permita a los niños jugar dentro del moisés o
cerca de este.
•NO utilice el moisés en ningún vehículo motorizado.
Para usar como carriola . . . . . . . . . . . . . . . . . . . . . . . . . . . .4
Para instalar el portabebé en la carriola
Para quitar el portabebé de la carriola
Para usar el mosquitero y el protector para lluvia
.....5
Cuidado y mantenimiento
.......................6
Para retirar el colchón
Para retirar el revestimiento
Para colocar el colchón y el revestimiento
Garantia . . . . . . . . . . . . . . . . . . . . . . . . . . . . . . . . . . . . . . 6

Advertencias
C
1
•NO UTILICE el moisés si alguna de sus piezas falta
oestá rota. Si necesita piezas de reemplazo o más
instrucciones, comuníquese con el Departamento
de Relaciones con el Consumidor.
•NUNCA utilice bolsas plásticas para embalaje u
otro material plástico como funda de colchón. Las
bolsas no se venden para eso y tampoco han sido
diseñadas con ese fin, y pueden causar asfixia.
CUANDO UTILICE SU BUZZ DREAMI COMO PORTABEBÉ:
ADVERTENCIA
•Utilizar únicamente con niños de 5 a 15 libras de
peso (2.3 a 7 kg) y de hasta 27 pulg. de altura.
•NUNCA deje al niño sin atención.
•Peligro de asfixia: El portabebé puede rodar sobre
las superficies blandas y sofocar al niño. NUNCA
coloque el portabebé sobre camas, sofás u otras
superficies blandas.
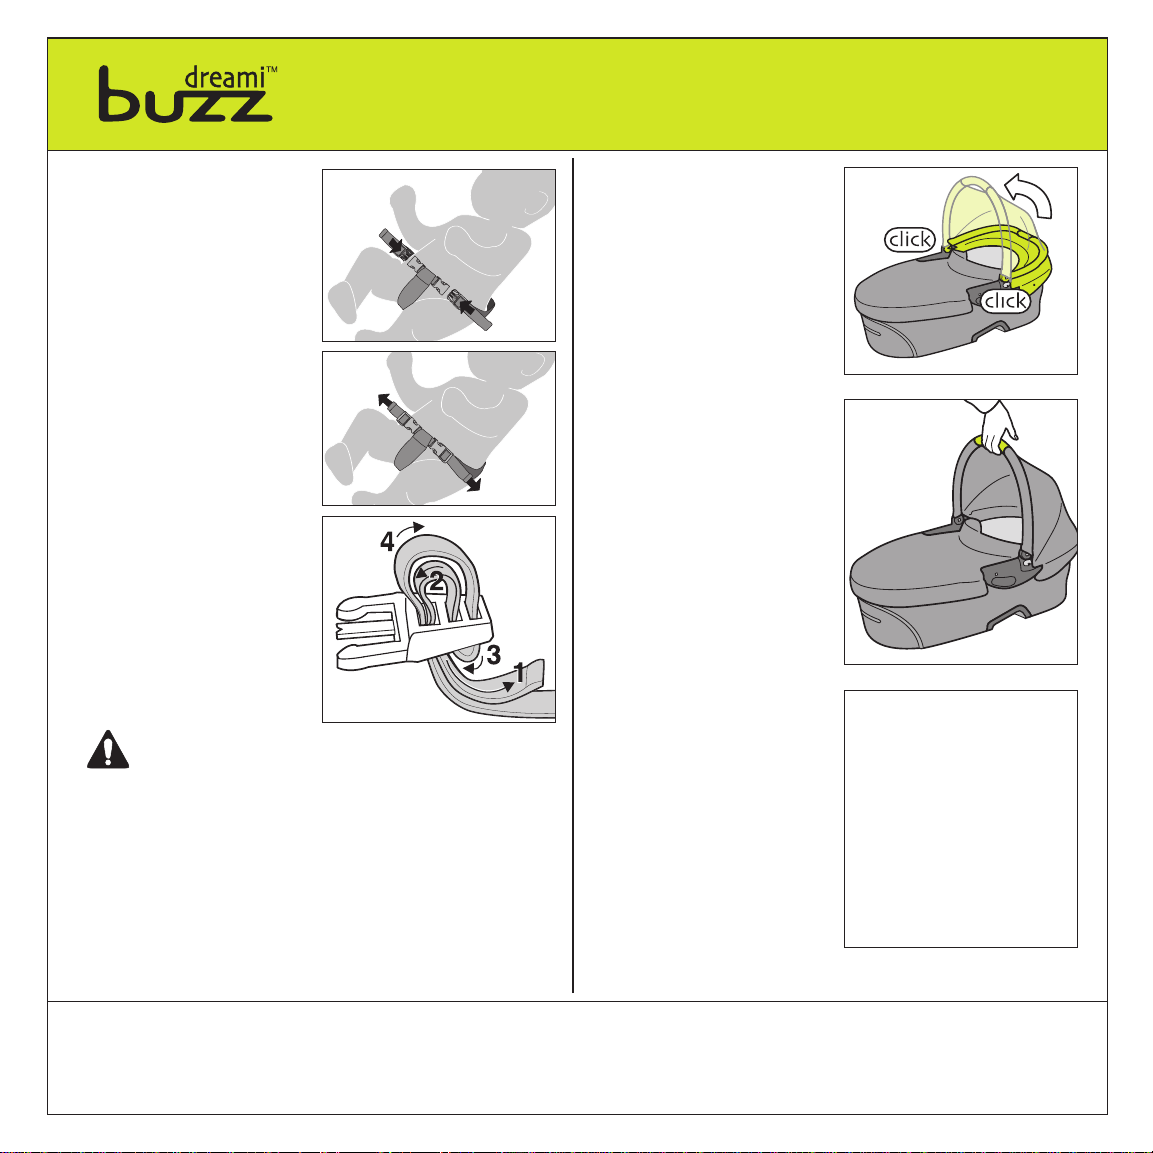
•Peligro de estrangulación: El niño puede estrangu-
larse con las correas de retención flojas. NUNCA
deje al niño en el portabebé cuando las correas
estén flojas o desabrochadas.
•Riesgo de caída: Los movimientos del niño pueden
hacer que el portabebé se deslice. NUNCA coloque
el portabebé cerca de bordes de mostradores,
mesas u otras superficies elevadas.
•El portabebé no está diseñado para ser utilizado como
dispositivo de retención en vehículos motorizados.
•NUNCA utilice el portabebé como medio de trans-
porte de un niño en un vehículo motorizado.
•No utilice el portabebé si está dañado o roto.
CUANDO UTILICE SU BUZZ DREAMI COMO CARRIOLA:
ADVERTENCIA:NUNCA
DEJE AL NIÑO SIN ATENCIÓN.
POR LA SEGURIDAD DE SU HIJO, POR FAVOR LEA
LAS SIGUIENTES ADVERTENCIAS E INSTRUCCIONES DE
ARMADO, Y GUÁRDELAS PARA CONSULTA FUTURA.
•La CARRIOLA es para usar únicamente con niños de
hasta 15 libras (7 kg).
•NUNCA DEJE AL NIÑO SIN ATENCIÓN. SIEMPRE debe
mantener al niño a la vista cuando esté en la carriola.
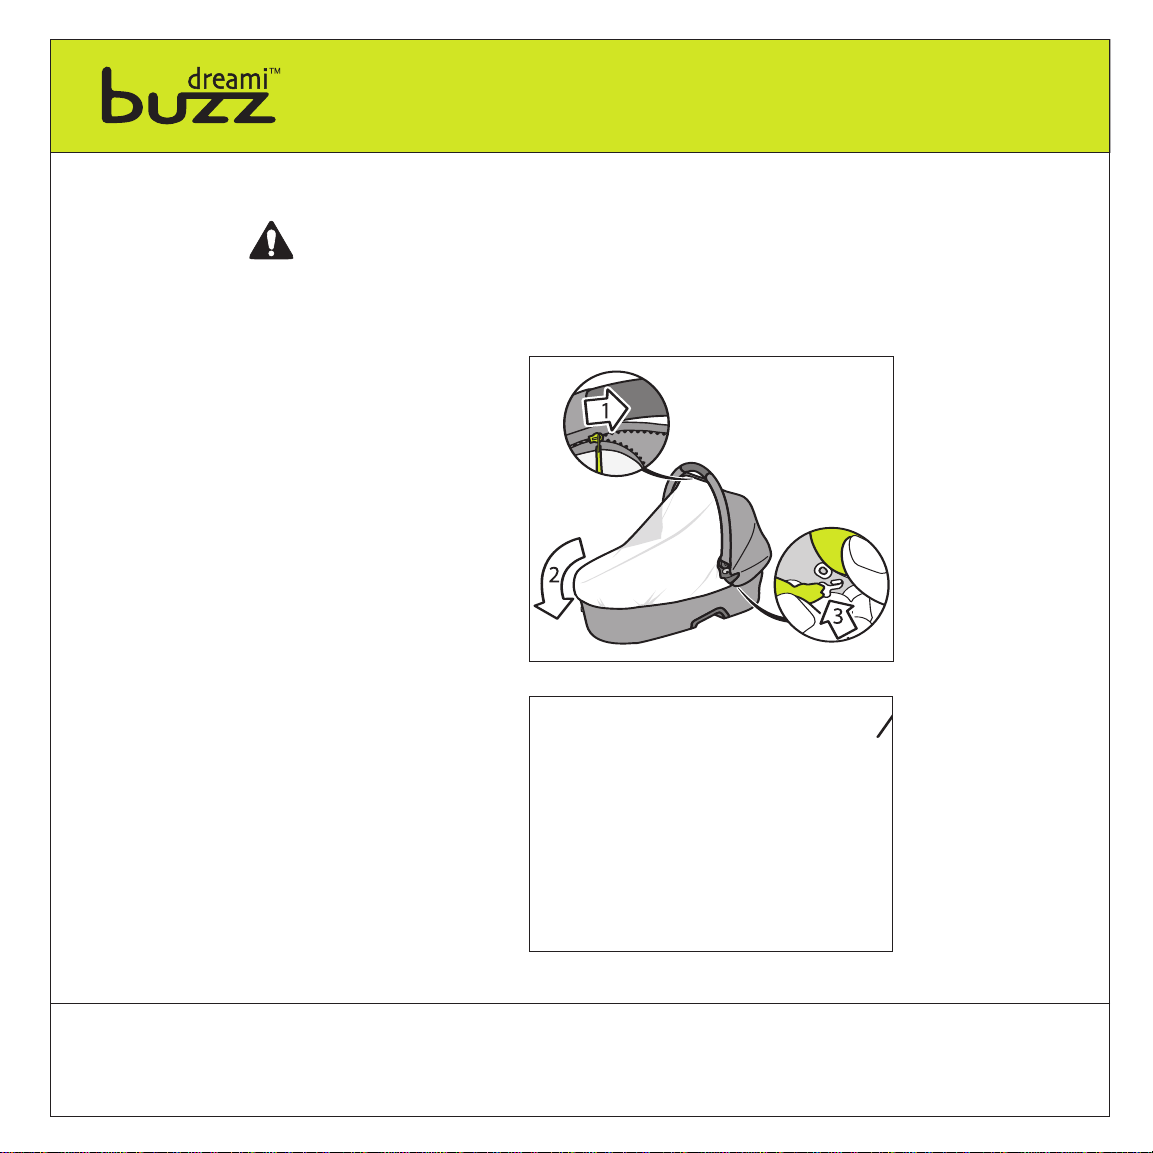
•EVITE LESIONES GRAVES provocadas por caídas
odeslizamientos. SIEMPRE use el cinturón de
seguridad. Revise con frecuencia para comprobar
que esté asegurado.
•Este producto se tornará inestable si se le agrega
indebidamente una bolsa o un accesorio para llevar
paquetes.
•Este producto podría tornarse inestable si se le agrega
una bolsa para paquetes que no sea la recomendada
por el fabricante.
•Este producto se tornará inestable si se excede el
máximo de carga que recomienda el fabricante.
•NO transporte más de un niño, ni cargas o accesorios que
no se recomienden en las instrucciones del fabricante.
•SIEMPRE mantenga los dedos alejados de las partes
móviles cuando pliegue, despliegue o ajuste la
carriola, para evitar atrapárselos.
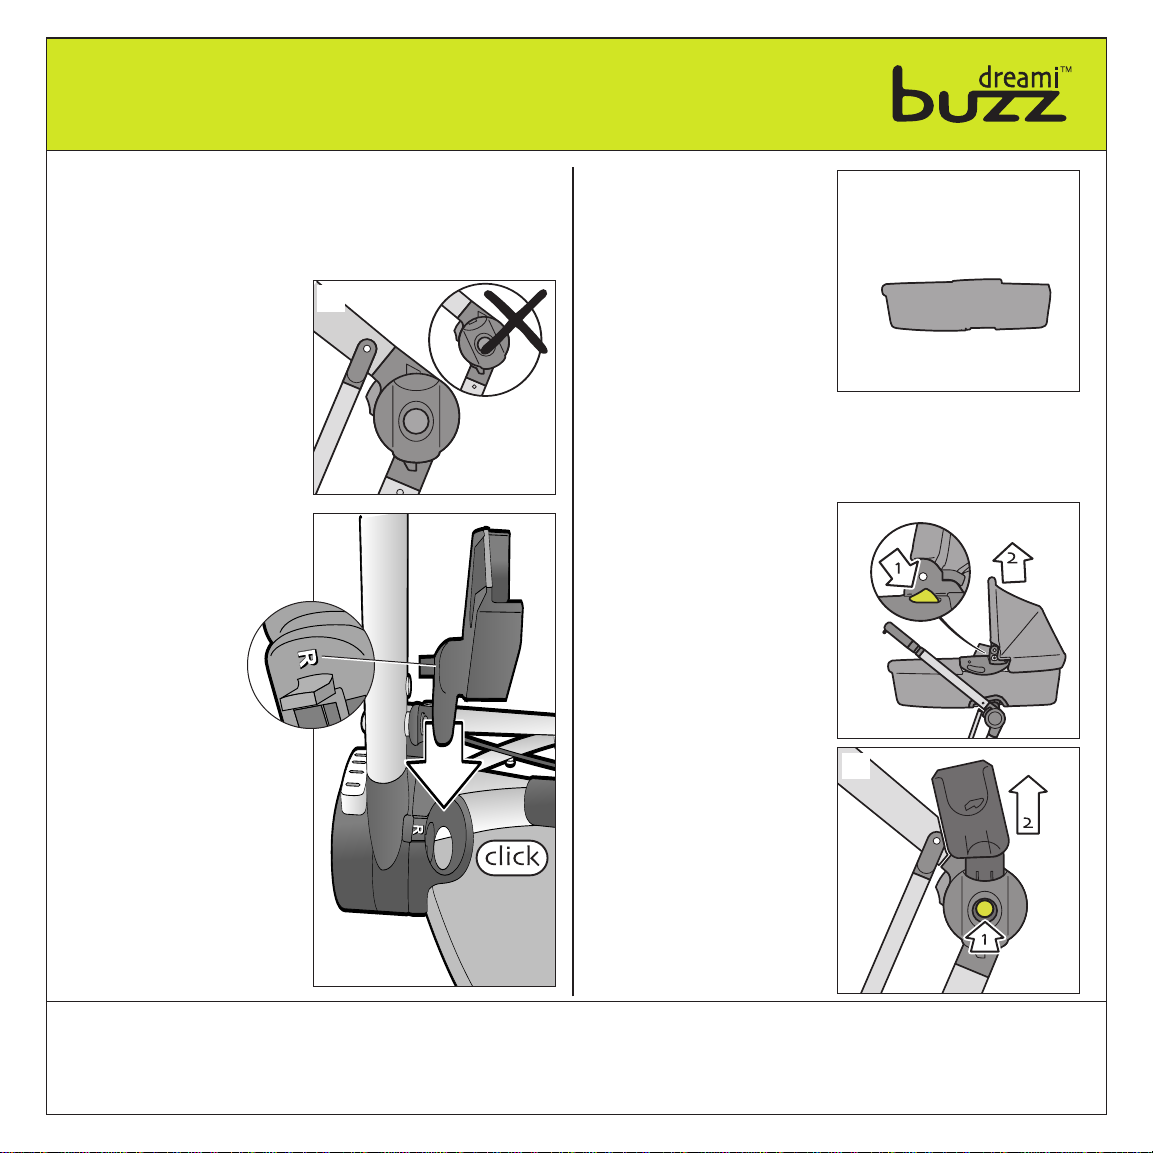
•SIEMPRE debe asegurarse de que la carriola esté
TOTALMENTE ABIERTA Y ASEGURADA antes de usarla.

Advertencias
Lista de piezas/Características A
2
•Guarde estas instrucciones para su uso
futuro.
•Despliegue e identifique todas las piezas.
•No devuelva esteproducto al lugar donde
lo adquirió. Si faltan piezas, llame al
Departamento de Relaciones con el
Consumidor,(800) 951-4113, o visitenue-
stro sitio web www.quinny.com.
•Tenga a mano el número de modelo y el
código de fecha (fecha de fabricación),
que se encuentran en la parte posterior del
colada y etiqueta del cuidado.
a Capota
b Ventana
c Revestimiento
d Botones de liberación (para retirarlo
de la carriola)
e Botones de control para la capota
f Cubierta
g Manijas laterales
h Abertura para adaptador
i Sistema de retención
j Colchón
k Manija de traslado
l Mosquitero y protector para lluvia
m Adaptadores
n Manta
NOTA: El Dreami™ puede usarse con fines múltiples.
En esta guía de usuario se utilizan los siguientes tres términos:
Moisés –El Dreami™, cuando se usa para que el niño duerma en él.
Portabebé –El Dreami™, cuando se usa para llevar al niño.
Carriola –El Dreami™, cuando se usa en la carriola Buzz™.
•SIEMPRE aplique los frenos cuando detenga la carriola.
•SIEMPRE quite y elimine correctamente las cubiertas
protectoras y las bolsas de polietileno antes de armar
la carriola.
•NUNCA use la carriola en escaleras ordinarias o
mecánicas.
•NUNCA permita que los niños jueguen con la carriola
ose cuelguen de la misma.
•NUNCA permita que los niños se suban a la carriola.
Esta podría volcarse y el niño se lesionaría.
•NUNCA coloque ni cuelgue paquetes, bolsas o acce-
sorios en el manubrio o en la capota. La carriola
podría volcarse o la capota podría hundirse.
•NUNCA debe llevar más de UN niño en esta carriola.

Para usar como
portabebé
C
3
Para usar el sistema
de retención:
1
Siente a su niño en el
Dreami
TM
,con la correa de
la entrepierna entre las
piernas. Enganche ambas
hebillas (Figura1).
Apriete las correas
ceñidamente al niño
(Figura 1a).
Para apretar las correas,
tire del lazo 4. Hágalo pasar
por el lazo 3. Tire del
extremo de la correa 1.
Para aflojar las correas, tire
del lazo 4. Tire del lazo 2.
Tire de la hebilla hacia fuera
mientras sostiene el extremo
de la correa (Figura1b).
Si las correas se salen de la
hebilla, vuelva a pasarlas tal
como se muestra(Figura
1b).
ADVERTENCIA
•
NUNCA DEJE AL NIÑO SIN ATENCIÓN. SIEMPRE
debe mantener al niño a la vista cuando esté en la
carriola.
•EVITE UNA LESIÓN GRAVE por caída o resbalamiento.
Siempre use el cinturón de seguridad. Revise con fre-
cuencia para asegurarse que esté asegurado. Los cin-
turones deben pasarse exactamente como se muestra
(Figura 1b).
•El no seguir estas instrucciones podría resultar en
lesiones graves o la muerte del niño.
1
1a
1b
Para llevar:
2Tire de la manija de
traslado hacia arriba hasta
oír un “clic” en ambos
lados (Figura 2).
Asegúrese de que ambos
lados de la manija encajen
en posición.
Para plegar la capota y la
manija de traslado:
3Presione uno de los
botones de control
(a ambos lados del
portabebé) para soltar la
traba (Figura 3, flecha 1).
Presione el botón del otro
lado mientras empuja la
manija hacia abajo
(Figura 3, flecha 2).
2
2a
3
El
Dreami
TM
puede
trasladarse utilizando la
manija de traslado (la
abertura ubicada en la
parte superior de la
capota).(Figura 2a).
clic
clic

Para usar como carriola
4
Para instalar el
portabebé en la
carriola:
1Ajuste los puntos de
conexión utilizando el
botón del centro.
Asegúrese de que los
puntos de conexión
estén en posición verti-
cal (Figura 1).
2Los adaptadores y los
puntos de conexión cor-
respondientes están
marcados con una
“L” (lado izquierdo)
yuna “R” (lado
derecho). Inserte
el adaptador mar-
cado con una “R” en
el punto de conexión
marcado con una “R”
hasta oír un “clic”.
Haga lo mismo con el
que está marcado con
una “L” (Figura 2).
Do the same for those
marked “L”. Tire de
ellos para comprobar
que estén firmemente
ajustados.
Para quitar el portabebé
de la carriola:
4Presione ambos botones
de liberación dentro de la
capota (1) mientras tira
del portabebé hacia arri-
ba (2) (Figura 4).
5Paraquitar los adapta-
dores, presione el botón
(1) en la parteinterna y
tire del adaptador hacia
fuera (2) (Figura 5).
3Coloque el portabebé con
la parte de los pies hacia el
manubrio, como se indica
(Figura 3). Coloque el
portabebé en los adapta-
dores hasta oír un “clic”.
Tire hacia arriba de la
manija del portabebé
para comprobar que
esté bien encajada. El
portabebé no debe poder
liberarse sin presionar
los botones de liberación.
Para usar el Dreami™ en la carriola Buzz™:
NOTA: Para retirar el asiento del armazón de la carriola, lea
la guía del usuario de la carriola Buzz™.
1
2
3
4
5
clic
clic

Para usar el mosquitero
y protector para lluvia
5
Para usar el mosquitero:
Para utilizar el mosquitero,
la capotadebe estar trabada
en posición vertical. Cierre
la cremallera que une al
mosquitero al borde interno
de la capota (flecha 1).
Despliegue el mosquitero
hasta la parte de los pies
del portabebé (flecha 2).
Abroche los ganchos debajo
de las aletas de la capota
(flecha 3).
Para usar el protector
para lluvia:
Para utilizar el protector
para lluvia, la capota debe
estar trabada en posición
vertical. Despliegue el
protector para lluvia sobre
la capota hasta la parte de
los pies del portabebé.
ADVERTENCIA – PELIGRO
DE ASFIXIA
•Asegúrese de que el mosquitero no cubra la cara del niño.
•Asegúrese de que el protector para lluvia no cubra la cara del niño.

Cuidado y mantenimiento
Garantía P
Para retirar el colchón:
1Desabroche y tire del
sistema de retención
hacia abajo a través de
las tres ranuras del
colchón. Retire el
colchón.
Para retirar el
revestimiento:
2Retire el revestimiento de
la parte inferior de las
manijas y desengánchelo
(Figura 1).
3Tiredel revestimiento
desde los laterales y la
parte de los pies del
portabebé para soltar las
correas adhesivas
(Figura 2).
6
Cuidado y mantenimiento:
Garantía limitada de un año
Dorel Juvenile Group,Inc. garantiza al comprador original que este producto
(cochecito Buzz DreamiTM)estará librede defectos de material y mano de obra
cuando se utilice bajo condiciones normales durante un periodo de un (1) año
apartir de la fecha de compra. Si el producto tuviese defectos de material o
mano de obra, Dorel Juvenile Group, Inc. reparará o reemplazará el producto,
anuestraopción, sin cargo.El comprador será responsable de todos los costos
asociados con embalar y enviar el producto al Departamento de Relaciones con
el Consumidor de Dorel Juvenile Group a la dirección indicada en la primera
página y de todos los otros costos de envío o seguro asociados con la devolución.
Dorel Juvenile Group correrá con los gastos de enviar el producto reparado o
reemplazado al comprador.El producto se debe devolver en su embalaje
original acompañado de la constancia de compra, yasea un recibo de compra
uotra prueba que demuestre que el producto está dentro del periodo de
garantía. Esta garantía es nula si el propietario repara o modifica el producto o
si éstesufrió daño como resultado de uso incorrecto. Esta garantía excluye
cualquier responsabilidad que no sea la expresamenteindicada anteriormente,
incluyendo perosin limitarse a daños incidentales o consecuentes.
ALGUNOS ESTADOS NO PERMITEN LA EXCLUSIÓN O LIMITACIÓN DE
DAÑOS INCIDENTALES O CONSECUENTES, POR LO TANTO LA LIMITACIÓN
OEXCLUSIÓN ANTERIOR PODRÍA NO APLICARSE EN SU CASO.
ESTA GARANTÍA LE OTORGA DERECHOS LEGALES ESPECÍFICOS Y USTED
PODRÍA TENER TAMBIÉN OTROS DERECHOS QUE PUEDEN VARIAR DE UN
ESTADO A OTRO.
Cómo lavar la cubierta, el sistema de retención y la capota:
•No lubrique las piezas móviles del Dreami™.
•Límpielas usando un paño húmedo. No use agentes
limpiadores abrasivos.
Cómo lavar el colchón, el mosquitero y el revestimiento
desmontable:
•Lávelos a mano con agua fría. Utilice únicamentedetergente
suave. NO UTILICE BLANQUEADORES. Séquelos al aire
libre. No los planche.
Cómo lavar el protector para lluvia:
•Límpielo usando un paño humedecido en agua tibia.
4Tire del revestimiento
desde la parte exterior y
hágalo pasar por debajo
de la capota (Figura 3).
5Haga pasar el sistema
de retención a través de
las ranuras ubicadas en
la parte inferior del
revestimiento.
Para colocar el colchón
yel revestimiento:
Para colocar nuevamente
2
3
1
el revestimiento, siga las instrucciones mencionadas
anteriormente, pero en orden inverso. Asegúrese de que
todos los ganchos y las correas adhesivas estén firmemente
asegurados. NO utilice el portabebé sin el revestimiento, el
colchón y el sistema de retención.

©2007 Dorel Juvenile Group. All Rights Reserved.
www.quinny.com (800) 951-4113
Made in CHINA. Hecho en CHINA.
Styles and colors may vary. Los estilos y los colores pueden variar.
Distributed by (distribuido por) Dorel Juvenile Group, Inc., 2525 State St., Columbus, IN 47201-7494
Dorel Distribution Canada, 873 Hodge, St. Laurent, QC H4N 2B1
03/20/07 4358-4237
This manual suits for next models
1
Table of contents
Languages:
Other Quinny Baby Carrier manuals

Quinny
Quinny BUZZ User manual

Quinny
Quinny ZAPP User manual

Quinny
Quinny Zapp Lux User manual

Quinny
Quinny Buzz Dreami User manual

Quinny
Quinny SAFETY CARRYCOT Troubleshooting guide

Quinny
Quinny BUZZ User manual

Quinny
Quinny zapp xtra User manual

Quinny
Quinny TM 06620 Curbb User manual

Quinny
Quinny Zapp Xtra2 User manual

Quinny
Quinny Speedi SX Dreami Troubleshooting guide