manuals.online logo
Brands
  1. Home
  2. •
  3. Brands
  4. •
  5. Bald Eagle
  6. •
  7. Industrial Equipment
  8. •
  9. Bald Eagle BE1127 User manual

Bald Eagle BE1127 User manual

COPYRIGHT © DECEMBER, 2013 BY BULLETS.COM, REVISED JULY, 2015 (MN)
WARNING: NO PORTION OF THIS MANUAL MAY BE REPRODUCED IN ANY SHAPE OR FORM WITHOUT
THE WRITTEN APPROVAL OF BULLETS.COM
PHONE: (800) 235-0272 • EMAIL: [email protected] • #DMMN16220 • PRINTED IN TAIWAN • V2.07.15
BE1127
Barrel Vise
Instructions
Tech Support: (360) 676-3299 • Email: service@bullets.com • Web: www.bullets.com
Introduction
The BE1127 Bald Eagle Barrel Vise is designed
to mount to a solid base and provide the neces-
sary clamping force to secure a firearm barrel for
maintenance or removal.
This vise is made of high-strength T-6061 alumi-
num alloy to firmly grip the barrel without damag-
ing it. The simple two-nut, spring-loaded design
allows the user to hold the firearm with one hand
while quickly securing/releasing it in the vise with
the other.
Always make sure firearm is not loaded
prior to servicing, assembling, or disas-
sembling. Follow firearm manufacturer's
guidelines or consult instruction of an ex-
pert for assembly/disassembly procedures.
Failure to do so could result in misfire and
serious injury or death.
-2- BE1127 Barrel Vise
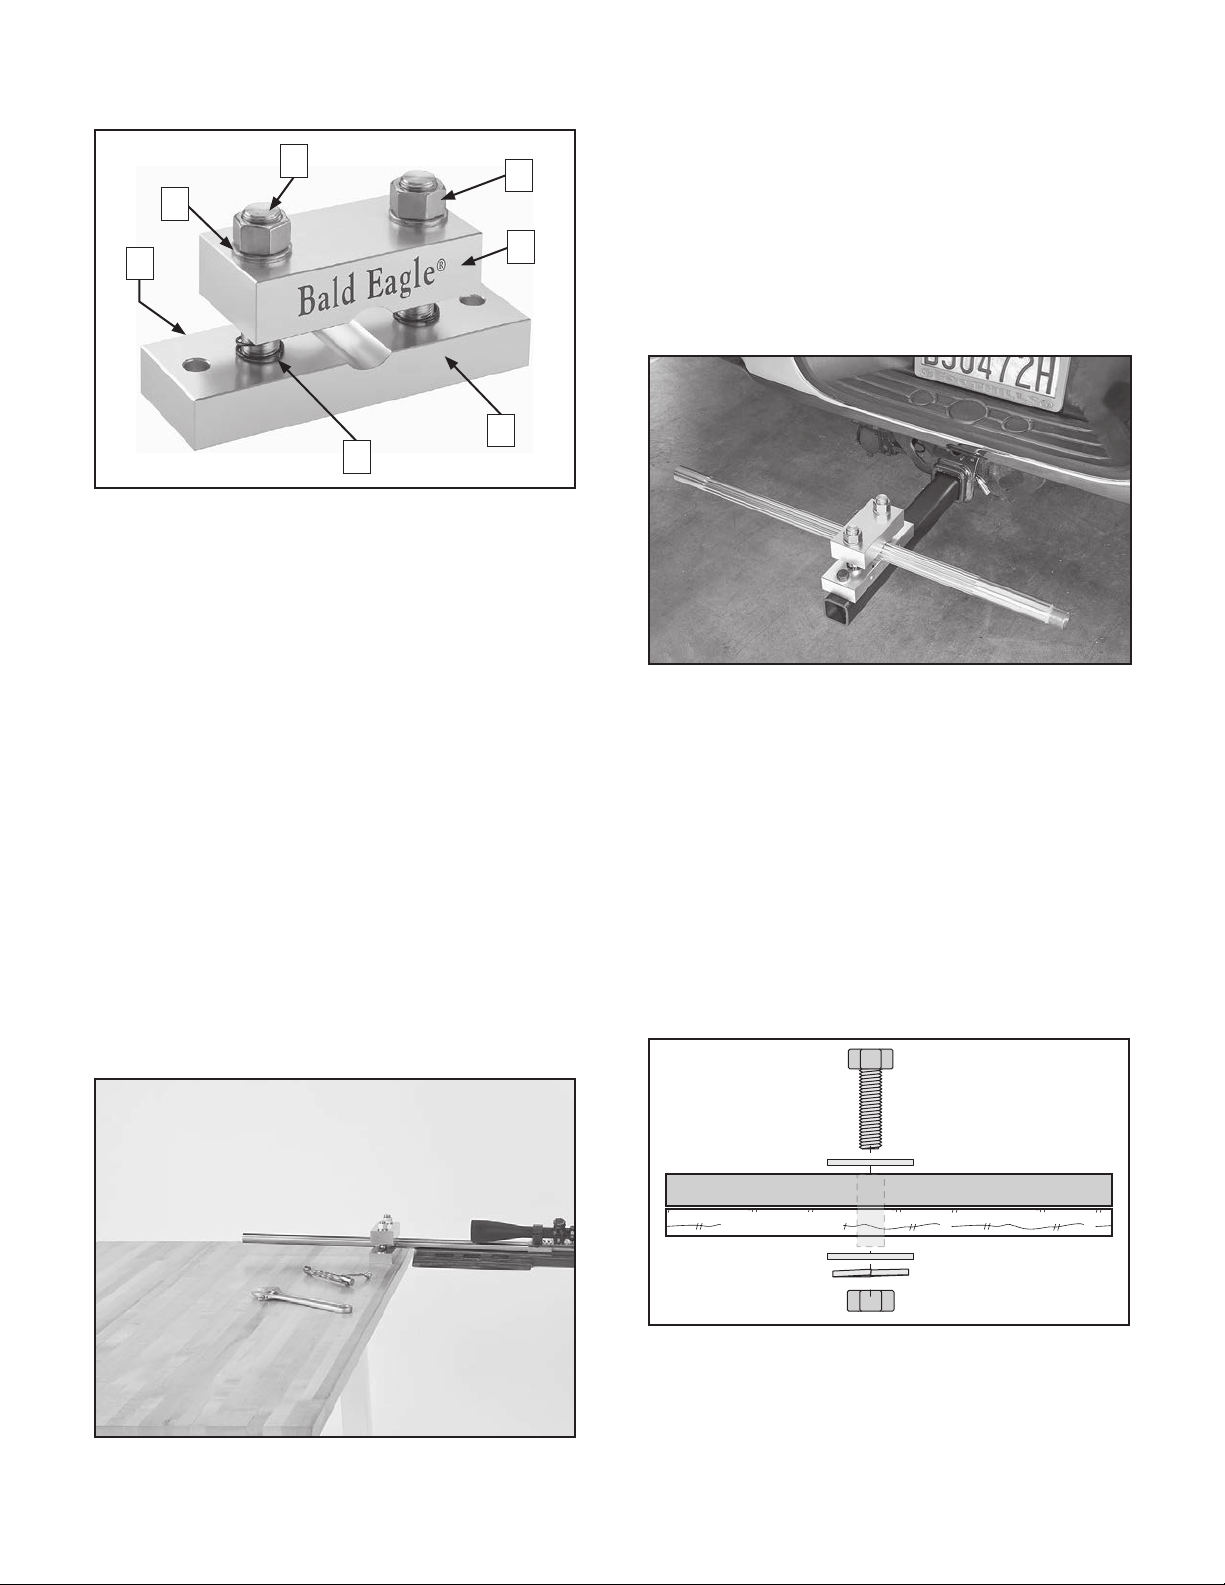
Mount the vise flush with or slightly overhang-
ing the surface edge, as shown in Figures 2–3.
Ensure there is enough clearance to slide the bar-
rel in as close to the action as possible and still do
any service work on the barrel. Additionally, main-
tain enough clearance to rotate an action wrench
and stock when assembling/disassembling the
barrel from the firearm. Mount the vise using one
of the two fastener configurations below.
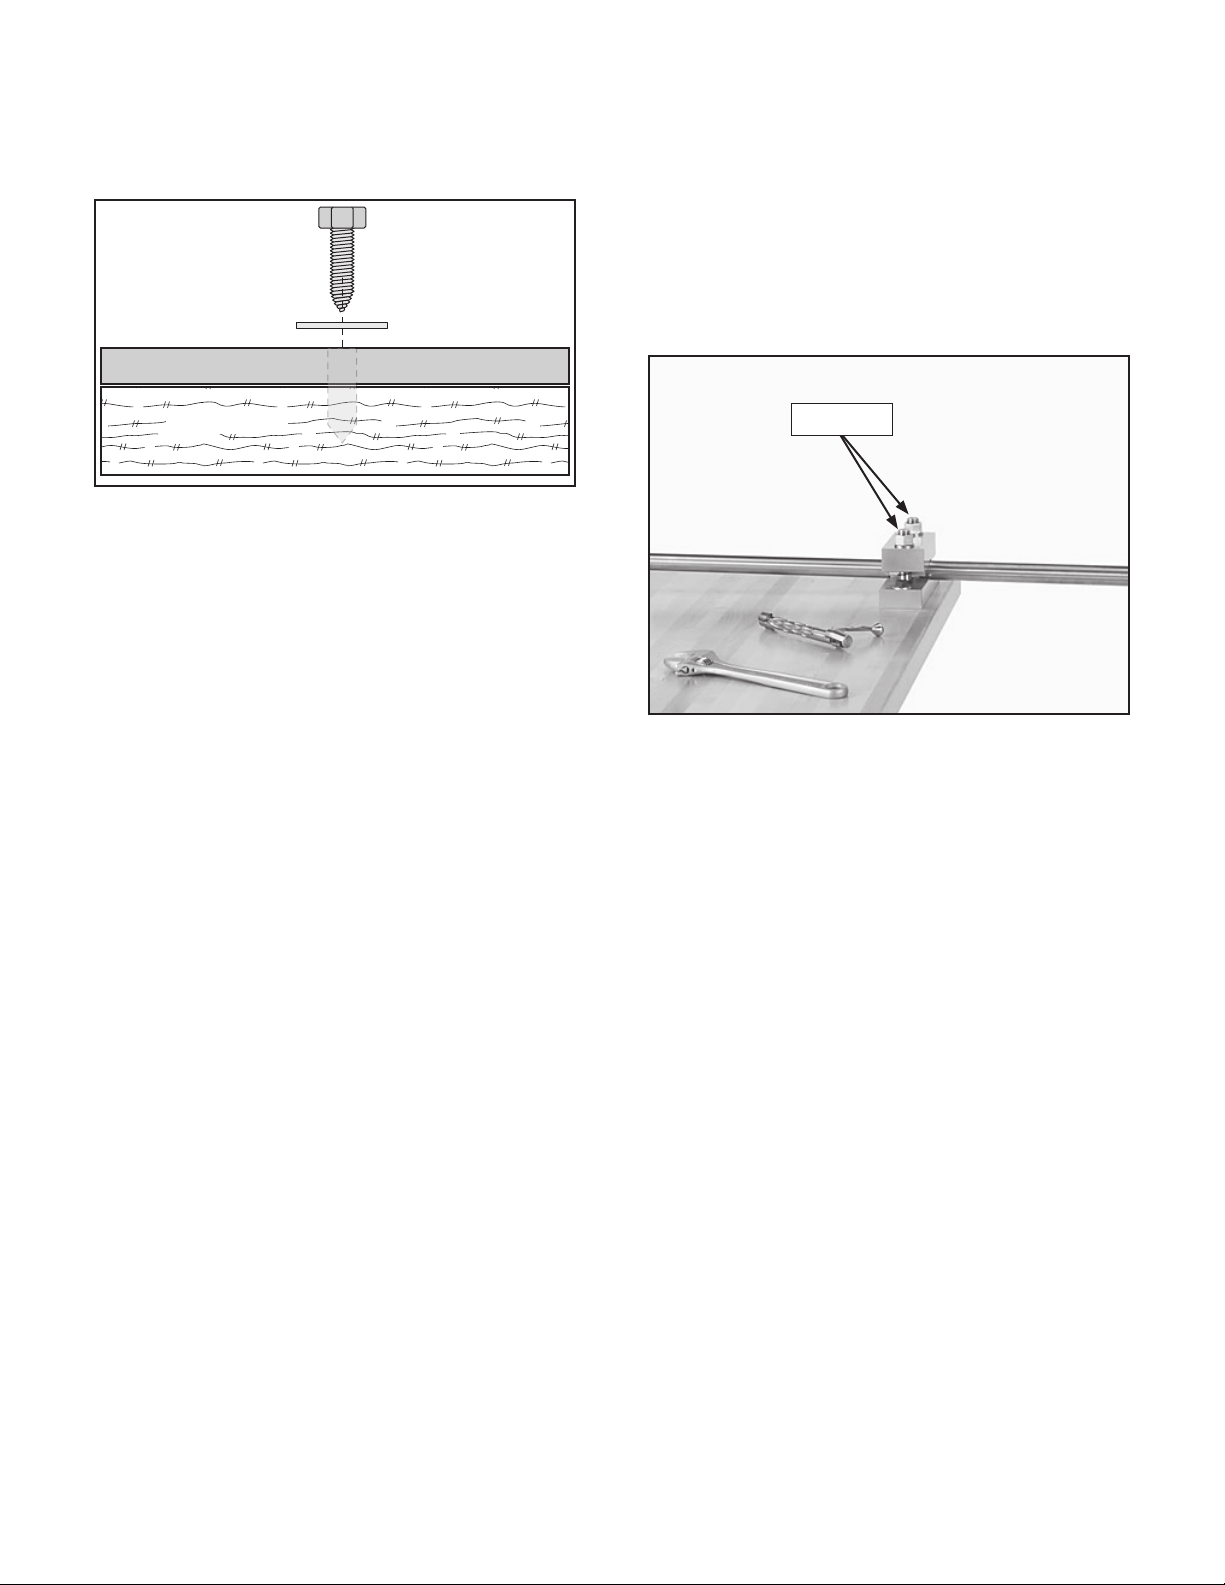
Figure 3. Mounting on a trailer hitch.
The base of this vise has mounting holes that
allow it to be fastened to a workbench or other
mounting surface. This prevents the vise from
moving during barrel removal and causing acci-
dental injury or damage to the firearm.
Vise Base
Workbench
Hex
Bolt
Flat Washer
Flat Washer
Lock Washer
Hex Nut
Figure 4. Example of a "Through Mount."
The strongest mounting option is a "Through
Mount" (see Figure 4) where holes are drilled all
the way through the workbench—and 7⁄16" hex
bolts, washers, and hex nuts are used to secure
the vise in place.
Mounting Vise
Select a mounting location that will not slide or tip,
such as a workbench or a trailer hitch (for mobile
applications). When using a smaller or lightweight
workbench, mount the vise considering the thread
direction of the barrel. Greater force is required
to remove barrels. For instance if the barrel is
right-threaded, mount the barrel on the right hand
side to prevent the workbench from tipping when
removing the barrel (see Figure 2).
Figure 2. Mounting on a workbench.
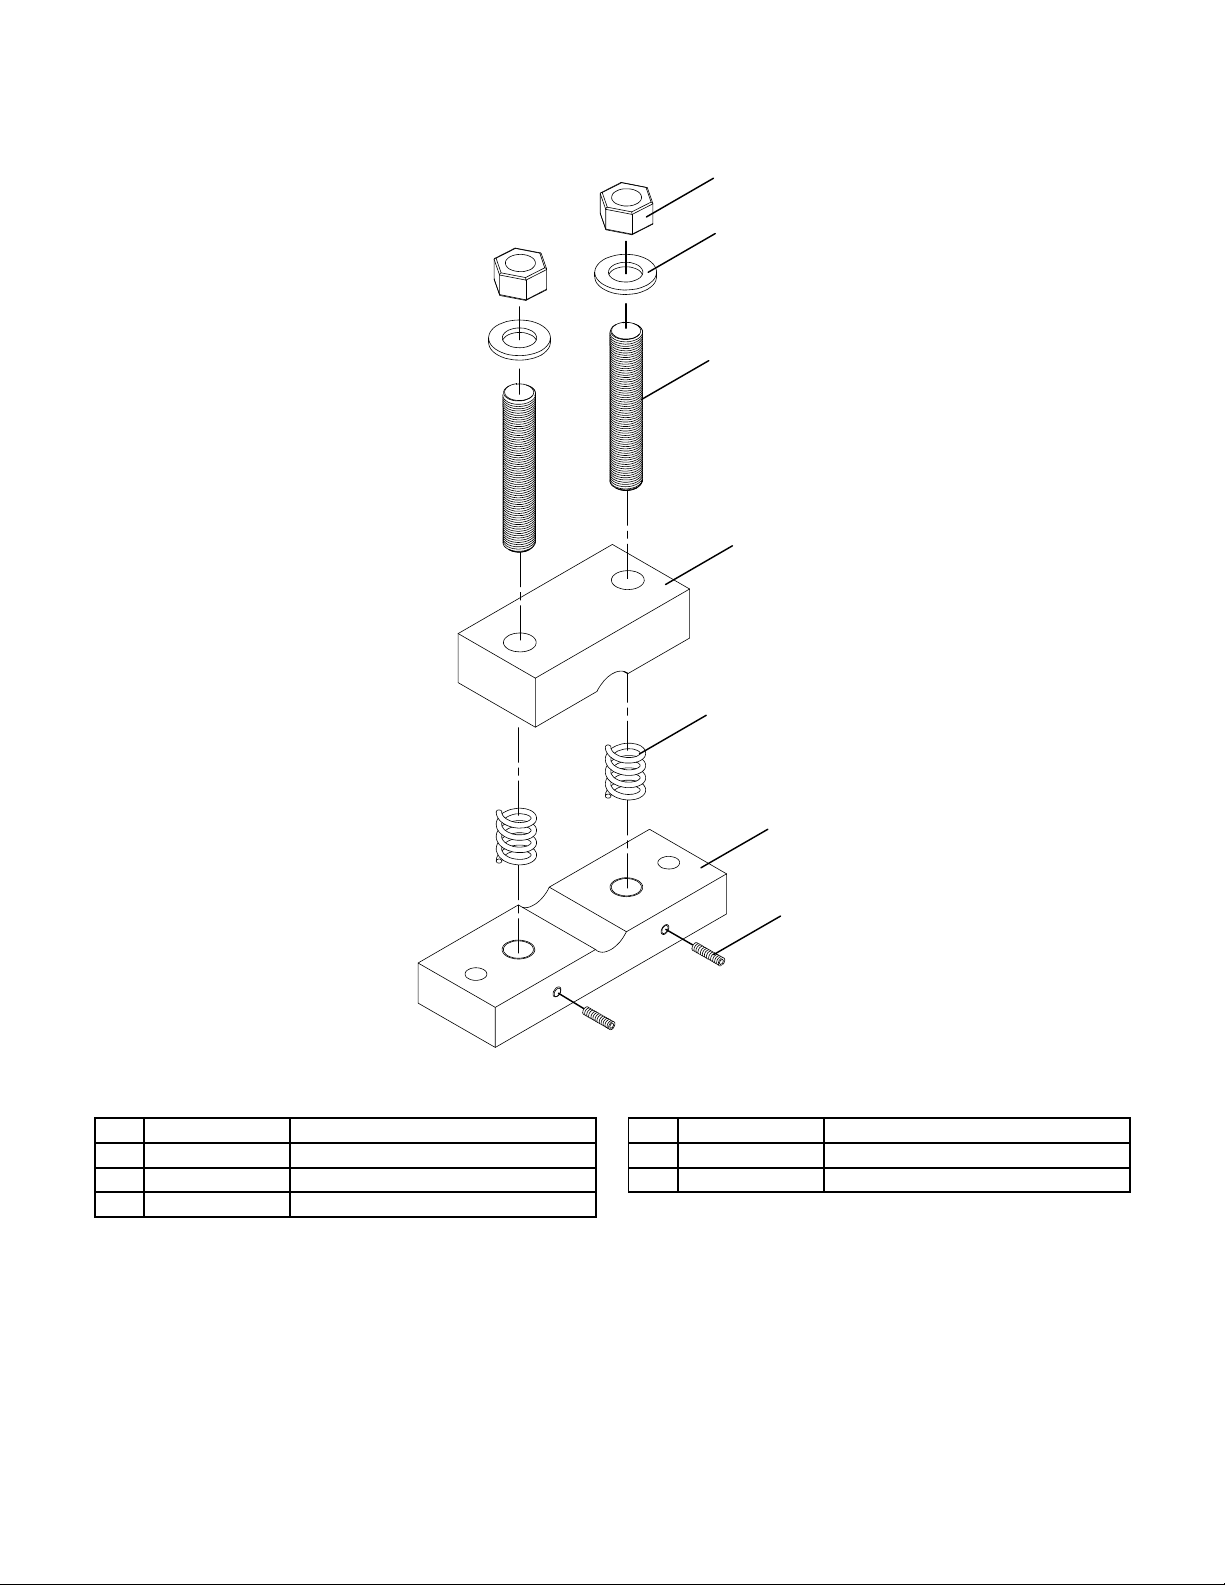
Description Qty
A. Set Screws 1⁄4-20 x 7⁄8................................ 2
B. Flat Washers 3⁄4.......................................... 2
C. Studs
3⁄4-16 x 4 ........................................... 2
D. Hex Nuts 3⁄4................................................ 2
E. Vise Body (Top) ......................................... 1
F. Vise Body (Bottom) .................................... 1
G. Compression Springs................................. 2
Figure 1. BE1127 Barrel Vise components.
B
C
F
A
G
D
E
Inventory
-3-
BE1127 Barrel Vise
Vise Base
Workbench
Lag Screw
Flat Washer
Figure 5. Example of a "Direct Mount."
Another option is a "Direct Mount" (see Figure
5) where the vise is secured directly to the work-
bench with 7⁄16" lag screws and washers.
Operation
This barrel vise is designed to secure 7⁄8"–1-1⁄2"
firearm barrels while performing various main-
tenance tasks, such as cleaning or exchanging
barrels.
If the surface area of the firearm barrel is uneven
and prevents proper gripping due to tapering or
obtrusions such as sights or ribs, molding clay
can be used to fill voids and create a constant
clamping surface area.
Consult the manufacturer's instructions for spe-
cific directions on assembling and disassembling
barrels with bodies.
To secure barrel with vise:
1. Follow instructions on previous page to mount
vise.
2. Holding firearm firmly, slide barrel into barrel
vise as close to action as possible.
Note: Placing action as close to vise as pos-
sible decreases amount of stress placed on
barrel and barrel bushing. This lessens the
chance of barrel springing if removing barrel.
4. Evenly tighten each hex nut with a 1" socket,
maintaining parallelism between top and bot-
tom body of vise until barrel is firmly secure.
Avoid overtightening! Overtightening may
crush thinner barrels.
5. To remove barrel from vise, hold onto firearm/
barrel and loosen the two hex nuts until barrel
can be removed.
Figure 6. Securing barrel in vise.
Hex Nuts
3. Tighten the two hex nuts evenly, keeping top
body of vise parallel with bottom body of vise
until clamped finger tight (see Figure 6).
Note: If barrel has a protective finish, place a
thin piece of leather between vise and barrel
to protect finish from marking. Use leather or
similar gripping fabric to prevent barrel from
slipping in vise if disassembling firearm.
-4- BE1127 Barrel Vise
BE1127 Parts Breakdown
1
2
3
4
5
6
7
REF PART # DESCRIPTION REF PART # DESCRIPTION
1 PBE1127001 HEX NUT 3/4-16 5 PBE1127005 COMPRESSION SPRING
2 PBE1127002 FLAT WASHER 3/4 6 PBE1127006 VISE BODY, LOWER HALF
3 PBE1127003 STUD-FT 3/4-16 X 4 7 PBE1127007 SET SCREW 1/4-20 x 7/8
4 PBE1127004 VISE BODY, UPPER HALF

Popular Industrial Equipment manuals by other brands

ABB HT846518 Operation manual

ABB

ABB HT846518 Operation manual

SCHUNK ZENTRICO THL plus Assembly and operating manual

SCHUNK

SCHUNK ZENTRICO THL plus Assembly and operating manual

ABB HT565485 Operation manual

ABB

ABB HT565485 Operation manual

Intimus Auditor Pro Administrator's manual

Intimus

Intimus Auditor Pro Administrator's manual

Rubi T-7500-M instruction manual

Rubi

Rubi T-7500-M instruction manual

Stepp SPHD series Operation, maintenance and parts manual

Stepp

Stepp SPHD series Operation, maintenance and parts manual

Ferro IC8TH Installation and operation manual

Ferro

Ferro IC8TH Installation and operation manual

Rockwell Automation Reliance Electric SR3000 instruction manual

Rockwell Automation

Rockwell Automation Reliance Electric SR3000 instruction manual

KOREX AIR-SEP AS-T 20 Series user manual

KOREX

KOREX AIR-SEP AS-T 20 Series user manual

KTC GOD80E instruction manual

KTC

KTC GOD80E instruction manual

Rottler EM69P CNC 5 AXIS installation manual

Rottler

Rottler EM69P CNC 5 AXIS installation manual

THORLABS LNR50 Series manual

THORLABS

THORLABS LNR50 Series manual

GE GEH-2906B instructions

GE

GE GEH-2906B instructions

Emerson Rosemount 2410 instructions

Emerson

Emerson Rosemount 2410 instructions

ABB HT569949 Operation manual

ABB

ABB HT569949 Operation manual

Temspec VGB Series Operation & maintenance manual

Temspec

Temspec VGB Series Operation & maintenance manual

ABB HT845551 Operation manual

ABB

ABB HT845551 Operation manual

MSD MESO SECTOR S 600 user manual

MSD

MSD MESO SECTOR S 600 user manual

manuals.online logo
manuals.online logoBrands
  • About & Mission
  • Contact us
  • Privacy Policy
  • Terms and Conditions

Copyright 2025 Manuals.Online. All Rights Reserved.