BALMUDA GreenFan Cirq EGF-3300 Series User manual

Instruction Manual
Air Circulator (Home / Office Use)
[Model: EGF-3300 Series]
Safety Precautions .......................................... 1
Please make sure to observe the following ...... 2
Warning / Caution ......................................... 3, 4
Package Contents ............................................ 5
Operating Instructions .................................. 5, 6
BALMUDA Multi Plug AC Adapter Features.....6
Connecting the AC Adapter .......................... 7, 8
Remote Control Operation ................................ 9
Using the Remote Control .......................... 9, 10
How to Use this Product Effectively ......... 11, 12
Maintenance ............................................. 13, 14
Cautions when attaching the Fan Guard ........ 15
Specifications ................................................. 16
Trouble Shooting ............................................ 17
Warranty and After Service / Handling of
Personal Information / Customer Service ....... 18
Warranty.......................................................... 19
Contents
English
Important
Thank you for purchasing the BALMUDA GreenFan Cirq.
Please be sure to read this manual,
especially “Safety Precautions” on page 1 before using the product.
Also be sure to take note of content marked with a on individual pages.
This manual also includes the warranty.
Fill in the spaces for information such as date
and place of purchase, and keep this manual for future reference.

Safety Precautions
Warning
Caution
Indicates actions that must not be done.
Indicates actions that must be done.
Please read the safety precautions and use the product correctly.
The cautions herein are intended to help you use the product safely and avoid
injury and property damage.
Classifications for hazards or damage that could result from improper use.
Indicates possibility of death or serious injury.
Indicates possibility of minor injury or damage
to buildings, property, etc.
Symbols describing precautions that must be followed.
* This product is intended for household and office use only. Please do not use for any other
purposes.
●In case of emergencies such as quakes or fire, immediately unplug and stop use of the product.
●This product is for use in Germany only.
1
English

Please make sure to observe the following:
English
2
Use the included dedicated
AC adapter for power.
Stop use immediately if malfunctions
such as:abnormal noise/odor,
high temperature or irregular fan
circulation occur.
Do not insert fingers or foreign objects
inside the Guard or moving parts.
Do not use near curtains or other
obstacles which may block the airflow.
Accident or injury may result
if items get caught or
block the flow of air.
Do not use on an unstable surface or
near obstacles.
The product may fall and cause injuries.
Please make sure the product is secure.
Always unplug the product before
maintenance.

Warning
• Do not use for purposes other than those written on this
instruction manual.
• Do not allow children or persons unable to understand the
instructions on the manual operate the product.
• To avoid electrocution risks, do not soak the product, cord
or plug in water or any other liquid.
• Do not disassemble except for maintenance purposes.
Fire, electrocution or serious injury may result. For repairs,
please consult your dealer or BALMUDA Europe Service
Center (P.18).
• Insert the power plug completely.
• Do not use if there is damage to the cord or power plug,
or the plug connection is loose.
• Unplug when not in use.
• Do not damage, modify, bend, pull, twist, or bundle the
cord. Do not place heavy things on top, or pinch the cord.
• Keep the cord away from sharp edges of tables,
counters and hot surfaces.
• Use general household power outlet for the AC adapter.
• To unplug, always hold the AC adapter to remove the plug,
and do not pull the cord.
Remove any dust from the plug on a regular basis.
• Do not use cord or power plug which have been damaged in
any way.
• To avoid fire or electrocution risks, do not use together with
a solid state fan speed control device.
• Do not operate without attaching fan or Guard.
Injury may result.
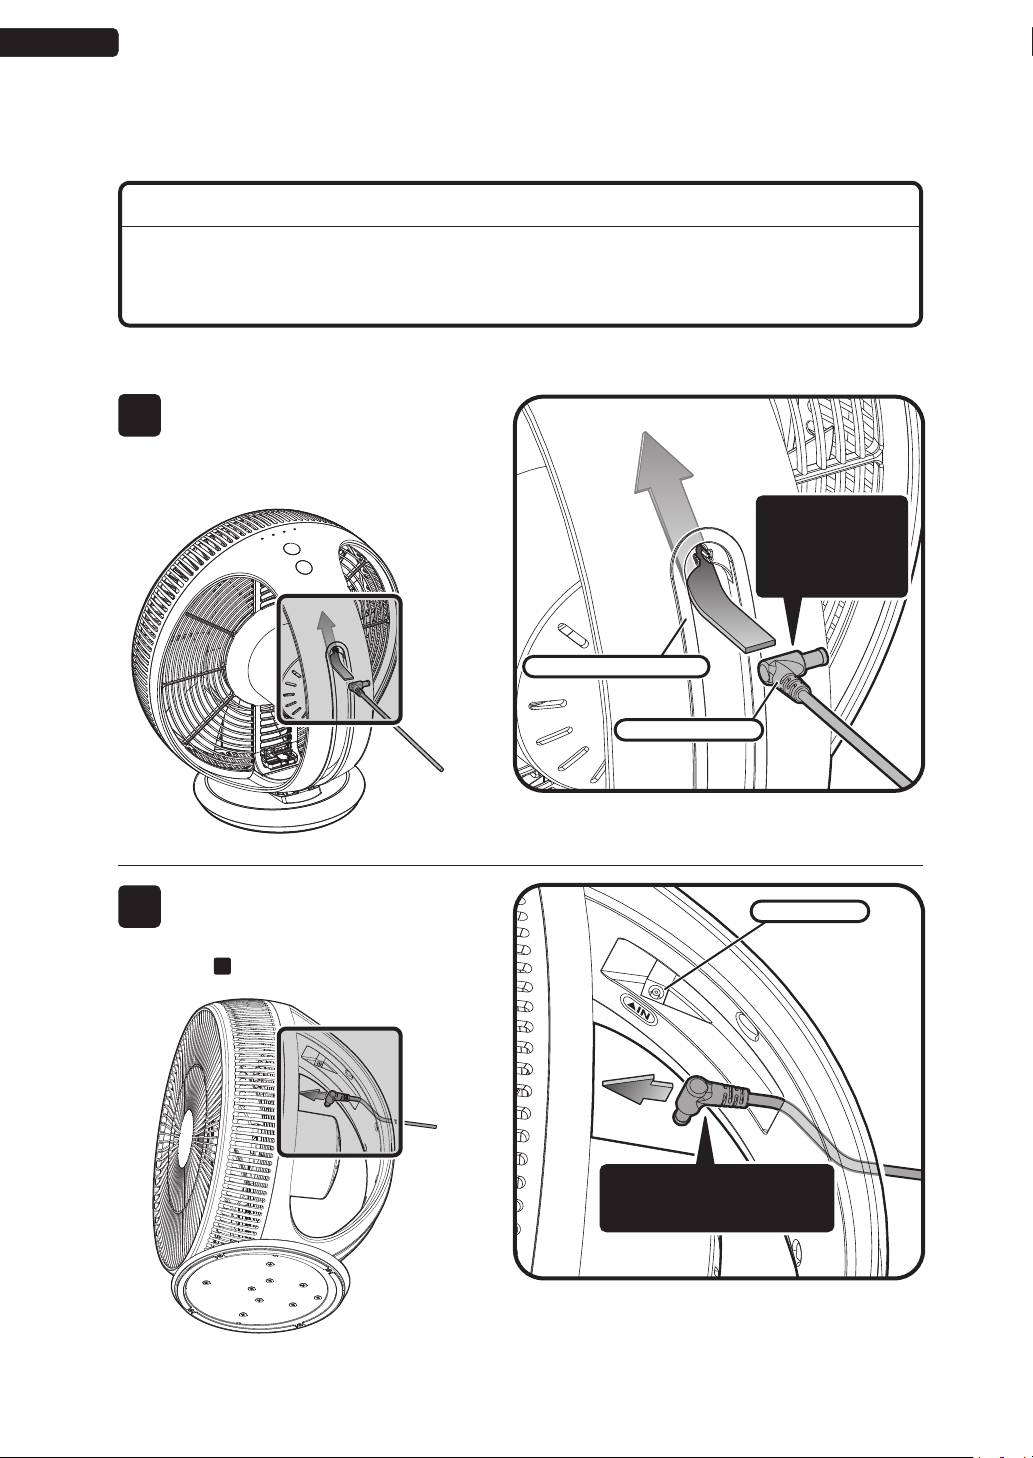
• Do not connect the power plug or touch the connector
terminal on the joint before assembly/disassembly of the
product.
• Do not touch moving parts. Do not use without attaching
the Guard, or if the fan is damaged.
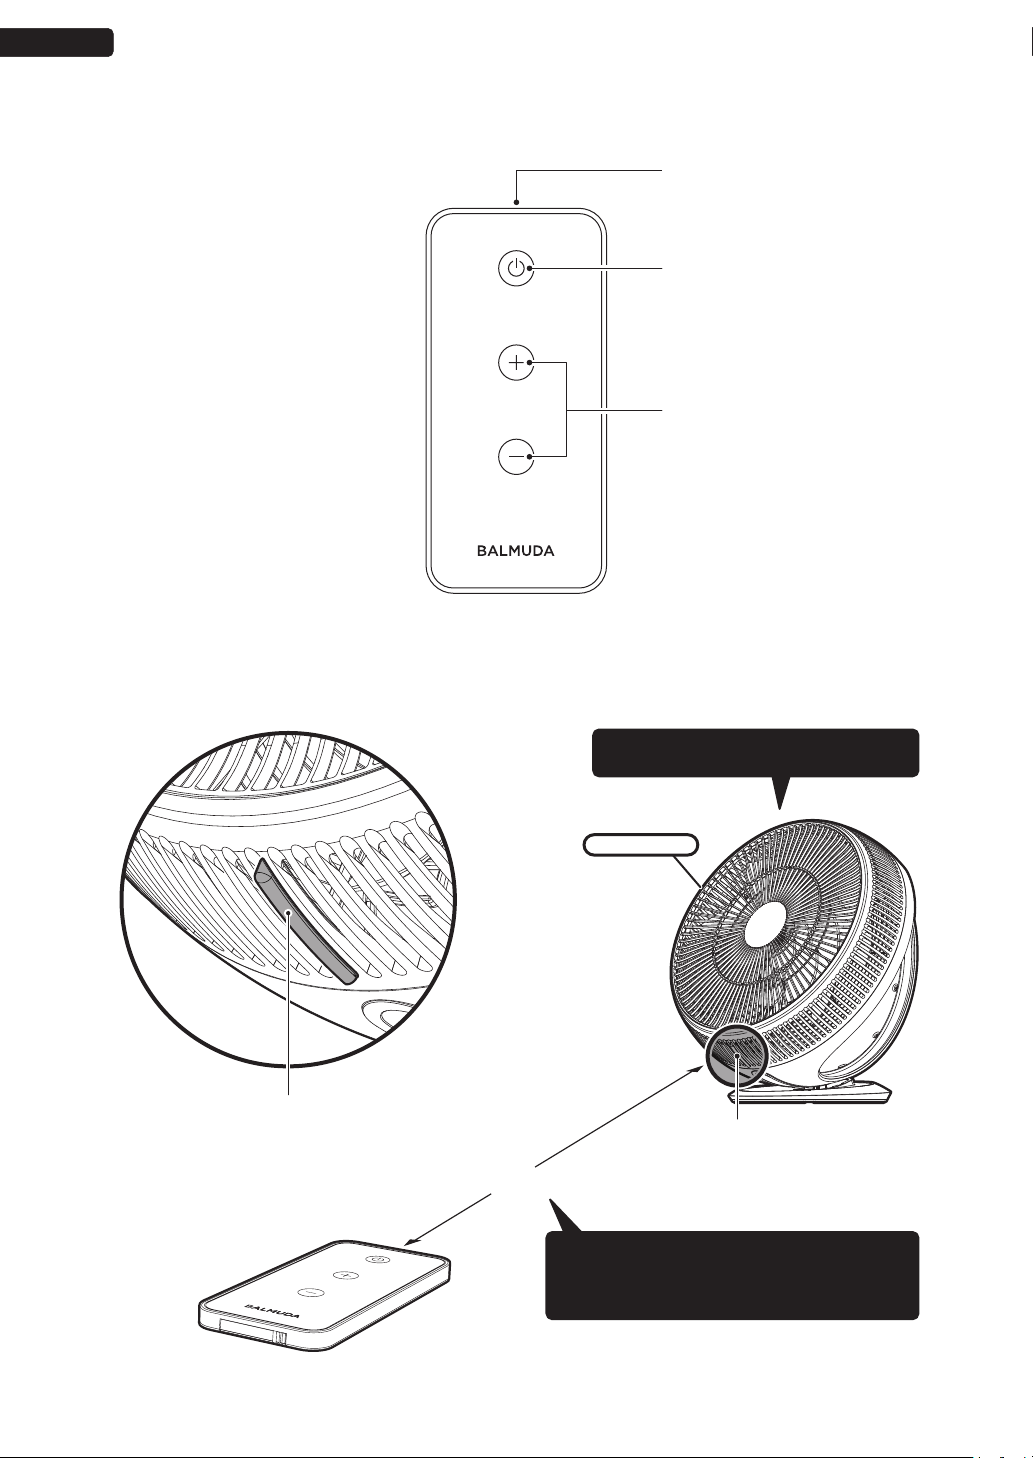
• Keep the remote control’s batteries out of reach of children.
• To prevent battery corrosion, remove the batteries when the
remote is not in use for extended periods.
• Dispose of used batteries according to your local rules.
• Do not disassemble, recharge, burn or heat the batteries.
• When exchanging batteries, insert the correct type with the
correct polarity, or it may cause fire or explode.
• Keep button battery of the remote control out of the reach
of young children. Failure to do so may result in accidental
ingestion. If accidentally ingested, seek medical attention
immediately.
English
3

Caution
• To prevent liquid leakage, remove the battery when the
remote control is not in use for extended periods of time.
Failure to do so may result in injury or staining by liquid
leakage.
• Do not use the product in the following places since it may
cause electrocution or fire.
a. Near gas stoves or near open flames
b. In/around flammable gases
c. In/around water or rain
• Do not insert fingers or foreign objects inside the Guard or
moving parts.
• Do not expose your body to the wind for an extended period
of time.
• Make sure the BALMUDA Multi Plug AC Adapter is firmly
secured when in use.
• Do not plug/unplug with a wet hand.
• Do not drop, or give strong impact to the product.
• Keep objects susceptible to magnetization away from the
product.
A powerful magnet is used on the front Guard, which may
damage objects susceptible to magnets.
• Do not transport the assembled product. Place the product
in a box before transportation.
Otherwise, the product or parts may get damaged.
• Do not use sprays or liquids on the product.
Inflammable sprays may cause fire or explosion. Other sprays
may damage the plastic or paint.
• Do not let children use by themselves. Keep out of reach of
small children.
Children should use only under adult supervision.
• Store in a dry place out of reach of children.
• Do not cover the back of the fan with cloths or curtains.
• Keep long hair and loose clothing away from the fan and
moving parts.
• For indoor use only.
• This appliance can be used by children aged from 8 years
and above and persons with reduced physical, sensory or
mental capabilities or lack of experience and knowledge if
they have been given supervision or instruction concerning
use of the appliance in a safe way and understand the
hazards involved.
Children shall not play with the appliance. Cleaning and user
maintenance shall not be made by children without
supervision.
English
4

Package Contents
■Remote Control
■AC Adapter
* See P.7 & 8 for how to connect
to a power source.
* See P.9 & 10 for how to use the remote control.
■Body
■Instruction Manual
(This manual)
/ Warranty
English
5
Button battery inside
* Test battery.
Operating Instructions
Air Volume Button
Adjusts fan speed
* Each time the button is pressed, the volume increases. When “Max” is
reached, pressing the button again returns the air volume to “Low.”
Low
Medium
High
Max
Power Button
Turns power ON/OFF
Air Volume Display
Indicates the air volume
setting in green lights.
It is possible to select from
among 4 levels of volume.
Example of Air Volume Display
(When seen from the direction of
the above diagram)

1
1
2
2
6
■Adjusting the angle of the fan
The fan can be adjusted to any angle from vertical to horizontal.
* Using excessive force or causing a strong impact to the moving parts may damage the product.
The fan can be adjusted to
the angle of your choice
Vertical Horizontal
…………
English
Push the button on the side of the AC adapter
in direction ❶
Fix the Plug Unit to the connector on the side
of the AC adapter as shown.
Slide the Plug Unit in direction ❷, then pull
off to detach.
Slide the Plug Unit in direction ❷until it clicks
in place.
■Detaching the Plug Unit
■Attaching the Plug Unit
* Don’t touch the inner metal part.
BALMUDA Multi Plug AC Adapter Features
The BALMUDA Multi Plug AC Adapter can be plugged in four ways, letting you
choose the best fit for your outlet.
Click!Click!
Plug Unit
❶
❶
❷
❷

Before using the product, make sure to follow the steps set out below.
If the product's connector and AC adapter plug are not correctly connected, the product may
not operate correctly.
Connecting the AC Adapter
Make sure to check this before using the product.
▲Insert from the back of the Body deep into the
uppermost part of the angle adjustment rail.
▲Pull on the cord inside until you have a length of about
10
cm of the cord.
Angle Adjustment Rail
Adjust which side
of the cord is up,
so that it fits into
the width of the
groove.
Continue pulling until you
have a length of about 10
cm
of the cord.
1
2Connector
AC Adapter Plug
Insert the AC Adapter Plug into the
uppermost portion of the angle
adjustment rail on the back of the Body.
Pull on the cord from the adapter
plug, which was passed through the
back of the Body into the inside at
step , until it’s length is 10
cm.
1
7
English

8
▲Pull on the cord on the outside of the Body to remove
the slack inside.
* The view from
directly behind
▲Insert the AC adapter plug firmly into the
connector.
▲Set it into the groove on the top of the angle
adjustment rail and fix it firmly in place.
Set it firmly inside
the uppermost part
of the hook.
If the cord is not fixed firmly in place, it could be
severed when the angle of the fan changes!
3
4
Hook
Carry out the following steps in this order:
[Connect the AC adapter plug] →
[Remove the slack from the cord].
Fix the remaining cord outside of the
Body to the hook positioned at the
highest point of the adjustment rail.
Insert the AC
adapter plug
firmly from
the side.
In trying to remove the
slack, do not pull too hard.
English

Power Button
Turns power ON/OFF
Remote Control Operation
Using the Remote Control
Signal Emitter
Air Volume Button
Adjusts fan speed (4 levels)
“+” increases volume and
“-” decreases volume.
Pressing “+” when the volume is “Max”,
or “-” when the volume is “Low” causes
the emission of a “beep beep beep”
confirmation tone, to indicate that the
volume cannot be increased or decrease
any further.
English
約
9
Remote control signal receiver
E
n
l
a
r
g
e
d
d
i
a
g
r
a
m
o
f
t
h
e
R
e
m
o
t
e
C
o
n
t
r
o
l
S
i
g
n
a
l
R
e
c
e
i
v
e
r
* The transparent portion on the bottom of the front of
the Fan Guard is the receiver for signals from
the remote control. Maximum
Approx. 5 m
The operational distance of the remote control
may be shorter depending on the location of
the Body and its surrounding environment, as
well as the angle of the fan.
* The distance shown is for indication only.
When an operation is made on the Body,
it makes an electronic beeping sound.
Fan Guard

LARGE
C
R
2
0
2
5
3
V
English
A battery is placed in the remote control at the
factory.Pull off the insulation sheet in the direction
of the arrow before using the remote control.
Changing the Battery
Push the tab and slide out the battery compartment.
"+" side upward
*Be aware of the "+" and "-"
sides of the button battery
when changing the battery.
Below are precautions for using the remote control. Please read these to
ensure correct use.
・
Do not expose the receiver of the body to direct light or strong light from a light fitting. This may prevent operation
of this product.
・
Do not block the receiver. This product cannot be operated with the remote control when there is an obstruction
between the remote control and the body.
・
Replace the battery with a new one if this product begins responding poorly to the remote control.
・
The remote control uses a button battery (CR2025 3V).
・
Remove the battery from the remote control when it will not be used for a long time, to prevent the battery from
leaking.
Safety Precautions
・
Keep the remote control out of reach of small children, as they may remove the battery and swallow it.
Consult a physician immediately if the battery is swallowed.
・
If the battery leaks and the fluid gets in your or somebody else's eyes, do not rub the eyes. Wash the eyes with
clean water such as tap water and seek treatment from a physician immediately. Otherwise, the eyes will be damaged.
・
If the battery leaks onto the skin or clothing, wash it off immediately with clean water such as tap water.
Otherwise, the fluid will irritate the skin.
・
Take care not to allow the battery to leak onto clothing, leather items, furniture or flooring, as it may cause staining.
・
Dispose of the battery according to your local trash sorting methods.
(Wrap the "+" and "-" sides with adhesive tape, etc. when disposing.)
②
①
10
Tab
Insulation sheet
Remote control

How to Use this Product Effectively
A circulator is...
Circulate the air in the room
The main role of the circulator is “ensuring air circulates around the entire room”.
By blowing air toward the ceiling and walls, the effectiveness, not only of air-conditioning
in summer, but also of heating in winter, is increased by a wide margin, saving power
and achieving energy efficiency.
In addition to the method of use introduced on this page, this product can be set up in
various locations, and with various fan orientations, to increase the circulation of air in a room.
Customers are recommended to discover for themselves the most efficient placement
and orientation for their individual environment.
In addition, the product can also be conveniently used to reduce the
drying time needed for wet clothes being dried inside a room, through
the direct application of blown air. However, in that case, caution
must be taken, for safety reasons, to ensure a strict separation
between the product and the objects being dried.
To circulate the air in the room evenly, it is recommended to
set up the device in the center of the space, with the fan
aimed upward.
The air expelled from the circulator hits the ceiling and then
moves along the walls to create an efficient air circulation
through out the room.
Use efficiently
and conserve
energy
1
11
English

2
3
4
When using for
ventilation, set up
facing outside
In a stairwell or atrium
In the center of a large room
For ventilation set the air circulator up
in front of the window facing outward
and sending a flow of air out the
window. At the same time, if you open
the window on the opposite side of the
room, it will be even more effective.
In the case of two adjoining
rooms, you can install the
product at the point where
the two rooms are joining to
circulate air in both rooms.
In this case, if you set the
product up so that the air
flow from the air-
conditioner strikes the
back of the air circulator, it
will be even more effective.
The product can also be used for air
circulation in a comparatively large
space, such as a stairway or an atrium.
Opening a nearby window or door
will be even more effective.
English
12

This product is a circulator, designed for circulating the air in a room. Where dust has built up
on and around the guard, this may decrease the effectiveness of the fan. Where continuous
usage is intended, maintenance, as detailed below, should be carried out on a roughly
bi-weekly basis.
* When removing the Fan Guard for maintenance etc., make sure to disconnect the AC
adapter from the power outlet.
When cleaning, be sure to wear heavy-duty gloves.
In the case of continuous usage over a period of time, maintenance
should be carried out once every two weeks.
Maintenance
▲Slide the lock from the “LOCK” position to the
“OPEN” position.
Carry out the process in the order of:
(1) [Depress the Guard Lock Lever]→
(2) [Remove the Fan Guard]
Remove from
below with the
two catches
as pivots
1
2
Fan Guard
▲Remove the Fan Guard by disengaging it from the catch from beneath while the Guard Lock Lever remains
depressed.
Note
(1) Lift the “Operating Lever”
(2) Set the “Slide Lock” to “OPEN” and
release the lock.
This product has an “Open-Shut Sensor” that detects whether the Fan Guard is attached or not.
If you attempt to remove the Fan Guard while the fan is in operation, a single electronic “beep”
sound will be issued and the power will turn OFF.
While continuing
to press down,
remove the Fan
Guard
Guard Lock Lever
English
13
Always set to the
“LOCK” position
when using the
product
Slide Lock
Operating Lever


English
15
탭을
For your safety: “Cautions when attaching the Fan Guard”
Line up the position of the pawls on the
top of the Fan Guard with the holes on
the top of the body and attach to it.
Using the pawls on top of the Fan Guard
as a pivot attach securely to the main unit
without leaving any gaps.
Slide the sliding lock to the “LOCK”
positionand attach the Fan Guard
securely to the body.
Fan Guard
For safety reasons, the product includes an Open-Shut Sensor which turns off the power
when the Fan Guard is removed. When re-attaching the Fan Guard after maintenance etc.,
if the Fan Guard is not properly attached and a gap exists between the Guard and the body,
the power will not turn on.
When attaching the Fan Guard, follow the instructions and diagram below, and make
sure the Fan Guard is correctly attached to the body.
When in use, the sliding lock should be set to the
“LOCK” position. Also, after “LOCK” is engaged,
depress the operation lever.
Lift the “guard lock lever” up, while moving the
“sliding lock” firmly into the “LOCK” position.
Sliding lock
Operation lever
Guard lock lever
1
2
3
Top of the Fan Guard
Line up the “pawls on the Fan Guard” with
the “holes on the body”.
Top of the body
Eliminate gaps between the Fan Guard and
the body of the fan.
* If there is a gap between the Fan Guard and the body, the Open-
Shut Sensor will react and the power will not turn on.

16
* The power consumption, rpm, wind speed and volume figures are measured with the wind speed set at Max (level 4).
Voltage
Power Consumption
Max. rpm
Dimensions (W x D x H)
Weight
Oscillation Angle
DC 12 V
Max. 20 W*
850 rpm
340 x 256 x 360 mm
Body
Approx. 2.3 kg
Approx. Vertical-Horizontal (no fixed levels)
Operating Temperature Range +10 to +35°C
Operating Humidity Range 20 to 80% RH
Storage Temperature Range -20 to +55°C
AC Adapter
Remote Control
Rated Power Input
Rated Frequency
Rated Output Voltage
CR2025 3V
1
Rated Secondary Electric Current
Cord Length
AC 100-240 V
50/60 Hz
DC 12 V
Max. 2 A
Approx. 1.8 m
No. of Batteries
Battery Type
English
This symbol on the product, the battery or on the packaging indicates that the product and the battery shall
not be treated as household waste. On certain batteries this symbol might be used in combination with a
chemical symbol. The chemical symbols for mercury (Hg) or lead (Pb) are added if the battery contains more
than 0.0005% mercury or 0.004% lead. By ensuring these products and batteries are disposed of correctly, you
will help prevent potentially negative consequences for the environment and human health which could otherwise
be caused by inappropriate waste handling. The recycling of the materials will help to conserve natural resources.
Hand the battery over to the applicable collection point for the recycling of waste batteries.
For more detailed information about recycling of this product or battery, please contact your local Civic Office,
your household waste disposal service or the shop where you purchased the product or battery.
Disposal of waste batteries and electrical and
electronic equipment
Notice for lithium batteries : Please hand only discharged batteries over to the collection point. Due to danger
of short circuit, please patch the terminals of the battery with tape. Lithium batteries can be identified by the
Li or CR marking on the battery.
Specifications

Trouble Shooting
Please check the following guide before contacting the BALMUDA Europe Service Center (P.18)or
the dealer that you purchased the product from.
Points to Check
□Are your fuses blown, or is your
breaker tripped?
□Is the AC adapter properly plugged
into the power outlet?
□Is the AC adapter firmly connected to
the connector on the Body?
□Is the Fan Guard bumping against the
Fan?
□Is the Fan attached properly?
□Have you lined the Fan Guard up
exactly with the Body so that there are
no gaps? Or, does the product issue
an electronic “beep, beep, beep” noise
when you press the Power Button?
□Are you using old batteries?
□Are the batteries’ +/- positions correct?
□Are you pointing the remote control
toward the signal receiver?
□What part of the product is broken?
□Are you operating within the effective
distance?
□How did it break?
□Which part did you lose?
> Check your fuse and breaker.
> Plug the AC adapter into the power
outlet properly.
> Check the method of connection.
(→P.7, 8)
A short beep confirms that a proper
connection is established.
> Make sure the Fan Guard is properly
attached. (→P.13 )
> Re-attach the Fan. (→P.14 )
> The “Open and Shut Sensor” could be
operating. Make sure the Fan Guard is
properly attached. (→P.13 )
> Replace with new batteries. (→P.10)
> Check the batteries’ +/- positions.
(→P.10)
> Check where the Body’s signal receiver is.
(→P.9)
> Use the remote control within 5 m.
(→P.9)
> Contact theBALMUDA Europe Service Center.
They will advise you whether on repairs are
necessary or what other measures, if any,
need to be taken. When contacting the
Center, please inform them of the model of
product that you have. (→P.18)
> Some parts can be purchased. Please
contact the BALMUDA Europe Service
Center. (→P.18)
Possible Solutions
Fan will not
start
□Is the Fan firmly secured with
the Fan Holder?
□Is the Fan Guard bumping against the
Fan?
□Is the Fan facing the right way?
□Is the Fan Guard firmly attached and
correctly secured?
□Has dust accumulated on the Fan or
Guard?
□Are you turning the Fan Holder in the
right direction?
> Firmly attach the Fan with the Fan Holder.
(→P.14 )
> Attach the Fan properly. (→P.14 )
> Make sure the Fan Guard is properly
attached. (→P.13 )
> Check that the Slide Lock on the top of the of
the Guard Lock Lever is in the “LOCK”
position. (→P.13 )
>
Airflow efficiency declines when dust
accumulates around the Guard. We
recommend a
bi-weekly cleaning.
(→P.13, 14)
> Turn the Fan Holder in the right direction to
fasten. (→P.14 )
Fan is noisy
during
operation
The airflow has
decreased
Can’t fasten
the Fan Holder
Remote
control doesn’t
work
The product
is broken
Lost a part
Problem
English
17
1
2
3
3
4
2
2
4

Customer Service
(for inquiries on usage, maintenance, repair)
■BALMUDA Europe Service Center
(9:00-16:30, weekdays & business days only)
■Online Inquiries
Please search the net with the keyword “BALMUDA,”
or visit http://www.balmuda.com/support/.
[Please check the product model (printed in the attached warranty)before
inquiry]
040-897 25 35 15
Warranty and After Service
For inquiries on repairs, usage, or maintenance, please call the BALMUDA Europe Service
Center (see below), or contact your dealer.
1) Please receive the warranty card from your dealer with the purchase date and the dealer
name filled in.
2) The warranty is valid for 2 years from the date of purchase. For repairs during the warranty
period, please contact the BALMUDA Europe Service Center or your dealer.
The repairs will be carried out according to the warranty.
3) Contact the BALMUDA Europe Service Center or your dealer for out-of-warranty repairs. You
can request for a repair with charge, if it enables the product to function properly.
4) Never attempt to repair or modify the product by yourself.
Handling of Personal Information
1) BALMUDA Inc. (hereinafter “BALMUDA”)may use personal information for customer service
and repairs, and may keep a record of the inquiries.
2) BALMUDA will not disclose personal information to third parties, except in the following
cases:
a. When repairs or confirmation of repairs are entrusted to third parties.
b. In cases pursuant to the provisions of laws and regulations.
3) For inquiries on personal information, please contact the BALMUDA Europe Service Center.
(* Call charge required)
English
18

19
Warranty
Model: EGF-3300Series
Warranty Period:
2 years from the date of purchase
Body and AC Adapter (included)
Date of Purchase: Month Date Year
* Customer Name
* Dealer
Name/Address/Tel.
Address
Tel.
BALMUDA Europe GmbH: Immermannstr. 13, 40210 Dusseldorf, Germany
BALMUDA Europe Service Center: 040-897 25 35 15
This warranty guarantees free repair of the product based on conditions stated herein.
Within the warranty period from the day of purchase, if the product proves defective despite normal use in compliance to the instruction
manual, product label, and other warnings, BALMUDA will repair the product at no charge in accordance to this warranty. Please request for a
repair by submitting the warranty card with the product at the BALMUDA Europe Service Center (see Instruction Manual P18) or your dealer.
Recycled parts compliant with our quality standard may be used for repair.
1. Repairs for the following cases will be conducted with charge, even during the warranty period:
a. Misuse, defect or damage due to modifications or improper repair, and repair conducted by unauthorized service organizations.
b. Damage caused by change of installation after initial setup, falling impact, removal, or transportation.
c. Damage caused by fire, earthquake, flood, lightning, or other natural disasters, pollution, abnormal voltage, and other external factors.
d. Damage, rust or mold caused by use or storage of product in vehicles, ships, places of extreme temperature, humidity, or dust.
e. Damage due to non-domestic (commercial) use.
f. Failure to present the warranty card.
g. No proof of purchase such as receipt etc. when the date of purchase, customer name, or dealer name are not written on the warranty card,
or the content has been modified.
h. Use under conditions not written on the warranty, outdoor use, or any other unintended use or storage.
i . Damage due to soaking in water, exposure to alcohol, other liquid or gas, dust accumulation, or physical impact or pressure.
2. Defects on consumables and parts, or conditions that require cleaning are not applicable for returns.
3. Even during the warranty period, if the product has been sent for repair, or on-site support has been provided, the shipping/on-site service
fee will be charged to the customer.
4. This warranty is only valid in Germany.
5. This warranty will not be reissued. Please keep it in a safe place.
6. The content of this warranty does not apply to the extended warranty service provided by third parties.
This warranty guarantees free repairs for the stated period and conditions. The warranty does not limit the customer’ s legal rights to the
warranty issuer, or any other agents.
BALMUDA.Inc
Table of contents
Languages:
Other BALMUDA Fan manuals

BALMUDA
BALMUDA EGF-1200 Series User manual

BALMUDA
BALMUDA GreenFan User manual

BALMUDA
BALMUDA GreenFan EGF-1400 Series User manual

BALMUDA
BALMUDA EGF-3100 Series User manual

BALMUDA
BALMUDA The GreenFan EGF-1700 Series User manual

BALMUDA
BALMUDA GreenFan Cirq EGF-3100 Series User manual

BALMUDA
BALMUDA EGF-1600 Series User manual
Popular Fan manuals by other brands

Alpha Fan
Alpha Fan Motto DT 60/7-AC instruction manual

Vortice
Vortice VARIO Series Instruction booklet

Makita
Makita DCF203 instruction manual

Home Decorators Collection
Home Decorators Collection GRENADA YG522-BN Use and care guide

aerauliqa
aerauliqa QR100M installation manual

Natural Light
Natural Light Gable Solar Fan installation instructions