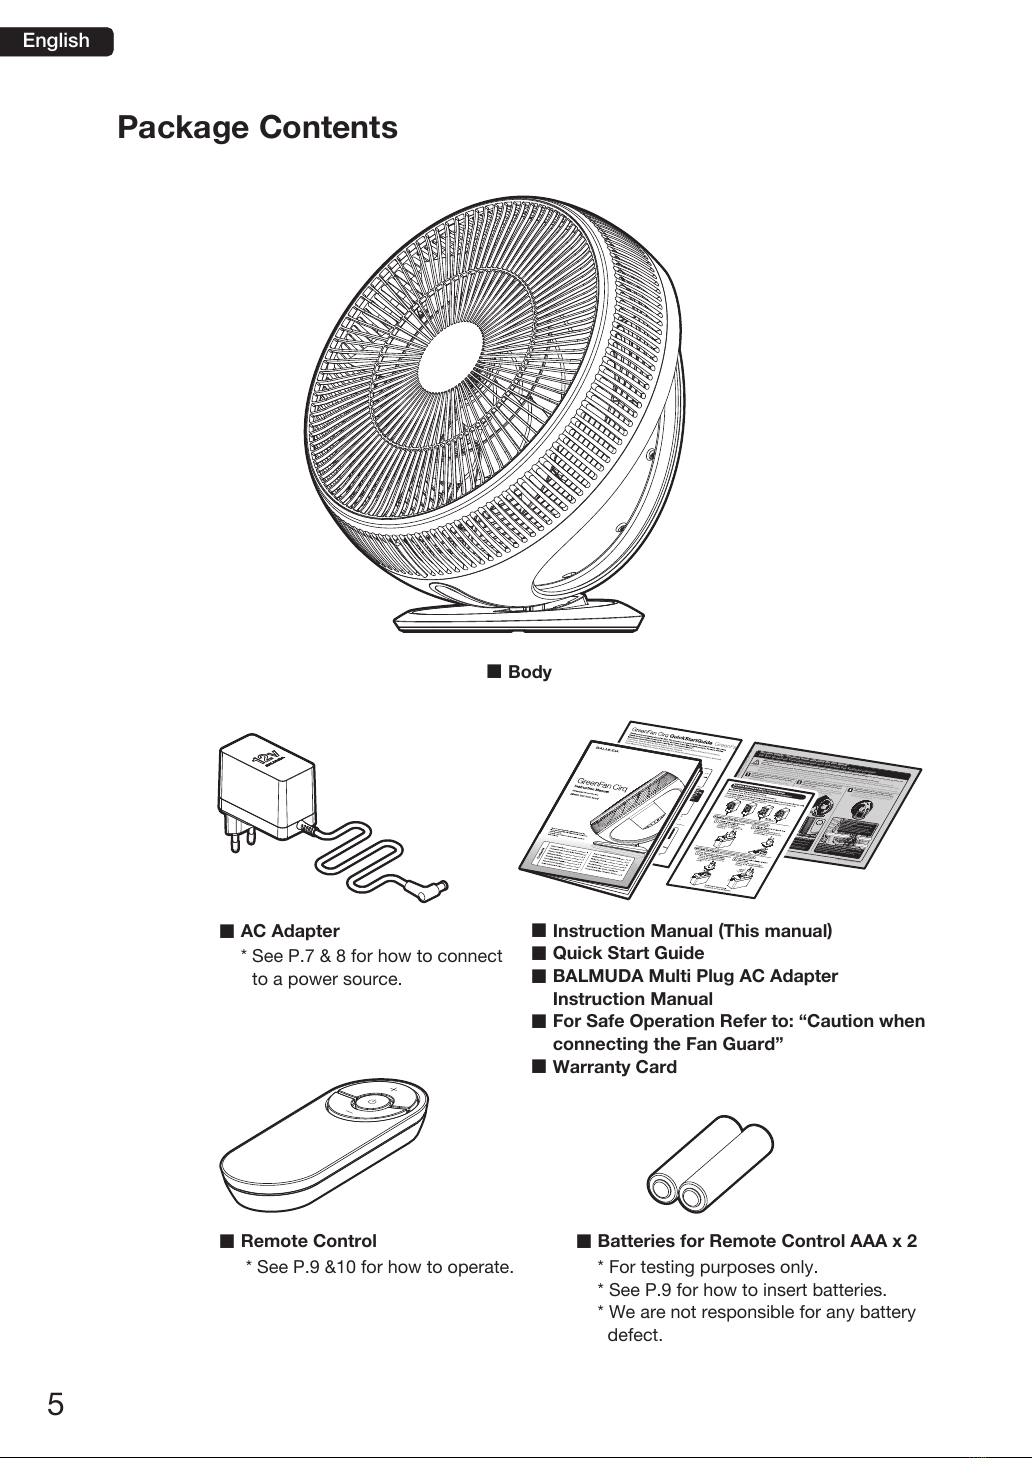
BALMUDA GreenFan Cirq EGF-3100 Series User manual

Thank you for purchasing the BALMUDA GreenFan Cirq.
Please read through this instruction manual to ensure proper
use of the product.
A warranty is also attached, so please keep this manual for
future reference.
Instruction Manual
Air Circulator (Home / Office Use)
[Model: EGF-3100 Series]
Safety Precautions .......................................... 1
Please make sure to observe the following ...... 2
Warning / Caution ......................................... 3, 4
Package Contents ............................................ 5
Operating Instructions ...................................... 6
Connecting the AC Adapter .......................... 7, 8
Remote Control Operation ................................ 9
Using the Remote Control ............................. 10
How to Use this Product Effectively ......... 11, 12
Maintenance ............................................. 13, 14
Storing the Product ........................................ 15
Specifications ................................................. 16
Trouble Shooting ............................................ 17
Warranty and After Service / Handling of
Personal Information / Customer Service ....... 18
Contents
English

1
Please read the Safety Precautions before use and keep this manual for future reference.
To avoid the dangers of fire, electrocution and injury, please make sure to fully observe
the Safety Precautions and below instructions when using this product.
Indicates information that, if ignored, could possibly result
in personal injury or even death.
Indicates information that, if ignored, could possibly result in
personal damage or property damage.
Safety Precautions
Warning
Caution
Explanation of Symbols
* This product is intended for household and office use only. Please do not use for any other
purposes.
● In case of emergencies such as quakes or fire, immediately unplug and stop use of the product.
● This product is for use in Germany only.
English

2
Caution
Do not insert fingers or foreign objects
inside the Guard or moving parts.
Do not use near curtains or other obstacles
which may block the airflow.
Accident or injury may result if items get caught or
block the flow of air.
Use the included dedicated AC adapter for
power.
Do not use on an unstable surface or near
obstacles.
The product may fall and cause injuries.
Please make sure the product is secure.
Stop use immediately if malfunctions such as:
abnormal noise/odor, high temperature or
irregular fan circulation occur.
Please make sure to observe the following:
Prohibited
Prohibited
English

3
Warning
• Do not use for purposes other than those written on this instruction
manual.
• Do not allow children or persons unable to understand the instructions
on the manual operate the product.
• To avoid electrocution risks, do not soak the product, cord or plug in
water or any other liquid.
• Do not disassemble except for maintenance purposes.
Fire, electrocution or serious injury may result. For repairs, please consult
your dealer or BALMUDA Europe Service Center (P.18).
• Insert the power plug completely.
• Do not use if there is damage to the cord or power plug, or the plug
connection is loose.
• Unplug when not in use.
• Do not damage, modify, bend, pull, twist, or bundle the cord. Do not
place heavy things on top, or pinch the cord.
• Keep the cord away from sharp edges of tables, counters and hot
surfaces.
• Use general household power outlet for the AC adapter.
• To unplug, always hold the AC adapter to remove the plug, and do not
pull the cord. Remove any dust from the plug on a regular basis.
• Do not use cord or power plug which have been damaged in any way.
• To avoid fire or electrocution risks, do not use together with a solid
state fan speed control device.
• Do not operate without attaching fan or Guard.
Injury may result.
• Do not connect the power plug or touch the connector terminal on the
joint before assembly/disassembly of the product.
• Do not touch moving parts. Do not use without attaching the Guard, or
if the fan is damaged.
• Keep the remote control’s batteries out of reach of children.
• To prevent battery corrosion, remove the batteries when the remote is
not in use for extended periods.
• Dispose of used batteries according to your local rules.
• Do not disassemble, recharge, burn or heat the batteries.
• When exchanging batteries, insert the correct type with the correct
polarity, or it may cause fire or explode.
English

4
Caution
• Do not use the product in the following places since it may cause
electrocution or fire.
a. Near gas stoves or near open flames
b. In/around flammable gases
c. In/around water or rain
• Do not insert fingers or foreign objects inside the Guard or moving
parts.
• Do not expose your body to the wind for an extended period of time.
• Make sure the BALMUDA Multi Plug AC Adapter is firmly secured when
in use.
• Always unplug the product before maintenance. Do not plug/unplug
with a wet hand.
• Do not drop, or give strong impact to the product.
• Keep objects susceptible to magnetization away from the product.
A powerful magnet is used on the front Guard, which may damage
objects susceptible to magnets.
• Do not transport the assembled product. Place the product in a box
before transportation.
Otherwise, the product or parts may get damaged.
• Do not use sprays or liquids on the product.
Inflammable sprays may cause fire or explosion. Other sprays may
damage the plastic or paint.
• Do not let children use by themselves. Keep out of reach of small
children.
Children should use only under adult supervision.
• Store in a dry place out of reach of children.
• Do not cover the back of the fan with cloths or curtains.
• Keep long hair and loose clothing away from the fan and moving parts.
• For indoor use only.
• This appliance can be used by children aged from 8 years and above
and persons with reduced physical, sensory or mental capabilities or
lack of experience and knowledge if they have been given supervision
or instruction concerning use of the appliance in a safe way and
understand the hazards involved.
Children shall not play with the appliance. Cleaning and user
maintenance shall not be made by children without supervision.
English

5
Package Contents
■ Remote Control ■ Batteries for Remote Control AAA x 2
■ AC Adapter
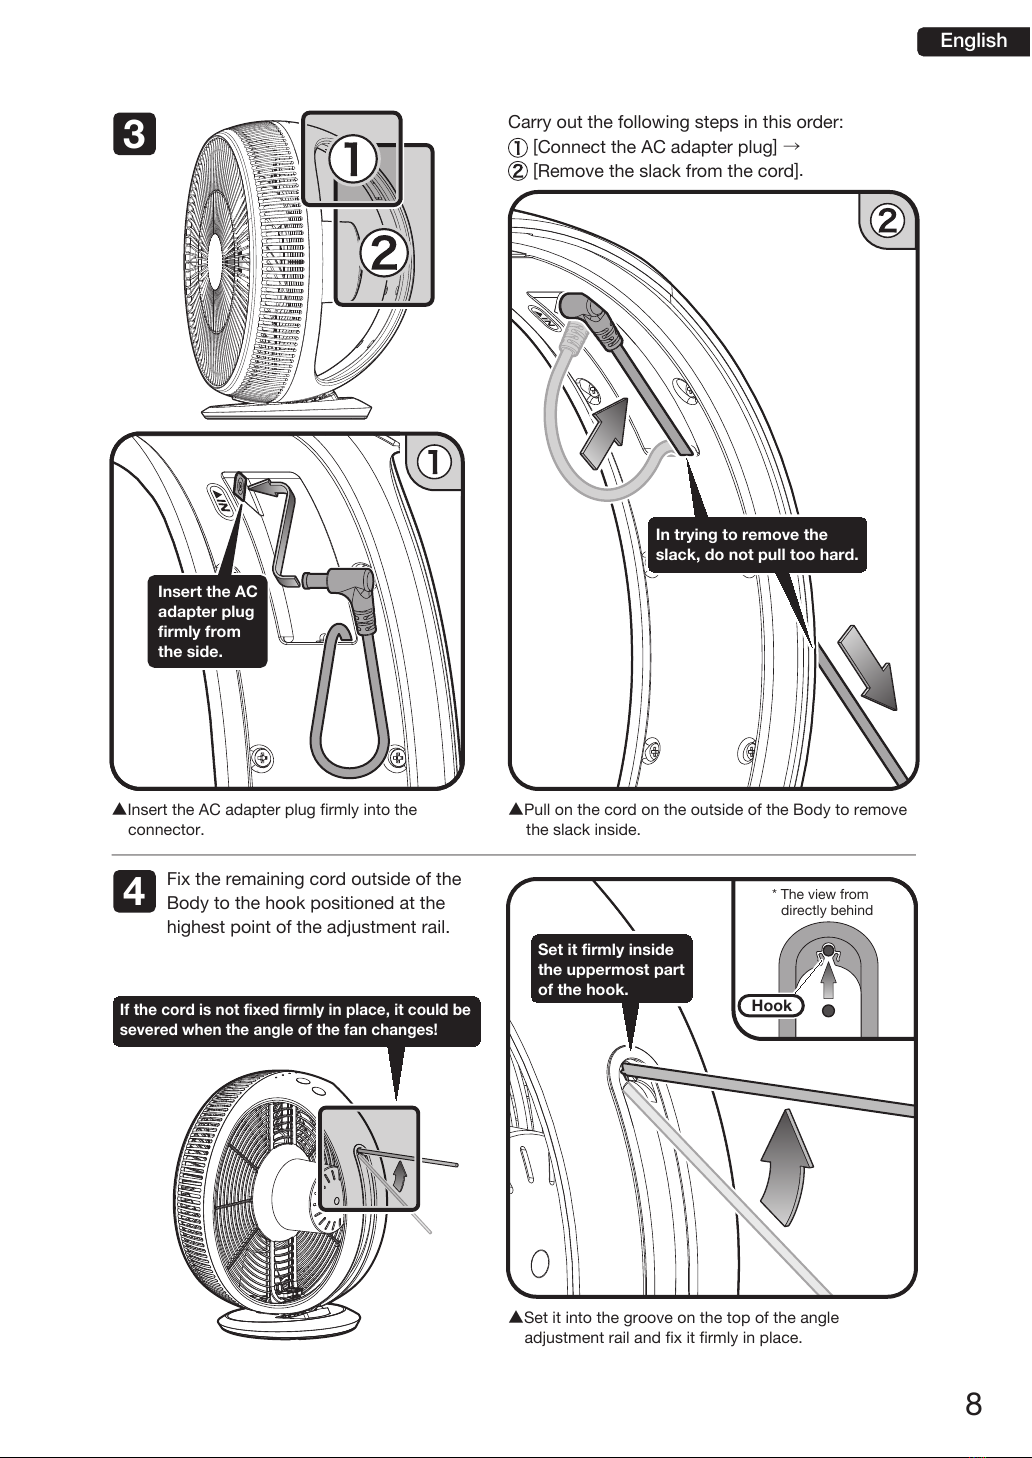
* See P.7 & 8 for how to connect
to a power source.
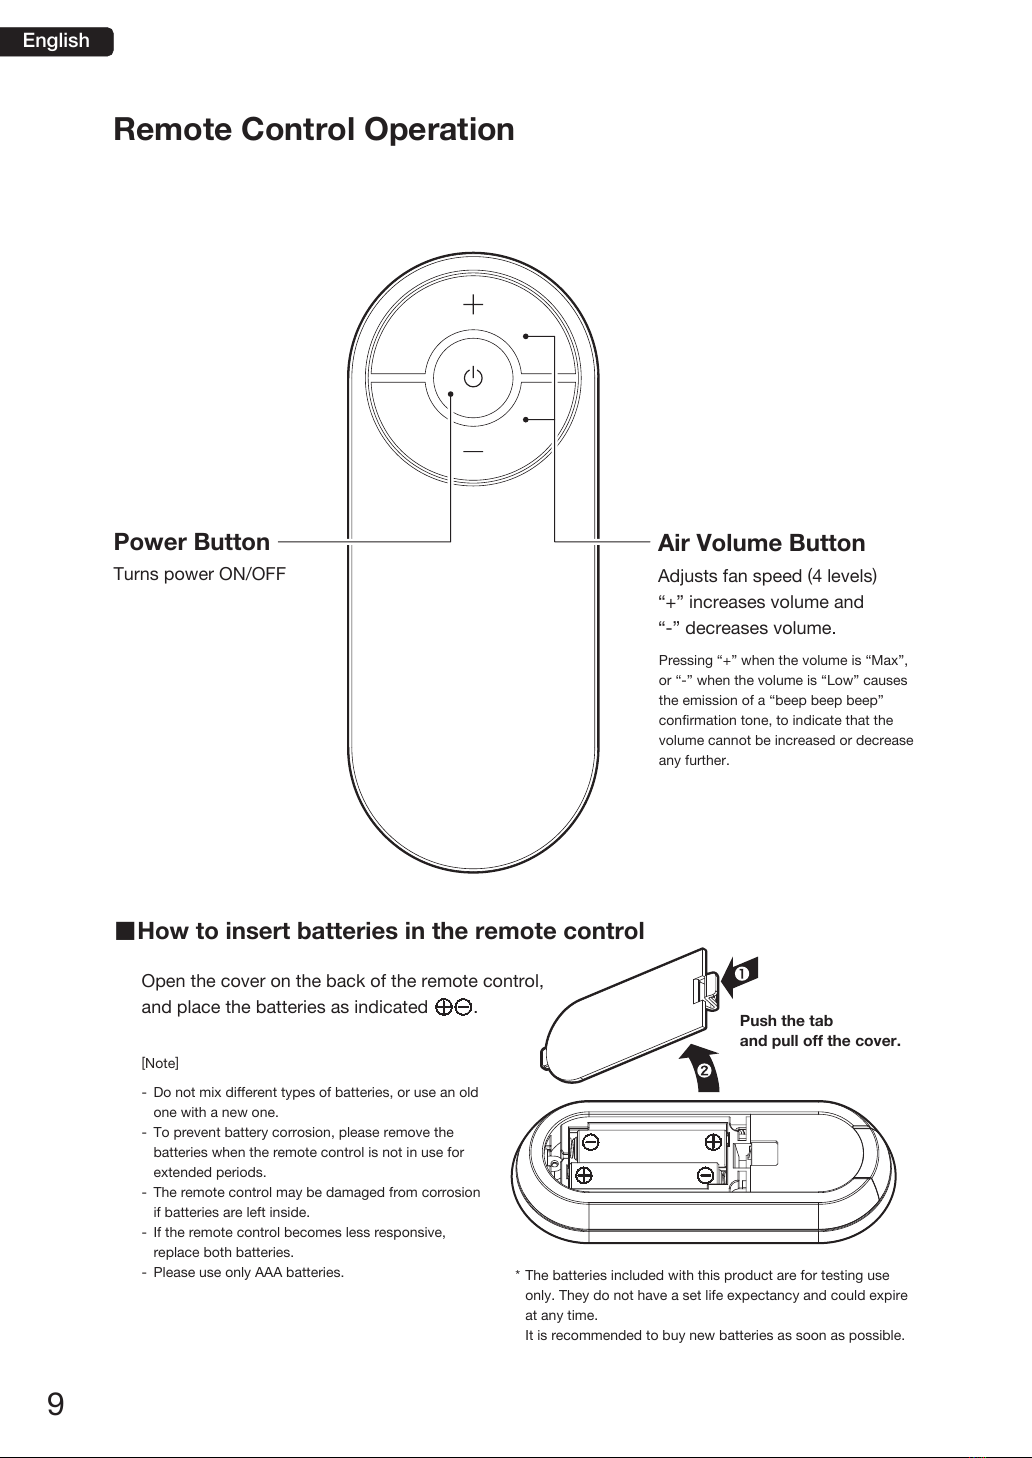
* See P.9 &10 for how to operate. * For testing purposes only.
* See P.9 for how to insert batteries.
* We are not responsible for any battery
defect.
■ Body
■ Instruction Manual (This manual)
■ Quick Start Guide
■ BALMUDA Multi Plug AC Adapter
Instruction Manual
■ For Safe Operation Refer to: “Caution when
connecting the Fan Guard”
■ Warranty Card
GreenFan Cirq SafetyGuide Rev.1.0
For your safety: “Cautions when attaching the Fan Guard”
Für Ihre Sicherheit: Vorsichtshinweise zum Anbringen des Ventilatorschutzes
Line up the position of the pawls on the top of the
Fan Guard with the holes on the top of the body
and attach to it.
Bringen Sie zum Anbringen die Klauen an der
Oberseite des Ventilatorschutzes mit den Löchern
an der Oberseite des Gerätekörpers in
Übereinstimmung.
Using the pawls on top of the Fan Guard as a
pivot attach securely to the main unit without
leaving any gaps.
Verwenden Sie die Klauen an der Oberseite des
Ventilatorschutzes, um diesen durch Schwenken
lückenlos am Hauptgerät anzubringen.
Slide the sliding lock to the “LOCK” position
and attach the Fan Guard securely to the body.
Schieben Sie den Sperrschieber in die Position
„LOCK“ und bringen Sie den Ventilatorschutz
fest am Gerätekörper an.
Fan Guard
Ventilatorschutz
CAUTION
VORSICHT
Insert the two pawls on the
top of the Fan Guard into
the corresponding holes on
the body.
Führen Sie die zwei Klauen
an der Oberseite des
Ventilatorschutzes in die
entsprechenden Öffnungen
am Gerätekörper.
After attaching the
Fan Guard securely,
check for any gaps
around the edges.
Prüfen Sie nach dem
festen Anbringen des
Ventilatorschutzes,
ob an den Rändern
noch Spalte
vorhanden sind.
Top of the Fan Guard
Oberseite des Ventilatorschutzes
Top of the body
Oberseite des Gerätekörpers
Line up the “pawls on the Fan Guard” with the “holes on
the body”.
Die Klauen am Ventilatorschutz mit den Löchern am
Gerätekörper in Übereinstimmung bringen.
Eliminate gaps between the Fan Guard and the body of
the fan.
Es darf kein Spalt zwischen dem Ventilatorschutz und
dem Ventilatorkörper vorliegen.
* If there is a gap between the Fan Guard and the body, the Open-Shut Sensor will
react and the power will not turn on.
* Wenn ein Spalt zwischen dem Ventilatorschutz und dem Gerätekörper vorliegt,
spricht der Öffnungssensor an, so dass sich das Gerät nicht einschalten lässt.
For safety reasons, the product includes an Open-Shut Sensor which turns off the power when the Fan Guard is removed.
When re-attaching the Fan Guard after maintenance etc., if the Fan Guard is not properly attached and a gap exists between the Guard and the body, the power will
not turn on.
When attaching the Fan Guard, follow the instructions and diagram below, and make sure the Fan Guard is correctly attached to the body.
Das Produkt ist aus Sicherheitsgründen mit einem Öffnungssensor versehen, der die Stromversorgung unterbricht, wenn der Ventilatorschutz entfernt wird.
Wenn Sie den Ventilatorschutz nach der Instandhaltung usw. erneut anbringen und der Ventilatorschutz nicht richtig befestigt wird, so dass ein Spalt zwischen dem
Schutz und dem Gerätekörper vorliegt, lässt sich das Gerät nicht einschalten.
Gehen Sie beim Anbringen des Ventilatorschutzes wie unten beschrieben und dargestellt vor und achten Sie darauf den Ventilatorschutz richtig am Gerätekörper anzubringen.
When in use, the sliding lock should be set to
the “LOCK” position.
Also, after “LOCK” is engaged, depress the
operation lever.
Bei der Verwendung des Geräts sollte der
Sperrschieber in der Position „LOCK“ sein.
Betätigen Sie den Bedienungshebel, nach dem
Einrasten in der Position „LOCK“.
*In case of removing the Fan Guard for maintenance etc., make sure to disconnect the AC adapter from the power source first.
*Wenn Sie den Ventilatorschutz zum Beispiel zu Instandhaltungszwecken abnehmen, achten Sie darauf, zunächst den
Netzadapter von der Stromquelle zu trennen.
Lift the “guard lock lever” up, while moving the “sliding
lock” firmly into the “LOCK” position.
Heben Sie den Sperrhebel des Ventilatorschutzes an und
bringen Sie zugleich den Sperrschieber fest in die
Position „LOCK“.
Sliding lock
Sperrschieber
Operation lever
Bedienungshebel
Guard lock lever
Sperrhebel des Ventilat orschutzes
English

6
Operating Instructions
■Adjusting the angle of the fan
The fan can be adjusted to any angle from vertical to horizontal.
* Using excessive force or causing a strong impact to the moving parts may damage the product.
The fan can be adjusted to
the angle of your choice
Vertical Horizontal
Air Volume Button
Adjusts fan speed
* Volume Button on Body is set to “Rotary.”
Each time the button is pressed the volume increases. When “Max” is
reached, pressing the button again returns the air volume to “Low.”
Low
Medium
High
Max
Power Button
Turns power ON/OFF
Air Volume Display
Indicates the air volume
setting in green lights.
It is possible to select from
among 4 levels of volume.
Example of Air Volume Display
(When seen from the direction of
the above diagram)
…………
English

7
Before using the product, make sure to follow the steps set out below.
If the product's connector and AC adapter plug are not correctly connected, the product may
not operate correctly.
Connecting the AC Adapter
Make sure to check this before using the product.
▲Insert from the back of the Body deep into the
uppermost part of the angle adjustment rail.
▲Pull on the cord inside until you have a length of about
10
cm of the cord.
Angle Adjustment Rail
Adjust which side
of the cord is up,
so that it fits into
the width of the
groove.
Continue pulling until you
have a length of about 10
cm
of the cord.
1
2Connector
AC Adapter Plug
Insert the AC Adapter Plug into the
uppermost portion of the angle
adjustment rail on the back of the Body.
Pull on the cord from the adapter
plug, which was passed through the
back of the Body into the inside at
step , until it’s length is 10
cm.
1
English

8
▲Pull on the cord on the outside of the Body to remove
the slack inside.
* The view from
directly behind
▲Insert the AC adapter plug firmly into the
connector.
▲Set it into the groove on the top of the angle
adjustment rail and fix it firmly in place.
Set it firmly inside
the uppermost part
of the hook.
If the cord is not fixed firmly in place, it could be
severed when the angle of the fan changes!
3
4
Hook
Carry out the following steps in this order:
[Connect the AC adapter plug] →
[Remove the slack from the cord].
Fix the remaining cord outside of the
Body to the hook positioned at the
highest point of the adjustment rail.
Insert the AC
adapter plug
firmly from
the side.
In trying to remove the
slack, do not pull too hard.
English

9
Power Button
Turns power ON/OFF
Air Volume Button
Adjusts fan speed (4 levels)
“+” increases volume and
“-” decreases volume.
Remote Control Operation
Open the cover on the back of the remote control,
and place the batteries as indicated .
[Note]
- Do not mix different types of batteries, or use an old
one with a new one.
- To prevent battery corrosion, please remove the
batteries when the remote control is not in use for
extended periods.
- The remote control may be damaged from corrosion
if batteries are left inside.
- If the remote control becomes less responsive,
replace both batteries.
- Please use only AAA batteries.
■How to insert batteries in the remote control
* The batteries included with this product are for testing use
only. They do not have a set life expectancy and could expire
at any time.
It is recommended to buy new batteries as soon as possible.
Pressing “+” when the volume is “Max”,
or “-” when the volume is “Low” causes
the emission of a “beep beep beep”
confirmation tone, to indicate that the
volume cannot be increased or decrease
any further.
Push the tab
and pull off the cover.
English

10
- Avoid strong shocks. Avoid contact with water or extreme humidity.
- The remote control may not work if there is an obstacle between it and the Body’s signal
receiver.
- The operable distance will shorten as the battery level gets lower. Early battery replacement is
recommended.
- The remote control may not work well when the signal receiver is exposed to direct sunlight or
strong lighting.
In such cases, try moving the Body or the lighting.
- The remote control may not work well near fluorescent lights.
Remote control signal receiver
Read the instructions below carefully and use the remote control according to the content
of those instructions.
Using the Remote Control
E
n
l
a
r
g
e
d
d
i
a
g
r
a
m
o
f
t
h
e
R
e
m
o
t
e
C
o
n
t
r
o
l
S
i
g
n
a
l
R
e
c
e
i
v
e
r
* The transparent portion on the bottom of the front of
the Fan Guard is the receiver for signals from
the remote control.
Maximum
Approximately 8 mApprox. 8 m
The operational distance of the remote control
may be shorter depending on the location of
the Body and its surrounding environment, as
well as the angle of the fan.
When an operation is made on the Body,
it makes an electronic beeping sound.
* The distance shown is for indication only.
Fan Guard
English

11
How to Use this Product Effectively
A circulator is...
Circulate the air in the room
The main role of the circulator is “ensuring air circulates around the entire room”.
By blowing air toward the ceiling and walls, the effectiveness, not only of air-conditioning
in summer, but also of heating in winter, is increased by a wide margin, saving power
and achieving energy efficiency.
In addition to the method of use introduced on this page, this product can be set up in
various locations, and with various fan orientations, to increase the circulation of air in a room.
Customers are recommended to discover for themselves the most efficient placement
and orientation for their individual environment.
In addition, the product can also be conveniently used to reduce the
drying time needed for wet clothes being dried inside a room, through
the direct application of blown air. However, in that case, caution
must be taken, for safety reasons, to ensure a strict separation
between the product and the objects being dried.
To circulate the air in the room evenly, it is recommended to
set up the device in the center of the space, with the fan
aimed upward.
The air expelled from the circulator hits the ceiling and then
moves along the walls to create an efficient air circulation
through out the room.
Use efficiently
and conserve
energy
1
English

12
2
3
4
When using for
ventilation, set up
facing outside
In a stairwell or atrium
In the center of a large room
For ventilation set the air circulator up
in front of the window facing outward
and sending a flow of air out the
window. At the same time, if you open
the window on the opposite side of the
room, it will be even more effective.
In the case of two adjoining
rooms, you can install the
product at the point where
the two rooms are joining to
circulate air in both rooms.
In this case, if you set the
product up so that the air
flow from the air-
conditioner strikes the
back of the air circulator, it
will be even more effective.
The product can also be used for air
circulation in a comparatively large
space, such as a stairway or an atrium.
Opening a nearby window or door
will be even more effective.
English

13
This product is a circulator, designed for circulating the air in a room. Where dust has built up
on and around the guard, this may decrease the effectiveness of the fan. Where continuous
usage is intended, maintenance, as detailed below, should be carried out on a roughly
bi-weekly basis.
* When removing the Fan Guard for maintenance etc., make sure to disconnect the AC
adapter from the power outlet.
In the case of continuous usage over a period of time, maintenance
should be carried out once every two weeks.
Maintenance
▲Slide the lock from the “LOCK” position to the
“OPEN” position.
Carry out the process in the order of:
(1) [Depress the Guard Lock Lever]→
(2) [Remove the Fan Guard]
Remove from
below with the
two catches
as pivots
1
2
Fan Guard
▲Remove the Fan Guard by disengaging it from the catch from beneath while the Guard Lock Lever remains
depressed.
Note
(1) Lift the “Operating Lever”
(2) Set the “Slide Lock” to “OPEN” and
release the lock.
This product has an “Open-Shut Sensor” that detects whether the Fan Guard is attached or not.
If you attempt to remove the Fan Guard while the fan is in operation, a single electronic “beep”
sound will be issued and the power will turn OFF.
Always set to the
“LOCK” position
when using the
product
While continuing
to press down,
remove the Fan
Guard
Slide Lock
Operating Lever
Guard Lock Lever
English

14
T
u
r
n
c
o
u
n
t
e
r
c
l
o
c
k
w
i
s
e
t
o
f
a
s
t
e
n
T
u
r
n
c
l
o
c
k
w
i
s
e
t
o
l
o
o
s
e
n
Front
Back
(1)
(2)
(3) (4)
Note
Fan Guard (1) and Fan (3) can be washed. Use
diluted mild detergent with a soft cloth or a sponge
to wash the parts.
Gently wipe the Body (4) and Fan Holder (2) clean
using a soft dry cloth (Never wash).
Rotate the Fan Holder in a clockwise
direction and then remove it.
Remove the fan by pulling it free from the front. Again, when re-assembling, be careful to
align the front and back sides of the fan correctly.
<Regarding maintenance of individual parts>
* After maintenance is complete, re-assemble the parts in the order (4) to (1).
When re-assembling, be careful to align the
front and back sides of the fan correctly!
Fan Holder
Fan
3
4
Before assembly, wipe the parts that have been washed, using a dry cloth. Leave them to dry
completely in a place that is out of direct sunlight. If the parts are not completely dry, it may cause
the unit to rust or break.
▲ Rotate the Fan Holder in a clockwise direction
and then remove it.
English

15
Storing the Product
Diagram of the Body seen
directly from the side
A diagram of the packaging
material seen directly from
the side
Operation Buttons
Rear
Rear
Front
Front
Low High
Round hole
* Align the front and
back of the product
correctly with the
packing material
and slide together
into the box.
English

16
Specifications
Guidelines for Environmental Protection
This product must be disposed of based on rules regarding the recycling of
electronics. The materials used for this product can be recycled. For details
on disposal, please check your local rules.
■Product
This product is marked with the WEEE (Waste Electrical and Electronic
Equipment) Directive 2002/96/EC symbol. Proper disposal helps to protect
the environment and human health.
■Package
The package can be recycled.
* The power consumption, rpm, wind speed and volume figures are measured with the wind speed set at Max (level 4).
Voltage
Power Consumption
Max. rpm
Max. Air Speed
Max. Wind Volume
Dimensions (W x D x H)
Weight
Oscillation Angle
DC 12 V
Max. 20 W*
850 rpm
230 m/min.
52 m3/min.
340 x 256 x 360 mm
Body
Approx. 2.5 kg
Approx. Vertical-Horizontal (no fixed levels)
Operating Temperature Range +10 to +35°C
Operating Humidity Range 20 to 80% RH
Storage Temperature Range -20 to +55°C
AC Adapter
Remote Control
Rated Power Input
Rated Frequency
Rated Output Voltage
AAA Batteries
2
Rated Secondary Electric Current
Cord Length
AC 100-240 V
50/60 Hz
DC 12 V
Max. 2 A
Approx. 1.8 m
No. of Batteries
Battery Type
English

17
Trouble Shooting
Please check the following guide before contacting the BALMUDA Europe Service Center (P.18) or
the dealer that you purchased the product from.
Points to Check
□ Are your fuses blown, or is your
breaker tripped?
□ Is the AC adapter properly plugged
into the power outlet?
□ Is the AC adapter firmly connected to
the connector on the Body?
□ Is the Fan Guard bumping against the
Fan?
□ Is the Fan attached properly?
□ Have you lined the Fan Guard up
exactly with the Body so that there are
no gaps? Or, does the product issue
an electronic “beep, beep, beep” noise
when you press the Power Button?
□ Are you using old batteries?
□ Are the batteries’ +/- positions correct?
□ Are you pointing the remote control
toward the signal receiver?
□ What part of the product is broken?
□ Are you operating within the effective
distance?
□ How did it break?
□ Which part did you lose?
> Check your fuse and breaker.
> Plug the AC adapter into the power
outlet properly.
> Check the method of connection.
(→ P.7, 8)
A short beep confirms that a proper
connection is established.
> Make sure the Fan Guard is properly
attached. (→ P.13 ❷)
> Re-attach the Fan. (→ P.14 ❹)
> The “Open and Shut Sensor” could be
operating. Make sure the Fan Guard is
properly attached. (→ P.13 ❷)
> Replace with new batteries. (→ P.9)
> Check the batteries’ +/- positions.
(→ P.9)
> Check where the Body’s signal receiver is.
(→ P.10)
> Use the remote control within 8 m.
(→ P.10)
> Contact theBALMUDA Europe Service Center.
They will advise you whether on repairs are
necessary or what other measures, if any,
need to be taken. When contacting the
Center, please inform them of the model of
product that you have. (→ P.18)
> Some parts can be purchased. Please
contact the BALMUDA Europe Service
Center. (→ P.18)
Possible Solutions
Fan will not
start
□ Is the Fan firmly secured with
the Fan Holder?
□ Is the Fan Guard bumping against the
Fan?
□ Is the Fan facing the right way?
□ Is the Fan Guard firmly attached and
correctly secured?
□ Has dust accumulated on the Fan or
Guard?
□ Are you turning the Fan Holder in the
right direction?
> Firmly attach the Fan with the Fan Holder.
(→ P.14 ❸)
> Attach the Fan properly. (→ P.14 ❹)
> Make sure the Fan Guard is properly
attached. (→ P.13 ❷)
> Check that the Slide Lock on the top of the of
the Guard Lock Lever is in the “LOCK”
position. (→ P.13 ❶)
>
Airflow efficiency declines when dust
accumulates around the Guard. We
recommend a
bi-weekly cleaning.
(→ P.13, 14)
> Turn the Fan Holder in the right direction to
fasten. (→ P.14 ❸)
Fan is noisy
during
operation
The airflow has
decreased
Can’t fasten
the Fan Holder
Remote
control doesn’t
work
The product
is broken
Lost a part
Problem
English

18
Customer Service
(for inquiries on usage, maintenance, repair)
■BALMUDA Europe Service Center
(9:00-16:30, weekdays & business days only)
■Online Inquiries
Please search the net with the keyword “BALMUDA,”
or visit http://www.balmuda.com/support/.
[Please check the product model (printed in the attached warranty) before
inquiry]
040-897 25 35 15
Warranty and After Service
For inquiries on repairs, usage, or maintenance, please call the BALMUDA Europe Service
Center (see below), or contact your dealer.
1) Please receive the warranty card from your dealer with the purchase date and the dealer
name filled in.
2) The warranty is valid for 2 years from the date of purchase. For repairs during the warranty
period, please contact the BALMUDA Europe Service Center or your dealer.
The repairs will be carried out according to the warranty.
3) Contact the BALMUDA Europe Service Center or your dealer for out-of-warranty repairs. You
can request for a repair with charge, if it enables the product to function properly.
4) Never attempt to repair or modify the product by yourself.
Handling of Personal Information
1) BALMUDA Inc. (hereinafter “BALMUDA”) may use personal information for customer service
and repairs, and may keep a record of the inquiries.
2) BALMUDA will not disclose personal information to third parties, except in the following
cases:
a. When repairs or confirmation of repairs are entrusted to third parties.
b. In cases pursuant to the provisions of laws and regulations.
3) For inquiries on personal information, please contact the BALMUDA Europe Service Center.
(* Call charge required)
English

19
This manual suits for next models
2
Table of contents
Other BALMUDA Fan manuals

BALMUDA
BALMUDA EGF-1600 Series User manual

BALMUDA
BALMUDA EGF-3100 Series User manual

BALMUDA
BALMUDA GreenFan User manual

BALMUDA
BALMUDA GreenFan EGF-1400 Series User manual

BALMUDA
BALMUDA The GreenFan EGF-1700 Series User manual

BALMUDA
BALMUDA GreenFan Cirq EGF-3300 Series User manual

BALMUDA
BALMUDA EGF-1200 Series User manual
Popular Fan manuals by other brands

S&P
S&P SILENT DUAL Series manual

Schwille Elektronik
Schwille Elektronik Dew Point Touch 100-600 operating instructions

AC Infinity
AC Infinity CLOUDLINE S4 user manual

flowair
flowair KM EL LITE Technical documentation operation manual

Unold
Unold BREEZY SWING Instructions for use

Hunter
Hunter 28420 Installation & operation manual