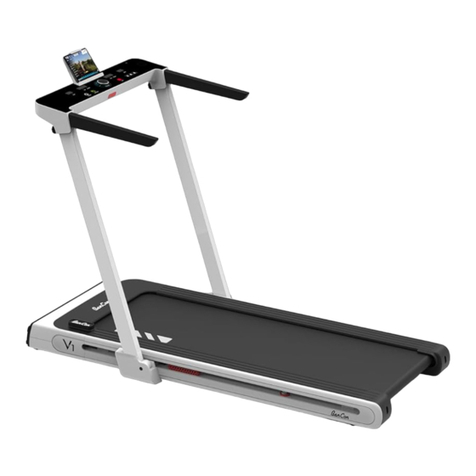
BanCon BC-T2100 User manual

WALKING
MACHINE
www . onebancon. c o m
BC-T2100
USER MANUAL
IMPORTANT! Please retain owner’s manual for maintenance and adjustment
instructions. For details regarding product warranty or if you have any
questions or problems, please contact [email protected].

CONTENTS
PRODUCTS&PARTS........................................01
MOVING THE MACHINE................................. 02
TECHNICAL SPECIFICATION.........................02
PRODUCT FEATURES....................................03
SAFETY INSTRUCTIONS................................04
GETTING STARTED GUIDE............................07
REMOTE CONTROL GUIDE............................09
EXERCISE SAFETY MEASURES......................11
MAINTENANCE GUIDE...................................11
LUBRICATING THE WALKING BELT.............12
MAINTENANCE INSTRUCTION.....................13
TROUBLESHOOTING.....................................15

01
PRODUCTS&PARTS
Item
Description Qty
Item
Description Qty
1 Walking Machine 1 4 Power Cord 1
2 Remote control 1 5 Inner Hexagon
Wrench (5mm)
1
6 Silicone Lubricant 1
3 Battery 1 pair 7 Instruction 1
Walking Machine
Remote Control Power Cord Battery
Tool Silicone Lubricant User Manual
234
65 7
1

02
TRANSPORT INSTRUCTIONS
TECHNICAL SPECIFICATION
1. After the walking machine stops running,
please turn off the power switch, unplug the
power cord, and put away the power cord;
2. Stand in the middle of the tail end of the
treadmill and raise your hands (as shown in the
figure);
3. Push the walking machine forward to your
designated position and put it lightly.
Note: Before moving the walking machine,
please make sure that the power cord plug of
the walking machine is unplugged, otherwise
the plug and socket may be damaged. To
prevent scratching the wooden floor,
handling movements on the wooden floor are
not recommended.
Overall dimension
(cm)
153.0 * 63.0 * 14.3 The rated voltage 220 v ~
Folding size (cm) Do not fold Rated frequency 50 hz
Running table size
(cm)
42.0 * 125.0 Rated power 745 w.
Net weight of the
machine
34 kg Rated current 4.2 A
The gross weight 40 kg Speed range 0.8 6.0 km/h
Applicable age 12-60 years old Operating ambient
temperature
0 to 40 ° C
Allow the weight < 90 kg Class don't H.
Remote control
display
Time distance speed step count calories
Security and
protection
The front end of the platform is overcurrent and overpressure type
recoverable insurance

PRODUCT FEATURES
03
The Product implementation standard
1. Gb17498.1-2008 /IS020957-1:2005 General Safety Requirements and Test methods
2. T/CSSGA1023-2019 Walking Machine Group Standard
3. Gb5296.7-2008 Instructions for Consumption of sports equipment
The pictures and parameters of this product our company reserves The right of technical
improvement. Subject to change without prior notice.
The use of different thicknesses of high-strength, high-density, wear-resistant running
board brings safe and comfortable walking experience.
High-grade anti-static, wear-resistant, non-slip running belt brings safe and comfortable
walking experience
The front and rear rollers are made of fine pumping tubes with taper at both ends, making
the running belt automatically reset.
The front end of the running platform uses bridge cellular cushioning, and the back end
uses magnetic suspension. The cushioned shock absorber provides full elasticity,
comfortable walking, avoids damage to the human body, and minimize the vibration noise.
Brushless motor makes the machine with low vibration, small noise and longer lifespan.
Remote control displays distance, time, calories, speed.
Automatic shutdown when no one is walking
Step recording is available but the data is for reference only. (Note: low-speed operation
might cause large step counting errors)
Feature over-voltage, over-current, under-voltage, overload and other protection
mechanism.
1.
2.
3.
4.
5.
6.
7.
8.
9.

04
SAFETY INSTRUCTIONS
Thank you for purchasing our products. the correct use is your guarantee of safety and
convenience, before using the walking machine please obey the following warnings.
1. WARNING.The power cord plug must be inserted into the power outlet with a safe
grounding to prevent the generation of static electricity which may affect the use of the
walker.
2. WARNING. Try to avoid the use of other electrical appliances with same power supply line,
so as not to produce circuit interference. Otherwise, this may cause abnormalities or damage
to the walker and other electrical appliances.
3. The free space required for safe operation during exercise is 2000mm (L) X 100mm (W) X
2250mm (H).
4. WARNING. Walking machine is for indoor use, please do not use it outdoor. For aerobic
cardio exercise, mainly to increase the cardio-respiratory function, muscle training as a
supplement.
5. WARNING.Any adjustment device that may interfere with the user's movement should not
deviate from the design.
6.Caution: The user is cautioned that changes or modifications not expressly approved by the
party responsible for compliance could void the user's authority to operate the equipment.
This device complies with Part 15 of the FCC Rules. Operation is subject to the following two
conditions: (1) this device may not cause harmful interference, and (2) this device must accept
any interference received, including interference that may cause undesired operation.
NOTE: This equipment has been tested and found to comply with the limits for a Class B
digital device, pursuant to Part 15 of the FCC Rules. These limits are designed to provide
reasonable protection against harmful interference in a residential installation. This
equipment generates, uses and can radiate radio frequency energy and, if not installed and
used in accordance with the instructions, may cause harmful interference to radio
communications. However, there is no guarantee that interference will not occur in a
particular installation.
If this equipment does cause harmful interference to radio or television reception, which can
be determined by turning the equipment off and on, the user is encouraged to try to correct
the interference by one or more of the following measures:
-- Reorient or relocate the receiving antenna.
-- Increase the separation between the equipment and receiver.
-- Connect the equipment into an outlet on a circuit different from that to which the receiver
is connected.
-- Consult the dealer or an experienced radio/TV technician for help.
FCC Radiation Exposure Statement
This equipment complies with FCC radiation exposure limits set forth for an uncontrolled
environment. This equipment should be installed and operated with a minimum distance of
20cm between the radiator and your body.
This transmitter must not be co-located or operating in conjunction with any other antenna
or transmitter.

05
Maintain eye level to avoid visual vertigo;
For beginners, please set the speed below
3km/h until you get used to it.
Wear rubber soled running shoes or gym
shoes
Professionals for repair and replacement It is strictly prohibited to use by more than
one person at the same time
Do not place on uneven ground or thick
carpet
Do not walk backwards
It is strictly prohibited to place the walking
machine upright
It is strictly prohibited to place the walking
machine on the side

06
Unplug and put away the power cord when
not in use to avoid uncontrolled use by a
third party
Do not touch any moving parts with hands
when in use
The walking machine and the rear space
must be maintained at
Above 1000mm X 1000mm
The space distance between the walking
machine and both sides should be
maintained separately
More than 500 mm
Minors must be accompanied and guided
by adults
The elderly and pregnant women are
advised to use with caution

If you are using a walker for the first time, it is necessary for you to read the following.
Preparation:
Before exercising you need to know your health condition in order to make an exercise plan that
suits you, it is recommended to consult a physician so that you may get twice the result with half
the effort.
Before using the machine, please make sure you know how to control it - such as start, stop and
speed adjustment, etc. Then stand on the plastic anti-skid plate on both sides of the treadmill,
start the machine at a low speed of 0.8 ~ 1.0 km/h. Stand straight, look forward and use one foot
to rub a few times on the running belt. Then stand on the running belt and move with it.
After adapting to the machine, slowly increase the speed to 2-3 km/h. Maintain this speed for
about 10 minutes, and then let the machine stop slowly. Do not run at high speed for the first
time to prevent falls.
Exercise:
Walk at a regular pace for about 1 km and record the time spent. This may take 15-25 minutes.
When walking at a speed of 4 km/h, 1 km will take about 15 minutes. After you are able to do this
easily a few times, you can gradually increase the speed so that you get a good workout for 30
minutes. Be clear in mind: be patient, this exercise is for your lifetime health, not an overnight
magic trick.
Frequency of exercise:
Aim for 3-5 times per week, 15-60 minutes of exercise each time. It's best to plan your workout
schedule according to your physical condition, not your preference, and you can control the
intensity of your workout by adjusting the speed and duration of your workout.
Exercise volume.
Shortcuts - Exercising for 15-20 minutes is a great way to save time. Warm up for 5 minutes at
64-4.8 km/h, then increase in increments of 0.3 km/h every 2 minutes until you feel it would be
challenging to keep exercising at a certain speed for 45 minutes. The above is for reference only,
please consult a professional for details.
Dressing:
All you need is a good pair of shoes, running shoes or fitness shoes are recommended. Also, do
not stick foreign objects on the soles of your shoes to avoid carrying them under the running belt
and wearing out the running board and running belt. Clothing should be comfortable and
suitable for exercise, we recommend the use of cotton breathable sports clothing.
07
GETTING STARTED GUIDE

Stretching exercises:
No matter what speed you walk, it is best to do stretching exercises first. Warm muscles are
easier to stretch, so walk for 5 to 10 minutes to warm up. Then stop and stretch as follows - 5
times for 10 seconds or more on each leg, and again at the end of the workout.
1. Downward Stretch
Bend your knees slightly, bend your body forward slowly, let your back and shoulders relax, and
try to touch your toes with both hands as much as possible. Hold for 10 to 15 seconds, then relax.
Repeat 3 times (see Figure 1).
2. Hamstring stretch
Sit on a clean seat cushion and stretch one leg out straight. Tuck the other leg inward so that it is
close to the inside of the straightened leg. Try to touch your toes with your hands. Hold for 10 to
15 seconds, then relax. Repeat 3 times for each leg (see Figure 2).
3 . Calf and Achilles Tendon Stretch
Hold with both hands on a wall or tree, one foot behind the other. Keep the back leg upright and
heel on the ground, leaning in the direction of the wall or tree. Hold for 10 to 15 seconds, then
relax. Repeat 3 times for each leg (see Figure 3).
4. Quadriceps extension
Hold the wall or table with your left hand for balance, then reach back with your right hand, grab
your right ankle and slowly pull it toward your buttocks until you feel tension in the muscles in
front of your thighs. Hold for 10 to 15 seconds, then relax. Repeat 3 times for each leg (see Figure
4).
5. Suture muscle (inner thigh muscle) stretch
Sit with the soles of your feet facing each other and your knees facing outward. Grab your feet
with both hands and pull them toward your groin. Hold for 10 to 15 seconds, then relax. Repeat 3
times (see Figure 5).
08

09
INSTRUCTIONS
I. Console Icon Display
Figure: Remote Control Guide
Battery Cover
LCD Console
(Speed, time, distance, calories, steps)
Speed+
Power(Start/Stop)
Speed-
Display Switch Button
Short press: change display
long press: standby/exit
Steps Calories
Distance Standby Constant Speed
Speed Time

10
1. The machine itself has no button or display. Remote control is required.
2. Speed control: machine starts at the lowest speed 0.8Km / h. If you want to accelerate
please press speed + (each press increases by 0.5Km / h), to slow down please press speed-
(each press decreases by 0.5Km/h). The control range is 0.8Km/h-6Km/h.
3. Start/Stop: In the stop state of the walker, press once to start the walker, and press
the button again to stop the walker.
4. Display switch button: the LCD screen displays: time, distance, calories, speed and steps.
short press the switch button to switch the display; when running, press increase button or
decrease button to change the speed; long press to enter standby mode ; long press or
press will exit standby mode and screen shows .
5. Remote control pairing instructions:
A. If remote control does not respond or screen does not flash please replace the battery (No.
7 battery).Re-pair is not needed.
B. If remote control does not respond or you have updated the remote control,re-pair is
needed.
Pairing method: start the machine again, long press display switch button for 5
seconds.Beeping means pairing is successful.
6. Error code:
E01-Software over-current
E02-Hardware over-current
E03-IPM module overheating
E04-under-voltage protection
E05-Over-voltage protection
E06-Engine out-of-phase protection
E07-Engine blocking protection
E08-Engine failure
E09-Engin over-current protection
E10-Overload protection
E11-Hall signal missing
E12-Communication problem

EXERCISE SAFETY MEASURES
11
Consult a professional before exercising. He or she can help you recommend exercise frequency,
exercise intensity, and exercise time appropriate to your age and physical condition. If you
experience chest tightness or pain, irregular heartbeat, shortness of breath, dizziness, or other
discomfort while exercising, stop immediately! Consult a professional before continuing to
exercise.
MAINTENANCE GUIDE
Warning: Before cleaning or maintaining the product, be sure to unplug the machine.
Cleaning: A comprehensive cleaning will greatly extend the life of the machine.
Remove dust regularly to keep parts clean. Be sure to clean the exposed parts of the running belt
on both sides, this will reduce the accumulation of debris under the running belt. Make sure your
sneakers are clean and avoid carrying foreign matters under the running belt to wear out the
running board and running belt. The surface of the running belt must be wiped with a damp
cloth dampened with soap. Be careful not to splash water on the electrical components and
under the running belt.
Warning: Please unplug the power of the walking machine before moving the motor protective
cover. Vacuum the motor with the motor cover open at least once a year.
Running Belts and Lubricating Silicone Oil
This walking machine has been pre-applied with lubricating silicone oil between the running
board and the running belt. The friction between the running belt and the running board has a
great influence on the service life and performance, so it is necessary to lubricate the silicone oil
regularly. We recommend regular inspections of the deck. If the board is damaged, please
contact our customer service center.
We recommend applying lubricating silicone oil according to the following schedule;
Light usage users (less than 3 hours per week) once a year;
Medium usage users (3-5 hours per week) every 6 months;
Heavy users (more than 5 hours per week) every 3 months.
We recommend that you purchase lubricating silicone oil from your local distributor or contact
us directly.

LUBRICATING THE WALKING BELT
12
Figure: Lubrication silicone oil added way
1. Gently push the walking machine as shown in the picture to make it inclined at an angle of more
than 45 degrees.
2. As shown in the picture, lift one side of the running belt by hand, pour the lubricating silicone
oil on the running board, and let the lubricating silicone oil flow down to the other side of the
running belt until the flow exceeds the middle of the running board, and then lay the machine flat.
When starting up, walk slowly for a few minutes to allow the running belt to fully absorb the
lubricating silicone oil, and then increase the speed.
Note: 20-25ml of refueling each time, do not add too much to avoid excessive refueling.
After adding oil, wipe off the oil dripping on the side panel and the surface of the running
belt with a rag.

1. In order to better maintain your walking machine and prolong the life of the machine, it is
recommended that you turn off the power after 2 hours of continuous use and let the machine
rest for 10 minutes before using it.
2. If the running belt is too loose, there will be slippage during running; if it is too tight, it may
reduce the performance of the motor and increase the wear of the roller and running belt. When
the running belt is tight enough, you can lift both sides of the running belt about 50-75mm away
from the running board by hand.
Adjustment of running belt alignment and tightness
In order for you to use the walking machine better and make the walking machine work better,
it is necessary to adjust the running belt to the best condition.
Running belt alignment:
Put the walking machine on a flat ground (press and hold the speed plus and minus keys of the
remote control at the same time for more than 3 seconds).
Run the walking machine at a speed of about 4 km/h.
If the running belt is skewed to the right, turn the right adjustment bolt 1/2 turn clockwise, and
then turn the left adjustment bolt 1/2 turn counterclockwise. Figure A
If the running belt is skewed to the left, turn the left adjustment bolt 1/2 turn clockwise, and then
turn the right adjustment bolt 1/2 turn counterclockwise. Figure B
MAINTENANCE INSTRUCTIONS
13
Figure A Figure B

Multi-ribbed Belt Tightness Adjustment
When you use the walking machine for a long time, the V-ribbed belt will become loose due to a
little wear or tensile deformation. At this time, you must make appropriate adjustments to
facilitate safe use. The judgment method is as follows: If you feel that the running belt
occasionally pauses when your feet fall on the running board during your normal walking
exercise, it means that the running belt or the V-ribbed belt is somewhat loose, and further
confirmation must be made. The way to judge which part is loose is; remove the front corner
guard and the left/right side cover screws, then remove the motor cover screws, let the walking
machine run at a speed of 1 km/h, and then you stand On the running belt, press the running belt
with both feet. (We recommend pressing the running belt with the amount of pedaling force
generated by the user's own body weight. )
A. If the instantaneous stepping pressure cannot stop the running belt from rotating, it means
that the tightness of the V-ribbed belt and the running belt is appropriate.
B. If you observe that the instantaneous stepping pressure causes the running belt to stop
rotating, but the V-ribbed belt and the front roller are still rotating, it means that the running belt
is somewhat loose and must be properly adjusted for safe use. (For adjusting the tension of the
running belt, see the maintenance guide on the previous page)
C. If you observe that the instantaneous stepping pressure causes the running belt and the
V-ribbed belt to stop rotating, but the motor is still running, it means that the V-ribbed belt is
somewhat loose and must be properly adjusted for safe use.
Adjustment Method
Step 1: Remove the front corner protector and left/right side cover screws of the machine first,
and then remove the motor cover screws.
Step 2: Loosen (but do not remove) the 2 nuts on both sides of the fixed motor, then use a
wrench to adjust the adjusting screw on the motor according to the situation. At the same time,
gently flip the V-ribbed belt between the motor shaft and the front roller by hand. If it is too
loose, you can flip the V-ribbed belt 100%; if it is too tight, you can flip the V-ribbed belt at a very
limited angle; It is suitable to be able to turn the V-ribbed belt 80% over after adjustment. Please
adjust the tightness of the V-ribbed belt to a state where it can be turned 80% (Note: the motor
and the roller should be kept parallel).
Step 3: Finally, tighten the lock nuts on both sides of the motor and install the plastic parts.
14

TROUBLESHOOTING
15
If your walking machine failure is not within the above range, please contact our customer
service.
Trouble Reason Solution
Machine not start
1.The power supply is not
plugged in or the switch is not
turned on
2.The overcurrent protector of
the machine is disconnected
3.The indoor overcurrent
protector is disconnected
1. Plug into a power outlet or turn
on the power switch
2. Replace the power fuse (or press
the overcurrent protection switch
at the front)
3. Reset the overcurrent protector
4. Put the safety switch in the
correct position
Running belt slips Running belt not tightened Adjusting running belt tension (see
maintenance guide)
V-ribbed belt slips The V-ribbed belt not
tightened
Adjust the tension of the V-ribbed
belt (see maintenance guide)
The running belt is not
in the center of the
treadmill
Roller balance is not adjusted
Adjust the running belt to the
neutral position (see maintenance
guide)
The machine makes
abnormal noise
1. The rotating shaft needs to
be lubricated
2. The machine screw is loose
1. Add lubricating oil to the
rotating shaft
2. Tighten the relevant screws

CONNECT WITH US
WWW.ONEBANCON.C O M
FOR FITNESS ARTICLES, VIDEOS & WORKOUTS
@BANCON @BANCONFITNESS@BANCONFITNESS @BANCONFITNESS @BANCONFITNESS
Table of contents
Other BanCon Treadmill manuals