Bang & Olufsen BeoVision 7 User manual

BeoVision 7
Guide

The Guide and the Reference Book
This Guide contains information about the daily use of your Bang & Olufsen
product. The Reference book contains information about connecting and operating
external equipment.
We expect your Bang & Olufsen retailer to deliver, install and set up your products.
However, the information required to install and set them up is included in the
Reference book. This is useful if you move your products or expand your system at
a later date.
Index
The Reference book also contains an index which refers to this Guide and the
Reference book. It can help you find the specific subject you want to know more
about.
An explanation of symbols in the Guide and
Reference book
Buttons on the Beo4 remote
control
Display on the Beo4 remote
control
TV
LIST
FORMAT

Introducing your Bang & Olufsen television, 4
Find out how to use the Beo4 remote control and bring up the menus on the
screen.
Watch TV, 6
Find out how to operate the daily functions of your television.
See two sources at the same time, 9
Find out how to use the dual-screen function of your television.
Surround sound and Home cinema, 10
How to use your television as a Home cinema.
Use the DVD player, 12
How to operate the daily functions of the DVD player and call up on-screen menus.
The digital tuner, 18
How to operate the digital tuner.
The digital tuner – Programme Guide, 19
Find information on current and coming programmes.
The pincode system, 20
How to utilise the pincode system.
Maintenance, 22
How to clean your television and change batteries in the Beo4 remote control.
Contents 3

Introducing your BeoVision and Beo4
The Beo4 remote control gives you
access to all functions. When a function
is in use, you are informed via displays
on Beo4 or on the screen.
Switch on the television
Switch on a source registered as DTV
Switch on a source registered as V MEM
Switch on a source registered as DVD
Switch on a source registered as CD
Select channels, track numbers and DVD chapters.
Enter data in on-screen menus
Enter information in on-screen menus. Cue back
and forth during playback of a DVD
Accept and store instructions or settings. Press
and hold to call up a channel list. Start disc
playback
Step up or down through channels or menu items.
Step between chapters or tracks on a disc
Reveal additional functions in the Beo4 display,
such as FORMAT
For information about how to operate connected
equipment, refer to the Guide enclosed with it.
For information on how to add extra functions to
those shown in the Beo4 display, refer to the
chapter ‘Customise Beo4’ on page 70 in the
Reference book.
The Beo4 display shows the source you have
selected, or extra functions available when you
press the LIST button
Bring up the main menu
Press to activate or deactivate Closed Captioning
The coloured buttons give you access to different
functions, depending on the source you have
selected.
Adjust sound volume: press in the middle to mute
the sound
Stop playback of a disc. Go back to the previous
on-screen menu
Exit all on-screen menus
Switch the television to standby
TV LIGHT RADIO
DTV DVD CD
V MEM RECORD A MEM
7 8 9
4 5 6
TEXT 0MENU
1 2 3
LIST EXIT
STOP
GO
TV
FORMAT
MENU
TEXT
STOP
EXIT
•
TV
DTV
V MEM
DVD
CD
0 – 9
GO
LIST
4

Information about the selected source is
shown in the display. On-screen menus allow
you to adjust settings.
How to use on-screen menus …
Press to switch on the television
Press to bring up the TV SETUP
menu
Press to move between the
different menu options
Press to reveal different settings
Press to bring up a menu or
store a setting you have made
Press to step back through
previous menus
Press to exit all menus
Displayed information and menus
TV
MENU
GO
STOP
EXIT
E
U
R
O
S
P
O
R
OPTIONS
select GO
CONNECTIONS
SOUND
PICTURE
CLOSED CAPTIONING
PARENTAL CONTROL
CLOCK
5
Menu name
Menu options
Information field

Watch TV
Choose a TV channel by its number
and switch to another channel or
source. Bring up a list of TV channels
on the screen, adjust the sound
volume or change the sound type or
language.
‘Watch TV’ concerns analogue TV. For
digital TV refer to page 18 in this
guide and to page 54 in the
Reference book.
Select a TV channel
When you switch the television on, the last
channel viewed appears on the screen.
Press to switch on the television
Press a channel number to go
directly to that channel
Press to change channels one by
one
Press to switch the television to
standby
Pressing 0 swaps between the
current TV channel and previous
TV channel.
Bring up a channel list
All your TV channels appear on a list, which
you can bring up on the screen. The list
contains channel numbers and names.
Press to switch on the television
Press and hold to bring up a
channel list on the screen
Press or to step between
‘pages’ in the channel list
To select a channel, enter the
channel number, or …
… press until the desired
channel is highlighted
Press to switch on the chosen
channel, or …
… press to leave the menu
TV
0 – 9
•
TV
GO
0 – 9
GO
EXIT
6

The channel list for TV is now called up. It provides
you with an overview of all your available TV
channels.
Adjust or mute the sound
You can adjust or mute the sound at any time.
Press either end of the button to
adjust the volume up or down
Press in the middle of the button
to mute the sound
Press either end of the button to
bring the sound back
Prolonged listening at high
volume levels can cause hearing
damage!
Change sound type or language
While you are watching TV, you can switch
between the types of sound that are
available.
Press repeatedly to display
SOUND* on Beo4
Press to bring up the current
sound type on the display
Press GO repeatedly to switch to
another sound type or language
in a multi-language programme
Press to leave the SOUND
function
You can store your favourite
sound type when scanning in
your TV channels. For further
information, refer to the chapter
‘Edit TV channels’ on page 40 in
the Reference book.
*Before you can bring up SOUND
in the Beo4 display, you must
add it to the list of functions.
Refer to the chapter ‘Customise
Beo4’ on page 70 in the
Reference book.
LIST
SOUND
GO
GO
EXIT
TV CHANNEL LIST
1 CNN
2 MOVIE NW
3 DISCOVER
4 CWNBC
5 BBCWORLD
6 SUPER CH
7 CRIME TV
8 CINEMA
9
10
11
12
13
14
15
16
17
18
more select GO
7

You can turn the television using your Beo4
remote control.*
Press repeatedly to display
STAND on Beo4
Press to turn the television to the
left or the right, or …
… press the number buttons to
choose a pre-defined position;
1 represents the far left position,
9 represents the far right
position
If your television is equipped
with a stand with motorised tilt
function, press to tilt the tele-
vision up or down
*Note: You cannot use the
motorised stand before you have
completed the calibration of the
built-in stand. Please refer to the
chapter ‘First time setup of your
television’ on page 26 in the
Reference book.
For further information about how to preset
positions for TV viewing, refer to the chapter ‘Set
positions for the television to turn to’ on page 46
in the Reference book.
>> Watch TV
Turn the television
LIST
STAND
1 – 9
8

See two sources at the same time
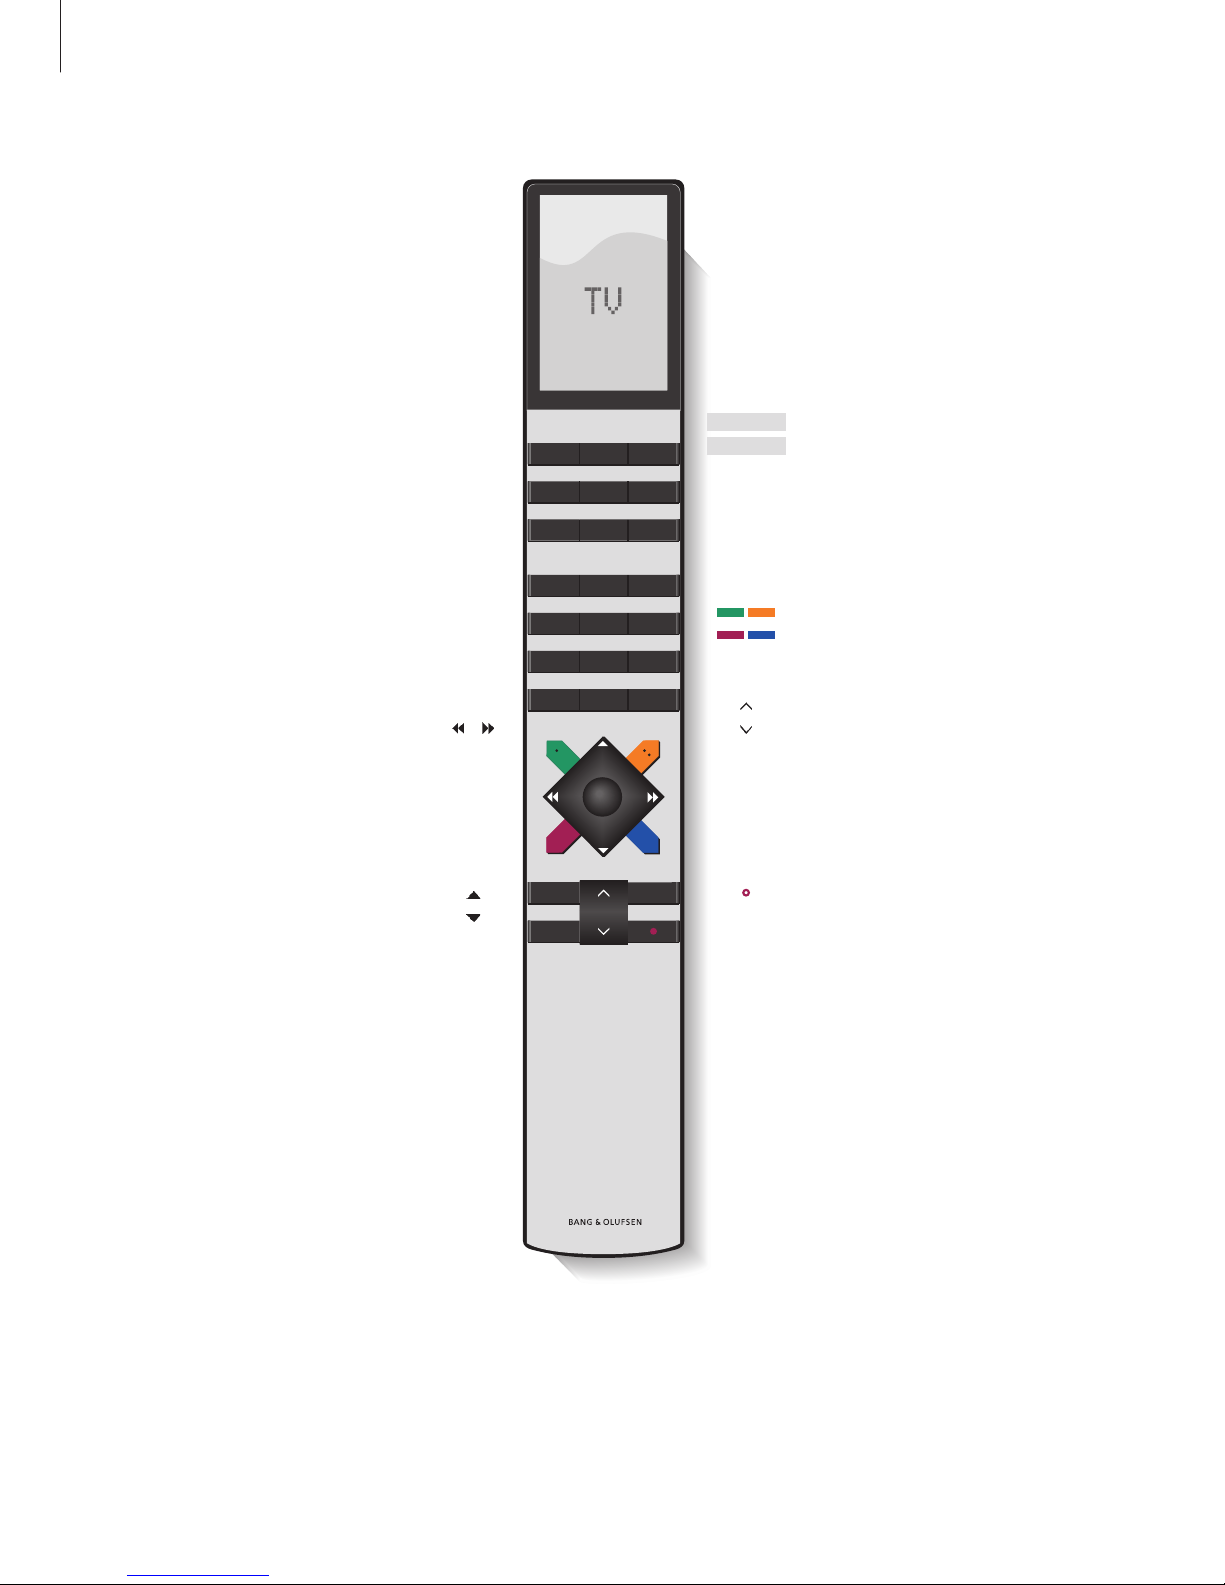
Your Beo4 remote control gives you
access to a dual-screen function for
viewing two video sources at the
same time. For example, you can
view video playback and a TV
programme at the same time,
provided that the selected sources
are available in your television.
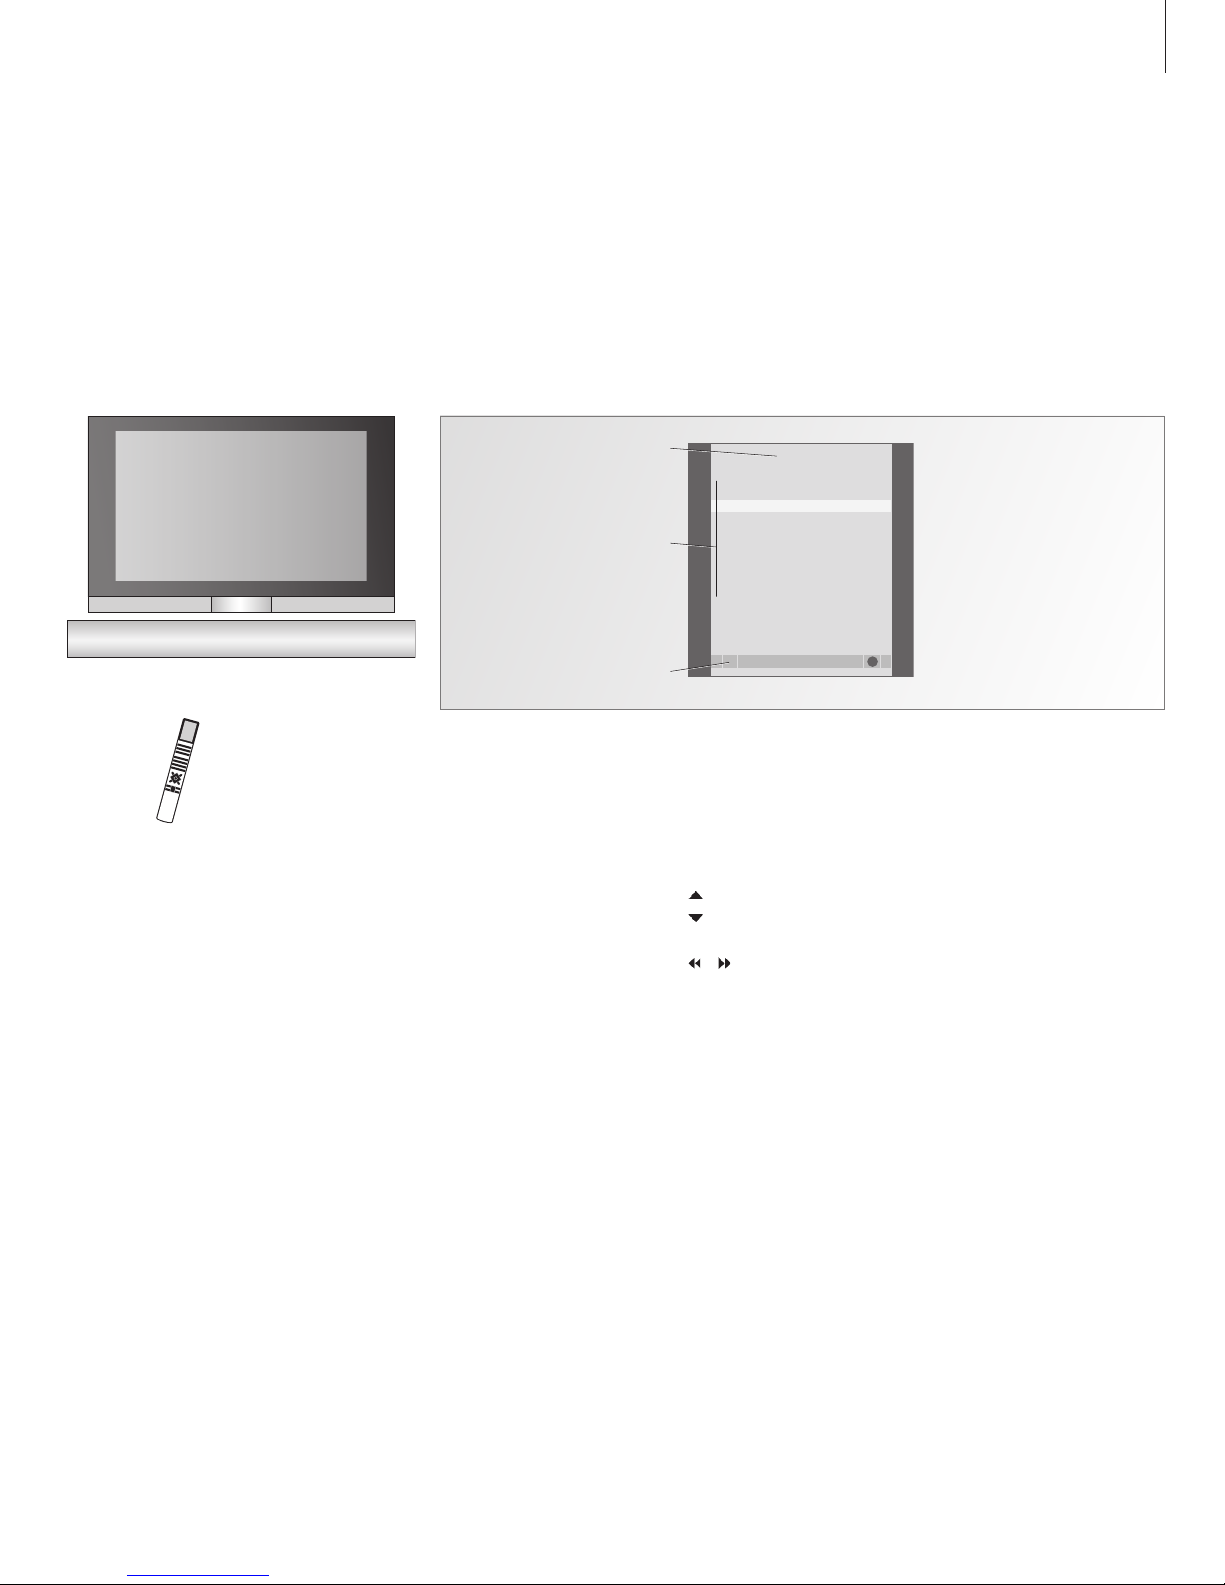
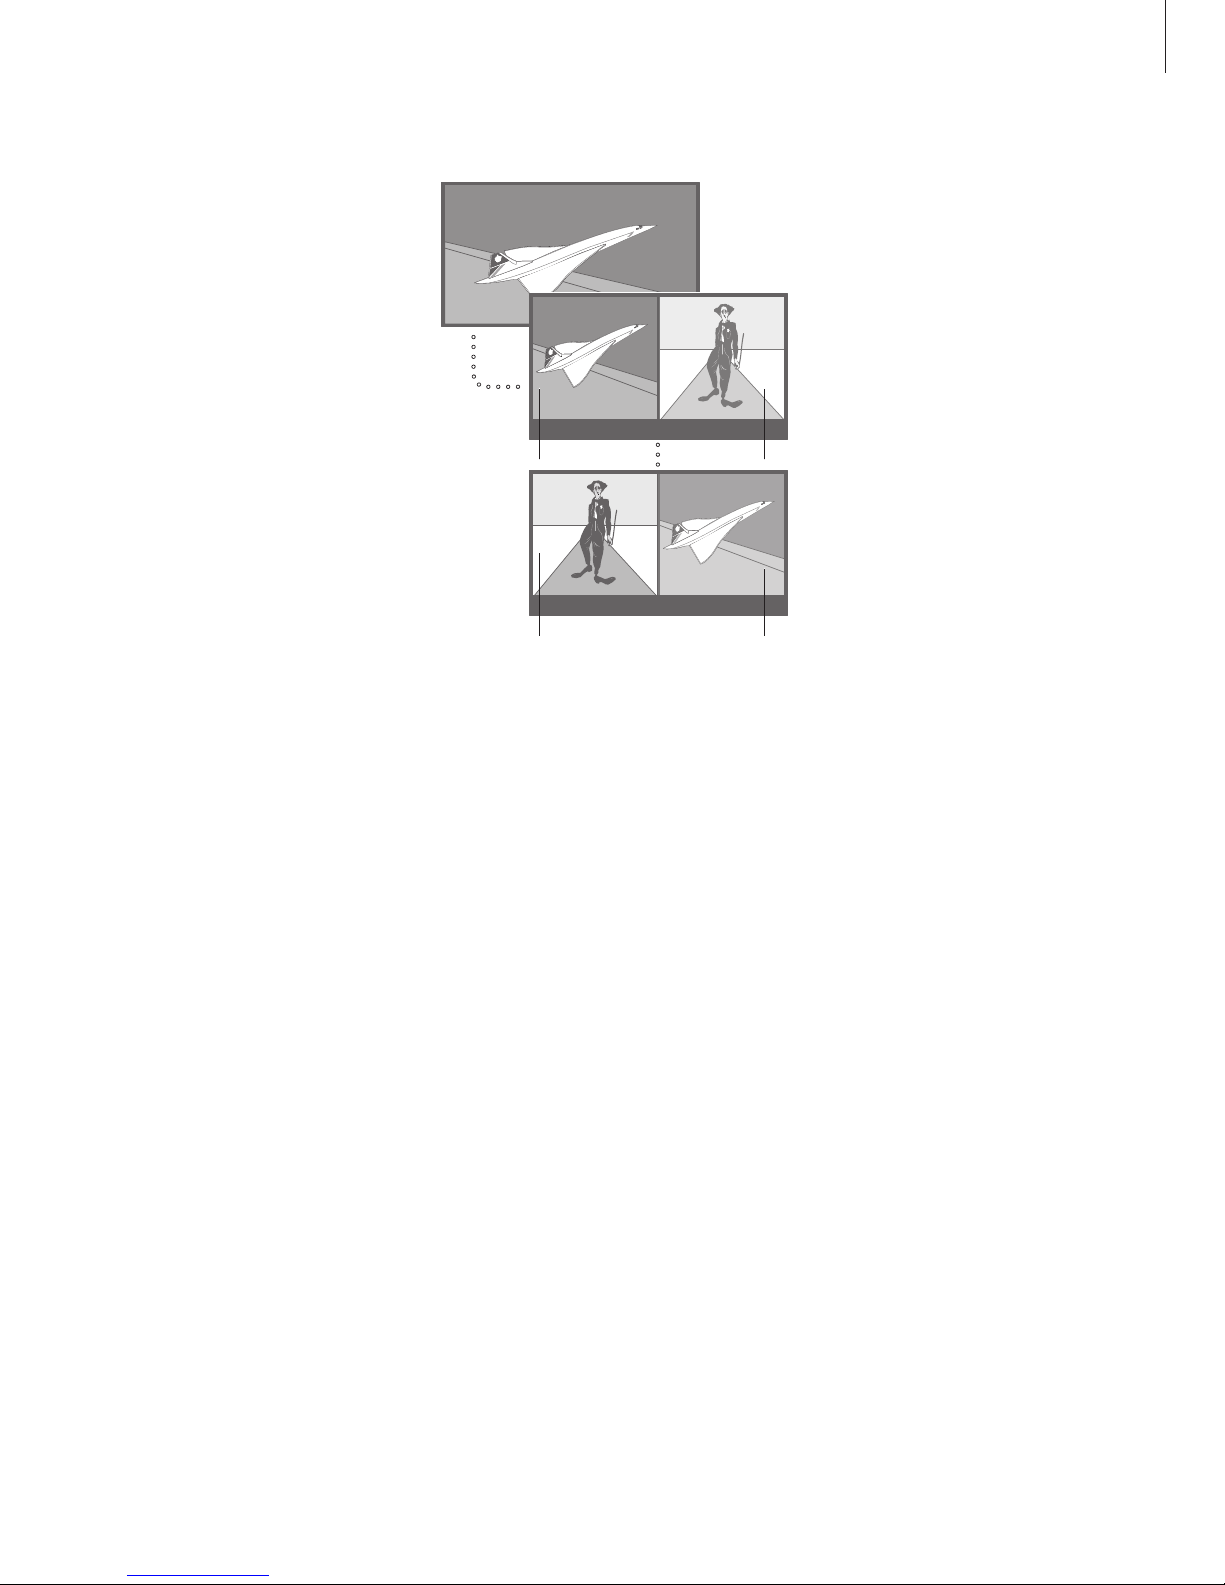
While watching a programme or
recording, you can divide the screen
between the current programme or
recording (picture A in the second
illustration) and a new programme or
recording (picture B). You can also
swap the two pictures at any time.
Volume adjustment with Beo4 always
affects picture A, while other Beo4
operations, such as selecting
channels, affect picture B. Choosing
a new source cancels dual-screen
viewing.
To view a source registered in the CONNECTIONS
menu as V.AUX, such as a set-top box, press LIST
repeatedly until P-V.AUX* is shown in the Beo4
display instead.
You can view two HDMI sources at the same time,
but only if one of the sources is connected to
either the HDMI A or HDMI B socket, and the
other source is connected to either the HDMI C or
HDMI D socket. For further information about the
HDMI sockets, refer to the chapter ‘Connection
panels’ on page 20 in the Reference book.
While watching, for example, TV …
> Press LIST repeatedly to display P-AND-P on
Beo4.
> Press, for example, V MEM to select the source
to view on the right side of the screen (B).
> Press 0 to swap the left picture and right
picture.
To leave the dual-screen function …
> Press a source ,for example TV, to leave the
function and return to normal viewing of the
chosen source.
When the television is in dual mode the number 0
is used for changing the picture, therefore it
cannot be used for, for example, selecting
channels.
AB
AB
9
*NOTE! In order to display P-V.AUX on Beo4, you
must add it to the Beo4 list of functions. For
further information, refer to the chapter
‘Customise Beo4’ on page 70 in the Reference
book.

Surround sound and Home cinema
You can extend your television into a
surround sound system by adding
Bang & Olufsen loudspeakers and up
to two BeoLab 2 subwoofers.
When you switch on one of the
sources, speakers in a surround
sound system can be cut in or out,
depending on what kind of sound
suits the source you are using.
If you connect a projector, you can
turn your television into a Home
cinema. When you switch to the
Home cinema setup, the television
switches the picture from its own
screen to the projector screen and
activates the appropriate speakers.
For further information about how to
connect speakers to the television,
refer to the chapter ‘Set up the
television’ on page 16 in the
Reference book.
You can select the speaker combination that
suits the source you are using, provided that
the various speaker modes are available in
your television.
Press repeatedly to display
SPEAKER on Beo4
Press if you want to return to the
chosen default sound setting,
or …
… press the number of the
speaker combination you want.
The selected speakers cut in
automatically
Press to remove SPEAKER from
the Beo4 display and to return to
the source you were using
Speaker combinations
SPEAKER 1 … Sound in the centre speaker only.
SPEAKER 2 … Stereo sound in the front speakers.
Subwoofers are active.
SPEAKER 3 … The centre speaker, front speakers
and subwoofers are active.
SPEAKER 4 … The front speakers, surround
speakers, and subwoofers are active.
SPEAKER 5 … Surround sound from all speakers
and subwoofers. For programmes encoded in
Surround Sound.
If you have added only two front speakers to the
television, you will only be able to choose
SPEAKER 1–3.
Select speakers for movie sound
LIST
SPEAKER
GO
1 – 5
EXIT
10

Picture format
Your television always ensures you the best
possible picture. It automatically adapts the
picture so that it fills out as much of the
screen as possible. However, you can always
choose the format you prefer. When you
select a format yourself, the automatic
format selection is deactivated, until you
switch to a different channel or change
source.
Press repeatedly to display
FORMAT on Beo4
Press if you want to optimise the
picture, or …
… press the number of the
desired picture format
If you have chosen Format 1 …
Press or to select variations
of this format
If you have chosen Format 1
or Format 2 …
Press or to move the
picture up and down
Press to leave the FORMAT
function
Picture formats to choose from
FORMAT 1 … For standard TV pictures. Two
variations are available: Panoramic view (for the
largest picture) and 4:3.
FORMAT 2 … For letter-box pictures. When you
select FORMAT 2, the picture is automatically
adjusted vertically. This ensures that channel
names or subtitles – if these appear in the
broadcasted picture – can be seen.
FORMAT 3 … For genuine 16:9 wide-screen
pictures.
Switch to Home cinema
If a projector is connected, you can use your
Beo4 remote control and move the picture
from the television screen onto a projector
screen for a special occasion or movie.
Press repeatedly to display
FORMAT on Beo4
Press to switch between Home
cinema mode and ordinary TV
mode
Press to leave the function
LIST
FORMAT
0
EXIT
LIST
FORMAT
GO
1 – 3
EXIT
11

Use the DVD player
You can start and stop playback, step
between chapters and tracks and cue
back and forth on a disc. Bring up
the DVD menus to change, for
example, audio or subtitle language.
Use the DVD main menu to make
your own settings for DVD playback.
You can always resume playback of
the loaded DVD at the point where
you left off provided that you have
just stopped playback of the DVD by
pressing STOP twice, not three times.
Some discs do not register, whether the
DVD player is in “play mode” or “menu
mode” when being operated. In these few
cases, you must press the yellow button
before sending a command to the player;
In menus, for example, you must press the
yellow button and then GO, to store a
selection.
When playing an audio CD, the television
screen is blank.
To load a disc, press the load bar below the
television screen.
Place a disc in the loader with the label facing
upwards. Eight centimetre discs may only be
loaded provided with a suitable adaptor. Discs of
other shapes cannot be played.
To load a disc and begin playback …
> Press the load bar below the screen. The loader
slides out, and the display prompts you to load
a disc.
> Place a disc in the loader as described to the left.
> Press and hold the load bar. The loader retracts,
DVD is activated and playback begins
automatically.*
To load a DVD while watching TV, for example,
for playback at a later point in time, press the load
bar shortly. The loader retracts and playback
does not begin.
If you restart playback of a loaded disc after an
interruption, playback resumes at the point of
interruption.
Load and play a disc
12
*NOTE! If the DVD player cannot recognise the
format of a loaded disc, the disc is ejected and
DVD LOAD is shown in the display window. This
may be due to disc faults such as dust, dirt, finger-
prints or scratches, or because the DVD is from an
incompatible region. For more information about
handling DVDs, refer to the chapter ‘Maintenance
of your television’ on page 22.
Load bar

Play and change chapters or tracks on a disc …
Press to start playing a DVD or
CD
Press to step between chapters
or tracks
Press repeatedly to jump to
another chapter or track on the
disc
Enter the chapter number to
step directly to a chapter or track
Press to cue backwards or
forwards during playback
Press to resume playback
Pause, slow playback or stop playback of a
disc …
Press to pause playback
Press for playback in slow-
motion either forwards or
backwards (DVD only)
Press again to stop playback
completely*, or …
… press to resume playback, or …
… press a third time to return to
the beginning of the disc
Some video CDs and super VCDs
have playback control menus, to
bring up this menu press the
yellow button, then STOP.
*If you stop playback like this, the
player remembers where you
left off on the last 5 discs, and
resumes playback, when you
restart.
DVD
1 – 9
GO
STOP
STOP
GO
STOP
13
NOTE! Some DVDs offer special features which are
temporarily available during playback, such as
additional film sequences. In such situations, press
the yellow button then GO to select this special
feature.
To play other disc formats
Your television is designed to play back
different disc formats. Supported formats are:
– DVD-Video
– Audio CD
– Video CD
– CD-R/RW
– DVD-R/RW, provided that these are
recorded using the DVD Video format and
the disc is finalised.
– Discs containing mp3 files are supported, if
the sampling frequency is set to either 32,
44.1 or 48 Khz.
– WMA (Windows Media Audio), except
when protected with DRM (Digital Rights
Management).
When playing discs with mp3 or WMA files,
use and to step between tracks, and
and to wind.
Press the blue button to bring up a list of
the disc content and browse in the content.
Press EXIT to remove the list.
– JPEG files up to a resolution of 3072 x 2048.
When playing discs with JPEG files, use the
yellow button, then and , and to
rotate the picture.
– DivX versions 3, 4, 5 and DivX VOD are
supported.
In general, playback of data generated files is
only possible if the files are recorded onto a
CD-R/RW or DVD-R/RW.

DVD menu
>> Use the DVD player
To get a quick overview of the DVD menus,
you can bring up an overlay on the TV screen.
Press to switch on DVD
Press to bring up the DVD menu
overlay
Press one of the coloured
buttons to activate a function,
or …
… press the number button that
activates the function you want
Use DVD on–screen menus …
Press the red button to bring up
the audio language menu*. Press
repeatedly to switch between
the available options. When you
have made your selection, the
menu disappears
Press the green button to bring
up the subtitle language menu*.
Press repeatedly to switch
between the available options.
When you have made your
selection, the menu disappears
Press the blue button to bring
up the disc menu
In the disc menus …
Use the arrow keys to move
between options in the menus
Press to enter your choice or
setting
*Not all discs have separate
subtitle and audio language
menus, in those cases you must
use the main or disc menu.
The menu overlay helps you remember the DVD
functions, however, you can call up the functions
without calling up the overlay first.
When DVD is selected as source, press MENU
twice to bring up the television’s main menu.
GO
DVD
MENU
1 – 5
AUDIO
SUBTITLE
“SHIFT”
DISC MENU
TOP MENU
DVD DISPLAY
DVD SETUP
ZOOM
ANGLE
1
2
3
4
5
1
2
3
4
5
AUDIO
SUBTITLE
“SHIFT”
DISC MENU
TOP MENU
DVD DISPLAY
DVD SETUP
ZOOM
ANGLE
14

While DVD is selected …
Press the yellow button then 1
to bring up the disc’s own top
menu (not all discs contain a top
menu)
Use the arrow keys to move
between options in the menus
Press to enter your choice or
setting
Press the yellow button then 2
to bring up the on-screen status
display menu. Press 2 again to
change to the next on-screen
display. Press 2 a third time to
remove the on-screen status
display
Press the yellow button then 3
to bring up the DVD main menu.
This is described to the right
Press the yellow button then 4
to zoom in on the picture. Press
4 to increase the zoom factor.
Press 4 a third time to exit the
zoom feature
Press the yellow button then 5
to bring up the camera angle
menu. Press 5 to switch
between the available options.
When you have made your
selection the menu disappears.
However, if you have switched
on the angle indicator in the disc
setup menu, the icon remains on
the screen
How to use the DVD menus …
> Press the yellow button, then 3 to bring up the
DVD main menu.
> Press or to move to the menu you wish to
enter and press GO.
> Use the arrow keys; , , and to move
between menus and settings.
> Press GO to store your choice.
> Press EXIT to leave on-screen menus.
What’s on the Play Mode menu …
The Play Mode menu allows you to make selections
for playback. The following options are available:
A–B Repeat … The A–B repeat function allows
you to specify two points on a disc that form a
loop to be played over and over.
Repeat … The repeat function allows you to
repeat a title or a chapter on a disc over and
over.
Random … The random play function allows you
to play titles or chapters on a disc in random
order.
Search Mode … The search mode function
allows you to search through a disc, either by
searching for a specific title or chapter, or by
searching for a moment in elapsed time on a
disc.
1
GO
2
3
4
Play Mode
A-B Repeat
Repeat
Random
Search Mode
A (Start Point)
B (End Point)
Off
Play Mode Disc Navigator
Initial Settings
5
15
NOTE! This DVD player is set for the appropriate
region from the factory. Discs from incompatible
regions will not play on this player.

What’s on the Initial Settings menu …
The Initial Settings menu enables you to choose
your preferred settings for DVD playback. Settings
in this menu cannot be entered during playback.
The following options are available:
Digital Audio Out … Choose the sound output
for your system. Options for Dolby Digital Out
are: Dolby Digital or Dolby Digital > PCM
(stereo). Options for DTS Out are: DTS and DTS
> PCM (stereo).
Video Output … Do not change.
Language … The language menu allows you to
store your preferred language for audio, subtitle
and the disc menu, and to decide whether or
not available subtitles should be shown during
playback. If the languages you choose in this
menu are available on the loaded disc, they will
be used.
Some DVDs will require you to choose a subtitle
language from a disc menu, even if you have
previously selected a default subtitle language
from the ‘Language’ menu.
Display … The display menu allows you to select
the language of the DVD player menus, to decide
whether or not operation displays should be
shown on the screen, and whether the angle
indicator should be shown. The angle indicator
is only available if the disc contains the alternate
camera angle feature.
Options … Some DVDs feature a Parental Lock
level. If you specify a level lower that the one
contained on the disc, the disc will not play,
unless your pincode is entered. Some discs also
support the Country Code feature. This means
that the player does not play certain scenes on a
disc, depending on the Country Code and the
Parental Lock level you set. Before you can set
the Parental Lock level or the Country Code, you
must enter a pincode. You can change the
pincode at any time.
If you forget your pincode, you must enter the
Parental Lock menu, and disable the Parental
Lock. The function is then deactivated. This is
described on the next page.
DivX VOD is used for video on demand. Use the
menu to generate a DivX VOD registration code
which you submit to your provider. Contact your
DivX VOD provider for further instructions.
What’s on the Disc Navigator menu …
The Disc Navigator menu allows you to quickly step
to specific titles or chapters on a disc.
>> Use the DVD player
Initial Settings
Digital Audio Out
Video Output
Language
Display
Options
Dolby Digital Out Dolby Digital
DTS Out DTS
Disc Navigator
Title
Chapter
16

To disable the Parental Lock …
IMPORTANT! You must remove the disc from the
DVD player and make sure the loader is closed
before you disable the Parental Lock.
> Press DVD to activate the DVD player.
> Press MENU to bring up the DVD SETUP menu.
> Press to move the cursor down to the
OPTIONS menu.
> Press MENU to reveal the item PARENTAL LOCK.
> Press GO to bring up the PARENTAL LOCK menu.
> Press GO to disable the Parental Lock, or …
> … press STOP to leave the menu without
disabling the Parental Lock.
> Press EXIT to leave all menus.
Note: When you disable the Parental Lock, the DVD
player restarts automatically. All settings you have
made for the DVD player, such as language
selection, are reset and you must make your
settings again.
DVD SETUP
select GO
DVD
TIMER RECORDING
PLAY TIMER
OPTIONS
DVD SETUP
select GO
DVD
TIMER RECORDING
PLAY TIMER
PARENTAL LOCK
To disable Parental lock
press GO
PARENTAL LOCK
accept GO
17

The digital tuner
When you select the built-in ATSC
tuner, you can receive digital
terrestrial and open cable
programmes.
A small information display with
channel number and name appears
briefly on the screen every time you
change channels. You can bring up a
more detailed display on the screen
to see programme information at any
time.
ATSC tuner functions
Activate the built-in ATSC tuner
Bring up the ATSC tuner menu
Press and hold while watching
television via the built-in ATSC
tuner to bring up a Channel List
or a list of your favourite
channels
Press to change the Closed
Captioning for the current
channel*
Press to bring up information on
the programme you are currently
watching, or use as indicated in
the ATSC tuner menus
Press to bring up the Programme
Guide with information on
current and next programmes,
Press to change audio language
for the current channel
Press to activate the Channel
Delimiter
Closed Captioning or Audio options …
If Closed Captioning is available it is indicated in
the programme information*. If an additional
audio option is available, it is indicated which
language. ‘Multi’ indicates that more than one
language are available.
DTV
MENU
GO
TEXT
Air 11-1 KNTV-HD 3:30 AM, Tue Sep 28
9:00AM-10:00AM Gone with the Wind
Mode: HD Language: Multi
CC: Caption Rating: TV-14
18
To see the more detailed programme information, press the blue button. If N/A appears on the
information display, it indicates that information is not available for the specific area. Furthermore you
find a specific programme information display in the Programme Guide, which also offers you details
about the programme content. For further information refer to ‘The digital tuner – Programme Guide’,
on page 19.
Programme name
Channel name
Programme duration
Time and date
Programme rating*
Additional audio
options
Additional caption
options*
Programme mode
Channel number
*NOTE! Closed Captioning and programme rating
are not available in Korea.
Depending on your Beo4 version, the ‘DTV’
button may be named ‘SAT’ instead. These
buttons have the same function.

Press to bring up the Programme
Guide
Press to move the cursor up or
down
Press to step between ‘pages’ of
the Programme Guide
Press to select a highlighted
programme
Press to call up a 7-days list of
programmes for the selected
channel
Press to remove the Programme
Guide from the screen
From the 7-days list …
Press to bring up information on
a specific programme
Press to go back to the previous
menu
If N/A appears on the
information display, it indicates
that information is not available
for the specific area.
The Programme Guide.
The 7-days list.
When specific programme information is shown on
the screen and the information exceeds one page,
you can scroll down the page with the button.*
The digital tuner – Programme Guide
You can bring up a Programme Guide
of current and following programmes
on the screen while watching
television via the built-in ATSC tuner.
The Programme Guide contains
information about the current and
coming programmes on all available
channels. You can also change to a
different channel via the Programme
Guide.
GO
EXIT
STOP
11-1 WTTW-HD 11:24 AM, Thu Aug 31
Great Performances AM 11:00 - PM 12:00
move page move program GO select info
11-1 WTTW-HD Great Performances
Small Fortunes: Microcredit and the Fu ...
11-2 WTTW-DT Sesame Street
Bob the Builder
11-3 WTTW-DT Scrapbook Memories
Katie Brown Workshop
11-1 WTTW-HD 11:24 AM, Thu Aug 31
Great Performances AM 11:00 - PM 12:00
STOP back
11-1 WTTW-HDMode: HD Language: English
CC: Caption Rating: TV-G
Bruce Springsteen - The Seeger Sessions Live
A concert presentation from “The Boss’s”
current tour. Recorded at St. Luke’s in
London’s East End, rocker Bruce Springsteen
performs an intimate concert of songs
selected from his new album, We shall ov ...
11-1 WTTW-HD 11:24 AM, Thu Aug 31
Great Performances AM 11:00 - PM 12:00
move page move program GO select info
AM 11:00 Great Performances
12:00 Small Fortunes: Microcredit and the ...
1:00 They Made America
2:00 Frontline
3:00 Great Performances
4:00 Small Fortunes: Microcredit and the ...
5:00 They Made America
6:00 Frontline
7:00 JAKERS! The Adventures of Piggley Wi ...
7:30 Design: E2 (The Economics of Being E ...
8:00 NOVA
19
*NOTE! Closed Captioning and programme rating
are not available in Korea.

The pincode system
The pincode system is intended to
make normal use of your television
impossible for someone who does
not know the pincode. You choose
whether or not to activate the
pincode system.
When the pincode system is activated
and the television has been
disconnected from the mains for 15–
30 minutes, the pincode system goes
into effect.
When reconnected and switched on,
the television automatically switches
itself off after four minutes. Entering
the pincode returns the television to
normal.
Note: If you change your pincode more than
five times within a three-hour period, the
PINCODE menu becomes inaccessible for three
hours, assuming that the television is not
disconnected from the mains. Disconnecting
the television resets the three-hour period.
Activate the pincode system
If you wish to deactivate the pincode system,
you can do so by deleting your pincode.
To activate the pincode system …
> Press MENU to bring up the TV SETUP menu.
> Press twice, followed by STOP. The PINCODE
menu appears on the screen.
> Use the number buttons on Beo4 to enter the
four digits of your code.
> Press GO after the last digit is found.
> Re-enter your code to confirm it and press GO
again. If the two codes are not identical, the
input fields are cleared and you must enter the
code again.
To change or delete your pincode …
> Press MENU to bring up the TV SETUP menu.
> Press twice, followed by STOP. The PINCODE
menu appears on the screen.
> Enter the correct pincode and press GO.
DELETE PINCODE is highlighted.
> To delete your code, press GO.
> To change your code, press to highlight
NEW PINCODE and press GO. Enter the new
code using the number buttons and press GO.
Re-enter the new code to confirm it.
If you inadvertently press a wrong button while
entering a code, press STOP. The entry is
cancelled and the input fields are cleared.
PINCODE
next
accept GO
PINCODE 0 . . .
CONFIRM PINCODE . . . .
PINCODE
select GO
DELETE PINCODE
NEW PINCODE
20
Other manuals for BeoVision 7
11
Table of contents
Other Bang & Olufsen Home Theater System manuals

Bang & Olufsen
Bang & Olufsen VX5500 Beovision User manual

Bang & Olufsen
Bang & Olufsen BeoSystem 4 User manual

Bang & Olufsen
Bang & Olufsen BeoVision 7 Product guide

Bang & Olufsen
Bang & Olufsen BeoVision 7 User manual

Bang & Olufsen
Bang & Olufsen BeoVision 7 Product guide

Bang & Olufsen
Bang & Olufsen BeoSound THEATRE User manual

Bang & Olufsen
Bang & Olufsen BeoVision 7 User manual

Bang & Olufsen
Bang & Olufsen BeoSystem 3 User manual

Bang & Olufsen
Bang & Olufsen BeoVision 9 User manual

Bang & Olufsen
Bang & Olufsen BeoVision 7 User manual