Bang & Olufsen BeoLab 19 User manual

BeoLab 19

Important Safety Instructions
WARNING: To reduce the risk of fire or
electric shock, do not expose this
appliance to rain or moisture.
The product can only be switched o
completely by disconnecting it from the
mains sockets. The mains sockets must
always be accesible.
The lightning flash with arrowhead
symbol within an equilateral triangle,
is intended to alert the user to the
presence of un insulated “dangerous
voltage” within the product’s enclosure that may
be of sufficient magnitude to constitute a risk of
electric shock to persons.
The exclamation point within an
equilateral triangle is intended to alert
the user to the presence of important
operating and main tenance (servicing)
instructions in the literature accompanying the
product.
To prevent electric shock hazard,
do not connect to mains power
supply while grille is removed.
For the Chinese market only!
仅适用于海拔2000m以下地区安全使用。
仅适用于非热带气候条件下安全使用。
如 果 在 热 带 地 区 使 用 ,房 间 内 必 须 有 空
调
Read these instructions.
Keep these instructions.
Heed all warnings.
Follow all instructions.
Do not use this apparatus near water.
Clean only with dry cloth.
Do not block any ventilation openings. Install in
accordance with the manufacturer’s instructions.
Do not install near any heat sources such as
radiators, heat registers, stoves, or other
apparatus (including amplifiers) that produce heat.
Do not defeat the safety purpose of the polarized
or grounding-type plug. A polarized plug has two
blades with one wider than the other. A grounding
type plug has two blades and a third grounding
prong. The wide blade or the third prong are
provided for your safety. If the provided plug does
not fit into your outlet, consult an electrician for
replacement of the obsolete outlet.
Protect the power cord from being walked on or
pinched particularly at plugs, convenience
receptacles, and the point where they exit from
the apparatus.
Only use attachments/accessories specified by
the manufacturer.
Use only with the cart, stand, tripod, bracket, or
table specified by the manufacturer, or sold with
the apparatus. When a cart is used, use caution
when moving the cart/apparatus combination to
avoid injury from tip-over.
Unplug this apparatus during lightning storms or
when unused for long periods of time.
Refer all servicing to qualified service personnel.
Servicing is required when the apparatus has been
damaged in any way, such as power-supply cord
or plug is damaged, liquid has been spilled or
objects have fallen into the apparatus, the
apparatus has been exposed to rain or moisture,
does not ope rate normally, or has been dropped.
Cautions
– No naked flame sources, such as lighted candles
should be placed on the product.
www.bang-olufsen.com
CA
UTION
İ2000
m

Contents
Illustrations, Illustrationer, Illustrationen, Illustraties, Illustrations, Ilustraciones, Illustrazioni,
Ilustrações, , イラスト, 삽화, 图示, 圖示, 4
English, 8
Dansk (Danish), 9
Deutsch (German), 10
Nederlands (Dutch), 11
Français (French), 12
Español (Spanish), 13
Italiano (Italian), 14
Português (Portuguese), 15
(Russian), 16
日本語 (Japanese), 17
한국어 (Korean), 18
简体中文 (Simplified Chinese), 19
繁體中文 (Traditional Chinese), 20
Technical specifications, features and the use
thereof are subject to change without notice.
3511230 Version 1.0 1310
This guide is primarily intended for the retailer
Denne vejledning er primært beregnet til
forhandleren!
Diese Anleitung richtet sich in erster Linie an
Fachhändler
Deze handleiding is in de eerste plaats bedoeld
voor de dealer.
Ce manuel est avant tout destiné au revendeu
Esta guía está destinada principalmente al
distribuidor
Questa Guida è primariamente indirizzata
all’installatore
Este Livro de consulta destina-se principalmente
ao revendedor
本書は設置者向けのガイドです。
본 사용 설명서는 Bang & Olufsen 매장용으로
작성되었습니다.
本《 指 南 》主 要 供 零 售 商 参 阅 。
本指南主要供 Bang& Olufsen 門市人員使用

1
4
2
3

6
5
4
5

7
9
8
6

7
10 11
12

English
Set up your BeoLab 19 subwoofer wirelessly or
with cables. Ensure that the subwoofer is
positioned, set up and connected in accordance
with the instructions in this guide. You may also
contact your retailer regarding installation.
1When handling your subwoofer make sure
to place it on a soft cloth or the like to
avoid making marks on the subwoofer. Do not
hold by or place the subwoofer on the front or
back.
2Set up your audio/video product wirelessly
with the BeoLab19 subwoofer. See the
guide enclosed with your transmitter device, for
example BeoLab Transmitter1, for information
about how to connect the transmitter device,
your audio/video product and your subwoofer.
Set the WIRED/WIRELESS switch to WIRELESS.
3 If you choose a cabled setup, you can use
Power Link or line-in cables for connection
between BeoLab 19 and your audio/video
product. Set the WIRED/WIRELESS switch to
WIRED and the L, R, L+R (left-right) switch
according to how the subwoofer is connected to
the product, see also 9. A splitter can be used if
all Power Link sockets are occupied on the
connected product.
4POS.: Set the position switch according to
whether your subwoofer is placed close to
a wall, a corner or in a free-standing position.
5Socket and switch panel.
RESET: To reset the wireless setting of the
subwoofer, press and hold the button for a few
seconds until the status indicator starts to flash
green quickly. The subwoofer is now in associate
mode and ready to be connected to the wireless
Power Link device.
SERVICE: For service use only.
6GAIN: Adjusts the output level of the
BeoLab 19 compared to the main speakers.
When Beolab 19 is connected to a Bang &
Olufsen TV, there is no need to adjust gain. When
connected to non-Bang & Olufsen products, you
may have to adjust gain.
7LP FILTER (low pass filter): Aligns the
frequency areas in BeoLab 19 and the
speakers. When the switch is set to ON, the knob
can be turned to obtain lower or higher
frequency. When BeoLab19 is connected to a
surround sound system, there is no need to
adjust the LP filter. When BeoLab 19 is connected
to a Bang & Olufsen audio system, the LP filter
should be switched on and adjusted to a position
between 40 and 80 which suits most Bang &
Olufsen Power Link speakers. Generally, the
setting of the LP FILTER is dependent on the size
of the main speakers. This means that a larger
speaker requires a lower setting, whereas a
smaller speaker requires a higher setting. When
you connect BeoLab 19 to non-Bang & Olufsen
products, you should listen to music from the
subwoofer and loudspeakers to determine if the
LP FILTER should be adjusted.
8PHASE: You may adjust the PHASE if the
sound from the speakers and subwoofer
does not seem to be synchronised. If your
subwoofer is in line with your front speakers,
then set the subwoofer PHASE switch to 0. If
your subwoofer is located anywhere else then try
the phase switch in both positions and set it to
the position that produces the strongest bass at
your listening position. If you notice no
dierence at all, set the switch to 0.
9 L, R, L+R (left-right switch): Set the switch
according to the connection you have
made to the audio or video product. Bang &
Olufsen televisions can send signals to the
BeoLab 19 via either the left (L) or right (R)
channel. This is set up in the television menus
and the switch should be set accordingly. Usually
when connecting to an audio system, the L+R
position should be used.
10 Secure the mains cable with the holders
either to the left or the right as illustrated.
The connection cable can run under the holder
together with the mains cable.
11 Product status and wireless indicator:
– Red (solid): The indicator is solid red for some
seconds when the subwoofer is connected to
the mains or switches o.
– Green (solid): The indicator is solid green for
some seconds when the subwoofer switches on.
– Green (flashing slowly): A software update is in
progress, during which the subwoofer cannot
play. Do not disconnect from the mains.
– Green (flashing quickly): If you have a wireless
Power Link device in your setup, the speaker is
in associate mode and ready to be connected to
the device.
– Orange (solid): The signal strength for a wireless
connection is low.
– Orange (flashing slowly): The product is
overheated and turns down the volume.
– Orange (flashing quickly): An error has occured.
Disconnect the subwoofer from the mains and
reconnect it or reset the network connection, if
you have a wireless Power Link device. If the
problem persists, contact your Bang & Olufsen
retailer.
12 To see the product labels, remove the front
cover (with Bang & Olufsen logo) by
pulling at the outer edges. Make sure to align
pins and holes when remounting.
Cleaning
Wipe dust o the surfaces using a dry, soft cloth.
If necessary, remove stains or dirt with a soft,
slightly damp cloth and a solution of water and
mild detergent such as washing-up liquid.
Never use alcohol or other solvents to clean any
part of the subwoofer!
English
8

Dansk (Danish)
Opsætning af BeoLab19 trådløst eller via kabel.
Sørg for, at subwooferen er placeret, opsat og
tilsluttet i overensstemmelse med instruktionerne
i denne vejledning. Du kan også kontakte
forhandleren angående installation.
1Sørg for at placere subwooferen på en blød
klud eller lignende under håndtering for at
undgå mærker på subwooferen. Subwooferen
må ikke holdes eller anbringes på fronten eller
bagsiden.
2
Trådløs opsætning af et lyd- og billedprodukt
med BeoLab19 subwooferen. Se vejledningen,
der følger med senderen, f.eks. BeoLab
Transmitter1, for at få oplysninger om, hvordan
du tilslutter senderen, lyd- og billedproduktet
og subwooferen. Indstil omskifteren WIRED/
WIRELESS til WIRELESS.
3Hvis du vælger en opsætning med kabler,
kan du anvende Power Link, eller line-in-
kabler til at tilslutte BeoLab19 til lyd- og
billedproduktet. Indstil omskifteren WIRED/
WIRELESS til WIRED og L, R, L+R (venstre-højre)
i forhold til, hvordan subwooferen er forbundet
med produktet (se også 9). Hvis alle Power Link
stik på det tilsluttede produkt er optaget, kan der
anvendes en splitter.
4POS.: Indstil positionsomskifteren efter, om
subwooferen er placeret tæt på en væg, et
hjørne eller fritstående.
5Stik og switch-panel.
RESET: For at nulstille den trådløse indstilling af
subwooferen skal du trykke knappen ind og holde
den nede i få sekunder, indtil statusindikatoren
begynder at blinke hurtigt grønt. Subwooferen er
nu klar til at blive tilsluttet den trådløse
PowerLink enhed.
SERVICE: Kun til brug ved service.
6GAIN: Justerer lydstyrken på BeoLab19
sammenlignet med hovedhøjttalerne. Når
BeoLab19 er sluttet til et Bang& Olufsen tv, skal
forstærkningen ikke justeres. Når BeoLab er
sluttet til produkter, som ikke er fra Bang&
Olufsen, kan det være nødvendigt at justere
forstærkningen.
7LP FILTER (lavpasfilter): Justerer
frekvensområderne på BeoLab19 og
højttalerne. Når omskifteren er indstillet til ON,
kan der drejes på knappen for at opnå en højere
eller lavere frekvens. Når BeoLab19 er sluttet til
et surround sound-system, skal lavpasfilteret
ikke justeres. Når BeoLab19 er sluttet til et
Bang& Olufsen musiksystem, skal lavpasfilteret
tændes og justeres til en position mellem 40 og
80, hvilket passer til de fleste Bang& Olufsen
Power Link højttalere. Lavpasfilterets indstilling
afhænger generelt af højttalernes størrelse. Det
betyder, at en større højttaler kræver en lavere
indstilling, hvorimod en mindre højttaler kræver
en højere indstilling. Når du slutter BeoLab19 til
produkter, som ikke er fra Bang& Olufsen, skal
du lytte til musikken fra henholdsvis subwooferen
og højttalerne for at afgøre, om lavpasfilteret
skal justeres.
8PHASE: Du kan eventuelt justere PHASE,
hvis det lyder, som om lyden fra højttalerne
og subwooferen ikke er synkroniseret. Hvis din
subwoofer står på linje med fronthøjtalerne, skal
subwooferens faseomskifter indstilles til 0. Hvis
subwooferen står i en anden position, skal du forsøge
at sætte omskifteren i begge positioner og indstille
den til den position, som giver den stærkeste
basoplevelse i forhold til lyttepositionen.
Hvis der
ikke er forskel, skal du indstille omskifteren
til 0.
9 L, R, L+R (venstre-højre omskifter): Indstil
omskifteren i henhold til den forbindelse,
du har oprettet til lyd- og billedproduktet. Bang&
Olufsen tv'er kan sende signaler til BeoLab19 via
enten den venstre (L) eller højre (R) kanal. Denne
opsætning foretages i tv-menuerne, og omskifteren
skal indstilles i henhold hertil. Ved tilslutning til et
musiksystem skal L+R positionen anvendes.
10 Fastgør strømkablet med holderne, enten
i højre eller venstre side som vist.
Forbindelseskablet kan føres under holderen
sammen med strømkablet.
11 Produktstatus og trådløs indikator:
– Rød (lyser konstant): Indikatorlampen lyser
konstant rødt i et par sekunder, når subwooferen
tilsluttes strømmen eller slukkes.
– Grøn (lyser konstant): Indikatoren lyser konstant
grøn i et par sekunder, når subwooferen tændes.
– Grøn (blinker langsomt): Softwaren opdateres,
og subwooferen kan ikke afspille lyd. Afbryd
ikke strømmen til subwooferen.
– Grøn (blinker hurtigt): Hvis opsætningen
indeholder en trådløs PowerLink enhed, er
subwooferen klar til at blive tilsluttet den
trådløse PowerLink enhed.
– Orange (lyser konstant): Trådløs forbindelse har
en lav signalstyrke.
– Orange (blinker langsomt): Produktet er
overophedet og skruer ned for lydstyrken.
– Orange (blinker hurtigt): Der opstod en fejl.
Afbryd strømmen til subwooferen, og tilslut den
igen, eller nulstil netværksforbindelsen, hvis du
har en trådløs PowerLink enhed. Kontakt din
Bang& Olufsen forhandler, hvis problemet varer
ved.
12 For at kunne se produktmærkaterne skal
du afmontere frontstoet (med Bang&
Olufsen logoet) ved at trække i yderkanterne.
Sørg for at rette stifterne og hullerne ind efter
hinanden ved genmontering af frontstoet.
Rengøring
Tør støv af overfladerne med en tør, blød klud.
Pletter og snavs kan fjernes med en blød klud
fugtet med en opløsning af vand og et mildt
rengøringsmiddel, f.eks. opvaskemiddel.
Brug aldrig sprit eller andre opløsningsmidler til
rengøring af subwooferen.
9

Deutsch (German)
Sie können Ihren BeoLab 19-Subwoofer entweder
drahtlos einrichten oder per Kabel anschließen.
Achten Sie darauf, dass der Subwoofer den
Anweisungen in dieser Bedienungsanleitung
entsprechend aufgestellt und angeschlossen
wird. Sie können zur Unterstützung auch Ihren
Fachhändler kontaktieren.
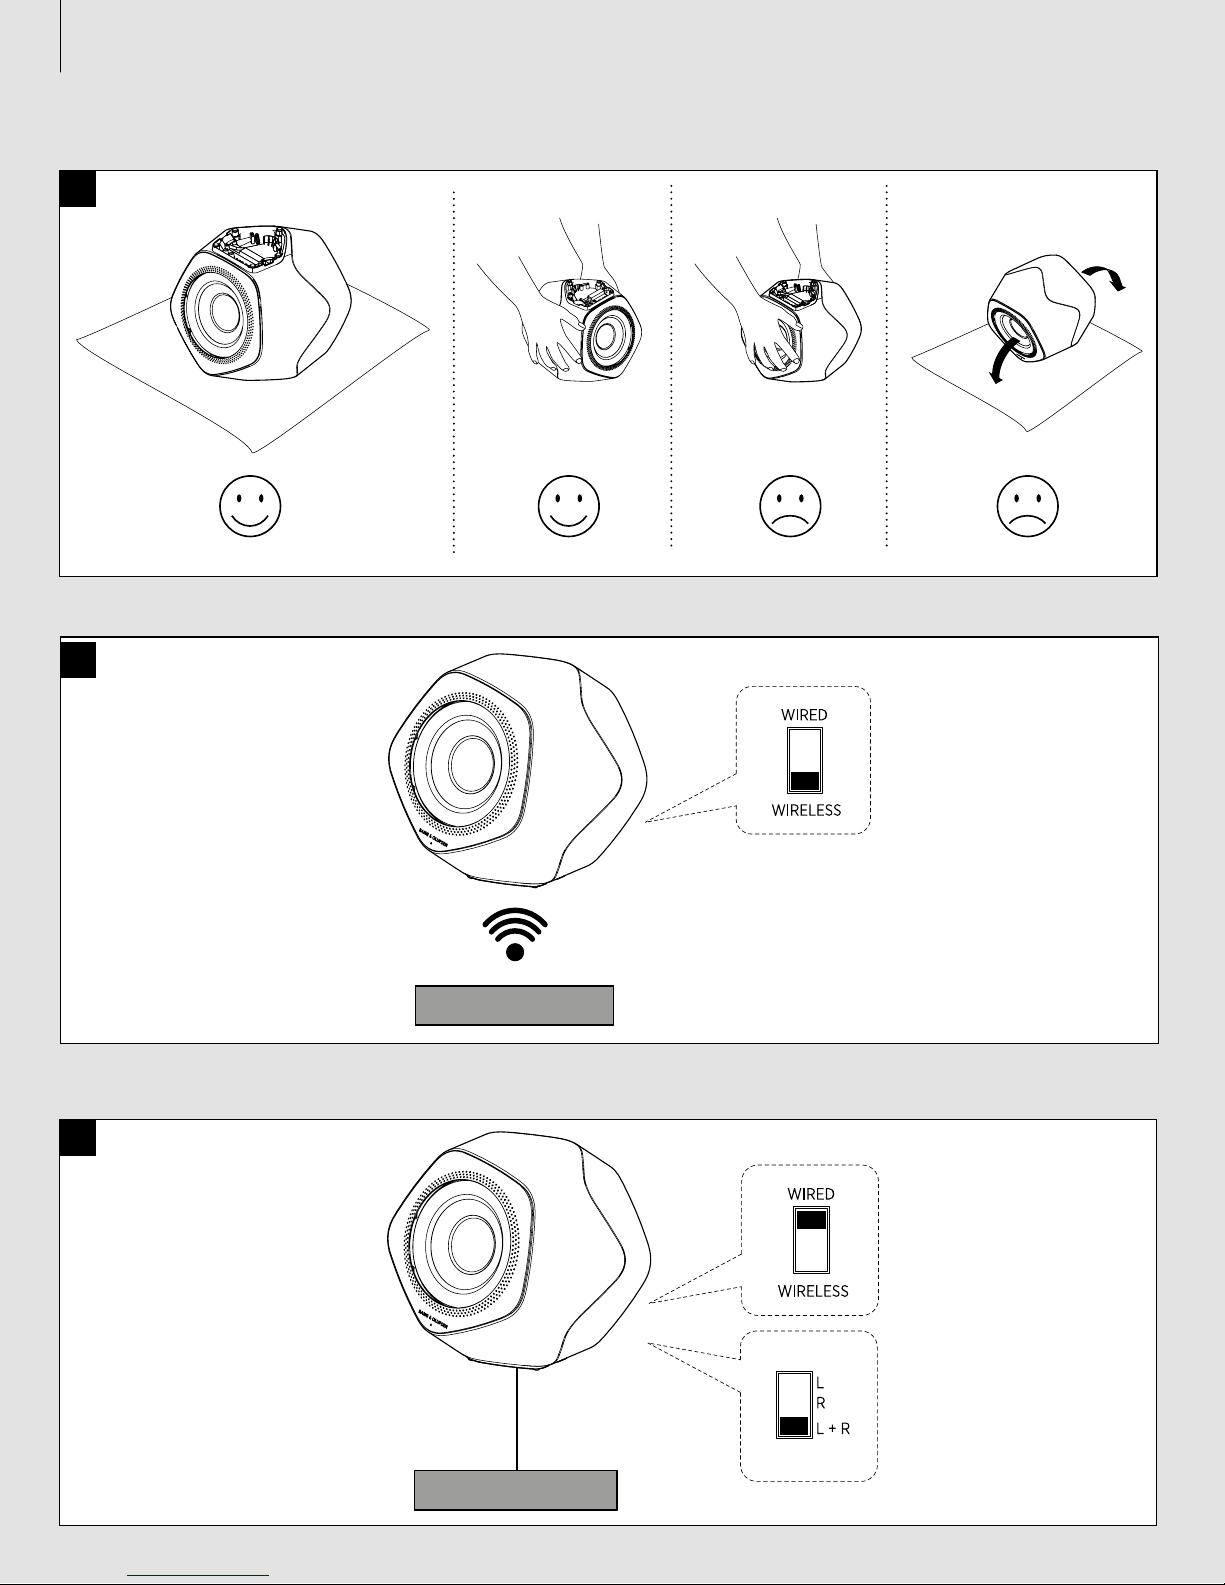
1Der Subwoofer sollte immer auf einem
weichen Tuch oder ähnlichem abgestellt
werden, um Kratzer oder Beschädigungen auf
der Oberfläche zu vermeiden. Halten oder stellen
Sie den Subwoofer nicht an bzw. auf die Vorder-
oder Rückseite.
2Sie können Ihr A/V-Gerät drahtlos mit dem
BeoLab 19-Subwoofer verbinden. Bitte
beachten Sie die Anleitung, die Ihrem Sender
beiliegt, z. B. dem BeoLabTransmitter1, um
weitere Informationen über den Anschluss der
Sendevorrichtung, des Audio-/Videogeräts und
Ihres Subwoofers zu erhalten. Stellen Sie den
WIRED/WIRELESS-Schalter auf WIRELESS.
3Wenn Sie einen Anschluss mit Kabeln
wünschen, können Sie Power Link oder
Line-in Kabel für die Verbindung zwischen dem
BeoLab 19 und Ihrem Audio-/Videogerät benutzen.
Stellen Sie den WIRED/WIRELESS-Schalter auf
WIRED und den L, R, L+R (links-rechts)-Schalter
entsprechend dem Anschluss Ihres Subwoofers
ein. Siehe hierzu auch 9. Sind alle Power Link-
Buchsen des angeschlossenen Geräts belegt,
kann ein Splitter verwendet werden.
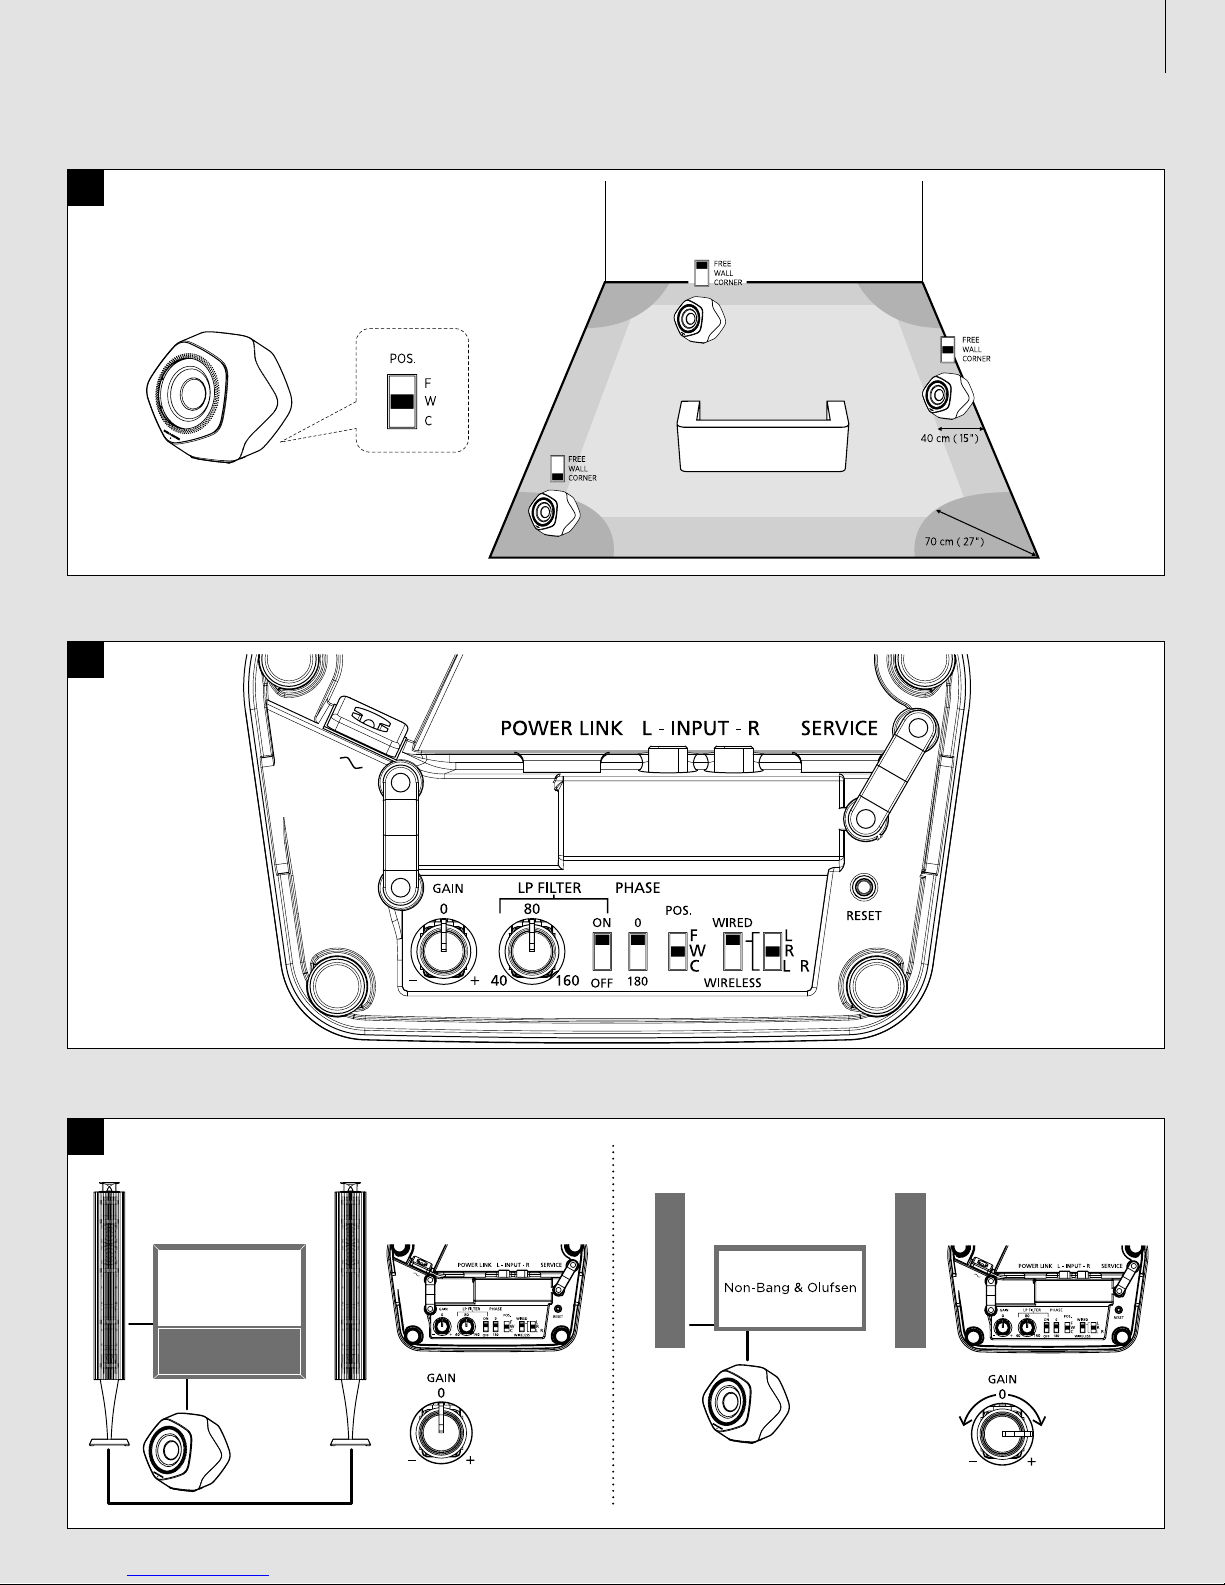
4POS.: Geben Sie mit dem Positionsschalter
den Standort – in einer Ecke, gegen eine
Wand oder freistehend – Ihres Subwoofers an.
5Anschluss- und Schalterfeld.
RESET: Um die Wireless-Einstellung des Subwoofers
zurückzusetzen, halten Sie den Schalter für
einige Sekunden gedrückt bis die Statusanzeige
schnell grün blinkt. Der Subwoofer befindet sich
nun im Anschlussmodus und kann mit dem
kabellosen Power Link-Gerät verbunden werden.
SERVICE: Nur für Servicezwecke
6
GAIN: Zur Anpassung des Lautstärkepegels
des BeoLab 19 im Vergleich zu den
Hauptlautsprechern. Ist der BeoLab19 an ein TV-
Gerät von Bang& Olufsen angeschlossen, muss
der Gain-Wert nicht angepasst werden. U. U. ist
aber eine Anpassung nötig, wenn der Subwoofer
an andere TV-Geräte angeschlossen wird.
7LP FILTER (Tiefpassfilter): Stimmt die
Frequenzbereiche des BeoLab 19 und der
Lautsprecher aufeinander ab. Ist der Schalter in
der Stellung ON, kann durch Drehen des Knopfes
eine höhere bzw. niedrigere Frequenz erreicht
werden. Ist der BeoLab19 an ein Surround-
Sound-System angeschlossen, muss der LP-Filter
nicht angepasst werden. Ist der BeoLab 19 an ein
Audiosystem von Bang & Olufsen angeschlossen,
sollte der LP-Filter aktiviert und auf eine Position
zwischen 40 und 80 gestellt werden. So wird
Kompatibilität mit den meisten Power Link-
Lautsprechern von Bang & Olufsen erreicht.
Grundsätzlich hängt die Einstellung des LP
FILTERS von der Größe der Hauptlautsprecher
ab. Ein größerer Lautsprecher
benötigt eine
niedrigere Einstellung als ein kleinerer
Lautsprecher. Wenn Sie einen BeoLab19 an
Geräte anschließen, die nicht von Bang & Olufsen
stammen, sollten Sie die LP FILTER-Einstellung
nach Gehör anpassen.
8PHASE: Eine Änderung der PHASE-
Einstellung kann sinnvoll sein, wenn die
Tonwiedergabe über Lautsprecher und Subwoofer
allem Anschein nach asynchron ist. Ist Ihr
Subwoofer auf derselben horizontalen Höhe wie
Ihre Frontlautsprecher, stellen Sie den PHASE-
Schalter auf 0. Ist Ihr Subwoofer anderweitig
platziert, probieren Sie beide PHASE-
Schalterstellungen aus und entscheiden Sie sich
für die Position, die an Ihrer Hörposition für die
stärkste Basswiedergabe sorgt. Ist kein Unterschied
feststellbar, empfehlen wir die Nullstellung des
Schalters.
9L, R, L+R (Links-Rechts-Schalter): Stellen
Sie den Schalter entsprechend der
Verbindung ein, die Sie mit dem Audio- oder
Videoprodukt hergestellt haben. TV-Geräte von
Bang & Olufsen können entweder über den
linken (L) oder rechten (R) Kanal Signale an den
BeoLab 19 übertragen. Diese Einstellung wird in
den Menüs des TV-Geräts vorgenommen und der
Schalter sollte in eine entsprechende Position
gebracht werden. Beim Anschluss an ein
Audiosystem, sollte die Position L+R gewählt
werden.
10 Sichern Sie das Netzkabel links- oder
rechtsseitig mit den dafür vorgesehenen
Haltern, wie in der Abbildung dargestellt. Das
Verbindungskabel kann zusammen mit dem
Netzkabel unter dem Halter durchgeführt werden.
11 Gerätestatus und Anzeige für die kabellose
Verbindung:
– Rot (leuchtend): Die LED leuchtet für einige
Sekunden rot, wenn der Subwoofer an das Netz
angeschlossen wird oder sich abschaltet.
– Grün (leuchtend): Die Anzeige leuchtet für
einige Sekunden grün, wenn sich der Subwoofer
einschaltet.
– Orange (langsam blinkend): Es wird eine
Softwareaktualisierung durchgeführt und der
Subwoofer kann nicht verwendet werden. Nicht
vom Netz trennen.
– Grün (schnell blinkend): Wenn Sie in Ihrer
Konfiguration ein drahtloses Power Link-Gerät
verwenden, befindet sich der Lautsprecher im
Anschlussmodus und kann mit dem Gerät
verbunden werden.
– Orange (leuchtend): Die Signalstärke für eine
kabellose Verbindung ist niedrig.
– Orange (langsam blinkend): Das Gerät ist
überhitzt und reduziert die Lautstärke der
Wiedergabe.
– Orange (schnell blinkend): Es ist ein Fehler
aufgetreten. Trennen Sie den Subwoofer vom
Netz und schließen Sie ihn wieder an oder
starten Sie die Netzwerkverbindung neu, wenn
Sie ein drahtloses Power Link-Gerät verwenden.
Falls das Problem weiterhin besteht, wenden
Sie sich an Ihren Bang& Olufsen Fachhändler.
12 Um die Produktetiketten einzusehen,
entfernen Sie die Frontabdeckung (mit
Bang & Olufsen Logo), indem Sie an den äußeren
Ecken ziehen. Stellen Sie bei der Montage die
korrekte Ausrichtung der Stecker und Löcher.
Reinigung
Wischen Sie Staub auf den Oberflächen mit
einem trockenen, weichen Tuch ab. Entfernen Sie
ggf. Fettflecken und hartnäckigen Schmutz mit
einem weichen, leicht angefeuchteten Tuch
sowie einer Lösung aus Wasser und wenigen
Tropfen eines milden Reinigungsmittels, wie z.B.
Spülmittel.
Verwenden Sie zum Reinigen des Subwoofers
niemals Alkohol oder andere Lösungsmittel!
10

Nederlands (Dutch)
Stel uw BeoLab 19 subwoofer draadloos of met
kabels op. Controleer of de subwoofer is
geïnstalleerd, opgesteld en aangesloten volgens
de instructies in deze handleiding. U kunt ook
contact opnemen met uw dealer over de
installatie.
1Plaats uw subwoofer altijd op een zachte
doek of iets gelijkaardigs om vlekken op de
subwoofer te vermijden. Houd de subwoofer niet
vast aan of plaats hem niet op de voor- of
achterkant.
2Stel uw audio-/videoproduct draadloos op
met de BeoLab19 subwoofer. Raadpleeg
de handleiding die bij uw zendapparaat zit,
bijvoorbeeld de BeoLab Transmitter1, voor
informatie over het aansluiten van het zendapparaat
,
uw audio- en videoproduct en uw subwoofer.
Stel de WIRED/WIRELESS schakelaar in op
WIRELESS.
3Als u een opstelling met kabels kiest, kunt
u Power Link- of line-in-kabels gebruiken
om de BeoLab 19 met uw audio- of videoproduct
te verbinden. Stel de WIRED/WIRELESS
schakelaar in op WIRELESS en de L, R, L+R
(links-rechts)-schakelaar in al naargelang de
aansluiting van de subwoofer met het product,
zie ook 9. Er kan een splitter worden gebruikt als
alle Power Link-aansluitingen bezet zijn op het
aangesloten product.
4POS.: Stel de positieschakelaar in al
naargelang de plaatsing van uw subwoofer:
dicht bij een muur, in een hoek of vrijstaand.
5Aansluit- en schakelpaneel.
RESET: Om de draadloze instelling van de
subwoofer te resetten, houdt u de toets enkele
seconden ingedrukt tot de statusindicator snel
groen begint te knipperen. De subwoofer bevindt
zich nu in de associatiemodus en is klaar om te
worden verbonden met het draadloze Power
Link-toestel.
SERVICE: Alleen voor servicedoeleinden.
6GAIN: Hiermee stelt u het uitgangsniveau
van de BeoLab19 in ten opzichte van de
hoofdluidsprekers. Wanneer de BeoLab19 is
aangesloten op een tv van Bang & Olufsen, moet
GAIN niet worden ingesteld. Wanneer aangesloten
op een niet-Bang & Olufsen product, zult u GAIN
moeten instellen.
7LP-FILTER (laagdoorlaatfilter): Hiermee
stemt u de frequentiegebieden af in de
BeoLab19 en de luidsprekers. Wanneer de
schakelaar ingesteld is op ON, kan er aan de
knop worden gedraaid voor een lagere of hogere
frequentie. Wanneer de BeoLab19 is aangesloten
op een surround-soundsysteem, moet de LP-filter
niet worden ingesteld. Als de BeoLab op een
audiosysteem van Bang & Olufsen is aangesloten,
moet de LP-filter ingeschakeld zijn en aangepast
zijn aan een positie tussen 40 en 80 wat geschikt
is voor de meeste Power Link-luidsprekers van
Bang & Olufsen. De instelling van de LP-FILTER is
in het algemeen afhankelijk van de grootte van
de hoofdluidsprekers. Dit betekent dat een
grotere luidspreker een lagere instelling vereist,
terwijl een kleinere luidspreker een hogere
instelling vereist. Wanneer u de BeoLab19 op
niet-Bang & Olufsen producten aansluit, moet u
luisteren naar de muziek van de subwoofer en
luidsprekers om te bepalen of de LP-FILTER
moet worden ingesteld.
8PHASE: U kunt de PHASE instellen als het
geluid van de luidsprekers en subwoofer
niet gesynchroniseerd lijkt te zijn. Als uw subwoofer
niet op hetzelfde vlak ligt als uw luidsprekers
voor, stel dan de PHASE-schakelaar van subwoofer
in op 0. Als uw subwoofer ergens anders is gelegen,
probeer de phase-schakelaar dan in beide posities
te zetten en stel hem in op de positie die de
sterkste bas aflevert in uw luisterpositie. Als u
helemaal geen verschil merkt, stel de schakelaar
dan in op 0.
9L, R, L+R (links-rechts-schakelaar): Stel de
schakelaar in al naargelang de verbinding
met het audio- of videoproduct. Tv's van Bang &
Olufsen kunnen signalen versturen naar de
BeoLab 19 via ofwel het linkse (L), ofwel het
rechtse (R) kanaal. Dit kunt u instellen in de
televisiemenu's en de schakelaar moet
dienovereenkomstig worden ingesteld.
Gewoonlijk moet de L+R-positie worden gebruikt
bij de aansluiting op een audiosysteem.
10 Maak de netkabel vast met de houders aan
de linker- of rechterkant zoals geïllustreerd.
De verbindingskabel kan samen met de netkabel
onder de houder lopen.
11 Indicator voor productstatus en draadloze
activiteit:
– Rood (ononderbroken): Het indicatorlampje
brandt ononderbroken rood gedurende enkele
seconden wanneer de subwoofer wordt
aangesloten op het net of wordt uitgeschakeld.
– Groen (ononderbroken): Het indicatorlampje
brandt ononderbroken groen gedurende enkele
seconden wanneer de subwoofer wordt
ingeschakeld.
– Groen (traag knipperend): Er is een software-
update bezig en de subwoofer kan nu geen
geluid afspelen. Koppel niet los van de netstroom.
– Groen (snel knipperend): Als u een draadloos
Power Link-toestel in uw opstelling hebt,
bevindt de luidspreker zich in de associatiemodus
en is hij klaar om te worden verbonden met het
toestel.
– Oranje (ononderbroken): De signaalsterkte voor
een draadloze verbinding is te laag.
– Oranje (traag knipperend): Het product is
oververhit en verlaagt het volume.
– Oranje (snel knipperend): Er is een fout
opgetreden. Koppel de subwoofer los van de
netstroom en sluit hem opnieuw aan of reset de
netwerkverbinding als u een draadloos Power
Link-toestel heeft. Als het probleem zich blijft
voordoen, neem dan contact op met uw Bang&
Olufsen-dealer.
12 Om de productlabels te bekijken,
verwijdert u het voorpaneel (met Bang &
Olufsen-logo) door aan de buitenste randen te
trekken. Pas de pennen en gaten goed in elkaar
bij het terugplaatsen.
Reinigen
Verwijder stof van de buitenkant met een zachte,
droge doek. Verwijder indien nodig vlekken of
vuil met een zachte, licht vochtige doek en een
oplossing van water en mild reinigingsmiddel,
zoals afwasmiddel.
Gebruik nooit alcohol of andere oplosmiddelen
om onderdelen van de subwoofer te reinigen!
11

Français (French)
Configurez le subwoofer BeoLab19 sans fil ou
avec fil. Vérifiez que le subwoofer est positionné,
configuré et connecté conformément aux
instructions du présent manuel. Pour toute
question relative à l'installation, vous pouvez
également contacter votre revendeur.
1Pour ne pas abîmer le subwoofer lorsque
vous le manipulez, posez-le sur un chion
doux. Ne tenez pas le subwoofer par les faces
avant ou arrière, ne le posez pas non plus sur ces
faces.
2Configurez l'appareil audio-vidéo sans fil
avec le subwoofer BeoLab19. Pour plus
d'informations sur la connexion de l'émetteur, de
l'appareil audio-vidéo et du subwoofer, reportez-
vous au manuel fourni avec l'émetteur, par
exemple le BeoLab Transmitter1. Réglez le
commutateur WIRED/WIRELESS sur WIRELESS.
3 Si vous choisissez une connexion câblée
entre le BeoLab19 et l'appareil audio-
vidéo, utilisez des câbles PowerLink ou d'entrée
de ligne. Réglez le commutateur WIRED/WIRELESS
sur WIRED et le commutateur L, R, L+R (gauche-
droite) conformément à la connexion du subwoofer
et de l'appareil, voir aussi le point 9. Si aucune
prise PowerLink n'est libre, vous pouvez
également utiliser un répartiteur.
4POS.: Réglez le commutateur de position
en fonction de l'emplacement du subwoofer,
près d'un mur, dans un angle ou sur pied.
5Panneau de prises et de commutateurs.
RESET: Pour réinitialiser les paramètres du
subwoofer, maintenez la touche enfoncée
pendant quelques secondes jusqu'à ce que
l'indicateur d’état de la connexion clignote
rapidement en vert. Le subwoofer est en mode
d'association et est prêt à être connecté à
l'appareil PowerLink sans fil.
SERVICE: Réservé à la maintenance.
6GAIN: Permet de régler le niveau de sortie
du BeoLab19 avec les enceintes principales.
Lorsque le BeoLab19 est connecté à un téléviseur
Bang&Olufsen, il est inutile de régler le gain.
Lorsqu'il est connecté à des appareils d'une
autre marque que Bang&Olufsen, vous devrez
peut-être régler le gain.
7LP FILTER (filtre passe-bas): Permet
d'aligner les fréquences entre le BeoLab19
et les enceintes. Lorsque le commutateur est sur
ON, il est possible de tourner la molette pour
baisser ou monter la fréquence. Lorsque le
BeoLab19 est connecté à un système son
surround, il est inutile de régler le filtre LP.
Lorsque le BeoLab19 est connecté à un système
audio Bang&Olufsen, le filtre LP doit être activé
et réglé entre 40 et 80 pour convenir aux
enceintes PowerLink Bang&Olufsen. Le
paramètre de LP FILTER dépend généralement
de la taille des enceintes principales. Une
enceinte plus grande nécessite un paramètre
inférieur et une enceinte plus petite nécessite un
paramètre supérieur.
Lorsque le BeoLab19 est
connecté à des appareils
d'une autre marque que
Bang&Olufsen, vous devez écouter de la
musique sur le subwoofer et
les enceintes pour
savoir s'il faut régler LP FILTER.
8PHASE: Vous pouvez régler PHASE si le
son des enceintes et du subwoofer ne
semble pas synchronisé. Si le subwoofer est
aligné avec les enceintes avant, réglez le
commutateur PHASE du subwoofer sur 0. Si le
subwoofer est placé autrement, testez les deux
réglages du commutateur et choisissez celui qui
produit les basses les plus graves à votre
position d'écoute. Si vous n'entendez aucune
diérence, réglez le commutateur sur 0.
9L, R, L+R (commutateur gauche-droite):
Réglez le commutateur conformément à la
connexion de votre appareil audio ou vidéo. Les
téléviseurs Bang & Olufsen peuvent envoyer des
signaux au BeoLab19 via le canal gauche (L) ou
droite (R). Ce réglage est défini dans les menus
du téléviseur et le commutateur doit s'y conformer
.
Avec un système audio, la position L+R devrait
être privilégiée.
10 Rangez le câble secteur dans le passe-
câble vers la gauche ou vers la droite,
comme illustré. Le câble de connexion tient dans
le passe-câble avec le câble secteur.
11
État de l'appareil et indicateur de connexion
sans fil:
– Rouge (fixe): L'indicateur est rouge et fixe
pendant quelques secondes lorsque le subwoofer
est connecté au secteur ou lorsqu'il s'éteint.
– Vert (fixe): L'indicateur est vert et fixe pendant
quelques secondes lorsque le subwoofer s'active
.
– Vert (clignotement lent): Une mise à jour du
logiciel est en cours, empêchant le fonctionnement
du subwoofer. Ne le débranchez pas du secteur.
–
Vert (clignotement rapide): Si votre installation
comprend un appareil PowerLink sans fil,
l'enceinte est en mode d'association et est prêt
à être connecté à l'appareil.
– Orange (fixe): La puissance du signal pour une
connexion sans fil est faible.
– Orange (clignotement lent): L'appareil
surchaue et diminue le volume.
– Orange (clignotement rapide): Une erreur s'est
produite. Débranchez le subwoofer du secteur
et rebranchez-le ou, si vous disposez d'un
appareil PowerLink sans fil, réinitialisez la
connexion réseau. Si le problème persiste,
contactez votre revendeur Bang&Olufsen.
12 Pour voir les étiquettes de l'appareil,
déposez le capot avant (avec le logo
Bang&Olufsen) en tirant sur les bords externes.
Lors du remontage, veillez à aligner les broches
et les trous.
Nettoyage
Retirez la poussière à l'aide d'un chion doux et
sec. Si nécessaire, pour éliminer les taches ou la
saleté, utilisez un chion doux et légèrement
humide imbibé d'une solution d'eau et de détergent
doux (par exemple du liquide vaisselle).
N'utilisez jamais d'alcool ou d'autres solvants
pour nettoyer le subwoofer, même en surface!
12

Españiol (Spanish)
Instale el subwoofer BeoLab19 de forma
inalámbrica o empleando cables. Asegúrese de
que el subwoofer se encuentre situado, instalado
y conectado de acuerdo con las instrucciones
que contiene esta guía. Póngase en contacto con
su distribuidor si necesita ayuda para llevar a
cabo la instalación.
1Al manipular el subwoofer, asegúrese de
apoyarlo sobre un paño mullido u otra
superficie similar para evitar que sufra arañazos.
No sujete el subwoofer por la parte delantera o
trasera ni lo apoye sobre ninguna de ellas.
2Conecte el equipo de audio/vídeo al
subwoofer BeoLab19 de forma inalámbrica.
Consulte la guía que acompaña al dispositivo
transmisor (por ejemplo, BeoLab Transmitter1)
si desea obtener información acerca de la
conexión del dispositivo transmisor, el equipo de
audio/vídeo y el subwoofer. Coloque el interruptor
WIRED/WIRELESS en la posición WIRELESS.
3Si opta por una instalación cableada,
emplee cables Power Link o de entrada de
línea para conectar BeoLab19 al equipo de
audio/vídeo. Coloque el interruptor WIRED/
WIRELESS en la posición WIRED y el interruptor
L, R, L+R (izquierda-derecha) en la posición que
corresponda al modo en que haya conectado el
subwoofer al equipo (consulte el paso 9). Puede
usar un divisor si todas las tomas Power Link del
equipo conectado están ocupadas.
4POS.: Ajuste el interruptor de posición de
acuerdo con la posición que ocupe el
subwoofer (cerca de una pared, en una esquina
o en una posición libre).
5Panel de conexiones e interruptores.
RESET: Para restablecer la configuración
inalámbrica del subwoofer, mantenga pulsado
este botón durante algunos segundos hasta que
el indicador de estado comience a parpadear
rápidamente en color verde. El subwoofer pasará
entonces al modo de asociación y se preparará
para la conexión al dispositivo Power Link
inalámbrico.
SERVICE: Sólo para uso técnico.
6GAIN: Este mando permite ajustar el nivel
de salida de BeoLab19 en comparación
con los altavoces principales. Si BeoLab19 se
conecta a un televisor Bang & Olufsen, no será
preciso ajustar la ganancia. Si se conecta a un
equipo de otro fabricante, puede que sea necesario
ajustar la ganancia.
7LP FILTER (filtro de paso bajo): Este mando
permite ajustar las frecuencias que cubre
BeoLab19 a las que cubren los altavoces.
Cuando el interruptor se encuentra en la posición
ON, es posible usar el mando para reducir o
elevar la frecuencia. Si BeoLab19 se conecta a
un sistema de sonido envolvente, no será preciso
ajustar el filtro LP. Si se conecta a un sistema de
audio Bang & Olufsen, el filtro LP deberá activarse
y ajustarse a un valor comprendido entre 40 y 80
(válido para la mayoría de altavoces Power Link
de Bang & Olufsen). Por lo general, el ajuste del
mando LP FILTER depende del tamaño de los
altavoces principales. De este modo, cuanto más
grande sea un altavoz, menor será el ajuste que
requerirá, y viceversa. Si BeoLab19 se conecta a
un equipo de otro fabricante, será preciso
escuchar música a través del subwoofer y los
altavoces para determinar la necesidad de
ajustar el mando LP FILTER.
8PHASE: Cambie la posición del interruptor
PHASE si el sonido que reproducen los
altavoces y el subwoofer no parece sincronizado.
Si el subwoofer se encuentra junto a los altavoces
frontales, coloque el interruptor PHASE en la
posición 0. Si el subwoofer se encuentra en
cualquier otro lugar, compruebe el resultado de
colocar el interruptor PHASE en ambas posiciones
y manténgalo en la que dé lugar a graves más
intensos desde la posición del espectador. Si no
aprecia ninguna diferencia, coloque el interruptor
en la posición 0.
9L, R, L+R (interruptor izquierda-derecha):
Ajuste el interruptor de acuerdo con el
modo en que haya conectado el equipo de audio
o vídeo. Los televisores Bang & Olufsen pueden
enviar señales a BeoLab19 a través de los
canales izquierdo (L) y derecho (R). El canal a
través del que tiene lugar el envío se configura
en los menús del televisor y el interruptor debe
ajustarse en consonancia con la configuración
aplicada. Por lo general, cuando el subwoofer se
conecta a un sistema de audio, el interruptor
debe colocarse en la posición L+R.
10 Pase el cable de alimentación a través de
las guías hacia la izquierda o hacia la derecha
,
como muestra la ilustración. El cable de conexión
se puede pasar también, junto con el cable de
alimentación, a través de la primera guía.
11
Indicador de estado y conexión inalámbrica
del equipo:
– Rojo (fijo): El indicador permanece iluminado en
color rojo durante varios segundos al conectar
el subwoofer a la red eléctrica o apagarlo.
– Verde (fijo): El indicador permanece iluminado
en color verde durante varios segundos al
encender el subwoofer.
– Verde (intermitente, lento): Existe una
actualización de software en curso, durante la
cual el subwoofer permanecerá inactivo. No
desconecte el subwoofer de la red eléctrica.
– Verde (intermitente, rápido): Si la instalación
incorpora un dispositivo Power Link inalámbrico
y el subwoofer se encuentra en el modo de
asociación y preparado para su conexión al mismo.
– Naranja (fijo): La intensidad de la señal de una
red inalámbrica es baja.
– Naranja (intermitente, lento): El equipo ha
sufrido un exceso de temperatura y ha reducido
el nivel de volumen.
– Naranja (intermitente, rápido): Se ha producido
un error. Desconecte el altavoz de la red eléctrica
y vuelva a conectarlo a continuación, o restablezca
la conexión de red si cuenta con un dispositivo
Power Link inalámbrico. Si el problema no
desaparece, póngase en contacto con su
distribuidor de Bang & Olufsen.
12 Para ver las etiquetas del equipo, retire la
cubierta delantera (que ostenta el logotipo
de Bang & Olufsen) tirando de los bordes exteriores.
Asegúrese de hacer coincidir los pasadores y
orificios al volver a instalarla.
Limpieza
Limpie el polvo de las superficies empleando un
paño seco y suave. Para eliminar las manchas y
la suciedad incrustada, use un paño suave
ligeramente humedecido en una solución de agua
y un detergente débil, como líquido lavavajillas.
No limpie ninguna pieza del subwoofer con
alcohol o disolventes de otro tipo.
13

Italiano (Italian)
Configurazione del subwoofer BeoLab 19 in
modalità wireless o cablata. Accertarsi che il
subwoofer sia posizionato, installato e collegato
conformemente alle istruzioni descritte in questa
guida. È inoltre possibile contattare il rivenditore
per quanto riguarda l'installazione.
1Quando si maneggia il subwoofer,
posizionarlo su un panno morbido per
non graarne la superficie. Non maneggiare il
subwoofer tramite la parte anteriore o posteriore
e non posizionarlo sul lato frontale o posteriore.
2Configurazione del prodotto audio/video
in modalità wireless con un subwoofer
BeoLab19. Vedere la guida fornita con il dispositivo
trasmettitore, per esempio BeoLab Transmitter 1,
per informazioni su come collegare il dispositivo
trasmettitore, il prodotto audio/video e il
subwoofer. Impostare l'interruttore WIRED/
WIRELESS su WIRELESS.
3 Se si sceglie una configurazione cablata, è
possibile utilizzare cavi Power Link o line-in
per il collegamento del BeoLab 19 al prodotto
audio/video. Impostare l'interruttore WIRED/
WIRELESS su WIRED e l'interruttore L, R, L+R
(sinistro-destro) in base al tipo di collegamento
del subwoofer al prodotto; vedere anche 9. Uno
splitter può essere utilizzato se tutte le prese
Power Link sono occupate sul prodotto collegato.
4POS.: impostare l'interruttore di posizione
a seconda del collocamento del subwoofer:
vicino a una parete, in un angolo o in una posizione
libera.
5Pannello delle prese e degli interruttori.
RESET: per ripristinare le impostazioni wireless
del subwoofer, premere senza rilasciare il
pulsante per alcuni secondi fino a quando
l'indicatore di stato non inizia a lampeggiare
rapidamente in verde. Il subwoofer è ora in
modalità abbinamento e pronto per essere
collegato al dispositivo wireless Power Link.
SERVICE: solo per attività di servizio.
6GAIN: consente di regolare il livello di
uscita del BeoLab 19 rispetto ai diusori
principali. Quando il BeoLab 19 è collegato a un
televisore Bang & Olufsen, non è necessario
regolare il guadagno. Se è collegato a un prodotto
non Bang & Olufsen, potrebbe essere necessario
regolare il guadagno.
7LP FILTER (filtro passa-basso): consente di
allineare le aree di frequenza del BeoLab
19
e dei diusori. Quando l'interruttore è impostato
su
ON, la manopola può essere ruotata per ottenere
una frequenza inferiore o superiore. Quando il
BeoLab 19 è collegato a un impianto audio
surround, non è necessario regolare il filtro LP.
Quando il BeoLab 19 è collegato a un impianto
audio Bang & Olufsen, il filtro LP deve essere
acceso e impostato su 40-80, un valore compatibile
con la maggior parte dei diusori Power Link
Bang & Olufsen. In generale, l'impostazione di
LP FILTER dipende dalle dimensioni dei diusori
principali. Questo significa che un diusore più
grande richiede una regolazione più bassa,
mentre un diusore più piccolo richiede un
valore più alto. Quando si collega un BeoLab 19 a
prodotti non Bang & Olufsen, ascoltare la musica
dai diusori e dal subwoofer per determinare se
LP FILTER debba essere regolato o meno.
8PHASE: è possibile regolare PHASE se il
suono proveniente dai diusori e il subwoofer
non sembrano essere sincronizzati. Se il subwoofer
si trova in linea con i diusori anteriori, impostare
l'interruttore di FASE del subwoofer su 0. Se il
subwoofer è ubicato altrove, provare l'interruttore
di fase in entrambe le posizioni e selezionare la
posizione che produce i bassi più corposi nella
postazione di ascolto. Se non si nota alcuna
dierenza, impostare l'interruttore su 0.
9L, R, L+R (interruttore sinistro-destro):
impostare l'interruttore in base al
collegamento eettuato al prodotto audio o
video. I televisori Bang & Olufsen possono inviare
segnali al BeoLab 19 tramite il canale sinistro (L)
o destro (R). Questo viene impostato tramite i
menu del televisore e l'interruttore deve essere
impostato di conseguenza. Nel caso di un
collegamento a un impianto audio, in genere si
utilizza la posizione L+R.
10 Fissare il cavo dell'alimentazione con i
fermacavo sulla destra o sulla sinistra,
come illustrato. Il cavo di collegamento può
essere instradato sotto i fermacavo, insieme al
cavo dell'alimentazione.
11 Stato prodotto e indicatore wireless:
– Rosso (sempre illuminato): quando il subwoofer
è collegato alla rete elettrica o si spegne,
l'indicatore è rosso fisso per alcuni secondi.
– Verde (sempre illuminato): quando il diusore
si accende, l'indicatore è verde fisso per alcuni
secondi.
– Verde (lampeggiamento lento): un
aggiornamento software è in corso, durante il
quale il subwoofer non riproduce alcuna musica.
Non scollegare dalla rete elettrica.
– Verde (lampeggiamento rapido): se un
dispositivo wireless Power Link è presente nella
configurazione, il diusore sarà in modalità
abbinamento e pronto per essere collegato al
dispositivo.
– Arancione (sempre illuminato): il segnale della
connessione wireless è basso.
– Arancione (lampeggiamento lento): il prodotto
si è surriscaldato e ha abbassato il volume.
– Arancione (lampeggiamento rapido): errore.
Scollegare il subwoofer dalla rete elettrica e
ricollegarlo o ripristinare la connessione di rete
se si dispone di un dispositivo wireless Power
Link. Se il problema persiste, contattare il
proprio rivenditore Bang & Olufsen.
12 Per consultare le etichette del prodotto,
rimuovere la copertura anteriore (con il
logo Bang & Olufsen) tirandola tramite i bordi
esterni. Assicurarsi di allineare i perni e i fori al
rimontaggio.
Pulizia
Spolverare le superfici utilizzando un panno
asciutto e morbido. Se necessario, per rimuovere
macchie o sporco, usare un panno soce e
leggermente umido e una soluzione di acqua e
detergente delicato, per esempio detersivo per
stoviglie.
Non pulire alcuna parte del subwoofer con alcol
o altri solventi.
14

Configure o seu subwoofer BeoLab 19 sem fios
ou com fios. Certifique-se de que o subwoofer é
posicionado, configurado e ligado de acordo
com as instruções apresentadas neste Livro de
consulta. Também pode contactar o seu revendedor
acerca da instalação.
1Ao manusear o subwoofer certifique-se de
que o coloca sobre um pano suave ou
semelhante para evitar deixar marcas no subwoofer.
Não agarre nem pouse o subwoofer com a parte
da frente nem a parte de trás para baixo.
2Configure o seu aparelho áudio/vídeo sem
fios com o subwoofer BeoLab19. Consulte
o Livro de consulta fornecido com o seu dispositivo
transmissor, por exemplo o BeoLab Transmitter1,
para obter informações sobre como ligar o
dispositivo transmissor, o seu aparelho áudio/
vídeo e o seu subwoofer. Coloque o botão
WIRED/WIRELESS em WIRELESS.
3Se optar por uma configuração com fios,
pode utilizar os cabos Power Link ou
line-in para efectuar a ligação entre o BeoLab 19
e o seu aparelho áudio/vídeo. Coloque o botão
WIRED/WIRELESS em WIRED e o botão L, R, L+R
(esquerda-direita) em conformidade com a forma
como o subwoofer está ligado ao aparelho;
consulte também 9. Se todos os terminais Power
Link do aparelho ligado estiverem ocupados,
pode usar-se um divisor.
4POS.: Coloque o interruptor de posição
conforme a posição do subwoofer - se está
junto a uma parede, a um canto ou numa posição
afastada.
5Painel de terminais e botões
RESET: Para reiniciar a definição da ligação sem
fios do subwoofer, prima o botão por alguns
segundos até o indicador de estado começar a
piscar rapidamente a verde. O subwoofer está
agora em modo associado e pronto para ser
ligado ao aparelho Power Link sem fios.
SERVICE: Apenas para assistência.
6GAIN: Ajusta o nível de saída do BeoLab 19
comparado com as colunas principais.
Quando o BeoLab 19 está ligado a um televisor
Bang & Olufsen, não é necessário ajustar
novamente. Quando ligado a aparelhos não
Bang & Olufsen, poderá ter de ajustar
novamente.
7LP FILTER (filtro passa-baixo): Alinha as
áreas de frequência no BeoLab19 e colunas.
Quando o interruptor está em ON, é possível
rodar o botão para obter uma frequência mais
baixa ou mais elevada. Quando o BeoLab 19 está
ligado a um sistema de som surround, não é
necessário ajustar o filtro LP. Quando o BeoLab19
está ligado a um sistema de som Bang & Olufsen,
o filtro LP deve ser ligado e ajustado para uma
posição entre 40 e 80, que é o que melhor se
adequa à maioria das colunas Power Link da
Bang & Olufsen. Em geral, a definição do LP
FILTER depende do tamanho das colunas
principais. Isto significa que uma coluna de maior
dimensão requer uma definição mais baixa, e
uma coluna mais pequena requer uma definição
mais elevada. Quando liga o BeoLab19 a
aparelhos não Bang & Olufsen, deve
ouvir a
música a partir do subwoofer e das colunas
para
determinar se o LP FILTER necessita de ser
ajustado.
8PHASE: Pode ajustar PHASE se o som
proveniente das colunas e do subwoofer
não parecer estar sincronizado. Se o seu subwoofer
estiver em linha com as colunas dianteiras,
coloque o botão PHASE do subwoofer em 0.
Se o seu subwoofer estiver noutra posição,
experimente colocar o botão em ambas as
posições, colocando-o finalmente na posição
que produzir os graves mais fortes para a sua
posição de audição. Se não notar qualquer
diferença, coloque o interruptor em 0.
9L, R, L+R (interruptor esquerdo-direito):
Coloque o interruptor em conformidade
com a ligação efectuada ao aparelho de áudio ou
vídeo. Os televisores Bang & Olufsen podem
enviar sinais para o BeoLab 19 através dos canais
esquerdo (L) ou direito (R). Isto é configurado
nos menus do televisor e o botão deve ser colocado
em conformidade. Geralmente, ao ligar a um
sistema de som, deve ser usada a posição L+R.
10 Fixe o cabo da corrente eléctrica com os
respectivos suportes para a esquerda ou
para a direita, conforme ilustrado. O cabo de
ligação pode ser encaminhado sob o suporte
juntamente com o cabo da corrente eléctrica.
11 Indicador da ligação sem fios e de estado
do produto:
– Luz vermelha (constante): O indicador acende a
vermelho de forma constante por alguns segundos
quando o subwoofer é ligado à corrente eléctrica
ou dela desligado.
– Luz verde (constante): O indicador acende a
verde de forma constante por alguns segundos
quando o subwoofer é ligado.
– Luz verde (intermitência lenta): Existe uma
actualização de software a decorrer, durante
a qual o subwoofer não pode reproduzir. Não
desligue da corrente eléctrica.
– Luz verde (intermitência rápida): Se possui
um transmissor Power Link sem fios na sua
configuração, a coluna está em modo associado
e pronta para ser ligada ao aparelho.
– Cor-de-laranja (constante): A força do sinal
para uma ligação sem fios é baixa.
– Cor-de-laranja (intermitência lenta): O produto
está a sobreaquecer, pelo que baixa o volume.
– Cor-de-laranja (intermitência rápida): Ocorreu
um erro. Desligue o subwoofer da corrente
eléctrica e volte a ligar, ou reinicie a ligação à
rede se possuir um aparelho Power Link sem
fios. Se o problema persistir, contacte o seu
revendedor Bang& Olufsen.
12 Para ver as etiquetas do aparelho, retire a
tampa frontal (com o logótipo da Bang &
Olufsen) puxando pelas extremidades exteriores.
Ao voltar a colocar a tampa, certifique-se de que
os pinos estão alinhados com os orifícios.
Limpeza
Limpe o pó das superfícies com um pano seco e
macio. Se necessário, remova manchas ou
sujidade com um pano suave e ligeiramente
húmido com uma solução de água e detergente
suave, como detergente para a louça.
Nunca utilize álcool ou outros solventes para
limpar qualquer parte do subwoofer!
Português (Portuguese) 15

1
2
3
4
5
SERVICE:
6
7
8
9
10
11
– Красный (светится):
– Зеленый (светится):
– Зеленый (медленно мигает):
– Зеленый (быстро мигает):
.
– Оранжевый (светится):
.
– Оранжевый (медленно мигает):
– Оранжевый (быстро мигает):
12
Уход за системой
Русский (Russian)
16

BeoLab 19 サブウーファーをワイヤレスまたは有 線
でセットアップします。本サブウーファーを、本ガイド
に従って正しく設置・接続してください。設置に関し
て販売店に問い合わせることも可能です。
1サブウーファーを取り扱う際には、サブウーフ
ァーに傷をつけないように柔らかい布などを
敷いてからその上に置いてください。サブウーファー
の前面または背面を持ったり、それらの面を下にし
て置かないでください。
2AV 製品を BeoLab 19 サブウーファーにワイヤ
レス で セ ットア ップ し ま す 。送 信 機 、A V 機 器 、
サブウーファーを接続する方法について詳細
は 、B e o L a b Transmitter 1 などの送信機に付属の
ガイドをご覧ください。WIRED/ WIR EL ESS スイッチ
を wi r el e ss に設 定します。
3有線セットアップをする場合は、Power Link
またはライン入力ケーブルを使 用して
BeoLab 19 とAV機器を接続します。WIRED/
WIRELESS スイッチをWIREDに設定し、サブウーファー
と 製 品 の 接 続 形 態 に 従 っ て L 、R 、L + R( 左 右 )ス イッ
チを設定します。手順9も参照してください。接続す
る製品で全ての Power L i n k ソケットが 使 用 中 の 場
合 は 、ス プ リ ッ タ ー を 使 用 す る こ と も で き ま す 。
4
POS.:壁沿いにあるか、コーナー、またはフリ
ー
位置などサブウーファーの設置位置に応じ
てポジションスイッチを設定します。
5ソケ ットと スイッ チパ ネ ル 。
RESET:サブウーファーのワイヤレス設定をリセット
するには、ステータスインジケーターが緑に高速点
滅するまでボタンを数秒長押しします。サブウーファー
が連携モードに入っており、ワイヤレス Power Link デ
バイスと接 続 待 ち の 状 態 で す。
SERVICE:修理時にのみ使用します。
6
GAIN:メインスピーカーと比較して BeoL ab 19
の出力レベルを調整します。B e o L a b 19 が
Bang & O l u f s e n テ レ ビ に 接 続 し て い る 場 合 は 、ゲ イ ン
を調整する必要はありません。Bang & O l u f s en テレ
ビ以外の製品に接続している場合は、ゲインの調
整が必要な場合があります。
7
LP FILTER(ローパスフィルター):BeoLab 19
と
ス ピ ー カ ー の 周 波 域 を 合 わ せ ま す 。ス イッ チ
が O N に 設 定してあ る場 合、ノブ を 回して周 波域の
高低を調整できます。Be oL ab 19 がサラウンドサウ
ンドシステムに接続している場合は、ローパスフィ
ルターを調整す
る必 要はありませ
ん 。B e o L a b 19 が B ang & Olufsen
オーディオシステ
ムに 接 続して いる 場 合は、ローパ スフィルターをオ
ンし、大部分の Bang & Olufsen Power Li n k スピー
カーに適 する 4 0 ~8 0 の間 に調 整 する 必 要がありま
す 。一 般 的 に 、L P F ILT ER の 設 定はメインス
ピーカー
の サ イ ズ に 応 じ て 設 定 し ま す 。大 き な ス ピ ー
カーの
場合は低い設定、小さなスピーカーの場合
は高い
設 定 と し ま す。B e o L a b 19 を Ban g & Olufsen 以
外の
製品に接続する場合は、サブウーファーとスピー
カー
からの音楽
を聴いて LP FILT ER を調整するかどうか
を判断します
。
8PHASE:スピーカーとサブウーファーの音が
同 期 し て い な い よ う に 感 じ る 場 合 は 、P H A S E
を調整します。サブウーファーがフロントスピーカー
と同じ面にある場合は、サブウーファーの phase ス
イッチを 0 に 設 定します。サブウーファーがそ の他
の位置にある場合は、PHASE スイッチを調整して、
リスニング位置で最も強い低音となる設 定とします。
特に 違い のない 場 合はスイッチを 0 に設 定します。
9L、R、L+R(左右)AV 製品の接続状態に応じ
て ス イッ チ を 設 定 し ま す 。B a n g & O l u f s e n テ
レ ビ は 、B e o L a b 1 9 に 左( L )ま た は 右( R )チ ャン ネ
ルのどちらかを通して信号を送ります。これはテレ
ビ の メ ニ ュ ー で 設 定 し 、そ れ に 応 じ て ス イ ッ チ を 設
定します。通常、オーディオシステムに接続する場
合 は 、L + R 位 置 を 使 用 し ま す 。
10 図に示すように、電源ケーブルを左または右
にホルダーで固定します。接続ケーブルは電
源ケーブルとともにホルダーの下に引き回します。
11 製品ステータスおよびワイヤレスインジケー
タ ー:
– 赤( 点 灯 ):サブウーファーを電源につないだとき、
ま た は スイッ チを オ フ にし た とき にイ ン ジ ケ ー
ターが数秒赤点灯します。
– 緑( 点 灯 ):サブウーファーのスイッチがオンになっ
たときにインジケーターが数秒間緑点灯します。
– 緑( 低 速 点 滅 ):ソフトウェア更新中で、サブウーフ
ァーからの再生ができません。コンセントを抜か
ないでください。
– 緑( 高 速 点 滅 ):セ ットア ップ 内 に ワ イヤ レス Power
Link デバイスがある場合は、スピーカーが連携モー
ドとなり、デバイスへの接続待ち状態となってい
ま す。
– オ レ ン ジ( 点 灯 ):ワイヤレス接続の信号強度が低
いことを 示し ます。
– オ レ ン ジ( 低 速 点 滅 ): 製 品 が 過 熱 状 態 の た め 、音
量を下げ ます。
– オ レ ン ジ( 高 速 点 滅 ):エラーが発生しました。サブ
ウーファーをコンセントから抜き、再度接続します。
ワイヤレス Power L i n k デバイス が ある 場 合 は ネッ
ト ワ ー ク 接 続 を リ セ ット し ま す 。問 題 が 解 決 さ れ
な い 場 合 、B a n g & Olufsen 販 売店にご連絡くだ
さい。
12 製品ラベルを見るには、フロントカバー
(B ang & O l uf s en ロゴ入り)を外側を引いて取
り 外 し ま す 。再 組 み 立 て す る と き は 、ピ ン と 穴 の 位
置を 合 わ せま す。
クリーニング
ホコリなどは、乾いた柔らかい布で拭き取ってくだ
さい。油汚れやしつこい汚れは、台所用の中性洗剤
を 少 量 水 に 混 ぜ、柔 らか な布 を 使 って拭き取 ってく
ださい。
このサブウーファーのクリーニングに、アルコールな
どの溶剤は絶対に使わないでください。
日本語 (Japanese) 17

‘한국어 (Korean)
BeoLab 19 서브우퍼를 유선이나 무선으로
설정합니다 이 설명서의 지침에 따라 서브우퍼
위치를 지정하고, 설정하며, 연결하십시오.
설치와 관련해 매장에 문의할 수도 있습니다.
1
서브우퍼를 다룰 때에는 흠집이 생기지 않도록
부드러운 천 등을 깔고 작업하십시오.
서브우퍼를 붙잡거나 앞이나 뒤로 눕히지 마십시오
.
2
오디오/비디오 제품을 BeoLab 19 서브우퍼와
무선으로 설정하십시오. 구입한 트랜스미터와
오디오/비디오 제품, 서브우퍼를 연결하는 방법에
대해서는 트랜스미터(예: BeoLab Transmitter 1)
와 함께 제공된 설명서를 참고하십시오.WIRED/
WIRELESS 스위치를 WIRELESS로 설정하십시오
.
3유선 설치를 하려면 Power Link 또는 라인
입력 케이블을 이용해 BeoLab 19와 오디오
/
비디오 제품을 연결할 수 있습니다. WIRED/
WIRELESS 스위치는 WIRED로 설정하고 L, R,
L+R (좌-우) 스위치는 서브우퍼가 제품에 연결된
방식에 따라 설정하십시오. 9번 항목 참조.
연결된 제품의 Power Link 소켓이 모두 사용
중인 경우에는 스플리터를 사용할 수 있습니다.
4POS: 벽면, 구석, 자유 배치 등 서브우퍼가
설치된 위치에 따라 포지션 스위치를
설정하십시오.
5소켓 및 스위치 패널.
RESET: 서브우퍼의 무선 설정을 초기화하려면
상태 표시등이 녹색으로 빠르게 깜박일 때까지
버튼을 몇 초간 길게 누릅니다. 이제 서브우퍼는
연결(associate) 모드이고 무선 Power Link
장치에 연결될 준비가 되었습니다.
SERVICE: 서비스 전용.
6GAIN: 메인 스피커를 기준으로
BeoLab 19의 출력 수준을 조정합니다.
BeoLab 19
가 Bang & Olufsen TV에 연결된
경우에는 GAIN
을 조정할 필요가 없습니다. 타사
제품에 연결된 경우에는 GAIN을 조정해야 하는
경우가 있습니다.
7LP FILTER (저역 필터): BeoLab 19와
스피커의 주파수 영역을 정렬합니다.
스위치를 ON으로 설정하면 노브를 돌려 높거나
낮은 주파수를 얻을 수 있습니다. BeoLab 19가
서라운드 사운드 시스템에 연결된 경우에는 LP
필터를 조정할 필요가 없습니다. BeoLab 19가
Bang & Olufsen 오디오 시스템에 연결된
경우에는 LP 필터를 켜서 40에서 80 사이의
위치로 조정해야 대부분의 Bang & Olufsen
Power Link 스피커에 적합한 설정이 됩니다.
일반적으로 LP FILTER의 설정은 메인 스피커의
크기에 따라 달라집니다. 다시 말해, 스피커가
클수록 낮은 설정이 필요하고 스피커가 작을수록
높은 설정이 필요합니다. BeoLab 19를 타사
제품에 연결하는 경우에는 서브우퍼와
라우드스피커에서 나오는 음악을 듣고 LP FILTER
의 조정 여부를 결정해야 합니다.
8PHASE: 스피커와 서브우퍼에서 나오는
사운드가 동기화되지 않은 것 같으면
PHASE를 조정할 수 있습니다. 서브우퍼가 전면
스피커와 나란히 있는 경우에는 서브우퍼 PHASE
스위치를 0으로 설정합니다. 서브우퍼가 그 밖에
다른 곳에 있으면 PHASE 스위치를 양쪽에서
시험해보고 청취 위치에서 가장 강한 저음을
내는 위치로 설정합니다. 아무런 차이도 느낄
수 없다면 스위치를 0으로 설정하십시오.
9
L, R, L+R (좌-우 스위치): 오디오나 비디오
제품에 연결한 방식에 따라 스위치를
설정합니다. Bang & Olufsen TV는 왼쪽(L)이나
오른쪽(R) 채널을 통해 BeoLab 19에 신호를
보낼 수 있습니다. 이 설정은 TV 메뉴에서 하고
여기에 맞게 스위치를 설정해야 합니다. 오디오
시스템에 연결할 때는 일반적으로 L+R 위치를
이용해야 합니다.
10 그림과 같이 홀더를 이용해 왼쪽이나
오른쪽에 전원 케이블을 고정시킵니다.
연결 케이블은 전원 케이블과 함께 홀더 아래로
지나갈 수 있습니다.
11 제품 상태 및 무선 상태 표시등:
– 빨간색 (켜짐): 서브우퍼가 전원에 연결되거나
꺼지면 상태 표시등에 몇 초간 빨간색 불이
들어옵니다.
– 녹색 (켜짐): 서브우퍼가 켜지면 상태 표시등에
몇 초간 녹색 불이 들어옵니다.
– 녹색 (느리게 점멸): 소프트웨어 업데이트가
진행중입니다. 이때는 서브우퍼가 동작하지
않습니다. 전원선을 분리하지 마십시오.
– 녹색 (빠르게 점멸): 무선 Power Link 장치를
설치한 경우, 스피커는 연결(associate)
모드이고 무선 Power Link 장치에 연결될
준비가 되었습니다.
– 오렌지색 (켜짐): 무선 연결의 신호 강도가
약합니다.
– 오렌지색 (느리게 점멸): 제품이 과열 상태이고
볼륨이 낮아집니다.
– 오렌지색 (빠르게 점멸): 오류가 발생했습니다.
서브우퍼의 전원선을 분리했다가 다시 연결하거나
무선 Power Link 장치가 있으면 네트워크 연결을
재설정하십시오. 문제가 지속되면 Bang & Olufsen
매장에 문의하십시오.
12 제품 라벨을 보려면 전면 커버(Bang &
Olufsen 로고가 있는)의 바깥쪽 가장자리를
잡아당겨 제거합니다. 다시 장착할 때에는 핀과
홀을 정렬해야 합니다.
청소
마르고 부드러운 천으로 표면을 닦아내십시오.
얼룩이나 먼지를 제거하려면, 세척액과 같은
중성 세제를 희석한 물에 부드러운 천을 살짝
적셔 닦으십시오.
서브우퍼는 알콜 등 화학 용액으로는 절대로
청소하지 마십시오!
18

简体中文 (Simplified Chinese)
以无线方式或使用线缆设置您的 BeoLab 19 超重低
音扬声器。确保此超重低音扬声器的摆放、设置及连
接都依照本《指南》的指示进行。您也可以联系您的
零售商以了解有关安装的事宜。
1在搬运您的超重低音扬声器时,请确保将其放
在一块软布或类似表面上,避免在超重低音扬
声器上留下划痕。请不要握持超重低音扬声器的正
面或背面,或者将其正面或背面朝下放置。
2将您的音频 /视频产品设置为与 BeoLab19 超
重 低 音 扬 声 器 无 线 连 接 。参 阅 您 的 发 射 器 设 备
随附的指南,例如 BeoLab 发射器1,以了解有关 连接
发射器设备、您的音频/视频产品以及您的超重低音
扬声器的详细信息。将有线/无线Ç(WIRED/
WIRELESS) 开关设为“无线 (WIRELESS)”。
3如果您选择有线设置,可以使用 Power Link
或输入线缆来连接 BeoLab 19 和您的音频/
视 频 产 品 。将 有 线 / 无 线 (WIRED/WIRELESS) 开关
设 为“ 有 线 (WIRED)”,并根据超
重低音扬声器与产
品的连接方式设置 L, R, L+R(左-右)
开关。请参阅第9
条 。如 果 所 有 Power Link
插座都被已连接的产品占
用,则可以使用分线器。
4位置 (POS.) 开 关 :根 据 您 的 超 重 低 音 扬 声 器
的位置(靠近墙壁、角落或独立摆放位置)设置
位置开关。
5插座和开关面板。
重置 (RESET) 按 钮 :若 要 重 置 超 重 低 音 扬 声 器 的 无
线设置,请按住此按钮并保持几秒钟,直至状态指示
灯开始迅速闪烁绿色。此时,超重低音扬声器处于关
联模式,并已准备好连接到无线 Power Link 设备。
维修 (SERVICE) 开关:仅用于维修。
6增益Ç(GAIN)Ç开 关 :对 照 主 扬 声 器 调 节
BeoLabÇ19Ç的 输 出 音 量 。当 BeoLab 19 与 Bang&
Olufsen
电视机连接时,无 需 调 节 增 益 。当
BeoLab19
与
非 Bang & Olufsen 产品连接时,可能需要调节增益。
7
低通滤波器(LP FILTER) 开 关 :校 准 BeoLab19
与扬声器的频区。当开关设为“打开”时,您可
以旋转旋钮,以 获 得 较 低 或 较 高 的 频 率 。当 BeoLab19
与环绕声系统连接时,无需调节低通滤波器。当
BeoLab
19
与 Bang & Olufsen
音响系统连接时,应开
启低通滤波器并将其调节至 40~80 之间
。
该频区适合
大多数
Bang & Olufsen Power Link
扬声器。通常情
况下,低通滤波器的设置取决于主扬声器的大小。也
就是说,较大的扬声器需要较低的设置值,而较小
的扬声
器 需 要 较 高 的 设 置 值 。当 您 将 BeoLab 19 与非
Bang &
Olufsen 产品连接时,您应使用超重低音扬
声器和扬声器听音乐,确定是否需要调节低通滤波器。
8相位 (PHASE) 开 关 :如 果 扬 声 器 与 超 重 低 音
扬声器发出的声音不同步,您可以调节相位开
关。如果您的超重低音扬声器与您的前置扬声器处
于同一平面,那么,请将超重低音扬声器的相位开关
设为0。如果您的超重低音扬声器放置在其他位置,
那么,请尝试将相位开关调至两个位置,并将其设在
能够向您所在的聆听位置发出最强低音的位置。如
果您发现两个位置之间没有差异,请将此开关设为0。
9 L, R, L+R(左-右)开关:根据音频或视频产
品
的连接方式来设置此开关。Bang & Olufsen
电
视机可通过左 (L) 声道或右 (R) 声道向 BeoLab19 发
送信号。可在电视机菜单中设置此功能,并且开关也
应进行相应设置。当与音频系统连接时,通常应使用
L+R 位置。
10 如图所示,用固定器将电源线缆固定在左侧
或右侧。连接线缆可以在固定器下方与电源线
缆一同走线。
11 产品 状 态 和无 线 指 示 灯:
– 红色(长亮):当 超 重 低 音 扬 声 器 与 电 源 连 接 或 者
关闭超重低音扬声器时,指示灯会长亮红色,并保
持数秒。
– 绿 色( 长 亮 ):当打开超重低音扬声器时,指示灯
会长亮绿色,并保持数秒。
– 绿 色( 缓 慢 闪 烁 ):软 件 更 新 正 在 进 行 中 ,在此期
间超重低音扬声器无法使用。请勿断开电源。
– 绿色(快速闪烁):如 果 您 的 系 统 中 有 无 线
Power Link 设备,则扬声器处于关联模式,并准备
好连接到该设备。
– 橙 色( 长 亮 ):无线连接的信号强度较弱。
– 橙 色( 缓 慢 闪 烁 ):产 品 过 热 ,将调低音量。
– 橙色(快速闪烁):出现错误。断开超重低音扬声
器与电源的连接,并重新连接电源,或者如果您的
系统中有无线 Power Link 设备,您也可以重置网
络 连 接 。如 果 问 题 依 然 存 在 ,请联系您的 Bang &
Olufsen 零售商。
12 若要查看产品标签,请拉动外缘拆下前盖
(带有 Bang & Olufsen 徽标)。重新安装时,
请务必对齐销孔。
清洁
用干软布抹掉表面的灰尘。如有必要,使用柔软的微
湿 布 和 含 温 和 清 洁 剂( 如 洗 洁 精 )的 水 溶 液 清 除 污 点
或污渍。
切忌用酒精或其他溶剂清洁超重低音扬声器的任何
部位。
19

繁體中文 (Traditional Chinese)
以無線方式或纜線安裝 B e o Lab1 9 超重低音揚聲器。
請務必按照本指南的指示說明放置、安裝及連接
超重低音揚聲器。若有安裝問題,也可直接洽詢門
市人員。
1處理您的超重低音揚聲器時,請確認將其放
在軟布或類似性質平面上,以免刮傷超重低
音揚聲器。請勿以正面或背面抓握或放置超重低
音揚聲器。
2以無線方式將音訊/視訊產品連接至
BeoLab 19 超 重 低 音 揚 聲 器 。請 參 考 傳 輸 裝
置 (例如 BeoLab Transmitter1) 隨 附 的 指 南 ,瞭 解
如何連接傳輸裝置、音訊/視訊產品及超重低音揚
聲 器 。請 將 WIRED/WIRELESS (有線/無線) 開關
設定為 WIRELESS (無線)。
3若您選擇使用纜線,可使用 Power Link 或訊
源輸入纜線,在 BeoLab 19 及音訊/視訊產品
之間進行連接。將 WIRED/WIRELESS (有線/無線)
開關設定為 WIRED (有線),並 依 據 超 重 低 音 揚 聲
器與產品連接的方式設定 L、R、L+ R (左 + 右) 開關;
請另行參閱第9頁。若連接的產品佔用所有 Power
Link 插 座 ,可 使 用 分 線 器 。
4POS.Ç(定位):依據超重低音揚聲器在牆面、
角落或獨立擺放的位置來設定定位開關。
5插座與開關面板。
RESET (重設):如欲重設超重低音揚聲器的無線設
定,請按住按鍵數秒鐘,直到狀態指示燈開始快閃
綠燈為止。超重低音揚聲器目前處於連結模式,隨
時可以連接至無線 Power Link 裝置。
SERVICE (維修):維 修 專 用 。
6GAIN (增益):調 整 BeoLab 19 的輸出音量
(相較於主揚聲器)。BeoLab19連接至 Bang&
Olufsen 電視時無需調整增益。若連接至非 Bang&
Olufsen 產品,您就可能需要調整增益。
7LP FILTER (低通濾波器):調 準 BeoLab 19 及
揚聲器的頻率區域。將開關設定為 ON (開啟)
時,可旋轉旋鈕以降低或升高頻率。BeoLab 19 連
接至環繞音效系統時無需調整低通濾波器。
BeoLab 19 連接至 Bang & Olufsen 音 訊 系 統 時 ,應 開
啟低通濾波器並調整介於 40 與 80,最 適 合 Bang&
Olufsen Power Link 揚 聲 器 。一 般 來 說 ,低 通 濾 波
器設定需視主揚聲器大小而定。這代表尺寸較大
的揚聲器需要較低設定,而尺寸較小的揚聲器則
需
要 較 高 設 定 。將 BeoLab 19 連接至非 Bang& Olufsen
產品時,您應由超重低音揚聲器及揚
聲器聆聽音樂,
以決定是否應該調整低通濾波器。
8PHASE (相位):如果揚聲器及超重低音揚聲
器發出的聲響似乎無法同步,您可以調整相
位。若超重低音揚聲器與前置揚聲器位於相同平
面,請將超重低音揚聲器的相位開關設定為0。若
超重低音揚聲器放置於任何其他位置,請嘗試設
定兩種相位,並選擇在您聆聽位置產生最強低音
的相位。若您認為完全沒有差別,請將開關設定為0。
9
L、R、L+R (左 + 右開關):請依據與音訊或視
訊產品的連接方式設定開關。Bang& Olufsen
電視可透過左Ç(L) 或右 (R) 聲道傳送訊號至 BeoLab19。
這是在電視機的功能表單進行設定,請依此設定
開關。連接至音訊系統時,通常應使用 L+R 位置。
10 請按照圖示說明以纜線座固定主電源線,連
接至左側或右側。連接線可與主電源線一起
通過 纜線座下方。
11 產品狀態及無線指示燈:
–¹紅燈¹(恆亮):指示燈恆亮紅燈數秒時,代表超重低
音揚聲器連接至主電源或關閉。
–¹綠燈¹(恆亮):指示燈恆亮綠燈數秒代表超重低音
揚聲器開啟。
–¹綠燈¹(慢閃):正 在 進 行 軟 體 更 新 ,此 時 超 重 低 音 揚
聲器無法播放音樂。請勿切斷電源。
–¹綠燈¹(快閃):若 您 的 配 置 中 有 無 線 Power Link 裝
置,則揚聲器處於連接模式,隨時可連接至裝置。
–¹橘燈¹(恆亮):無線連接時的訊號強度較低。
–¹橘燈¹(慢閃):產品過熱並將音量調小。
–¹橘燈¹(快閃):出現故障。先切斷超重低音揚聲器電
源,再重新接上電源,或者若您使用無線 Power Link
裝置,可重設網路連線。如果問題仍然無法解決,
請聯絡 Bang& Olufsen 門市。
12 如欲檢視產品標籤,請拉外緣拆下前蓋(有
Bang & Olufsen 商標)。重新裝回時請務必對
齊插銷及孔洞。
清潔
使用乾軟布擦拭表面灰塵。若要去除污漬或灰塵,
請使用稍微沾濕的軟布,以及清水加溫和清潔劑
(例如洗潔精) 製成的溶液。
切勿使用酒精或其他溶劑清潔任何超重低音揚聲
器零件!
20
Other manuals for BeoLab 19
2
Table of contents
Languages:
Other Bang & Olufsen Subwoofer manuals
Popular Subwoofer manuals by other brands

Polk Audio
Polk Audio PSW550 instruction manual

Acoustic Research
Acoustic Research ARS115PSB owner's manual

B&C Speakers
B&C Speakers Subwoofer 12PS100 specification

Wet Sounds
Wet Sounds XS-XXX owner's manual

Infinity
Infinity Kappa Center owner's manual

Electro-Voice
Electro-Voice Plasma Plasma P2 Technical specifications