manuals.online logo
Brands
  1. Home
  2. •
  3. Brands
  4. •
  5. Banjo
  6. •
  7. Water Pump
  8. •
  9. Banjo 300PI8PRO User manual

Banjo 300PI8PRO User manual

®
Liquid Handling Products
3" Cast Iron &
Stainless Steel Pump
Instruction Manual
Read these instructions and the instructions covering the operation of the engine before
starting the engine. Do not operate the engine until you have put oil in the engine
crankcase. It is wise to check the oil level each time the gasoline tank is lled. If the pump
is used only occasionally, check oil and gasoline before
starting engine.
Do not run the pump dry. Always ll the pump body with
water (or liquid to be pumped) before starting pump. It
is not necessary to drain the pump body after use,
unless there is a danger of freezing.
Use a regular grade of gasoline (unleaded and
uncolored if available). Remove the engine
cylinder head after 100 hours of operation and
remove the carbon and lead deposits from the
combustion chamber and top of the piston.
Make certain that all hose and pipe connections are air-
tight. An air leak in the suction line may prevent priming
and will reduce the capacity of the pump.
Always place the pump as close to the liquid to be pumped as
as possible. Keep the suction line short and with few bends.
Keep the pump and engine on a level foundation. A poor foundation
and a heavy suction hose (made heavier when “primed’ full of
liquid) could result in a pump “down the hole”.
There are important instructions regarding
preparing the engine for long periods of idleness.
(Read the engine instruction manual). Under these
conditions, drain the pump completely, turn the engine
over a few times and leave all plugs (lter and drain) out of
the pump. Always try to store the unit in a heated and dry
building.
When pumping dirty water or other liquids containing
solids, always use a pump strainer on the end of the
suction line. There are no points on the pump which need lubric tion.
lubrication. The shaft seal is self-lubricating, and designed to handle clean or dirty liquids.
1
300PI8PRO, 300PIH-8,
300PIH-11, 300PIH13
Disassembly instructions:
1. Remove bolted clamp from shaft. Remove (4)
bolts holding motor or Bearing Pedestal to the
adapter plate.
2. Remove (6) nuts and lock washers holding
adapter plate to housing. Using a screwdriver
behind the side tabs, gently pry the adapter loose.
Remove impeller, drive sleeve and seal assembly.
3. Remove two stainless steel at head screws
and remove wear plate. Replace the wear plate
when there are surface grooves or excessive
wear.
When reassembling, make sure there is no foreign
material between the wear plate and the pump
housing that would prevent the wear plate from
lying at.
4. Remove the seal and spring from the impeller
and drive sleeve. Inspect the surface of the
impeller sleeve. The surface can be cleaned with
very ne sandpaper (#400) or if excessively worn
or grooved, the impeller should be replaced.
Remember, a worn impeller can cause an out of
balance condition resulting in vibration and seal
wear.
Always install a new seal assembly onto impeller
before reassembling pump. It is very important not
to scratch or mark the black carbon surface of the
seal assembly.
2
1
2
3
4
5. Remove the white ceramic seal and rubber cup
from the rear adapter. Clean the recess opening
with sandpaper or wire brush.
Install the new seal half.
Very important to not scratch or mark the white
ceramic seal surface. It is usually helpful to apply a
small amount of lubrication to the rubber cap and
then press the seal into position, using your two
thumbs or arbor press to press in evenly. Make
sure the seal is in position straight and true to
prevent seal wobble.
6. A shim is used to set the clearance between the
impeller and wear plate. Any shim with a thickness
of .030/.040 can be used. An ideal shim is a ½"
wide piece of No. 21 gauge sheet metal.
Place the impeller and seal half assembly in
position with impeller face against the banding
material.
7. Install rear adapter using a new adapter gasket.
Tighten (6) nuts.
8. Install pump to gas engine or bearing pedestal
and tighten bolts.
Install bolted clamp and tighten bolts. The clamp
bolts should be very tight. They should also be
tightened equally so the space from side to side
between clamps is equal for balance and to pre-
vent vibration.
After all bolts are tight, grip the banding material
and pull out.
After shim is removed the pump should turn freely.
3
5
6
7
8
150 Banjo Drive ℡765-362-7367 INT’L℻765-362-0744
Crawfordsville, IN 47933 ℻800-458-0232 [email protected] www.banjocorp.com 4
15
11
8
17
5
23
28
27
6
12
18
1
94
2
10 18 12
13
7
18
22
3
21
20
26
25
24
14
16
19
19
18
16
18
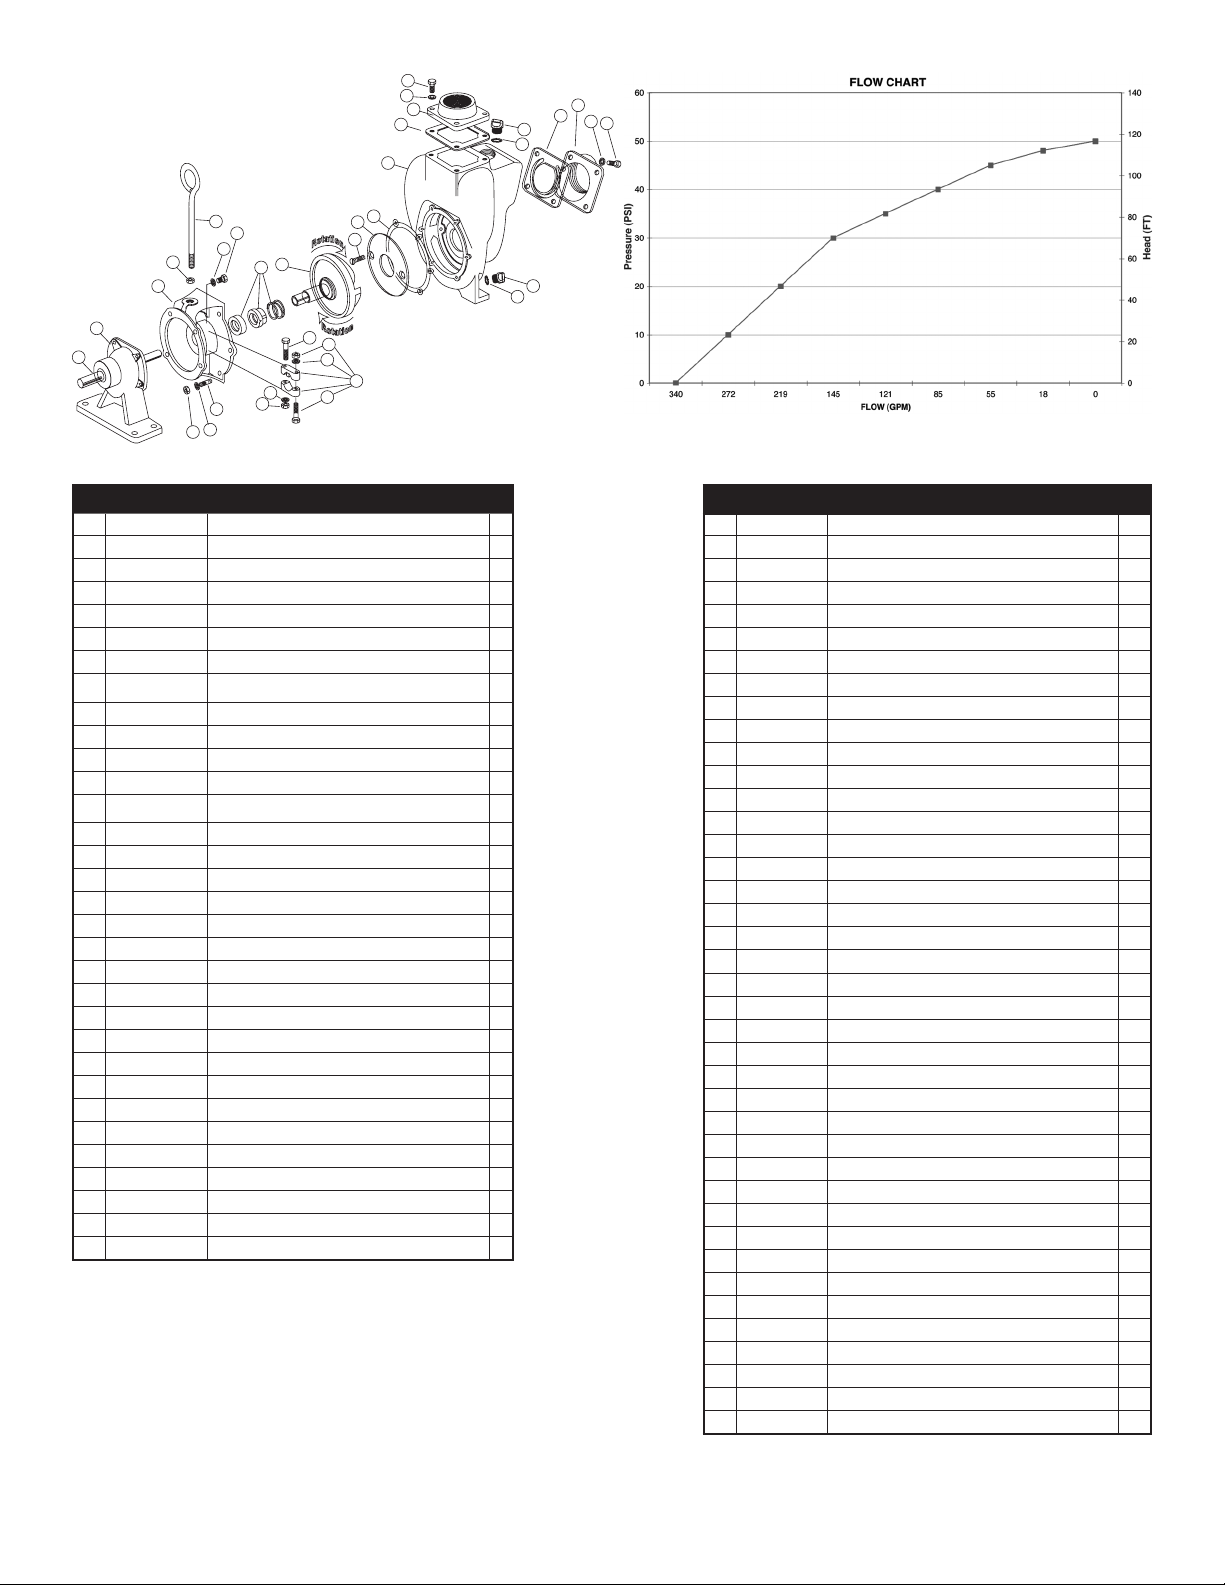
REPLACEMENT PARTS 3" SS PUMPS
ITEM PART NO DESCRIPTION QTY
1 18008SS NPT Outlet Flange 1
2 18012SS NPT Inlet Flange 1
3 18026SS Adapter for Gas Engine 1
3 18048SS SS C-Flange Adapter 1
4 13777SS ¾" Stainless Steel Plug 1
5 18023SS 1" SS Impeller & Drive Shaft for Gas Engine 1
5 18023-1.125SS 1
1⁄8" SS Impeller & Drive Shaft for Electric
Motor 1
6 12777SS ½" Stainless Steel Plug 1
7 18034 5⁄8"SS Jam Nut 1
8 18004SS SS Wear Plate 1
9 18044 FKM (viton type) Outlet Gasket 1
10 18042 FKM (viton type)Gasket Check Valve
Assembly 1
11 18021 Adapter Gasket 1
12 18010SS 3⁄8" - 16 x 11⁄8" SS Cap Screw HXHD 8
13 18033 Handle 1
14 18129 Clamp Assembly 1
15 18001SS SS Pump Housing 1
16 18030 3⁄8" -24 x 2¼" SS Bolt 2
17 18106SS Wear Plate Flat Head Screw 2
18 V20018 3⁄8" Lock Washer 8
19 18032 3⁄8" x 24 SS Hex Nut 2
20 18504 1" Shaft 1
21 18500 Bearing Pedestal 1
22 18027 3⁄8" -16 x 1½"HHCS 1
23 18025SS FKM (viton type) Seal Assembly 1
24 V20019 3⁄8" 16 SS Hex Nut 6
25 V20018 3⁄8" SS Lock Washer 6
26 18218 3⁄8" -16 x 24 x 21⁄8" SS Stud 6
27 13778V O-Ring FKM (viton type) 1
28 UV15163V O-Ring FKM (viton type) 1
N/S 18100SS Repair Kit(Consist of items 5, 8,11,17 & 23) 1
REPLACEMENT PARTS 3" CAST IRON PUMPS
ITEM PART NO DESCRIPTION QTY
1 18008 NPT Outlet Flange 1
1 M18008 3" Manifold Outlet Flange 1
2 18012 NPT Inlet Flange 1
2 M18012 3" Manifold Inlet Flange 1
3 18026 Adapter for Gas Engine & Bearing Pedestal 1
3 18048 C-Flange Adapter 1
3 18049 Hydraulic Motor Adapter 1
N/S 18055 Hydraulic Adapter Shaft 1
4 13777 ¾" Plug 1
5* 18023 1" Impeller & Drive Shaft for Gas Engine 1
5 18023-1.125 11⁄8" Impeller & Drive Shaft for Electric Motor 1
6 12777 ½" Plug 1
7 18034 5⁄8"SS Jam Nut 1
8 18004 Wear Plate 1
9 18009 EPDM Outlet Gasket 1
10 18013 Gasket Check Valve Assembly 1
11 18021 Adapter Gasket 1
12 18010SS 3⁄8" - 16 x 11⁄8" SS Cap Screw HXHD 8
13 18033 Handle 1
14 18029 Clamp Assembly (Old Style) 1
14 18129 Clamp Assembly (New Style) 1
15 18001 Pump Housing 1
16 18030 3⁄8" -24 x 2¼" Bolt 2
17 18106 Wear Plate Flat Head Screw 2
18 V20018 3⁄8" Lock Washer 8
19 18032 3⁄8" x 24 SS Hex Nut 2
20 18504 1" Shaft 1
21 18500 Bearing Pedestal 1
N/S 18502 Bearing SKF 66306-2RS1/C3 2
22 17704 Bolt 4
23* 18025 FKM (viton type) Seal Assembly 1
23 18025SD Severe Duty Seal 1
24 V20019 3⁄8" 16 SS Hex Nut 6
25 V20018 3⁄8" SS Lock Washer 6
26 18218 3⁄8" -16 x 24 x 21⁄8" SS Stud 6
27 13778 O-Ring 1
28 UV15163 O-Ring 1
N/S 18035 Z-Rail Mounting Bracket (Pair) 1
N/S 18100 Repair Kit (Consist of items 5*, 8,11,17, 23*) 1

This manual suits for next models

3

Other Banjo Water Pump manuals

Banjo 201 Series User manual

Banjo

Banjo 201 Series User manual

Banjo M350 Series User manual

Banjo

Banjo M350 Series User manual

Banjo 222 Series User manual

Banjo

Banjo 222 Series User manual

Banjo 300PH-6 User manual

Banjo

Banjo 300PH-6 User manual

Banjo 222 Series User manual

Banjo

Banjo 222 Series User manual

Banjo 301PIH13W User manual

Banjo

Banjo 301PIH13W User manual

Banjo 200P6PROE User manual

Banjo

Banjo 200P6PROE User manual

Banjo M350POW User manual

Banjo

Banjo M350POW User manual

Banjo M222 Series User manual

Banjo

Banjo M222 Series User manual

Popular Water Pump manuals by other brands

Ebinger TBW 36 Instruction booklet

Ebinger

Ebinger TBW 36 Instruction booklet

Pentair Myers TPL15-R5S Installation and service manual

Pentair

Pentair Myers TPL15-R5S Installation and service manual

Pfeiffer Vacuum HENA 401 operating instructions

Pfeiffer Vacuum

Pfeiffer Vacuum HENA 401 operating instructions

CAT Pumps 1570 Service manual

CAT Pumps

CAT Pumps 1570 Service manual

Graco President 224 757 instructions

Graco

Graco President 224 757 instructions

Balcrank Lion 600 Parts and technical service guide

Balcrank

Balcrank Lion 600 Parts and technical service guide

Fountain TECH FT-105 user guide

Fountain TECH

Fountain TECH FT-105 user guide

Erskine Attachments HP15 Operator's manual

Erskine Attachments

Erskine Attachments HP15 Operator's manual

JARDIN y NATURA Natflow DP5240 manual

JARDIN y NATURA

JARDIN y NATURA Natflow DP5240 manual

Xylem LOWARA ResiBoost MMW Installation, operation & maintenance manual

Xylem

Xylem LOWARA ResiBoost MMW Installation, operation & maintenance manual

Thermo Scientific 420-1901 operating manual

Thermo Scientific

Thermo Scientific 420-1901 operating manual

Pentair JUNG PUMPEN SIMER instruction manual

Pentair

Pentair JUNG PUMPEN SIMER instruction manual

Graseby 3000/500 manual

Graseby

Graseby 3000/500 manual

Lincoln 83668 user manual

Lincoln

Lincoln 83668 user manual

Espa VIGILA 100M instruction manual

Espa

Espa VIGILA 100M instruction manual

Varian TriScroll 600 series manual

Varian

Varian TriScroll 600 series manual

fluid-o-tech TMFR instruction manual

fluid-o-tech

fluid-o-tech TMFR instruction manual

Delavan HD Magnum Series manual

Delavan

Delavan HD Magnum Series manual

manuals.online logo
manuals.online logoBrands
  • About & Mission
  • Contact us
  • Privacy Policy
  • Terms and Conditions

Copyright 2025 Manuals.Online. All Rights Reserved.