banks Derringer User manual

Banks
Derringer®
Tuner
2011-2017 F-150 3.5L EcoBoost
2015-2017 F-150 2.7L EcoBoost
USE WITH SYSTEM P/N 66545, 66546, 66547
Owner’sManual
with Installation Instructions

1.Before starting work, familiarize
yourself with the installation procedure
by reading all of the instructions.
2. The exploded views provides only
general guidance. Refer to each step
and section diagram in this manual for
proper instruction.
3. Throughout this manual, the
left side of the vehicle refers to the
driver’s side, and the right side to the
passenger’s side.
4. Disconnect the negative (ground)
cable from the battery (or batteries,
if there are more than one) before
beginning work. The OEM battery
clamp can be removed using a 10mm
socket or wrench.
5. Route and tie wires and hoses a
minimum of 6" away from exhaust
heat, moving parts and sharp
edges. Clearance of 8" or more is
recommended where possible.
6. During installation, keep the work
area clean. Do not allow anything to be
dropped into intake, exhaust, or
lubrication system components while
performing the installation, as foreign
objects will cause immediate engine
damage upon start-up.
CAUTION! Do not use floor jacks
to support the vehicle while
working under it. Do not raise
the vehicle onto concrete blocks,
masonry or any other item not
intended specifically for this use.
7. During installation, keep the work
area clean. Do not allow anything to
be dropped into intake, exhaust, or
lubrication system components while
performing the installation, as foreign
objects will cause immediate engine
damage upon start-up.
Tools Required:
• Metric sockets and wrenches
• Diagonal (side cutter) Pliers
• Exacto knife or other
small bladed knife
• Drill motor*
• #31 (.1200 dia.) Drill bit*
• #1 or 7/32 (.228 dia.) Drill bit*
*Required only if mounting switch in dash
Highly recommended
tools and supplies:
• Standard and Phillips screwdrivers
• Silicon sealer (black or
clear recommended)
• Metal coat hanger
General Installation Practices

Also Available from Banks Power
Add even more power, control,
and efficiency to your Ford F-150
(Not all products available for all years/engines)
Monster®
Exhaust
AutoMind®
Programmer
Ram-Air®
Cold Air Intake
iDash®
1.8, 4.3 or 5.0"
Banks Monster Exhaust System
Constructed from heavy-duty stainless steel,
Banks' large bore, mandrel-bent Monster
exhaust connects to your truck's factory
intermediate pipe, cutting backpressure
and increasing flow. Gives you increased
power, greater longevity and maximum fuel
efficiency. The polished-stainless straight-
through muffler outflows stock by a mile and
delivers a commanding, yet civil, exhaust
note. Huge 6x5 inch tip comes in polished
chrome-over stainless or high-temp black.
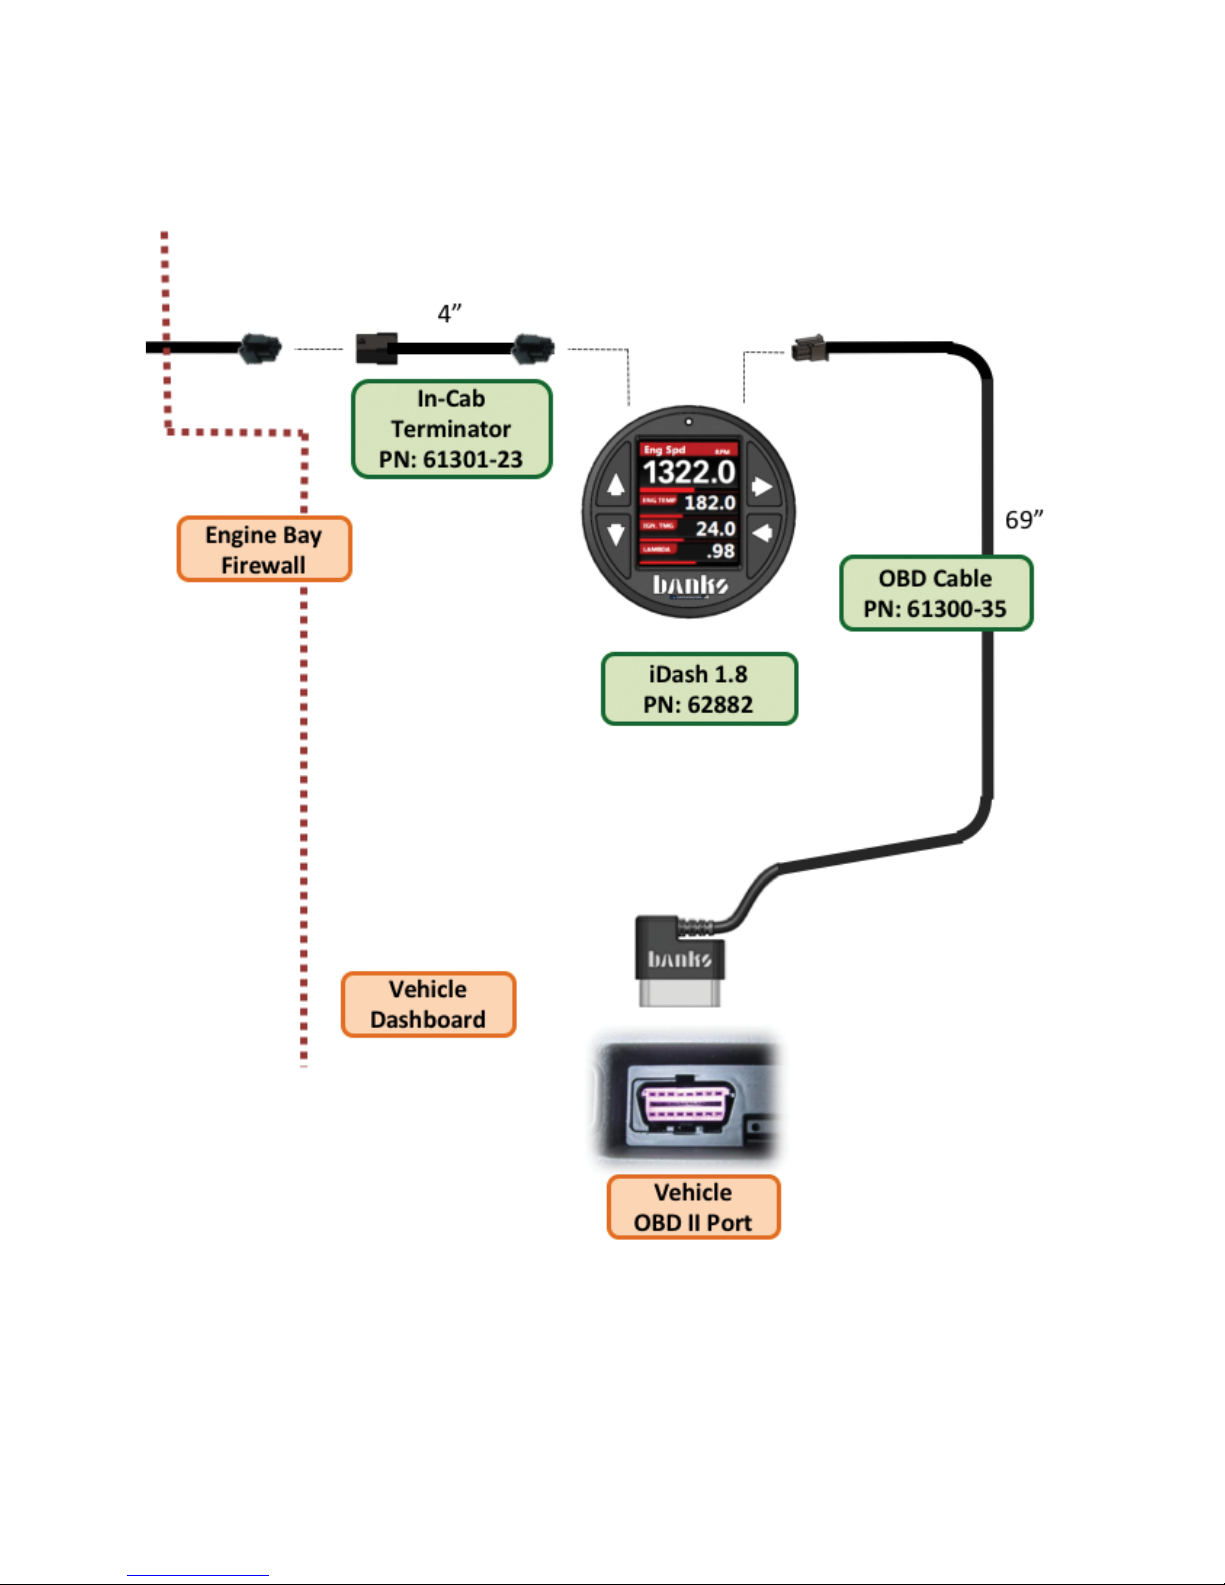
Banks iDash digital gauges
Monitor and control what’s happening
under the hood with a Banks man-machine
interface. Read and clear trouble codes, set
performance and fuel economy parameters,
customize the display, and so much more.
Available in three sizes to fit your specific
application. The 1.8" size fits perfectly in a
pilar mount, and the 4.3" and 5.0" give you a
large, easy-to-navigate touchscreen. Add the
AutoMind Flash Programming Module
to give your engine even more horsepower!
Banks AutoMind Programmer
The AutoMind comes ready to run with
pre-loaded power right out of the box. Its
calibrations were developed with power and
increased MPG in mind. Displays a host of
critical engine functions and provides service
technician diagnostic capabilities with its
ability to scan and clear vehicle trouble codes.
Banks Ram-Air Intake System
Opens up your truck’s breathing with a
flowbench-developed and dyno-proven intake
system that is less restrictive than stock.
Ram-Air's lifetime filter has a huge outlet
with deep filter pleats that maximize flow
and a complete air filter housing that draws
in cooler, denser air to the engine for greater
power and fuel economy.
Banks Stinger System
The Stinger combines intake, exhaust, and
programming into one package, giving you
greater performance at a better price! Intake,
exhaust, and tuning—all designed to optimize
airflow, air density, continuous power & MPG.

Wiring Diagram:
Stand Alone Tuner Configuration
TIP
MAP


Wiring Diagram:
iDash 1.8" Configuration
TIP
MAP


1. Use 10mm wrench to disconnect
the battery ground cable from the
battery (If equipped with more than
one battery, disconnect all negative
cables). Secure the cable(s) so that
they do not come in contact with the
battery posts during the installation
(See Figure 1).
2. Remove the engine cover for the
Ford F-150 Ecoboost by first removing
the oil filler cap (Figure 2). Then, lift
up at the passenger’s side to release
the rubber socket mounts. Then pull
up at the driver’s side to release the
opposite side mounts (Figure 3). After
removing the engine cover, reinstall
the oil filler cap to prevent accidentally
dropping anything into the engine
during work. (No tools required)
3. On the top of the EcoBoost 3.5L
engine you will find a Manifold Absolute
Pressure (MAP) sensor at the back of
the intake. Disconnect the MAP sensor
plug, pushing down on the release
lever until it releases, then pulling
the connector away from the sensor
(Figure 4). Note: Pull only on the
connector, do not pull on the wires.
(No tools required)
4. On the intake tube that connects
to the throttle body, you will find a
Throttle Inlet Pressure (TIP) sensor.
This connector is under the airbox
intake tube, behind the radiator and
under the coolant bottle. It can be
reached without disconnecting the
intake components. To disconnect the
TIP sensor plug, pushing down on the
release lever until it releases, then pull
the connector away from the sensor
(Figure 5). Note: Pull only on the
connector, do not pull on the wires.
(No tools required)
Section 1
INSTALLATION OF WIRING HARNESS, CONNECTIONS & DERRINGER
Figure 1
Figure 2
Figure 3

Figure 4
Figure 5

5. Plug the harness connectors
labeled TIP between the TIP sensor
and engine harness. Route the harness
towards the rear of the engine and
plug the harness connectors labeled
MAP between the MAP sensor and
engine harness. Route the Derringer
harness across the driver’s side valve
cover. Then over to the side of the
engine bay on the driver’s side fender.
Take care to route the harness over
the top of the brake booster vacuum
canister. Ensure that it doesn’t get
tangled in the steering shaft or the
brake rod that actuates the booster
(Figure 6).
6. Connect the Derringer module
to the sensor harness, mounting
it up and out of the way of any
moving parts. It is suggested that it
be mounted to the fender lip on the
driver’s side, using a provided Zip tie.
Leave the gray cap on the end of the
Derringer module, unless connecting
it to other Banks Power accessories.
Rotate the locking ring clockwise to
install the cap (Figure 7).
7. Route the Derringer starter
cable through the firewall wiring
harness gasket, and into the driver
compartment. Simply cut a small X
about, ¼-inch at the inside edge of
the wire harness gasket. Then feed
the 6-pin end of the Derringer starter
cable through the hole. Plug the round
connector end of the Banks starter
cable into the Derringer and secure it
by rotating the locking ring clockwise.
Secure the Derringer harness to the
factory harness with a wire tie. Apply
a little black silicone sealer around the
factory wire harness gasket where the
new hole was added (Figure 8 and
9). A wire coat hanger is helpful for
pulling the harness through the two
sides of the OEM wire harness gasket.
Take care to not damage the factory
wire harness.
Figure 6

Figure 7
Figure 8

8. Plug the OBDII cable into the OBDII
port under the dash (Figure 10).
NOTE: If using the Switch
configuration, perform steps
9-11. If using iDash 1.8" Gauge
configuration, skip to step 12.
9. Plug the 4-pin connector from
the OBDII cable, the 6-pin connector
from the starter cable, and the 2-pin
connector from the switch cable into
the Y-harness (Figure 11).
Figure 9

Figure 11
Figure 10

10. Install the power level plate to
the switch. Make sure to align the slot
of the switch with the red line on the
plate towards Sport (Figure 12).
11. OPTIONAL: Mount switch in
dashboard by drilling two holes using
the supplied template. Be careful to
not damage factory wiring behind the
dashboard. To keep the switch from
rotating, it is necessary to install the
locking tab washer behind the dash,
with the locking tab facing the
backside of the dash face.
Alternatively, Zip tie the switch in any
easy to access location for power level
adjustment.
NOTE: Only perform steps 12-14 if
using iDash gauge configuration. If
using the switch configuration skip
to step 15.
12. Plug the 4-pin from the OBDII
cable and the 6-pin from the starter
cable into the back of the iDash 1.8"
gauge (Figure 13).
13. Install iDash gauge in an A-pillar,
steering column, or suction cup
windshield mount gauge pod.
14. Install the black terminal cap onto
the Derringer in place of the grey cap
when using the Derringer in iDash 1.8"
gauge configuration (Figure 14).
15. Secure the harness connectors
under the dash, avoiding any moving
parts, with supplied Zip ties.
16. Double-check all wire harness
routing under the hood and the dash
for proper clearance around moving
parts and sharp objects as well as heat
sources, then use the supplied nylon
tie straps to secure the wire harnesses
safely away from any control linkages
and the operator’s feet underneath
the dashboard. Be sure to step on the
brake and E-brake pedals and move
the tilt column and adjustable peddles,
if equipped, when checking for proper
harness clearance. Also turn the
steering wheel lock to lock to ensure
that the harness does not hit, pull or
otherwise interfere with any moving or
hot parts of the truck.
17. Re-attach any previously removed
interior trim panels, reinstall the
acoustic foam engine intake cover
and oil fill cap and lower the vehicle.
Re-connect the negative battery cable.
18. Start the vehicle, checking for
normal engine operation.
NOTICE: Go over the entire
installation as a precautionary
check to ensure that all clamps are
tight, wiring and hoses are properly
routed, and connections are correct
and tight. Make sure that the
Derringer wire harness is not lying
in the way of the brake and gas
pedals, or any moving parts.
If vehicle is equipped with
adjustable pedals and/or column,
ensure that the harness is
clear through the full range of
adjustments.
Figure 12

Figure 14
Figure 13

Section 3
TROUBLESHOOTING
Section 2
OPERATION OF THE DERRINGER MODULE
Setting Desired Power Level:
Your Derringer tuner module has three settings. These are Sport, Plus, and
Stock (off). You can set the desired power level while the engine is running,
under power or off. It is recommended that you do not switch modes under
high throttle applications. The level can be changed by either the switch, or
the iDash 1.8" gauge by pressing the up or down keys on the left side.
SPORT MODE (switch up)
This is the most aggressive calibration. It is tuned to give you maximum power
and turbo response for short to medium bursts. Full power will be available for
10-15 seconds at a time depending on the application.
PLUS MODE (switch down)
The plus calibration is designed for use in everyday driving. This power level adds
a noticeable punch under high load acceleration by improving turbo response
and power. Power in this mode can be sustained for a prolonged duration.
STOCK MODE (switch middle)
Stock mode turns OFF your Derringer tuner. Throttle response and power return
to stock levels.
Your Derringer Tuner has a built-in, self-diagnostic
system. The status of the diagnostic system is
communicated via the LED on the module. When
the Derringer module is functioning properly the LED
will flash green. When the LED is not illuminated, the
Derringer module is not powered on. If the ignition is on
and the LED is not illuminated, check the connections at
the vehicle sensors and ensure they are fully engaged.
When faults are detected, the Derringer module will
flash a diagnostic code. These diagnostic codes are
comprised of 2 digits. Each digit is expressed by the
flashing red LED. A code can be determined by counting
the number of red flashes displayed before the LED
flashes green. This is the first digit. The number of
red flashes after the LED flashes green is the second
digit. After the diagnostic code is displayed, additional
codes will be displayed in sequence. Once all codes are
displayed the system we begin sending the codes again.
The display of the codes is separated by a longer period
of the LED not being illuminated. Once you have written
down all diagnostic codes being displayed, consult the
table on the following page for a description of the code
along with the action to be taken.

Code Event Course of Action
1,1
Throttle Inlet Pressure (TIP)
Input Voltage
Out of Range.
Turn ignition OFF and check the male and female
TIP sensor connectors. Turn ignition back ON and
re-check for presence of code. If code does not
re-appear at key ON, start engine and check for
presence of code both at engine idle and under
varying driving conditions.
1,2
Manifold Absolute Pressure
(MAP) Input Voltage Out of
Range.
Turn ignition OFF and check the male and female
MAP sensor connectors. Turn ignition back ON
and re-check for presence of code. If code does
not re-appear at key ON, start engine and check
for presence of code both at engine idle and
under varying driving conditions.
2,1
Throttle Inlet Pressure (TIP)
Output Voltage
Out of Range.
Turn ignition OFF and check the male and female
TIP sensor connectors. Turn ignition back ON and
re-check for presence of code. If code does not
re-appear at key ON, start engine and check for
presence of code both at engine idle and under
varying driving conditions.
2,2
Manifold Absolute
Pressure (MAP)
Output Voltage Out of Range.
Turn ignition OFF and check the male and female
MAP sensor connectors. Turn ignition back ON
and re-check for presence of code. If code does
not re-appear at key ON, start engine and check
for presence of code both at engine idle and
under varying driving conditions.
3,4
OBDII / BanksBus
CAN
communication error
Turn ignition OFF and check the following
connections (as applicable):
1) 61300-35 OBD-II Interface Cable - at 16-pin
vehicle OBD-II and 4-pin inter-cable connectors.
2) 61301-21 Y-Adapter Cable - at 4-pin inter-
cable and 6-pin inter-cable connectors.
3) 61301-20 B-Bus Starter Cable - at 6-pin inter-
cable and 6-pin B-Bus Circular connectors.
4) 61300-22 B-Bus Terminator Plug - at 6-pin
B-Bus Circular connector.
Turn ignition back ON and re-check for presence of
code. If code does not re-appear at key ON, start
engine and check for presence of code both at
engine idle and under varying driving conditions.

Section 4
PLACEMENT OF THE
BANKS POWER DECALS
Banks provides the best performance chips and programmers.
Other manuals for Derringer
1
Table of contents
Other banks Tuner manuals