Barazza 1MOA User manual
1
INSTRUCTIONS FOR USE
Microwave oven

2

3
1 / IMPORTANT NOTICE FOR USERS
Safety guidelines__________________________________________
04
Protecting the environment __________________________________
05
2 / INSTALLING THE OVEN
Electrical connection _______________________________________
06
Replacing the power cord ___________________________________
06
3 / DESCRIPTION OF THE OVEN
Presentation of the oven ____________________________________
09
4 / USING THE OVEN________________________________________
14
5 / CARE AND CLEANING OF THE OVEN_______________________
22
6 / TROUBLESHOOTING_____________________________________ 23
7 / AFTER-SALES SERVICE___________________________________
24

4
Important
:
Important safety instructions -
Read carefully and retain for future use.
If the appliance is ever sold or given to
another person, ensure that the new
owner receives the accompanying
guide. Please read these guidelines
before installing and using your
appliance. They were written for your
safety and the safety of others.
• SAFETY GUIDELINES
This appliance is not intended for use by
individuals (including children) with
impaired physical, sensorial or mental
abilities, or persons lacking in knowledge
or experience, unless they receive prior
supervision or instructions on using the
appliance from a person responsible for
their safety. Children should be supervised
to ensure they do not play with the
appliance. This appliance is designed to
cook with the door closed. WARNING: It is
dangerous for anyone other than a
qualified person to perform maintenance
or repair that requires the removal of the
cover providing protection against
exposure to microwave power.
WARNING: Liquids and other foods must
not be heated in sealed containers, as
they may explode. Only use utensils
suitable for usage in microwave ovens.
When heating food items in plastic or
paper containers, monitor the microwave’s
contents due to the risk of combustion. If
smoke appears, stop or unplug the oven
and leave the door closed to stifle any
flames present. Heating beverages in the
microwave oven can cause the sudden
and/or delayed splattering of boiling liquid,
so care must be taken when handling their
containers.
The contents of baby bottles and baby
food jars must be stirred or rearranged
and the temperature must be checked
before consumption, so as to prevent
burns. It is not recomended to heat eggs
in their shells or whole hardboiled eggs in
a microwave oven, as they may explode,
even after cooking has ended. WARNING:
Only allow children to use the oven
without supervision if adequate
instructions have been given so that the
child is able to use the oven safely and
understands the dangers of incorrect use.
Your appliance is solely intended for
domestic use for cooking, reheating and
defrosting food. The manufacturer does
not accept any liability in the event of
inappropriate use.
To avoid damaging your appliance, never
operate it while empty or without the turn-
table. Do not interfere with the openings
on the lock on the front of the appliance;
this could cause damage to your
appliance that would require a service
callout. The seal and frame of the door
must be regularly examined to ensure that
they have not become damaged. In
microwave mode, it is not recommended
to use metallic cookware, forks, spoons,
knives or metal staples or fasteners for
defrosting bags. Never heat a baby bottle
with the teat on, as it may explode. Always
use oven gloves to remove dishes from
the oven. Some dishes absorb the heat
from food and are therefore very hot.
When heating small quantities (a sausage,
a croissant, etc.) place a glass of water
next to the food. Excessive cooking times
may dry out food and burn it. To prevent
this occurring, never use the same times
recommended for cooking in a
conventional oven.
WARNING: If the door or door seals are
damaged, do not operate the oven until it
has be repaired by a competent person.
5
WARNING: The accessible parts of the
appliance may become hot during use. Be
careful not to touch the heating elements
located inside the oven. It is advisable to
keep small children away from the
appliance. WARNING: If the appliance is
being used in combination mode, it is
recommended that children only use the
oven under adult supervision due to the
temperatures generated.
• PROTECTING THE
ENVIRONMENT
This appliance’s packaging materials are
recyclable. Please recycle them and help
protect the environment by depositing
them in municipal containers provided for
this purpose.
Your appliance also contains
various recyclable materials. It
is therefore marked with this
logo to indicate that used
appliances must not be mixed with other
waste. The appliance recycling organised
by your manufacturer will therefore be
conducted in optimum conditions, in
accordance with European directive
2002/96/EC on electrical and electronic
equipment waste. Consult your local
authority or your retailer to locate your
nearest used appliance drop-off points.
Thank you for your help in protecting the
environment.
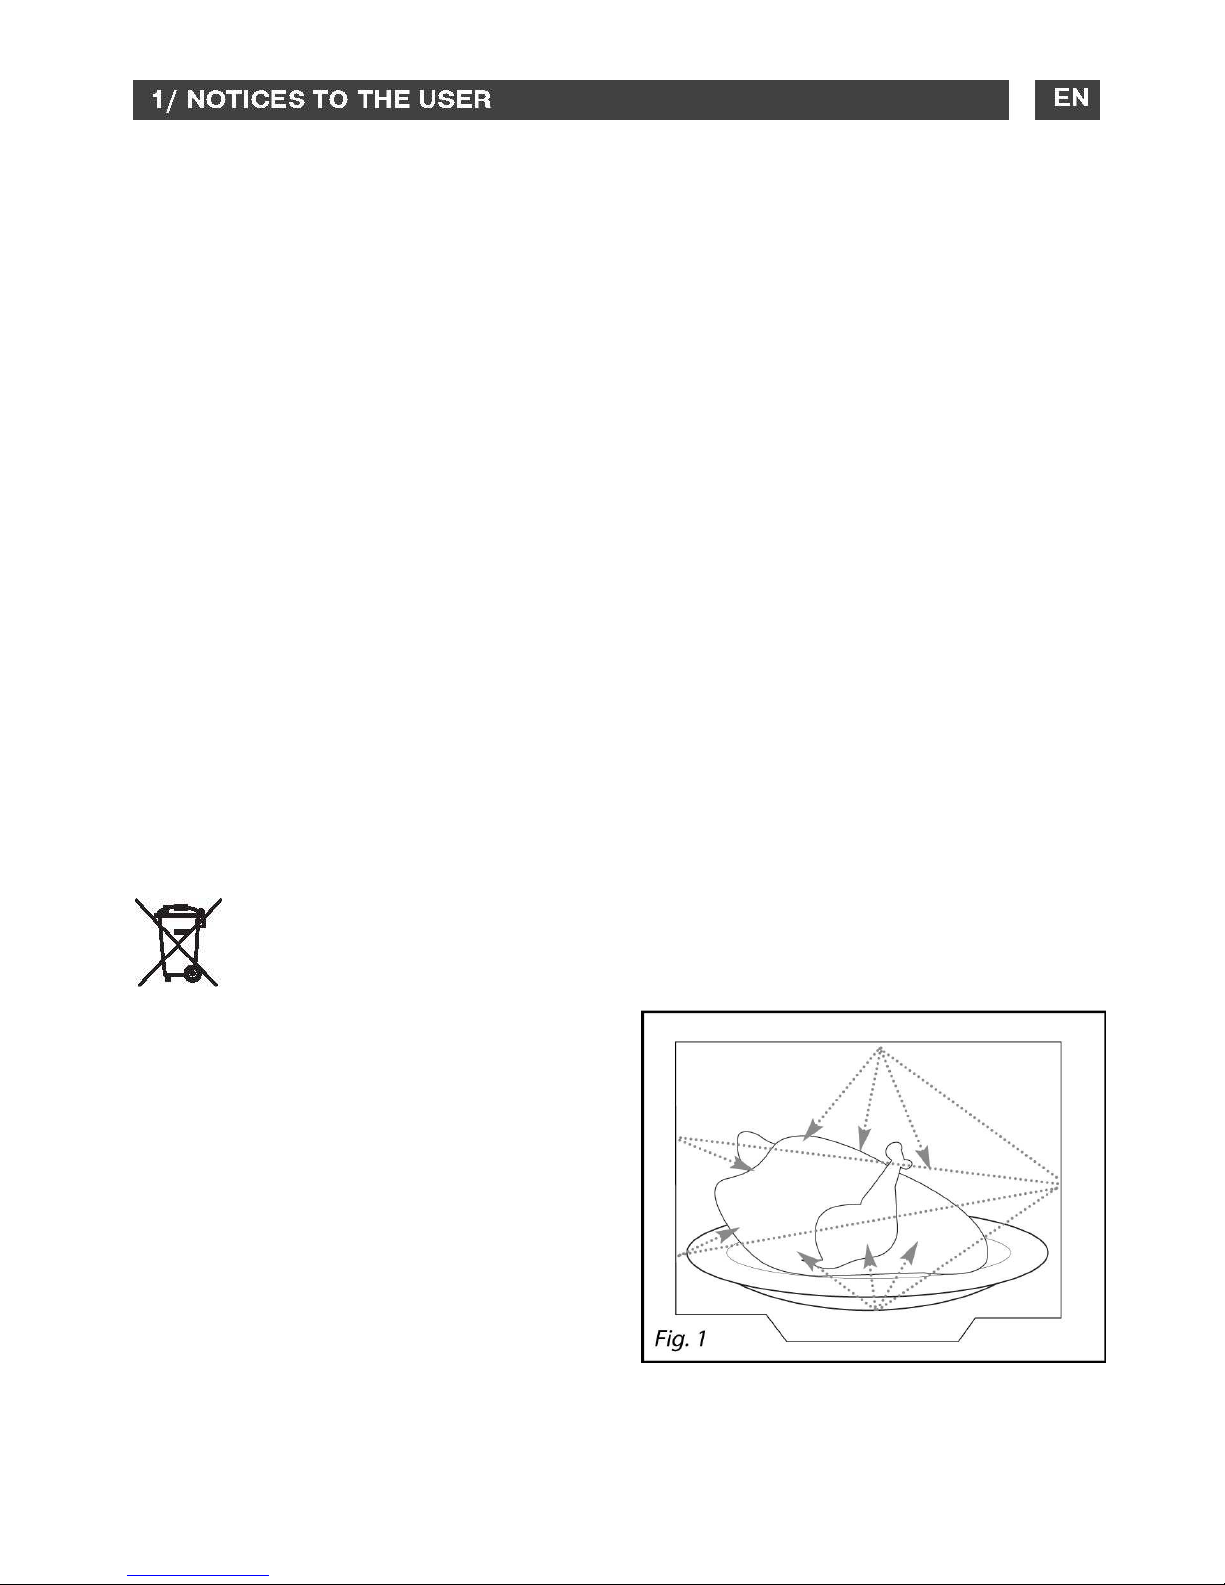
• HOW YOUR OVEN WORKS
The microwaves used for cooking are
electromagnetic waves. They are
commonly found in our environment in the
form of radio waves, light and infrared
rays. Their frequency is in the 2450 MHz
range.
Their behaviour:
•They are reflected by metals.
•They travel through all other materials.
•They are absorbed by water, fat and
sugar molecules.
When food is exposed to microwaves its
molecules begin moving rapidly, causing it
to heat up.
The penetration depth of waves into the
food is approximately 2.5 cm; if the food is
thicker, the centre of the food will be
cooked by conduction, as in conventional
cooking. Note that microwaves cause a
simple thermal phenomenon within food
and are not harmful to health.

6
• BEFORE CONNECTION
Warning:
Ensure that your appliance has
not suffered any damage during
transport (bent door or seal, etc.). If
you notice any kind of damage, contact
your retailer before using the
appliance.
In order to easily locate the make,
model number, etc. of your appliance,
we recommend that you note this
information on the “After-Sales Service
Department and Customer Support”
page.
• ELECTRICAL CONNECTION
Ensure that:
- The electrical installation has sufficient
voltage.
- The electrical wires are in good
condition.
- The diameter of the wires complies with
the
installation requirements.
- Your electrical installation is equipped
with 15-ampere thermal-sensitive
protection.
If in doubt, consult your electrician.
The appliance is not supplied with a plug
the cable must be connected directly to
the mains, this must only be done by an
authorized person in accordance with
current regulations in the country where
the appliance is installed.
Electrical connections should be
completed before the appliance is placed
in the wall unit. The appliance must be
recess-fitted correctly to ensure electrical
safety. During recess fitting and
maintenance operations, the appliance
must be disconnected from the mains;
fuses must be cut off or removed.
The isolating switch must remain
accessible after the appliance is installed.
Your electrical installation should include
an accessible feature that allows users to
disconnect the power supply.
If the power cable is damaged, it should
be replaced by the manufacturer, its after-
sales service or a similarly qualified
person so as to prevent a hazard.
Important:
We cannot accept liability for any
accident or incident resulting from non-
existant, defective or incorrect
grounding.
If the oven malfunctions in any way,
unplug the appliance or remove the
fuse for the oven’s connection line.
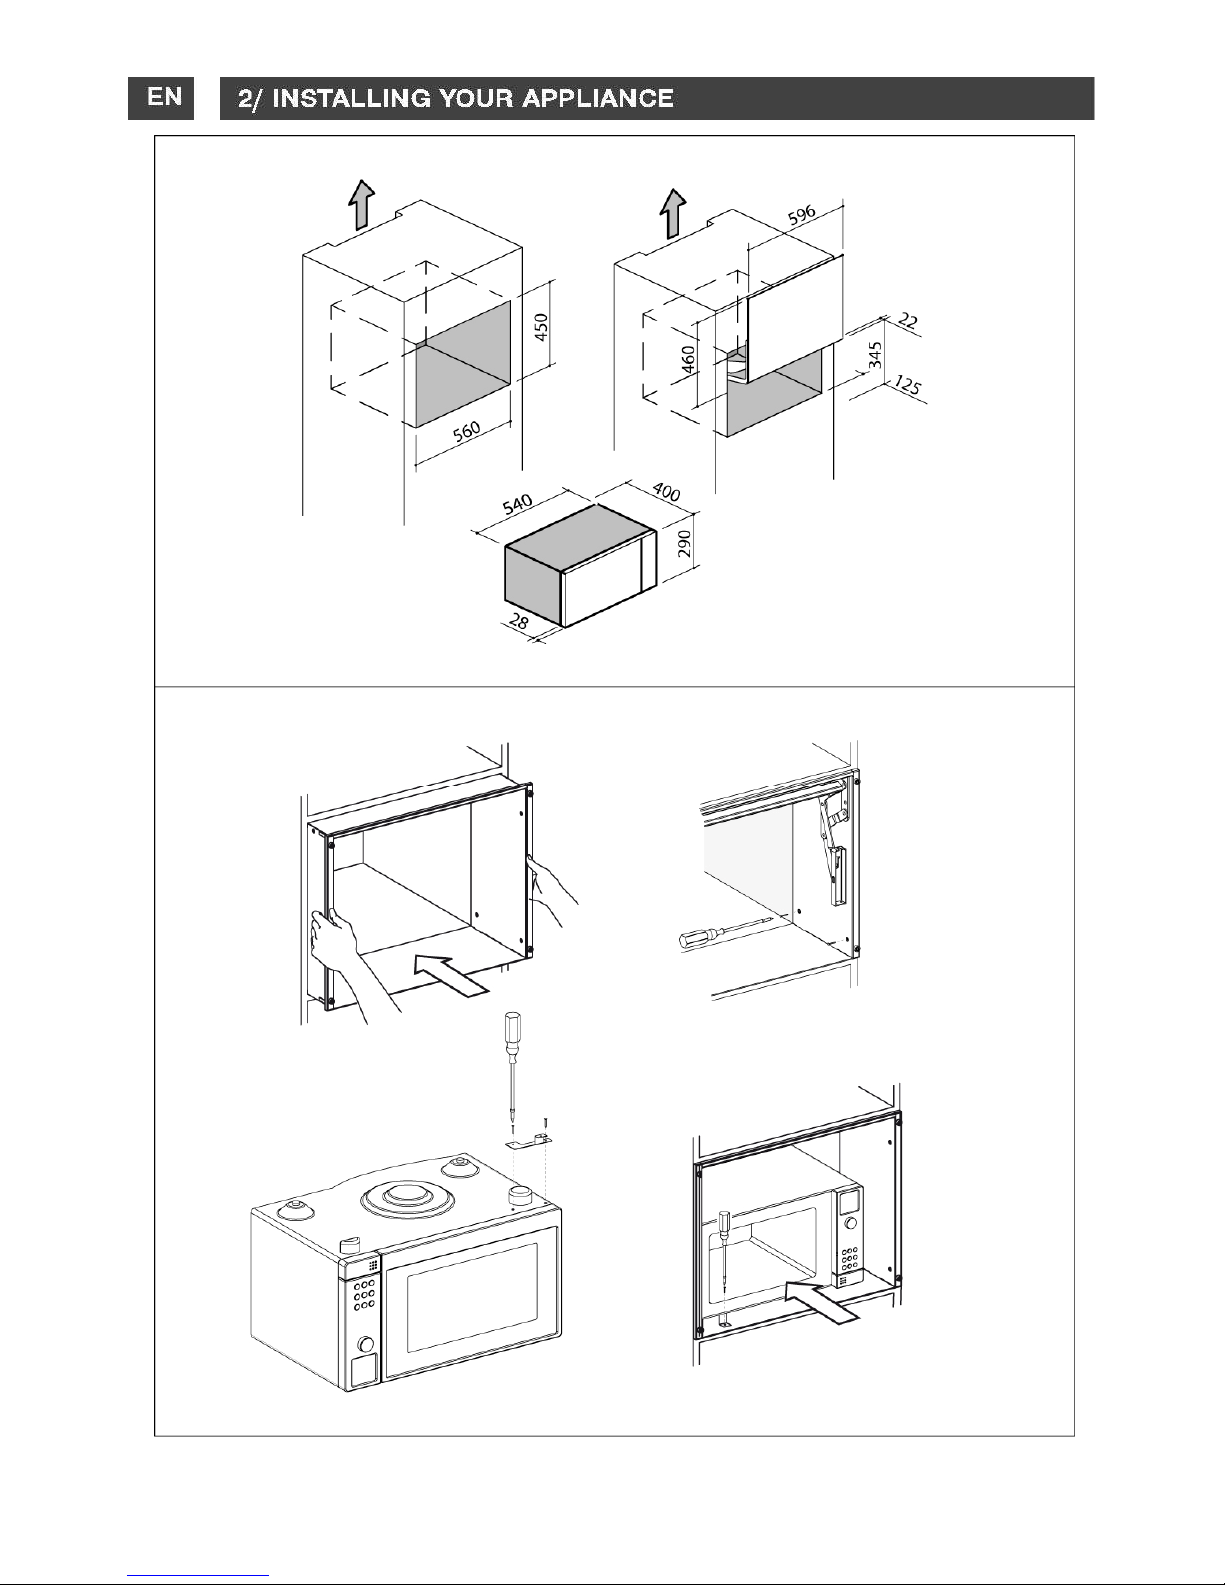
•The appliance must be installed inside
the built-In frame (fig. 2A on page 7),
or behind a lift-up door (fig. 2B on page
8).
•Place the oven on a flat and horizontal
surface, away from any source of heat or
steam. To ensure the stability of the
microwave oven, the front left foot is
adjustable (5 positions). Turn it to raise
or lower the appliance.
•Make sure that air may circulate freely
around the oven.
•Make sure that nothing obstructs the
ventilation louvers at the back of the
appliance.
•Do not use your appliance immediatly
(wait approx. 1-2 hours) after transfer
from a cold place to a warm place as
condensation may cause a malfunction.

7
F
i
g
.
2A
8
F
i
g
.
2
B
9
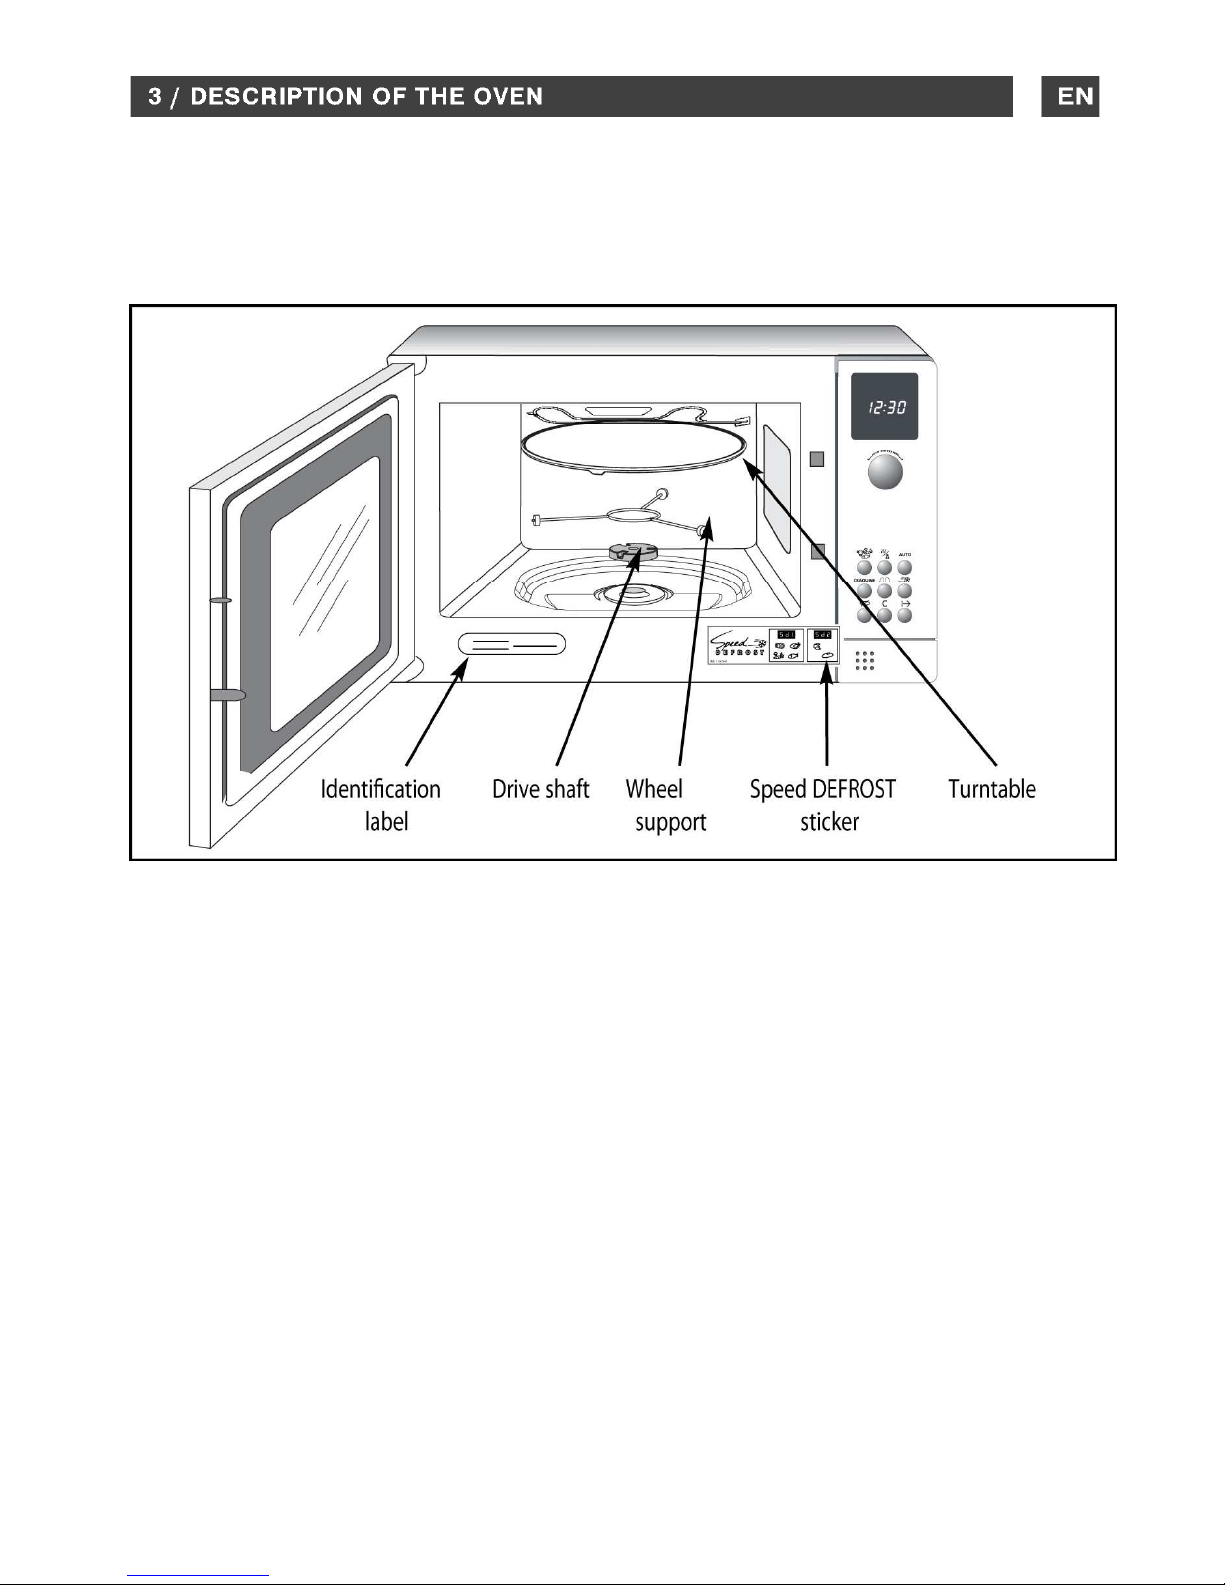
• THE TURNTABLE
:
ensures equal cooking of food throughout with no need to intervene.
-It may be used as a cooking dish.
-Rotation is controlled by the drive shaft and the wheel support.
-The turntable rotates in both directions.
-If it does not turn, verify that all components are properly positioned.
-For easy removal, wells are provided on either side.
• TURNTABLE OFF
: stops the turntable from revolving in order to use platters which require
the entire oven space. When off, remember to turn the recipient or stir the contents.
• THE WHEEL SUPPORT :
Do not try to rotate the roller ring manually, as you could damage
th
e drive system. If it does not turn smoothly, make sure that there is nothing in the well
beneath the turntable.
• Speed DEFROST STICKER : position the sticker as shown above.
: stops the turntable from revolving in order to use platters which require
the entire oven space. When off, remember to turn the recipient or stir the contents.
Do not try to rotate the roller ring manually, as you could damage
e drive system. If it does not turn smoothly, make sure that there is nothing in the well

10
• ACCESSORIES
•
The turntable :
ensures equal
cooking of food throughout with no need to
intervene. The turntable rotates in both
directions. If it does not turn, verify that all
components are properly positioned. It
may be used as a cooking dish. The
turntable can be removed for cleaning. by
using the wells provided on both sides for
easy access. (Fig.03).
•
The drive shaft :
If you remove the
drive shaft, do not allow water to enter the
motor shaft hole. Be sure to put the
turntable, the drive shaft and the wheel
support back in their proper place.
•
Wheel support :
Do not try to rotate
the roller ring manually, as you could
damage the drive system. If it does not
turn smoothly, make sure that there is
nothing in the well beneath the turntable.

11
A Display window :
to simplify programming, the display
indicates : the time of day, the types of
food and functions, the minutes /
seconds or weight programmed.
B The selector knob :
to choose the food type, function, pro-
gramme time or weight.
C FOOD TYPE key :
to choose the food type, with the
selector knob.
D FUNCTION key :
to choose the appropriate function, with
the selector knob.
E “AUTO” key :
automatically sets the correct
programme time according to a
specified food type and weight.
F ”CRAQUINE” key " :
for use with the Craquine dish.
G GRILL key :
to select low or high grill.
H ”Speed DEFROST” key :
to quickly defrost all types of froze food.
I STOP-TURNTABLE key
:
to stop the turntable from revolving.
J PAUSE/CANCEL key :
to interrupt (press once) or cancel a
programme (press twice). Also used
to set the clock.
K START key :
to start all programmes.
12
Microwave power settings
When you select the type of food, the appropriate
power setting Is automatically programmed.
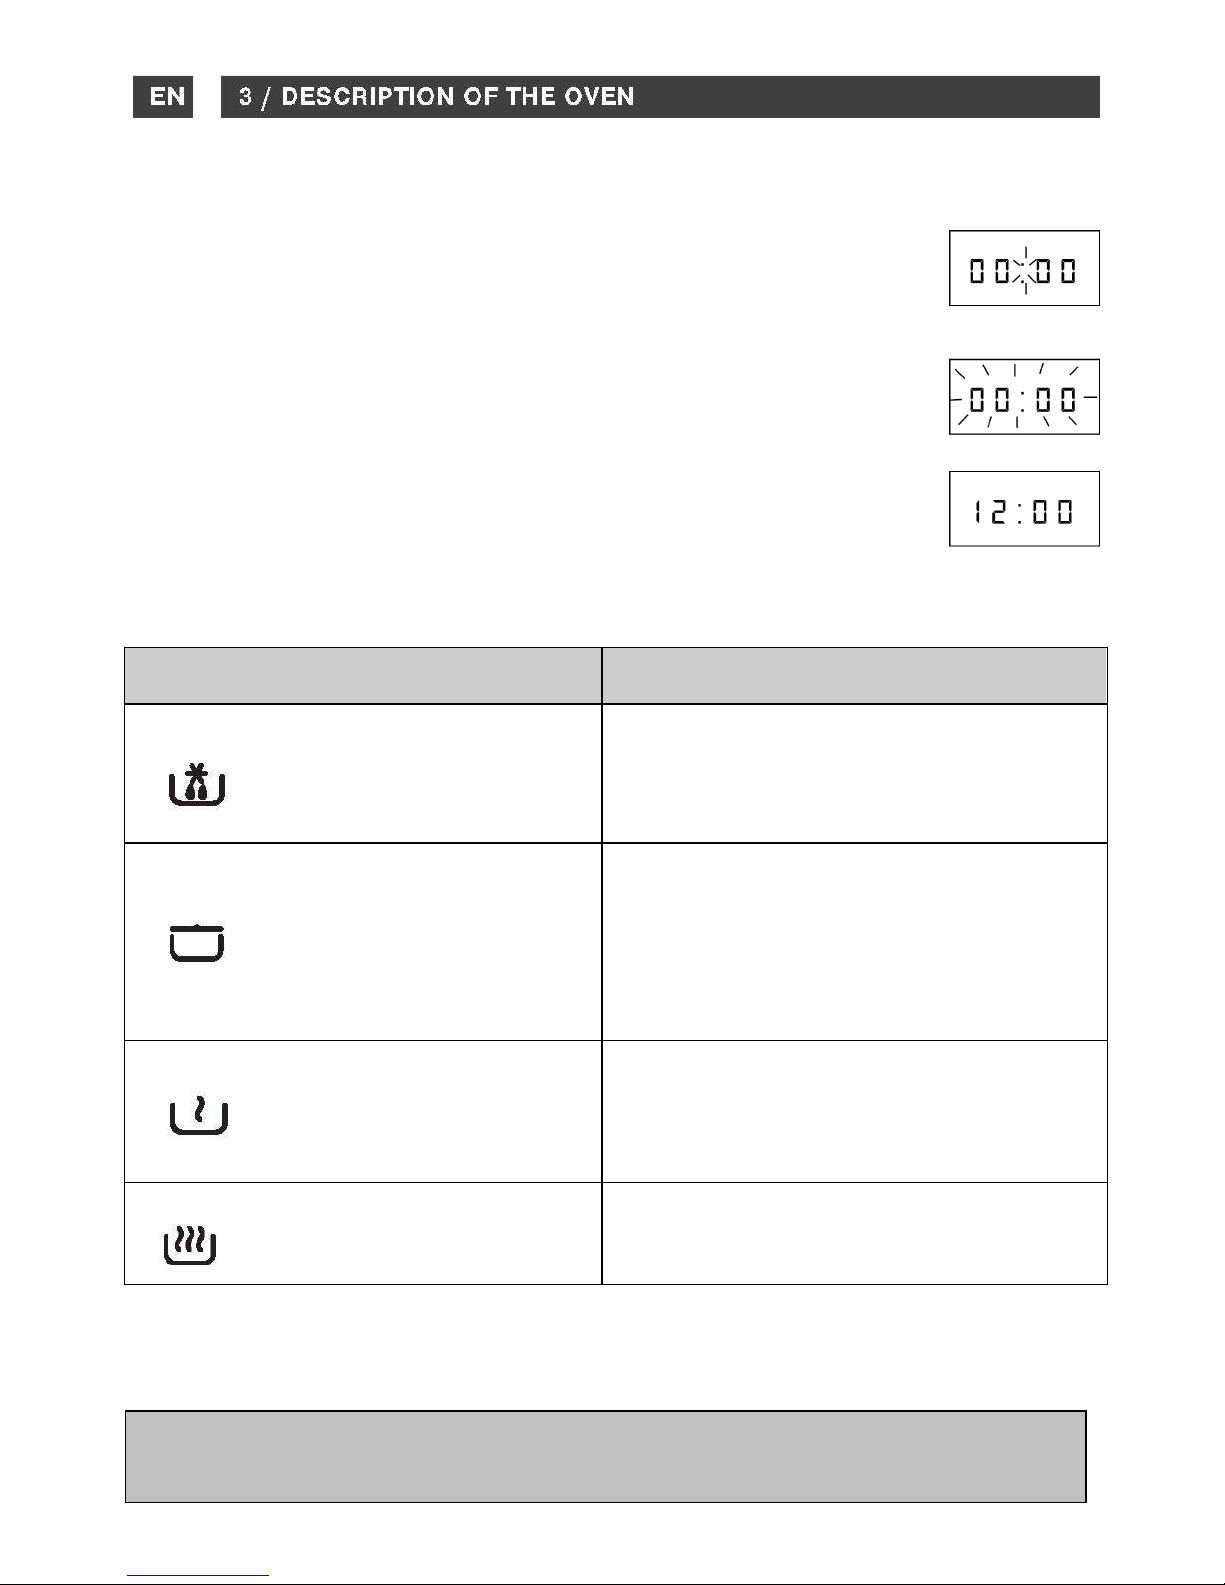
After first plugging in your microwave oven or after a power outage,
the clock reads 00:00 and the two dots flash.
To set the clock :
- Press the PAUSE / CANCEL key for 5 seconds.
The 4 numbers flash, and a tone sounds indicating the hour must be set.
-Turn the selector knob to display the correct time.
-Validate by pressing the PAUSE / CANCEL key
Your clock is set.
POWER SETTING
APPLICATION
DEFROST 150W
To defrost all frozen food or to top off
cooking of delicate dishes or cook very
slowly.
SIMMER 500W
To cook fish and poultry. To finish
programmes begun with the HIGH COOK
power setting, for instance beans, lentils, or
dairy products. (This power setting is
available when you programme with the
function key.)
HEAT 700W
To heat up all liquids and all fresh or frozen
pre-cooked dishes.
HIGH COOK 900W
To cook vegetables and soup.
Microwave output power: 900 W
13
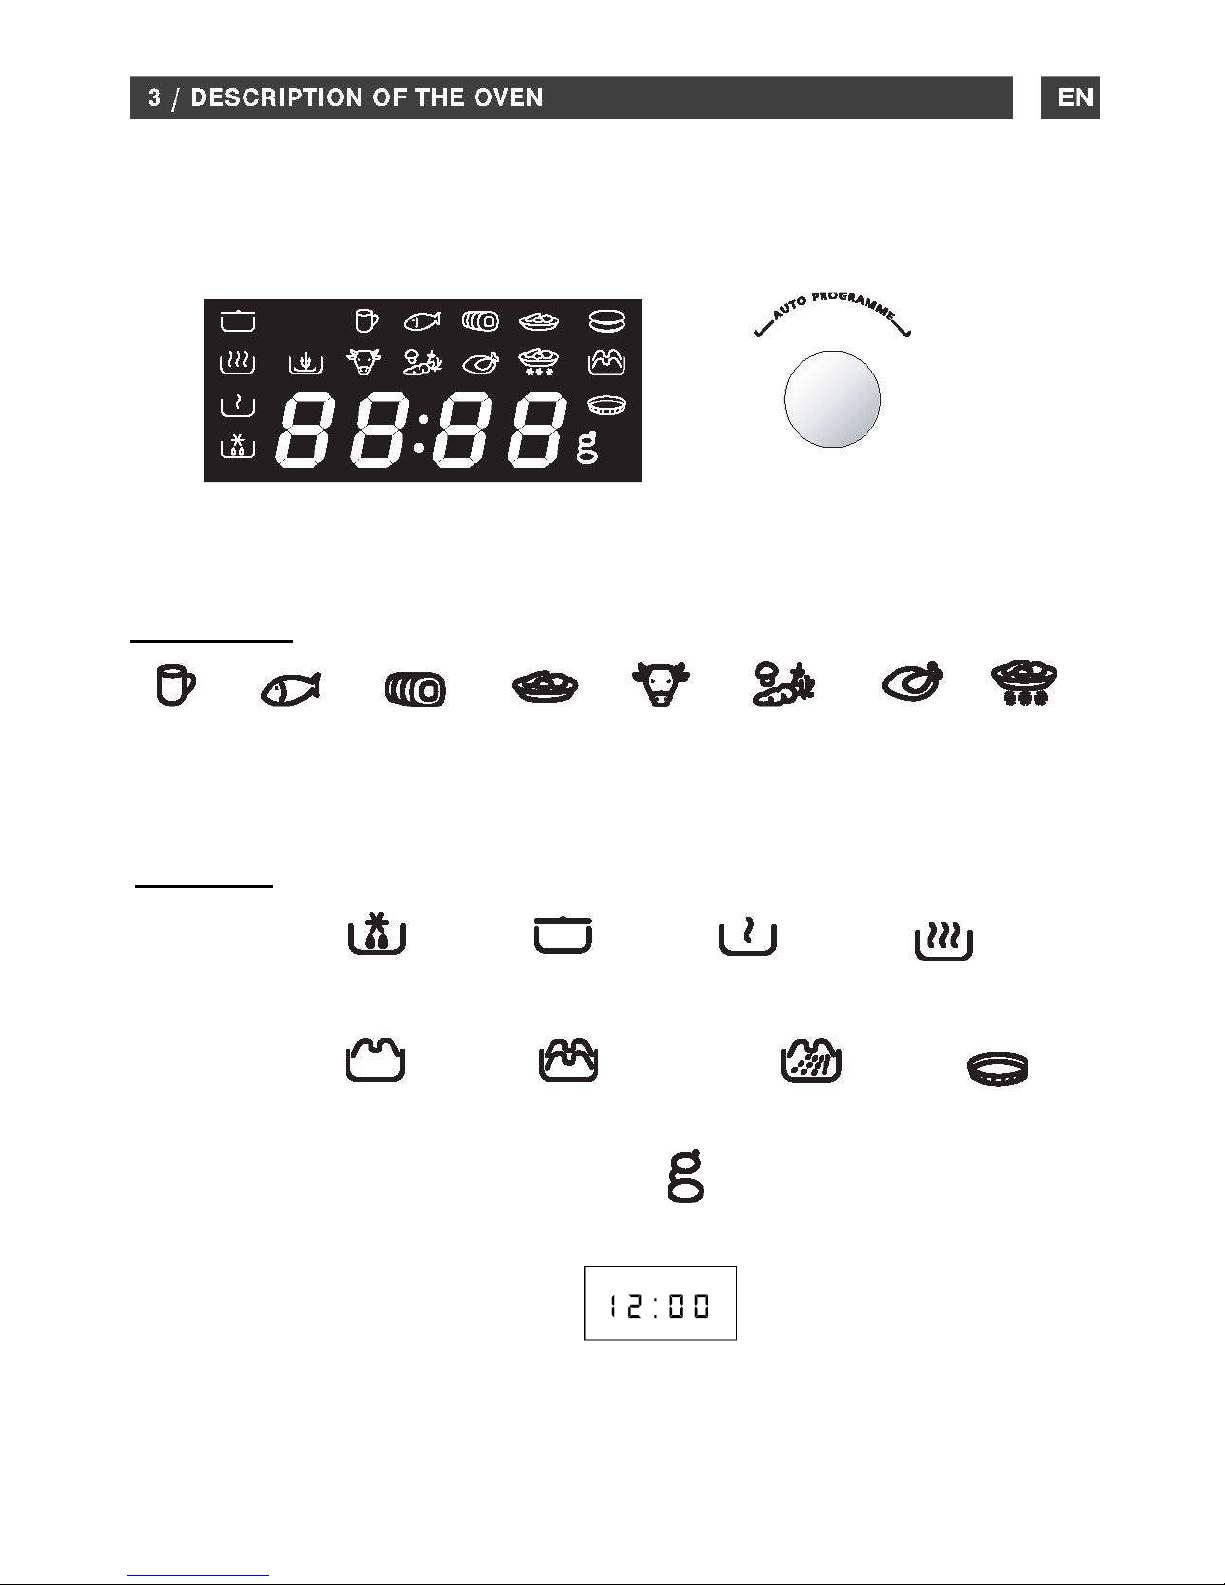
The display and the selector knob guide you in your choice of :
food types
functions
beverages
DEFROST
SIMMER HEAT COOK
LOW GRILL
HIGH GRILL CRAQUINE
MICROWAVE + GRILL
fish pork,
veal
turkey
fresh
ready-
made
dishes
beef,
lamb
vegetables
poultry frozen
ready-
made
dishes
the weight
for Automatic programming
the programme time
(or clock)
The food type or function being selected will blink in the display.

14
Your microwave oven is now plugged in and the clock is set.
Open the door, set the dish inside, close the door. If the door is not properly
shut, the appliance will not operate.
The following keys are used for the various programmes :
FOOD TYPE
AUTOMATIC
FUNCTION
SPEED DEFROST
CRAQUINE
GRILL
•3 beeps announce the end of a programme. The beeps are repeated every minute for 10
minutes until you open the door.
•If you think there is insufficient space for the dish to turn freely inside the oven, press the
STOP TURNTABLE key before or during the programme.
•If there is an error in the programming, press the CANCEL key twice.
••••••••••••••••••••••••••••••••••••••••••••••••••••••••••••••••••••••••••••••••••••••
You may choose amongst the following programmes :
Express programme
Set the programme time (ex. 2 minutes) with the selector knob.
The functions & blink alternatively to indicate that the
express programme (900 W) is set.
Press START .

15
USING THE PROGRAMMER
Programming with the function key
Press the FUNCTION key, make your selection.
With this key, the
SIMMER
setting is available.
Wait until 00:00 flashes, set the programme time
with the selector knob.
Press START .
Programming with the food type key
Press the FOOD TYPE key, make your selection.
Press the FUNCTION key, make your selection; the
correct microwave power setting will be programmed
according to the food type selected.
Wait until 00:00 flashes, set the programme time
with the selector knob.
Press START .
Automatic programming
With the AUTO key, the programme time is set
automatically
according to the weight of your food item.
Press the FOOD TYPE key, make your selection.
Press the FUNCTION key, make your selection.
Press the AUTO key;
flashes, use the
selector knob to indicate the weight of your food item.
Press START .
The appropriate time is programmed automatically
.
16
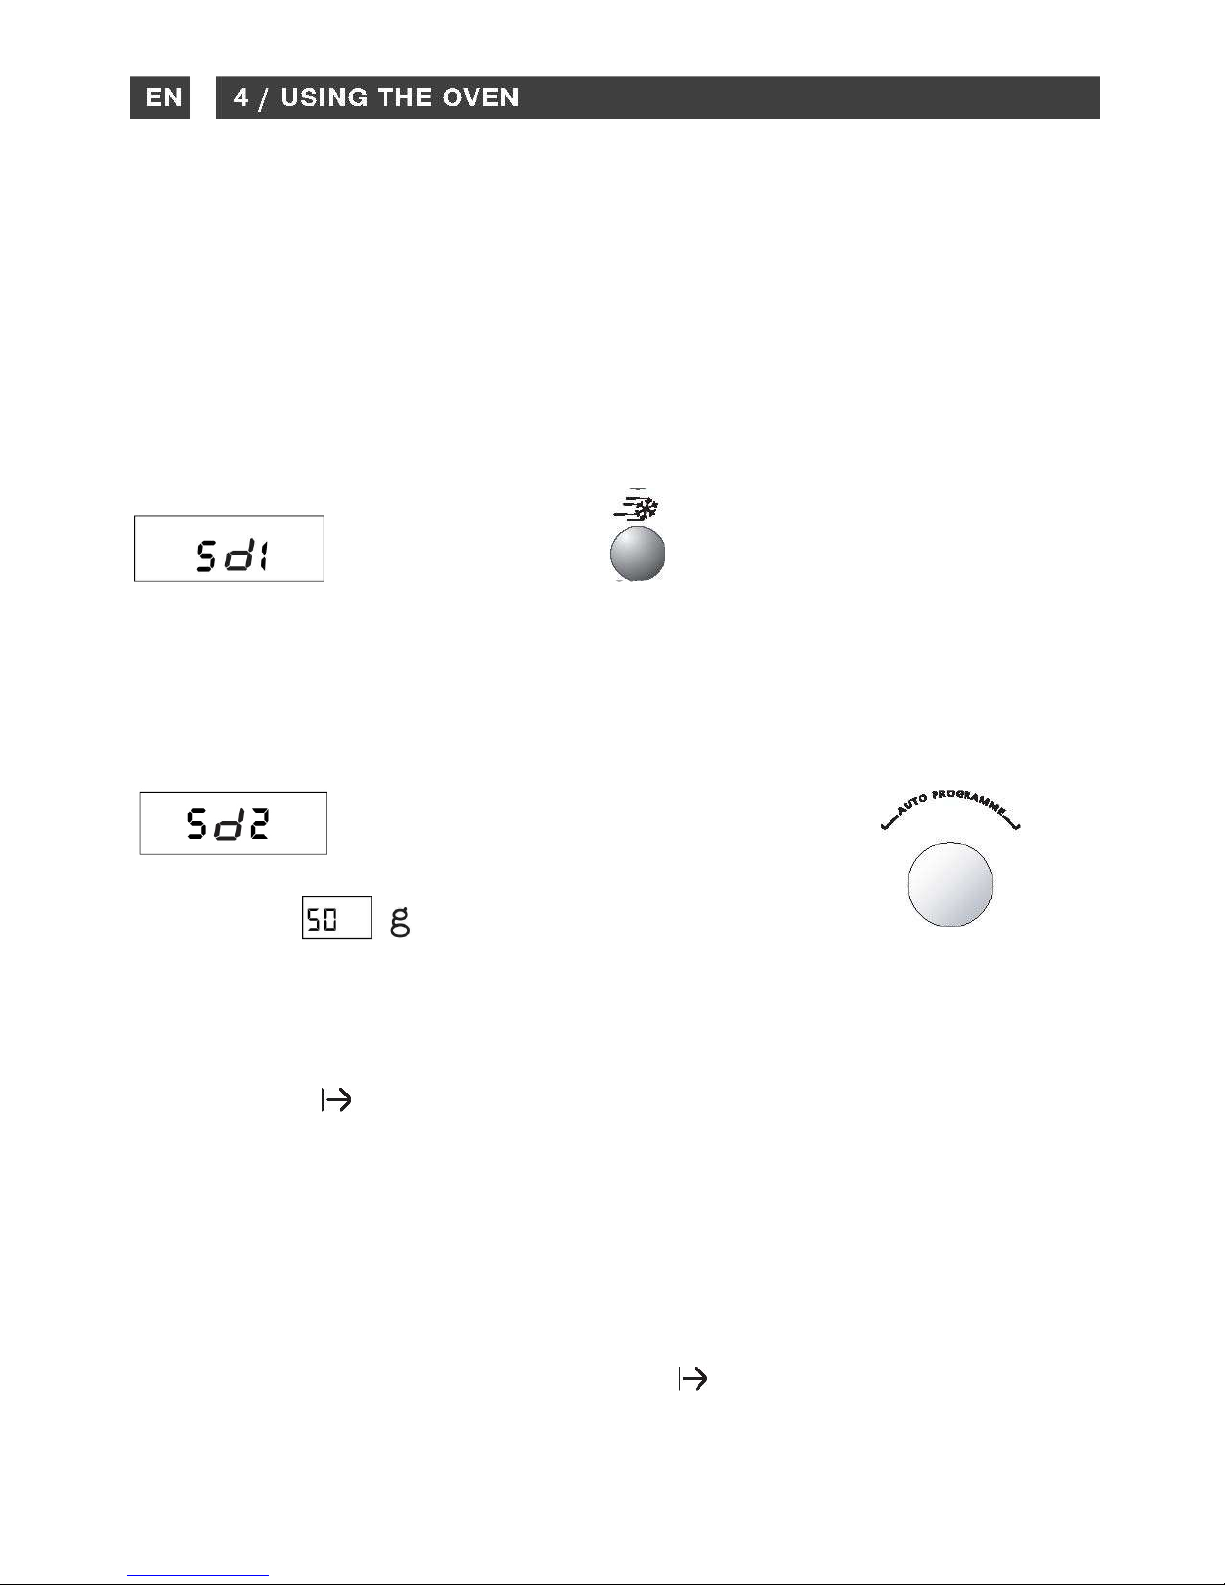
• DEFROST
With the Speed DEFROST key you can quickly defrost all types of frozen
food. To guarantee quality results, use Speed DEFROST for dishes weighing
up to 500g. To defrost food items over 500g, use the FUNCTION key (as
described on the preceding page).
For quick defrosting of meat, poultry, fish,vegetables and beverages, press the Speed
DEFROST key once :
is displayed.
For quick defrosting of bread, rolls and pastry, press the DEFROST key twice :
is displayed.
Wait until flashes
Use the selector knob to enter the weight of your food item (up to 500g).
Press START .
The defrost time corresponding to the given weight is automatically calculated.
Necessary time may vary according to the initial temperature of the food (the defrost
times were calculated for food frozen at -18°C). The defrost time is displayed and the
programme begins.
When using DEFROST or the defrost function a beep indicates the midpoint of the
programme (the oven continues to operate). To obtain the best results, turn the food at
this time, close the door and press the
START
key to continue the second half of the
programme.
17
• THE GRILL FUNCTION
This function enables you to brown dishes such as gratins or meat. It may be used
before or after cooking, as called for in the recipe.
• The grill folds down for easy cleaning :
1. Horizontal position: for cooking au gratin, grilled food laid flat.
2. Vertical position : for cleaning the oven.
Always allow the grill to cool off 25 minutes before touching it.
• After grilling make sure to use an oven mitt to handle dishes, and remember to use only
oven proof cookware such as ceramic dishes or heat resistant glass.
• The dual level grill offers you a choice between : HIGH GRILL (press the GRILL key
once) and LOW GRILL (press twice). As a rule, use the HIGH GRILL level to
grill
meat and fish and the LOW GRILL level with the simultaneous microwave + grill function
for gratins and to brown delicate dishes.
• THE MICROWAVE + GRILL FUNCTION
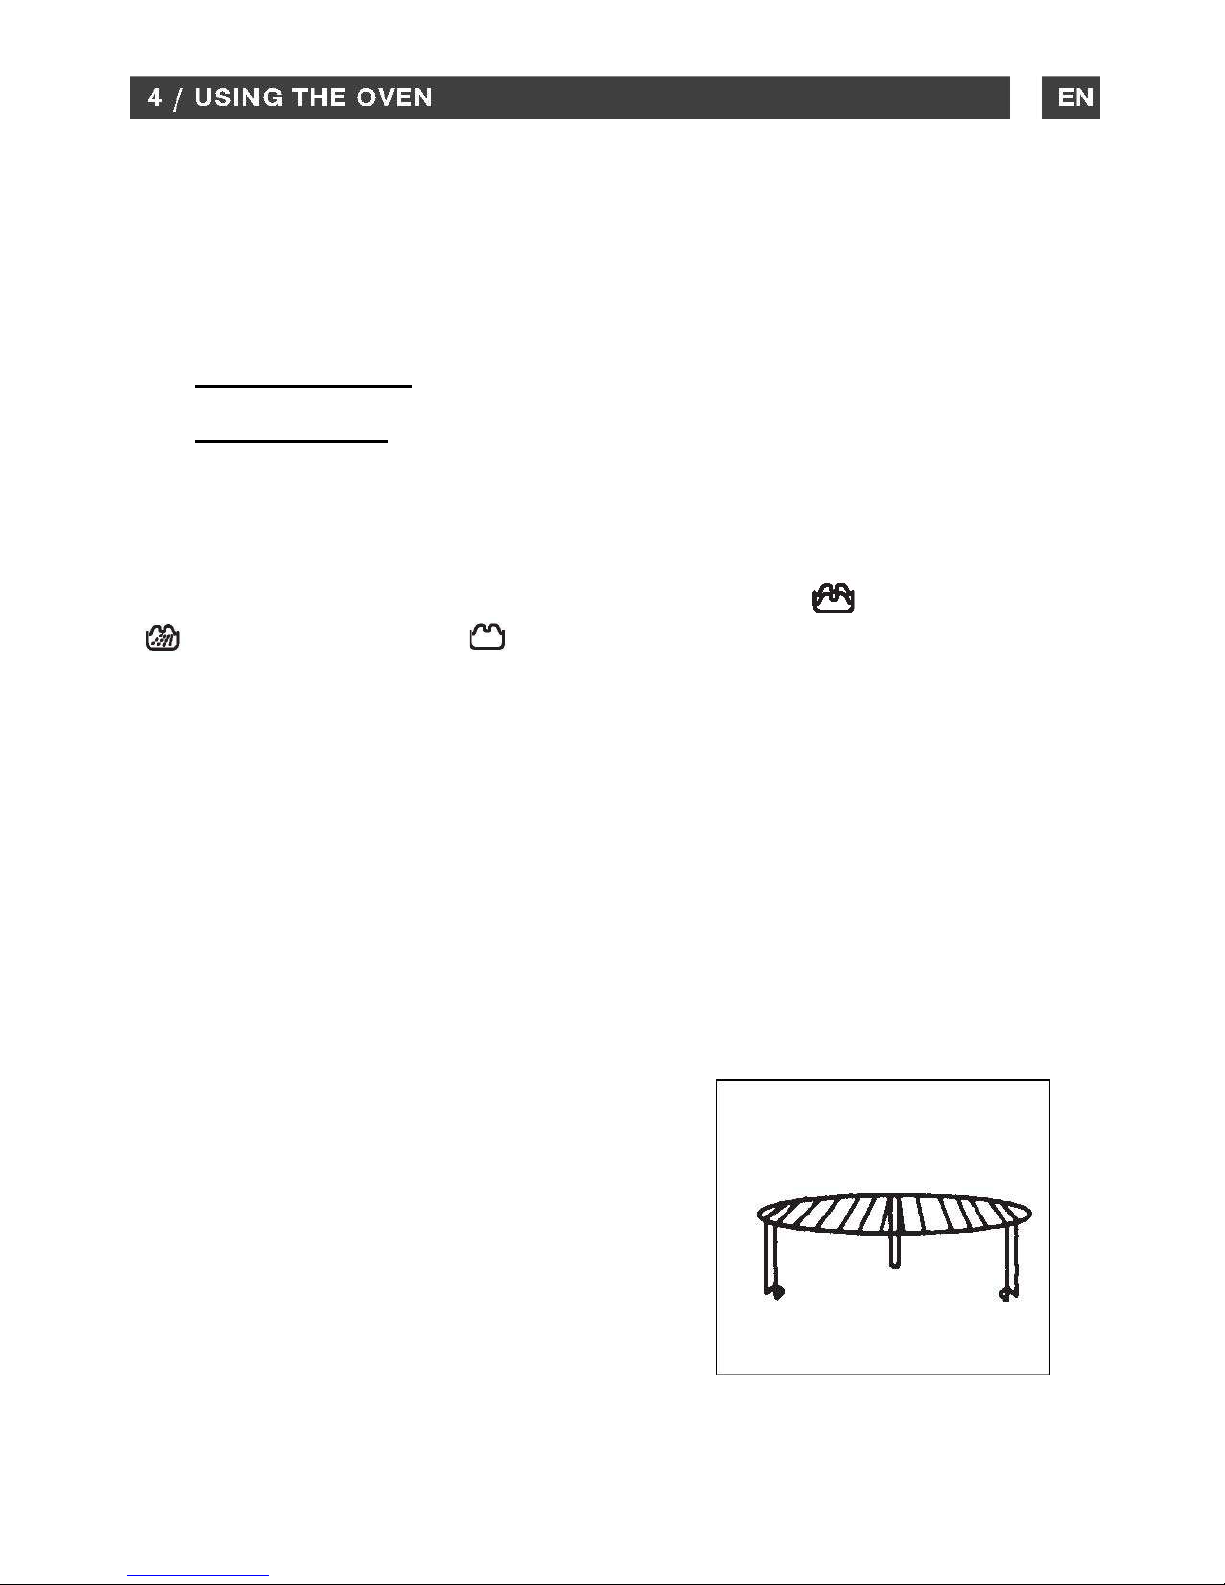
THE GRILLING RACK
Make sure that the rack is always well centered
on the turntable.
Never use any metal dish with the rack with the
microwave, grill + microwave or fan + microwave
functions
Nevertheless you may heat up food in an
aluminium tray if you place a plate between the
tray and the rack.

18
Press the GRILL key once to select HIGH GRILL,
press twice to select LOW GRILL .
Wait until 00:00 flashes, set the programme time with the
selector knob.
Press START .
Press the GRILL key a third time to turn the grill off.
Press the FOOD TYPE key, make your selection.
Press the FUNCTION key , select the microwave+gril
function. The appropriate microwave power
setting
and the grill level will be automatically adjusted
according to
your food type.
Wait until 00:00
flashes, set the programme time with the
selector knob.
Press the FUNCTION key + grill
, select the
microwave function. A medium microwave
power
setting and the high grill level will be programmed
Wait until 00:00
flashes, set the programme time with the
selector knob.
Press START .
…………………………………………………………………………………..
Programming the microwave + grill functions simultaneously
Programming the dual-level grill
……………………………………………………………………………….….
In the event the food item you wish to cook does not correspond
To any of the proposed food categories:

19
THE PIZZA FUNCTION
With the CRAQUINE function you can save time and energy cooking your favorite dishes
and have them turn out as crispy, tasty and golden brown as if cooked in a traditional
oven.l Use of the CRAQUINE key together with the CRAQUINE dish, allows you to use the
grill and microwave functions simultaneously. The CRAQUINE dish features a special
coating that absorbs microwaves through its bottom. It radiates heat from below the food to
cook or reheat it, giving it the required color and crispness while the grill browns the top. 2
cooking methods : Without preheating -
by using the CRAQUINE function you can cook and
brown most frozen meals and fresh, dough-based dishes without preheating the
CRAQUINE dish. They turn out as crispy as if cooked in a traditional oven. With preheating
- the CRAQUINE dish can be preheated using the CRAQUINE key for a maximum of 2
minutes. Preheating is recommended to cook or brown small pieces of meat or fish and
some dough-based, frozen and take-out dishes.
Raccomendations:
Take foods out of their metallic or plastic packaging before cooking or reheating them with
the CRAQUINE function. It is advisable to program shorter cooking times and extend if
necessary. All foods with a skin or wrapping, such as potatoes and sausages, must be
pierced before cooking. Make sure pieces of meat are completely thawed out and dried off
before searing with the CRAQUINE function. Keep an eye on the food’s coloring, just as
you would with a traditional oven. Protect your hands when taking out the dish because it
can be extremely hot. Do not serve stuffed foods (apple pastry for example) too quickly
because they can be warm on the surface whereas the filling is extremely hot. Cooking or
reheating of eggs with the CRAQUINE function is prohibited. If you wish to cook several
dishes consecutively with the CRAQUINE function, allow the oven to cool 10 minutes
between dishes for better browning.

20
•
THE CRAQUINE FUNCTION
Example: to cook a frozen pizza (350g)
lace the frozen pizza directly on the CRAQUINE
dish, place the VRAQUINE dish on the middle of the
turnable.
rogramming
1. ress the CRAQUINE key 3 times:
is displayed
2. rogram 6 minutes
Is displayed
3. Press START
The turnable resolves, the oven light comes on.
Be sure and use an oven mitt to remove the pizza
dish
Table of contents
Other Barazza Microwave Oven manuals


