Barista Mate CM200 User manual

MODEL: CM200 | BATCH: PR4495
PLEASE READ AND RETAIN THESE INSTRUCTIONS FOR FUTURE REFERENCE.
THIS APPLIANCE IS INTENDED FOR HOUSEHOLD USE ONLY.

The illustrations used in this manual are to illustrate the operation method and structure of
the product. Where there is a small difference between the physical item and the
illustrations, please take the physical as the standard.
About this product:
This Espresso Coffee Machine is the simple and affordable solution to at-home café style
coffee creations. Enjoy delicate taste through perfect extraction with the 20-bar pressure
Italian pump, producing your choice of a single or double cup.
With the powerful 360° rotating stainless steel steam wand, you can prepare velvety milk
foam so you can top off your delicious coffee creations with a rich, smooth crema for the
best quality café lattes, cortados, mochas, cappuccinos, macchiatos and flat whites.
The 1.8 litre detachable water tank coupled with an intelligent thermal heating system for
fast heating provides countless hot drinks at the simple twist of a control knob and press of
a button. This coffee machine ensures ease of use with the easy controls as well as it’s easy
to clean with the removable drip tray.
Choose your brew, your way –you can conveniently use your choice of ground coffee or
pre-packed coffee bags. With the included single cup filter, double cup filter and scoop,
getting the perfect setup is no hassle at all.
Complete with a black and stainless-steel silver finish, this straightforward yet elegant
Espresso Coffee Machine will provide professional results without any complications.

IMPORTANT SAFEGUARDS:
Please read the instruction manual before using this appliance and follow all the safety
instructions to avoid damage and/or injury due to improper use.
1. Read all instructions.
2. Before using check that the voltage of wall outlet corresponds to rated voltage marked on
the rating plate.
3. This appliance has been incorporated with a grounded plug. Please ensure the wall outlet
in your house is well earthed.
4. To protect against fire, electric shock and injury to persons do not immerse cord, plug, in
water or other liquid.
5. The appliance must not be immersed in water or other liquid.
6. Remove plug from mains power socket outlet before cleaning and when not in use. Allow
appliance cool down completely before taking off, attaching components or before cleaning.
7. Do not operate the appliance with a damaged cord or plug or after the appliance
malfunctions or is dropped or damaged in any manner. For electrical safety, any repairs on
the appliance must be carried out by a qualified electrical person only.
8. The use of accessory attachments not recommended by the appliance manufacturer may
result in fire, electric shock or injury to persons.
9. Place appliance on flat surface or table, do not hang power cord over the edge of table or
counter.
10. Ensure the power cord is placed away from external heat source.
11. Do not place the espresso machine on hot surface or near any heat source. i.e. stove.
12. To disconnect, press the ON/OFF button to turn OFF then remove the cord plug from
mains power outlet. Always hold by the plug, never pull on the cord when removing from
the mains power outlet socket.
13. Do not use appliance for other than intended use and place it in a dry environment.
14. Close supervision is necessary when your appliance is being used by or near children.
15. Do not touch the hot surfaces on the appliance (such as milk foaming wand, filter cup
and filter holder when boiling). Use handle or knobs.
16. Do not let the espresso machine operate without water.
17. Scalding may occur if the water tank is removed during the brewing cycles.
18. DO NOT remove the filter while brewing coffee. Remove the filter holder 10 seconds
after the brewing cycle to make additional coffee.

19. Caution should also be taken when removing the filter holder since the metal parts will
be hot. Please make sure to hold by the handle and to use the filter holder clip when tipping
out the filter holder with filter inside it to dispose coffee grounds.
20. Always allow steam and hot water to escape from the milk foaming wand after brewing.
This will ensure there is no pressure in the boiler when removing the filter holder.
21. Release pressure through milk foaming wand before removing water tank or filter
holder.
22. This appliance is not intended for used by persons (including children) with reduced
physical, sensory or mental capabilities, or lack of experience and knowledge, unless they
have been given supervision or instructions concerning use of the appliances by a person
responsible for their safety.
23. Children should be supervised to ensure that they do not play with the appliance.
24. This appliance is intended to be used in household and similar applications such as: –
staff kitchen areas in shops, offices and other working environments; –farmhouses; –by
clients in hotels, motels and other residential type environments; –bed and breakfast type
environments.
25. Do not place on or near a hot gas or electric burner, or in a heated oven
26. If the supply cord is damaged it must be replaced by qualified electrical person only to
avoid a hazard, or the product must be disposed.
27. The appliance and it’s power cord and plug must not be immersed in water or other
liquids.
28. The heating element surface is subject to residual heat after use.
29. Warning: Potential injury from misuse.
30. The espresso machine shall not be placed in a cabinet when in use.
31. Cleaning and user maintenance shall not be made by children without supervision.
32. CAUTION: To prevent damage to the appliance, do not use alkaline cleaning agents
when cleaning, use a soft cloth and a mild detergent.

Scalding Hazard!
Hot water/ hot steam escapes from the espresso machine during use. Parts of the espresso
machine become very hot. Handle with care to avoid scalding:
ཙEnsure the knob is turned to the coffee standby mode “" before switching ON the
espresso machine.
ཙHold the milk foaming wand only from the plastic handle during foaming and after use.
DO NOT touch the metal tube on the wand.
ཙUse the milk foaming wand carefully and never direct it towards parts of the body.
ཙDo not touch the coffee spout during operations and do not reach underneath it.
ཙOnly clean the espresso machine when it is switched OFF and completely cooled down.
ཙDo not release the filter holder while the machine is running: HOT WATER may spray out.
ཙAllow the filter holder to cool down completely before changing or inserting brewing
filter.
ཙPlease note that hot steam may also escape from the espresso machine after it has been
switched OFF.
ཙDo not overfill the filter holder with ground coffee, otherwise the filter holder cannot be
mounted correctly. This may also cause hot steam to escape from the side.
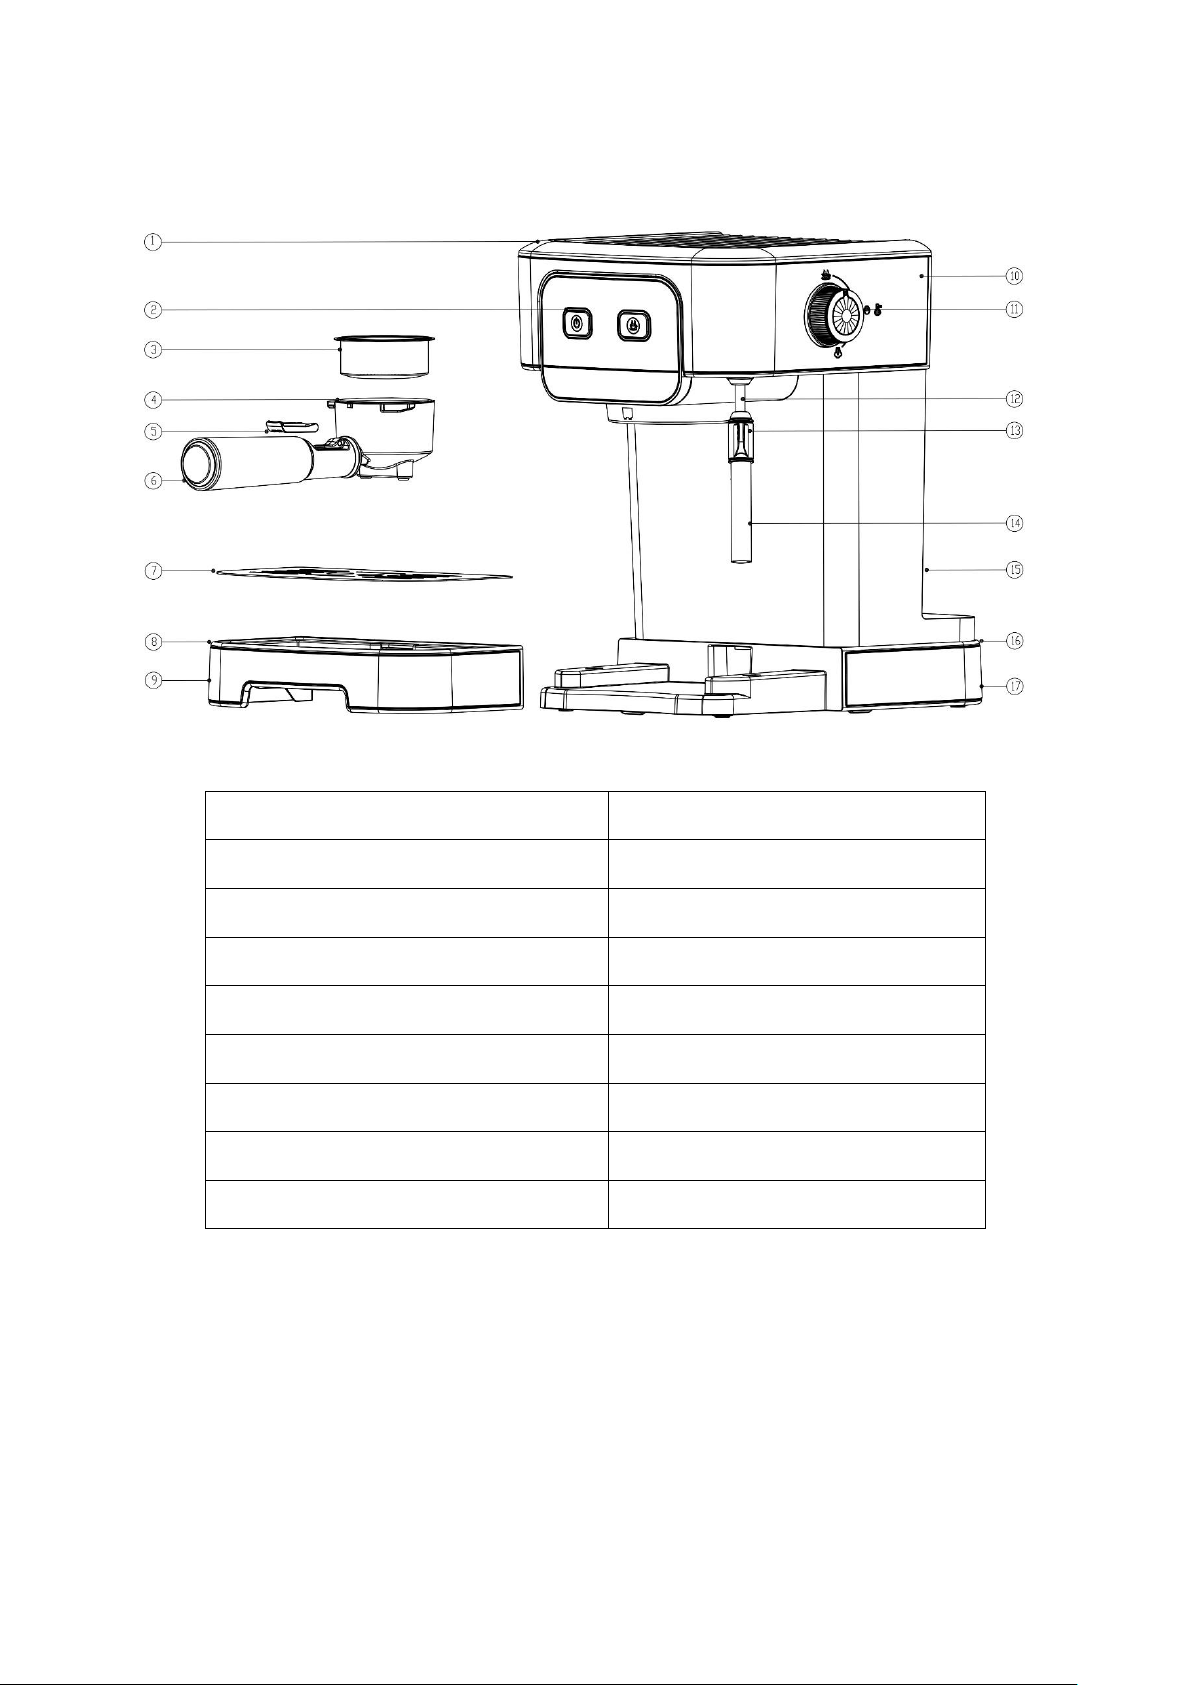
PRODUCT STRUCTURE:
1. Top cover
10. Main housing
2. Control panel
11. Knob
3. Filter cup
12. Steam pipe
4. Filter holder
13. Steam handle
5. Filter holder clip
14. Milk foaming wand
6. Handle
15. Main housing
7. Wastewater tray cover
16. Base
8. Wastewater tray
17. Base cover
9. Wastewater holder

CONTROLS:
1. Power button –Press the power button to turn the unit on. If there is no operation
within 20mins, the product will power off automatically.
Press the power button " " again to restart the product if use of it is required again.
2- Coffee making button
3- Coffee standby mode
4- Preheating and cooling
5- Steam making –used to foam milk
18. Water tank cover
19. Water tank handle
20. Water tank
USEAGE INSTRUCTIONS:
1. Place the machine on a flat and stable benchtop.
2. Power on:
Confirm that the product is plugged into the power socket and the socket can be used for
power supply normally.
Press the power button "" on the control panel to start the product, the power
indicator " " is always illuminated, the coffee indicator " " flashes until the water
temperature reaches the set temperature, the two indicators are always on.
The product is in standby mode.
3. Add water into the tank:
Take off the water tank to add water or use the container to add water---please make sure
that the amount of water in the water tank is between the "Min" and "Max" water lines
when filling water. Close the water tank cover and replace it back to the appliance.
Do not add warm water or hot water!
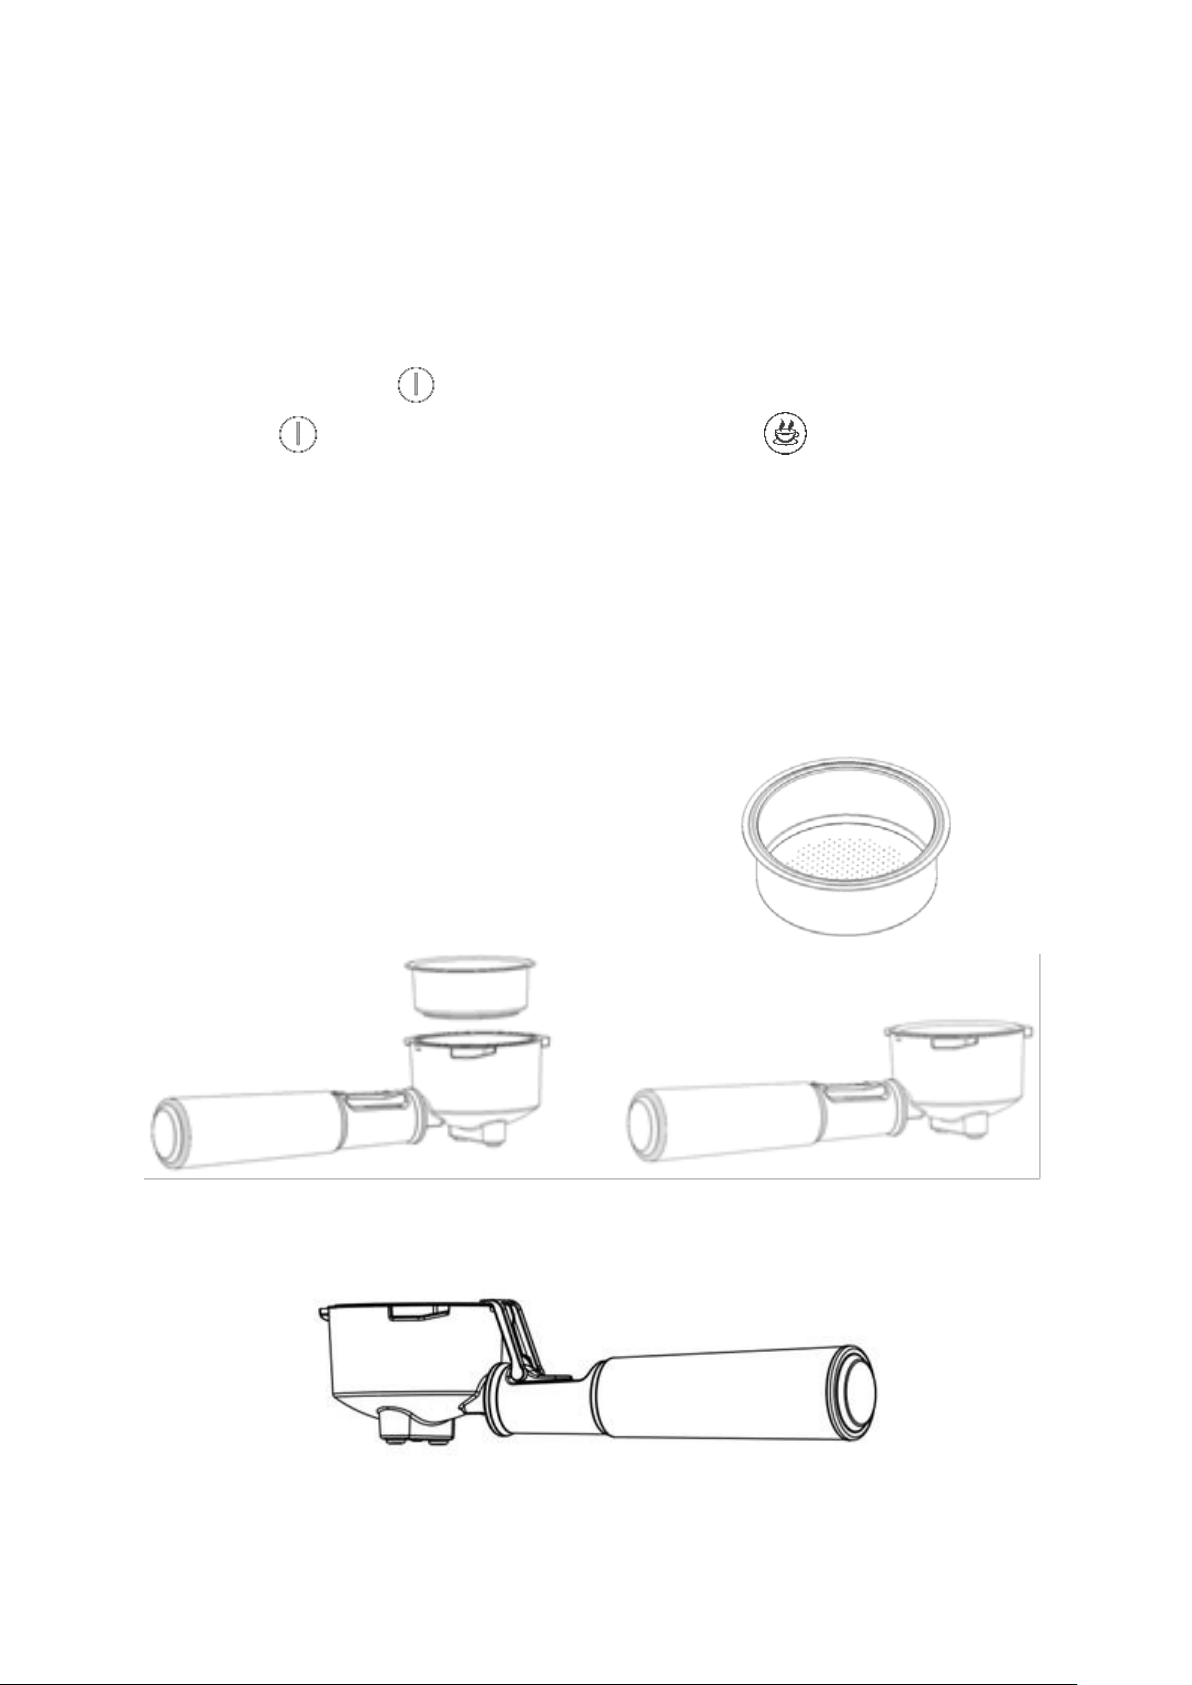
4. Filter cup:
Single strength cup of coffee –Use the smaller filter cup
Double strength cup of coffee - Use the larger filter cup
5.Install the filter cup into the filter:
The small lift up hook can be lifted and hoked onto the filter cup to hold it in place so it does
not drop out when coffee is pressed into it or tipped out of it after use.
6. Add coffee powder:
A. Put fresh, finely ground espresso powder into a filter cup.
B. Press the coffee powder with the end of the coffee spoon until it is flush with the edge of
the filter cup.
C. Remove excess coffee powder from the edge of the filter cup.
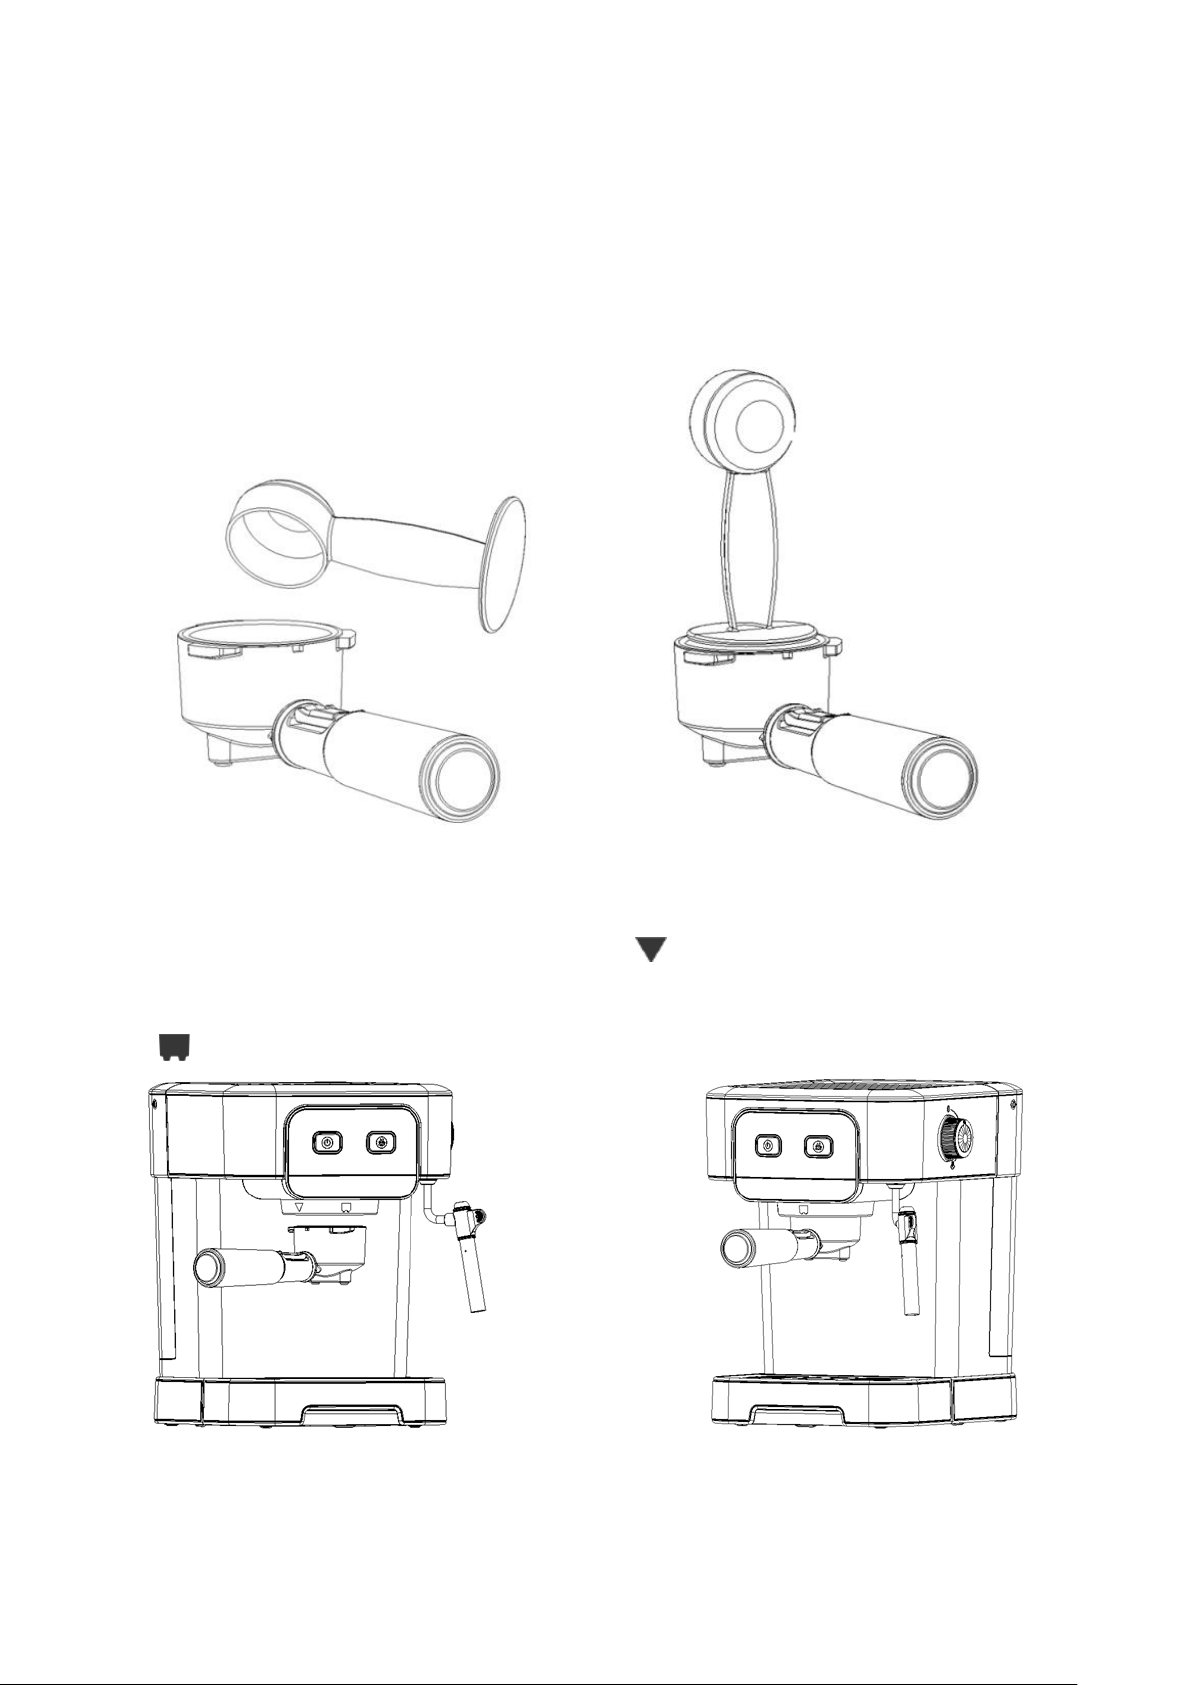
7. Install the filter:
A. Place the filter cup pressing plate flatly and then place the filter under the water outlet.
B. Align the handle assembly with the unlock icon" " and screw it into the groove.
C. Then slowly rotate the handle to the right until the handle is aligned with the lock icon
" " on the filter head.

USEAGE:
COFFEE BREWING:
Press the power button to turn the unit on.
Add the coffee to the unit.
Turn the knob to the pre-heat/ cooling icon.
The coffee making button will blink red.
When the unit has heated enough, coffee
making button will be illuminated white and no longer blinking.
Turn the knob back to the coffee standby mode.
Place a cup on the wastewater tray cover.
Press the coffee icon once to make a drink.
Once the drink is made, and you wish to make another, turn the knob to the pre-heat/
cooling icon to cool the unit,
Then add more coffee, then press the coffee button to make another drink.
Single cup –regular:
When using the smaller filter cup.
The water pump works for 2 seconds, stops for 2 seconds, and then works for 21 seconds
continuously,
It will automatically stop after brewing 40-60 ml.
Double cup - strong:
When using the larger filter cup.
The water pump works for 2 seconds, stops for 2 seconds, and then works for 32 seconds
continuously,
It will automatically stop after brewing 80-120 ml.
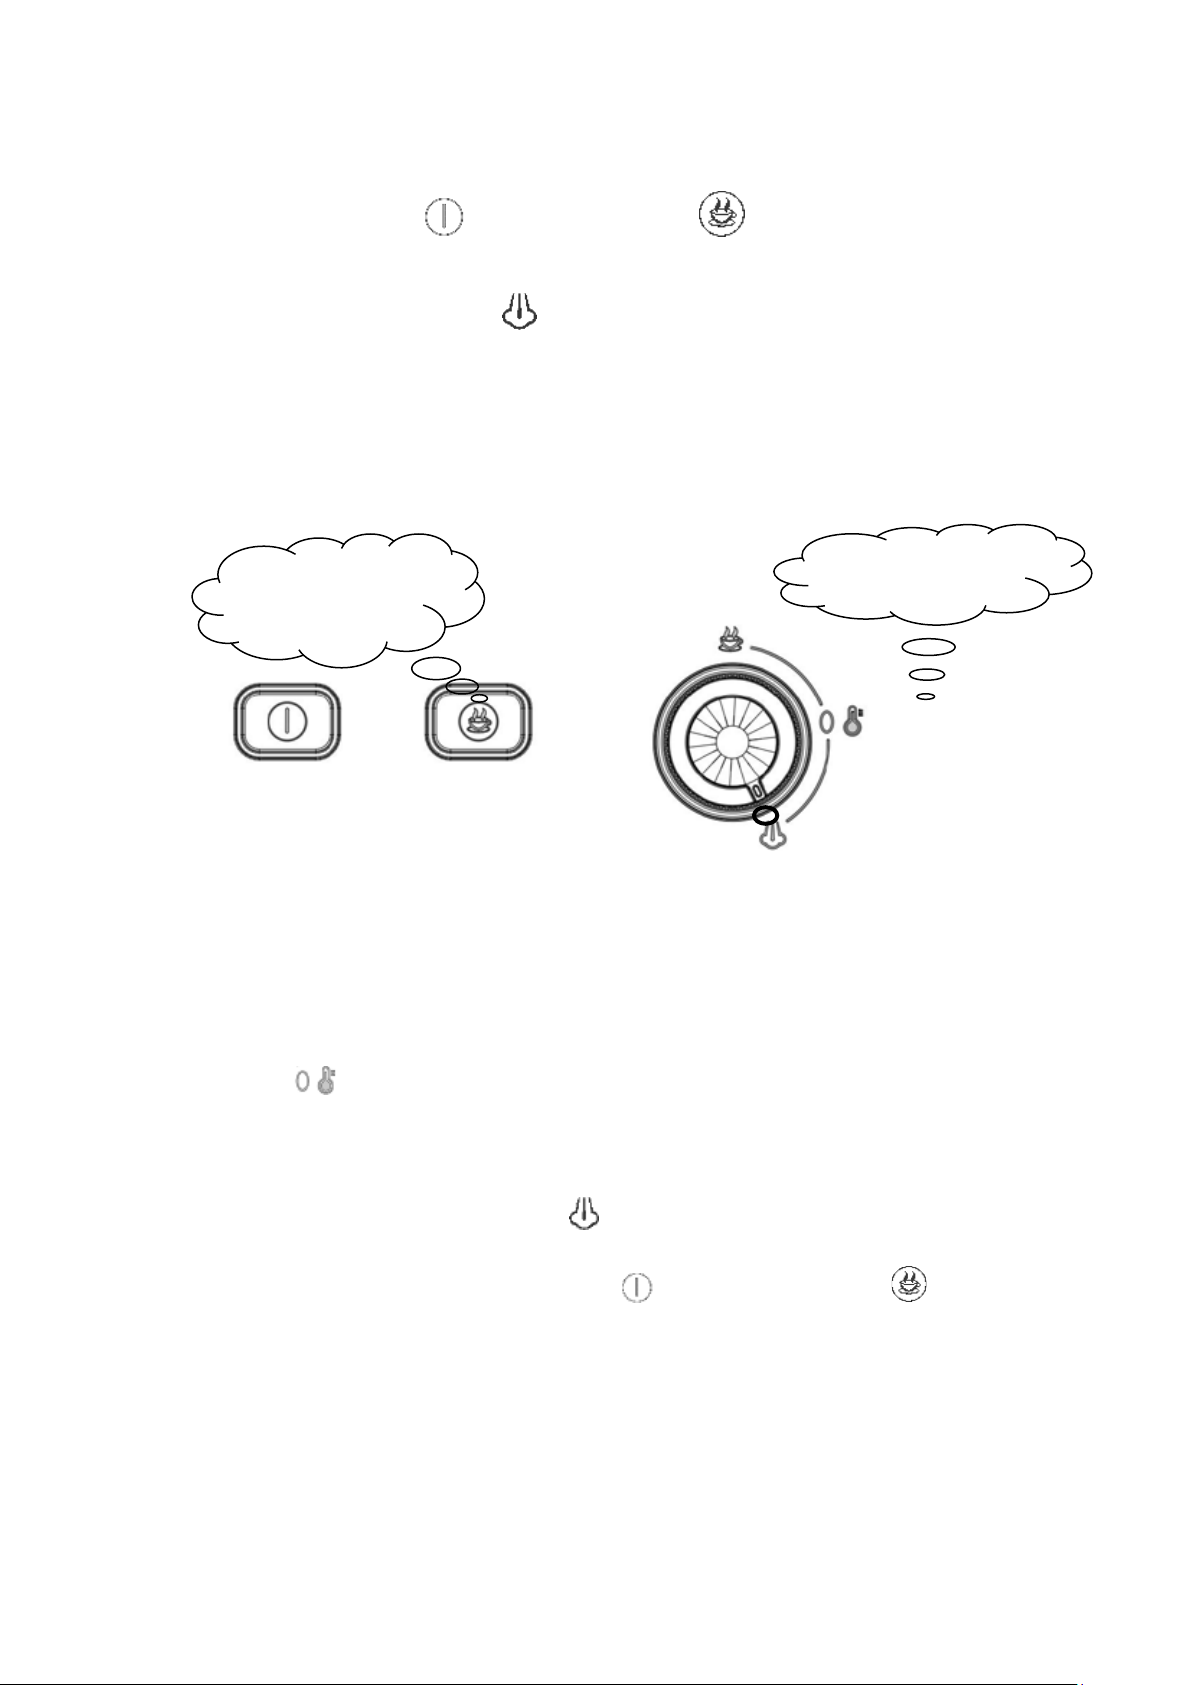
STEAM MAKING METHOD / MILK FOAMING:
When the power indicator " " and coffee indicator " " are illuminated, the unit can
enter the steam making mode.
Turn the knob to steam preheating " " mode,
The boiler continues to heat, and the coffee light blinks.
After heating to the steam set point, the coffee light (red light) will be illuminated.
Note: The cup with milk needs to be placed at the steam pipe outlet immediately after the
red light is illuminated.
In about 5 –7 seconds with milk foaming process will start.
The unit can then start the milk foaming mode, the maximum time for foaming milk is 120s.
Hold the cup in position with the milk foaming wand inside the cup with the milk.
Steam will come out of the milk foaming wand and heat the milk.
When milk has foamed or heated to your desired level, turn the knob to the preheating and
cooling mode “”.
Remove the cup with milk and add the milk to your drink.
If making more steam/ milk foaming is required, just repeat the steam production procedure
again, Turn the knob to the steam making " " mode.
During steam production, the power indicator " " and coffee indicator " " (red light)
are always illuminated, and the boiler and water pump perform corresponding actions
according to the procedure.
After milk foaming, clean the foaming device, steam pipe foaming nozzle in time to avoid
milk scaling to block the foaming nozzle and air inlet of the foaming device.
The coffee indicator
light flashes
Turn to steam preheating
mode

Exit steam mode:
Turn the knob to the coffee standby mode " ".
Or, if you wish to make another cup of coffee, turn the knob to the pre-heat/ cooling icon to
begin the coffee making process again.
CAUTIONS:
While brewing coffee, please pay attention to the following problems to avoid scalding and
powder frying:
1. During the normal coffee brewing process, do not open the handle, filter holder,
filter cup immediately after brewing, first turn the knob to the preheating and
cooling mode
2. “ “ before opening. Remove the coffee cup first, and then unscrew the coffee
handle.
2. After the steam making is finished, do not make coffee immediately. Wait for 10 seconds
before brewing coffee again.
3. During operation, pay attention to the water level in the water tank.
Avoid draining the water in the water tank and having the water pump form a vacuum,
which makes it difficult for the machine to pump water.
If this problem occurs and if it is difficult to pump water, turn the knob to the preheating and
cooling mode “” repeatedly or add in and remove the water tank repeatedly, to let the
water pump discharge the air and avoid the problem of back pressure.
4. Steam production time should not be too long. Prevent excessive milk temperature from
affecting the performance of preparing coffee.
Note: To make the next coffee making process cleaner and purer, it is necessary to clean the
coffee powder residue and coffee residue in the outlet head regularly.

CLEANING AND MAINTENANCE:
1. Clean the water outlet, filter and filter cup:
A. Turn off the power button and unplug from outlet.
B. Some metal parts may still be hot, DO NOT touch by hand before cooling down.
C. Remove the filter, tip out the coffee powder, and clean the filter holder and filter cup
with warm water with detergent. Do not put the filter holder and filter cup in the
dishwasher for cleaning.
D. Wipe the lower end of the water outlet with a wet cloth or tissue, clean any possible
residual coffee powder.
E. Install the filter holder (without filter cup) back to the outlet head.
F. Place a 200ml empty cup under the filter.
G. Boiling a few more cups with the coffee making mode, which can achieve the effect of
cleaning.
2. Clean the water tank:
Remove the water tank and pour out the remaining water. It is recommended to empty the
water tank before and after use. Clean the tank with warm water with detergent, clean
thoroughly and dry. Do not put the tank in the dishwasher for cleaning.
3. Clean the product:
Wipe the outer body of the appliance with a wet soft cloth. Do not clean with abrasive
detergent or cleaning cloth to avoid scratching the surface of the product.
Warning: Do not immerse this product in water or other liquids.
4. Calcium removal:
Mineral deposits will affect the heating performance of appliances, there will be a need
remove the calcium after using for a certain time.
Add a calcium remover into the water tank and mix the remover with warm water below 30
Ԩto avoid particles. Use the boiling hot water method to pump out the water in the water
tank, add purified water into the water tank (fill the water tank) again. Then use the boiling
hot water method two more times, to achieve the effect of cleaning the tube.
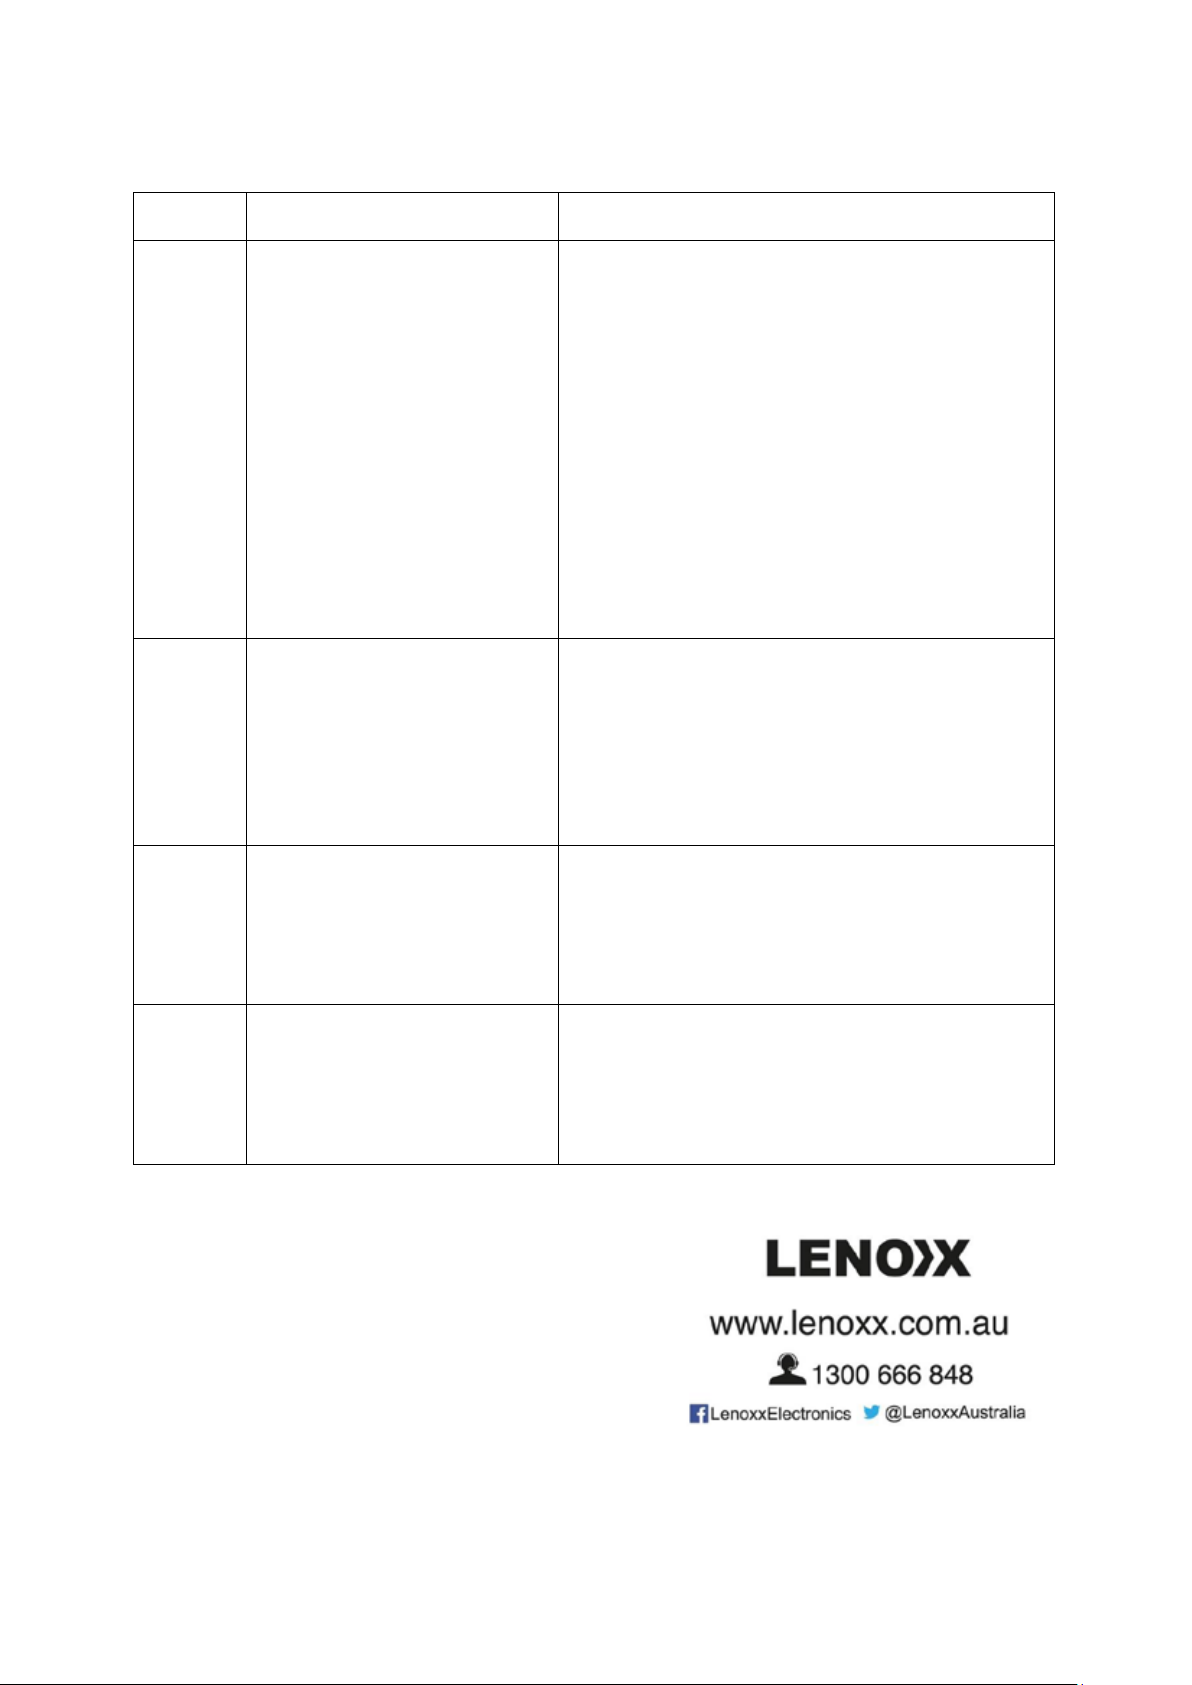
TROUBLESHOOTING:
Error
Causes
Solutions
No
coffee
output
1. No water in the water
tank.
2. The coffee powder is too
fine.
3.Excessive coffee powder.
4. Haven’t turn on the power.
5. The coffee powder is
pressed too tightly.
1. Add corresponding amount of water to the
water tank.
2. Grind the coffee powder to the proper
thickness.
3. Reduce the amount of coffee powder
appropriately.
4. Plug the power into socket and turn on the
power switch.
5.Refill the coffee powder, do not press too
hard.
Coffee
flows to
the edge
of the
filter
1. The filter is not turned to
the locked position.
2. Residual coffee powder
at the edge and top of
the filter cup.
1. Turn the filter to the locked indicated
position.
2. Clean the residual coffee powder at the
edge of the filter cup and sealing ring.
Coffee
comes
out too
fast
1. The coffee powder is too
thick.
2. Less coffee powder in filter
cup.
1. Choose coffee powder with appropriate
thickness.
2. Increase the appropriate amount of coffee
powder into the filter cup.
Coffee
comes
out too
slow
1.Excessive coffee powder in
filter cup.
2. The coffee powder is too
fine.
1. Adjust the appropriate amount of powder in
the filter cup.
2.Add thicker coffee power.
SPECIFICATIONS:
Power: 1200w
Extraction pressure: 20 bar
Water tank capacity: 1.8 Litre
This manual suits for next models
1
Table of contents
Other Barista Mate Coffee Maker manuals


