Barista Technology puq M2 User manual

USER
MANUAL
M5M3 M4M2
MODEL

2
www.puqpress.com/manuals
6WARNING
For more information see the extended
manual online about safe installation
and operation.
EN
NL
KO 사용자 설명서
DE
FR
ES
PT
IT
PL
EL Εγχειρίδιο χρήστη
RU Руководство пользователя
JA ユーザーマニュアル
ZH 用户手册
AR
EN Original manual
3
IMAGES
13
13
14
1 8
9
10
11
12
13
2
3
4
5
6
7
M2

4
9
8
10
11
12
1
2
3
4
5
6
7
13
14
M3
5
IMAGES
13
14
9
8
10
11
12
1
2
3
4
5
6
7
M4
6
13
14
9
8
10
11
12
1
2
3
4
5
6
7
M5

7
IMAGES
15
16
17
8
9
IMAGES

10
TABLE OF CONTENT
1 Introduction 10
2 Productdescription 11
3 Safety 13
Explanation of the symbols on the
4 Installation 15
5 Operation 17
6 Maintenance 18
7 Troubleshooting 20
8 Disposal 21
DEAR COFFEE ENTHUSIAST,
First off, we would like to congratulate you
with your very own PUQpress and thank you
The PUQpress is a fully automatic tamper,
developed by people with a passion for
perfect coffee and elegant technology.
Our specialists have spent all their
knowledge and devotion in developing the
ultimate tool to standardise the tamping
pressure, a crucial parameter for a perfect
cup of coffee.
Please read this manual closely so you and
your customers will enjoy the PUQpress to
the fullest and store the manual away safely
after reading. If anything remains unclear,
please feel free to contact your authorized
dealer or contact us directly.
We wish you all the fun and perfection with
your new PUQpress!
Greetings from Amsterdam,
Barista Technology B.V.
1INTRODUCTION
1.1 Used symbols in this manual
6WARNING
WARNING indicates a hazardous situation
which, if not avoided, could result in death or
serious injury.

11
EN
6CAUTION
CAUTION indicates a hazardous situation
which, if not avoided, could result in minor or
moderate injury. CAUTION is also used to
address practices not related to physical
injury.
NOTICE
NOTICE indicates useful information.
1.2 Warranty
•The warranty period is 2 years from the
date of purchase. Refer to the chapter
tamping cycles covered by the warranty.
•The warranty covers all damages that
can be attributed to inferior materials or
defective workmanship. The
corresponding PUQpress will be repaired
exception of transport or freight
charges. Proper transport is the
responsibility of the customer, so please
try to avoid damages during a product
return by correctly packing the
PUQpress. Use the original packaging to
return the PUQpress.
•This warranty does not cover damages
which have occurred through:
−improper usage,
−improper maintenance,
−lack of servicing,
−usage for purposes other than those
intended,
−incorrect installation,
−breakage,
−natural wear or for reasons beyond
•In order to maintain the warranty, only
original spare parts and accessory parts
may be used.
•The manufacturer is in no way liable for
consecutive or secondary damages.
•The warranty does not cover costs
resulting from repairs conducted by
1.3 Disclaimer
rights reserved. No part of this publication
may be reproduced or transmitted in any
form or by any means without the prior
written permission of Barista Technology
B.V. The information in this publication is
proprietary to Barista Technology B.V.
2PRODUCT DESCRIPTION
2.1 Intended use
The PUQpress is intended as a fully
automatic coffee tamper.
Grounded coffee can be tampered with an
adjustable force.
The PUQpress is intended for indoor use
only.
consequences for safety, warranty and
proper functioning.

12
2.2 Specications
Model M2 M3 M4 M5
Voltage
Frequency
Power
Dimensions
Weight
Tamping
pressure
Operating
temperature
Storing
temperature
Maximum
inclination
Tamping cycle
Tamper shape Flat bottom
Warranty
Tamping cycles
within the
warranty
Unlimited cycles Unlimited cycles Unlimited cycles
Serial number See tag plate on the bottom of the PUQpress
Year built See tag plate on the bottom of the PUQpress
Tamper diameter See tag plate on the bottom of the PUQpress
Suitable coffee
grinders
Victoria Arduino
Basic, Victoria
Nuova Simonelli
Mahlkönig
Supreme
Optional coffee
grinders*
Simonelli

13
EN
housing is not optimal.
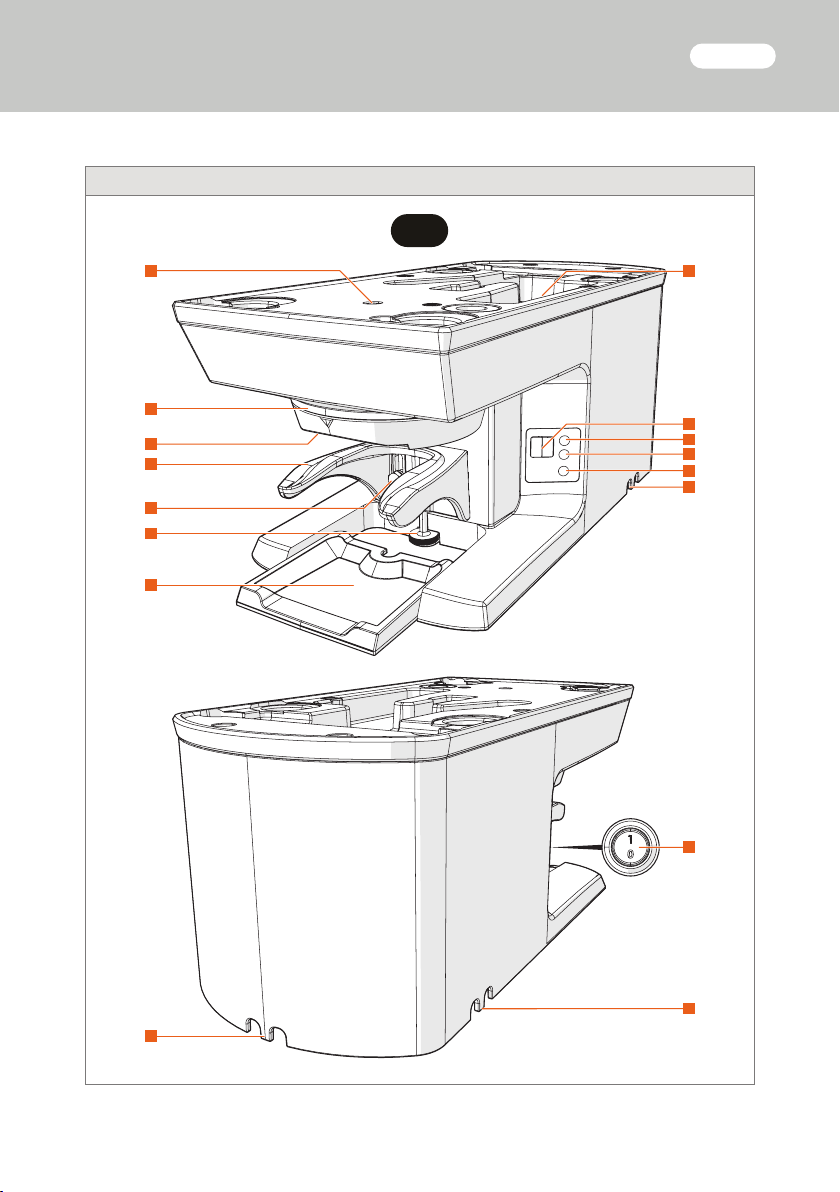
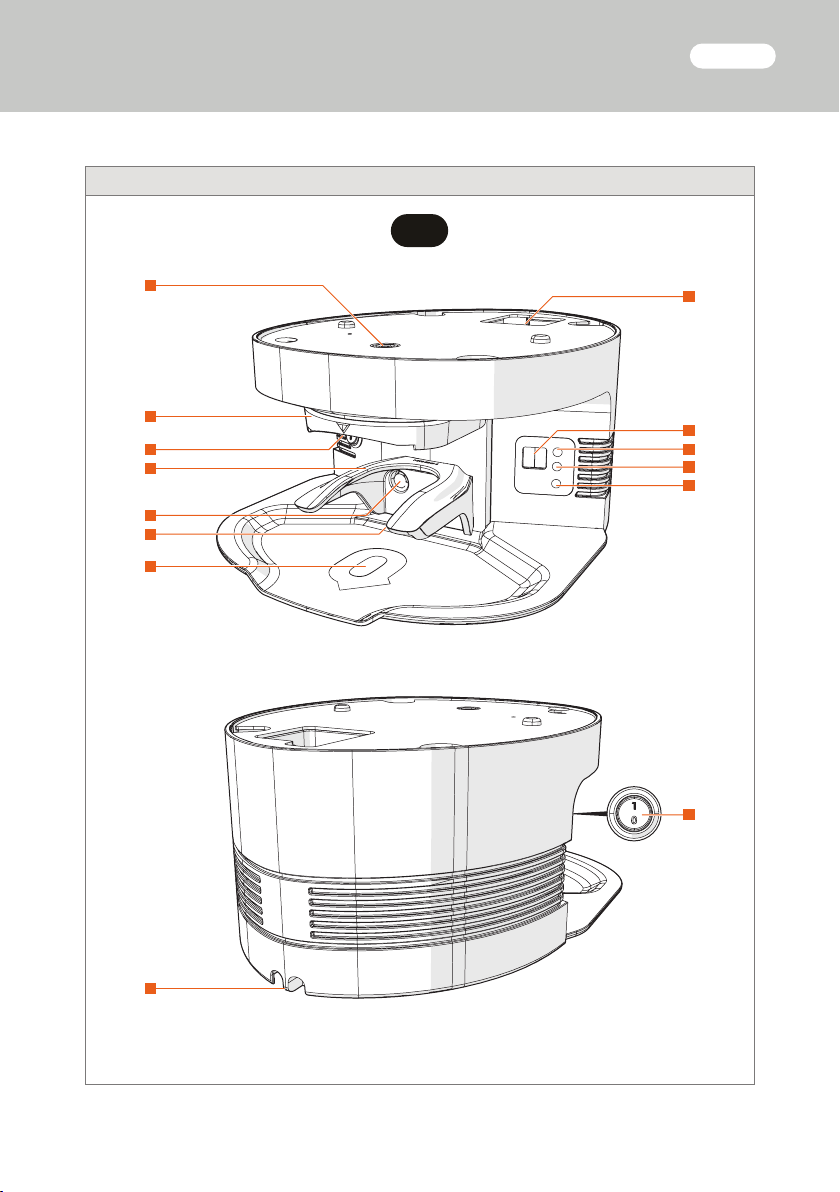
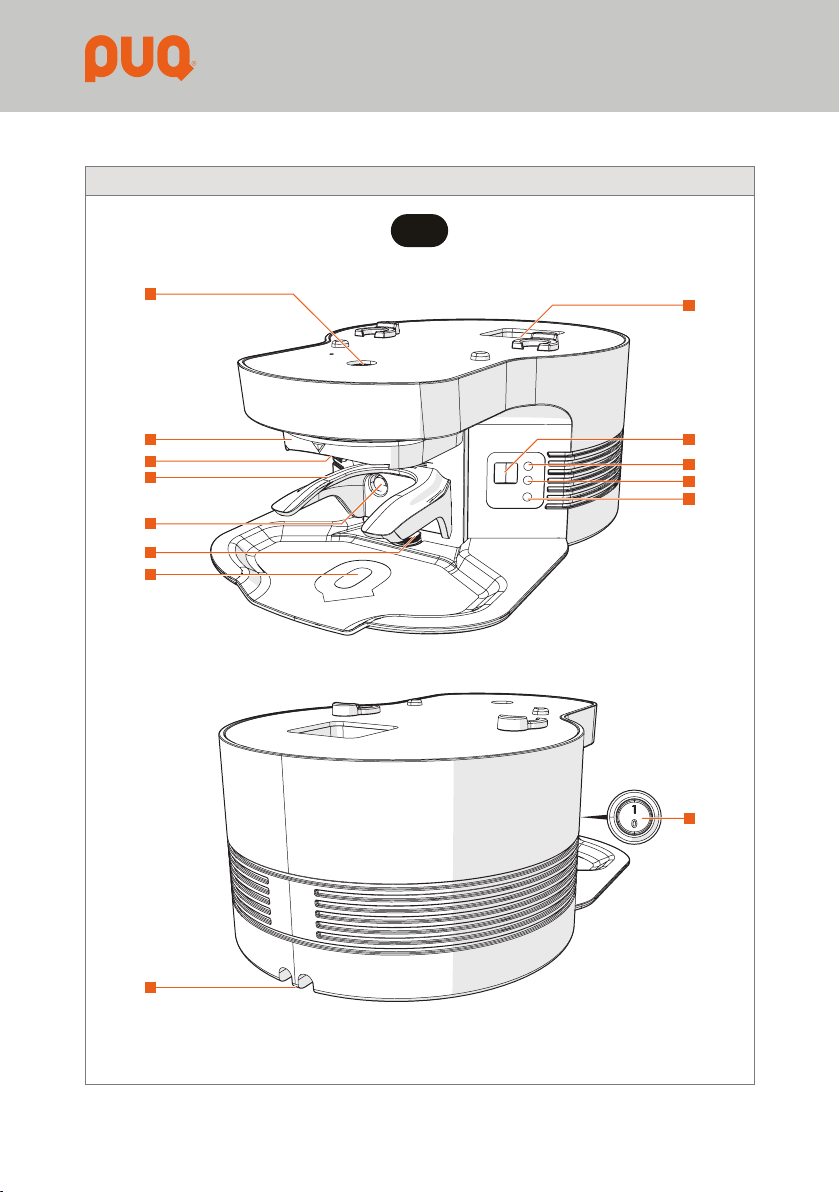
2.3 Main parts
See for an overview of the main parts of
the M2.
See for an overview of the main parts of
the M3.
See for an overview of the main parts of
the M4.
See for an overview of the main parts of
the M5.
See for an overview of the main parts of
the M2/M3/M4/M5.
1. Tamper base bolt
2. Upper clamp
3. Tamper base
4. Contactless sensor
5. Lower clamp
6. Lower clamp bolts
7. Adjustment wheel
8. Ground coffee basket
9. Power cable port
10. Display
11. Up button
12. Down button
13. Set button
14. Power cable entries
15. On/off switch
16. Power cable
3SAFETY
3.1 Safety instructions
6WARNING
•Ensure you have fully read and
understood the instructions in this
document before you install or use the
reference.
•Only use the PUQpress as described in
this document.
•The PUQpress can only be used by
people aged from 18 years and above and
persons with reduced physical, sensory
or mental capabilities or lack of
experience and knowledge if they have
been given supervision or instruction
concerning use of the PUQpress in a safe
way and understand the hazards
involved.
•Never let children play with the
PUQpress. Not doing so may result in the
PUQpress getting damaged.
•Cleaning and user maintenance shall not
be made by children without supervision.
•Never immerge cables, plugs or the
PUQpress itself into water or other
liquids to avoid electric shock, or injury.
•Always switch off the PUQpress before
performing maintenance or cleaning on
the PUQpress to avoid electric shock, or
injury.
•Always remove the plug from the outlet
before performing maintenance or

14
cleaning on the PUQpress to avoid
electric shock, or injury.
•Always unplug the PUQpress from the
power source and other equipment if
problems occur to avoid electric shock,
or injury.
•Never use the PUQpress if the PUQpress,
cable or plug is damaged. Any required
repairs may only be conducted by
authorized service personnel. For this
reason, please contact a customer
service repair facility or your dealer.
Using the PUQpress if the PUQpress,
cable or plug is damaged may result in
electric shock, or injury.
6CAUTION
•Always handle the coffee grinder with
two people with care. Not doing so may
result in the coffee grinder getting
damaged.
•Always adjust the lower clamp before
use. Not doing so results in exposure of
dangerous moving parts.
•
between the PUQpress base and lower
clamp. Risk to pinch.
•
alterations to the PUQpress. The
manufacturer holds no liability for
damages resulting from failure to
observe these instructions.
•Never drop the PUQpress and avoid
bumping. Not doing so results in the
PUQpress getting damaged.
•Never unplug the PUQpress by pulling the
cable. Always grasp the plug and pull.
•Always place the PUQpress on a level,
•Never operate the PUQpress in moist or
wet conditions.
•
•Make sure to guide the cables through
bottom. Not doing so may result in the
cables getting damaged.
•Make sure not to use a damp/wet cloth
to clean the tamper base. Grounded
coffee will stick to the tamper base.
•Never install the PUQpress in an area
where a water jet can be used.
•Never clean the PUQpress with a jet of
water.
3.2 Personnel requirements
The user of this PUQpress does not need
special requirements. Ensure you have fully
read and understood the instructions in this
document before you install or use the
reference.
15
EN
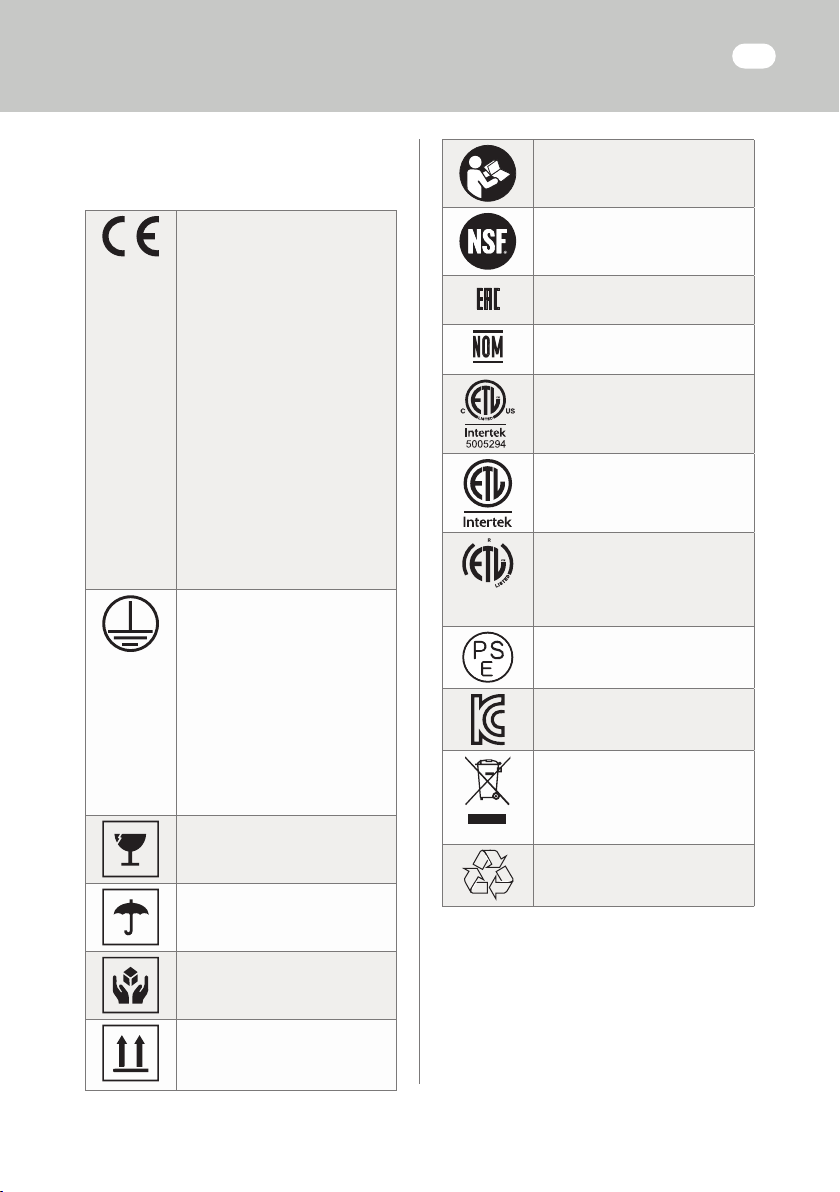
3.3 Explanation of the symbols on the
product and packaging
Electronic equipment needs to
bear the CE mark in order to be
marketed in the EU. CE marking
shows that a product is assessed
before being placed on the
market and that it meets EU
safety, health and environmental
protection requirements. CE
marking is also sometimes
accepted as a means of
requirements; for example,
electronic components that
marking for electromagnetic
equipment.
Indication that the PUQpress is an
Electrical class | product, with
provided means for the
connection of conductive parts
these parts cannot become live in
the event of a failure of the basic
insulation.
Indication that the PUQpress is
fragile.
Indication that the PUQpress
must be kept dry.
Indication that the PUQpress
must be handled with care.
Indication that the packaging of
the PUQpress must be handled
this way up.
Read the manual before use.
Indication to explain that the
Indication to explain that the
Indication to explain that the
Indication to explain that the
PUQpress is cETLus Intertek
Indication to explain that the
PUQpress is ETL Intertek
S
A
N
I
T
A
T
I
O
N
N
I
T
E
E
K
T
ForM3/M4/M5only:
Indication to explain that the
PUQpress is Intertek sanitation
Indication to explain that the
Indication to explain that the
Indication to explain that the
PUQpress needs to be collected
separately when disposed. Do not
throw in the trash bin.
Indication to explain that the
packaging can be recycled.
4INSTALLATION
You have received your PUQpress in
operating condition. Now you only need to
with your coffee grinder and switch on the

16
PUQpress. Refer to the chapter ‘Safety
instructions’ for more information.
4.1 Preparation
4.1.1 Checking the contents
Check that all parts are present and that no
damage is visible on the parts. If parts are
missing or damaged, contact your dealer or
your authorised customer service centre.
4.1.2 Tools and materials
Required tools and materials
•
Provided tools and materials
•
4.2 Adjustingtheport-a-lterclamp
The PUQpress is designed so that all
even and level tamping.
6CAUTION
Always adjust the lower clamp before use.
Not doing so results in exposure of
dangerous moving parts.
NOTICE
Make sure to adjust the lower clamp before
use. Not doing so can result in uneven and
unlevelled tamping.
1. Slightly loosen the bolts of the lower
2. Pull down the lower clamp.
upper and lower clamp.
4. Rotate the adjustment wheel clockwise
to move the lower clamp up against the
5. Slightly fasten the bolts of the lower
NOTICE
Make sure not to fasten the bolts entirely.
7. Fasten the bolts of the lower clamp with
upper and lower clamp and check if the
start again at step 1..
6CAUTION
does not wiggle after adjusting.
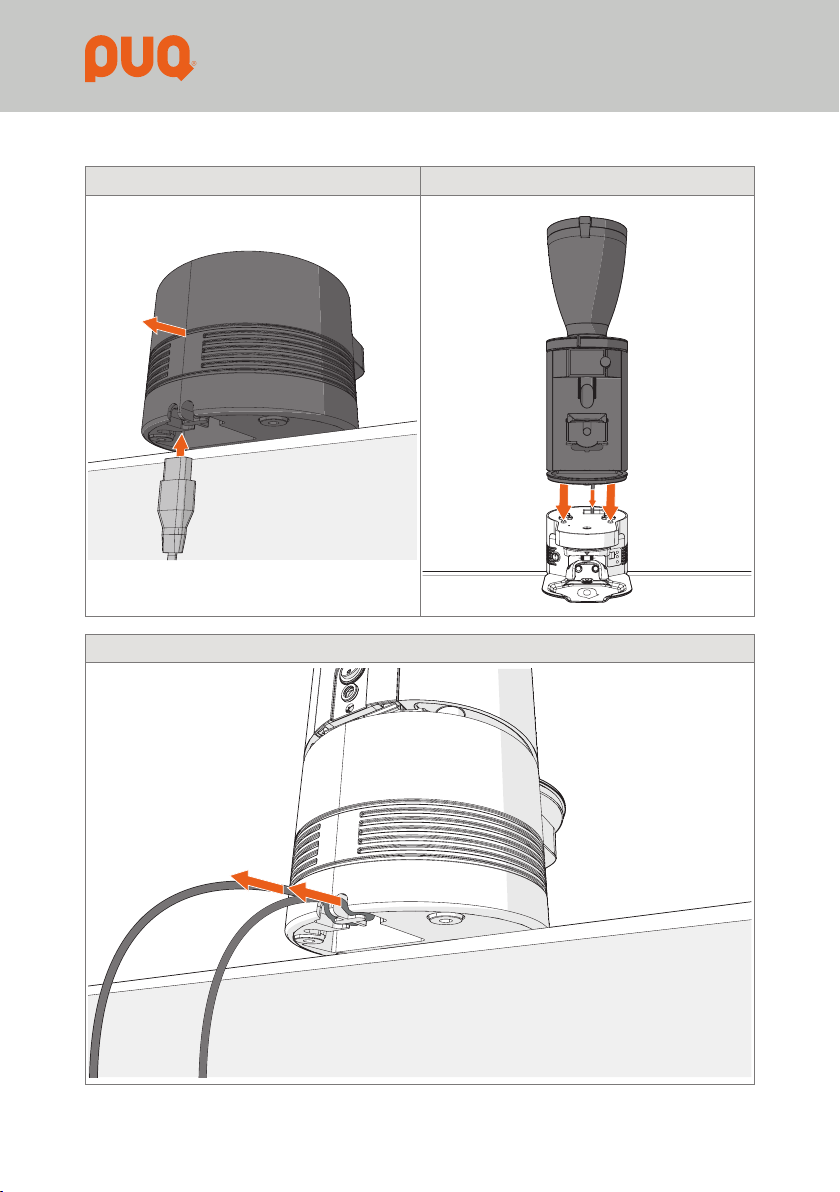
4.3 Setting up the coffee grinder
6CAUTION
Always place the PUQpress on a level,
1. Slide the back of the PUQpress over the
edge of the table or bar where you want
2. Plug the power cable into the PUQpress.

17
EN
3. Lift the coffee grinder with two people
and guide the power cable of the coffee
grinder from the top to the bottom of the
PUQpress.
4. Place the coffee grinder on the
PUQpress.
5. Guide the power cables of the PUQpress
and the coffee grinder through a power
cable entry.
6CAUTION
Make sure to guide the cables through the
doing so may result in the cables getting
damaged.
bar or table.
4.4 Switching on the PUQpress
6WARNING
Never use the PUQpress if the PUQpress,
cable or plug is damaged. Any required
repairs may only be conducted by authorized
service personnel. For this reason, please
contact a customer service repair facility or
your dealer. Using the PUQpress if the
PUQpress, cable or plug is damaged may
result in electric shock, or injury.
1. Plug the other side of the power cable
2. Switch on the PUQpress by setting the
on/off switch to I.
5OPERATION
Your PUQpress is now in operating condition.
Now you only need to use PUQpress and
adjust the settings to create perfect coffee!
Refer to the chapter ‘Safety instructions’ for
more information.
5.1 Preparation
5.1.1 Tools and materials
Required tools and materials
•
grounded coffee
5.2 Using the PUQpress
upper and lower clamp.
3. The PUQpress automatically starts
tamping the coffee. The contactless
4. Wait until the PUQpress has tampered
the coffee.
of approximately 1.5 seconds.
5.3 Adjusting the tamping force
Adjust the tamping force by using the display
and the buttons.
1. Press the up button to increase the
force.
2. Press the down button to decrease the
force.

18
NOTICE
5.4 Selecting the tamping mode
1. Press and hold the set button for 5
seconds.
2. Use the up and down button to adjust
the setting.
3. Choose between the following settings:
M2/M3/M5
Code Setting Explanation
SPEEDY Normal tamping speed
PRECISE Slow retraction of the
tamper base
SOFT Slow retraction of the
tamper base, lower
Triple tamp
SINGLE Single tamp
M4
Code Setting Explanation
SPEEDY Normal tamping speed
PRECISE Slow retraction of the
tamper base
SINGLE Single tamp
4. Press the set button
setting.
5.5 Checking the tamping cycle count
1. When the PUQpress is not in use, press
and hold the up and down button for 3
seconds.
seconds. Multiply this number by 5,000
to get the tamping cycle count.
5.6 Checking the cleaning cycle count
1. Press the set button.
2. Press and hold the up and down button
for 3 seconds when the PUQpress is in
clean modus.
seconds. Multiply this number by 20 to
get the cleaning cycle count.
5.7 Switching off the PUQpress
1. Switch off the PUQpress by setting the
on/off switch to O.
2. Unplug the power cable out of the socket
3. Unplug the power cable out of the
PUQpress.
6MAINTENANCE
Your PUQpress is now in use. Now you only
need to maintain the PUQpress to keep
creating the perfect coffee! Refer to the
chapter ‘Safety instructions’ for more
information.

19
EN
6.1 Preparation
6.1.1 Tools and materials
Required tools and materials
•Allen key
Provided tools and materials
•Brush
•Damp cloth
•Dry cloth
6.2 Cleaning
Clean the housing of the PUQpress with a
damp cloth.
Refer to the table for an overview of the
cleaning intervals.
NOTICE
Make sure to clean the parts of the PUQpress
following the cleaning intervals. Not doing so
may result in parts of the PUQpress getting
damaged.
Part Cleaning
method
Cleaning
interval
Tamper base
Dry cloth Daily
Tamper base
Dry cloth Weekly
Upper clamp
tamper base is
Dry cloth Weekly
Contactless
sensor
Brush Weekly
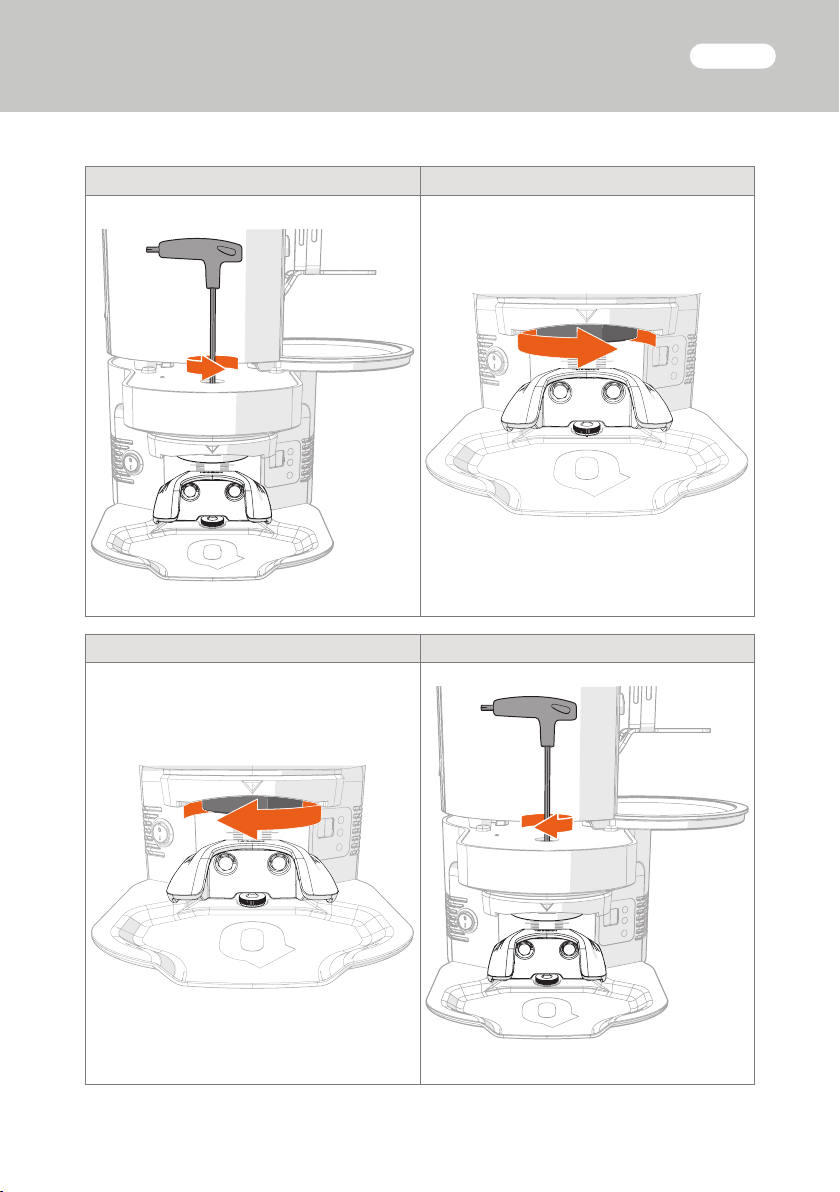
6.2.1 Cleaning the tamper base
Clean the tamper base regularly:
1. Press the set button. The tamper base
moves down in the cleaning position.
2. Turn the coffee grinder 90 degrees.
3. Unscrew the tamper base bolt by turning
4. Remove the bolt.
5. Unscrew the tamper base by turning it
6. Clean the tamper base using a brush or
dry cloth.
6CAUTION
Make sure not to use a damp/wet cloth to
clean the tamper base. Grounded coffee will
stick to the tamper base.
7. Screw the tamper base back by turning
it clockwise.
8. Place the bolt.
9. Screw the bolt back by turning the Allen
key clockwise.
10. Turn the coffee grinder back to the
original position.
11. Press the set button again. The tamper
base moves upwards to the original
position.
6.3 Storing
Store the PUQpress indoors in a dry and
secure location, out of reach of children.

6.4 Maintaining
6.4.1 Servicing
Any required repairs may only be conducted
by authorized specialist personnel. For this
reason, please contact a customer service
repair facility or your dealer. Refer to the
safety instructions in chapter ‘Safety
instructions’.
It is advised to conduct all maintenance and
repairs by a customer service centre or your
dealer.
If you have a new espresso machine with a
different tamper diameter, please contact
your local dealer. They can provide a new
tamping base and upper clamp and
interchange these parts.
There are two types of upper clamps
available. Which clamp you should use
depends on the diameter range of the
tamper base:
•
•
espresso machine falls within the other
range as the one your PUQpress is suitable
for, both the upper clamp and the tamper
base need to be changed. If it falls within the
same range, only the tamper base needs to
be changed.
6.4.2 Ordering spare parts
Spare parts can be ordered from your
customer service centre or your local dealer.
To ensure quick and correct processing of
your order, the following information is
essential:
•Serial number
•Description of the part to be replaced.
Use the same name as the part is
7TROUBLESHOOTING
Problem Cause(s) Solution(s)
Ground coffee sticks to
the tamper base.
The tamper base is greasy or dirty. Clean the tamper base.
The tamper base is wet. Dry the tamper base.
The PUQpress does not
start, the display does
not work.
The power cable is not inserted in the
PUQpress.
Plug the power cable into the
PUQpress.
The power cable is not plugged into
Plug the power cable into the socket
The power cable is not correctly
outlet.
Unplug the power cable and correctly
plug the power cable into the socket
functioning.
Unplug the power cable and try
20
This manual suits for next models
3
Table of contents
Languages:
Popular Power Tools manuals by other brands

Pro Work
Pro Work PJS 360 E Original operating instructions

Delta
Delta 2-speed heavy-duty wood shaper instruction manual

Hellermann Tyton
Hellermann Tyton H6100 operating manual

Far Tools
Far Tools DPC 35E Original manual translation

Far Tools
Far Tools DP 25E manual

OEM Tools
OEM Tools 25695 Operating instructions and parts manual


Band-it
Band-it C003369 operating instructions

WorkPro
WorkPro W023029A Original operating instructions

PROPOINT
PROPOINT 8968299 user manual

Power Fist
Power Fist 8257370 owner's manual

Hellermann Tyton
Hellermann Tyton M-BOSS Compact operating instructions

BLACK DECKER
BLACK DECKER EVO185 Original instructions