Barrett 960 HF User manual

1
Barrett 960 HF Telephone Interconnect
Operation Manual
© BARRETT COMMUNICATIONS
BCM96001/2
Head office: European office:
Barrett Communications Pty Ltd Barrett Europe Limited
10 Port Kembla Drive, Bibra Lake WA 6163 19 Lenten Street
P O Box 1214, Bibra Lake WA 6965 Alton, Hampshire
AUSTRALIA GU34 1HG
Toll Free Tel: 1800 999 580 UNITED KINGDOM
Tel: (61-8) 9 434 1700 Tel: (44) 1420 542254
Fax: (61-8) 9 418 6757 Fax: (44) 1420 543373

2
Introduction .......................................................................7
System Overview .................................................................7
Operation .........................................................................7
Automatic mode overview ................................................................... 7
Facilities available to the telephone user .........................................8
Selecting a channel ...................................................8
Sending a Beacon Request .............................................8
Sending a Selcall .....................................................8
Sending a Telcall .....................................................9
Requesting current channel information ....................................9
Completingacall-"Hangingup" ........................................10
Sending an ALE call ..................................................10
Facilities available to the HF station ............................................10
Sending a beacon Request ............................................10
Sending a Selcall - dialling a preset phone number ..........................10
Sending a Telcall - dialling a telephone number .............................10
Terminatingacall....................................................10
Sending an ALE call ..................................................11
Manual mode overview ..................................................................... 11
ReceivingaSelcallfromaHFstation ..........................................11
Toon-forwardthecall.................................................11
To communicate by voice with the calling HF user ...........................11
ReceivingaTelcallfromaHFstation...........................................11
Toon-forwardthecall.................................................11
To communicate by voice with the calling HF user ...........................11
Incoming phone calls .......................................................11
Completingthecall-"Hangingup".......................................12
Sending a Selcall to a HF station ..............................................12
Sending a Telcall to a HF station ..............................................13
Making a telephone call .....................................................13
Completing a telephone call ............................................14
Sending a Beacon request to a HF station .......................................14
Sending an ALE Request/End ................................................14
System Setup ....................................................................15
Hardware................................................................................ 15
Front Panel ..............................................................15
Rear Panel ...............................................................15
System interconnection .................................................................... 16
Optionlevels............................................................................. 17
Level 1 Preset telephone numbers only ...................................17
Level 2 Standard configuration ..........................................17
Level3 Fullloggingcommercialoption ....................................17
Primary screen functions ................................................................... 18
Settingparameters ........................................................................ 19
Navigating the menus ......................................................19
Channels - setting .........................................................19
Adding / editing a Channel .............................................19
Deleting a channel ...................................................20
960 interface parameters ....................................................21
Selecting receiver audio source .........................................21
Selecting 960 interface ................................................21
SelectingDuplexMode................................................22
Phone dialling configuration ..................................................23
Preset phone numbers ................................................23
Adding / editing a preset phone number ...................................23
Deleting a preset phone number ........................................23

3
Selecting DTMF or pulse (Decadic) dialling ................................24
Enabling dial tone checking ............................................24
Setting DTMF tone duration ............................................25
Setting time to wait for someone to answer the phone ........................25
Settingtimetowaitforfirstring .........................................25
Enabling line reversal off hook / on hook detection ..........................26
Setting the number of rings before the 960 will auto-answer ...................26
Setting the number of rings to determine "no one is home" ....................26
Settingthemaximumcalllength.........................................27
Dialling a prefix to obtain an external line ..................................27
SettingPABXprefixnumber............................................27
Learning non-standard ring / busy / disconnect cadences .....................28
Accesslevels.............................................................30
Setting Access from Transceiver to Phone .................................30
Preset............................................................... 30
Preset/Local.......................................................... 30
Preset/Local/STD...................................................... 30
All Phone Calls ....................................................... 30
Barred .............................................................. 30
Setting Access from Phone to Transceiver .................................31
SelcallsOnly ......................................................... 31
Selcalls and Telcalls ................................................... 31
Barred .............................................................. 31
ViewingAccessLevel.................................................31
Telcallaccessparameters .............................................32
BarredPrefix ......................................................... 32
Local Number Length .................................................. 32
TollFreePrefixes ...................................................... 33
STDPrefixes ......................................................... 33
Pre-recorded messages .....................................................34
Playing a Pre-Recorded Message .......................................34
RecordingaMessage.................................................34
ErasingaMessage...................................................35
Operational parameters .....................................................36
Selecting Channel Scan on Power-up ....................................36
Selecting Automatic Mode on Power-up ...................................36
EnablingAutomaticVOX ..............................................36
Setting VOX Hang-up Timeout Period ....................................37
Setting Number of Busy Tones before Hangup .............................37
SettingVOXHang-time ...............................................37
SettingVOXThreshold................................................38
SettingSelcallSelfID.................................................38
EnablingPeriodicBeacon .............................................39
SelectingtheChargingMethod .........................................39
EnablingthePrinter ..................................................39
SettingtheRealTimeClock(RTC) ......................................40
SettingtheCustomStart-upMessage ....................................40
EnablingtheScrambler ...............................................41
SettingScramblerIDforeachUser'sSelfSelcallID .........................41
Setting RX Level when in PTT ..........................................42
Enabling Mute during Scanning .........................................42
Factoryoptions ...........................................................43
Resetalltodefaults ..................................................43
Reset operational only to defaults .......................................43
ResetSelcallaccesslevelsonlytodefault .................................43
Reset Call Progress Cadences to default .................................44
Erase all channels ...................................................44
Erase all preset phone numbers .........................................44
Erase internal DataLog ................................................44
Getting DataLog % Full ...............................................45
Enable configuration through PC serial port ................................45

4
ALEConfiguration .........................................................46
Enabling/DisablingtheALE ............................................46
ALE Fill Mode .......................................................46
Preset ALE Phone Numbers ...........................................46
ALESelfID.........................................................46

5
Remote supervisory software ....................................................47
ProgramOverview ........................................................................ 47
Installation............................................................................... 47
MainScreen ............................................................................. 47
Menu Options ............................................................48
Creating a New Group File .............................................48
Opening an Existing Group... ...........................................48
Copying a Group File’s Parameters ......................................48
SettingConfigurationOptions...........................................48
ExitProgram .......................................................48
Downloading All Interconnect Parameters .................................48
Uploading All Interconnect Parameters ...................................48
ChargingSetup .....................................................48
ClientAdministrator ..................................................48
Setup Window ............................................................................ 49
Baud Rate ...............................................................49
CommunicationPort .......................................................49
FlowControl..............................................................49
Dialling Method ...........................................................49
Modem Initialisation String ...................................................49
Printer ..................................................................49
Local RS-232 Connection ...................................................49
Adding Interconnect Sites ................................................................... 50
SiteName ...............................................................50
Phone Number ............................................................50
PinNumber ..............................................................50
DefaultPacks.............................................................50
Upload Operational Parameters ...............................................51
Upload Channels ..........................................................51
Upload Phone Numbers .....................................................51
Upload Selcall Access Levels ................................................51
Download and Erase Call History ..............................................51
Hang-uponCompletion.....................................................51
Dialling ................................................................................. 52
Modifying the Interconnect’s Parameters ....................................................... 53
Operational Parameters .................................................................... 54
Operational Settings .......................................................54
Version (Read Only) ..................................................54
ScanonPowerup....................................................54
Auto Mode on Powerup ...............................................54
Printer Enabled ......................................................54
AutomaticVOX......................................................54
Scrambler Enabled ...................................................55
ScanMuteonPowerup ...............................................55
PeriodicBeaconPeriod ...............................................55
SelcallSelfID.......................................................55
ALESelfID.........................................................55
VOX Inactivity Timeout ................................................55
Hangup Count ......................................................55
VOXThreshold......................................................55
VOXHangtime ......................................................55
DuplexMode .......................................................55
PTTRxLevelLow ...................................................55
ALE Enabled .......................................................55
AUXRxAudio ......................................................55
AUXBCD..........................................................55
DialSettings..............................................................56
Tone Dialling .......................................................56
Dial Tone Wait ......................................................56
DTMF Tone Length ..................................................56

6
PABXPrefix ........................................................56
LineReversalDetection ...............................................56
WaitforRing .......................................................56
WaitforAnswer .....................................................56
Rings Till Answer ....................................................56
Rings Till Hang-up ...................................................56
Call Length .........................................................56
CallCharging .......................................................56
Operational - Date/Time .....................................................57
Date/Time..........................................................57
StartupMessage ....................................................57
Setting Preset Phone Numbers/Prefixes ....................................................... 58
PresetNumbers...........................................................58
Long Distance ............................................................58
TollFree ................................................................58
Barred ..................................................................58
ALENumbers ............................................................58
Programming Channels .................................................................... 59
SelcallAccessLevels...................................................................... 60
Access from Radio to Phone .................................................60
Preset Phone Number Calls ............................................60
Preset and all Local Calls ..............................................60
Preset and all Local and Long Dist. Calls ..................................60
All Phone Calls (Except Barred Numbers) .................................61
Barred from receiving Selcalls and Telcalls ................................61
Access from Phone to Radio .................................................61
SelcallsOnly........................................................61
All Selcalls and Telcalls ...............................................61
Barred from receiving Selcalls and Telcalls ................................61
ScramblerID's............................................................................ 62
DataLog ................................................................................ 63
CallCharging ............................................................................ 64
Introduction ..............................................................64
SettingChargingRates .....................................................64
UsingTimeCharging.......................................................64
UsingChargePulseScheme.................................................64
InvoiceOptions ...........................................................65
Adding/EditingClients ......................................................66
BuildingInvoices ..........................................................67
Choosing a Client ....................................................67
Choosing a Selcall ID .................................................67
Month/YearField ....................................................67
BuildInvoiceButton ..................................................67
APPENDIX - A ....................................................................68
Primary Screen/ Menu Key Functions ......................................................... 68

7
Introduction
The 960 HF Telephone interconnect is designed to provide users on a HF network full interconnection with the
international telephone network. It is designed to be operated as a completely automatic facility with no requirement
for human operator supervision. A high level of security is incorporated to eliminate system abuse.
This manual is divided into two sections, the first part of the manual gives a brief system overview and details the
operation of the 960 telephone interconnect assuming the 960 has already been setup by a system supervisor. The
second part of the manual details the 960 setup procedures.
System Overview
The 960 telephone interconnect will make your HF network stations extensions of the international telephone
network.
The 960 telephone interconnect provides a fully automated interface between the international telephone network
and a HF network. Stations in a HF network equipped with selective call systems based on CCIR 493 can call up
to 98 numbers that can be stored in the 960 telephone interconnect. Stations fitted with a “Telcall” facility, based on
selective call format CCIR 493, can direct dial any telephone number on the international telephone network.
Telephone subscribers can dial into the 960 telephone interconnect from anywhere on the international telephone
network and call any station on the HF network.
The Barrett 960 telephone interconnect provides full network management facilities including multiple telephone
access levels for HF stations, call logging and remote supervision by dial up computer links
Operation
After switching on, the 960 performs a series of internal checks and displays important system information on the
front panel display. If Levels 2 or 3 are fitted, additional information is sent to the printer.
Automatic mode overview
In automatic mode the 960 HF telephone interconnect will:-
Scan all channels programmed for scan looking for an incoming Selcall or Telcall from a HF network station.
On receipt of a Selcall or Telcall, the 960 checks that the station calling is registered in the database and has
the required access privilege programmed by the system supervisor, if so it then initiates a telephone call and
connects the telephone party with the HF station.
Return to scan when the call is complete.
Answer an incoming telephone call, prompt the telephone caller with recorded instructions on how to select
a channel and how to send a Selcall to connect to a user on the HF network.
Periodic beacons if selected, will be sent on all channels to help the user determine if a particular channel is
suitable for communication at the required time. A beacon signal can also be requested from the transceiver
being called to check if a particular channel is suitable for use at the required time.
In the case of Level 2 or Level 3 960's - log all calls from both the telephone network and the HF network,
either sending the information to a local printer or in the case of a Level 3 960 storing the information internally,
ready to be interrogated by an external PC, loaded with 960 online supervisory software. A standard MODEM
is used to connect to the 960 via the telephone network.

8
Facilities available to the telephone user
A telephone subscriber using a DTMF telephone can access the following facilities provided by the 960 telephone
interconnect. These facilities are available after the 960 has answered the call and played its recorded instruction
messages. To make a call to a station on the HF network a channel must be selected and the Selcall number of the
station required must be entered, after which the 960 will send the selcall and if successful an audible reply will be
heard from the station being called. If this audible reply (revertive call) is not heard another channel should be
selected and the call repeated.
Selecting a channel
The 960 can store up to 50 channels. These are selected as follows:-
Press the two digits, representing the channel number required, on the DTMF key pad of the phone being
used. Valid channel numbers are from 01 to 50. Alternatively for channels 1 to 9 can be selected by pressing
a single digit followed by the '#' key. i.e. 1# selects channel one. Once the second number is pressed, the
request is processed and a stored voice will repeat back the channel number.
The second option is especially useful for telephone systems which have STD-bar limits placed upon them.
These telephones usually have a system fitted which prohibits the first digit pressed from being a zero.
Note:- channel numbers must be two digits in length. e.g. Enter 03 or 3# instead of 3.
Note:- once channel entry commences HF receiver noise will disappear until the DTMF function being entered is
complete. This lack of HF receiver noise identifies that you are still in the DTMF request sequence.
Sending a Beacon Request
A beacon request is used to test to see if a channel is "open" to a HF station you may wish to call later with a
Selcall. A beacon request does not alert the HF station being called. After the beacon request is sent a confirmation
tone (revertive call) will be heard from the HF station, the strength of this confirmation tone (revertive call) indicates
the quality of the channel for communication. If no confirmation tone (revertive call) is heard try another channel.
A beacon request can be sent to any HF station that has an access level that allows it to receive Selcalls (access
levels are set in the 960 by the system supervisor and are described in the setup section within this manual).
To send a beacon request, press the '*'(star) key on the telephone key pad.
If the '*' key is recognised the receiver noise will disappear. Some DTMF telephones do not send the '*' and '#'
tones. This should be tested before the system is first used.
Then enter the 4 digit selcall ID of the transceiver you wish to contact using the telephone key pad. Press the '*'
button to send the beacon request. The tones of the beacon request selcall being sent will now be heard.
To re-send the last sent beacon request, press ‘**’(star twice) on the telephone key pad.
Sending a Selcall
A selcall is used to call a HF station and alert the operator that you wish to commence communication with that
station. After the selcall is sent a confirmation tone (revertive call) will be heard from the HF station indicating the
station has received the call. If no confirmation tone (revertive call) is heard try another channel.
A selcall can be sent to any HF station that has an access level that allows it to receive Selcalls (access levels are
set in the 960 by the system supervisor and are described in the setup section within this manual).
To send a Selcall, press the '*' key on the telephone key pad.

9
If the '*' key is recognised the receiver noise will disappear. Some DTMF telephones do not send the '*' and '#'
tones. This should be tested before the system is first used.
Then enter the 4 digit Selcall of the transceiver you wish to contactfollowed bytwo '#' key presses (onlyone '#' press
is necessary on Level 1 Interconnects). The tones of the selcall being sent will now be heard. Note: ID's 9900 to
9999 are reserved for ALE calls. See "Sending an ALE call".
If the entered ID does not have the access level to receive Selcalls then the ‘Access Denied’ pre-recorded message
will be played and the Selcall not sent.
After the Selcall has been sent, if the transceiver with that Selcall ID is on channel, a confirmation tone (revertive
tone) will be heard. The telephone user should then wait for the transceiver operator to make voice contact. If no
voice contact is made, a telephone number to call back on can be sent to the HF station using the 'Sending a Telcall'
procedure.
If no audible acknowledgment tones are heard, the transceiver may be on another channel, or switched off. To try
to make contact on another channel, follow the 'Selecting a Channel' procedure, then repeat the 'Making a Selcall'
procedure.
If you wish to send the same Selcall number again, press ‘**’.
Sending a Telcall
In the event that a transceiver responds to a Selcall, but no voice contact is established, indicating the operator is
not available, a ring back telephone number can be sent to the HF station transceiver and stored in its memory. On
the HF station operators return he can return the call. This facility is not available on Level 1 Interconnects
A Telcall can only be made to a HF station that has an access level required for direct dialling on the PSTN.
To send a Telcall:-
Press '*' followed by the 4 digit Selcall number, then press '#'.
Enter the desired telephone number (up to 16 digits long) and then press '#' again.
The Telcall will then be sent and the telephone number will be stored in the HF station transceivers "Selcall
history".
An audible acknowledgment will be heard if the call was successful.
If the HF station does not have the access level required for this operation the ‘Access Denied’ pre-recorded
message will be heard and no action will be taken.
Using the Voice Operated Switch (VOX)
The transceiver being operated by the Barrett 960 telephone interconnect is usually switched between transmit and
receive using the telephone subscribers voice to derive the switching signal. This is achieved using a specialised
VOX (voice operated switch). If however the telephone is of bad quality then a manual method to switch between
transmit and receive is available. To switch to the manual method press "88" on the telephone key pad. The internal
synthesised voice will annunciate "OFF" indicating automatic VOX is off and you are now in a "manual VOX mode".
In the manual mode to key the transceiver into transmit press the "#" key on the telephone keypad. When you finish
talking again press the "#" key, the transceiver will now be in receive mode. i.e. using the "#" key on the telephone
keypad is the similar to the microphone Press To Talk (PTT) button, except it only has to be pressed momentarily
to switch between transmit and receive and visa versa.
To return to "automatic VOX mode" press "88" again on the telephone keypad, the internal synthesised voice will
annunciate "ON" indicating automatic VOX is on again.
Requesting current channel information
The telephone subscriber can request the 960 to annunciate the current channel's number and frequency
information using its internal synthesised voice by entering 77 on their telephone keypad.

10
Completing a call - "Hanging up"
There are two methods to complete a call or "Hang up":-.
The fastest and most efficient method is to enter "99" on the telephone keypad. This causes the 960
interconnect to instantly hang up. The telephone user then replaces the handset on his telephone. The 960
interconnect is now immediately ready for the next caller.
The second method is to simply hang up the telephone handset. The 960 cannot sometimes detect the
telephone subscriber has "hung up" due to the way different telephone systems operate in different countries.
The 960 in this case will either respond to a "BUSY" signal from the telephone system and then hang up or
will time out due to lack of activity. Which ever is the case whilst the 960 is waiting to hang up, the system is
not available for use and the last caller will be charged extra time on his call. Thus the first method is always
preferable.
Sending an ALE call
If the optional ALE board is fitted, then an ALE call can be made to a HF transceiver also fitted with the optional ALE
board.
To transmit an ALE call, press '*' (STAR) on the telephone keypad. If the '*' key is recognised the receiver noise
will disappear. Enter the Destination ID number (up to 4 digits), followed by two '#' key presses.
Source and Destination ID's are allocated by the Interconnect operator.
Note: ID's 9900 and above are reserved for ALE calls.
Facilities available to the HF station
For more detailed information on how to call the interconnect using Barrett 530,550,930 and 950 transceivers refer
to the relevant transceiver operation manuals.
Sending a beacon Request
To receive a beacon revertive from the 960 interconnect, send a Selcall to the ID xx99, where xx is the self ID of
the interconnect. For example, Selcall 4599 will receive a beacon revertive from the interconnect with self ID of 45.
Sending a Selcall - dialling a preset phone number
To dial one of the interconnect preset phone numbers (0-98), send a Selcall to the interconnect with the preset
number to dial. For example, Selcall 4501 will dial preset number 1, Selcall 4587 will dial preset number 87 etc, on
a 960 interconnect with Self ID of 45.
The HF station sending the Selcall must have a relevant access level assigned to their selcall number to permit
dialling to a preset phone number.
Sending a Telcall - dialling a telephone number
A 950 transceiver must be fitted with the telcall option to enable it to dial any desired telephone number via the 960.
To make a telephone call, enter the self ID of the 960 to be used via the numeric key pad.
The SEL/TEL key is then pressed and then the wanted telephone number is entered. Finally, press the CHAN/SEND
key. All of the information needed by the 960 to connect the transceiver to the required telephone number is sent
to the 960 along with the selcall information.
Terminating a call
When a call has been completed, the caller must hang up by sending a "hang up" code to the 960.
To do this, press the SEL/TEL key followed by the PROG/END key.

11
Sending an ALE call
ALE calls may be sent to Interconnects fitted with the ALE option. The transceiver must also be fitted with an ALE
board.
Preset numbers are allocated by the Interconnect operator. Preset numbers are allocated according to which
destination address is used.
Manual mode overview
In manual mode the 960 interconnect will act as a HF base station and :-
Enable the operator to send Selcalls to stations on the HF network.
Enable the operator to send Telcalls to stations on the HF network.
Receive incoming Selcalls from the HF network and manually forward the call to the pre-set telephone
number within the 960 that is associated with selcall number received.
Receive incoming Telcalls from the HF network and forward these manually to the telephone network.
Note:- To operate the 960 in manual mode, the option ‘Auto on Power up’ should be set to 'Manual', in the
‘Operational Menu’ - refer to the setup section later in this manual.
Receiving a Selcall from a HF station
On receipt of a Selcall directed to your 960 , it will be displayed on the front panel and an alarm will sound.
To on-forward the call
To on-forward the call to the pre-set telephone, stored in your 960 and associated with the received selcall number,
press the 'LEFT' key. The 960 will process the request, the telephone number will be dialled and the HF user will
be connected to the telephone party.
To communicate by voice with the calling HF user
Press the 'RIGHT' key. This will cancel the audible alarm and allow conversation with the HF user to commence.
Receiving a Telcall from a HF station
On receipt of a Telcall directed to your 960 , it will be displayed on the front panel and an alarm will sound.
To on-forward the call
To on-forward the call to the telephone number, sent within Telcall by the HF station, press the 'LEFT' key. The 960
will process the request, the telephone number will be dialled and the HF user will be connected to the telephone
party.
To communicate by voice with the calling HF user
Press the 'RIGHT' key. This will cancel the audible alarm and allow conversation with the HF user to commence.
Incoming phone calls
When the 960 is in 'Manual' mode, all incoming telephone calls are ignored. They are recognised but not answered.
A standard telephone should be connected in parallel to the 960, the call can then be manually answered by the
operator. The operator can then Selcall the required HF station using the manual operator's control menu. Once
contact is established, the telephone caller is connected to the HF station by selecting 'Place On Line' from the
manual operator's control menu.
12
Completing the call - "Hanging up"
The HF user can send a "Hangup Request" for his transceiver (see the transceiver operation manual for
details). When received by the 960 this will be displayed on the front panel, and pressing the 'LEFT' key
will complete the hang up action by the 960. Any other key will abort this action.
From the telephone:-
The telephone user can request a "Hangup" by entering '99' on their DTMF telephone handsets.
This will cause immediate call completion.
The telephone user can simply replace the phone to complete the call, the subsequent service
tones from the telephone network will result in call completion. Note:- the service tones do not
commence immediately the telephone receiver is replaced so extra time will be logged against the
call using this method.
The 960 operator can select 'Place Off Line' from the manual operator's control menu.
Once a telephone call is complete, the Barrett 960 will revert to scan if scanning is selected as the system default.
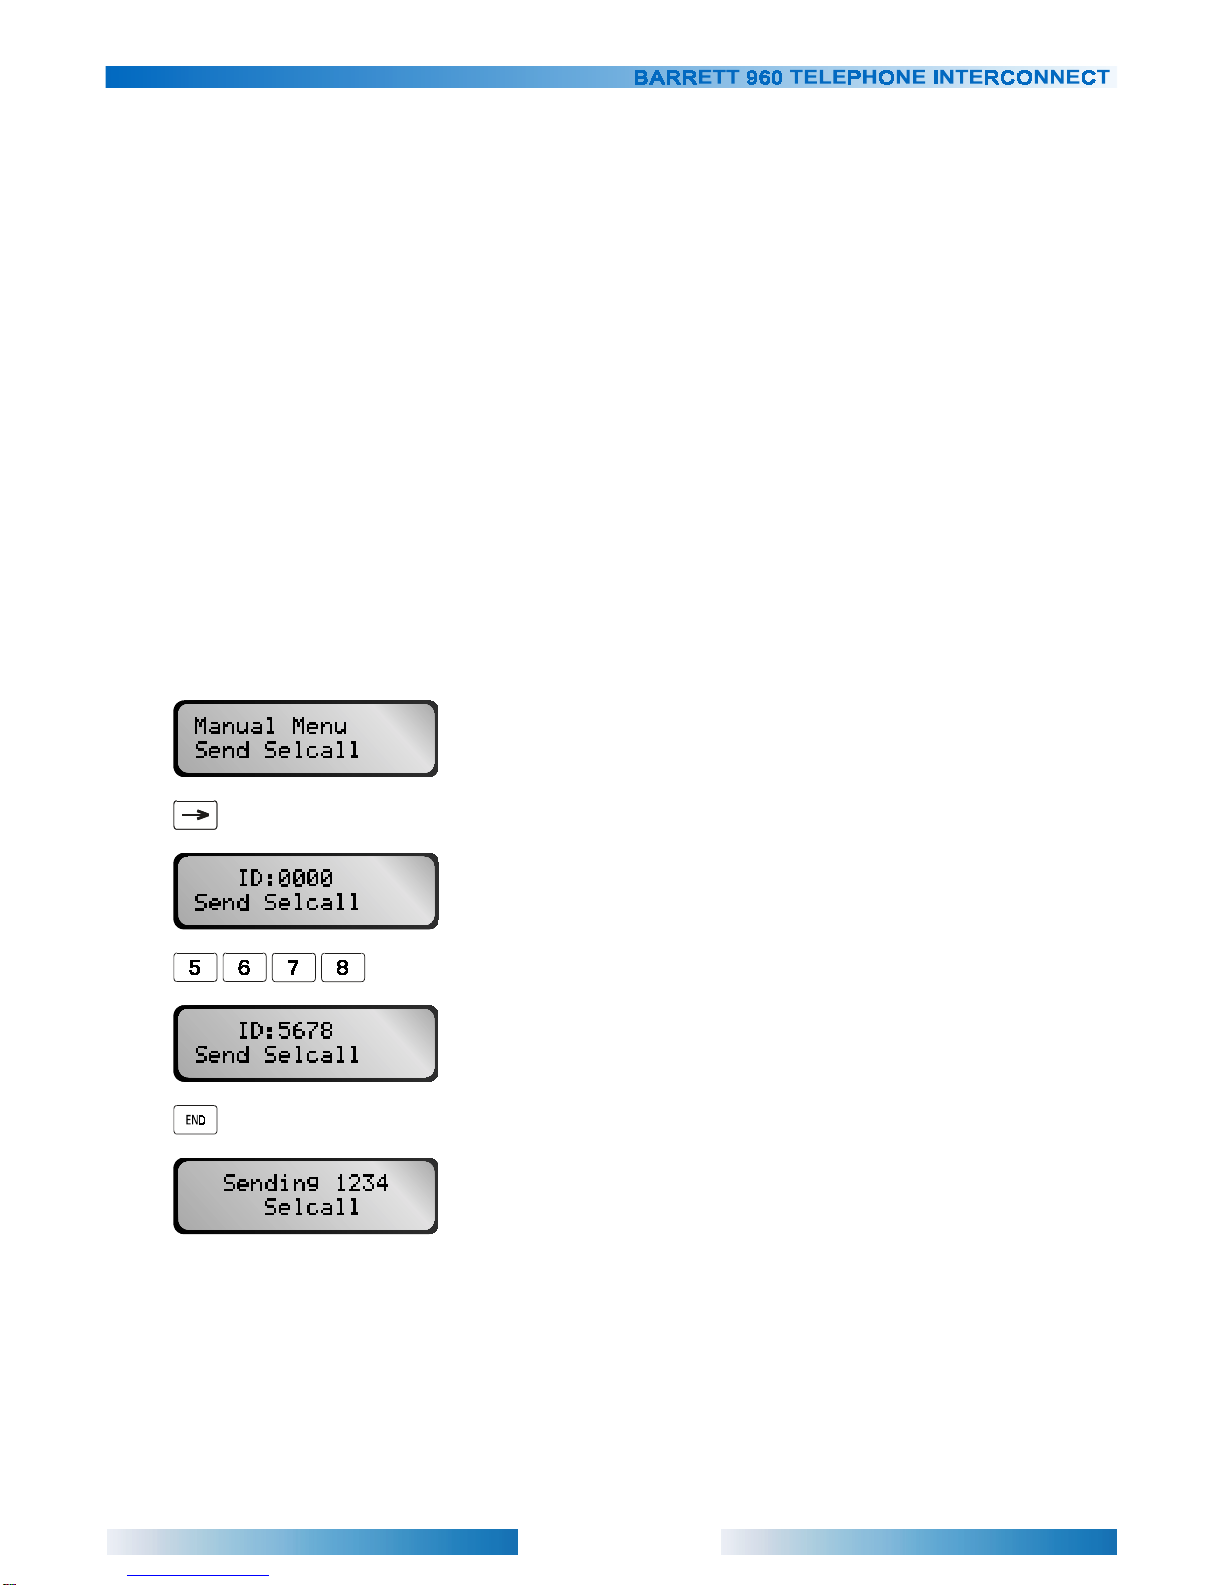
Sending a Selcall to a HF station
Enter manual mode by pressing '0'. Enter the manual operator’s control menu by pressing the ‘LEFT’ key while in
‘Manual’ mode. When making a Selcall, use the UP/DOWN keys to select 'Send Selcall'. Press the RIGHT key.
When making a Selcall, the most recent Selcall number becomes the default. If the same Selcall number is required,
press the ‘END’ key. If a different Selcall number is required, directly enter it using the number keys.
When the Selcall number displayed is correct, press 'END' to send the call. Press ‘CANCEL’ at any time to exit
without making the call.
13
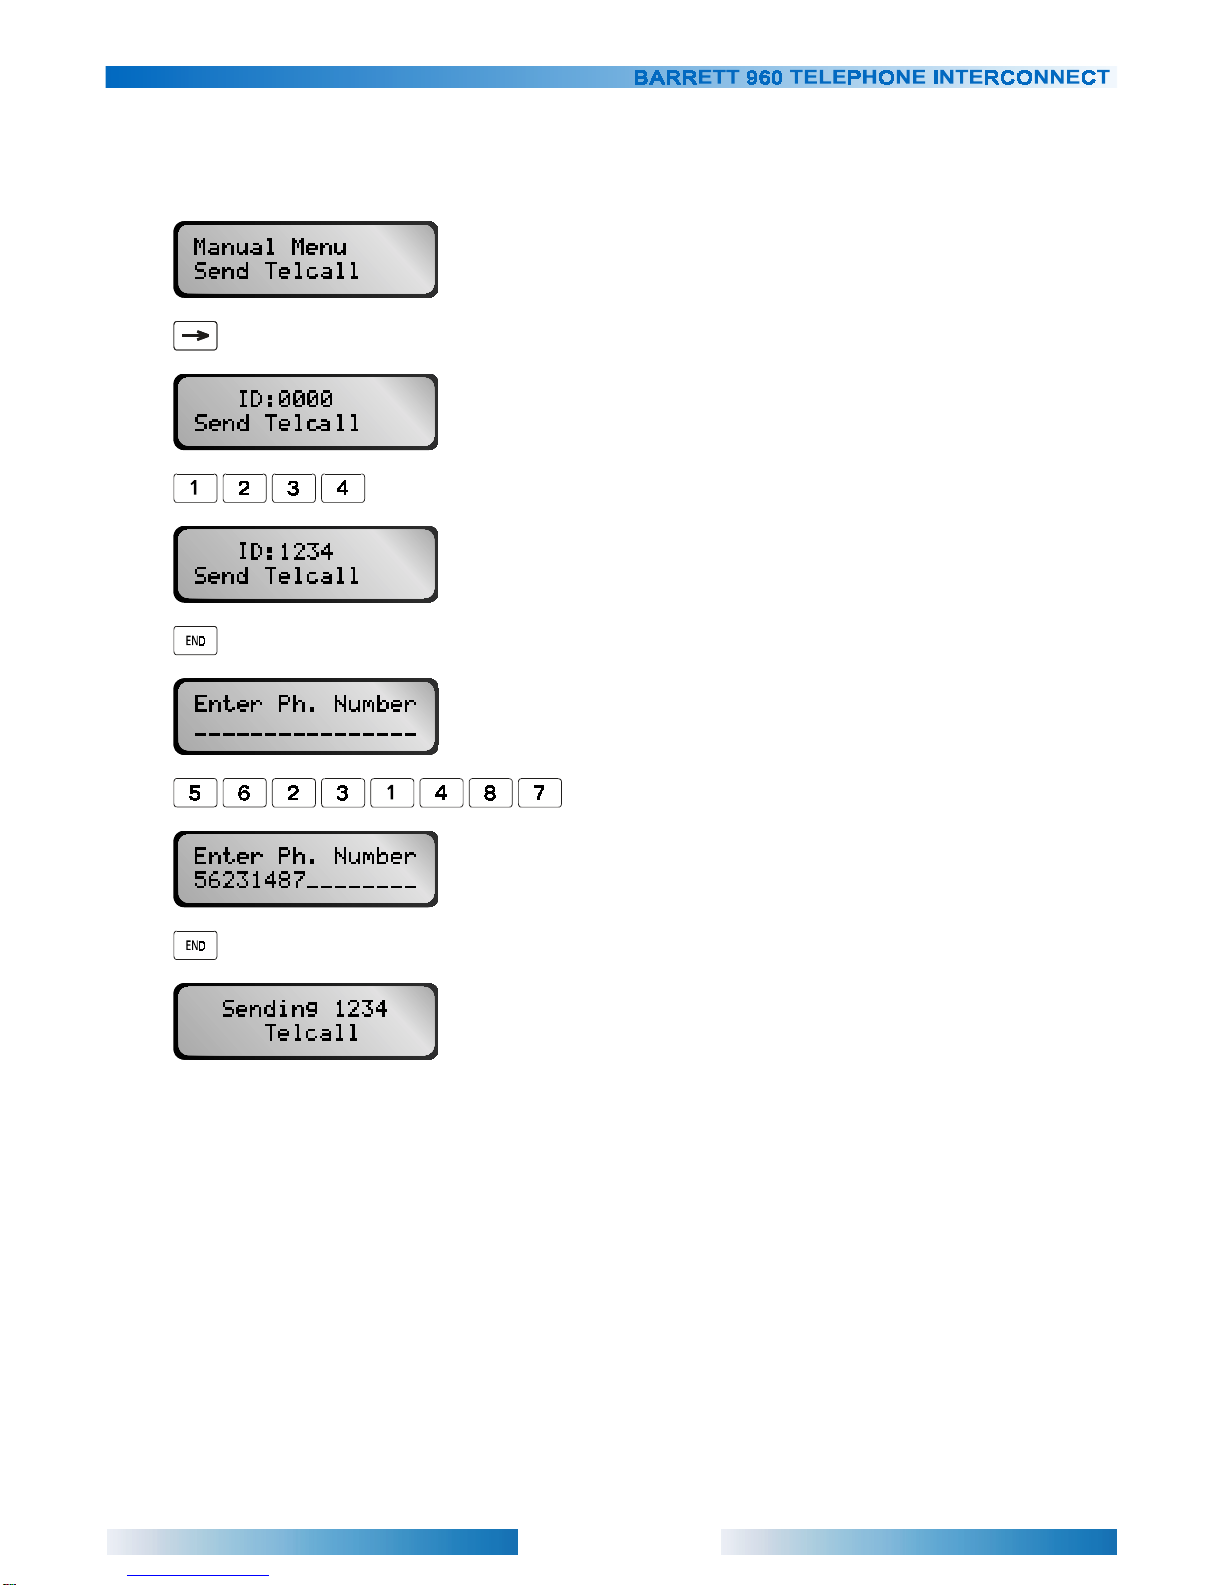
Sending a Telcall to a HF station
Enter manual mode by pressing '0'. Enter the Manual Operator’s Control Menu by pressing the ‘LEFT’ key while in
‘Manual’ mode. When making a Telcall, use the UP/DOWN keys to select 'Send Telcall'. Press the RIGHT key.
Enter the telephone number required by using the numeric keypad. To delete the previous phone number,
repeatedly press the 'CANCEL' button, until there is no phone number. If a mistake is made press 'CANCEL' and
try again. If a 16 digit number is entered, the number is dialled immediately after the 16th digit is entered. When the
telephone number displayed is correct press ‘END’ to dial the number.

14
Making a telephone call
Enter the Manual Operator’s Control Menu, as before. When making a telephone call, use the UP/DOWN keys to
select 'Make Phonecall'. Press the RIGHT key.
When the telephone number displayed is correct press ‘END’ to dial the number. When the telephone is answered,
use the front panel microphone to talk and the speaker to listen.
If a 16 digit number is entered, the number is dialled immediately after the 16th digit is entered. Press CANCEL at
any time to exit without making the call.
Completing a telephone call
When placing the 960 On Line and Off Line, the current line status is always shown by the front panel LED's. The
centre LED is the On Line indicator.
To go offline manually, enter the Manual Operator’s Control Menu, as before. Use the UP/DOWN keys to select
'Place Off-Line'. Press the RIGHT key

15
Sending a Beacon request to a HF station
Enter manual mode by pressing '0'. Enter the Manual Operator’s Control Menu by pressing the ‘LEFT’ key while in
‘Manual’ mode. Use the UP/DOWN keys to select 'Send Beacon Rqst'. Press the RIGHT key.
When sending a Beacon, the most recent destination ID becomes the default. If the same destination ID is required,
press the ‘END’ key. If a different destination ID is required, directly enter it using the number keys.
When the destination ID displayed is correct, press 'END' to send the call. Press ‘CANCEL’ at any time to exit
without making the call.
16
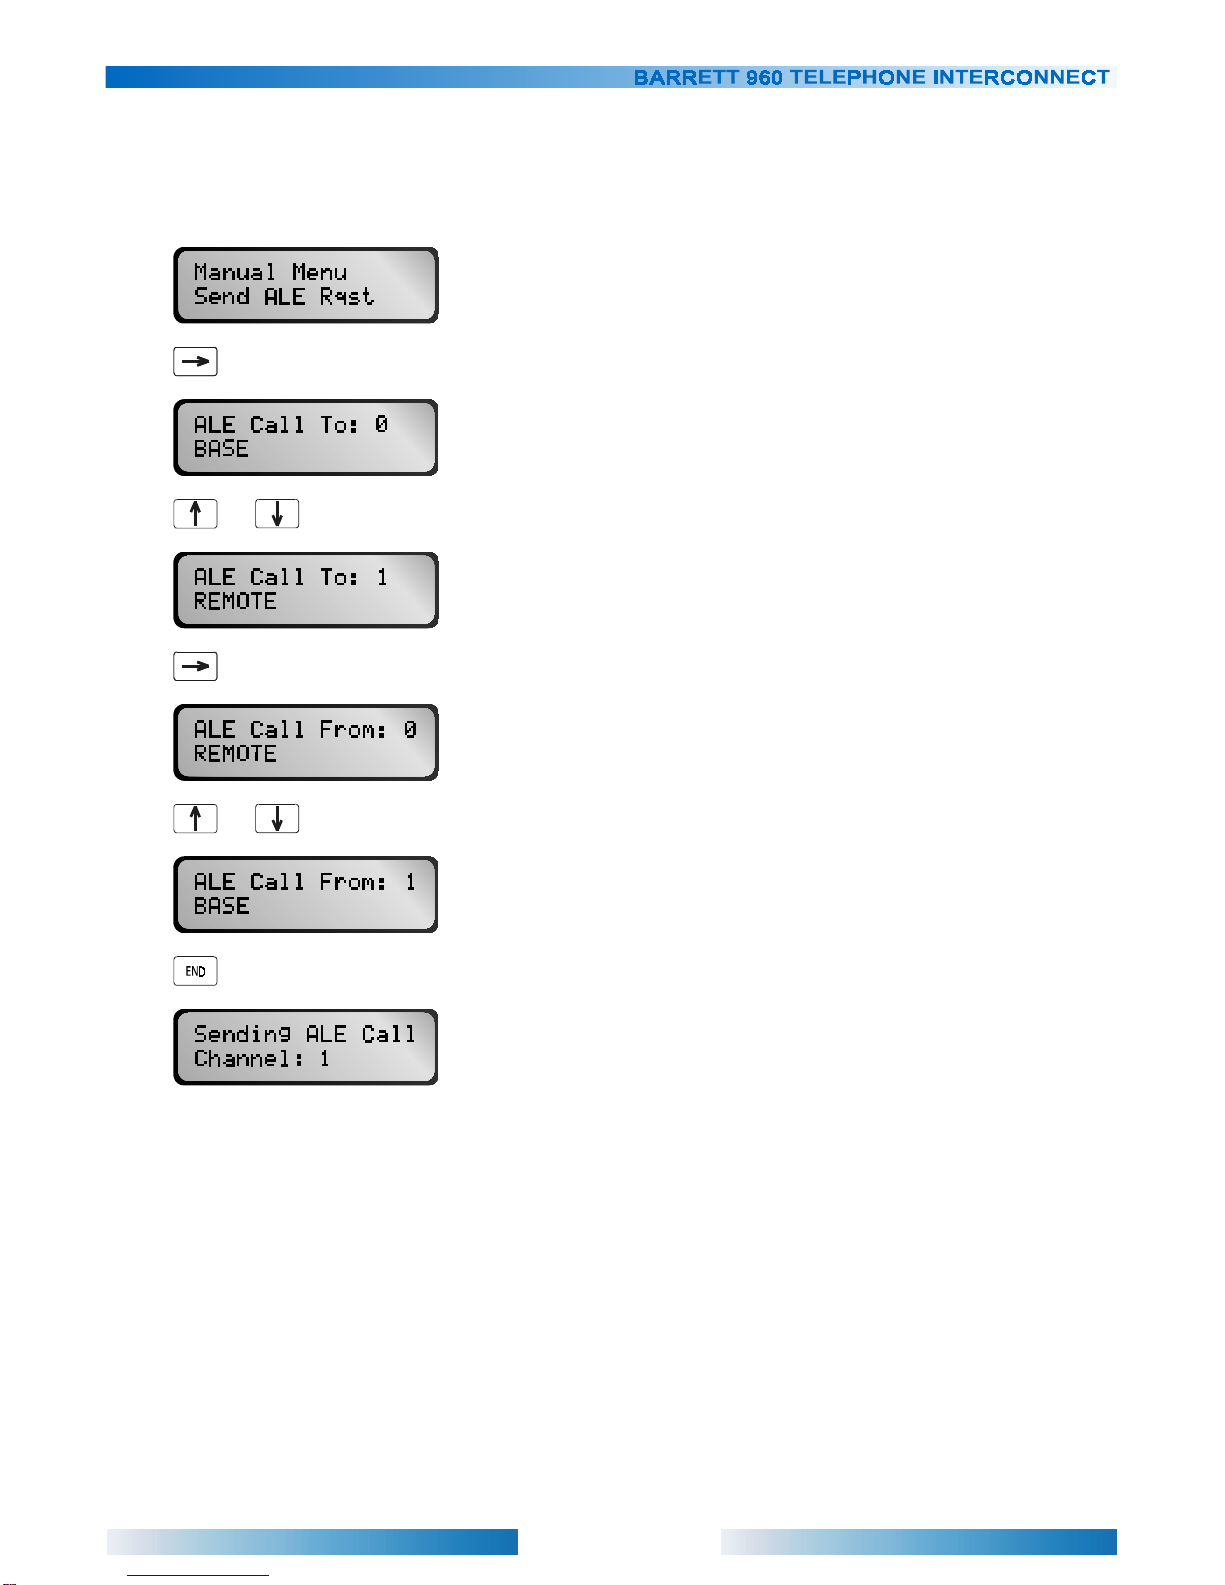
Sending an ALE Request/End
To send an ALE call or end call requires the optional ALE board. Enter the Manual Operator’s Control Menu by
pressing the ‘LEFT’ key while in ‘Manual’ mode. Use the UP/DOWN keys to select ‘Send ALE Rqst’ or ‘Send ALE
End’. Press the RIGHT key.
or
or
When sending an ALE request, select the destination address by pressing the ‘UP’ or ‘DOWN’ keys. The most
recent destination address becomes the default. Destination addresses must be set in the MS-Windows ALE
software, and downloaded to the ALE board on the 960 interconnect. (See ALE Configuration section of this
manual.)
Press theLEFT/RIGHT arrow keys to move onto the source address field. The most recent source address becomes
the default. Select the source address by pressing the ‘UP’ or ‘DOWN’ keys. To make a call press the ‘END’ key.
To abort a call press the ‘CANCEL’ key.
To send an ALE end call, select the ‘Send ALE End’ menu option. The ALE must be already linked to send an ALE
end call.
17
System Setup
Hardware
Front Panel
32 character (16 x 2 lines) backlit, liquid crystal display.
16 control keys for full operation and editing.
5 status LED's giving POWER, ALE, ON LINE, PTT and VOX indications.
Speaker giving full audio response and output power.
Volume control knob with POWER ON/OFF control.
International standard 8-pin microphone connector.
Handles, for easy removal from racking installations.
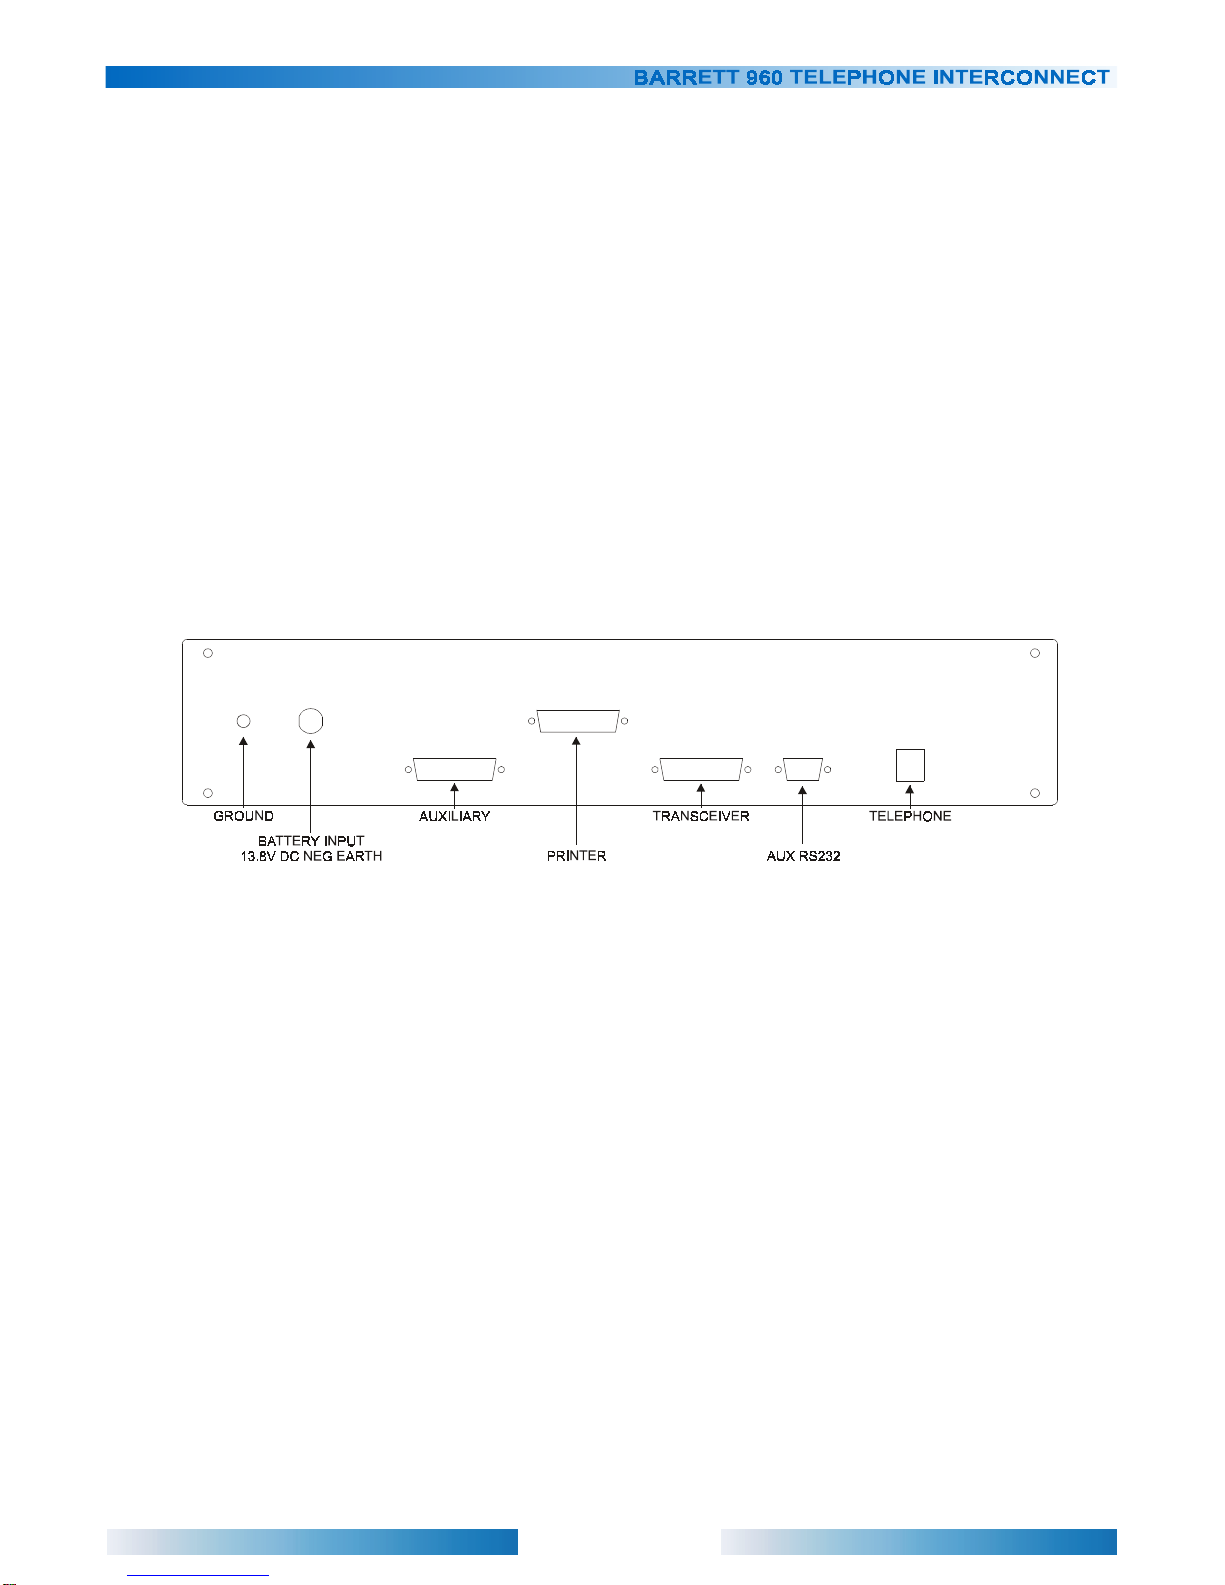
Rear Panel
Transceiver port for connection to a 950 transceiver. (25 pin 'D' female connector).
Auxiliary port 2 for connection to remote site systems etc. i.e. Barrett 974 system(25 pin “D” female connector)
Auxiliary serial port for configuring (filling) the optional ALE board (9 pin ‘D’ connector). Can also be used for logging
/ monitoring and direct programming.
Parallel printer port for connection to a tractor-feed dot matrix printer - for real time hard copy print out.
Power lead - suits 922 Power Supply
. Telecom line socket (RJ12 type, 6P4C)
. Ground Bonding Strap

18
System interconnection
Ensure that all components to be connected into the system are switched off:-
On the 960 interconnect ensure the ON/OFF Volume control is fully counter-clockwise.
On the 922 Power supply remove the IEC mains connector lead.
Connect the 25 way interface cable (cable Barrett connector P/N BCA90021) from the 950M transceiver 25 pin
auxiliary connector to the 960 25 pin 950 transceiver connector.
Connect the 960's ground bonding strap to the transceiver and the 950 transceiver's ground bonding strap to the
922 power supply. It is very important that these bonding straps are correctly fitted or transmitter instability may
occur.
Connect the supplied telephone cable to the 'Telephone' socket of the 960 and to the PSTN socket.
Connect the power leads to the 950Mtransceiver, and 960 interconnect from the 922 power supply. The 922 power
supply has two outputs. Transceiver output and Aux output. Connect the Transceiver output to the 950 and the Aux
output to the 960.
If a power supply other than the 922 is to be used, it must be capable of providing the 960 interconnect with +13.8V
@ 2A and the 950M transceiver with +13.8V @ 20A.
Connect a suitable antenna to the 950 transceiver module.
Switch the 960 on by turning the volume control knob clockwise. A click will result and the 960 interconnect and
950M transceiver units will both be powered up. Further turning of this knob adjusts the volume of the front panel
speaker.

19
Option levels
There are 3 different option levels of 960 Telephone interconnect available. These are only available factory fitted.
These options can be upgraded, however this can onlybe done by returning the 960 to the Barrett factory. It is NOT
possible for dealers to perform this upgrade.
The 3 option levels are:
Level 1 Preset telephone numbers only
This level gives no facility for direct dialling of telephone numbers. Only the 98 internal preset numbers can be
used. No system activity information is available.
Level 2 Standard configuration
Full direct dialling facilities as well as preset telephone numbers are available. A complete log of system activity
is available from the printer port.
Level 3 Full logging commercial option
Full direct dialling facilities as well as preset telephone numbers are available. A complete log of system activity
is available from the printer port. Full reprogramming facilities from an external computer/terminal are available
through the RS-232 port. Logging to a remote computer is available for complete remote site system management.
20
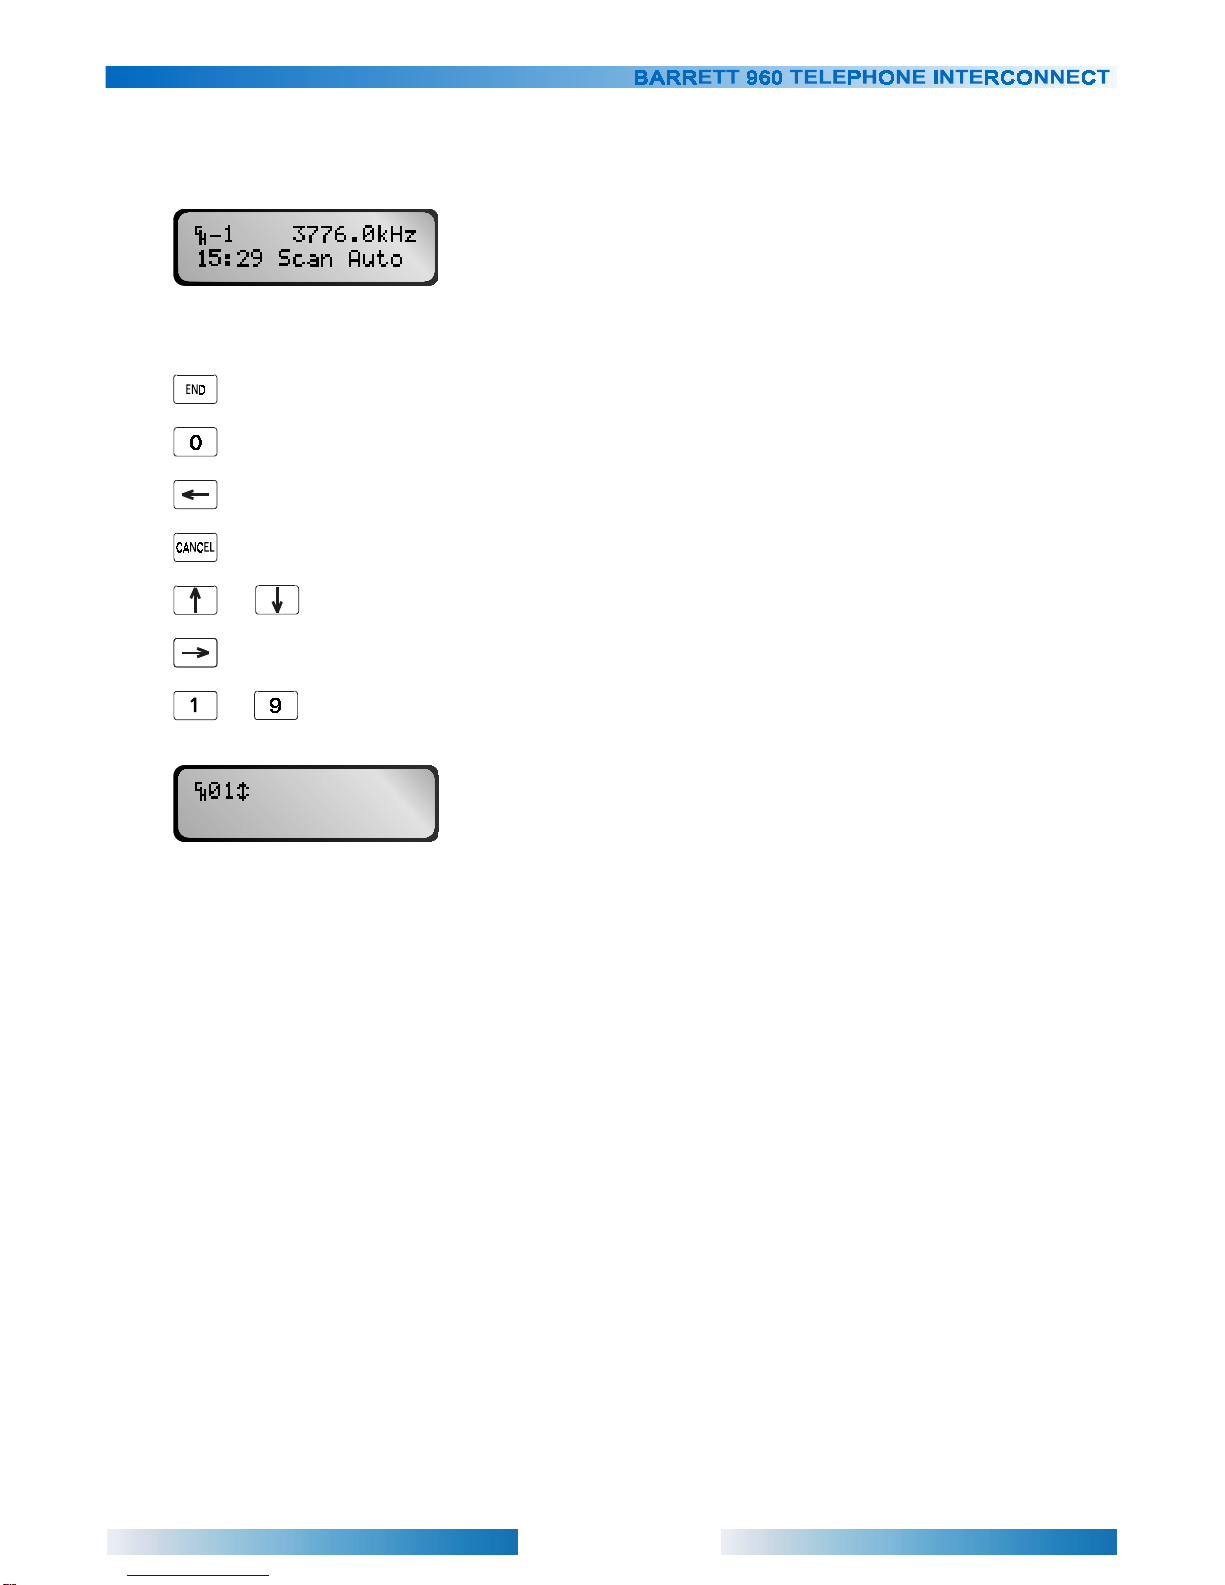
Primary screen functions
The primary screen is the normal operational screen of the 960 interconnect.
From the primary screen, the user can do several operations by using the front panel key pad. These are shown
individually below, but are not intended to be a sequence of key presses.
... to enter the main menu
... to enter/exit manual mode.
... to enter the manual menu, while the interconnect is in manual mode.
... to enable/disable scan mode.
or ... to scroll up and down through the channels. Interconnect must be out of scan.
... to enable/disable scan mute. Speaker is muted until the interconnect begins to detect a Selcall.
to ... to change channels. (See below)
To change channels, press any one of the number keys except 0. The interconnect prompts the user to enter a
2 digit channel number, as above. Press the 'UP' and 'DOWN' keys to scroll up and down through the channels, or
enter a 2 digit channel number using the number keys.
Note:- to enter a single digit channel number, press the zero key, followed by one of the digit keys, while the
interconnect is prompting for a channel number, as above.
Table of contents


