Basalte Auro Cresnet User manual

Auro Cresnet
Manual
1/ 13 v1.0 © 2017 basalte
Auro Cresnet
Manual
basalte bvba
hundelgemsesteenweg 1a
9820 merelbeke
belgium

Auro Cresnet
Manual
2/ 13 v1.0 © 2017 basalte
Table of contents:
1. Introduction............................................................................................................................. 3
2. Installation............................................................................................................................... 4
2.1 Identifying the parts ............................................................................................................ 4
3. General functions .................................................................................................................... 5
4. Changing the Basalte Auro Cresnet ID .................................................................................... 6
5. Programming in SIMPL Windows ............................................................................................ 7
5.1 Adding a Basalte Auro motion sensor ................................................................................. 7
5.2 Basalte Auro symbol............................................................................................................ 9
5.3 Basalte Auro Configuration module .................................................................................. 11

Auro Cresnet
Manual
3/ 13 v1.0 © 2017 basalte
1. Introduction
Auro is everything a motion sensor should be: small, fast and almost invisible. When mounted in
the ceiling, the innovative flat design makes Auro completely blend in. Only requiring an opening of
1.7”, it is very easy to install.
Auro has a built-in light sensor to use for light dependent switching, dimming and controlling
scenes.
The internal temperature sensor discretely reports the room temperature on the Cresnet bus, while
it can also be used to trigger a heat alarm in case of an abnormal temperature rise.
With a vertical detection angle of 90° it has a detection area with a diameter of 16 ft when installed
at a height of 8 ft, making it perfect for hallways, toilets and small rooms.
Auro connects directly to the Cresnet bus without additional interface.
0180-22 auro - white
0180-23 auro - black

Auro Cresnet
Manual
4/ 13 v1.0 © 2017 basalte
2. Installation
The Basalte Auro motion sensor is intended for ceiling mounting. To install Auro, an opening should
be made with a diameter of 43 mm (1.7 in).
Connect the Cresnet bus according the Crestron installation guidelines.
The minimal depth required for Auro is 39 mm (1.5 in). Additional depth should be reserved to
connect the device.
After a Cresnet bus voltage failure or a bus reset, Auro will not be ready for operation for at least 5
seconds, due to its initialisation process.
2.1 Identifying the parts
2.1.1 Front view
A Mounting clip
B Central IR window
2.1.2 Rear view
C Recessed button
C
B
A

Auro Cresnet
Manual
5/ 13 v1.0 © 2017 basalte
3. General functions
The Basalte Auro motion sensor will report any motion detected when entering the sensor’s
detection area. The sensor will stay active for as long as the movement takes place.
Auro’s central Led can follow motion, indicating when the sensor is active, or it can manually be
controlled over the Cresnet bus.
Auro has a built-in light sensor which can be used for light dependent switching, dimming and
scene control. The lux value can be reported cyclically or on a minimal value change.
Auro has a built-in temperature sensor as well, discretely reporting the room temperature on the
Cresnet bus, while it can also be used to trigger a heat alarm in case of abnormal temperature rise.
The temperature value can be reported cyclically or on a minimal value change, both in degrees
Celsius or Fahrenheit.
In SIMPL Windows, a ‘Basalte Auro Configuration’ module is used for every Auro motion sensor in
the project, to define the functionality of the sensor.

Auro Cresnet
Manual
6/ 13 v1.0 © 2017 basalte
4. Changing the Basalte Auro Cresnet ID
A Basalte Auro Motion sensor’s Cresnet ID is factory set to 25.
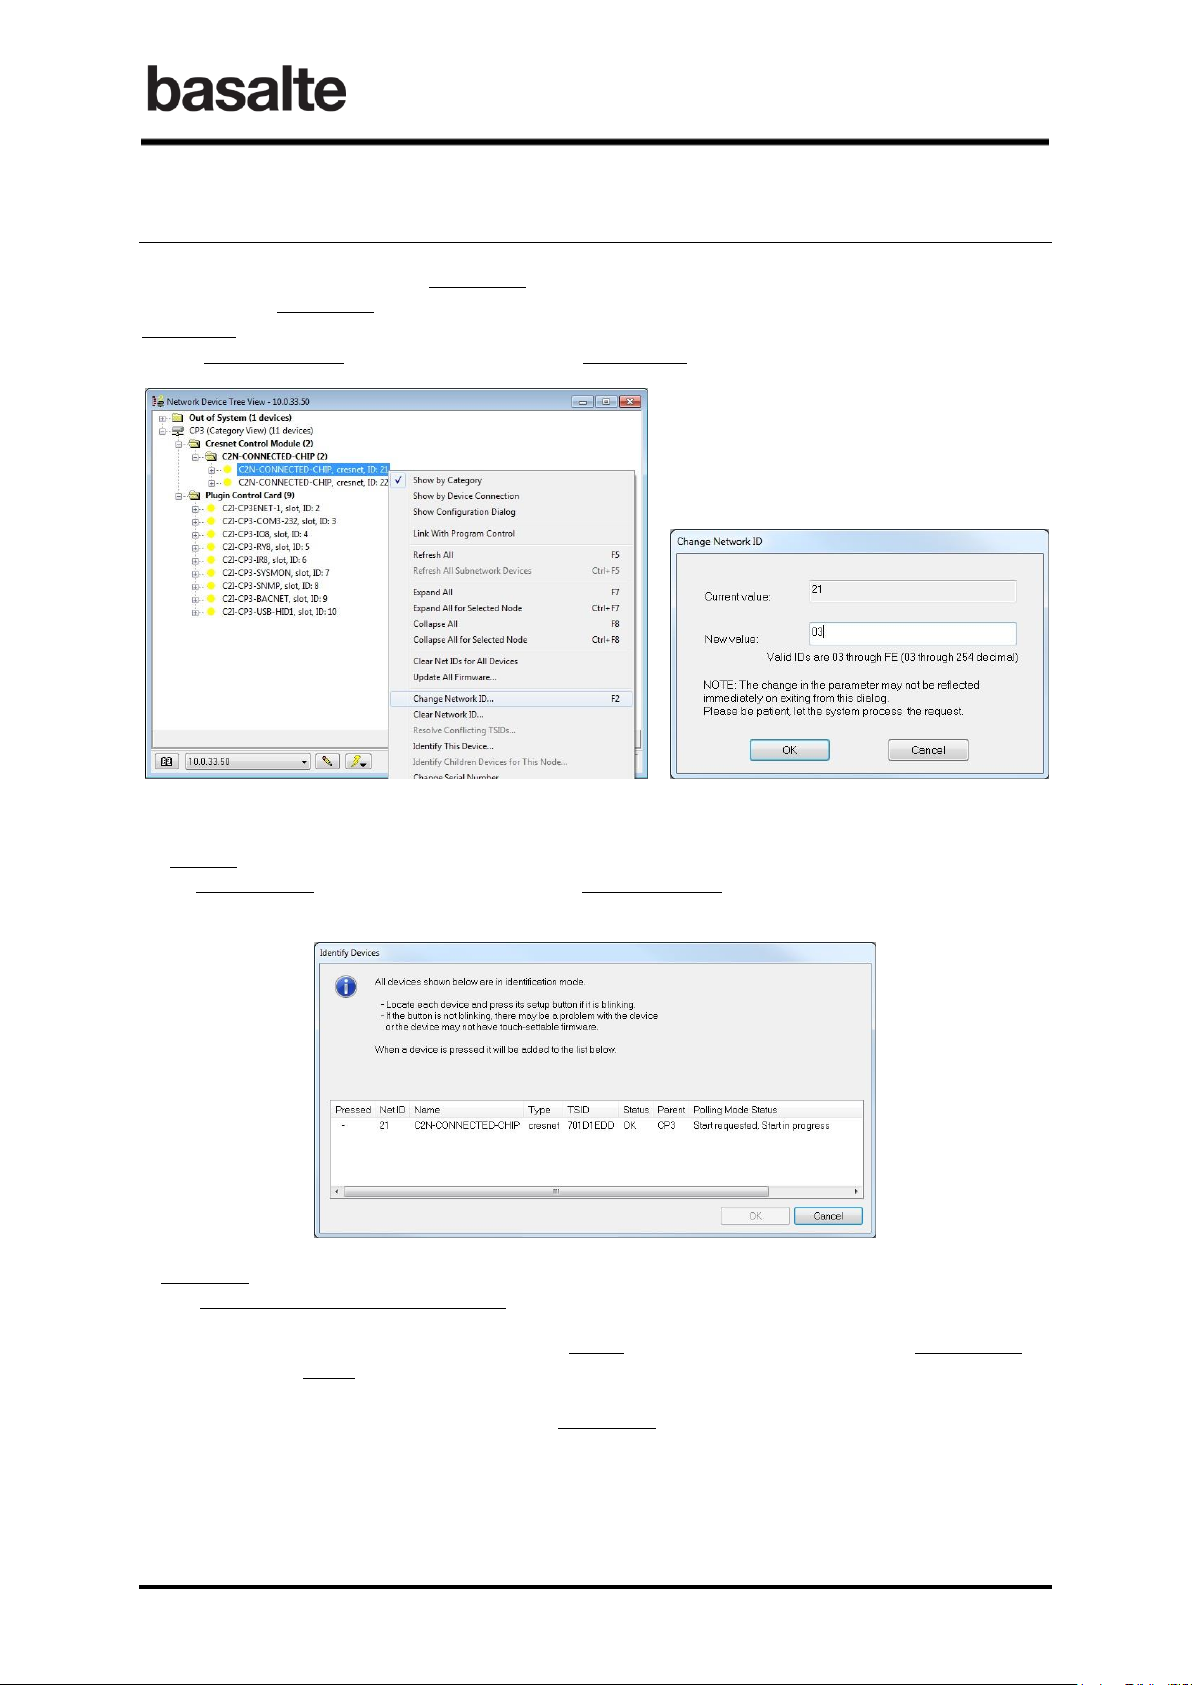
To change the Cresnet ID, you can use the Network Device Tree View in Crestron Toolbox.
Right-click on a discovered Basalte Auro and press the Change Network ID ... button.
A new pop-up-window allows you to change the Cresnet ID.
To identify multiple Basalte Auro motion sensors, you can use the Identify This Device ... button
when right-clicking a Basalte Auro again. A new pop-up-window gives an overview of all Cresnet
devices in identification mode.
A request is then sent on the Cresnet bus to the selected Basalte Auro. The Polling Mode Status
says, ‘Start requested, Start in progress’.
After some seconds, this status will change to ‘Active’, and the corresponding Auro’s internal Led
will start flashing White. Now press the ‘recessed button’on the back of the Auro. The Polling
Mode Status will change to ‘Pressed’. Pressing the OK button will bring you back to the Network
Device Tree View. Now you can change the Cresnet ID of the identified sensor.
Note: The recessed button is not accessible after physical installation. Make sure all auro devices
are properly identified before installation.

Auro Cresnet
Manual
7/ 13 v1.0 © 2017 basalte
5. Programming in SIMPL Windows
5.1 Adding a Basalte Auro motion sensor
A Basalte Auro motion sensor is added to the Cresnet Bus like any other Cresnet device, using the
Configure System window.
You can select the Basalte Auro from the ‘Cresnet Control Modules / Cresnet Sensing Modules’
folder in the Device Library on the left pane, and drag it to the processor’s Cresnet Bus on the
upper right pane.
The Basalte Auro motion sensor will be appended to the (if any) already existing Cresnet Devices.
To change the Cresnet ID of the Basalte Auro motion sensor, you can right-click the desired Auro
and press the Configure button. The Net ID tab on the new pop-up-window allows you to select
another Cresnet ID.
Another way of adding the Basalte Auro motion sensor to the Cresnet Bus is by using the Device
tree in the lower right pane.
Right click on the desired Cresnet ID and press the Add item to ... button. A new pop-up window
will allow you to select the Basalte Auro motion sensor from the available Cresnet devices.

Auro Cresnet
Manual
8/ 13 v1.0 © 2017 basalte

Auro Cresnet
Manual
9/ 13 v1.0 © 2017 basalte
5.2 Basalte Auro symbol
After adding a Basalte Auro motion sensor to the SIMPL Windows project, the Program System
window can be used to start programming the sensor.
All Basalte Auro motion sensors will be shown in the processor’s Cresnet Slot (on the Program View
pane).
Double clicking a Basalte Auro will bring up the device symbol in the Detail View pane.

Auro Cresnet
Manual
10 / 13 v1.0 © 2017 basalte
An overview of all available signals on the Basalte Auro motion sensor symbol:
Signal Name and Type
Description
Digital input:
<LED>
The Auro’s internal Led can be controlled by this digital input.
When the ‘Led Mode’ is set to ‘Follow Motion’, this digital input
will be overruled by the motion feedback.
The ‘Led Mode’ is set using the ‘Basalte Auro Configuration’
module.
High/1 = Led On; Low/0 = Led Off
Digital output:
<Motion>
This output will be pulsed High as long as there is any motion
detected.
High/1 (pulse) = Motion detected
Analog output:
<Lux_Sensor_FB>
Reports the ambient light in the room using Auro’s internal
light sensor.
Depending on the report type, the lux value will be updated
cyclically or at a certain change in value.
The report type can be set using the ‘Basalte Auro
Configuration’ module.
Valid values range from 0 to 4500, depending on the set
parameters.
Analog output:
<Temperature_FB>
Reports the temperature measured by Auro’s internal sensor,
in tenths of a degree Celsius or Fahrenheit.
Depending of the report type, the temperature will be updated
every 60 seconds, or on every temperature change of 0.5°
Celsius. (equal to 0.9° Fahrenheit)
The temperature format and report type can be set using the
‘Basalte Auro Configuration’module.
Serial input:
<Configuration$>
Needs to be connected to the serial output
<Initialize_To_Device$> on the ‘Basalte Auro Configuration’
module.
Serial output:
<Status$>
After a power cycle of the Auro, this string reports the sensor’s
software version.
If an invalid string is received on the <Configuration$>
input, an error message will be displayed on this output.
Serial output:
<Temperature_FB$>
Reports the ambient room temperature in following format
“xx.x”.
Depending of the report type, the temperature will be updated
every 60 seconds, or on every temperature change of 0.5°
Celsius. (equal to 0.9° Fahrenheit)
The temperature report type can be set using the ‘Basalte
Auro Configuration’ module.

Auro Cresnet
Manual
11 / 13 v1.0 © 2017 basalte
5.3 Basalte Auro Configuration module
Each Basalte Auro on the Cresnet bus requires a ‘Basalte Auro Configuration’ module. This module
allows to change the parameters for each Auro, and to send this custom configuration to the
Basalte Auro.
Be sure to include the ‘Basalte Auro Configuration.umc’ file in the same SIMPL Windows project
folder. The module should be visible in the Symbol Library Pane.
Add as many of these modules to the project as there are Basalte Auro on the Cresnet Bus.

Auro Cresnet
Manual
12 / 13 v1.0 © 2017 basalte
An overview of all available signals and parameters on the Basalte Auro Configuration symbol:
Signal Name and Type
Description
Digital input:
<Initialize>
When a High pulse is sent on this input, all configured
parameters are sent in 1 configuration string to the
corresponding Basalte Auro device.
High/1 (pulse) = Send configuration string
Serial outputs:
<Initialize_To_Device$>
Needs to be connected to the serial input <Configuration$>
on the Basalte Auro device symbol.
Parameter:
<LED Mode>
Defines the behaviour of the Auro’s internal Led when motion
is detected.
When set to ‘Follow Motion’, the Led will automatically be
activated as long as Auro’s Digital output ‘Motion’ is High.
When set to ‘Use Join’, the Led will be controllable with the
Auro’s digital input ‘LED’.
The ‘LED’ input will always control the Led, even if the ‘LED
Mode’ is on ‘Follow Motion’.
Available settings:
Follow Motion
Use Join
Parameter:
<Lux Sensor>
Defines how the Basalte Auro’s lux value is measured.
If enabled, the lux value can be sent cyclically on a definable
time interval, or on a minimal change in value.
Available settings:
Disabled
Cyclic
Delta
Parameter:
<Lux Cyclic Time>
Defines the time interval for the lux value to be updated
when the ‘Lux Sensor’ is set to ‘Cyclic’.
Available settings range from 5 to 60 seconds in steps of 5
seconds.
Parameters:
<Lux Delta>
Defines a minimal change factor which defines when the lux
value will be updated. When a high factor is selected, the
delta lux will be higher.
Available settings range from factor 1 to factor 9.
Parameter:
<Lux Compensation>
Due to environmental factors (e.g. dark colored floor), a lux
comensation may be required.
The measured lux value will be multiplied by a selectable
number.
Available settings range from 0.1 to 10 in steps of 0.1.

Auro Cresnet
Manual
13 / 13 v1.0 © 2017 basalte
Parameter:
<Temperature Sensor>
Defines how the Basalte Auro’s temperature is updated.
If enabled, the temperature can be sent every 60 seconds, or
on a 0.5° Celsius change. (equal to 0.9° Fahrenheit)
Available settings:
Disabled
Cyclic
Delta
Parameter:
<Temperature Format>
Defines in which format the temperature will be reported.
Available settings:
Celsius
Fahrenheit
Parameter:
<Temperature
Compensation>
Due to environmental factors, a temperature offset may be
required.
Available settings range from -9.5°C to +9.5°C in steps of
0.5°C. (equal to a range from -9.5°F to +9.5°F)
Questions or remarks?
Contact your Basalte representative or
Table of contents
Other Basalte Accessories manuals