Bask Aerospace AeroDrone MR4 User manual

Bask Aerospace
AeroDrone MR4 - Getting Started Guide
AeroDrone MR4 - Getting Started Guide
A complete guide to help you get flying
Copyright Bask Industries 2017. All rights reserved. 1 / 31

Bask Aerospace
AeroDrone MR4 - Getting Started Guide
1. Introduction ................................................................................................... 3
2. Regulations ................................................................................................... 4
3. Preparing the Aircraft ................................................................................... 4
3.1. Batteries .................................................................................................... 4
3.1.1. Battery Safety ........................................................................................ 4
3.1.2. Battery Charging .................................................................................... 4
3.2. Folding and Unfolding ................................................................................. 6
3.3. Installing Antennas ..................................................................................... 7
3.4. Propellers .................................................................................................. 8
4. Operating the Aircraft................................................................................... 9
4.1. Remote Controller ...................................................................................... 9
4.2. Flight Modes ............................................................................................ 20
4.3. Failsafe Systems ...................................................................................... 22
4.3.1. RC Failsafe ......................................................................................... 22
4.3.2. Battery Failsafe .................................................................................... 23
4.4. Status LED .............................................................................................. 23
4.5. Ground Control Software .......................................................................... 24
5. Flying the Aircraft ....................................................................................... 25
5.1. Pre-flight .................................................................................................. 25
5.1.1. Powering the Aircraft ............................................................................. 25
5.1.2. Arming the Aircraft ................................................................................ 26
5.2. Post-flight................................................................................................. 28
5.2.1. Disarming the Aircraft............................................................................ 28
6. Maintaining the Aircraft.............................................................................. 29
Copyright Bask Industries 2017. All rights reserved. 2 / 31

Bask Aerospace
AeroDrone MR4 - Getting Started Guide
1. Introduction
Welcome to the AeroDrone MR4 Mk4 Getting Started Guide. Here you’ll be able to find out everything you need
to know in order to fly your system safely.
Although this system is easy to use, it does have a number of advanced features that require your complete
understanding to operate the vehicle safely and within regulations. We encourage you to read through this entire
guide before trying to fly, so that you have a solid understanding of these features and their operation. It’s also a
good idea to download or print this guide and have it with you when flying, in case you need to refer to it at any
stage.
Reading this Guide
When reading through this document you’ll notice different coloured callouts that provide additional information;
NOTE or REFERENCE
These provide additional information that will be useful to read or point you to a section of the document that is
relevant to what you’re reading.
HINTS and TIPS
These are worth reading to understand a topic further, and maybe even save some time.
IMPORTANT MESSAGE
Please read and understand each of these messages before moving on. If there’s something you don’t
understand please contact us for clarification.
WARNING
Warnings are vitally important to your safety and the safety of others. Please read and follow them carefully
before completing any steps associated with them.
Downloading/Printing this Guide
You can download and print a copy of this guide by clicking the download PDF icon at the top of the
page.
If you download or print this guide, please remember to regularly check back to this online guide to make sure
Copyright Bask Industries 2017. All rights reserved. 3 / 31

Bask Aerospace
AeroDrone MR4 - Getting Started Guide
there hasn’t been any updates or changes made since you downloaded/printed the guide.
2. Regulations
Most countries have regulations in place that govern the safe use of drones. These regulations are in place to not
only ensure your safety, but the safety of other; aircraft, people, and property on the ground. It’s very important
that you understand your countries local laws and regulations regarding the use of drones.
Australia
In Australia, the Civil Aviation Safety Authority (CASA) is the organisation empowered by the Civil Aviation Act to
develop and enforce these safety rules and regulations. Most people find the regulations difficult to read and
interpret. As a result, CASA have released an eLearning Guide that helps determine what rules apply to you and
explains the regulations in plain English.
There are many different names or terminology for drones. CASA uses Remotely Piloted Aircraft, or RPA for
short. So wherever you see the term RPA, you know they’re just talking about drones.
For further information on the Australian rules and regulations around drones you can visit the CASA RPA website
.
There is also a range of other great resources available about flying safely, following regulations and being a
responsible pilot. The Australian Association of Unmanned Systems (AAUS) website is great and has some really
useful information about all of these topics.
3. Preparing the Aircraft
3.1. Batteries
3.1.1. Battery Safety
LiPo batteries can be dangerous and care must be taken when charging and handling.
For further information, please download these two documents:
Bask Aerospace Li-Po Material Safety Data Sheet
Bask Aerospace How To Safely Handle Li-Po Batteries
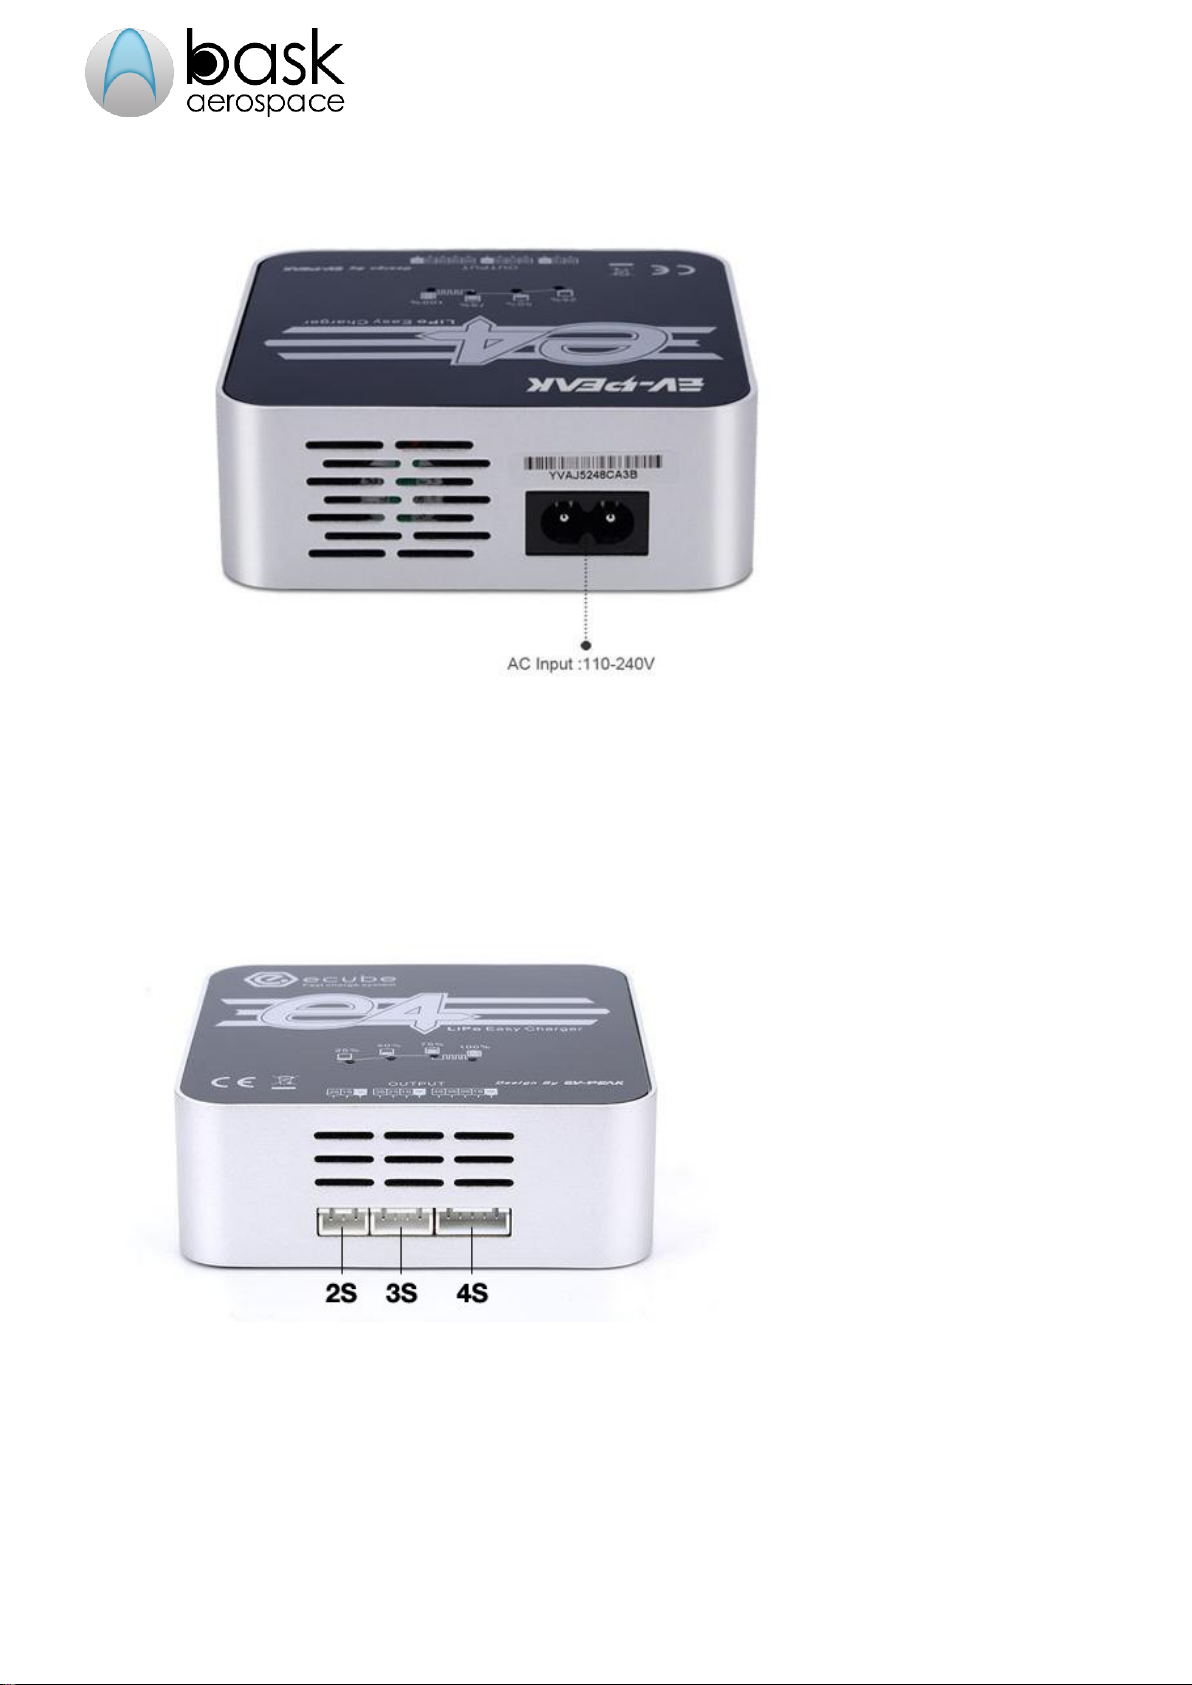
3.1.2. Battery Charging
The E4CUBE charger is very simple to setup and easy to use. To charge your battery simply plug the included AC
cable into the back of the charger and then into a 240v power point.
Copyright Bask Industries 2017. All rights reserved. 4 / 31
Bask Aerospace
AeroDrone MR4 - Getting Started Guide
Wait for the blue LED indicator lights on the top of the charger to flash alternatively. Then connect the battery’s
balance terminal into the correct port on the front of the E4CUBE charger. You should have either a 3S or 4S
battery (3-cell or 4-cell) so the 2S port will never be used. The battery balance connector will only fit into one of
the charge ports and it will also only go in one way, so do not force the plug into the charge port otherwise you
may cause damage to both the battery and charger.
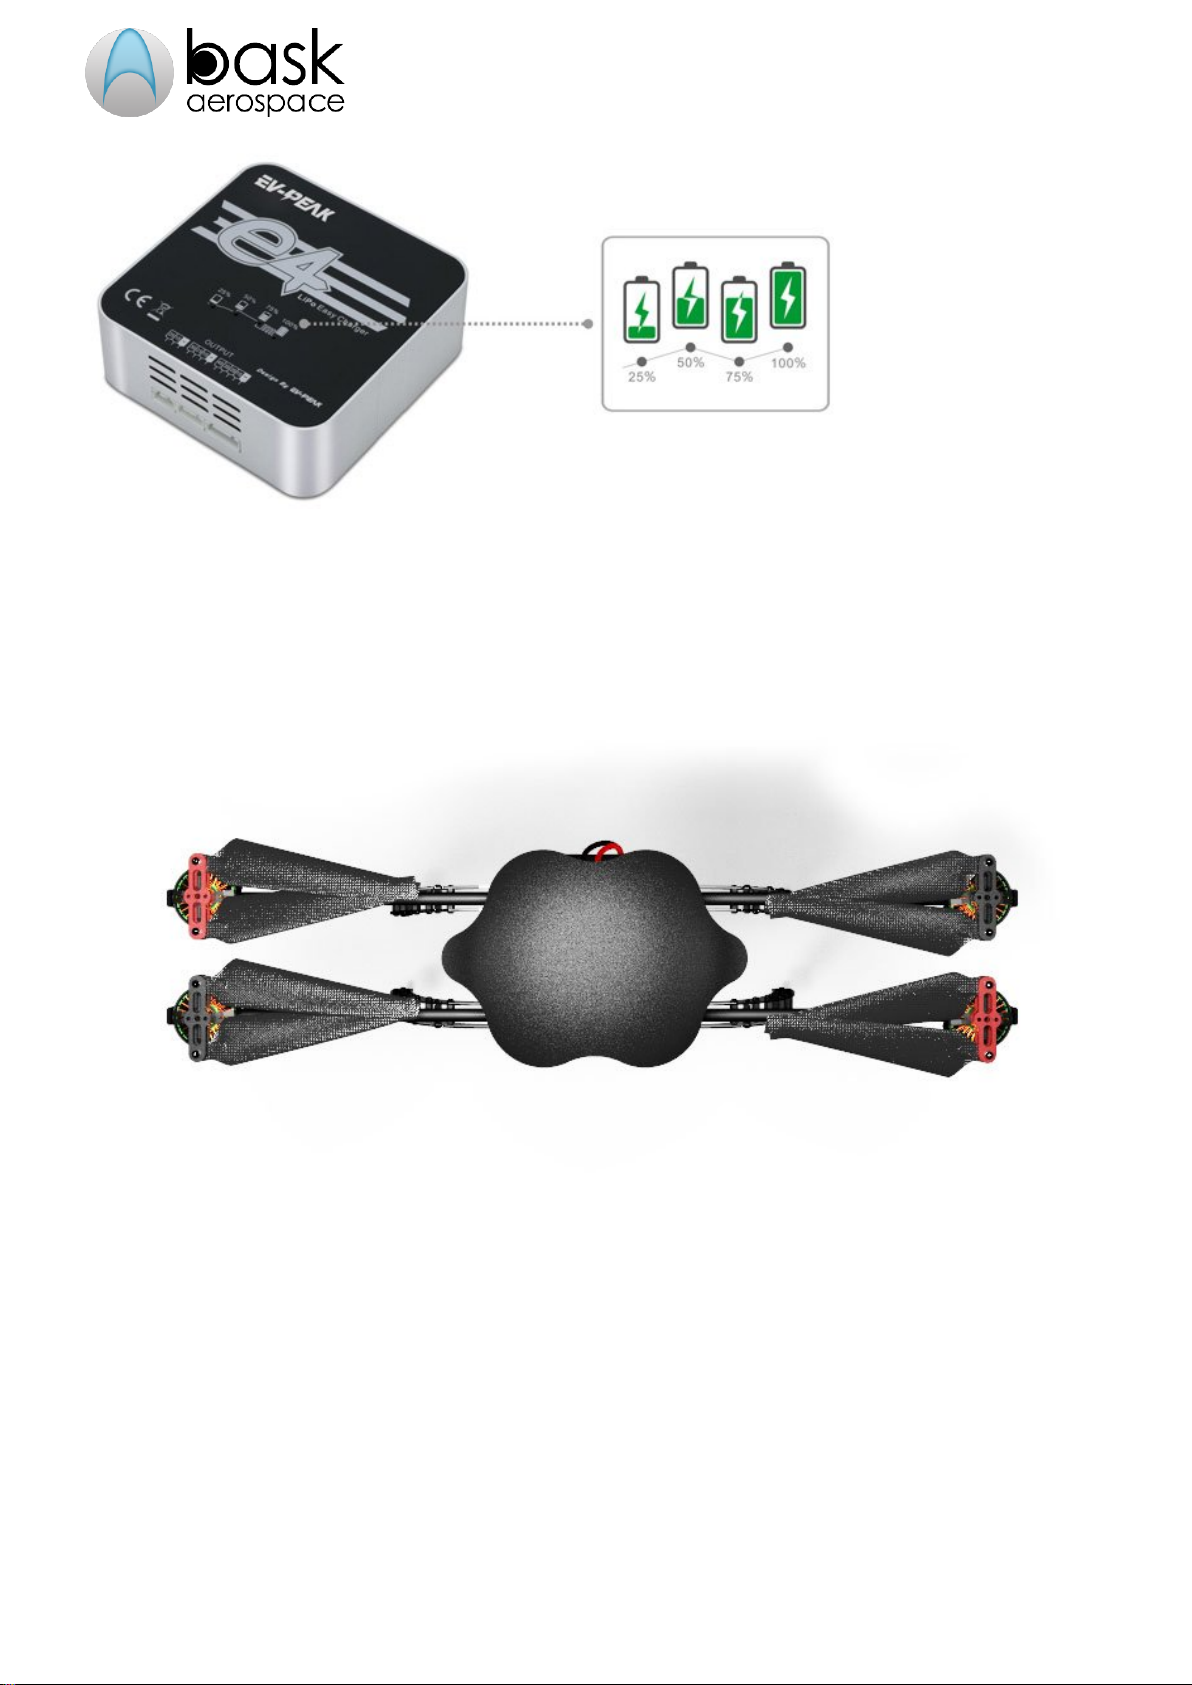
When you’ve plugged the battery into the correct charge port, the blue LED indicator lights on the top of the
charger will show the charge progress of the battery. Once the battery is fully charged the blue LED indicator
lights will all remain on solid.
Copyright Bask Industries 2017. All rights reserved. 5 / 31
Bask Aerospace
AeroDrone MR4 - Getting Started Guide
When using a LiPo battery for the first time you may not get the full rated capacity (and therefore flightime) that
you expect. New LiPo batteries need to be cycled several times before reaching their full capacity potential.
3.2. Folding and Unfolding
The first thing you’ll notice is that the aircraft comes with the arms folded, for easy storage and transportation.
Unfolding
To unfold the aircraft, simply follow these steps;
1. Remove the main cover by unclipping each of the four black o-rings holding it down to the arms.
2. Partially loosen the eight white thumb screws (four on top and four underneath the aircraft) so that the
washer underneath the thumbscrew clears the plate. There’s no need to undo the thumbscrews all the
way as unfolding will occur without them being completely removed.
3. Once the washer is clear of the plate, fold each arm outwards by 45 degrees so that the aircraft now forms
an “X” shape.
4. Tighten each thumb screw again, being careful to ensure the washer fits down into the circular cutout in
the plate. Once tight, the washer and thumb screw ensures the arm will not fold inwards during flight.
Copyright Bask Industries 2017. All rights reserved. 6 / 31

Bask Aerospace
AeroDrone MR4 - Getting Started Guide
Folding
To fold the aircraft for storage or transport simply reverse the steps you completed to unfold the aircraft.
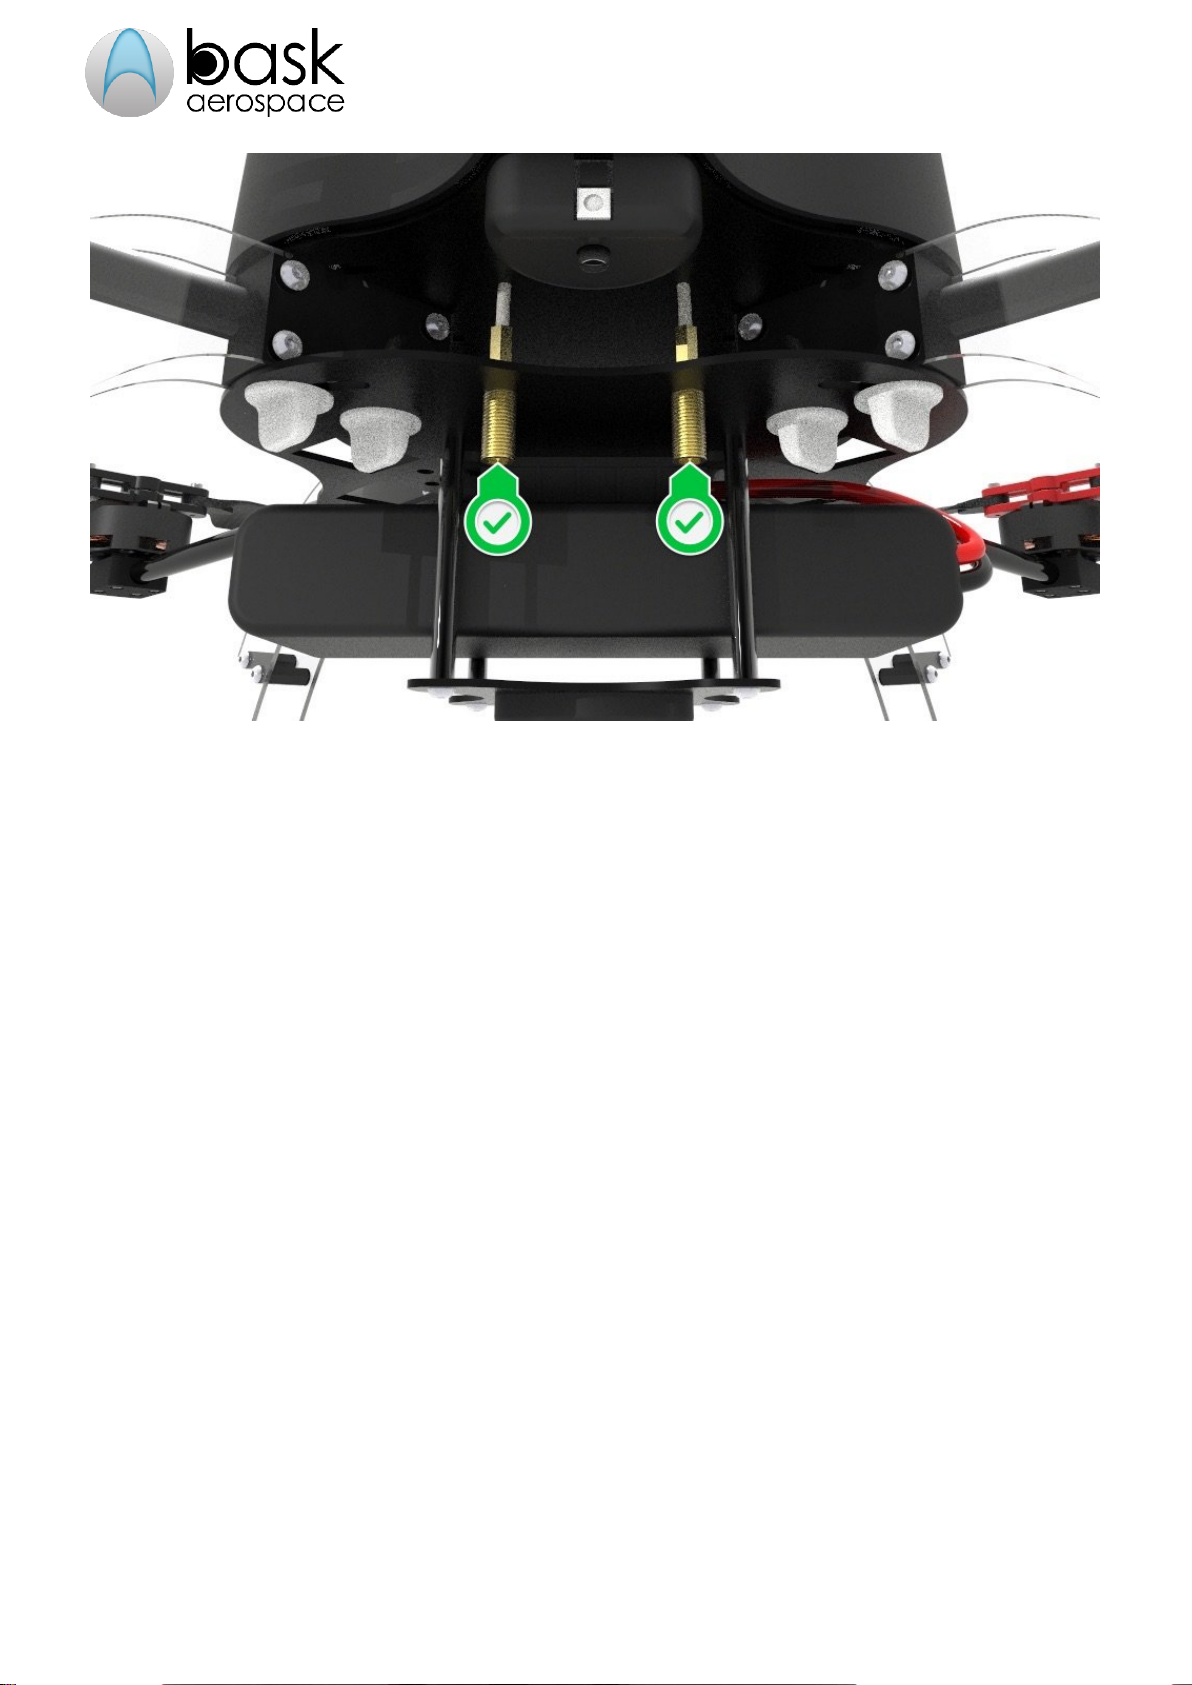
3.3. Installing Antennas
Before powering the aircraft you need to install the telemetry antennas.
Powering the aircraft without antennas can cause damage to the telemetry module.
To install the antennas simply screw each antenna on to the bulkhead connector on the bottom of the drone.
To achieve the best performance (ie. range) from the telemetry system, one antenna should be as horizontal as
possible and the other should be as vertical as possible. This is also known as horizontal and vertical polarisation.
Copyright Bask Industries 2017. All rights reserved. 7 / 31
Bask Aerospace
AeroDrone MR4 - Getting Started Guide
3.4. Propellers
The aircraft comes with folding propellers. They’re simple to use and easy to fold for storage or transport.
The propellers need to be loose enough to swing into place when the motor turns. Do NOT overtighten!
Copyright Bask Industries 2017. All rights reserved. 8 / 31

Bask Aerospace
AeroDrone MR4 - Getting Started Guide
Video
https://baskaerospace.com.au/wp-content/uploads/2017/06/Folding-Propeller.mp4
4. Operating the Aircraft
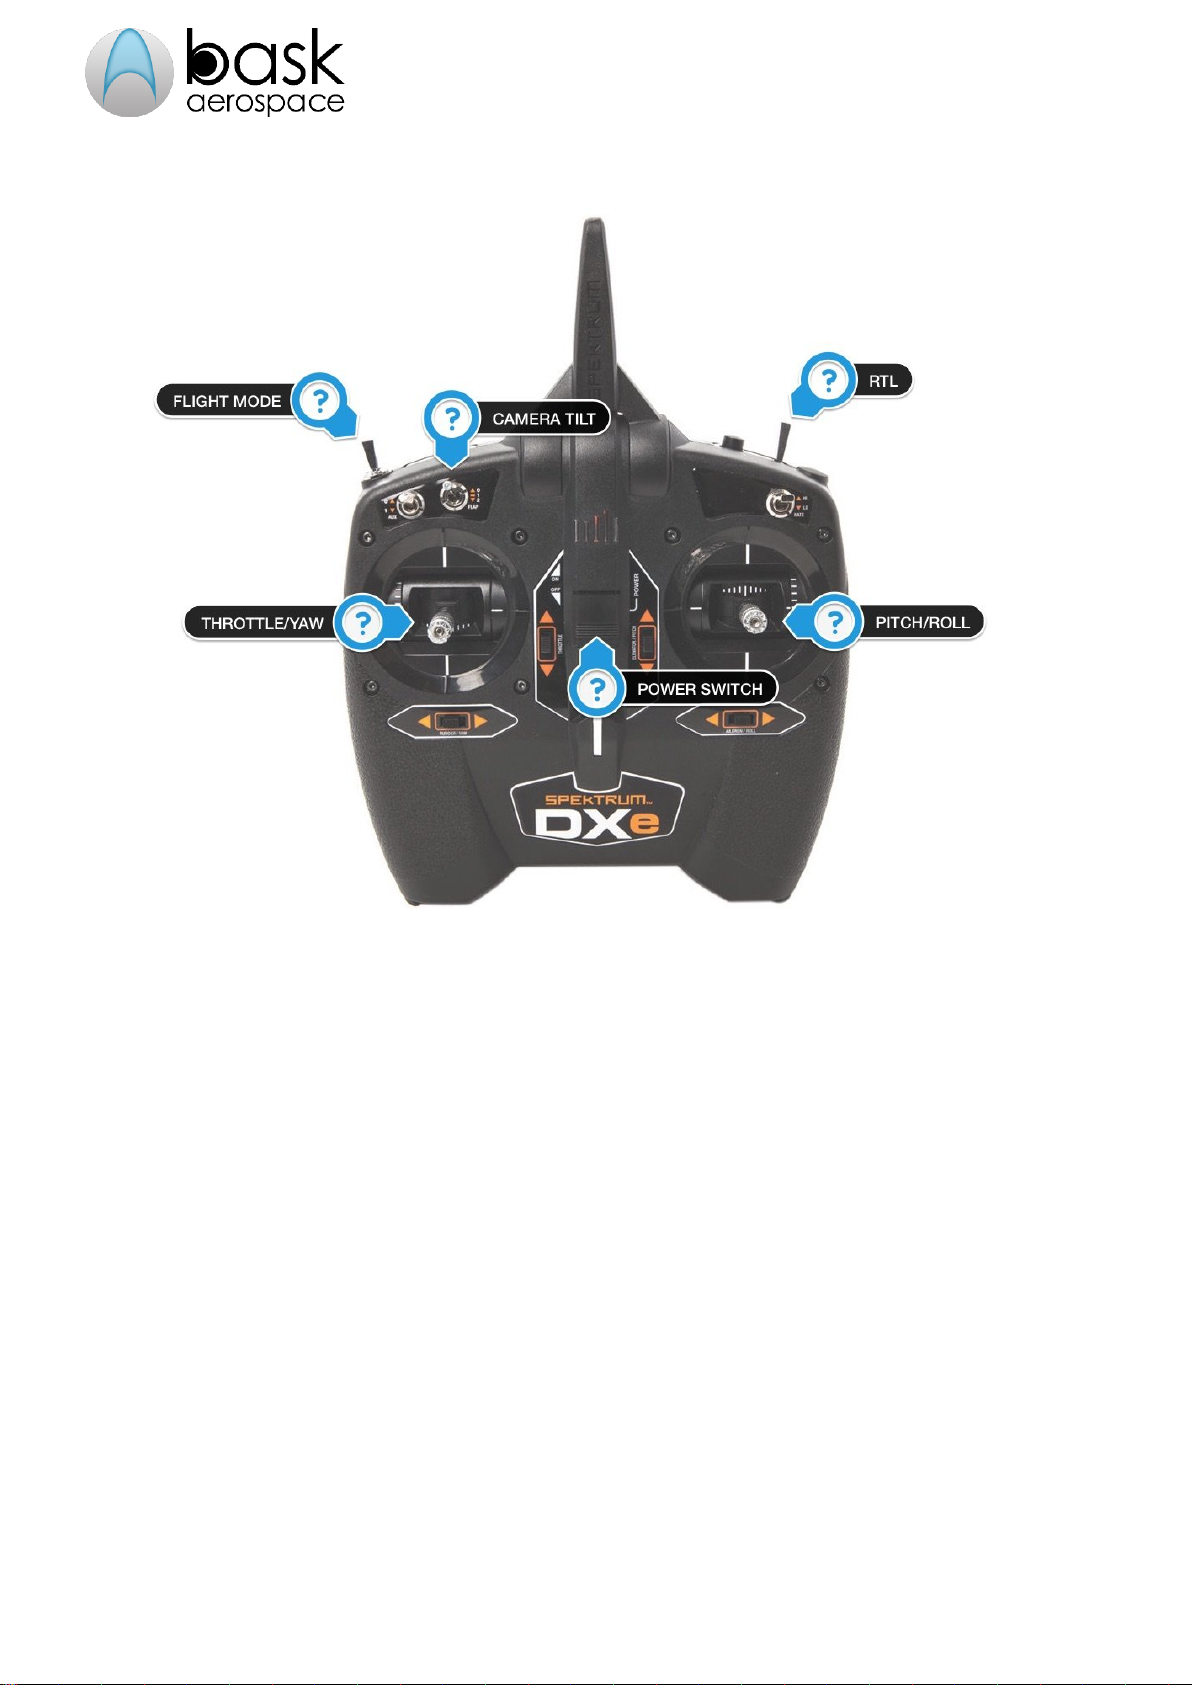
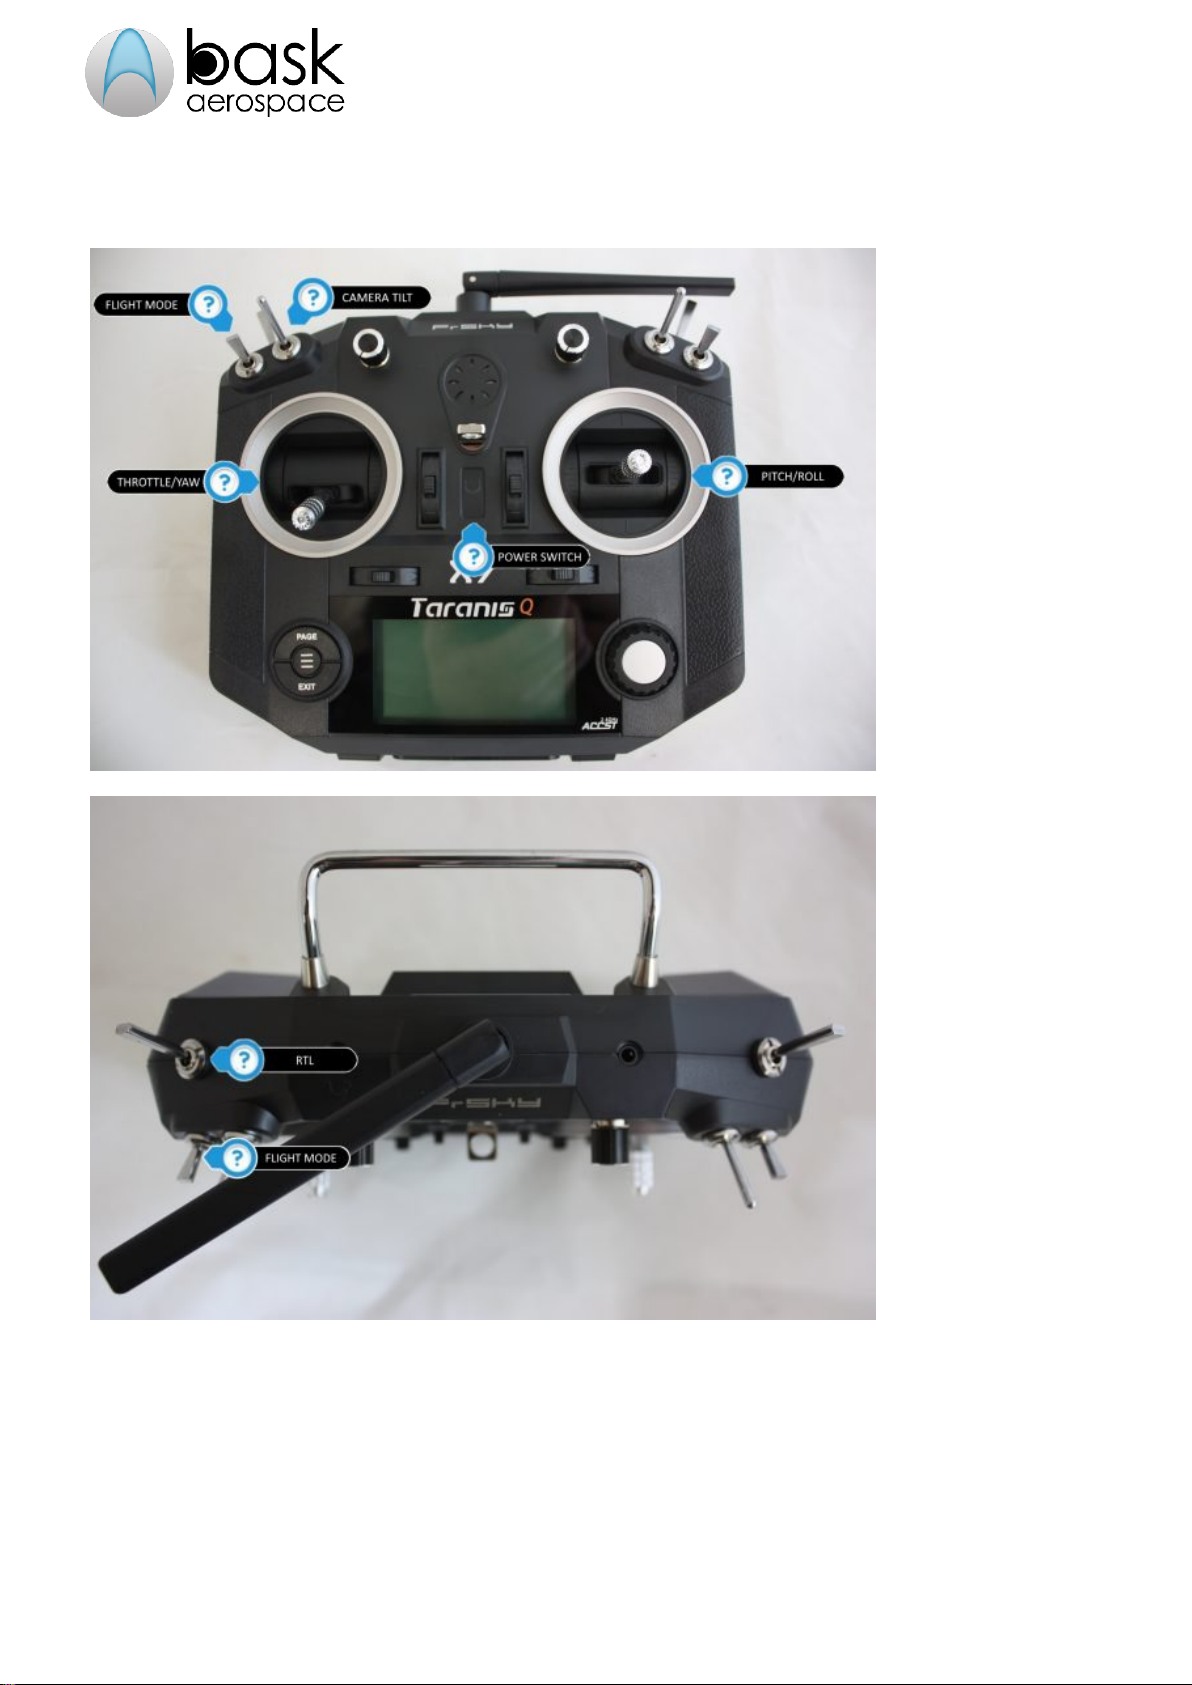
4.1. Remote Controller
The Remote Controller (also known as RC Controller or RC Transmitter) is the most direct way to control your
aircraft. Even though it’s possible to fly the aircraft without using the Remote Controller, we always recommend
you have it close by, ready to use should the need occur.
Below is a diagram of the Remote Controller stick and switch functions;
Spectrum DXe
Copyright Bask Industries 2017. All rights reserved. 9 / 31
Bask Aerospace
AeroDrone MR4 - Getting Started Guide
Copyright Bask Industries 2017. All rights reserved. 10 / 31

Bask Aerospace
AeroDrone MR4 - Getting Started Guide
Copyright Bask Industries 2017. All rights reserved. 11 / 31
Bask Aerospace
AeroDrone MR4 - Getting Started Guide
Fr Sky Qx7
Power Switch
The power switch simply allows you to power up the Remote Controller when you’re ready to begin flying. For the
Spectrum DXe controller, simply slide the switch up, whilst for the Fr Sky Qx7 controller press and hold until the
display screen shows the Bask Aerospace logo.
Copyright Bask Industries 2017. All rights reserved. 12 / 31

Bask Aerospace
AeroDrone MR4 - Getting Started Guide
There’s also a battery status indicator on the front of the Spectrum DXe controller. When the batteries are low,
the battery status indicator will go red. When this happens, all flying should be ceased immediately and the
batteries should be replaced/recharged.
The Fr Sky Qx7 controller will show the battery status of the controller on the display screen during operation. An
alert will be given when the battery is nearing depletion and all flying should be ceased immediately and the
batteries should be replaced/recharged.
Throttle/Yaw stick
The Throttle and Yaw stick is a two-axis joystick. The throttle is controlled with the up/down movement of the stick
and the yaw is controlled with the left/right movement of the stick. You’ll notice that the yaw movement is spring
loaded, causing it to always spring back to the center. The throttle however, is not. This allows you to set the
throttle at different positions and remove your finger without the throttle changing. This is mostly useful in
automated/assisted flight modes.
WHAT IS THROTTLE?
The throttle is what controls the altitude of the aircraft or speed of the motors. It’s the primary control that allows
the aircraft to move up and down in the air.
Copyright Bask Industries 2017. All rights reserved. 13 / 31

Bask Aerospace
AeroDrone MR4 - Getting Started Guide
WHAT IS YAW?
Yaw is the rotation of an aircraft about its yaw-axis that causes a change in heading. This can be thought of as the
direction the front of the aircraft is pointing.
Pitch/Roll stick
The Pitch and Roll stick is also a two-axis joystick. It controls both the pitch (up/down movement) and roll
(left/right movement) of the aircraft. You’ll notice both sticks are spring loaded, causing them to always spring
back to the center.
WHAT IS PITCH?
Pitch is the angle of an aircraft about its pitch-axis that causes a forward/back change in the position of the
aircraft. This can be thought of as moving the aircraft forwards and backwards, just like a car.
WHAT IS ROLL?
Roll is the angle of an aircraft about its roll-axis that causes a left/right change in the position of the aircraft.
Flight Mode Switch
The flight mode switch allows you to command the aircraft to change between different modes. The switch has
three possible positions and is setup as follows;
Position 1 (Back) – Altitude Hold Mode
Position 2 (Middle) – Loiter Mode
Position 3 (Forward) – Auto Mode
The flight mode switch will be identifiable by either a yellow or green indicator over the switch stem.
Copyright Bask Industries 2017. All rights reserved. 14 / 31

Bask Aerospace
AeroDrone MR4 - Getting Started Guide
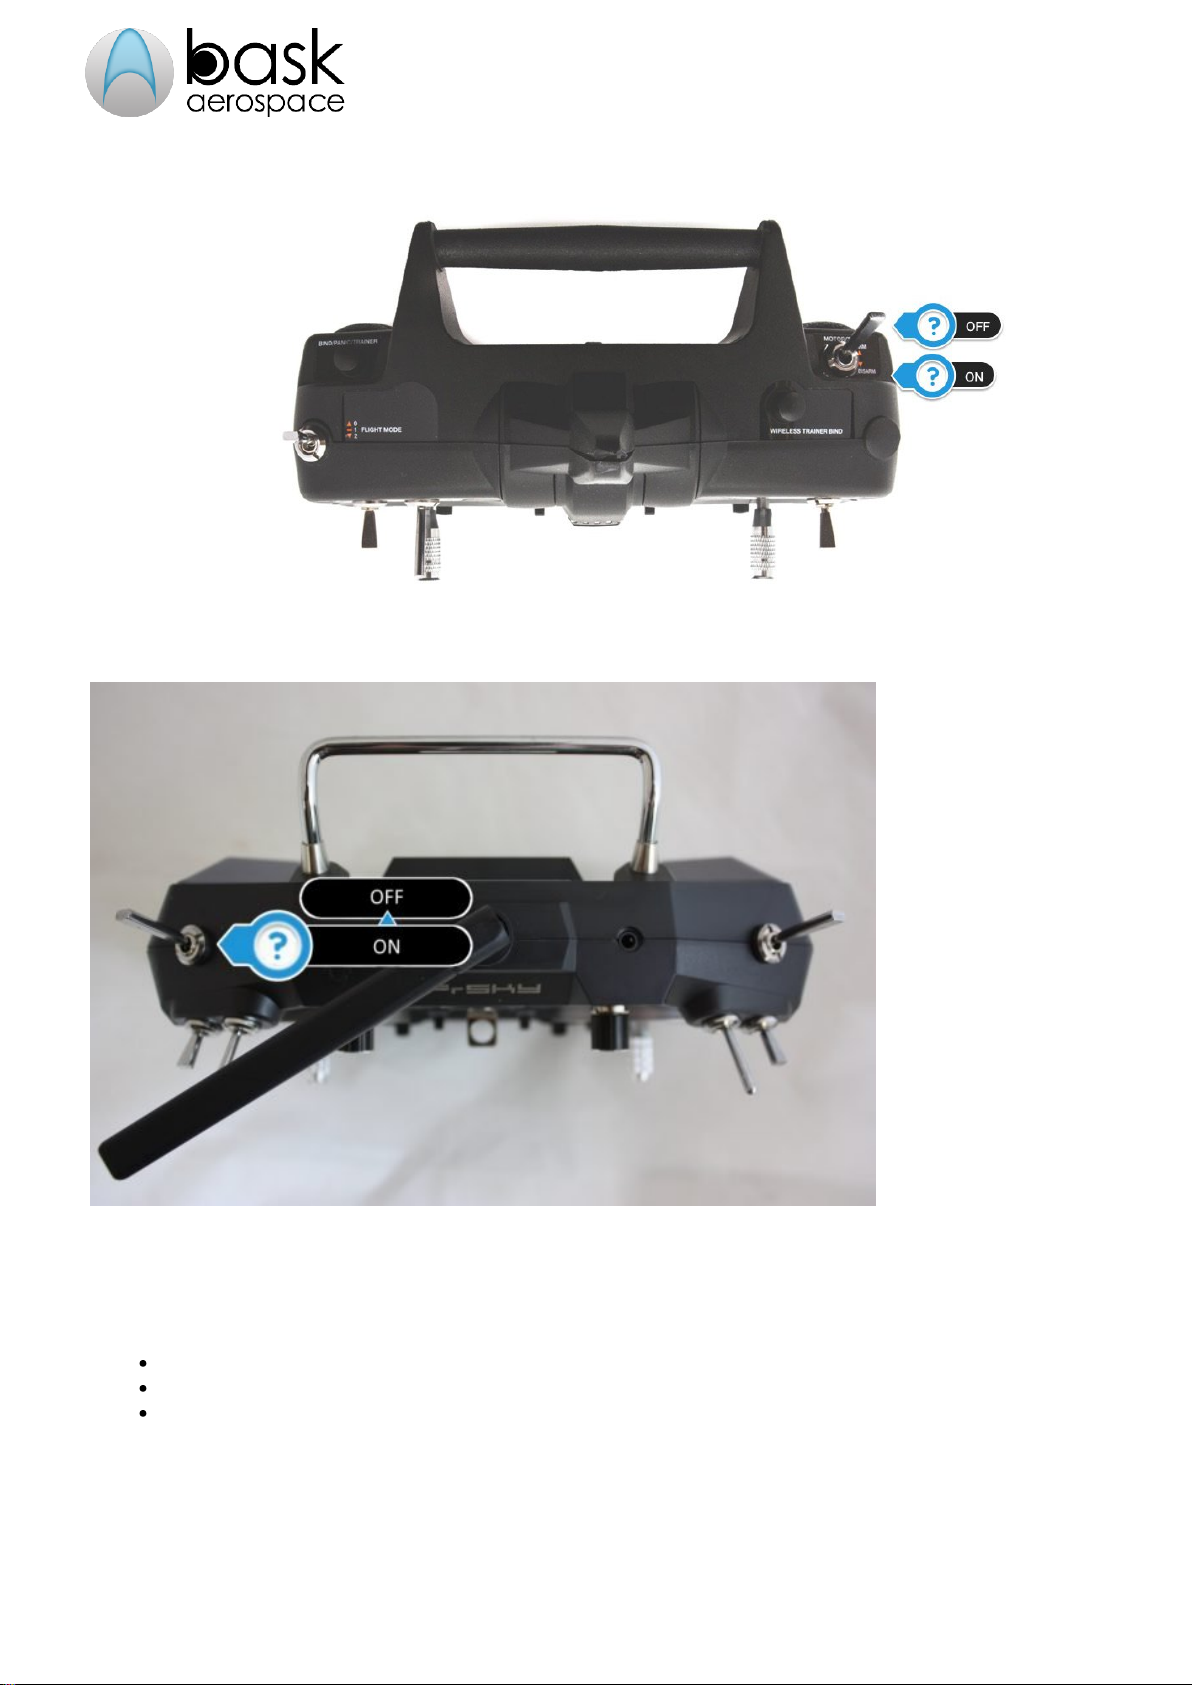
RTL (Return Home) Switch
The RTL switch allows you to activate the RTL (“return to home”) feature of the system. The switch has two
positions and is setup as follows;
Position 1 (Back) – RTL Off
Position 2 (Forward) – RTL On
The RTL switch will be identifiable by a red indicator over the switch stem.
Copyright Bask Industries 2017. All rights reserved. 15 / 31
Bask Aerospace
AeroDrone MR4 - Getting Started Guide
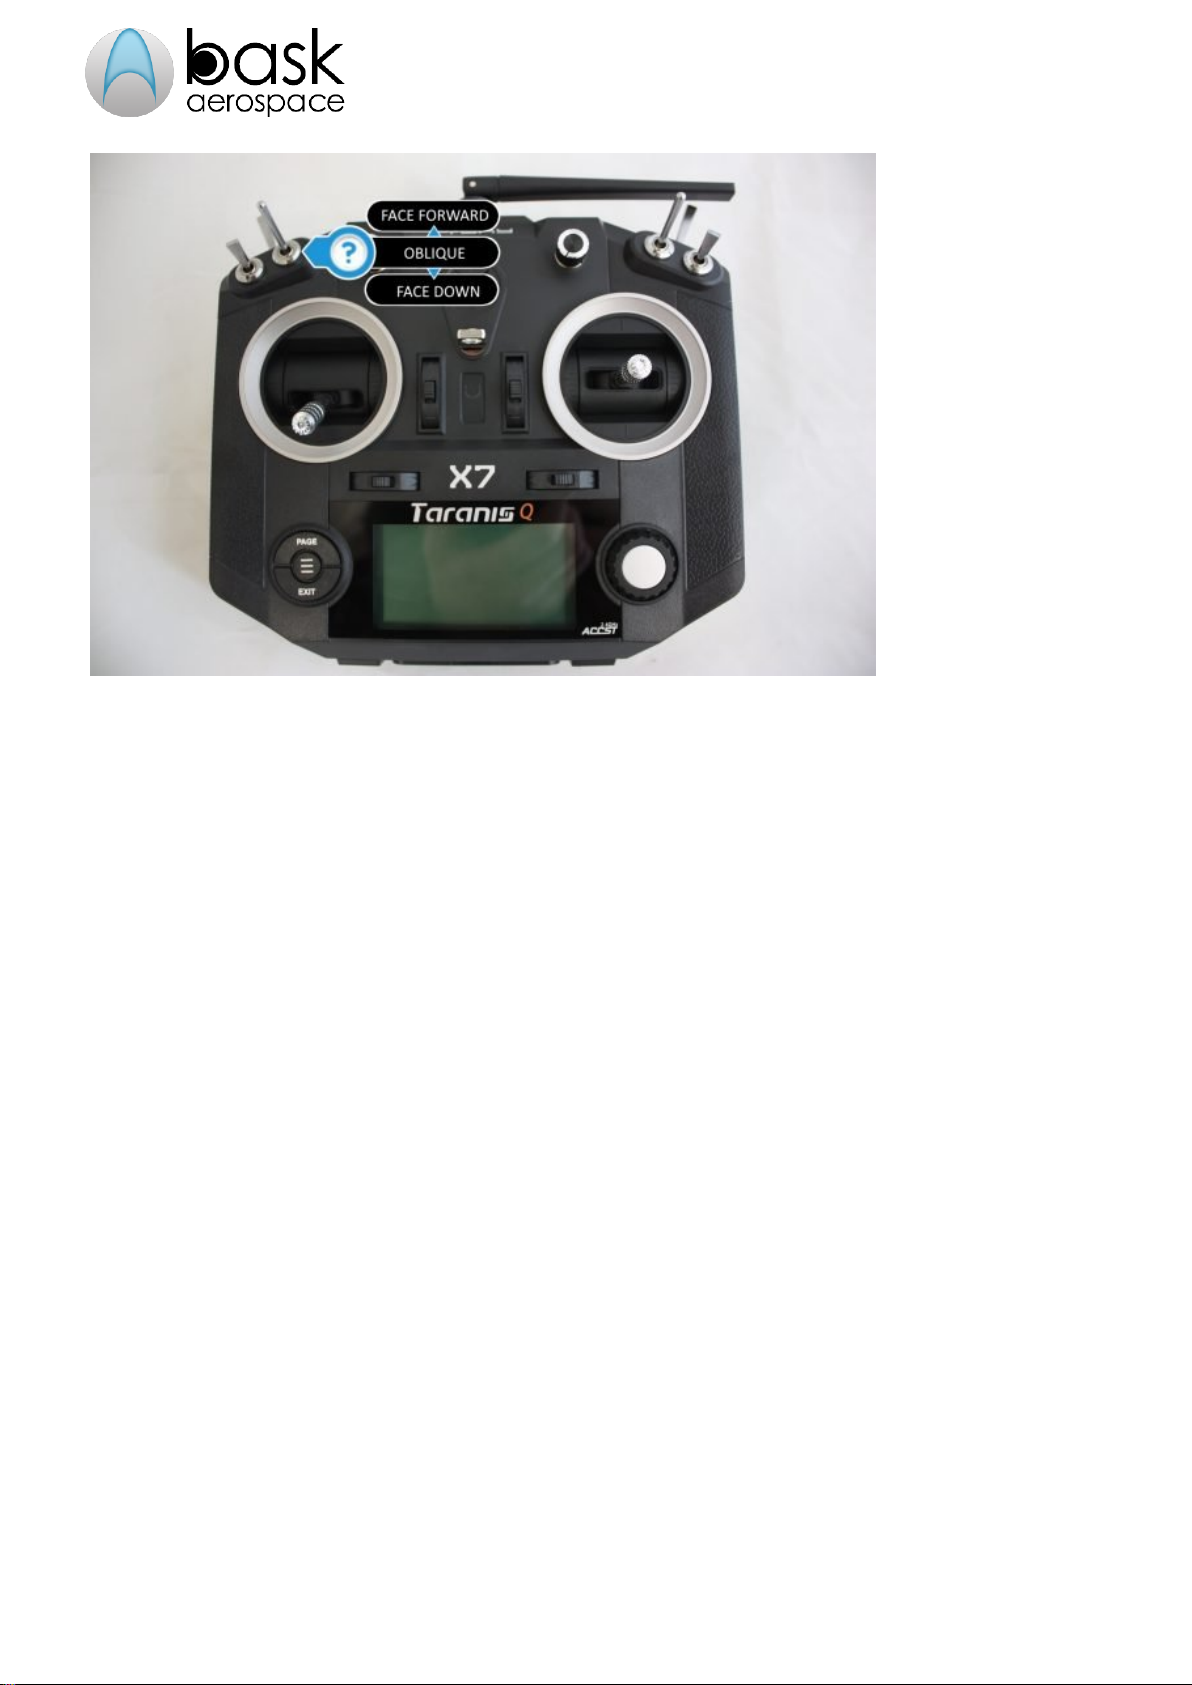
Camera Tilt Switch
The camera tilt switch allows you to set the camera to different angles. By default the camera should point
forward. The switch has three possible positions and is setup as follows;
Position 1 (Up) – Face Forward (0 deg)
Position 2 (Middle) – Oblique (45 deg)
Position 3 (Down) – Face Down (90 deg)
Copyright Bask Industries 2017. All rights reserved. 16 / 31

Bask Aerospace
AeroDrone MR4 - Getting Started Guide
Copyright Bask Industries 2017. All rights reserved. 17 / 31
Bask Aerospace
AeroDrone MR4 - Getting Started Guide
Position 1 and 2 are good for filming or capturing still images. Position 3 is best suited to mapping applications.
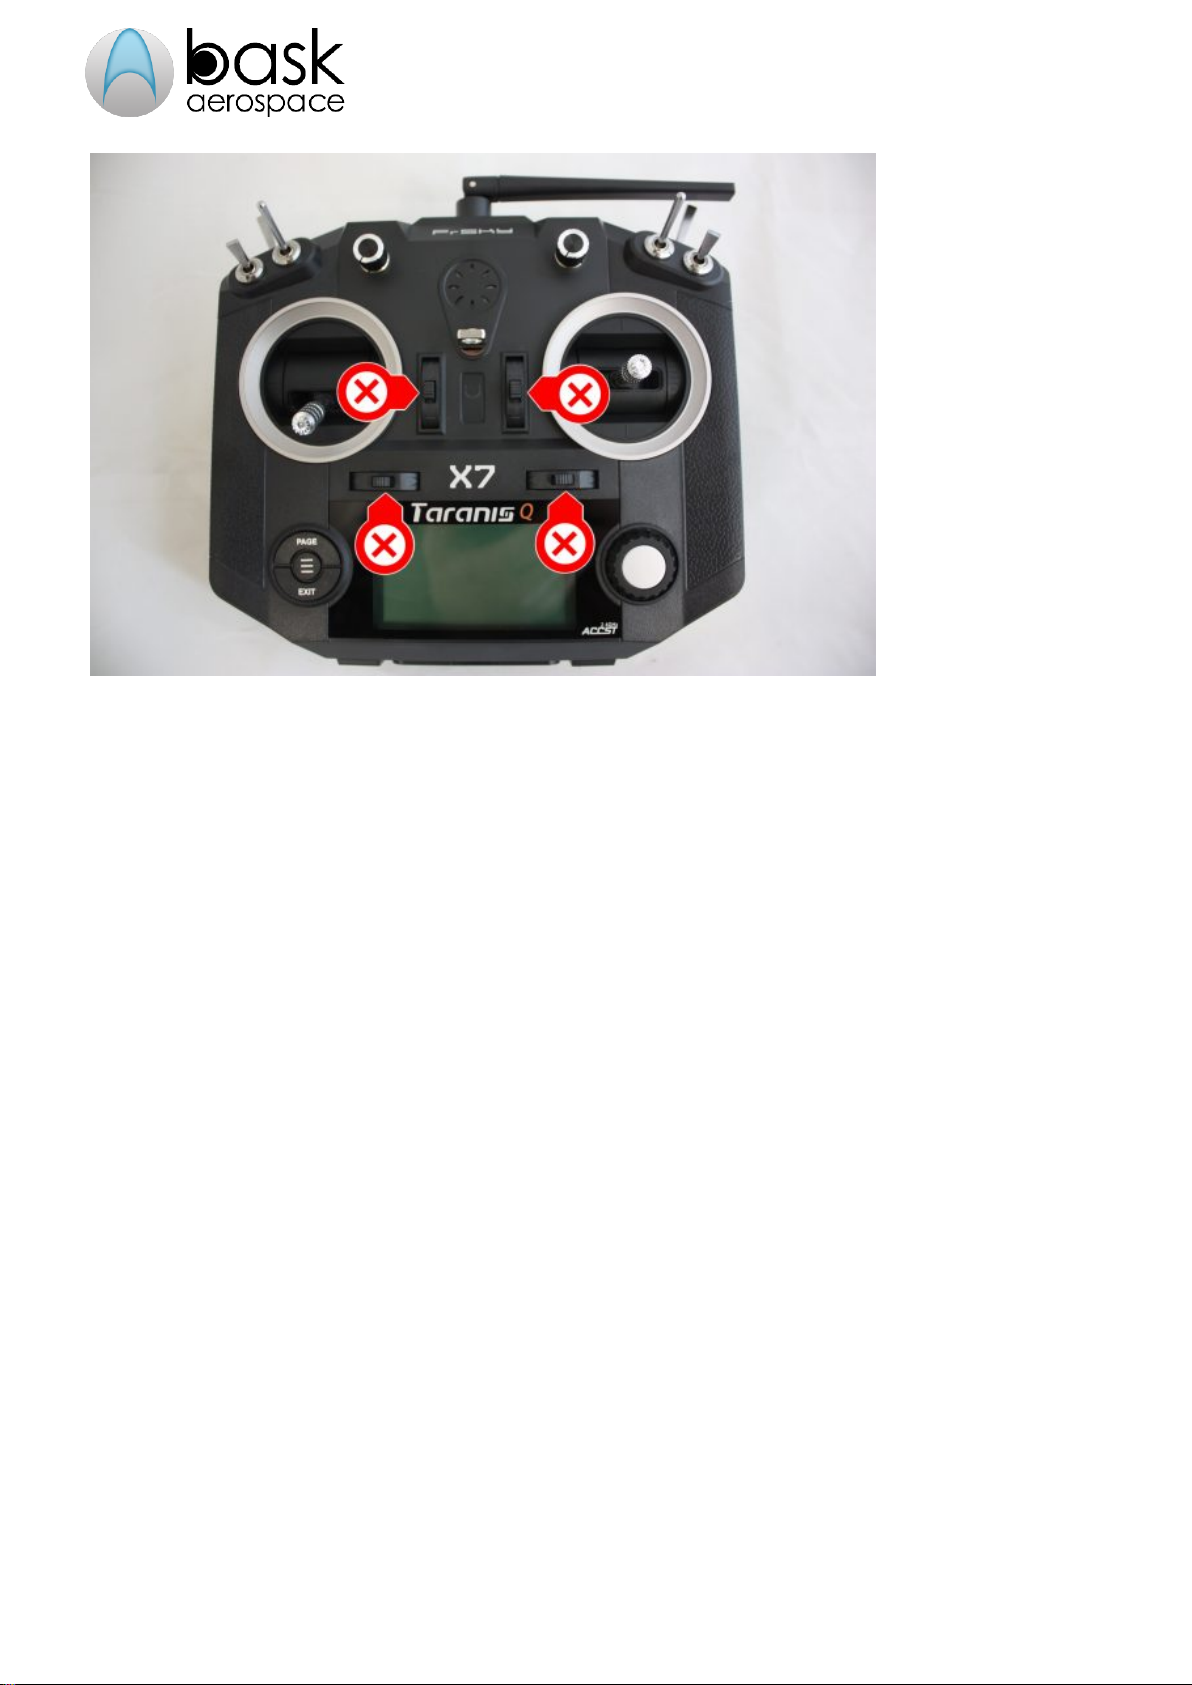
Trim Tabs
The trim tabs should never be used and should always be centered. If they’re not centered you risk crashing the
aircraft.
Copyright Bask Industries 2017. All rights reserved. 18 / 31

Bask Aerospace
AeroDrone MR4 - Getting Started Guide
Copyright Bask Industries 2017. All rights reserved. 19 / 31
Bask Aerospace
AeroDrone MR4 - Getting Started Guide
4.2. Flight Modes
For safe and normal operation, it’s important to understand that each flight mode requires all the aircraft’s
sensors and electronics to be working correctly. It’s imperative that you follow all the steps set out in this guide to
ensure the system is working correctly before flying.
This is especially true for the GPS, which has no redundancy and can be affected by a number of different factors.
Most of the flight modes will NOT work correctly if you have a bad GPS signal.
Altitude Hold Mode
Altitude Hold Mode means the aircraft will hold altitude without any pilot input and can be thought of as an
“assisted-manual” flight mode. With the throttle joystick centred in the “deadzone” the aircraft will maintain
altitude using the onboard barometer. However, as this mode is not GPS dependent the aircraft is not fixed in
position and is able to “drift” when both joysticks are centred.
It is recommended that the operator is able to fly the aircraft confidently in this mode in case of an emergency that
requires you to take manual control.
Moving the throttle stick up/down from the center “deadzone”, commands the aircraft to ascend/descend at a rate
proportional to the position of the stick from center. This means the more you raise the throttle stick above center
the faster the aircraft will climb, and conversely the more you lower the stick from center the faster the aircraft will
descend. The climb and descent rate is limited in this mode by the climb and descent speed settings, which can
be changed using your Ground Control Software. Moving the throttle back into the central “deadzone” at anytime
will cause the aircraft to maintain it’s current altitude.
Copyright Bask Industries 2017. All rights reserved. 20 / 31
Table of contents


