TTF AG T1 User manual
Agriculture Drone T1 User Manual
1 2018 TTF All Rights Reserved
AG Drone T1
User Manual
Shenzhen TitanFlying Technology Co., Ltd
www.titanflying.com

Agriculture Drone T1 User Manual
2 2018 TTF All Rights Reserved
△
! Information
The AG Drone T1 does not come with a battery. Please purchase the proper battery (please refer to salesmen’s advice). Read
the battery’s safety guidelines and take necessary precautions when handing to ensure your own safety. TTF assumes no
liability for damages or injuries incurred directly or indirectly from misusing batteries.
Using this Manual
Legend
△
! Important Hints and tips
Before Flight
The following manuals have been produced to help you get the most out of your AG Drone-T1.
1. In the Box
2. Disclaimer and Safety Guidelines
3. Quick Start Guide
4. User Manual
Refer to in the Box to check the listed parts, and read the Disclaimer and Safety Guidelines before flight. Refer to the Quick
Start Guide and the video tutorial on the official TTF website to complete assembly and to learn basic operation. Please refer
to the User Manual for more comprehensive information.
Watch the Tutorial Video
Please watch the tutorial video below or ask for it from salesman to how to install and use the AG Drone T1 correctly:
http://www.titanflying.com
Download Reference Software
All parameters all calibrated ready, users do not need to re-calibrate.
Download reference software from: http://www.titanflying.com
Or ask for it from salesman.

Agriculture Drone T1 User Manual
3 2018 TTF All Rights Reserved
Safety at a Glance
△
!
The T1 aircraft is NOT a toy and is not suitable for children under the age of 18.
Note that “Safety at a Glance” only provides a quick overview of the safety tips. Make sure you read and
understand the remaining sections of this document and the User Manual.
1Pesticide Usage
•Pesticides are poisonous and pose serious risks to human safety. Please use them in strict accordance with their specifications.
•Residue on the equipment caused by splashes or spills when pouring and mixing the pesticide can irritate you skin. Be sure to clean the
equipment after mixing.
•Use clean water to mix the pesticide to avoid blocking the strainer. Clear any blockages before using the equipment.
•Wear protective clothing to prevent direct body contact with the pesticide. Always rinse your hands and skin after handling pesticides. Clean
the aircraft and remote controller after applying the pesticide.
•Effective use of pesticides relies on pesticide density, spray rate, spray distance, aircraft speed, wind speed and wind direction. Consider all
factors when using pesticides, but NEVER compromise the safety of people, animals and the environment in doing so.
•DO NOT contaminate rivers and sources of drinking water.
•Avoid the use of powder pesticides as much as possible or else they may reduce the service life of the spraying system.
2Environmental considerations
•Always fly at locations that are clear of building and other obstacles.
•DO NOT fly above or near large crowds.
•Avoid flying at altitudes above 164feet(50m).
•Be very careful when flying over 6,560 feet (2,000) above sea level.
•Fly in moderate weather conditions with temperatures between 0℃-40℃.
•DO NOT operate any parts of the aircraft indoors.
3Pre-flight Checklist
•Remote controller and aircraft batteries are fully charged.
•Landing gear and spray tank are firmly in place.
•All screws are firmly tightened.
•Propellers and frame arms are unfolded, and arm sleeves are firmly tightened.
•Propellers are in good condition and firmly tightened.
•There is nothing obstructing the motors.
•Spraying system is without any blockage and works properly.
•Compass is calibrated at every new flight location.
4Operation
•Stay away from the rotating propellers and motors.
•The takeoff weight must not exceed 23.5 kg (taking off at sea level).
•Maintain a visual line of sight(VLOS) to your aircraft at all times.
•DO NOT use the Com bination Stick Command (CSC) or other methods to stop the motors when the aircraft is airborne unless in an
emergency situation.
•DO NOT answer incoming calls during flight.
•DO NOT fly under the influence of alcohol or drugs.
•During the Return-to-Home procedure, you can adjust the altitude to avoid obstacles.
Agriculture Drone T1 User Manual
4 2018 TTF All Rights Reserved
•In the instance of a Low Battery Warning, land the aircraft at a safe location.
•After landing, first stop the motors, then power off the aircraft, and then turn off the remote controller.
•Please maintain full control of the aircraft at all times and do not rely on the APP. Please keep the aircraft within your visual line of sight and
visually observe the flight. Please use your sound discretion to operate the aircraft and avoid obstacles timely and manually. It is important
to set an appropriate Failsafe and Return-to-Home altitude before each flight.
5Maintenance and Upkeep
•DO NOT use aged, chipped or broken propellers.
•Remove or empty the spray tank during transportation or when not in use to avoid damaging the landing gear.
•Recommended storage temperature(empty spray tank): between-20℃ and 40℃.
•Clean the aircraft every 100 flights or after flying for over 20 hours.
•For more maintenance guidelines, refer to the Product Care section in this document.
6Observe Local Laws and Regulations
•DO NOT fly any NO-FLY Zones.
•Avoid flying in areas where rescue teams are actively using the airspace.
△
!
1. Avoid flying over or near crowds, high voltage power lines or bodies of water.
2. Strong electromagnetic sources such as power line, base stations, and tall buildings may affect the
onboard compass. it is recommended to use RTK. Always stay alert about surroundings in flight.
3. DO NOT use the aircraft in adverse weather conditions such as rain (precipitation rate exceeding 25 mm
or 0.98 inches in 12 hours), wind speeds exceeding 8 m/s, fog, snow, and lightning.
4. Stay away from the rotating propellers and motors.
Items List
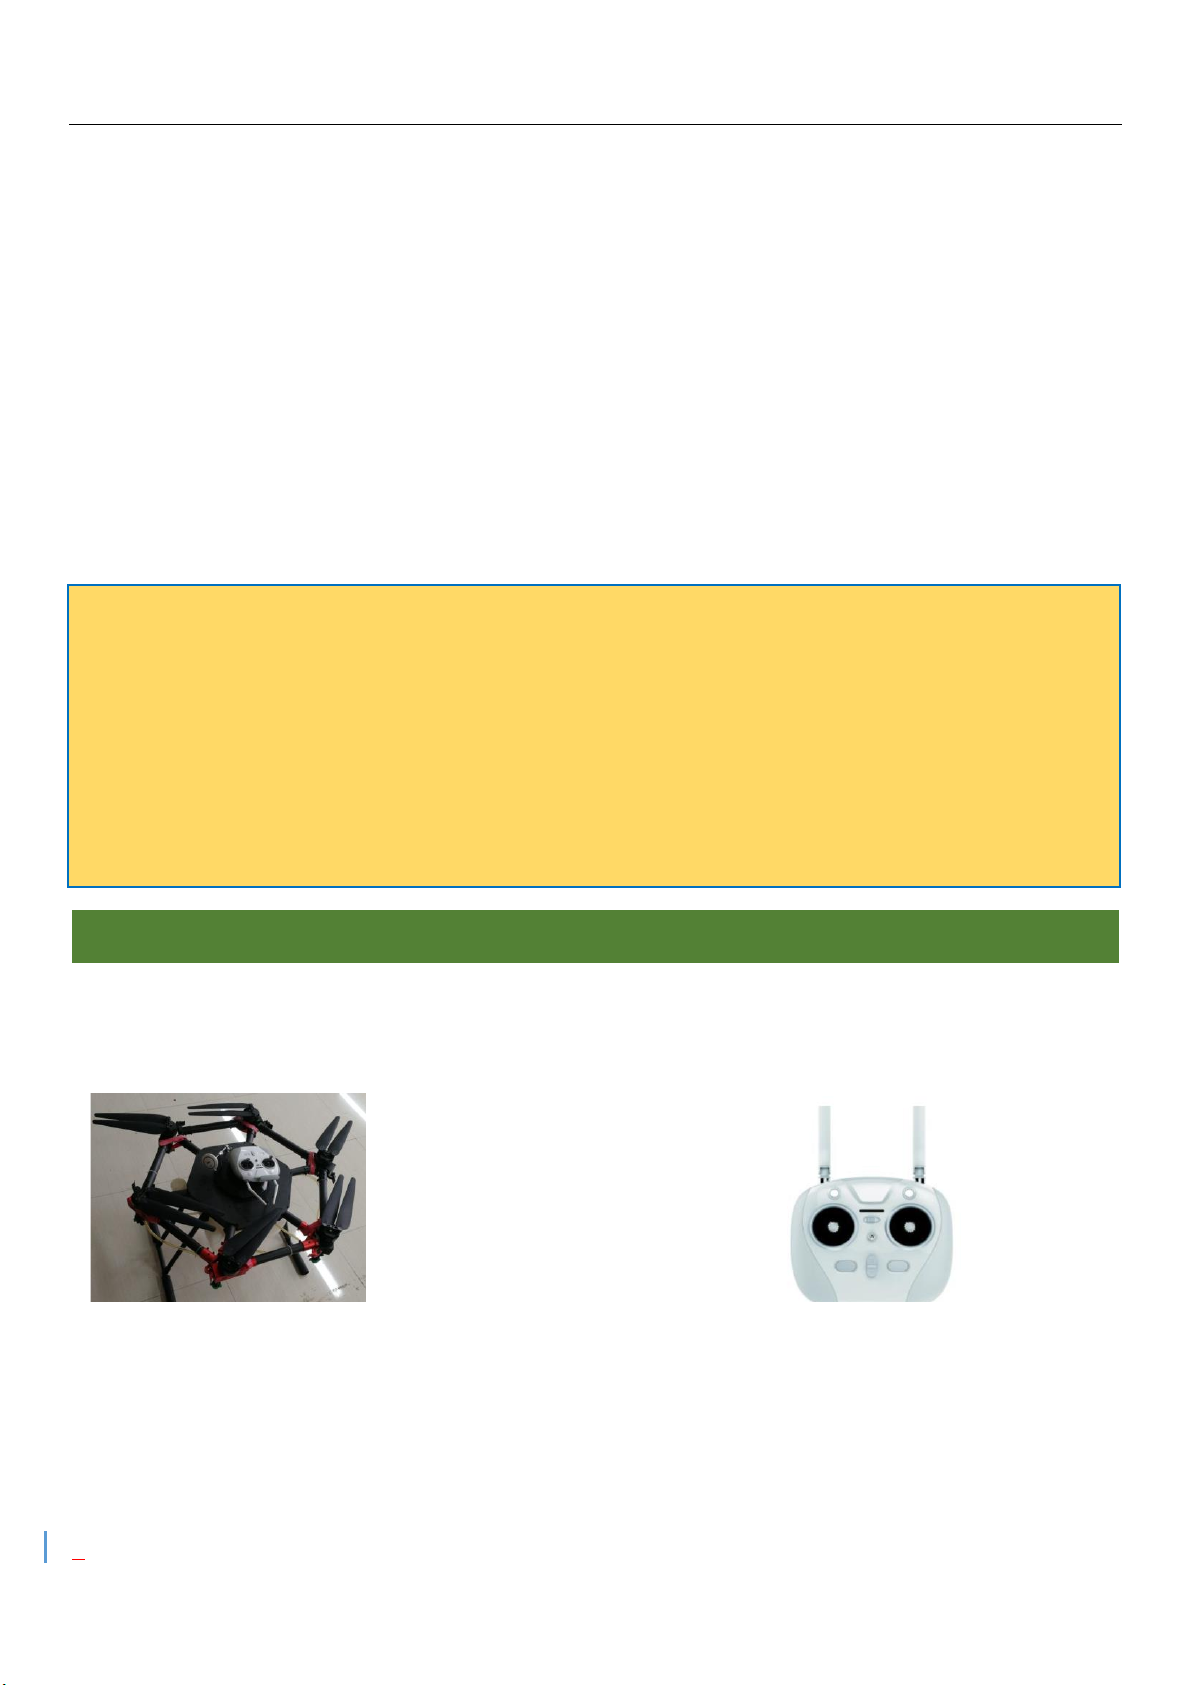
1. AG Drone T1 1PCS
2. Remote Controller 1PCS

Agriculture Drone T1 User Manual
5 2018 TTF All Rights Reserved
Content
Information
Using This Manual
Legend
Before Flight
Watch the Tutorial Video
Download Reference Software
Safety at a Glance
Profile
Introduction
Feature highlights
Parameter
Installation
Mounting the battery
Remote Controller
Profile
Using the Remote Controller
Remote Controller LEDs
Calibrating the Compass
Operation Procedure
Manual Operation Mode
AB Points Operation Mode
The APP
Lithium Battery Maintenance and Use
Aircraft LEDs
Disclaimer

Agriculture Drone T1 User Manual
6 2018 TTF All Rights Reserved
Aircraft Profile
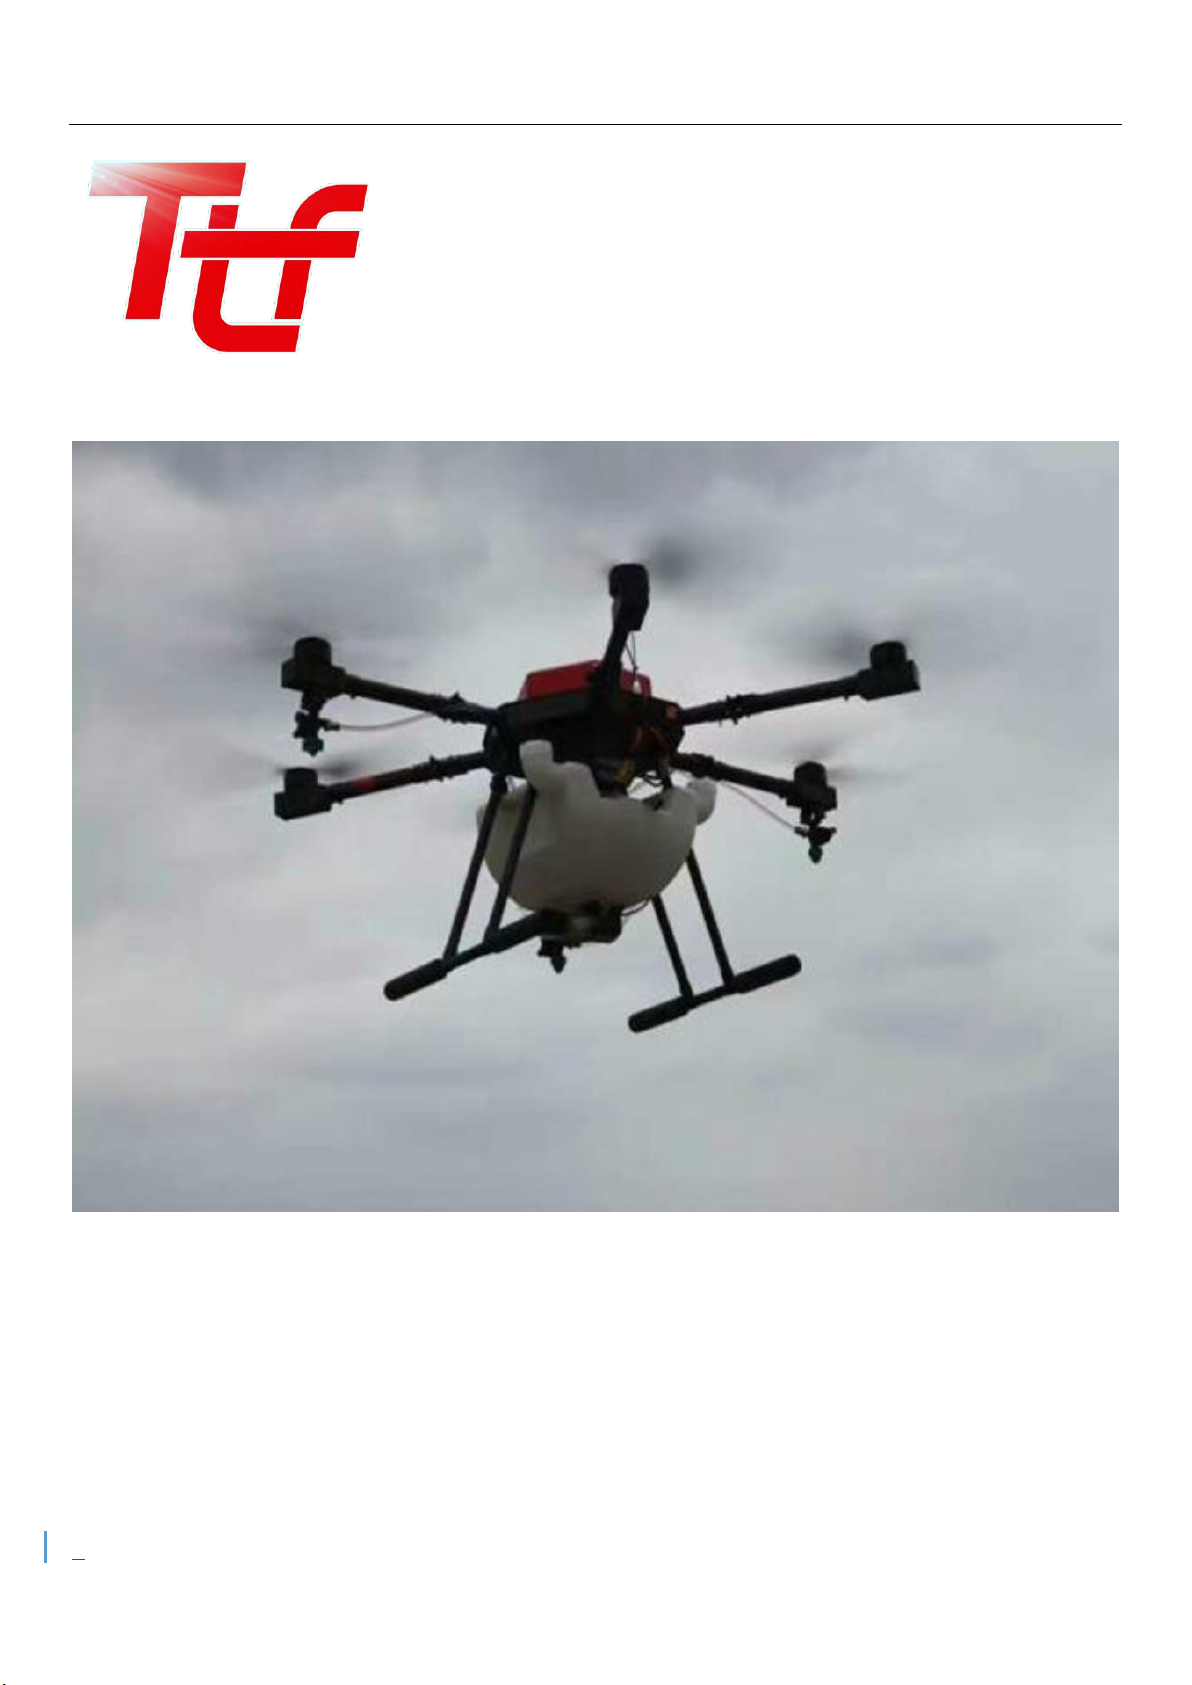
Introduction
T1 agriculture drone, specially designed for agricultural spraying, integrated advanced depth customization flight controller, efficient spray system,
portable folding fuselage and simple professional remote control to provide users with efficient, safe and convenient plant protection service.
Feature Highlights
Design Concept: not only to ensure the quality and reliability, but also to ensure the effect of spraying and flight endurance.
Product Features:
1. Imported nozzle from US, to ensure the atomization effect.
2. Foldable arm, more stable and more convenient to transport.
3. High-effective motors, low sound, low heat, fast response.
4. Imported Carbon fiber from Toray JP, with high intensity. Propeller made of Nylon carbon, which is more durable than traditional material.
5. Can be connected to Smart phone ground station. Real time broadcast, route planning, UAV data remind.
6. Varieties of operating modes, to adapt all kinds of terrain.
7. The uniting of the speed and flow makes spraying more accurate
Parameter
Dimension: 1300*1300*540 mm (arm unfolded, without propellers)
880*760*540 mm (arm folded, without propellers)
Total Weight: 9.5 kg(without battery) 23.5 kg(with battery, Full Loaded)
Standard Take-off Weight: 23.5 kg
Max Take-off Weight: 25 kg
Hovering Time: 10 min (23.5kg take-off weight) * 23 min (13.5kg take-off weight)*
Max Operating Speed: 8 m/s *
Liquid Tank Volume: 10 L
Number of Nozzle: 4
Spraying Span: 3.5-4 m
Max Spraying Speed: 1.6L /min
Max Transmission Range: 1000 m (Unobstructed, Free of Interference)**
Installation
The product is calibrated ready. Users only need to put the battery on. (Note: Please connect the wire from right to left, black-red-black-red.
When users uninstall the battery, disconnect the wire from left to right, red-black-red-black).
△
! PLEASE DO NOT CONNECT / DISCONNECT THE WIRE IN WRONG ORDER!
Agriculture Drone T1 User Manual
7 2018 TTF All Rights Reserved
Remote Controller
Profile
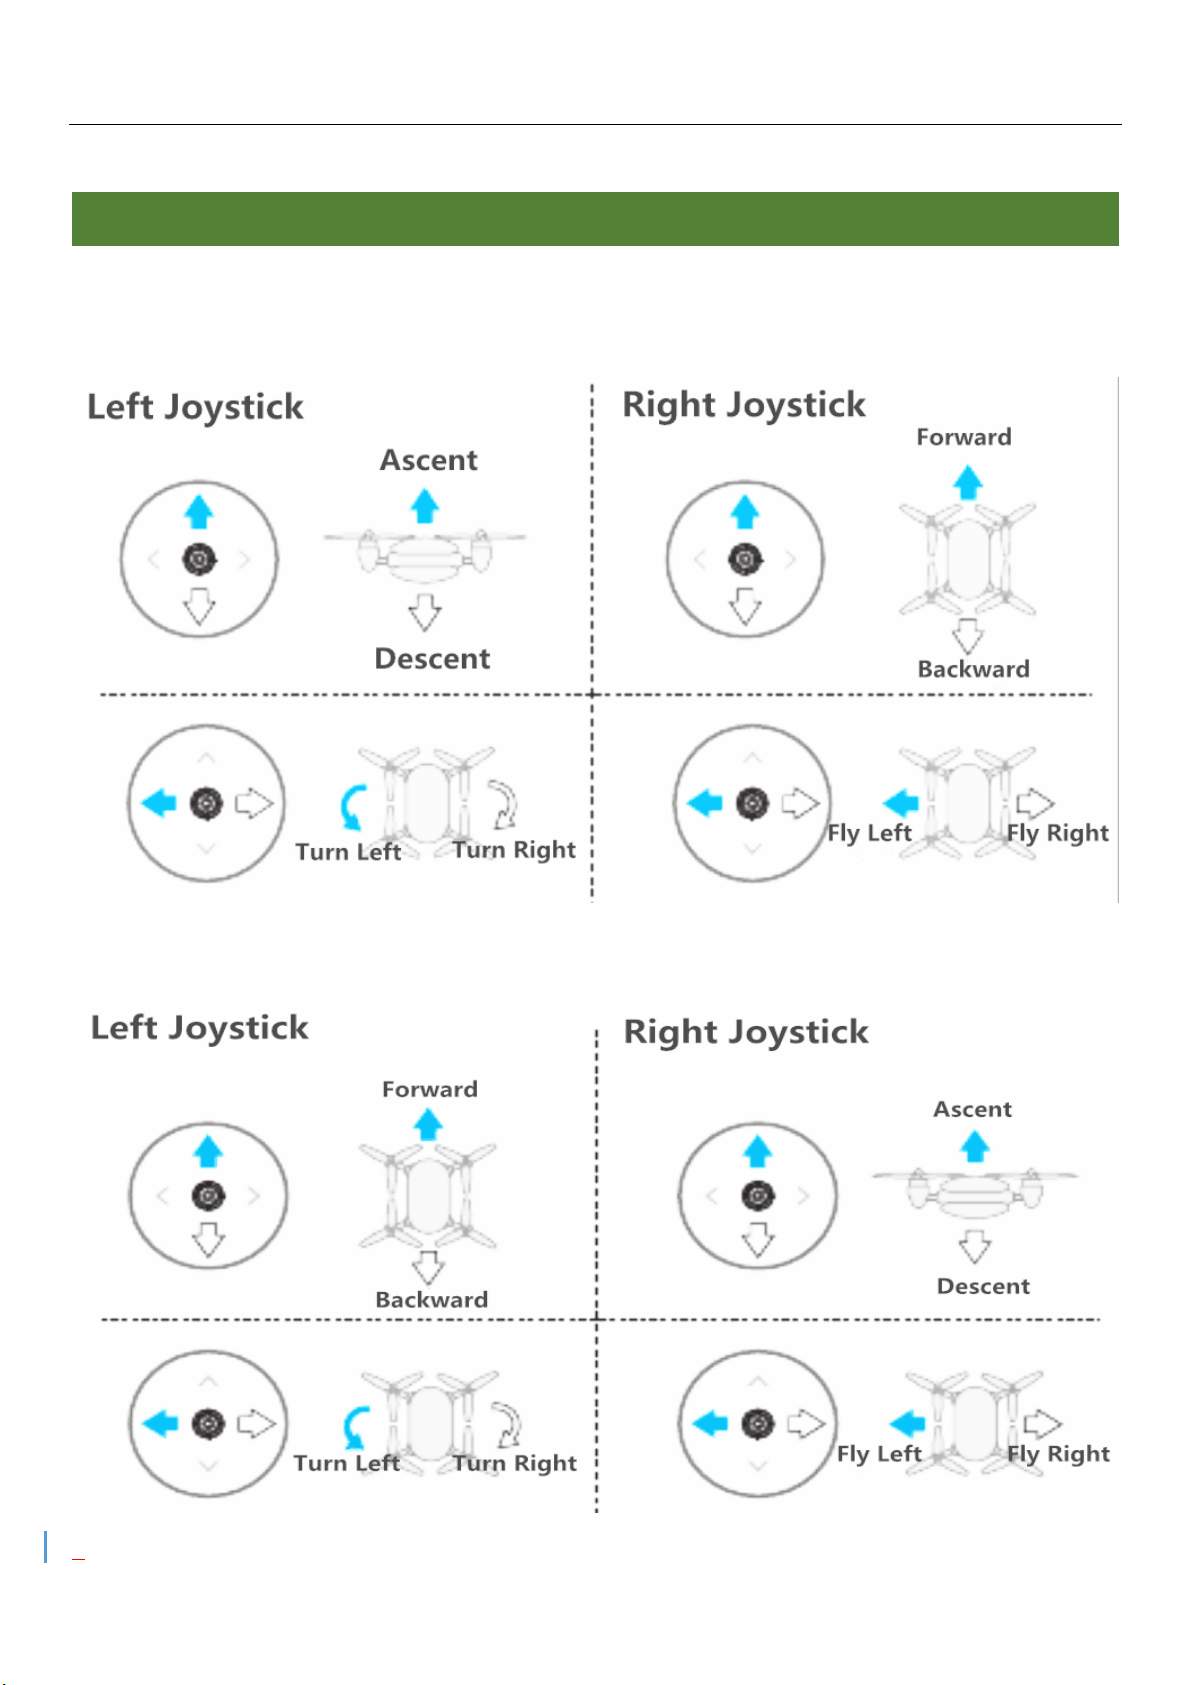
The aircraft remote control system operates at 2.4 GHz.
Stick mode can be set to Mode1, Mode2, our standard version is Mode1, please contact with TTF if you need Mode2 version, modification will
be completed before delivery.
Mode1 (American hand)
Mode2 (Japanese hand)
Agriculture Drone T1 User Manual
8 2018 TTF All Rights Reserved
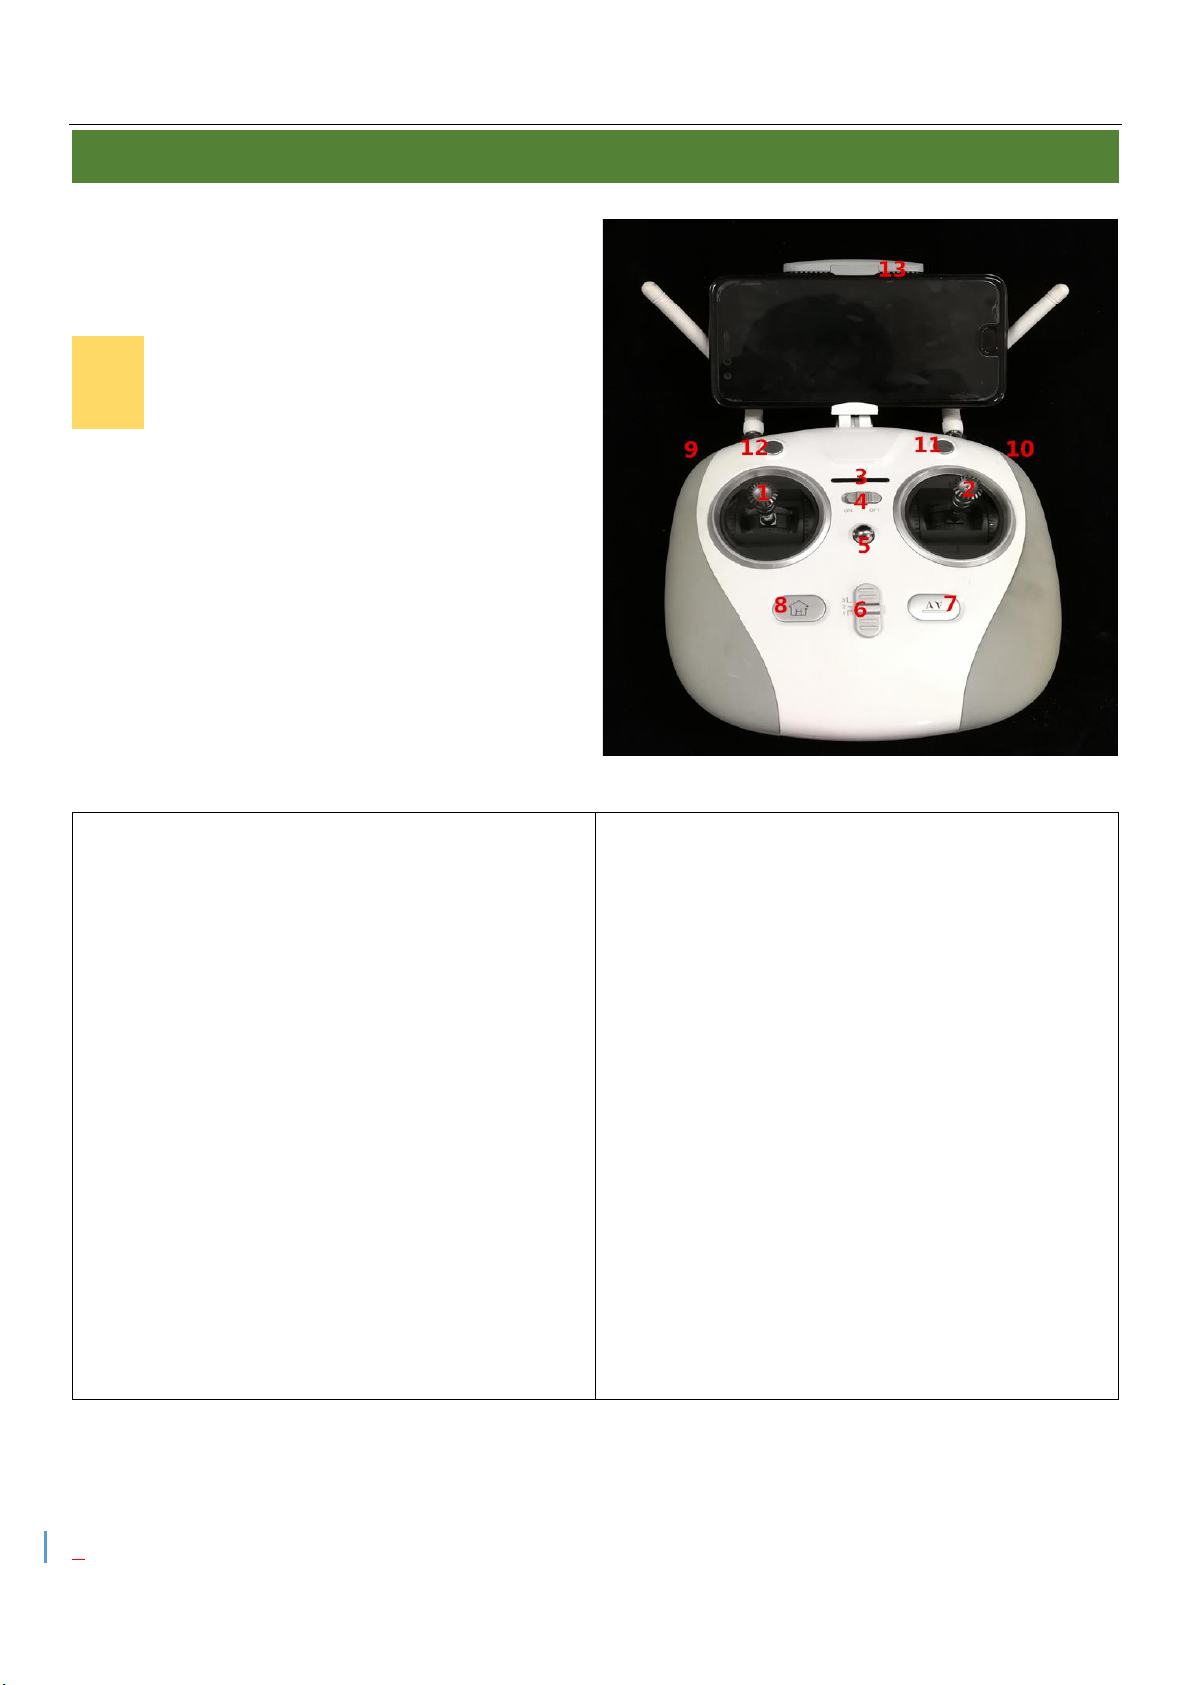
Using the Remote Controller
1/2 Control sticks
controls aircraft movement. Can be set to Mode 1, Mode2, or a
custom mode.
8 Return to Home Button
Short press to return to spraying break point, long press to return to
home.
3 Status LED
Remote controller LEDs
9 Blank Channel
4 Power Button
Used to turn the remote controller on and off.
10 Spray Rate Dial
Press downwards to spray, 2-3 seconds long press to get highest flow.
Press upwards to turn off the pump and stop spraying.
5 lanyard Attachment
Used to attach the remote controller lanyard.
11 Blank Channel
6 Operation Mode Switch
Used to switch between 1 Manual, 2 GPS (fit for small area), and 3 AB
operation modes (fit for large area).
Mode 1 and Mode 2 are both manual operation. The difference is
Mode 2 is with GPS function and easier to be operated. Mode 1 is not
recommended for new flyer.
12 Three Grades Switch
Button light off means close. Press the button to record point A and
the light twinkles. Press again to record point B and the light on. Press
the button rapidly for more than 16 times, until the aircraft status
indicator blinks in red, green and yellow alternately, to eliminate the
records of AB points.
7 Blank Channel
13 Display Bracket
Turn on/off the remote control by press button#4.
Users can charge the remote control with Android cable. Fully
charged remote control can work 8 hours.
△
! Avoid using wireless devices that use the same
2.4GHz frequency band as the remote controller. To prevent
transmission interference, do not operate more than three aircraft
in the same area.

Agriculture Drone T1 User Manual
9 2018 TTF All Rights Reserved
Remote Controller LEDs
Definition of the indicator lights:
1. Status Mode when green, GPS angle when yellow, AB points operation when red.
2. Green means batteries with power. Please charge the battery when light goes red with beep sound. Battery is running out when red light.
3. Red light means charging. Green light means charging complete.
Calibrating the Compass
Because the aircraft’s compass is highly sensitive, it requires calibration before your first flight and regularly to ensure optimal flight performance.
Lack of calibration can lead to abnormal compass data, causing poor flight performance or failure.
△
!Note:
DO NOT calibrate your compass where there is a chance of strong magnetic interference, such as magnetite quarries, parking structures, and
underground steel reinforcements.
DO NOT carry ferromagnetic objects such as cellular phones, key, watch with you during calibration.
If users calibrate the compass indoor, then calibrate it again when go outside, in case abnormality of flying data caused by the two-different
magnetic interference.
There might be magnetic conductor like steel or iron interfere the compass if the calibration fails. Please move your aircraft to another place and
calibrate.
Calibration Procedures
Choose an open space to carry out the following procedures. It is recommended to calibrate the compass with an empty tank.
1. Switch the operation mode switch (6) back and forth for more than 5 times until the status light on aircraft goes solid yellow, then start to
calibrate the compass.
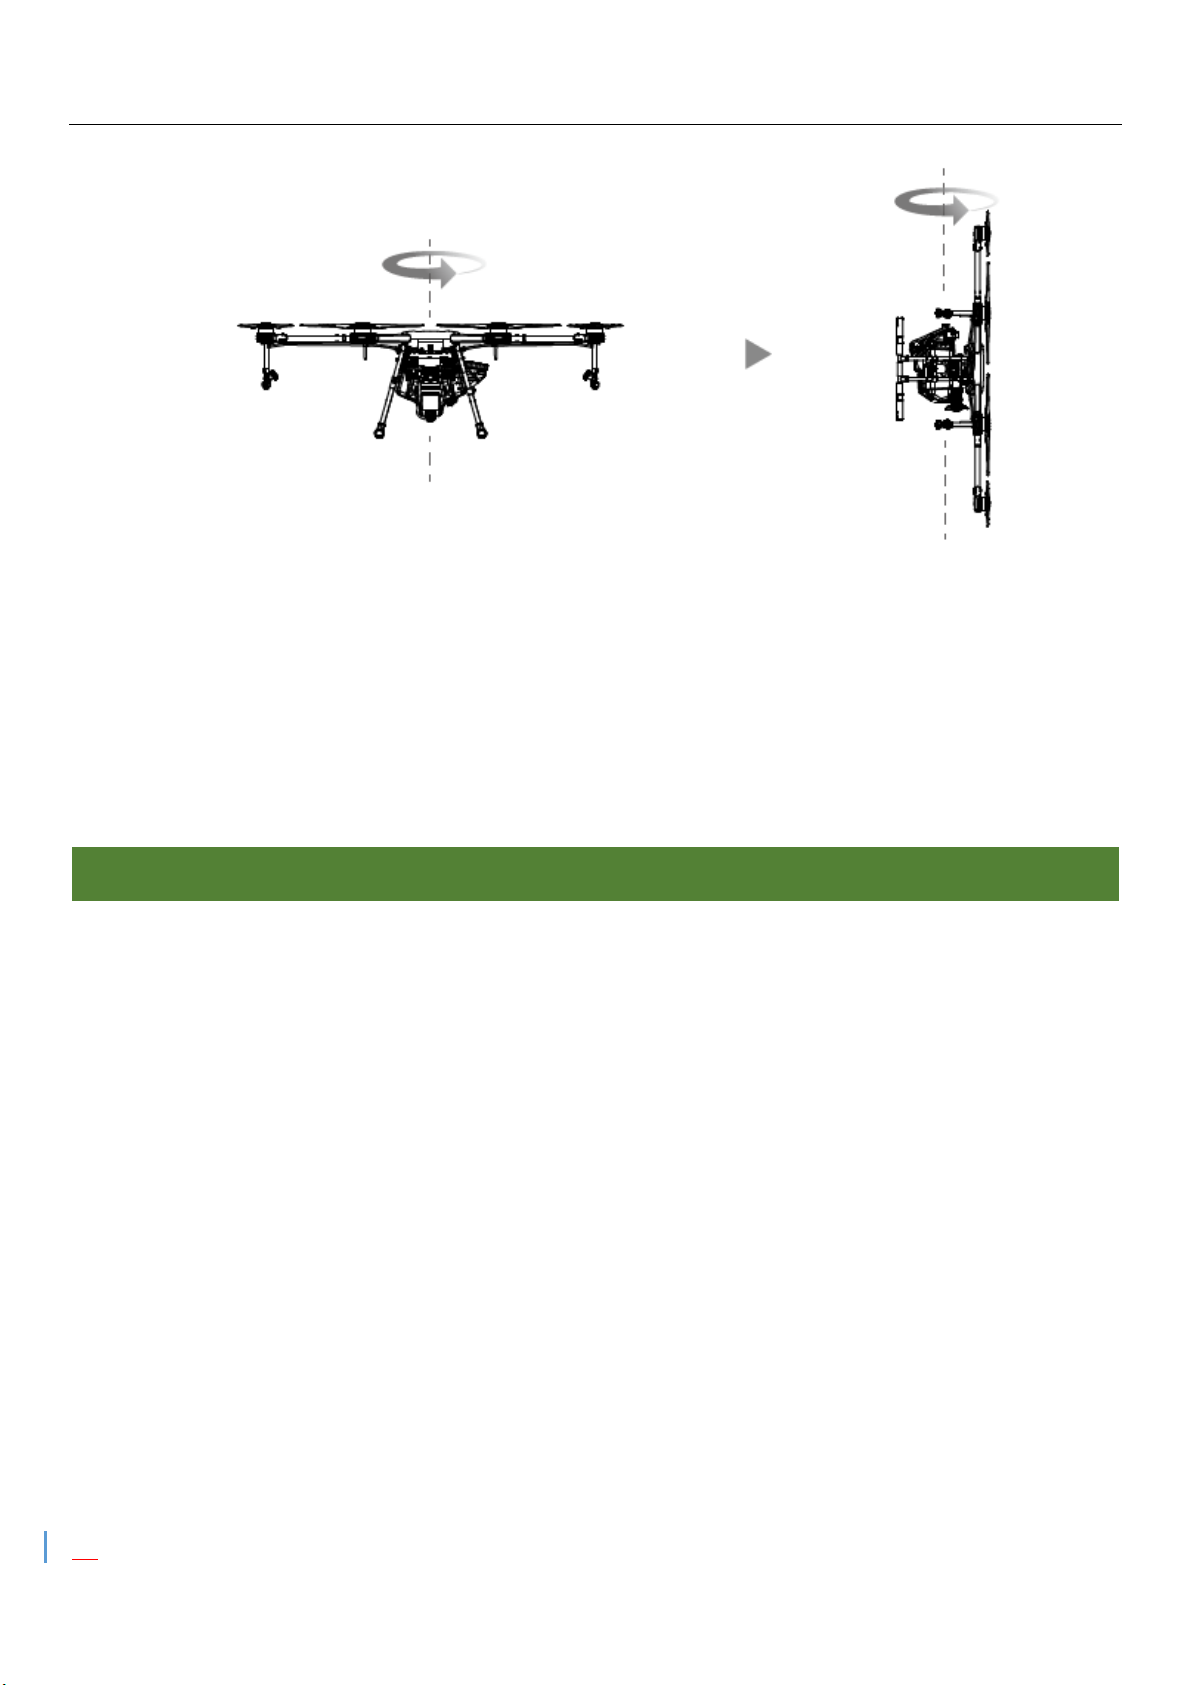
2. Hold the aircraft upright and rotate it 360° along its central axis until the Aircraft Status Indicator changes from solid yellow to solid green.
3. Hold the aircraft with its nose facing up and rotate it 360° along its central axis.
Remote Controller LEDs
Agriculture Drone T1 User Manual
10 2018 TTF All Rights Reserved
4. The calibration complete when the aircraft status indicator blinks in red, green alternately. If the indicator goes solid red, please repeat the
above steps to recalibrate the compass
5. Reinstall the battery and the indicator blink green, aircraft is ready to fly.
When to Recalibrate
1. Compass data is abnormal and the aircraft indicator is solid red.
2. Flying in a new location, or a location that is different from your last flight.
3. The mechanical structure of the aircraft has changed.
4. Severe drifting occurs in flight (e.g., the aircraft has difficulty flying in a straight line).
Operation Procedure
Manual Operation Mode
Set the operation mode switch to 2 to enter manual operation mode. You can control all the movements of the aircraft, spray liquid via the
remote controller’s spray button, and adjust the spray rate via the dial. Manual operation mode is ideal when the operation area is small.
1. check the screws on aircraft if they are fastened (screws on motors, propellers and aircraft). Open the foldable propeller to check the motors
if they are horizontal.
2. Start the remote control and connect the battery. (DO NOT connect in wrong order).
3. Calibrate the compass data and make sure the distance of ferromagnetic objects (such as cell phone or magnet). Calibrate on horizontal
direction and then vertical direction.
4. Wait until the indicator shows normally, uninstall the battery and reinstall it.
5. It's normal that aircraft inclines under GPS mode, because of terrain and the balance of gravity center.
6. Open the water pump channel on remote control after taking off, to start plant protection operation.
Agriculture Drone T1 User Manual
11 2018 TTF All Rights Reserved
AB Points Operation Mode
In this operation mode, the aircraft will travel along a pre-planned route. Operation resumption, data protection, and the terrain following
radar module are available in this mode. Use the settings dial on the remote controller or APP to adjust work efficiency (including flying speed
and spray rates). AB points operation mode is recommended for large, rectangular spray areas.
△
!Press the channel 12 rapidly for more than 16 times, until the aircraft status indicator blinks in red, green and
yellow alternately, to eliminate the records of AB points. (Users should do the above operation every time before
he/she starts AB Points Operation Mode, or else the aircraft will fly to the AB Points recorded last time.)
1. Make sure all button lights on remote control are closed. Channel 8is to record the AB Points.
2. Press theChannel 8to record Point A, the button light blinks and the aircraft status indicator goes yellow. Fly the aircraft forward and pres
sthe Channel 8to record Point B, the button light blinks.
3. Push the Mode switch up to AB Points Operation Mode.Then push the joystick towards left or right to start AB points opertion.
4. Cut off AB Points operation mode, push the Mode Switch to GPS Mode, and the aircraft stops.
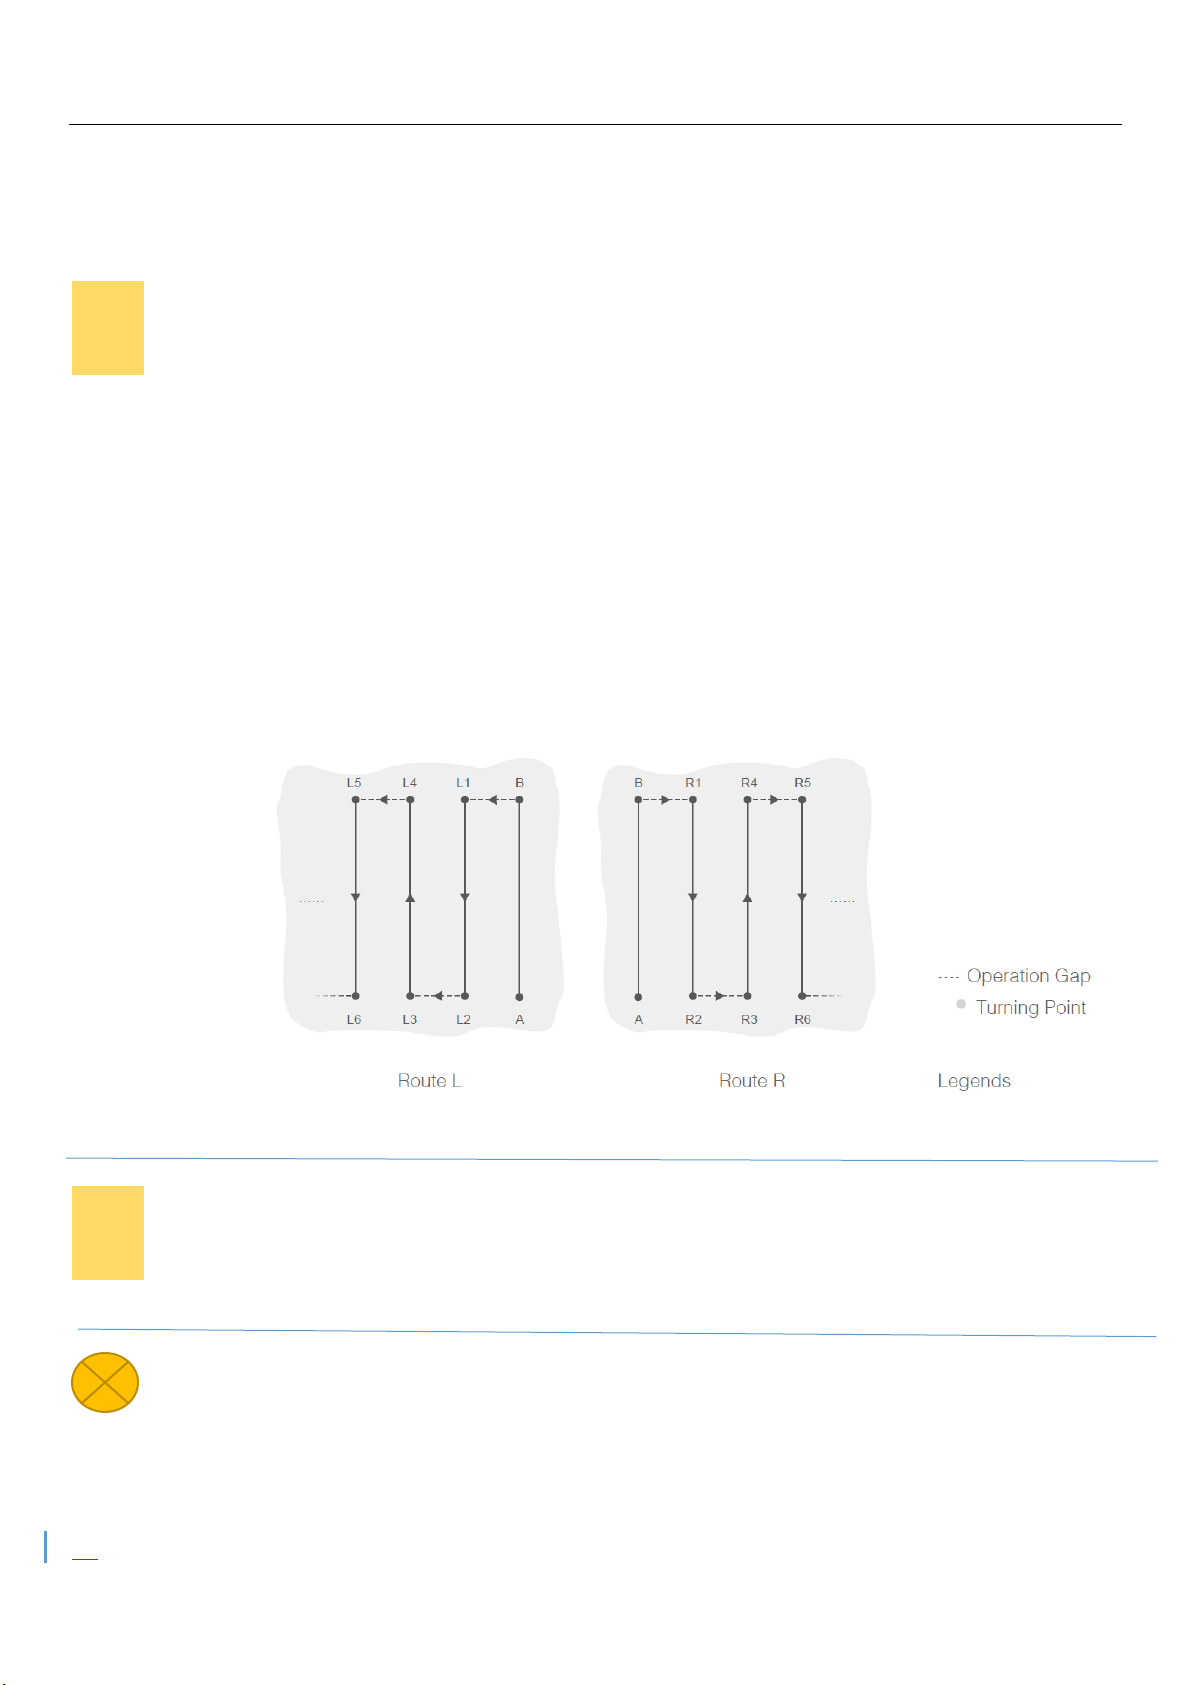
Operation Route
The aircraft will travel along a pre-designated square zig-zag route after recording turning points A and B. under optimal working conditions, the
aircraft maintains distance from the vegetation. The length of the dotted lines, called Line Spacing, can be adjusted in the APP.
Operation Procedure
△
!Maintain line of sight of the aircraft at all times.
Set the flight mode switch to P when the signal is strong. Otherwise, AB points operation mode may be unreliable.
Always inspect operating environments before flying.
Agriculture Drone T1 User Manual
12 2018 TTF All Rights Reserved
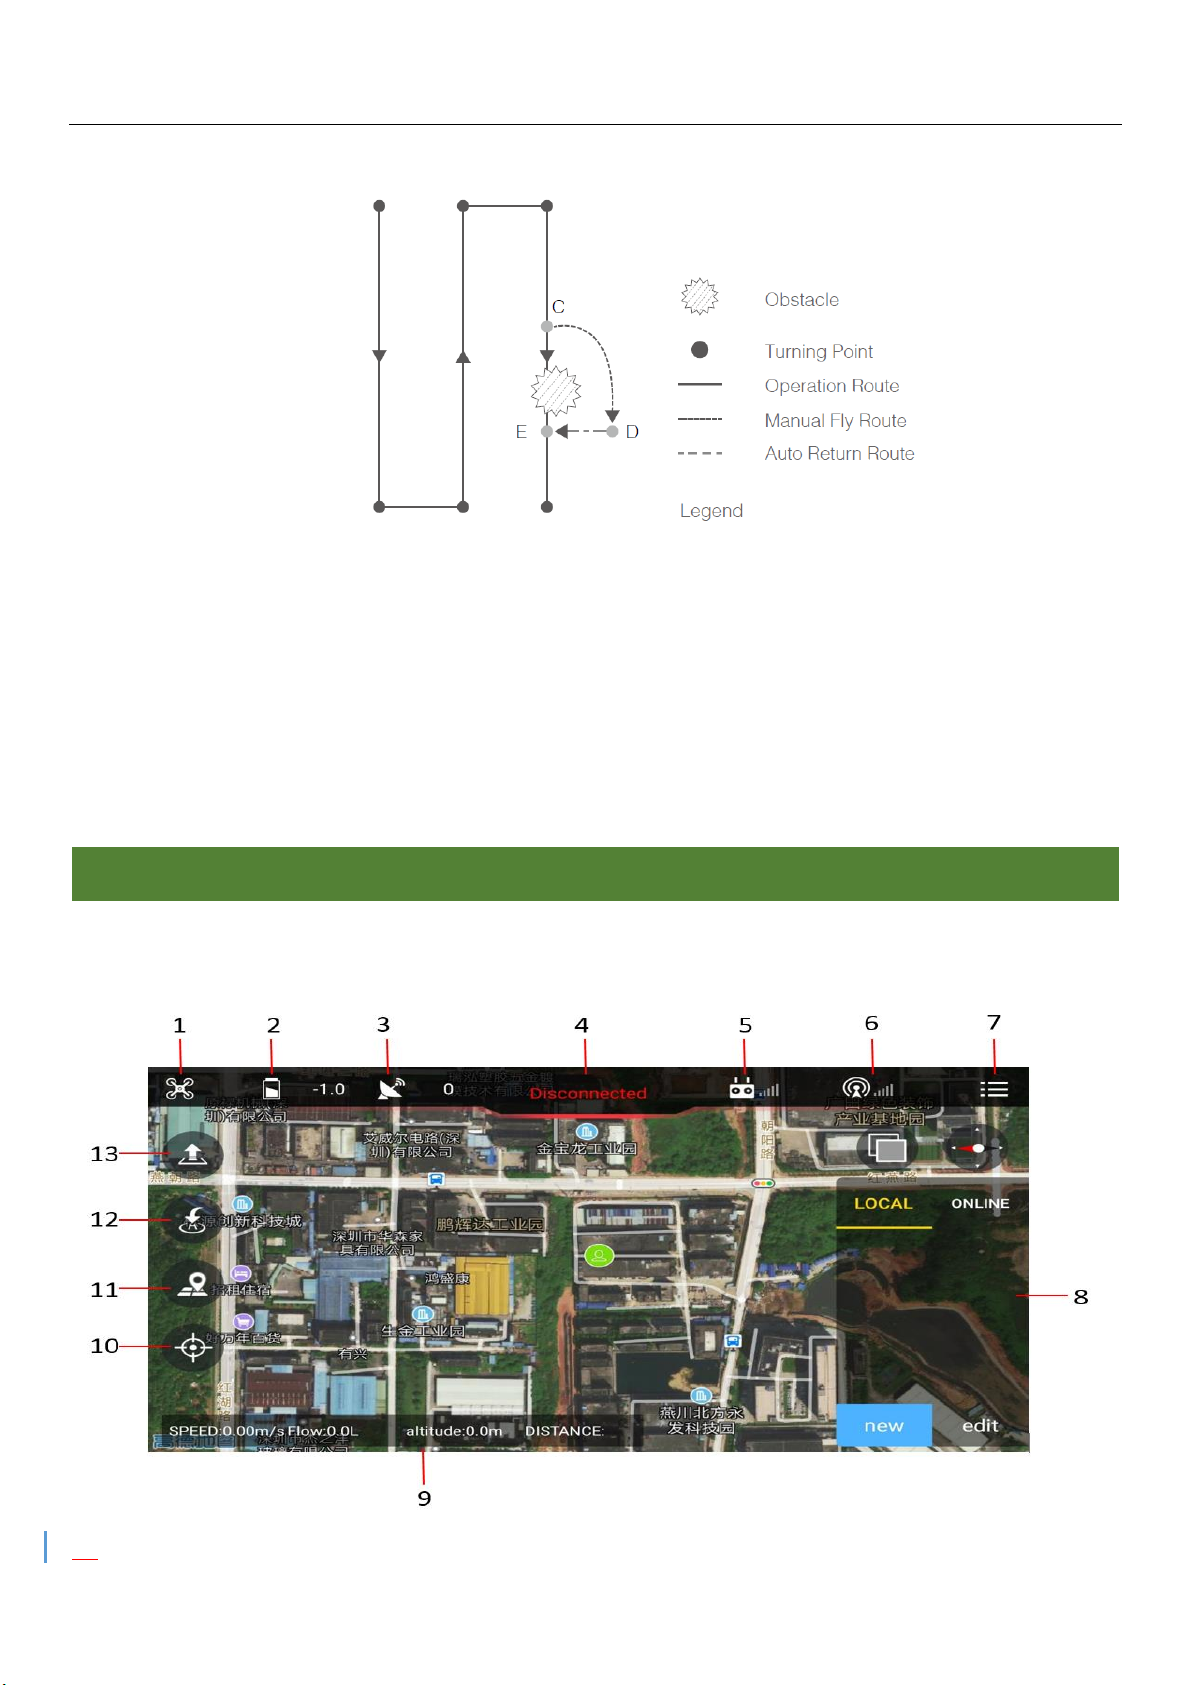
Manual Obstacle Avoidance
Under the AB Points Operation Mode, users can avoid an obstacle (From Point C to Point D) by using the control sticks to control the aircraft
forward, backward, left or right (i.e., push the pitch or roll stick). The aircraft will automatically return to the pre-planned route (From Point D to
Point E) after 3 seconds' no-operation.
Recording the Spraying Breakpoint and Return Route.
1. Aircraft will hover and record the break point automatically when there is no liquid inside. Users need to switch to GPS mode and fly the
aircraft back manually or long press the one-key return button (channel 8) and the aircraft will return automatically.
2. When the aircraft takes off after refilled, short press the channel 8, aircraft will return to the break point automatically. Then short press the
spray rate dial to turn on the water pump and resume operation.
3. Long press the channel 8 is one-key return. (not recommended for this operation is easy to be interfered).
The APP
The APP is designed for agricultural applications and is able to display the system status and configure various settings. After planning a task via
the app’s intelligent operation planning system.
Main Interface

Agriculture Drone T1 User Manual
13 2018 TTF All Rights Reserved
1 Mode
Indicates current flight modes
8 Flight Route Plan Interface
For users to plan the flight route.
2 Voltage
Indicates the current voltage of battery, to check if there is sufficient charge.
9 Flight Data
Flight Speed, Spray Flow, Flight altitude, Flight Distance
3 GPS Satellites QTY
Indicates the QTY of the GPS Satellites, to check if the aircraft can fly normally.
10 Location Follow
Tap to center the map around the aircraft’s location or my location at all times,
following its location update.
4 Status Information
Indicates the self-test status of flight control and abnormal information, such
as vibration, voltage alarm.
11 Flight Route Plan
Tap to enter Flight route plan interface.
5 Remote Controller Signal
Shows the signal strength of the remote controller.
12 Return to Home
6 Signal Strength of Data Transmission
Indicates the connection status of data transmission, RTK etc.
13 Take-off / Landing
Click to landing when aircraft in sky. Click to take-off when aircraft on ground
7 Parameters Setting
Consist of general parameters setting and advanced parameter setting. General setting is applied for terminal customers to adjust some basic parameters.
Advanced setting is for UAV manufacturer. (Terminal Customer should NOT change the advanced setting information.)
Speed and sparying range setting under AB points Mode
Click the parameter setting on top-right corner, then enter setting items.
1. Read the data.
2. Spraying range and speed setting (Suggested spraying range is 4m, flight speed should be 6m/s when flow is 1.4L/min,
flight speed should be 8m/s when flow is 2L/min.) Under this data setting, 1L Liquid can be used for 666 ㎡.
3. Save the data
Note: DO NOT modify other parameters, TTF assumes no liability for improper modification.
How to set the broadcast and cell phone vibration function

Agriculture Drone T1 User Manual
14 2018 TTF All Rights Reserved
Click the parameter setting ( ) on top-right corner, then enter more settings( ).
1. Coordinate rectification
2. Vibration application (Cell Phone vibration when AB Points setting or AB Points record elimination, choose whether to turn on according
to personal preference.)
3. Broadcast Function, applicable to AB Points operation at long distance away.
Lithium Battery Maintenance and Use
Charge
1. Keep away from sharp objects, to prevent the battery from puncturing, resulting in leaking and deflagration.
2. Avoid heat source when charging considering dissipation.
3. Try to charge when someone nearby and cut off the power if any problem occurs. DO REMEMBER to outfire with sand instead of water
after deflagration.
4. Finish charging when each cell reaches 4.2V voltage. A 6S battery is 25.2V after full charged. The charging current of Lithium battery should
be 0.5C-1C of the battery capacity. DO NOT exceed 2C battery capacity. (The charging current of 16000mAh battery should NOT exceed
32A). Try to minimize the times of fast charging. (20A).
5. Every time after operation finished, battery will get hotter and hotter, as the internal resistance will increase because of long time use of
the battery. DO REMEMBER to charge the battery after it gets back to normal temperature, otherwise the battery will be seriously damaged.
6. Unplug the battery in time after charging complete. DO NOT get it short circuit.
USAGE
1. The battery can normally be used to 3.7V per cell. DO NOT over discharge.
2. DO NOT connect positive and negative in wrong way and get the battery short circuit.
3. DO NOT use the battery in rainy days.
4. During normal use of the aircraft, stop immediately when battery bulge, rupture or leakage. If the above occurs during charging, stop
immediately.
5. Check the voltage of each cell of battery. If it is lower than normal voltage 3.3V/S or the voltage of each cell is unbalanced, then there is
quality problem of this battery.
Battery: DO NOT over discharged or short circuit. DO NOT discharge when temperature is too high or too low. Pay attention to protecting the
voltage.

Agriculture Drone T1 User Manual
15 2018 TTF All Rights Reserved
STORAGE
1. Please discharge the battery to 3.85V/cell if it lies idle for long time, which can be conductive to better preservation.
2. The storage temperature SHOULD NOT exceed 20-25℃. Please pack the battery in boxes or other devices to prevent it from mice.
3. Check the battery condition regularly, if it lies idle for over a month.
4. DO NOT put the battery close to fire or other ignition sources such as heaters.
5. DO NOT put the battery close to liquid nor a humid place.
Aircraft LEDs
Flight Mode
Indicator Status
Priority
Manual Mode (Stability, Positioning)
Green Light Single Blink
Low
GPS Mode (Angle, Speed)
Green Light Double Blink
Low
Functional Mode (Circling, Cruise, Agriculture)
Green Light Triple Blink
Low
Start Intelligent Orientation
Green Light Quadruple Blink
Low
Automatic Mode (Ground Station Control, Return)
Green Light Blink Rapidly
Medium
GPS
Indicator Status
Priority
GPS Disconnection / No GPS Signal
Red Light Triple Blink
Low
Poor GPS Signal
Red Light Double Blink
Low
Average GPS Signal
Red Light Single Blink
Low
Good GPS Signal
Red Light Off
Low
RTK Positioning
Yellow Light Single Blink
Low-Voltage Alarm
Indicator Status
Priority
Stage 1 Alarm
Yellow Light Triple Blink
Low
Stage 2 Alarm
Yellow Light Blink Rapidly
High
Straight Line Magnet Calibration
Indicator Status
Priority
Horizontal Calibration
Solid Yellow Light
Medium
Vertical Calibration
Solid Green Light
Medium
Calibration Failed
Solid Red Light
Medium
Calibration Succeeded
Red, Green, Yellow Blink Alternately
Medium
Spherical Magnet Calibration
Indicator Status
Priority
Calibrating
Red, Green, Yellow Blink Alternately
Medium
Calibration Succeeded
Lights Back to Normal
Medium
Accelerometer Calibration
Indicator Status
Priority
Calibrating
Red, Green, Yellow Blink Alternately
Medium
Calibration Succeeded
Solid Green Light
Medium
Abnormal Status
Indicator Status
Priority
Remote Out of Control
Red Light Blink Rapidly
High
Magnetic Compass Interference / Abnormal
Green, Yellow Blink Alternately
High
GPS Abnormal
Red, Green Blink Alternately
High
IMU Excessive Vibration / Abnormal
Red, Yellow Blink Alternately
High
Other Status
Indicator Status
Priority
Battery Initialization
Red, Green, Yellow Blink Alternately
High
Unlock
Red, Green, Yellow Blink Alternately
High
Unlock Failed
Solid Red Light
High

Agriculture Drone T1 User Manual
16 2018 TTF All Rights Reserved
Disclaimer
Please read this statement carefully before using this product. Anyone using this product is deemed to accept the entire
contents of this statement. This product is not suitable for minors under 18 years of age.
DO keep away from the crowd and vulnerable, fragile and dangerous items during flight, TTF Tech does not assume
responsibility because of the following causes personal injury, property damage, etc. (including direct or indirect damage)
1. Operator causes damage in case of poor health or mental condition, such as alcohol, drug abuse, narcotic drugs,
dizziness, weakness, nausea, etc.
2. Operator deliberately causes personal injury, property damage and so on.
3. Any compensation for mental impairment caused by the accident.
4. The product is not properly assembled or handled according to instructions of this manual.
5. Self-modification or replacement of parts or components which are not produced by TTF Tech, which results in other
damages resulting from the poor operation of the entire aircraft.
6. Damage caused by operation error or subjective judgment error from the operator.
7. aircraft operation improperly caused by natural wear and tear, corrosion, aging lines.
8. An unusual warning (such as red light flashed rapidly) occurred but operator does not land, resulting in the aircraft crash.
9. Damages caused by operating the aircraft even if it is in abnormal state (such as infiltration of water, oil, soil, sand and
other unidentified materials or assembling is not completed, the main components failed, the existence of obvious
defects or missing parts)
10. Damages caused by operating the aircraft under the circumstances in magnetic interference, radio interference, no-fly
areas prescribed by government, or the operator’s visual field is backlight, obstructed by obstacles, blurred vision, poor
eyesight and other improper operation.
11. Operate the aircraft under adverse weather conditions, such as rainy, windy (more than 4 class), snowy, haily or other
bad weather.
12. Regarding the battery, such as damage due to improper use of the protection circuit, battery pack, RC model or charger.
13. Any man-made accidents that do not comply with normal operation requirements (including aircraft blasting, casualties).
14. unauthorized disassemble the aircraft or replace the internal electronic components or battery connectors, TTF Tech
does not guarantee the quality and safety of the aircraft. TTF Tech does not assume responsibility.
15. Aircraft crash or blasting caused by not following the instructions of the indicator lights.
16. Accident caused by natural causes, rain, strong wind, strong magnetic compass interference, excluding the aircraft
quality problems.
Table of contents


