Simply Brands GD96 User manual

2.4G G-Sensor Control
Foldable Spider Drone
USER MANUAL
Model: GD96 SKU: SBA-00139 (without Camera)
SBA-00140 (4K HD Stills Camera/
1080p FHD Video Camera)
CAUTION: This product is not a toy. This
is not intended for use by children under the
age of 14. For your safety, please read this user
manual carefully and thoroughly before using
this product.
Please keep this manual somewhere safe for
future reference.
2
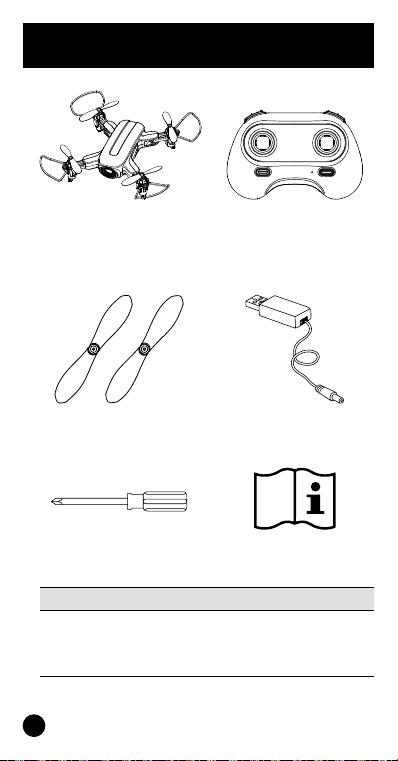
What’s Included
1x Foldable Spider
Drone (rechargeable
battery included)
1x Remote Control
(3x AAA batteries
not included)
2x Backup Propellers 1x USB Charger
1x Screwdriver 1x User Manual
Please Note
Please carefully check the number of accessories
shown above are not missing. Please provide proof of
purchase and contact the retailer for any replacement
parts if they are missing.

3
Pre-Flight Preparation
1. Opening the Wings
Wings now extended
2. Attaching the Protective Guard
Align the protective guard with the bottom of the
motor and rmly press it into place.
3. Attaching the Propellers
Align the propellers to the motor shaft and press them
in until rmly attached (match Propeller Awith Shaft A
and Propeller Bwith Shaft B).
4
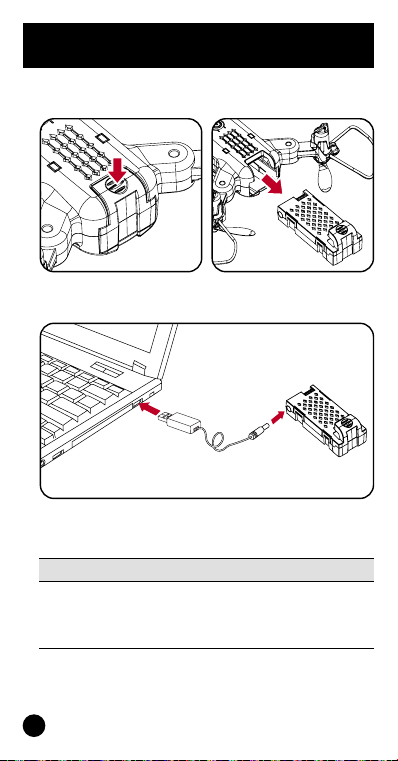
4. Battery Charging for the Drone
Pre-Flight Preparation
A. Remove the rechargeable lithium battery pack from
the bottom at the drone.
B. Connect the USB charger with the charging port of
the lithium battery pack.
Please Note
Battery pack’s red LED indicator light will be off whilst
charging and it will only switch on when fully charged.
Charging time is about 150 minutes. The drone’s
operation time is about 7 minutes.

5
Battery Pack Guidelines
•There is a certain risk when using the drone’s lithium
battery. It may potentially cause a re, body injury or
property damage. Users must be aware of these risks
and take full responsibility in ensuring the battery
isn’t improperly used.
• If battery leakage occurs, please avoid electrolyte
discharge making contact with your eyes or skin.
If it happens, please wash your eyes thoroughly with
clean water and immediately seek medical care.
•Please immediately remove the battery from the
drone if you sense any peculiar smell, noise or smoke
coming from it.
Battery Pack Charging
•Please use the originally supplied USB charger to
ensure your safety and minimise any potential risks.
•Do not charge a dilatant or outworn battery.
•Do not overcharge the battery. Please unplug the
USB charger once the battery is fully charged.
• Do not charge the battery next to inammables such
as carpet, wooden oor, wooden furniture or on the
surface of electro-conductive objects. Please always
keep an eye on the battery when charging.
•Do not charge the battery when it’s not yet properly
cooled down.
•The battery’s charging temperature should be
between O°C to 40°C.
Battery Recycling
•Do not dispose the battery as household rubbish.
Please take it to a battery recycling point at a
recycling centre local to you. Alternatively you can
take it to a specic recycling collection point in a
supermarket, a DIY centre or local shop.

6
Remote Control Overview
High / Low Speed
One-key Flips &
Rolls 360°
Left Joystick (press
and hold down for
‘Headless Mode’)
Right Joystick (press
and hold down for
‘Fine-tuning Mode’)
One-key Start /
Landing (long press for
emergency stop)
Power Switch
Indicator Light
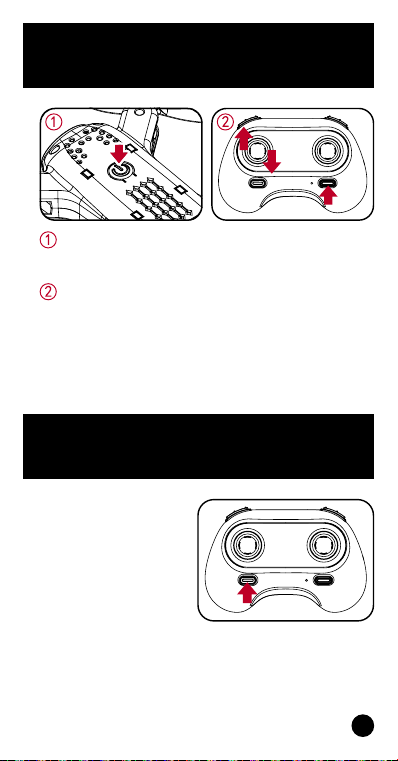
Inserting AAA Lithium Batteries
Open the battery cover and correctly insert the 3x
AAA batteries according to the +/- electrode markings.
(please note that batteries for the remote control are
not included).
Please Note
1. Make sure the batteries are loaded correctly according
to the polarity markings in the battery compartment.
2. Please do not mix old and new batteries together.
3. Please do not mix different types of batteries together.
7
Transmitter and Receiver
signal connection
Turn on the drone and place it on a level surface,
the drone’s indicator light should start to slowly
blink, which indicates it’s waiting for pairing.
Switch on the remote controller. When the remote
controller’s indicator light blinks, move the left
joystick upwards and you’ll hear a beep sound. Then
move it downwards and you’ll hear another beep
sound. When both the remote controller’s and
drone’s indicator light appear solid, this will indicate
pairing has been successful.
Press the ‘One Key Start/
Landing’ button as
shown on the right and
the drone’s propellers
will start to rotate.
Begin ying using
‘One Key Start’

8
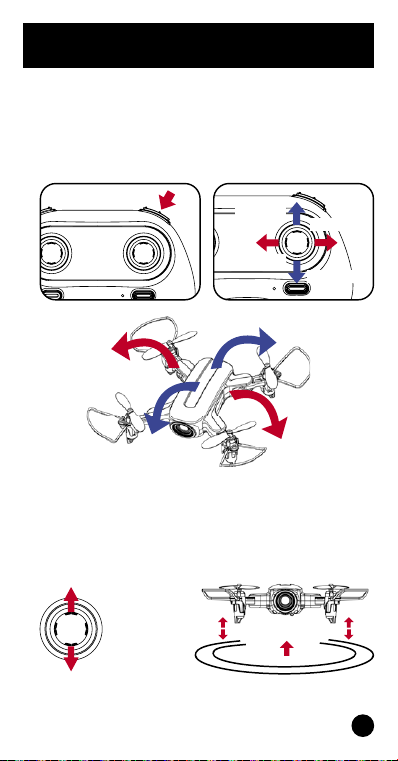
Basic Flight Controls
Use the left joystick to control the ight altitude (ascent
or descent) and to rotate around to the left or right.
The right joystick lets you control to go forwards or
backwards as well as being able to bank to the left-
hand side / right-hand side.
Left Joystick
Descent
Ascent
Rotate
Left
Rotate
Right
Backwards
Forwards
Bank
Left
Bank
Right
Right Joystick
9
Basic Flight Controls
Flips & Rolls
When the drone is ying above 3 metres high, you can
press the ‘360° ips and rolls’ button and move the
right joystick to any specic direction you want which
will make the drone rotate in that chosen direction.
360° ips and rolls
Bank right
Bank left
Forwards
Backwards
Hover
When you let go of the left joystick (throttle) after the
drone has ascended / descended, the drone will stay
still hovering in mid-air until you next move one of the
joysticks again.
Left Joystick
– once you let
go of this, the
drone will stay
still hovering
in mid-air
10
Headless Mode
Using ‘Headless Mode’ helps to make it easier and
safer to learn how to y a drone especially if you are
a beginner. The drone will automatically y in the
direction you want it to regardless of the direction it’s
facing. This is particularly useful if you’re unsure what
the drone’s orientation is if you can’t tell from a long
distance away from you.
1. The drone is by default in ‘common / normal’ mode
as the drone’s indication light will be visibly on.
When you press the ‘headless mode’ function key on
the remote control, you’ll hear a short beep sound
that will indicate the drone has entered into headless
mode. When you next press the headless mode
function key again, you’ll then hear a long beep
sound that indicates the drone has now come out of
headless mode and is back to it’s default setting.
2. ln headless mode, you as the operator don’t need to
worry about identifying the direction of the drone’s
nose is facing, which just leaves you to easily control
the direction of the drone you want it to y to. If you
move the drone to the left or right, it will move to
your left or right.
Left Joystick
– press this
down to enter
/ exit ‘headless
mode’
One-key Landing Mode
Press the ‘One-key Start
/ Landing’ button on the
remote control to make
the drone automatically
slowly descend until
landing on the ground
and switch itself off.

11
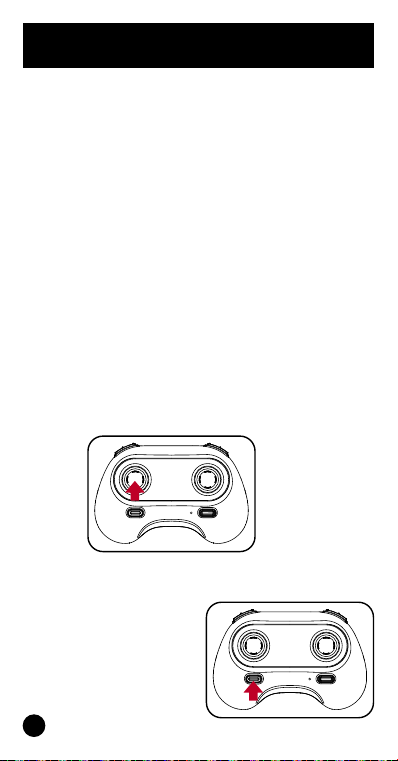
Fine-tuning Mode
When the drone spins uncontrollably or ‘yaws’ in the
air, please use the ne-tuning mode. Press down the
right joystick and push the joystick to the opposite
direction the drone is spinning or yawing, e.g. push
right if spinning to the left). You should now be able to
ne-tune the direction until the drone stays oriented.
Bank right
Bank left
Forwards
Backwards
Press down
Please Note
When the drone is within 30cm from the ground,
it’s stability will be affected by the ‘propeller blade
vortex’ made by itself and become unstable. This is
known as “ground effect” where the lower the drone
is, the greater this effect will be. To minimise ground
effect, either y higher / ascend the drone away from
the ground or choose to land it to prevent it crashing
down by using the ‘one-key landing mode’.
Emergency Stop
Press and hold down the
‘Emergency Stop’ button
which will make the
drone immediately stop
ying.
12
Frequently Asked Questions
Problems Causes Solutions
Control failure
The drone’s
battery pack isn’t
correctly installed
Remove the
battery pack and
re-install the right
way in
Wind is too strong
Do not y on
windy days.
The drone’s
performance
will become less
stable and risk it
crashing
Fails to ascend
The rotation speed
of main propeller
blades is too slow
Push up the left
joystick (throttle)
The drone’s battery
pack is not fully
charged
Please fully charge
the battery pack
Landing too
soon
The left / throttle
joystick is being
pulled down too
quickly
Gently pull down
the throttle
joystick slower
to perform a
smoother landing
Out of control
The drone is too
far away from
the effective
controllable
distance
Ensure drone
operation is within
the controllable
distance: using
the remote control
is up to 100 metres
while using Wi-Fi
app control is up
to 50 metres only
13
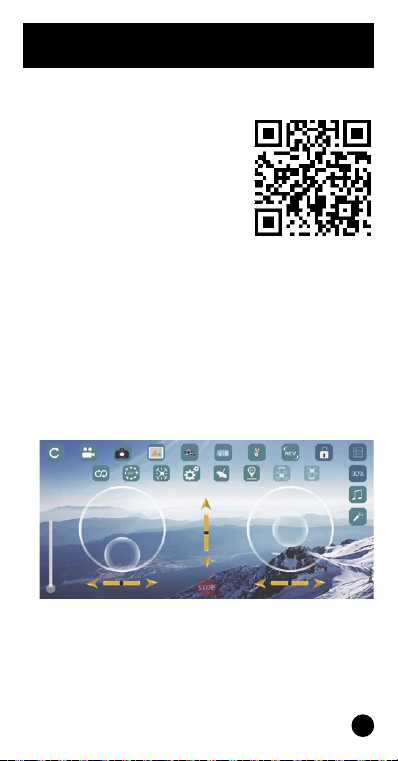
Drone control using Wi-Fi App
Install the Drone’s App
1. Search “WiFi_Cam” in the
Apple’s App Store or Google
Play to get the app.
2. Alternatively, you can scan the
QR code to download the app.
Pairing the Drone using the App
1. Turn on the drone and place it on a level surface, the
drone’s indicator light should start to slowly blink,
which indicates it’s waiting for pairing.
2. Open your smart device’s settings menu, open
the Wi-Fi options and look for a network called
“WIFI______XXX”. Select and connect to this network.
Exit the settings menu.
3. Open the app and click the “START” icon displayed in
the control interface.

14
Drone control using Wi-Fi App
WiFi_Cam App Interface
Rotate Trim
Motion Control
Emergency Stop
Calibration
Headless Control
Left Joystick
Acrobat
Flight Path
Back Button
Video Mode
Photo Mode Media
Switch between
two cameras VR First
Person View
Gesturing
Display
Reverse
Full Screen
Hidden Menu
Speed
Add Music
One-key Landing
Zoom
One-key Take Off
Right Joystick
Auto-Hover
Forward / Reverse Trim
Left / Right Trim

15
Download the instructions in
other languages
Mode d’emploi en Français
Instrucciones en Español
Instrukcja w języku polskim
Made in China
Importer Name:
Simply Brands (Asia) Ltd
Importer Address:
Unit 04-05, 16th Floor, The Broadway No. 54-62
Lockhart Road, Wanchai, Hong Kong
Customer Services:
ful[email protected].uk
Part of
This manual suits for next models
2
Table of contents


 user manual")