Battery Supplies Victron MultiPlus -II User guide

Nijverheidslaan +50/56, B-8540 Deerlijk - BELGIUM
Tel +32 56 617 977 - Fax +32 56 617 955
MANUAL
EnergyRack
1
INSTALLER'S MANUAL
AQ-Lith EnergyRACK
Victron MultiPlus -II
Three-phase Victron installation
(3*5KVA)
installation guide part I for kit BAT/49848
PART 1
Version 2.0
(September 2021)

Nijverheidslaan +50/56, B-8540 Deerlijk - BELGIUM
Tel +32 56 617 977 - Fax +32 56 617 955
MANUAL
EnergyRack
2
Content
1Introduction ........................................................................................................................ 3
2General information............................................................................................................ 4
2.1 Battery contact details supplies .................................................................................. 4
2.2 Type of manual ............................................................................................................ 4
2.3 Intended use................................................................................................................ 4
3Safety .................................................................................................................................. 5
3.1 environmental requirements ...................................................................................... 5
3.2 Operation Precautions................................................................................................. 5
3.3 emergencies................................................................................................................. 6
3.4 Personal protective equipment ( PPE )........................................................................ 6
4Overview components........................................................................................................ 7
4.1 Installation KIT 3*5kVA................................................................................................ 7
4.2 Provided by installer (not in KIT) ................................................................................. 8
5Installing the battery........................................................................................................... 9
6Connection diagrams: data and power cables ................................................................. 10
6.1 Schematic: 3*5kVA Victron (without Yuso ).............................................................. 11
6.2 Schematic : 3*5kVA Data cables (without Yuso ) ...................................................... 12
6.3 Schematic: 3*5kVA Victron (with Yuso ) ................................................................... 13
6.4 Schematic: 3*5kVA Data cables (with Yuso ) ............................................................ 14
7Technical Data Sheet: Victron MultiPlus- II (GX) .............................................................. 15
Nijverheidslaan +50/56, B-8540 Deerlijk - BELGIUM
Tel +32 56 617 977 - Fax +32 56 617 955
MANUAL
EnergyRack
3
1Introduction
This first section of this manual is intended to assist you in installing an AQ-Lith three-phase
battery storage system. It should only be installed by persons with a qualification in the field
of electricity and installation techniques.
The second part of the manual contains an extensive step-by-step plan for both connecting
the installation and setting the various devices and parameters. Furthermore, the second part
also contains an overview of the most common problems and their solutions.
Before installing a battery storage system, always check the conditions for a grid study and
the resulting additional safety measures.
The installer must always ensure that the contents of this manual
comply with the installation concerned and with the latest local
legislation such as the AREI, etc.
This manual is for support only. Following a training course
(recognised by us) is necessary for the correct installation and
commissioning of a battery storage system.
Be sure to refer to part 2 of the manual before starting to connect
and start up an installation. You will receive part two with the
purchase of your first installation.
Nijverheidslaan +50/56, B-8540 Deerlijk - BELGIUM
Tel +32 56 617 977 - Fax +32 56 617 955
MANUAL
EnergyRack
4
2General information
2.1 Battery contact details supplies
•Nijverheidslaan +50/56, 8540 Deerlijk, Belgium
•Phone: +32 (0) 56 61 79 77
•Fax: +32 (0) 56 61 79 55
•Email: info@batterysupplies.be
•Web: www.batterysupplies.be
2.2 Type of manual
This manual is an installation guide intended to assist a qualified installer in setting up and
powering up a Battery Supplies battery storage system .
2.3 Intended use
The EnergyRack from Battery Supplies (30-46kWh) is a storage battery intended to store
excess solar energy and use it later with the added possibility of UPS function for a limited
time.
The EnergyRack is not suitable for powering life-supporting medical devices and applications.
Changes to this product may only be made with the written permission of Battery Supplies.
Without this permission, the warranty will no longer apply. Battery Supplies will not be
responsible for injuries or damage caused by such modifications.
The batteries from Battery Supplies ( Energybox /Energyrack) may only be used with
compatible inverters. If in doubt, contact Battery Supplies.
It is necessary to read this manual thoroughly before installing or
using a battery.
Nijverheidslaan +50/56, B-8540 Deerlijk - BELGIUM
Tel +32 56 617 977 - Fax +32 56 617 955
MANUAL
EnergyRack
5
3Safety
This section contains all safety information that must be observed during installation and use
of a home battery. To avoid damage to the equipment or injury, this chapter must be read
carefully
read.
3.1 environmental requirements
-Do not expose the battery to temperatures above 50°C
-Do not place the battery near external heat sources
-Do not expose the battery to moisture or liquids
-Do not expose the battery to corrosive gases or liquids
-Do not expose the battery to direct sunlight for extended periods
-Do not allow the power connectors to come into contact with conductive materials
-Place the battery in a safe area away from children or animals
-Place the battery in an environment with a minimum amount of dust and dirt
3.2 Operation Precautions
-Never remove the battery case
-Never touch the battery with wet hands
-Do not drop or crush the battery.
-Never pierce the battery cells or battery housing
-Never place the battery in series
-Always respect the polarity of the power connectors on the battery
-Before installation, remove any jewelry or items that could cause a short circuit.
-Never short-circuit the power connectors
-Store the battery according to the guidelines in this manual
-Provide good and reliable grounding
-Disconnect the connection between inverter and battery and then switch off the
battery before maintaining, installing or cleaning it.
-Continuing to use a damaged battery can cause serious injury
-The battery should never be covered, painted,…
-Never connect the solar panels directly to the battery
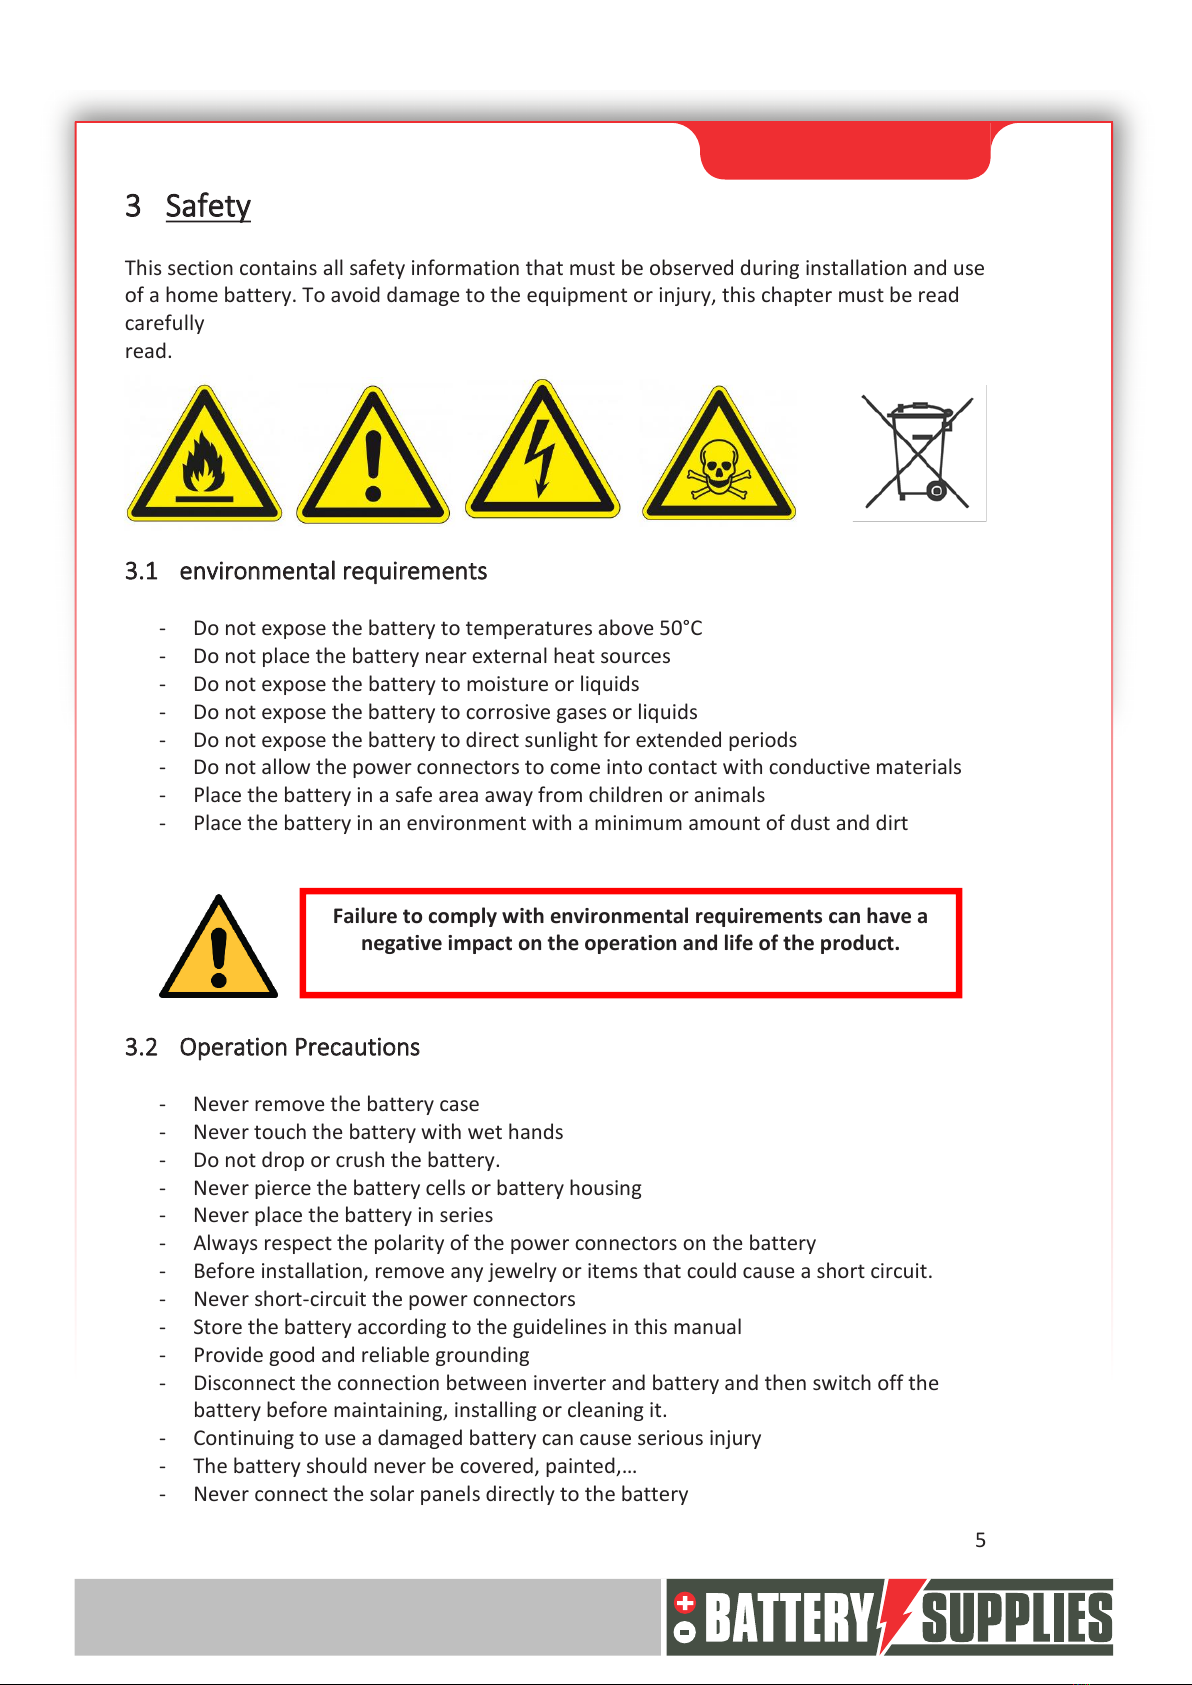
Failure to comply with environmental requirements can have a
negative impact on the operation and life of the product.

Nijverheidslaan +50/56, B-8540 Deerlijk - BELGIUM
Tel +32 56 617 977 - Fax +32 56 617 955
MANUAL
EnergyRack
6
-Never connect the battery directly to the AC mains
3.3 emergencies
Turn off the power and battery in an emergency!
-Wet batteries: If the battery is wet or submerged, do not leave people near the
battery. Contact Battery Supplies for further steps.
-Fire: never extinguish with water! Only use a dry powder extinguisher and if possible
move the battery to a safe place.
-Leaking battery: If electrolyte leaks from the battery, avoid all contact with this
leaking gas and/or liquid. If someone has come into contact with you, take the
following steps immediately:
oEyes: Immediately flush eyes with water for 15 min and seek medical
attention.
oSkin: Play and wash the touched skin with soap and water. Seek medical help.
oIngestion: Try to vomit and seek medical attention.
-Damaged battery: Damaged batteries are extremely dangerous and should be
handled with care. These may no longer be used. Contact Battery Supplies for further
steps.
3.4 Personal protective equipment ( PPE )
It is recommended to wear the following protective equipment when working with a battery
storage system.
-Insulated gloves
-Safety glasses
-Safety shoes

Nijverheidslaan +50/56, B-8540 Deerlijk - BELGIUM
Tel +32 56 617 977 - Fax +32 56 617 955
MANUAL
EnergyRack
7
4Overview components
This first part of the “Component overview” describes the products included in the kit. A
second part describes the matters that you as an installer must provide yourself. This
information should help you to get an overview of the additional costs you will incur to
complete the installation.
4.1 Installation KIT 3*5kVA
EnergyRack
44-56.7V DC
Up to 46 kWh
(NOT INCLUDED IN KIT)
2 x Victron
Energy
MultiPlus -II
48V / 5000VA /
70A
Charger / Inverter
5000VA
(https://www.victronenergy.com/inverters-
chargers/multiplus-ii)
1 x Victron
Energy
MultiPlus -II-GX
48/ 5000VA /
70A
Charger / Inverter
5000VA Built-in GX Function
(
https://www.victronenergy.com/inverters-
chargers/multiplus-ii )
1 x Carlo
Gavazzi EM24
Three-phase energy meter suitable for
current transformers
(these CTs are not included and depend on
the site setup)
Victron Energy
RS485 to USB
converter
Provides connection between energy meter
and MultiPlus
Nijverheidslaan +50/56, B-8540 Deerlijk - BELGIUM
Tel +32 56 617 977 - Fax +32 56 617 955
MANUAL
EnergyRack
8
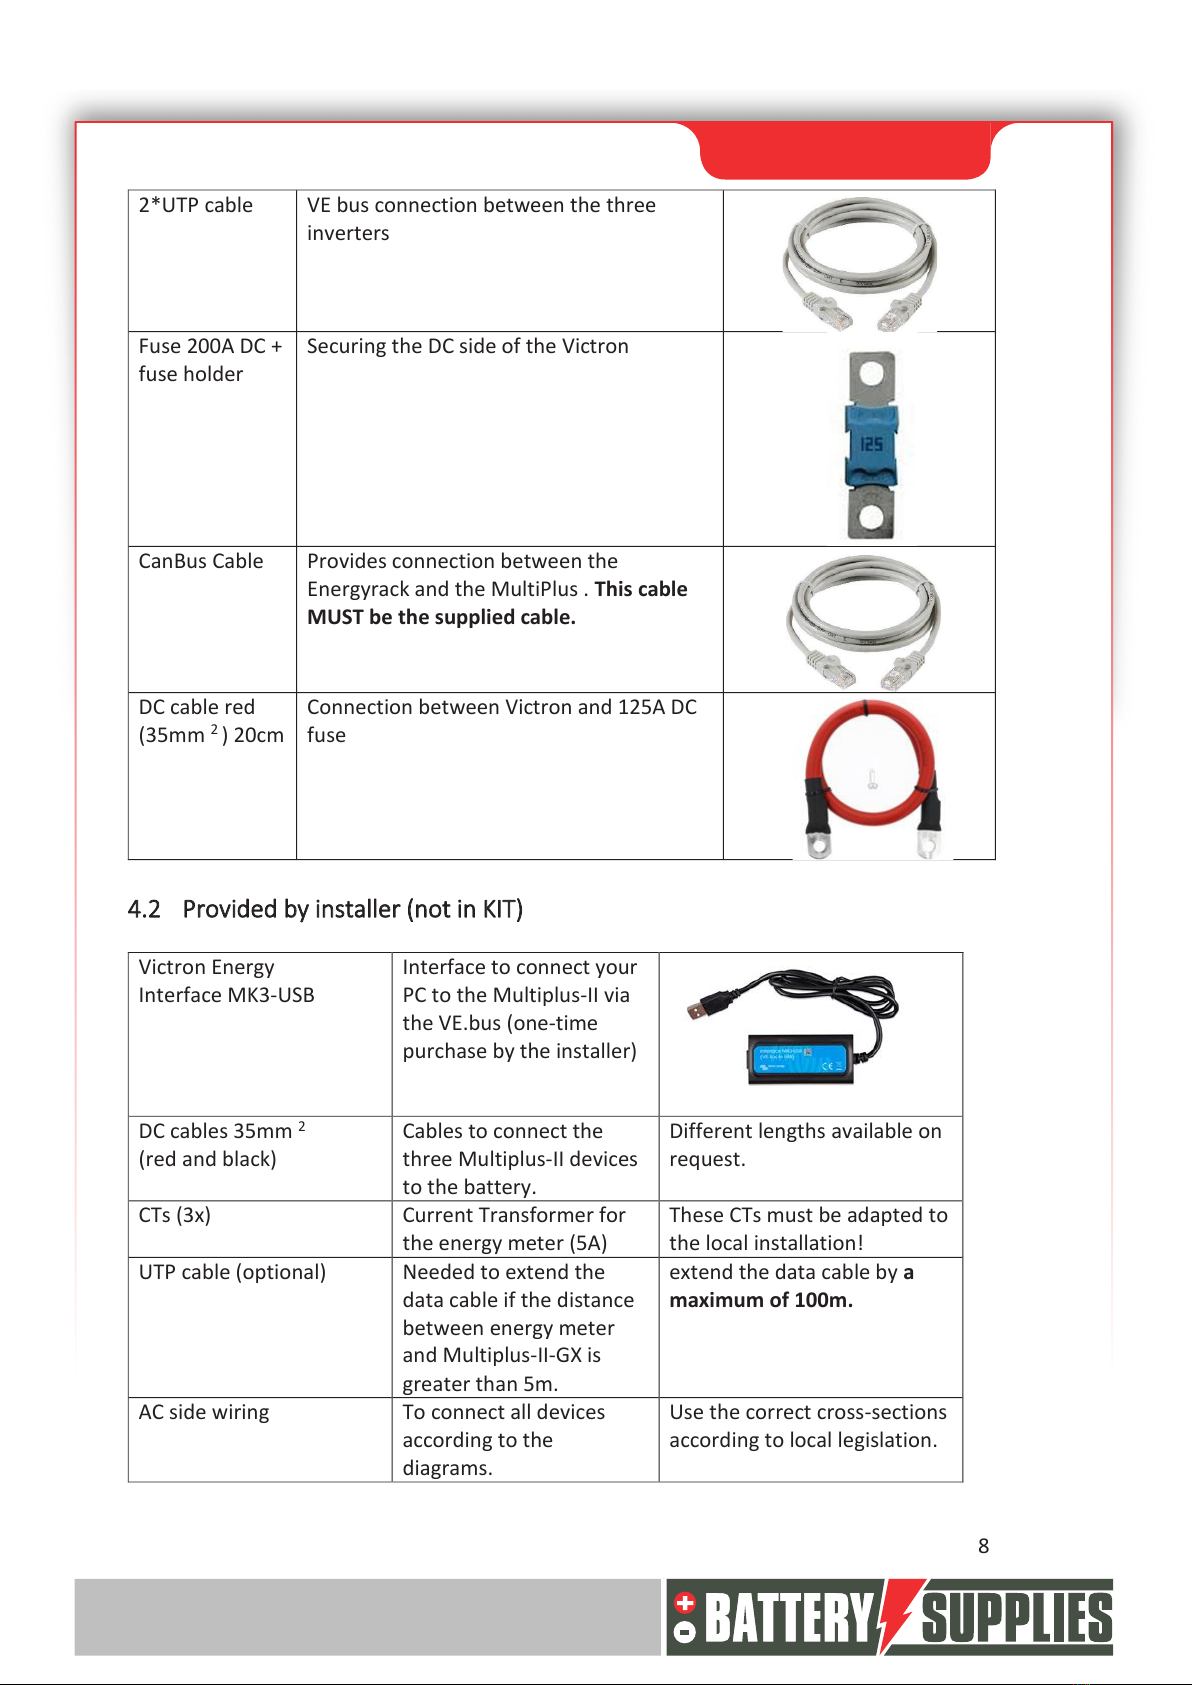
2*UTP cable
VE bus connection between the three
inverters
Fuse 200A DC +
fuse holder
Securing the DC side of the Victron
CanBus Cable
Provides connection between the
Energyrack and the MultiPlus . This cable
MUST be the supplied cable.
DC cable red
(35mm 2 ) 20cm
Connection between Victron and 125A DC
fuse
4.2 Provided by installer (not in KIT)
Victron Energy
Interface MK3-USB
Interface to connect your
PC to the Multiplus-II via
the VE.bus (one-time
purchase by the installer)
DC cables 35mm 2
(red and black)
Cables to connect the
three Multiplus-II devices
to the battery.
Different lengths available on
request.
CTs (3x)
Current Transformer for
the energy meter (5A)
These CTs must be adapted to
the local installation!
UTP cable (optional)
Needed to extend the
data cable if the distance
between energy meter
and Multiplus-II-GX is
greater than 5m.
extend the data cable by a
maximum of 100m.
AC side wiring
To connect all devices
according to the
diagrams.
Use the correct cross-sections
according to local legislation.
Nijverheidslaan +50/56, B-8540 Deerlijk - BELGIUM
Tel +32 56 617 977 - Fax +32 56 617 955
MANUAL
EnergyRack
9
Vending machines AC side
All breakers on the AC
side of the setup are not
included in the kit.
Also the fuses that have to
protect the energy meter!
(3*315mA and 1*50mA)
5Installing the battery
The Energyrack is delivered in its entirety and therefore has a weight of more than 600 kg. So
check in advance how the battery can be moved to its place. If necessary, the modules (each
48 kg) can be removed to make it easier to move the battery. The battery itself is not wired
on arrival for safety reasons.
The inverters are best placed as close to the battery as possible to minimize cable losses. Hang
the inverters in a cool place because too high temperatures reduce the maximum power of
the inverters (see datasheet at the back). The MultiPlus -II GX must be placed in a dry and well-
ventilated room (IP21) and there must be at least 10 cm of free space around the device.
The local situation has a major influence on the additional material
required (cabling, additional power box, etc.) and therefore on the
installation cost. Keep this in mind when drawing up the total price.
Nijverheidslaan +50/56, B-8540 Deerlijk - BELGIUM
Tel +32 56 617 977 - Fax +32 56 617 955
MANUAL
EnergyRack
10
6Connection diagrams: data and power cables
In this chapter some diagrams are given that are necessary when connecting this battery
storage system. Be sure to check whether a network study (or the associated additional
safety measures) is necessary. These are not included in the schedule!
These diagrams serve as an overview to clearly see the size of an installation. Before you
start connecting, you should carefully read the safety instructions for the battery and the
Victron Multiplus-II-GX.
These diagrams alone are not sufficient to correctly position and
connect the installation. Follow the step-by-step installation plan
(part 2) to avoid damage to battery and inverters.
The attached diagrams are principle diagrams. The installer is
responsible for choosing the correct safety components according
to the local application(s) and current legislation. Check whether a
grid study/decoupling relay is mandatory! (verg)
Circuit breakers may be installed with a nominal current other
than that indicated on the diagrams. 25A circuit breakers are best
chosen of type D.
Nijverheidslaan +50/56, B-8540 Deerlijk - BELGIUM
Tel +32 56 617 977 - Fax +32 56 617 955
MANUAL
EnergyRack
11
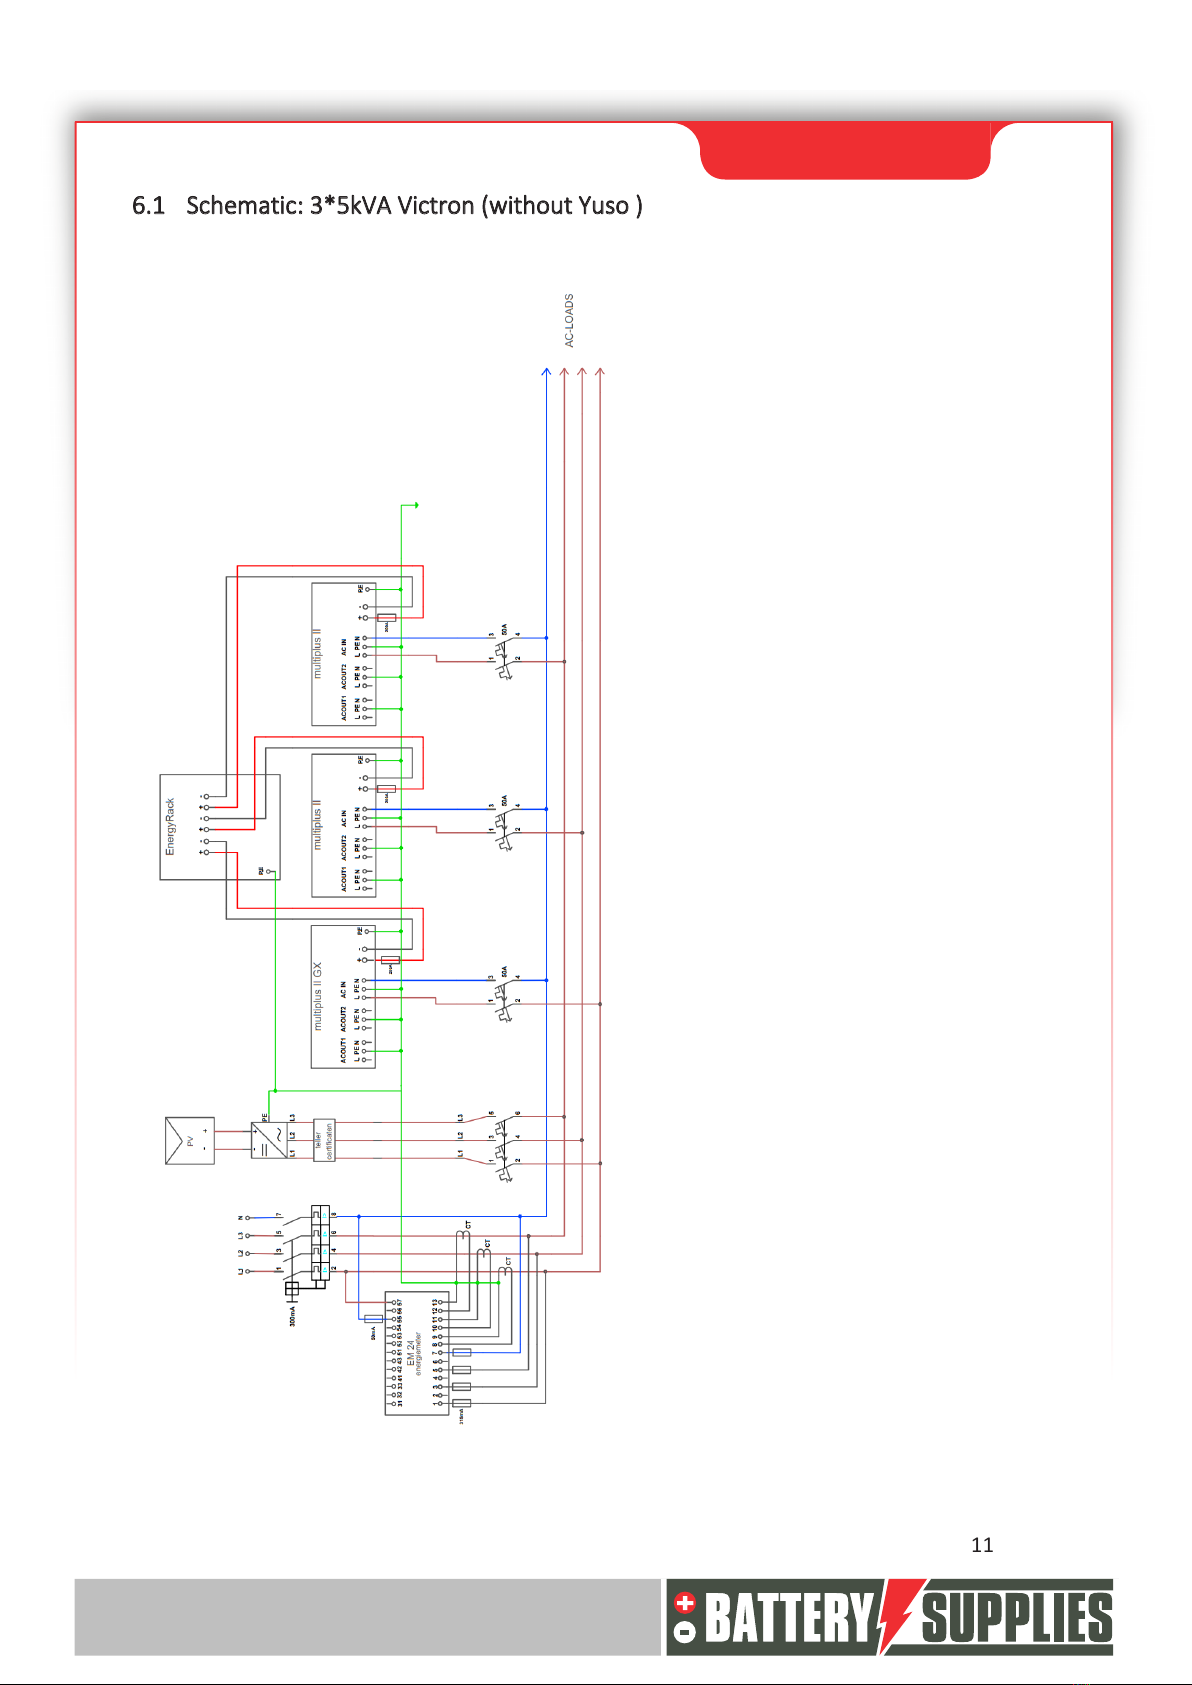
6.1 Schematic: 3*5kVA Victron (without Yuso )

Nijverheidslaan +50/56, B-8540 Deerlijk - BELGIUM
Tel +32 56 617 977 - Fax +32 56 617 955
MANUAL
EnergyRack
12
6.2 Schematic : 3*5kVA Data cables (without Yuso )
Nijverheidslaan +50/56, B-8540 Deerlijk - BELGIUM
Tel +32 56 617 977 - Fax +32 56 617 955
MANUAL
EnergyRack
13
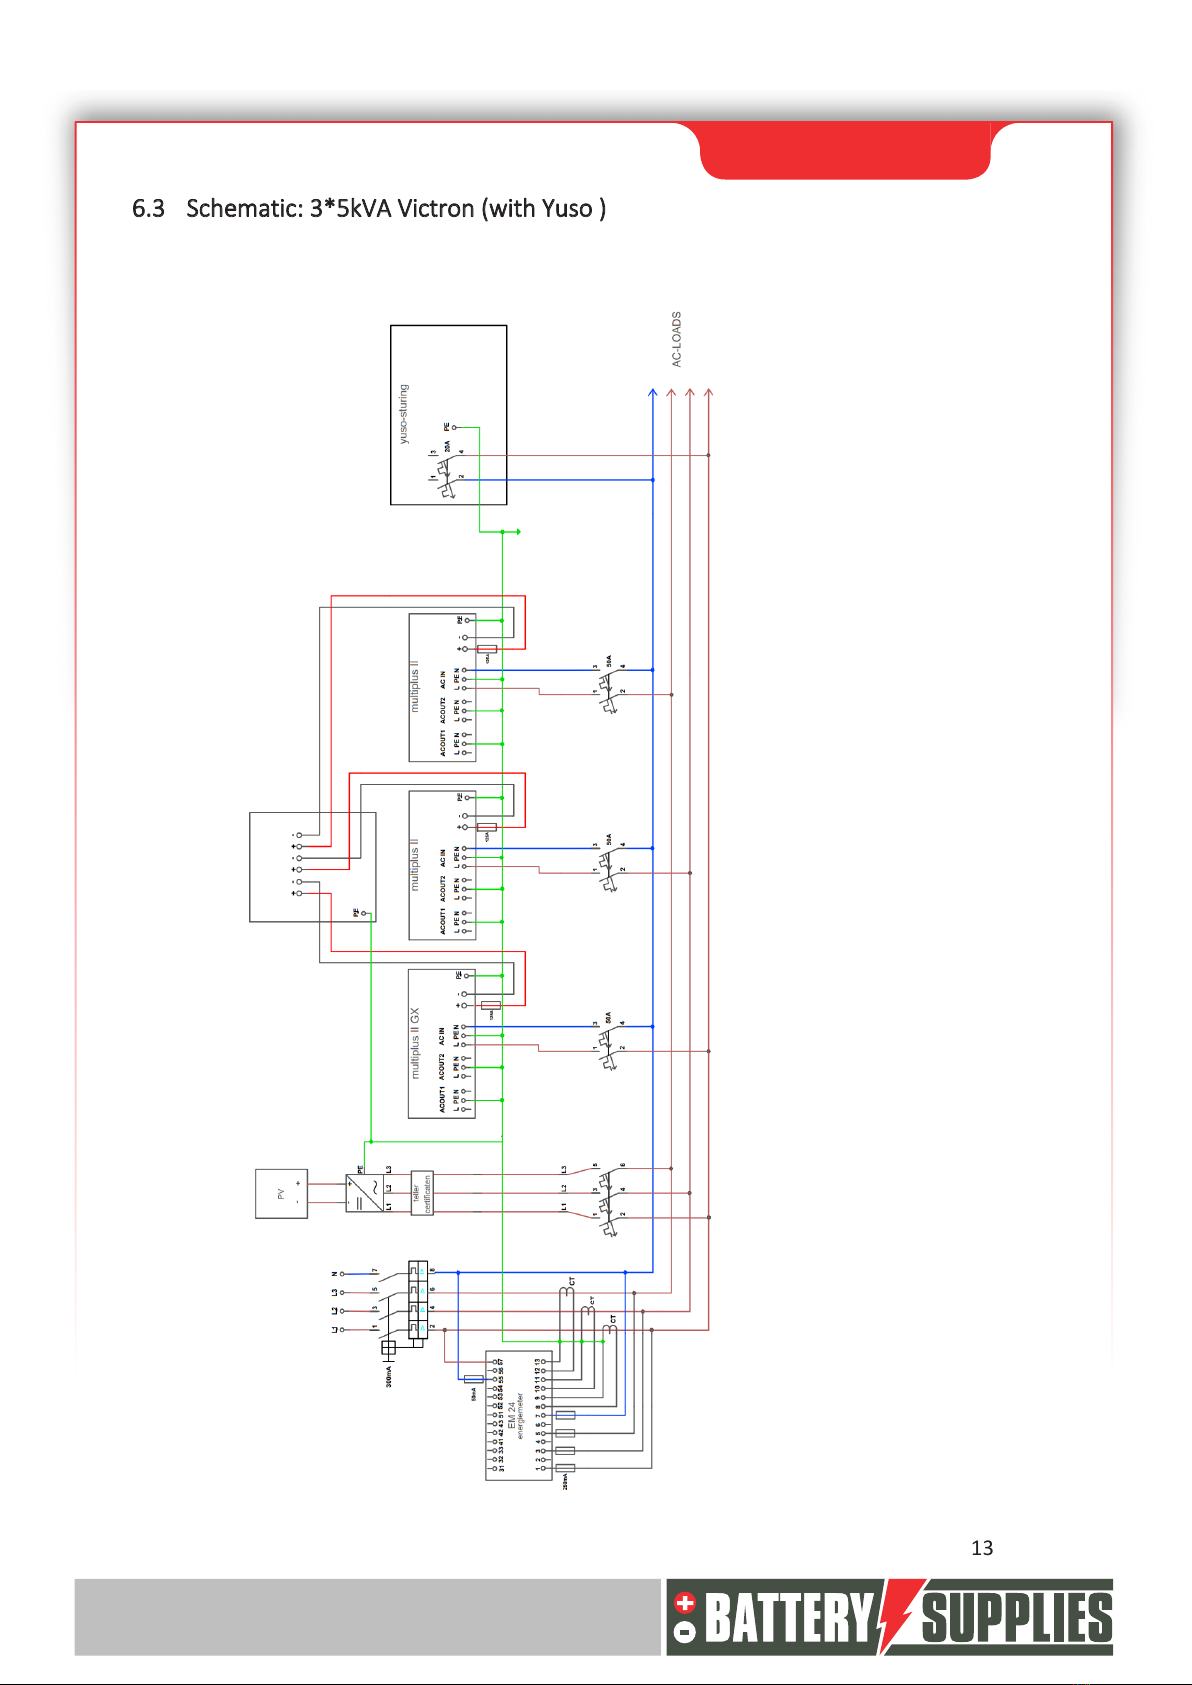
6.3 Schematic: 3*5kVA Victron (with Yuso )
Nijverheidslaan +50/56, B-8540 Deerlijk - BELGIUM
Tel +32 56 617 977 - Fax +32 56 617 955
MANUAL
EnergyRack
14
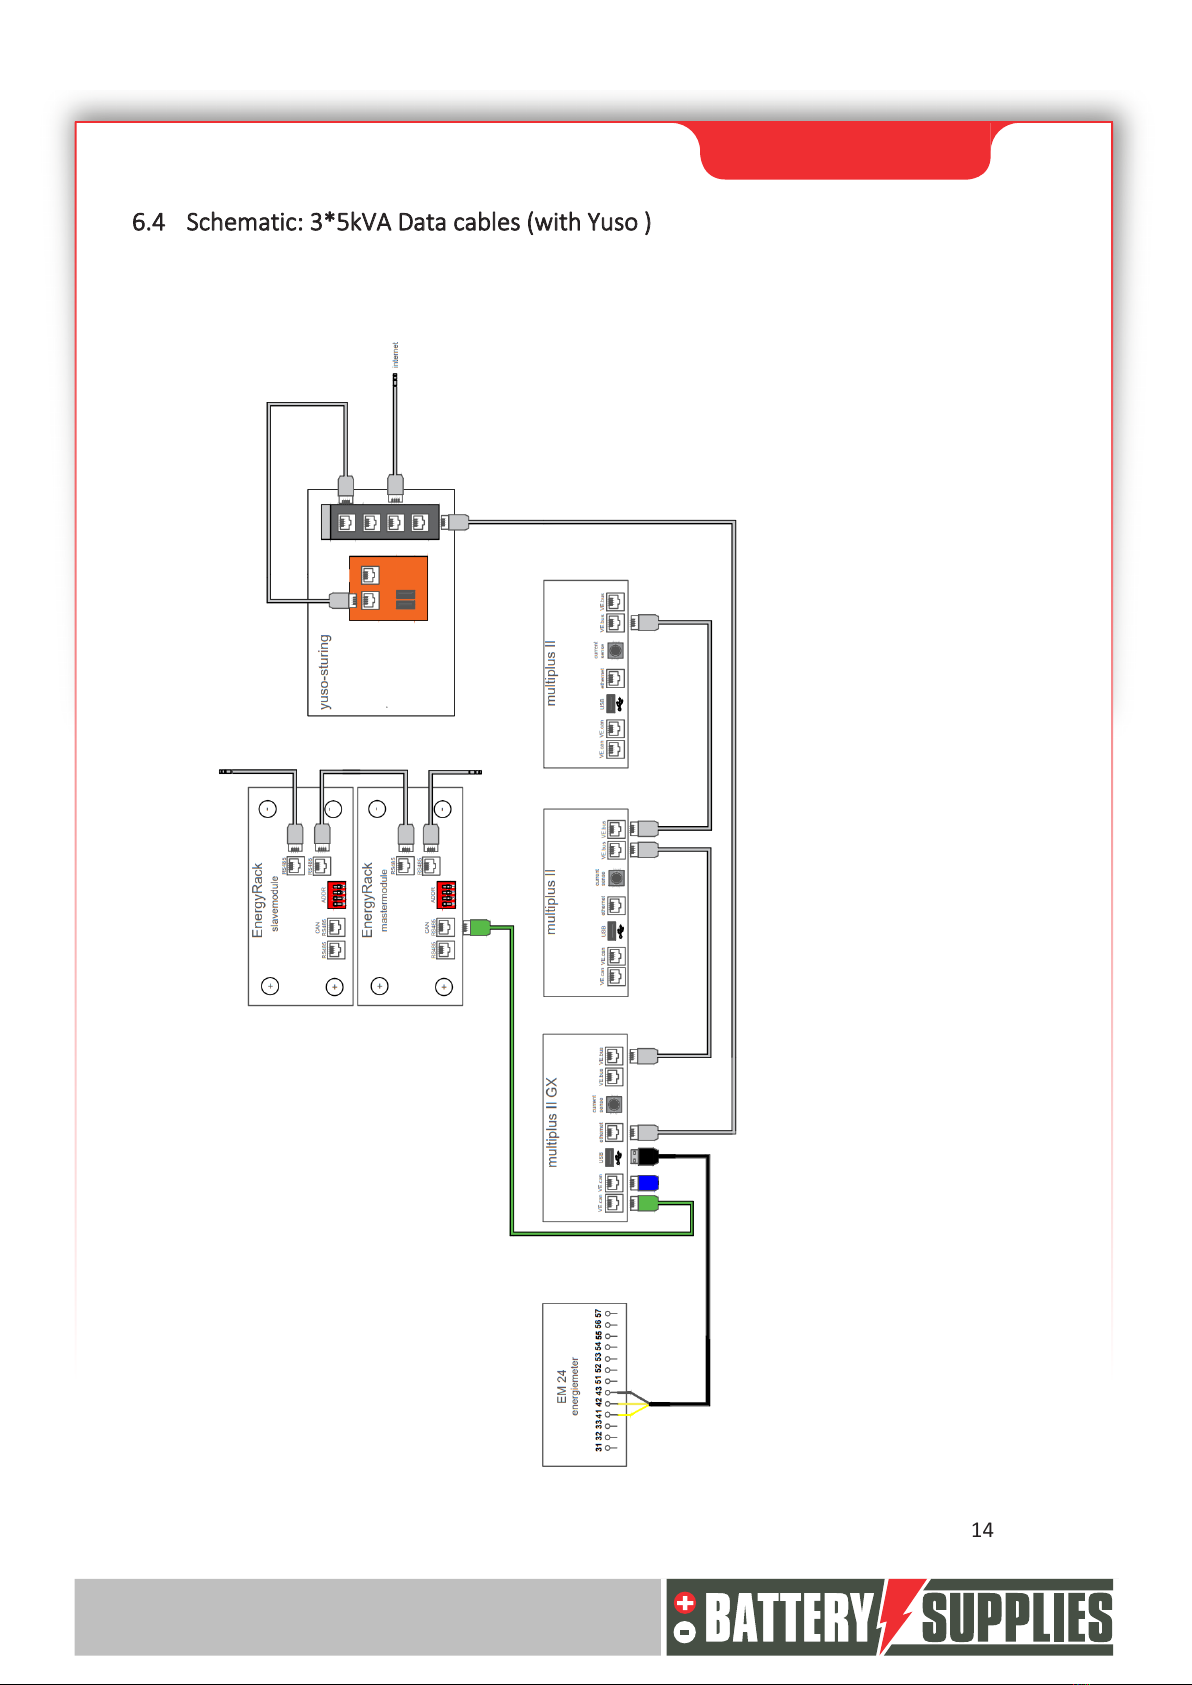
6.4 Schematic: 3*5kVA Data cables (with Yuso )
Nijverheidslaan +50/56, B-8540 Deerlijk - BELGIUM
Tel +32 56 617 977 - Fax +32 56 617 955
MANUAL
EnergyRack
15
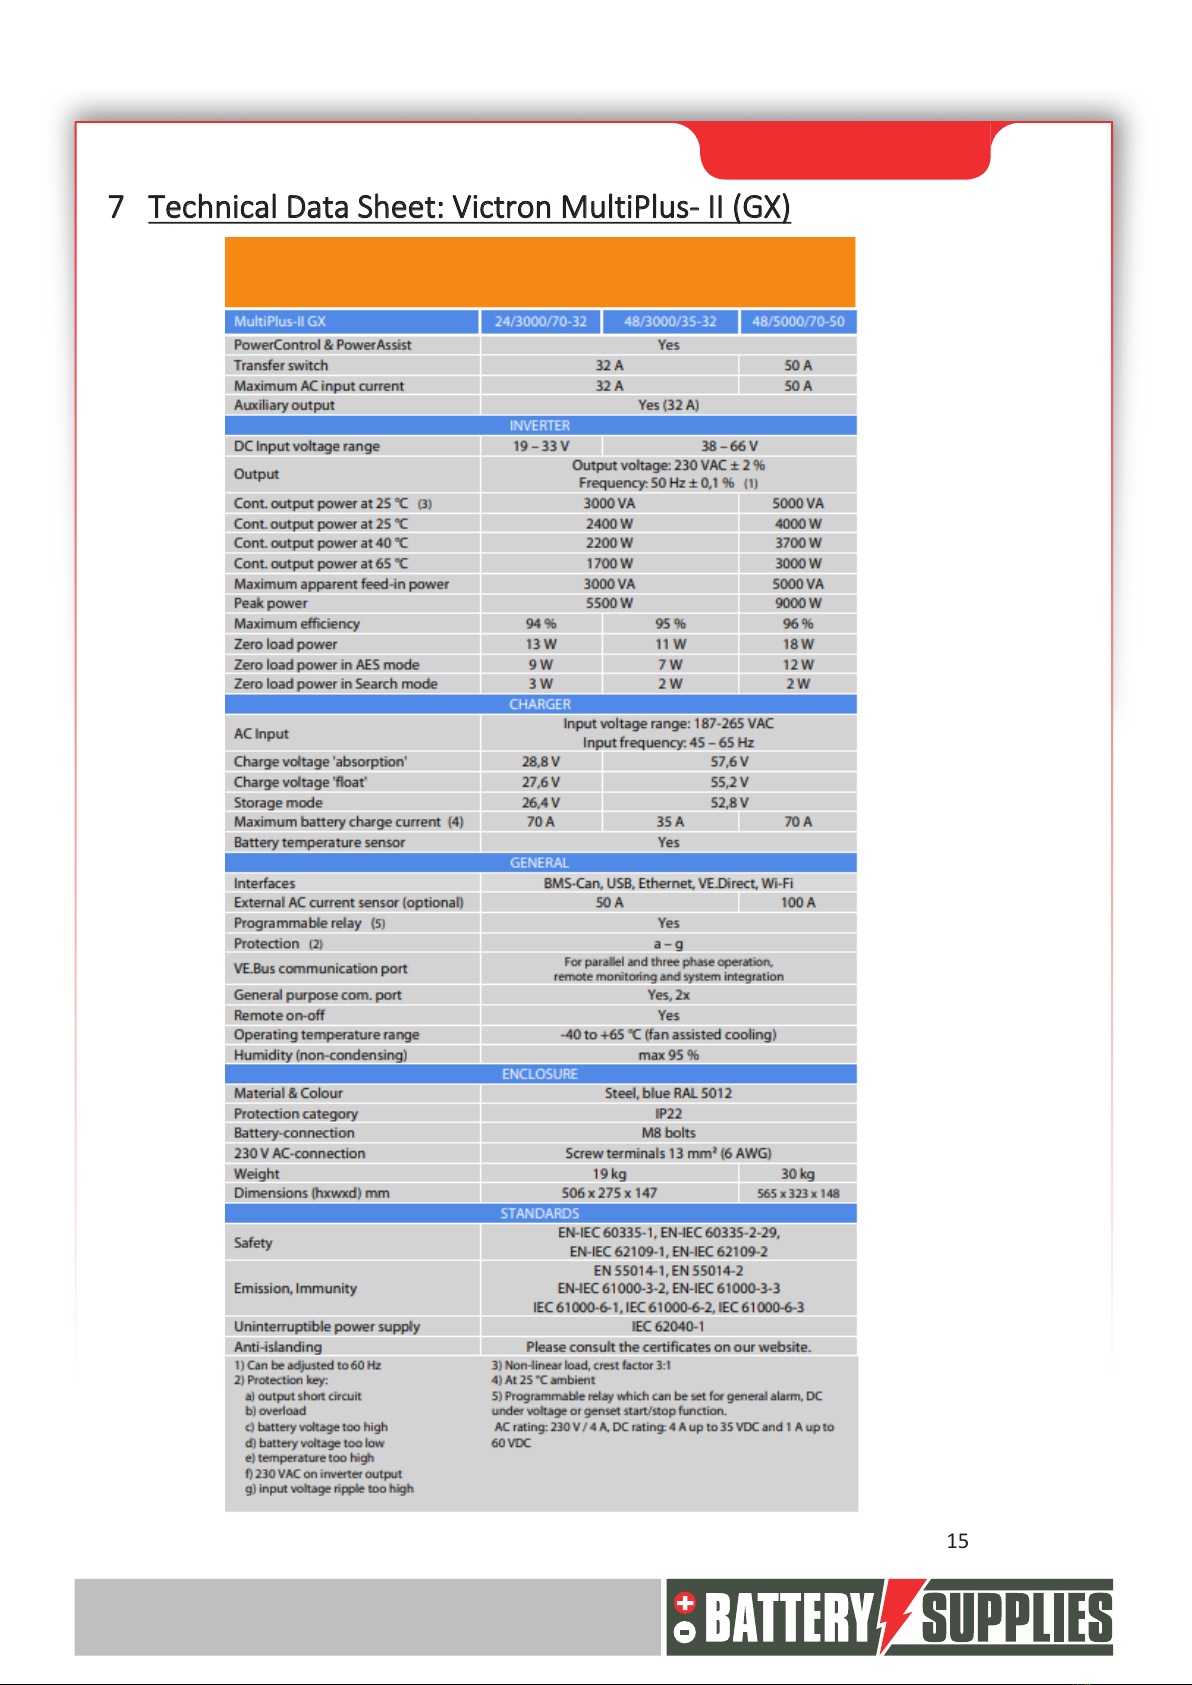
7Technical Data Sheet: Victron MultiPlus- II (GX)

Nijverheidslaan +50/56, B-8540 Deerlijk - BELGIUM
Tel +32 56 617 977 - Fax +32 56 617 955
MANUAL
EnergyRack
1
INSTALLER'S MANUAL
AQ-Lith EnergyRack
Victron MultiPlus -II
Three-phase Victron installation
3x5 kVA –BAT/49848
PART 2
Version
June 2022 version
BAT/50317

Nijverheidslaan +50/56, B-8540 Deerlijk - BELGIUM
Tel +32 56 617 977 - Fax +32 56 617 955
MANUAL
EnergyRack
2
Content
1Introduction........................................................................................................................ 3
2Connecting the installation ................................................................................................ 4
2.1 hanging and placing appliances................................................................................... 4
2.2 Connecting the devices................................................................................................ 4
2.2.1 Wiring the EnergyRack ......................................................................................... 5
2.2.2 Connecting the various devices............................................................................ 6
3Connecting and setting the energy meter EM24 ............................................................... 7
4Updating the firmware....................................................................................................... 9
5Load parameters with MK3-USB interface....................................................................... 13
6VRM portal –settings ESS ................................................................................................ 18
6.1 Connecting via VRM Online Portal ............................................................................ 18
6.2 Settings ...................................................................................................................... 18
7UPS function ..................................................................................................................... 20
8Inviting the customer (for the application on the smartphone)...................................... 22
Nijverheidslaan +50/56, B-8540 Deerlijk - BELGIUM
Tel +32 56 617 977 - Fax +32 56 617 955
MANUAL
EnergyRack
3
1Introduction
This second part of this manual is intended to assist you in installing an AQ-Lith three-phase
battery storage system. It should only be installed by persons with a qualification in the field
of electricity and installation techniques.
This manual consists of three chapters:
1) Connecting the installation
2) Starting up and setting up the installation
3) Problems and Solutions
Also make sure to check in advance that you have the latest version of this manual.
The installer must always ensure that the contents of this manual
comply with the installation concerned and with the latest local
legislation such as the AREI, etc.
This manual is for support only. Following a training course
(recognised by us) is necessary for the correct installation and
commissioning of a battery storage system.
Be sure to consult part 1 of the manual before starting to connect
and start up an installation.
Nijverheidslaan +50/56, B-8540 Deerlijk - BELGIUM
Tel +32 56 617 977 - Fax +32 56 617 955
MANUAL
EnergyRack
4
2Connecting the installation
With the help of the diagrams and the step-by-step plan that you can find in this chapter,
you are able to connect all devices and meters correctly.
2.1 hanging and placing appliances
The Victron Multiplus-II (GX) units should be hung on the wall. It is important to keep a free
space of at least 15 cm on all sides of these appliances so that the ventilation of the
appliances is not impeded. Never hang the inverters directly above the battery. Make sure
that the breakers protecting the inverters are not smaller than shown on the diagrams in
part 1.
The EnergyRack should be in a dry place with a constant temperature
(20-25°C) and out of the sun. Temperatures that are too high or too low can negatively affect
battery life and performance.
Try to keep the distance between the battery and inverters to a minimum to minimize any
cable losses.
The energy meter is placed just after the digital meter. Any Yuso controller may also be
placed on the wall near the inverter.
It is also possible to provide all the machines with which the inverters can be connected to
the grid at a later date. Do not connect the inverters to the grid yet!
2.2 Connecting the devices.
The wiring diagrams for connecting the power and data cables can be found in part 1 of this
manual. The first step here is connecting the EnergyRack internally. The schedule on the next
page can be followed.
When connecting the installation, the sequence (given in the step-
by-step plan) is MANDATORY to follow. If this is not done correctly,
damage may occur to the devices.
The Multiplus GX requires an internet connection via the cable.
Check beforehand that there are no security features that block
the access of the device to the network.
Nijverheidslaan +50/56, B-8540 Deerlijk - BELGIUM
Tel +32 56 617 977 - Fax +32 56 617 955
MANUAL
EnergyRack
5
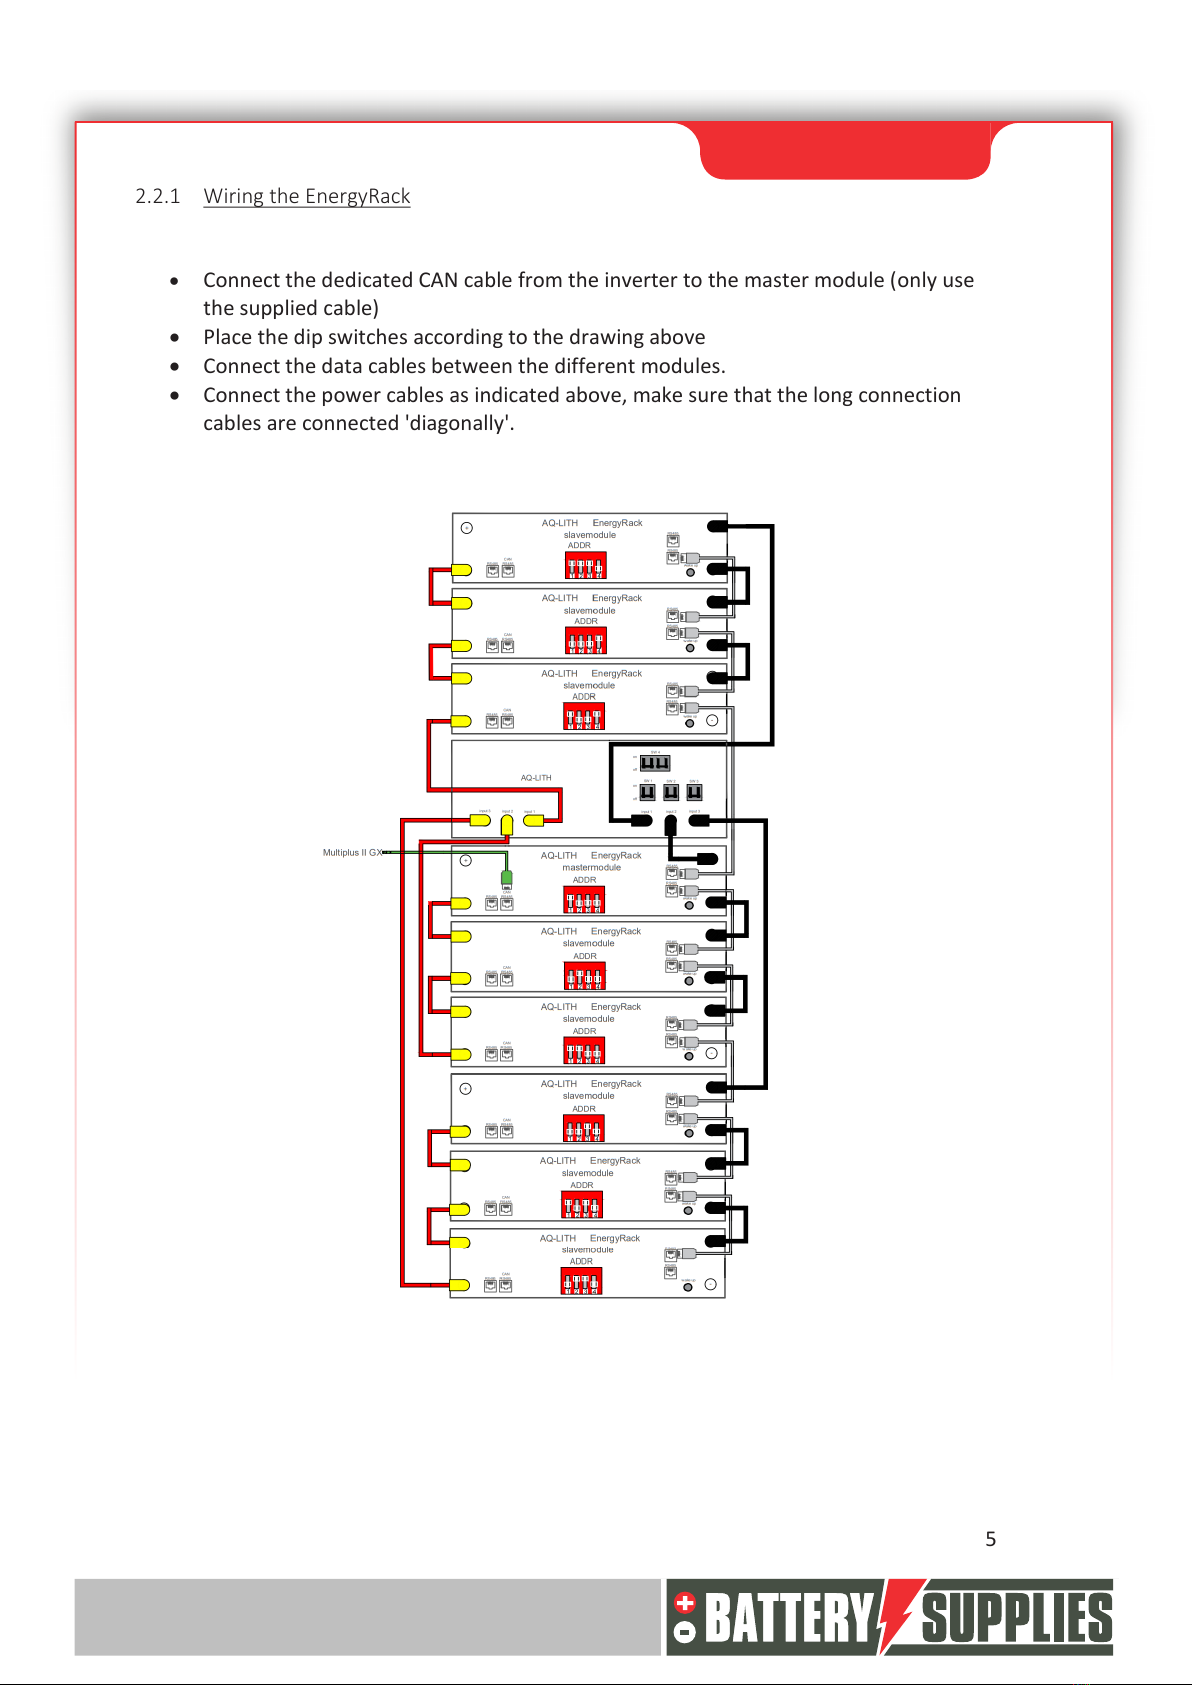
2.2.1 Wiring the EnergyRack
•Connect the dedicated CAN cable from the inverter to the master module (only use
the supplied cable)
•Place the dip switches according to the drawing above
•Connect the data cables between the different modules.
•Connect the power cables as indicated above, make sure that the long connection
cables are connected 'diagonally'.
This manual suits for next models
1
Table of contents
Popular Power Supply manuals by other brands


Voodoo Lab
Voodoo Lab Pedal Power AC user manual

Warner Electric
Warner Electric MCS-805-1 installation instructions

Agilent Technologies
Agilent Technologies E3633A Service guide

EVGA
EVGA GT Series manual

Sparkfun Electronics
Sparkfun Electronics TOL-11296 HOOK-UP GUIDE

Tri-M Systems
Tri-M Systems HE104-75W manual