Pecron EP3000-48V User manual

Please read the user manual thoroughly before using
USER MANUAL
EP3000-48V
EP3000-48V 3072Wh

FUNCTION INTRODUCTION
①
②
③
④
LED Capacity Indicator
Indicator Under Cascade Status
Serial number knob
Battery Expansion Port
⑤
⑥
⑦
⑧
Power Display Switch
DC12V XT60 Output
USB-C Ports
USB-A Ports
⑨
⑩
DC Switch
DC 12V~95V Charging Port
DC ON/OFF
12V-30A PD 100W 18W DC INPUT
12~95V-400W
3 5
4
2 1
3 5
4
2 1
25%
EXTRA BATTERY PORT 1 EXTRA BATTERY PORT 2
50% 75% 100% ⑤
④
①
②
③
⑥
⑨
⑩
⑦
⑧

SPECIFICATIONS
LiFePO4 Battery
Retain 80%+
Original Capacity
At 3500 Cycles
Dimension
L17.3*W12.2*H7.8 in
L441*W312*H200
mm
Capacity Battery Type Net Weight
Around 57lb
Around 26kg
3072Wh
(51.2V60Ah)
Protections
Over-Voltage,
Overheat,
Overload,
Short-Circuit,
Self-Recovery
Temperature
0℃~45℃/32°F~113°F
(Charging)
-20℃~45℃/-4°F~113°F
(Discharging)
OUTPUT SPECS INPUT SPECS
XT60 Output *1 USB-A *1
(5V,9V,12V,20V,
Max 100W)*1
USB-C *1
(5V,9V,12V,
Max 18W)*1
DC 12V-30A
GX16MF-5 *1
DC Charging(12V~95V)
Max 400W
Max 15A
CASCADE FUNCTION
Cascadable to devices
with MJ32 cascade port
Port For Cascade *2
3 5
4
2 1
3 5
4
2 1
EP3000-48V3072Wh

PACKING LIST
MC4 Solar Charging Cable(LSMC4-5GX16) *1
PECRON EP3000-48V *1
MJ32 Cascade cable *1
Cable from XT60 to
Cigar port and 5525 port *1
Car charge cable with
GX16MF-5 connector *1
Anderson Solar Charging Cable *1
Solar Cable with
5521 Connector *1
12V Alligator Clips *1 Corner protector *6 Metal connecting piece *6 Screws *6
3 5
4
2 1
3 5
4
2 1
25%
EXTRA BATTERY PORT 1 EXTRA BATTERY PORT 2
50% 75% 100%
HOW TO USE THE EP3000-48V
Light press to show battery capacity
EP3000-48V 3072Wh

HOW TO USE THE EP3000-48V IN CASCADE WITH THE HOST
1:Before use, make sure the EP3000-48V power pack and the host have similar battery levels, with a difference of no
more than 10%.
If there is a significant difference in battery levels, it will take a longer time for the host and power pack to display
green, indicating a complete balance.
2:When cascading multiple power packs, check the serial number knob on each power pack to ensure the uniqueness of
the serial numbers. These serial numbers will correspond to the identification numbers of the power packs in the app.
Duplicate serial numbers can cause inaccuracies in battery levels, among other issues.
3:Use the MJ32-48V cascade cable to connect the host and the EP3000-48V power pack through the cascade port.
4:Once the connection is completed, the status LED of the EP3000-48V power pack should display either yellow or green.
Yellow indicates a significant difference in battery levels, indicating that the balancing process is in progress. Green
indicates that the power pack and the host are fully balanced. (If you need to use high-power devices, please wait for
complete balance.)
DC ON/OFF
12V-30A PD 100W 18W DC INPUT
12~95V-400W
Long press to turn on/off DC (USB/XT60 12V)
Note: Operating temperature range of EP3000-48V is -20~45℃.
If the operating temperature is not within this range, it will fail to work.

25% 50% 75% 100%
HOW TO INSERT AND REMOVE THE CASCADE CABLE
1:When cascading multiple EP3000-48V units, it is important to maintain the uniqueness of the serial numbers.
2:Without connecting to the host, EP3000-48V units cannot be connected or activated.
3:After completing the cascade connection, when using EP3000-48V units, the charging and discharging power may not
be displayed on the host screen, but the host will calculate their battery levels.
4:After completing the cascade connection, when the host is powered on, the power packs will perform a self-check, and
the status lights may have a delayed response (within one minute). This is normal.
5:After completing the cascade connection, when the host is powered off, the power packs will wait to be fully balanced
with the host before shutting down.
CASCADE PROCESS NOTES
Inserting the cascade cable:
With the "PUSH" button facing upwards, align it with the
corresponding socket. Push it forward until you hear a "click"
sound, indicating that it is inserted in place.
Removing the cascade cable:
Press down and push the "PUSH" button downward, grip
the plug, and pull it outward.
25% 50% 75% 100%
Adjusting the angle of the cascade cable:
Before insertion, determine the desired angle and grip the
plug. Within the range of the rotating arrow, you can rotate
it 90° clockwise or 90° counterclockwise.
(Do not exceed this angle and do not rotate after insertion.)

1:First, remove the protective corners from the power packs you
want to stack, and align them with the positioning structure,
placing them on top of each other.
STACKING AND SECURING MULTIPLE POWER PACKS
EP3000-48V 3072Wh
25% 50% 75% 100%
EP3000-48V 3072Wh
25% 50% 75% 100%
Corresponding to
bottom projection
2:Use screws and metal connecting piece to secure the stacked
power packs from top to bottom.
3:Install the protective corners in the following order: align the
side with the positioning structure first, then snap the front
side into place. Install them one by one until they are properly
positioned.
EP3000-48V 3072Wh
25% 50% 75% 100%
EP3000-48V 3072Wh
25% 50% 75% 100%
EP3000-48V 3072Wh
EP3000-48V 3072Wh
①
②

DC ON/OFF
12V-30A PD 100W 18W DC INPUT
12~95V-400W
HOW TO CHARGE THE EP3000-48V BATTERY PACK BY VEHICL
Car charge cable with GX16MF-5 connector
RECHARGE TIME
Electric Generator
Around 30HoursAround 8~9Hours
(By wide voltage adapter)
Around 8~9Hours
Car Charger
Charged by adatper
4:After installation, as shown in the diagram, to ensure safety,
stack a maximum of four EP3000-48V power packs.
(The protective corners in the middle of the power packs are for
aesthetic purposes only and do not provide structural strength.)
EP3000-48V 3072Wh
EP3000-48V 3072Wh
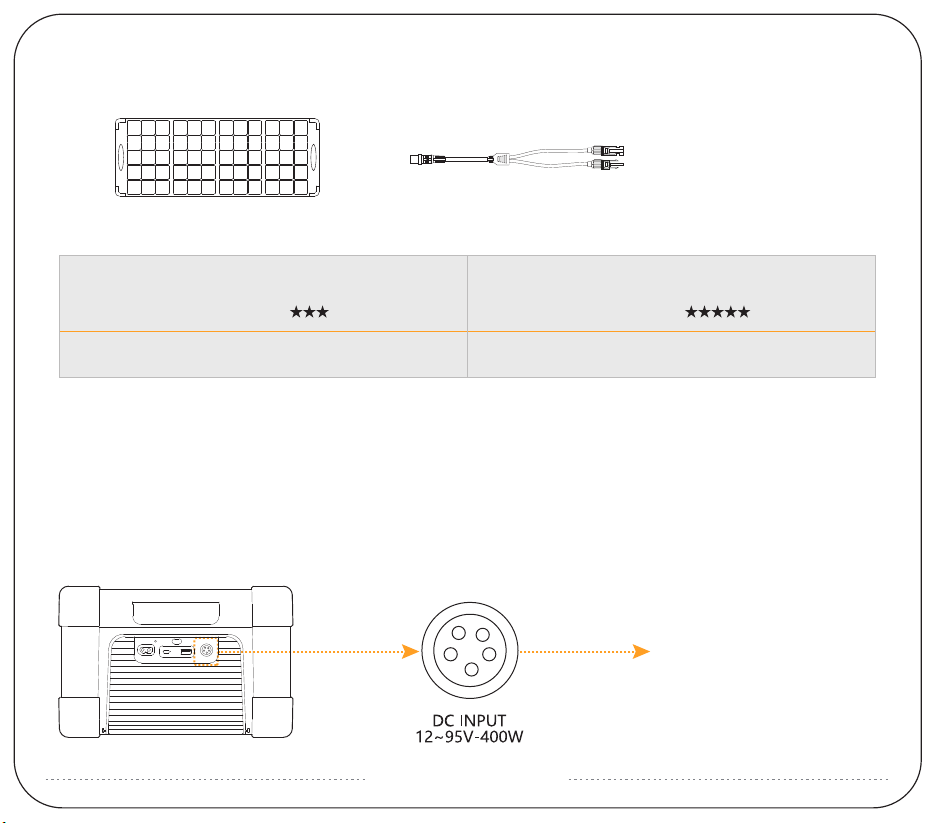
SOLAR CHARGE TIME
MC4 Solar Charging Cable
Note: The above data comes from PECRON’s laboratory. Actual charging time depends on the weather conditions.
200W
19~20 Hours
Recommended
400W
10~11 Hours
Recommended
USING SOLAR PANELS TO CHARGE THE EP3000-48V
GX16MF-5 Charging Port: PV (operating voltage) range 12V~95V, 400W maximum; VOC (open circuit voltage) of solar
panel/array must be less than 95V, otherwise, it will damage the unit! Do not wire more than two 36V solar panels in
series, or more than four 18V solar panels in series. (18V/36V stands for Vmp, the operating voltage, of the solar panel)
GX16MF-5 Charging Port:
PV12~95V-400W Maximum Input
DC ON/OFF
12V-30A PD 100W 18W DC INPUT
12~95V-400W
PECRON solar panel

USING SOLAR PANELS TO CHARGE THE EP3000-48V
Charging the EP3000-48V with a single solar panel
MC4 Solar Charging Cable*1
Solar charge cable with 5521 connector*1
MC4 Solar Charging Cable*1
※ It is recommended to choose PECRON solar panels for optimal user experience! The VOC of a single solar panel should be
less than 95V, and the VMP should be greater than 12V.
Charging EP3000-48V with two solar panels in series
※ It is recommended to choose PECRON solar panels for optimal user experience! The VOC of a single solar panel should be
less than 95V, and the VMP should be greater than 6V.
Table of contents
Other Pecron Power Supply manuals


