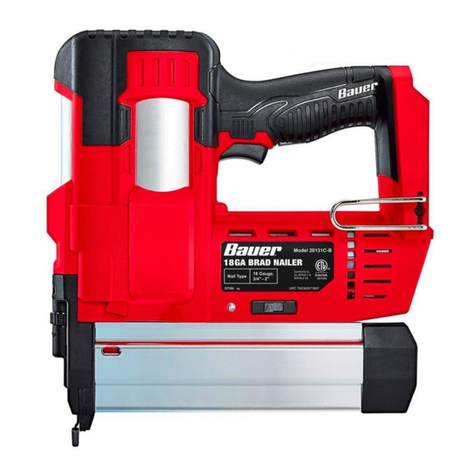
Bauer 20131C-B User manual

!"#"$%&'(%)*+#"$*%,$-%.$$/-00)))1.,(+&(2(*"3.$14&5
65,"7%&'(%$*4.8"4,7%#'//&($%,$-%/(&9'4$#'//&($:.,(+&(2(*"3.$14&5
;&(%<*#$%=*#'7$#>%
?#*%@1A%B5/%C&'(%<,$$*(D
EF&79%F*/,(,$*7DG
Owner’s Manual & Safety Instructions
Save This Manual Keep this manual for the safety warnings and precautions, assembly,
operating, inspection, maintenance and cleaning procedures. Write the product’s serial number in the
back of the manual near the assembly diagram (or month and year of purchase if product has no number).
Keep this manual and the receipt in a safe and dry place for future reference. 20j
When unpacking, make sure that the product is intact
and undamaged. If any parts are missing or broken,
please call 1-888-866-5797 as soon as possible.
Copyright© 2020 by Harbor Freight Tools®. All rights reserved.
No portion of this manual or any artwork contained herein may be reproduced in
any shape or form without the express written consent of Harbor Freight Tools.
Diagrams within this manual may not be drawn proportionally. Due to continuing
improvements, actual product may differ slightly from the product described herein.
To ol s r eq ui r ed f o r as s em bl y a nd se rvice m ay not be in cluded.
Read this material before using this product.
Failure to do so can result in serious injury.
SAVE THIS MANUAL.

Page 2 ;&(%$*4.8"4,7%H'*#$"&8#>%/7*,#*%4,77%IJKKKJKLLJMNON1 Item 57180
FB;6PQ RS6=BPTRU VBTUP6UBUW6F6P?S
P,+7*%&2%W&8$*8$#
Safety ......................................................... 2
Specifications ............................................. 8
Setup .......................................................... 8
Operation .................................................... 9
Maintenance .............................................. 14
Parts List and Diagram .............................. 18
Warranty .................................................... 20
XB=UTUY%FQV<RZF%BU[%[6;TUTPTRUF
This is the safety alert symbol. It is used to alert you to potential
personal injury hazards. Obey all safety messages that
follow this symbol to avoid possible injury or death.
Indicates a hazardous situation which, if not avoided,
will result in death or serious injury.
Indicates a hazardous situation which, if not avoided,
could result in death or serious injury.
Indicates a hazardous situation which, if not avoided,
could result in minor or moderate injury.
Addresses practices not related to personal injury.
TVSR=PBUP%FB;6PQ%TU;R=VBPTRU
Y*8*(,7%S&)*(%P&&7%F,2*$D%X,(8"83#
=*,9%,77%#,2*$D%),(8"83#%,89%,77%"8#$('4$"&8#1%%
Failure to follow the warnings and instructions may result in electric shock, fire and/or serious injury.
F,\*%,77%),(8"83#%,89%"8#$('4$"&8#%2&(%2'$'(*%(*2*(*84*1
The term ″power tool″ in the warnings refers to your battery-operated (cordless) power tool.
X&(]%B(*,%F,2*$D
1. ^**/%)&(]%,(*,%47*,8%,89%)*77%7"$1%%
Cluttered or dark areas invite accidents.
2. [&%8&$%&/*(,$*%/&)*(%$&&7#%"8%*_/7&#"\*%
,$5&#/.*(*#>%#'4.%,#%"8%$.*%/(*#*84*%&2%
27,55,+7*%7"H'"9#>%3,#*#%&(%9'#$1 Power tools
create sparks which may ignite the dust or fumes.
3. ^**/%4."79(*8%,89%+D#$,89*(#%
,),D%)."7*%&/*(,$"83%,%/&)*(%$&&71
Distractions can cause you to lose control.

Page 3;&(%$*4.8"4,7%H'*#$"&8#>%/7*,#*%4,77%IJKKKJKLLJMNON1Item 57180
FB;6PQRS6=BPTRUVBTUP6UBUW6 F6P?S
67*4$("4,7%F,2*$D
[&%8&$%*_/&#*%/&)*(%$&&7#%$&%(,"8%&(%)*$%4&89"$"&8#1
Water entering a power tool will increase the risk of electric shock.
S*(#&8,7%F,2*$D
1. F$,D%,7*($>%),$4.%).,$%D&'%,(*%9&"83%
,89%'#*%4&55&8%#*8#*%).*8%&/*(,$"83%
,%/&)*(%$&&71%%[&%8&$%'#*%,%/&)*(%
$&&7%)."7*%D&'%,(*%$"(*9%&(%'89*(%$.*%
"827'*84*%&2%9('3#>%,74&.&7%&(%5*9"4,$"&81
A moment of inattention while operating power
tools may result in serious personal injury.
2. ?#*%/*(#&8,7%/(&$*4$"\*%*H'"/5*8$1%%
B7),D#%)*,(%*D*%/(&$*4$"&81 Protective
equipment such as dust mask, non-skid safety
shoes, hard hat, or hearing protection used for
appropriate conditions will reduce personal injuries.
3. S(*\*8$%'8"8$*8$"&8,7%#$,($"831%
68#'(*%$.*%P("33*(%"#%"8%$.*%&22J/&#"$"&8%+*2&(*%
4&88*4$"83%$&%/&)*(%#&'(4*>%/"4]"83%'/%&(%
4,((D"83%$.*%$&&71
Carrying power tools with your finger on
the Trigger or energizing power tools that
have the Trigger on invites accidents.
4. [&%8&$%&\*((*,4.1%%^**/%/(&/*(%2&&$"83%,89%
+,7,84*%,$%,77%$"5*#1 This enables better control
of the power tool in unexpected situations.
5. [(*##%/(&/*(7D1%%[&%8&$%)*,(%7&&#*%47&$."83%&(%
`*)*7(D1%%^**/%D&'(%.,"(>%47&$."83%,89%37&\*#%
,),D%2(&5%5&\"83%/,($#1 Loose clothes, jewelry
or long hair can be caught in moving parts.
6. T2%9*\"4*#%,(*%/(&\"9*9%2&(%$.*%4&88*4$"&8%&2%
9'#$%*_$(,4$"&8%,89%4&77*4$"&8%2,4"7"$"*#>%*8#'(*%
$.*#*%,(*%4&88*4$*9%,89%/(&/*(7D%'#*91 Use of
dust collection can reduce dust-related hazards.
7. B7),D#%)*,(%.*,("83%/(&$*4$"&8%
).*8%'#"83%$.*%$&&71
Prolonged exposure to high intensity
noise is able to cause hearing loss.
8. B7),D#%,##'5*%$.,$%$.*%$&&7%4&8$,"8#%2,#$*8*(#1
Do not point the tool toward yourself or anyone
whether it contains fasteners or not.
9. XB=UTUY%a%[&%8&$%9("\*%2,#$*8*(%&8%$&/%&2%
,8&$.*(%2,#$*8*(1 This is able to cause the fastener
to be deflected and hit someone, or cause the tool
to react and result in a risk of injury to persons.
10. XB=UTUY%a%=*5&\*%2"83*(%2(&5%$.*%
P("33*(%).*8%8&$%9("\"83%2,#$*8*(#1
Never carry the%tool with finger on Trigger,
the tool is able to discharge a fastener.
11. R87D%'#*%#,2*$D%*H'"/5*8$%$.,$%.,#%+**8%
,//(&\*9%+D%,8%,//(&/(",$*%#$,89,(9#%,3*84D1
Unapproved safety equipment may not provide
adequate protection. Eye protection must be
ANSI-approved and breathing protection
must be NIOSH-approved for the
specific hazards in the work area.
S&)*(%P&&7%?#*%,89%W,(*
1. [&%8&$%2&(4*%$.*%/&)*(%$&&71%%?#*%$.*%
4&((*4$%/&)*(%$&&7%2&(%D&'(%,//7"4,$"&81
The correct power tool will do the job better and
safer at the rate for which it was designed.
2. [&%8&$%'#*%$.*%/&)*(%$&&7%"2%$.*%P("33*(%%
9&*#%8&$%$'(8%"$%&8%,89%&221
Any power tool that cannot be controlled with the
Trigger is dangerous and must be repaired.
3. ["#4&88*4$%$.*%+,$$*(D%/,4]%2(&5%$.*%
/&)*(%$&&7%+*2&(*%5,]"83%,8D%,9`'#$5*8$#>%
4.,83"83%,44*##&("*#>%&(%#$&("83%/&)*(%
$&&7#1 Such preventive safety measures reduce
the risk of starting the power tool accidentally.
4. F$&(*%"97*%/&)*(%$&&7#%&'$%&2%$.*%(*,4.%&2%
4."79(*8%,89%9&%8&$%,77&)%/*(#&8#%'82,5"7",(%
)"$.%$.*%/&)*(%$&&7%&(%$.*#*%"8#$('4$"&8#%
$&%&/*(,$*%$.*%/&)*(%$&&71 Power tools are
dangerous in the hands of untrained users.
5. V,"8$,"8%/&)*(%$&&7#1%%W.*4]%2&(%5"#,7"385*8$%
&(%+"89"83%&2%5&\"83%/,($#>%+(*,],3*%&2%/,($#%
,89%,8D%&$.*(%4&89"$"&8%$.,$%5,D%,22*4$%$.*%
/&)*(%$&&7b#%&/*(,$"&81%%T2%9,5,3*9>%.,\*%$.*%
/&)*(%$&&7%(*/,"(*9%+*2&(*%'#*1 Many accidents
are caused by poorly maintained power tools.
f. ?#*%&87D%$.&#*%2,#$*8*(#%7"#$*9%"8%$.*%
F/*4"2"4,$"&8#%4.,($%&2%$."#%5,8',71
Fasteners%not identified for use with this tool by the
tool manufacturer are able to result in a risk of injury
to persons or tool damage when used in this tool.
7. ?#*%$.*%/&)*(%$&&7>%,44*##&("*#%,89%$&&7%+"$#%
*$41%"8%,44&(9,84*%)"$.%$.*#*%"8#$('4$"&8#>%
$,]"83%"8$&%,44&'8$%$.*%)&(]"83%4&89"$"&8#%
,89%$.*%)&(]%$&%+*%/*(2&(5*91 Use of the
power tool for operations different from those
intended could result in a hazardous situation.

Page 4 ;&(%$*4.8"4,7%H'*#$"&8#>%/7*,#*%4,77%IJKKKJKLLJMNON1 Item 57180
FB;6PQ RS6=BPTRU VBTUP6UBUW6F6P?S
<,$$*(D%$&&7%'#*%,89%4,(*
1. Prevent unintentional starting. Ensure the
switch is in the off-position before connecting
to battery pack, picking up or carrying the
power tool. Carrying the power tool with your
finger on the switch or energizing power tool
that have the switch on invites accidents.
2. Disconnect the battery pack from the power
tool before making any adjustments, changing
accessories, or storing power tool. Such
preventive safety measures reduce the risk
of starting the power tool accidentally.
3. Recharge only with the charger specified by
the manufacturer. A charger that is suitable for
one type of battery pack may create a risk of
fire when used with another battery pack.
4. Use power tools only with specifically designated
battery packs. Use of any other battery packs
may create a risk of injury and actuate.
5. When battery pack is not in use, keep it away
from other metal objects, like paper clips, coins,
keys, nails, screws or other small metal objects,
that can make a connection from one terminal
to another. Shorting the battery terminals
together may cause burns or a actuate.
6. Under abusive conditions, liquid may be
ejected from the battery; avoid contact.
If contact accidentally occurs, flush with
water. If liquid contacts eyes, additionally
seek medical help. Liquid ejected from the
battery may cause irritation or burns.
7. Do not use a battery pack or power tool that is
damaged or modified. Damaged or modified
batteries may exhibit unpredictable behavior
resulting in actuate, explosion or risk of injury.
8. Do not expose a battery pack or power tool
to discharge or excessive temperature.
Exposure to discharge or temperature
above 265°F may cause explosion.
9. Follow all charging instructions and do not charge
the battery pack or power tool outside of the
temperature range specified in the instructions.
Charging improperly or at temperatures
outside of the specified range may damage
the battery and increase the risk of fire.
10. Have servicing performed by a qualified
repair person using only identical
replacement parts. This will ensure that
the safety of the product is maintained.
11. Do not modify or attempt to repair the power
tool or the battery pack except as indicated
in the instructions for use and care.
F*(\"4*
C,\*%D&'(%/&)*(%$&&7%#*(\"4*9%+D%,%H',7"2"*9%(*/,"(%/*(#&8%'#"83%&87D%"9*8$"4,7%(*/7,4*5*8$%/,($#1%
This will ensure that the safety of the power tool is maintained.
1. Maintain labels and nameplates on the tool.
These carry important safety information.
If unreadable or missing, contact
Harbor Freight Tools for a replacement.
2. Do not leave the tool unattended when the
Battery Pack is connected. Turn off the tool,
and remove the Battery Pack before leaving.
3. The battery Charger gets hot during
use. The Charger’s heat can build up
to unsafe levels and create a actuate
hazard if it does not receive adequate
ventilation, due to an electrical fault, or if it is used
in a hot environment.
Do not place the Charger on a flammable surface.
Do not obstruct any vents on the Charger.
6#/*4",77D%,\&"9%/7,4"83%$.*%W.,(3*(%&8%4,(/*$#%
,89%('3#c%$.*D%,(*%8&$%&87D%27,55,+7*>%+'$%$.*D%
,7#&%&+#$('4$%\*8$#%'89*(%$.*%W.,(3*(1%
Place the Charger on a stable, solid, nonflammable
surface (such as a stable metal workbench
or concrete floor) at least 1 foot away from all
flammable objects, such as drapes or walls.
Keep a actuate extinguisher and a smoke
detector in the area. Frequently monitor the
Charger and Battery Pack while charging.

Page 5;&(%$*4.8"4,7%H'*#$"&8#>%/7*,#*%4,77%IJKKKJKLLJMNON1Item 57180
FB;6PQRS6=BPTRUVBTUP6UBUW6 F6P?S
4. This product is not a toy.
Keep it out of reach of children.
5. People with pacemakers should consult their
physician(s) before use. Electromagnetic fields in
close proximity to heart pacemaker could cause
pacemaker interference or pacemaker failure.
6. The warnings, precautions, and instructions
discussed in this instruction manual cannot cover
all possible conditions and situations that may
occur.
It must be understood by the operator that
common sense and caution are factors
which cannot be built into this product,
but must be supplied by the operator.
!"+(,$"&8%S(*4,'$"&8#
This tool vibrates during use.
Repeated or long-term exposure to vibration may
cause temporary or permanent physical injury,
particularly to the hands, arms and shoulders.
To reduce the risk of vibration-related injury:
1. Anyone using vibrating tools regularly or for
an extended period should first be examined
by a doctor and then have regular medical
check-ups to ensure medical problems are not
being caused or worsened from use. Pregnant
women or people who have impaired blood
circulation to the hand, past hand injuries,
nervous system disorders, diabetes, or
Raynaud’s Disease should not use this tool.
If you feel any symptoms related to vibration (such
as tingling, numbness, and white or blue fingers),
seek medical advice as soon as possible.
2. Do not smoke during use. Nicotine reduces
the blood supply to the hands and fingers,
increasing the risk of vibration-related injury.
3. Wear suitable gloves to reduce the
vibration effects on the user.
4. Use tools with the lowest vibration when there
is a choice between different processes.
5. Include vibration-free periods each day of work.
6. Grip tool as lightly as possible (while still keeping
safe control of it). Let the tool do the work.
7. To reduce vibration, maintain
tool as explained in this manual.
If abnormal vibration occurs, stop immediately.
F/*4"2"4%F,2*$D%T8#$('4$"&8#
1. R/*(,$&(#%,89%&$.*(#%"8%)&(]%,(*,%V?FP%
)*,(%BUFTJ,//(&\*9%#,2*$D%3&337*#%)"$.%
#"9*%#."*79#%9'("83%'#*1%%The employer is
responsible to enforce the use of eye protection
by the operator and others in the work area.
2. ^**/%2"83*(#%,),D%2(&5%P("33*(%).*8%8&$%
9("\"83%2,#$*8*(#%$&%,\&"9%,44"9*8$,7%9"#4.,(3*1
3. W.&"4*%&2%$("33*("83%5*$.&9%"#%"5/&($,8$1%%
W.*4]%5,8',7%2&(%$("33*("83%&/$"&8#1
4. Always assume the tool contains fasteners.
5. Do not point the tool toward yourself or anyone
whether it contains fasteners or not.
6. Do not actuate the tool unless the tool is
placed firmly against the workpiece.
7. Respect the tool as a working implement.
8. No horseplay. This tool is not a toy
and can be deadly if misused.
9. Do not load the tool with fasteners when any
one of the operating controls, such as the
Trigger or Workpiece Contact, is activated.
10. Do not remove, tamper with, or otherwise cause
the tool operating controls to become inoperable.
11. Do not operate the tool if any portion of
the tool operating controls is inoperable,
disconnected, altered, or not working properly.
12. Disconnect the tool from the air supply when:
a. Unattended.
b. Performing any maintenance or repair.
c. Clearing a jam.
d. Moving the tool to a new location.
13. Do not make any modifications to this tool.
14. Refer to the tool maintenance instructions
for detailed information on the proper
maintenance of the tool.
15. Drive fasteners into an appropriate
work surface only. Do not attempt to discharge
fasteners into surfaces too hard to penetrate.
Do not drive fasteners on top of other fasteners,
or at too steep of an angle. Fasteners
can ricochet causing personal injury.
16. Do not drive fasteners too close to the edge
of a workpiece. They may split the workpiece
and fly free, causing personal injury.

Page 6 ;&(%$*4.8"4,7%H'*#$"&8#>%/7*,#*%4,77%IJKKKJKLLJMNON1 Item 57180
FB;6PQ RS6=BPTRU VBTUP6UBUW6F6P?S
17. Keep clear of the workpiece near the area being
fastened. Fasteners may bend sideways during
driving, causing them to exit the workpiece at
an unexpected point, causing personal injury.
18. Transport tool safely. Always disconnect air
supply when moving the tool. Carry the tool by
the handle and avoid contact with the Trigger.
19. Hold tool away from head and body.
During operation the tool may
kick back causing injury.
20. Do not drive fasteners into a workpiece
that has people, utility lines, or other
objects behind or inside it.
21. Keep balance while using this tool.
Keep area below clear if working in an elevated
location, and secure air hose to prevent falls
from bystanders accidentally pulling on it.
22. Obey the manual for the air compressor
used to power this tool.
23. Install an in-line shutoff valve to allow
immediate control over the air supply in an
emergency, even if a hose is ruptured.
24. Do not engrave or stamp anything into
the housing to avoid weakening it.
25. The warnings and precautions discussed in this
manual cannot cover all possible conditions and
situations that may occur. It must be understood
by the operator that common sense and caution
are factors which cannot be built into this
product, but must be supplied by the operator.
Z"$."'5%<,$$*(D%F,2*$D%X,(8"83#
ZTPCT?V%<BPP6=T6F%FPR=6%
B%ZB=Y6%BVR?UP%R;%6U6=YQ%BU[%%
XTZZ%!6UP%BWP?BP6%R=%6dSZR[6%
T;%VTFP=6BP6[-
1. ^**/%<,$$*(D%S,4]%9(D1
2. [R%URP%[R%BUQ%R;%PC6%;RZZRXTUY%
PR%PC6%<BPP6=Q%SBW^-
a. R/*8>
b. [(&/>
c. F.&($J4"(4'"$>
d. S'84$'(*>
e. T84"8*(,$*>%&(
f. 6_/&#*%$&%$*5/*(,$'(*#%3(*,$*(%$.,8%eLMf;1
3. Charge Battery Pack only according
to its Charger’s instructions.
4. Inspect Battery Pack before every use;
do not use or charge if damaged.
%FB!6%PC6F6%TUFP=?WPTRUF1

Page 7;&(%$*4.8"4,7%H'*#$"&8#>%/7*,#*%4,77%IJKKKJKLLJMNON1Item 57180
FB;6PQRS6=BPTRUVBTUP6UBUW6 F6P?S
Y(&'89"83
PR%S=6!6UP%6Z6WP=TW%FCRW^%BU[%[6BPC%;=RV%TUWR==6WP%Y=R?U[TUY-%
W.*4]%)"$.%,%H',7"2"*9%*7*4$("4",8%"2%D&'%,(*%"8%9&'+$%,#%$&%).*$.*(%$.*%&'$7*$%"#%/(&/*(7D%
3(&'89*91%%[&%8&$%5&9"2D%$.*%/&)*(%4&(9%/7'3%/(&\"9*9%)"$.%$.*%4.,(3*(1%%[&%8&$%'#*%$.*%
4.,(3*(%"2%$.*%/&)*(%4&(9%&(%/7'3%"#%9,5,3*91%%T2%9,5,3*9>%.,\*%"$%(*/,"(*9%+D%,%#*(\"4*%2,4"7"$D%
+*2&(*%'#*1%%T2%$.*%/7'3%)"77%8&$%2"$%$.*%&'$7*$>%.,\*%,%/(&/*(%&'$7*$%"8#$,77*9%+D%,%H',7"2"*9%*7*4$("4",81
6_$*8#"&8%W&(9#
U&$*- Extension cords must not be used with this item’s Charger.
FD5+&7&3D
Double Insulated
!Volts
gAlternating Current
BAmperes
n0 xxxx/min. No Load Revolutions
per Minute (RPM)
WARNING marking concerning Risk
of Eye Injury. Wear ANSI-approved
safety goggles with side shields.
Read the manual before
set-up and/or use.
WARNING marking
concerning Risk of Fire.
Do not cover Charger
ventilation ducts.
Charge on actuateproof surface only.
WARNING marking concerning
Risk of Electric Shock.
Properly connect Charger’s power
cord to appropriate outlet.
WARNING marking concerning
Risk of Explosion.
Do not puncture, short, or open
battery packs and do not charge
damaged battery packs.

Page 8 ;&(%$*4.8"4,7%H'*#$"&8#>%/7*,#*%4,77%IJKKKJKLLJMNON1 Item 57180
FB;6PQ RS6=BPTRU VBTUP6UBUW6F6P?S
F/*4"2"4,$"&8#
Battery Pack Bauer 20V Li-Ion, 3.0Ah / 63631, 1.5Ah / 63530 (sold separately)
Charger Bauer 20V Li-Ion / 63529 (sold separately)
Nailer Input Rating 20VDC, 60/min
Actuation System Single Sequential and Contact Actuation
Nail Type 18 Gauge 3/4″ – 2″ Brad
F*$'/%J%<*2&(*%?#*-
% =*,9%$.*%6UPT=6%TVSR=PBUP%FB;6PQ%TU;R=VBPTRU%#*4$"&8%,$%$.*%+*3"88"83%&2%$."#%
5,8',7%"847'9"83%,77%$*_$%'89*(%#'+.*,9"83#%$.*(*"8%+*2&(*%#*$%'/%&(%'#*%&2%$."#%/(&9'4$1
U&$*- For additional information regarding the parts listed in the
following pages, refer to Parts List and Diagram on page 18.
;'84$"&8#
X&(]/"*4*%
W&8$,4$
P("33*(
[*/$.%
^8&+
<,$$*(D%
=*4*/$,47*
<*7$%C&&]
X&(]%Z"3.$%
F)"$4.
V,3,h"8*
Z6[%
T89"4,$&(
B4$"\,$"&8%
V&9*%F)"$4.
X&(]%
Z"3.$
V,3,h"8*%
Z,$4.
C,897*
X&(]/"*4*%W&8$,4$ - The Workpiece Contact helps prevent the tool
from driving unless it is pressed against an object.

Page 9;&(%$*4.8"4,7%H'*#$"&8#>%/7*,#*%4,77%IJKKKJKLLJMNON1Item 57180
FB;6PQRS6=BPTRUVBTUP6UBUW6 F6P?S
R/*(,$"83%T8#$('4$"&8#
% =*,9%$.*%6UPT=6%TVSR=PBUP%FB;6PQ%TU;R=VBPTRU%#*4$"&8%,$%$.*%+*3"88"83%&2%$."#%
5,8',7%"847'9"83%,77%$*_$%'89*(%#'+.*,9"83#%$.*(*"8%+*2&(*%#*$%'/%&(%'#*%&2%$."#%/(&9'4$1
P&&7%F*$%?/
PR%S=6!6UP%F6=TR?F%TUi?=Q%;=RV%BWWT[6UPBZ%[TFWCB=Y6-%
V,]*%#'(*%$.,$%$.*%P("33*(%"#%"8%$.*%&22J/&#"$"&8%,89%(*5&\*%"$#%<,$$*(D%
S,4]%+*2&(*%/*(2&(5"83%,8D%/(&4*9'(*%"8%$."#%#*4$"&81
<,$$*(D%W.,(3"83
Charge battery after unpacking and before using this tool. Follow
instructions included with battery charger (sold separately)
X&(]/"*4*%,89%X&(]%B(*,%F*$%?/
1. Designate a work area that is clean and well lit.
The work area must not allow access by children
or pets to prevent distraction and injury.
2. Secure loose workpieces using a vise or clamps
(not included) to prevent movement while working.
3. There must not be objects, such as utility lines,
nearby that will present a hazard while working.
F"837*JF*H'*8$",7%B4$',$"&8%V*4.,8"#5%[*2"8"$"&8
The single-sequential activation mechanism is designed to allow accurate placement of fasteners. Use the
switch next to the LED Indicator to change modes. The tool should only actuate if the Workpiece Contact is
pressed against the workpiece prior to pulling the Trigger. It should only actuate again if the Trigger is released
and squeezed again. The Tool should not actuate if the Workpiece Contact is not pressed against an object.
F"837*JF*H'*8$",7%B4$',$"&8%V*4.,8"#5%P*#$"83%S(&4*9'(*
PR%S=6!6UP%F6=TR?F%TUi?=Q%;=RV%BWWT[6UPBZ%[TFWCB=Y6-%
65/$D%$.*%$&&7%+*2&(*%$."#%/(&4*9'(*1%%S&"8$%$.*%$&&7%,$%,%/"*4*%&2%#4(,/%)&&9%).*8%$*#$"831
1. Disconnect the Battery Pack from the tool.
2. Empty the magazine of fasteners.
3. Check that the Trigger and the Workpiece
Contact move freely, without sticking.
4. Connect the Battery Pack to the tool
making sure it clicks in place.
5. Set Activation Switch to the left
(single-sequential actuation).
6. Test the tool by pressing the Workpiece Contact
against the workpiece without pulling the Trigger.
P.*%$&&7%5'#$%8&$%4D47*%E,4$',$*G1
If it cycles (actuates), stop immediately and have
it repaired by a qualified service technician.
7. Hold the tool away, or off of the workpiece.
The Workpiece Contact should return to its original
position. Squeeze the Trigger.
P.*%$&&7%5'#$%8&$%4D47*%E,4$',$*G1
If it cycles (actuates), stop immediately and
take the tool to a qualified service technician.
8. Press the Workpiece Contact against the workpiece
and squeeze the Trigger.
P.*%$&&7%5'#$%4D47*%E,4$',$*G%&87D%&84*1
Release the Trigger, slide the nailer to a fresh piece
of wood, and squeeze it again.
P.*%$&&7%5'#$%4D47*%E,4$',$*G%,3,"8%&87D%&84*1
With the Trigger depressed, carefully lift the tool
and press it against the workpiece again.
P.*%$&&7%5'#$%8&$%4D47*%E,4$',$*G1
If it fails to act in the manner explained in bold,
have it repaired by a qualified service technician.

Page 10 ;&(%$*4.8"4,7%H'*#$"&8#>%/7*,#*%4,77%IJKKKJKLLJMNON1 Item 57180
FB;6PQ RS6=BPTRU VBTUP6UBUW6F6P?S
W&8$,4$%B4$',$"&8%V*4.,8"#5%[*2"8"$"&8
The contact actuation mechanism allows rapid placement of fasteners. Use the switch next to the LED
Indicator to change modes. The tool should only actuate if the Workpiece Contact is pressed against the
workpiece and the Trigger is pulled. It should actuate again if the Trigger is released and pulled OR if the
Workpiece Contact is lifted and pressed against the workpiece again. The tool should not actuate if the
Workpiece Contact is not pressed against an object. W&8$,4$%B4$',$"&8%#.&'79%&87D%+*%*8,+7*9%,89%
'#*9%+D%#]"77*9%&/*(,$&(#%).&%,(*%,),(*%&2%$.*%.,h,(9#%,89%'#*%/(&/*(>%#,2*%)&(]%/(,4$"4*#1
W&8$,4$%B4$',$"&8%V*4.,8"#5%P*#$"83%S(&4*9'(*
PR%S=6!6UP%F6=TR?F%TUi?=Q%;=RV%BWWT[6UPBZ%[TFWCB=Y6-%
S&"8$%$.*%$&&7%,$%,%/"*4*%&2%#4(,/%)&&9%).*8%$*#$"831
1. Disconnect the Battery Pack from the tool.
2. Load the magazine with fasteners.
3. Check that the Trigger and the Workpiece
Contact move freely, without sticking.
4. Connect the Battery Pack to the tool
making sure it clicks in place.
5. Set Activation Switch to the right
(contact actuation).
6. Test the tool by pressing the Workpiece Contact
against the workpiece without pulling the Trigger.
P.*%$&&7%5'#$%8&$%4D47*%E,4$',$*G1
If it cycles (actuates), stop immediately and have
it repaired by a qualified service technician.
7. Hold the tool away, or off of the workpiece.
The Workpiece Contact should return to its original
position. Squeeze the Trigger.
P.*%$&&7%5'#$%8&$%4D47*%E,4$',$*G1
If it cycles (actuates), stop immediately and
take the tool to a qualified service technician.
8. Press the Workpiece Contact against the workpiece
and squeeze the Trigger.
P.*%$&&7%5'#$%4D47*%E,4$',$*G%&87D%&84*1
Release the Trigger, slide the nailer to a fresh piece
of wood, and squeeze it again.
P.*%$&&7%5'#$%4D47*%E,4$',$*G%,3,"8%&87D%&84*1
With the Trigger depressed, carefully lift the tool
and press it against the workpiece again in a new
location.
P.*%$&&7%5'#$%4D47*%E,4$',$*G%,3,"8%&87D%&84*1
If it fails to act in the manner explained in bold,
have it repaired by a qualified service technician.
F)"$4.,+7*%P("33*(
PR%S=6!6UP%F6=TR?F%TUi?=Q%;=RV%BWWT[6UPBZ%[=T!TUY-
• =*7*,#*%P("33*(%,89%/&"8$%$&&7%"8%,%#,2*%9"(*4$"&8%+*2&(*%4.,83"83%,4$',$"&8%5&9*1
• RUZQ%&/*(,$*%$.*%$&&7%)"$.%$.*%F)"$4.%2'77D%"8%&8*%&2%$.*%,4$',$"&8%5&9*%/&#"$"&8#.
1. Set the Activation Mode Switch to the right
to enable Single Sequential operation
for precise placement of fasteners.
2. Set the Activation Mode Switch to the left to enable
Contact Actuation operation for rapid placement of
fasteners.
R87D%,%#]"77*9%&/*(,$&(%).&%"#%,),(*%&2%$.*%
.,h,(9#%,89%'#*#%/(&/*(>%#,2*%)&(]%/(,4$"4*#%
#.&'79%'#*%W&8$,4$%B4$',$"&8%&/*(,$"&81
F"837*%F*H'*8$",7% W&8$,4$%B4$',$"&8%
B4$"\,$"&8%V&9*%F)"$4.

Page 11;&(%$*4.8"4,7%H'*#$"&8#>%/7*,#*%4,77%IJKKKJKLLJMNON1Item 57180
FB;6PQRS6=BPTRUVBTUP6UBUW6 F6P?S
%%Z&,9"83%$.*%P&&7
PR%S=6!6UP%F6=TR?F%TUi?=Q%;=RV%BWWT[6UPBZ%[TFWCB=Y6>%<6;R=6%ZRB[TUY-
j%X*,(%BUFTJ,//(&\*9%#,2*$D%3&337*#%)"$.%#"9*%#."*79#1%%
Other people in the work area must also wear ANSI-approved impact safety goggles with side shields.
j%=*7*,#*%$.*%P("33*(1
j%["#4&88*4$%$.*%<,$$*(D%S,4]%2(&5%$.*%$&&71
j%B$$*5/$%$&%9"#4.,(3*%$.*%P&&7%"8$&%,%/"*4*%&2%#4(,/%)&&9%$&%*8#'(*%$.,$%
"$%"#%9"#4&88*4$*9%,89%"#%"84,/,+7*%&2%9("\"83%,8D%2,#$*8*(#1
1. Depress the Latch and pull back the
Sliding Magazine completely.
Z,$4.
2. Load the pointed end of the nail strip into
the bottom of the Fixed Magazine, laying
the strip flat on the bed of Magazine.
3. Make sure the heads of the nails fit in the
slots in the Fixed Magazine, as shown.
4. Slide strip forward into Drive Guide.
5. Gently push the Sliding Magazine inward
and push forward until the Latch snaps and
locks securely. WB?PTRUk Do not pinch your hand.
F7"9"83%
V,3,h"8*
U,"7%
F$("/
;"_*9%
V,3,h"8*
;"_*9%
V,3,h"8*
U,"7%
F$("/
W(&##J
#*4$"&8

Page 12 ;&(%$*4.8"4,7%H'*#$"&8#>%/7*,#*%4,77%IJKKKJKLLJMNON1 Item 57180
FB;6PQ RS6=BPTRU VBTUP6UBUW6F6P?S
Y*8*(,7%R/*(,$"83%T8#$('4$"&8#
1. Make sure that the Trigger is in the
off-position, then attach a fully charged
Battery Pack making sure it clicks in place.
2. Before each use, test the tool as
directed in the prior section.
XB=UTUYk%%PR%S=6!6UP%
F6=TR?F%TUi?=Q-%%^**/%#*4&89%.,89%
,),D%2(&5%$&&7%9"#4.,(3*%,(*,>%
*#/*4",77D%"2%.&79"83%)&(]/"*4*1%%
P&&7%,//7"*#%*_$(*5*%2&(4*%$&%2,#$*8*(>%
,89%2,#$*8*(#%5,D%9*27*4$%&(%9"#4.,(3*%
"8%,8%'8*_/*4$*9%9"(*4$"&81
XB=UTUYk%%PR%S=6!6UP%TUi?=Q-%%
[&%8&$%.&79%$&&7%8*,(%+&9D%)."7*%9("\"831%%
P&&7%(*4&"7%4,8%4,'#*%"8`'(D1
XB=UTUYk%%PR%S=6!6UP%F6=TR?F%
TUi?=Q>%TUWZ?[TUY%S6=VBU6UP%
C6B=TUY%ZRFF-%%B7),D#%)*,(%.*,("83%
/(&$*4$"&8%).*8%'#"83%$.*%$&&71
3. Position tool at desired fastener location, set
the Activation Mode Switch, and depress the
Workpiece Contact fully against the workpiece.
Squeeze the Trigger to discharge a fastener.
4. P&%4.,83*%9("\"83%9*/$.- ["#4&88*4$%<,$$*(D%
S,4]%,89%]**/%X&(]/"*4*%W&8$,4$%/&"8$*9%
,),D1
To reduce nail depth, turn the Depth Knob
clockwise, toward .
To increase nail depth, turn the Depth
Knob counterclockwise, toward .
[*/$.%
^8&+
5. P.*%Z6[%T89"4,$&(-
Z6[%T89"4,$&(
a. Flashing red indicates a jam in the
Magazine. Stop and clear the jam.
b. Solid red indicates low battery. Remove
Battery Pack and recharge it.
c. Flashing green indicates the tool is over
heating. Stop using the tool immediately and
allow it to cool down before continuing use.
d. Solid green indicates no fasteners are in
the Magazine. Stop and reload tool.
e. If the LED is not illuminated this indicates
the battery is fully charged and the
fasteners are correctly installed.
6. B2$*(%'#*>%$&%/(*\*8$%,44"9*8$#-
a. =*7*,#*%$.*%P("33*(1
b. =*5&\*%$.*%<,$$*(D%S,4]1
c. 65/$D%$.*%V,3,h"8*1
d. B$$*5/$%$&%9"#4.,(3*%$.*%$&&7%"8$&%,%/"*4*%&2%
#4(,/%)&&9%$&%*8#'(*%$.,$%"$%"#%9"#4&88*4$*9%
,89%"#%"84,/,+7*%&2%9("\"83%,8D%2,#$*8*(#1
e. =*7*,#*%$.*%P("33*(%,3,"81
f. W7*,8%*_$*(8,7%#'(2,4*#%)"$.%47*,8>%9(D%47&$.1
7. F$&(*%"89&&(#%&'$%&2%4."79(*8b#%(*,4.1

Page 13;&(%$*4.8"4,7%H'*#$"&8#>%/7*,#*%4,77%IJKKKJKLLJMNON1Item 57180
FB;6PQRS6=BPTRUVBTUP6UBUW6 F6P?S
W7*,("83%,%i,5
1. If the LED Indicator is flashing red, it indicates
there is a jam in the Magazine. Stop and
clear the jam before proceeding.
2. Remove the Battery Pack.
3. Open the Magazine by pressing the
release Latch and sliding it open.
Z,$4.
4. Remove the nail strip and jammed fastener.
i,5
5. Reinstall the nail strip and Battery Pack. Close
the Magazine. If the jam has been corrected,
the LED Indicator will no longer be illuminated.
If the LED is still flashing then the jam may
be in the internal striking mechanism.
6. Remove the Battery Pack and nail strip.
7. Using the included 3mm Hex Key, remove the
four crews located next to the Depth Knob.
C*_%^*D
[*/$.%
^8&+
[("\*%
Y'"9*
8. Remove the Drive Guide and jammed fastener.
9. Reattach the Drive Guide with the four
screws. Use the Hex Key to tighten.
10. Make sure the Workpiece Contact
moves smoothly without binding.
11. Reinstall the Battery Pack and nail
strip. Check that the LED Indicator is not
illuminated. If the LED is still flashing, have
the tool serviced by a trained technician.

Page 14 ;&(%$*4.8"4,7%H'*#$"&8#>%/7*,#*%4,77%IJKKKJKLLJMNON1 Item 57180
FB;6PQ RS6=BPTRU VBTUP6UBUW6F6P?S
V,"8$*8,84*%,89%F*(\"4"83
%S(&4*9'(*#%8&$%#/*4"2"4,77D%*_/7,"8*9%"8%$."#%5,8',7%5'#$%
+*%/*(2&(5*9%&87D%+D%,%H',7"2"*9%$*4.8"4",81
PR%S=6!6UP%F6=TR?F%TUi?=Q%;=RV%BWWT[6UPBZ%[TFWCB=Y6-%
<6;R=6%BUQ%VBTUP6UBUW6%R=%=6SBT=F%B=6%[RU6%E"847'9"83%47*,("83%`,5#G-
j%X*,(%BUFTJ,//(&\*9%#,2*$D%3&337*#%)"$.%#"9*%#."*79#1%%%
Other people in the work area must also wear ANSI-approved impact safety goggles with side shields.
j%=*7*,#*%$.*%P("33*(1
j%[*$,4.%$.*%<,$$*(D%S,4]1
j%B$$*5/$%$&%9"#4.,(3*%$.*%P&&7%"8$&%,%/"*4*%&2%#4(,/%)&&9%$&%*8#'(*%$.,$%
"$%"#%9"#4&88*4$*9%,89%"#%"84,/,+7*%&2%9("\"83%,8D%2,#$*8*(#1
j%65/$D%$.*%V,3,h"8*%,89%7*,\*%"$%&/*8%9'("83%#*(\"4*1%%%
P.*%V,3,h"8*%"#%#/("83J7&,9*9%,89%5,D%4,'#*%/,($#%&(%,%2,#$*8*(%$&%27D%&'$%&2%$.*%P&&71
PR%S=6!6UP%F6=TR?F%TUi?=Q%;=RV%PRRZ%;BTZ?=6-%
[&%8&$%'#*%9,5,3*9%*H'"/5*8$1%%T2%,+8&(5,7%8&"#*%&(%\"+(,$"&8%
&44'(#>%.,\*%$.*%/(&+7*5%4&((*4$*9%+*2&(*%2'($.*(%'#*1
W7*,8"83>%V,"8$*8,84*>%,89%Z'+("4,$"&8
1. <6;R=6%6BWC%?F6> inspect the general
condition of the tool. Check for:
• proper Workpiece Contact operation
• free Workpiece Contact and Trigger movement
• leaking, swollen, or cracked Battery Pack,
• loose hardware,
• misalignment or binding of moving parts,
• cracked or broken parts, and
• any other condition that may
affect its safe operation.
2. B;P6=%6BWC%?F6> perform the
following procedures:
• remove the Battery Pack and
empty the Magazine
• attempt to discharge the tool into a piece of
scrap wood to ensure that it is disconnected
and is incapable of driving any fasteners
• clean the Drive Guide and Magazine to
remove any accumulated dirt and debris.
Lightly oil the Drive Guide
• clean external surfaces with clean, dry cloth
• store indoors out of children′s reach.
3. Li-Ion BATTERY MUST BE RECYCLED OR
DISPOSED OF PROPERLY.
Do not short, incinerate or open battery.
4. Disconnect Battery Pack and store Battery
Pack, Charger, and tool in dry, indoor area out of
reach of children and away from metal objects
(i.e., paperclips, coins) to prevent shorting.

Page 15;&(%$*4.8"4,7%H'*#$"&8#>%/7*,#*%4,77%IJKKKJKLLJMNON1Item 57180
FB;6PQRS6=BPTRUVBTUP6UBUW6 F6P?S
P(&'+7*#.&&$"83
S(&+7*5 S&##"+7*%W,'#*# Z"]*7D%F&7'$"&8#
Insufficient
fastener depth.
1. Incorrect tool depth setting.
2. Incorrect lubrication or not
enough lubrication.
1. Adjust depth setting, if available.
2. Check for loose connections and make
Fasteners drive
too deeply.
Incorrect Tool depth setting. Adjust depth setting, if available.
Tool cycles without
driving fastener.
1. Jammed fastener.
2. Tool empty.
3. Incorrect fasteners used.
4. Magazine dirty or not
lubricated properly.
1. Clear jammed fastener according to
Clearing Jams instructions.
2. Reload with correct fasteners.
3. Empty, then reload with correct fasteners.
4. Clean and lubricate Magazine and Pusher.
Frequent jamming. Incorrect nail type. Confirm nail collation type, diameter, angle,
type, and length. Correct as needed.
Tool will not start. 1. Battery Pack not properly
connected.
2. Battery Pack not properly
charged.
3. Battery Pack burnt-out.
4. Internal damage or wear.
(Carbon brushes or
Trigger, for example.)
1. Remove Battery Pack, make sure there are no
obstructions, reinsert the Battery Pack according
to its shape (it should only fit one way), and press
firmly until the Battery Pack locks in place.
2. Make sure Charger is connected and
operating properly. Give enough time for
Battery Pack to recharge properly.
3. Dispose of old Battery Pack
properly or recycle. Replace Battery Pack.
4. Have technician service tool.
Tool operates slowly. 1. Forcing tool to work too fast.
2. Battery Pack wearing out.
1. Allow tool to work at its own rate.
2. Dispose of old Battery Pack
properly or recycle. Replace Battery Pack.
Performance
decreases over time.
Carbon brushes worn or damaged. Have qualified technician replace brushes.
Excessive noise
or rattling.
Internal damage or wear. (Carbon
brushes or bearings, for example.)
Have technician service tool.
Overheating. 1. Forcing tool to work too fast.
2. Blocked motor housing vents.
1. Allow tool to work at its own rate.
2. Wear ANSI-approved safety goggles and
NIOSH-approved dust mask/respirator while
blowing dust out of motor using compressed air.
% ;&77&)%,77%#,2*$D%/(*4,'$"&8#%).*8*\*(%9",38&#"83%&(%#*(\"4"83%$.*%$&&71%%%
["#4&88*4$%<,$$*(D%S,4]%,89%W.,(3*(%/&)*(%#'//7D%+*2&(*%#*(\"4*1
Other manuals for 20131C-B
1
Table of contents
Other Bauer Nail Gun manuals
Popular Nail Gun manuals by other brands

HIKOKI
HIKOKI NT 1865 DBAL Handling instructions

Hitachi
Hitachi NT 65M Instruction and safety manual

REICH
REICH 3475 1 Series Technical data spare parts

Axminster
Axminster Palm Nailer user manual

Wen
Wen 61723K instruction manual

Campbell Hausfeld
Campbell Hausfeld Framing Nailer JB3495 operating instructions