Bauer 22202E-B Assembly instructions

Visit our website at: http://www.harborfreight.com
1/2" X 50FT.
DRAIN CLEANING
DRUM MACHINE
22202E-B 22201E-B
WITH POWER FEED
Owner’s Manual & Safety Instructions
Save This Manual Keep this manual for the safety warnings and precautions, assembly,
operating, inspection, maintenance and cleaning procedures. Write the product’s serial number in the
back of the manual near the assembly diagram (or month and year of purchase if product has no number).
Keep this manual and the receipt in a safe and dry place for future reference. 23i
When unpacking, make sure that the product is intact
and undamaged. If any parts are missing or broken,
please call 1-888-866-5797 as soon as possible.
Copyright©2023 by Harbor Freight Tools®. All rights reserved.
No portion of this manual or any artwork contained herein may be reproduced in
any shape or form without the express written consent of Harbor Freight Tools.
Diagrams within this manual may not be drawn proportionally. Due to continuing
improvements, actual product may differ slightly from the product described herein.
Tools required for assembly and service may not be included.
Read this material before using this product.
Failure to do so can result in serious injury.
SAVE THIS MANUAL.

Page 2 For technical questions, please call 1-888-866-5797. Item 59533 59534
SAFETY OPERATION MAINTENANCESETUP
Table of Contents
Important Safety Instructions...................... 2
Specifications ............................................. 7
Setup - Before Use:.................................... 8
Operation................................................... 11
Maintenance and Servicing ....................... 18
Parts List and Diagram.............................. 20
Warranty .................................................... 24
WARNING SYMBOLS AND DEFINITIONS
This is the safety alert symbol. It is used to alert you to potential
personal injury hazards. Obey all safety messages that
follow this symbol to avoid possible injury or death.
Indicates a hazardous situation which, if not avoided,
will result in death or serious injury.
Indicates a hazardous situation which, if not avoided,
could result in death or serious injury.
Indicates a hazardous situation which, if not avoided,
could result in minor or moderate injury.
Addresses practices not related to personal injury.
IMPORTANT SAFETY INSTRUCTIONS
WARNING - When using electric appliances, basic precautions
should always be followed, including the following:
1. Read all the instructions before using the appliance.
2. To reduce the risk of injury, close supervision is
necessary when an appliance is used near children.
3. Do not contact moving parts.
4. Only use attachments recommended
or sold by the manufacturer.
5. Do not use outdoors.
6. To disconnect, turn all controls to the off (“O”)
position, then remove plug from outlet.
7. Do not unplug by pulling on cord. To
unplug, grasp the plug, not the cord.
8. Unplug from outlet when not in use
and before servicing or cleaning.
9. Do not operate any appliance with a damaged
cord or plug, or after the appliance malfunctions
or is dropped or damaged in any manner.
Return appliance to the nearest authorized
service facility for examination, repair, or
electrical or mechanical adjustment.
10. To reduce the risk of electrical shock, do not
put Drain Cleaner in water or other liquid.
Do not place or store appliance where it
can fall or be pulled into a tub or sink.
11. Connect to a properly grounded outlet
only. See Grounding Instructions.
12. Risk of Electric Shock. Keep extension
cord connection dry and off the ground.
13. Do not wear cloth gloves or loose clothing, or use
a rag to grasp the cable to prevent entanglement.

Page 3For technical questions, please call 1-888-866-5797.Item 59533 59534
SAFETYOPERATIONMAINTENANCE SETUP
Service
1. Have your power tool serviced by a
qualified repair person using only identical
replacement parts. This will ensure that the
safety of the power tool is maintained.
2. Maintain labels and nameplates on
the tool. These carry important safety
information. If unreadable or missing, contact
Harbor Freight Tools for a replacement.
Drain Cleaner Safety Warnings
1. Wear ANSI-approved safety impact eye
goggles and heavy duty LEATHER work gloves
when using the Drain Cleaner. Never grasp
a rotating cable with a rag or cloth glove. Using
personal safety devices reduce the risk for injury.
Safety impact eye goggles and heavy work gloves
are available from Harbor Freight Tools.
2. Avoid unintentional starting.
Prepare to begin work before turning on the tool.
3. Do not force the Drain Cleaner. This tool
will do the work better and safer at the speed
and capacity for which it was designed.
4. Maintain a safe working environment. Keep the
work area well lit. Make sure there is adequate
surrounding workspace. Always keep the work
area free of obstructions, grease, oil, trash, and
other debris. Do not use a power tool in areas
near flammable chemicals, dusts, and vapors
5. Unplug the Drain Cleaner from its electrical
outlet before performing any inspection,
maintenance, or cleaning procedures.
6. Do not leave the Drain Cleaner unattended
while running. Turn power off if you
have to leave the Drain Cleaner.
7. Do not allow the cutter to stop turning while
the machine is running. This can overstress
the cable and may cause twisting, kinking or
breaking of the cable. Twisting, kinking or breaking
cable may cause striking or crushing injuries.
8. Keep gloved hand on the cable whenever the
machine is running. This provides better control
of the cable and helps prevent twisting, kinking and
breaking of the cable. Twisting, kinking or breaking
cable may cause striking or crushing injuries
9. Before each use, check all nuts, bolts,
and screws for tightness. Vibration during
operation may cause these to loosen.
10. Avoid electrical shock. Do not operate the
Drain Cleaner if sitting in standing water, and if
the operator is in standing water. Keep extension
cord off the ground and away from water.
Water increases the risk of electric shock.
11. Install this product on a proper surface. Locate
on a flat, level, and solid surface that is capable
of supporting the weight of the Drain Cleaner.
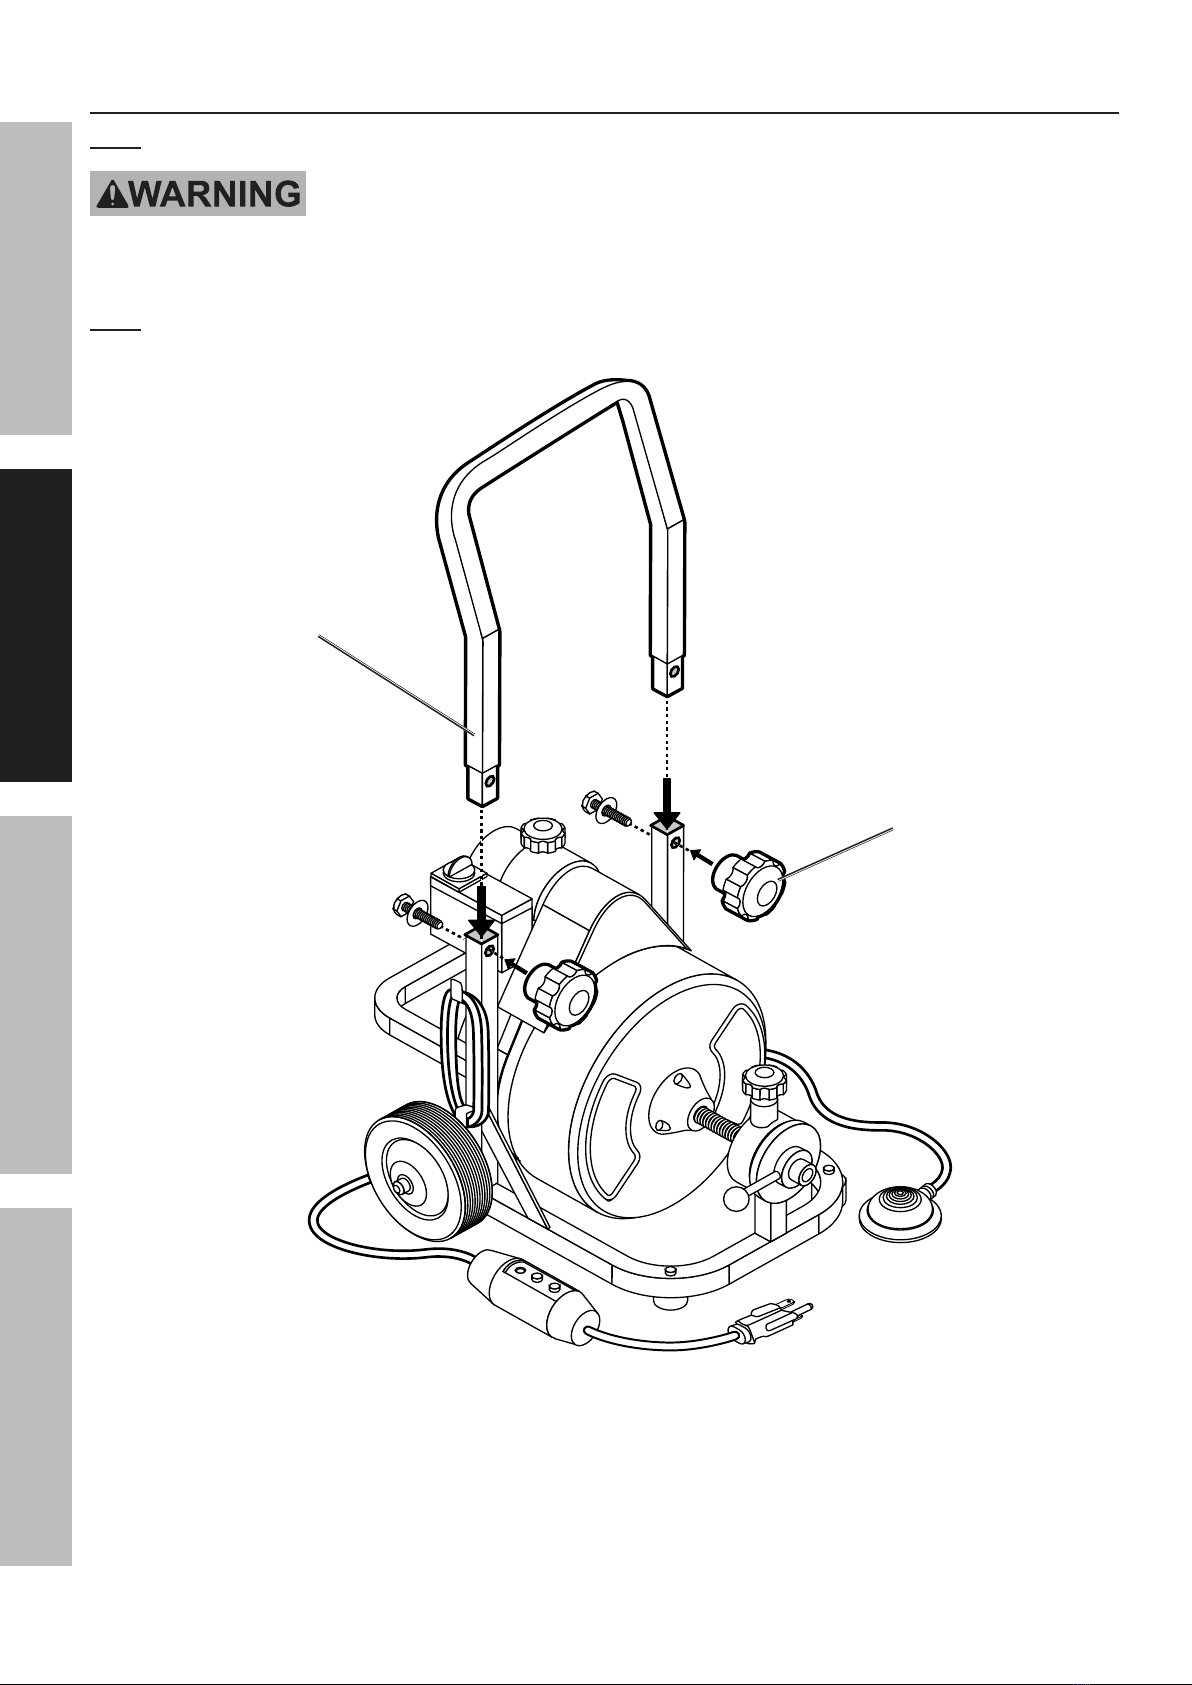
12. Do not operate the Drain Cleaner with
the belt guard removed. Fingers can get
caught between the drive belt and pulley.
13. Do not put too much stress on cable. Keep
gloved hand on the cable for control when
machine is running. In the course of drain
cleaning, if the cable encounters an obstruction,
it may stress the cable and cause the cable to
twist, kink, or break. This may result in serious
injury, and damage the equipment or pipes.
14. Position Drain Cleaner within two feet
of drain opening. Greater distances can
result in the cable twisting or kinking.
15. One person must control both the cable and
the Foot Switch. If the cutter stops rotating, the
operator must be able to turn the machine motor
off to prevent twisting, kinking and breaking of
the cable. Twisting, kinking or breaking cable
may cause striking or crushing injuries.
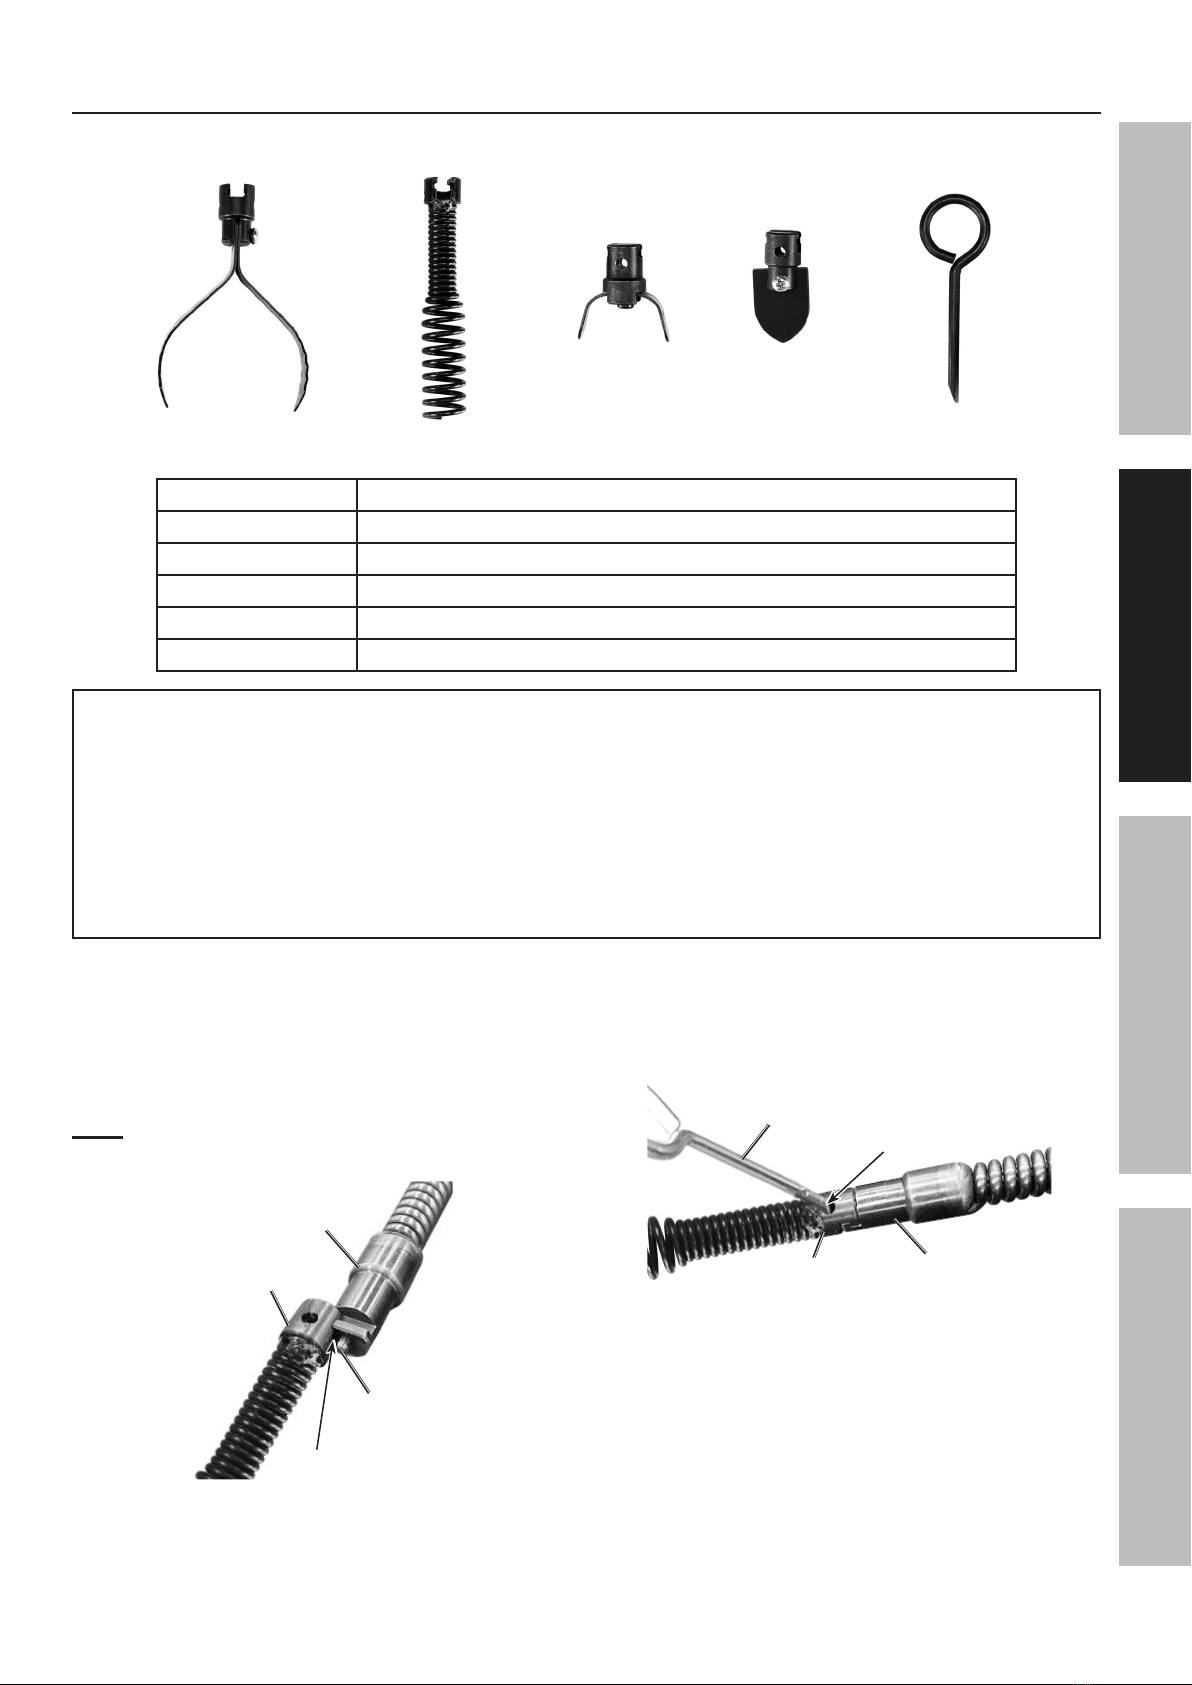
16. Reverse Motor direction only when pulling
the Cable off an obstruction. Trying to push the
Cable down the pipe or pull it out of a pipe while
in reverse operation can result in Cable damage.
Make sure Drum has stopped turning
before changing the Rotation Switch.
17. Keep hands away from the rotating Drum and
Distributor Tube. Do not reach into Drum unless
the Drain Clean power cord is unplugged.
18. Use appropriate personal protective equipment
while handling and using drain cleaning
equipment. Drains may contain chemicals,
bacteria and other substances that may be toxic,
infectious, cause burns or other issues. Appropriate
personal protective equipment always includes
ANSI-approved safety glasses and heavy-duty work
gloves, and may include equipment such as latex
or rubber gloves, face shields, goggles, protective
clothing, respirators and steel toed footwear.
19. Wash hands after use. Use hot, soapy water
to wash hands and other exposed body parts
exposed to drain contents after handling or
using drain cleaning equipment. Do not eat
or smoke while operating or handling drain
cleaning equipment. This will help prevent
contamination with toxic or infectious material.

Page 4 For technical questions, please call 1-888-866-5797. Item 59533 59534
SAFETY OPERATION MAINTENANCESETUP
20. Do not operate this machine if operator or
machine is standing in water. Operating machine
while in water increases the risk of electrical shock.
21. Only use drain cleaning machine to clean
drains of recommended sizes according
to these instructions. Other uses or
modifying the drain cleaning machine for other
applications may increase the risk of injury.
22. Be aware of possible damage to drain
lines that may result from the discovery
of roots and other obstacles.
23. WARNING! TO PREVENT SERIOUS INJURY:
People with pacemakers should consult
their physician(s) before using this product.
Electromagnetic fields in close proximity to a heart
pacemaker could cause interference to or failure of
the pacemaker. In addition, people with pacemakers
should adhere to the following:
• Avoid operating power tools alone.
• Properly maintain and inspect all tools
before use to avoid electrical shock.
24. The warnings, precautions, and instructions
discussed in this instruction manual cannot
cover all possible conditions and situations
that may occur. It must be understood by the
operator that common sense and caution are
factors which cannot be built into this product,
but must be supplied by the operator.
Vibration Safety
This tool vibrates during use.
Repeated or long-term exposure to vibration may
cause temporary or permanent physical injury,
particularly to the hands, arms and shoulders. To
reduce the risk of vibration-related injury:
1. Anyone using vibrating tools regularly or for
an extended period should first be examined
by a doctor and then have regular medical
check-ups to ensure medical problems are not
being caused or worsened from use. Pregnant
women or people who have impaired blood
circulation to the hand, past hand injuries,
nervous system disorders, diabetes, or
Raynaud’s Disease should not use this tool.
If you feel any symptoms related to vibration (such
as tingling, numbness, and white or blue fingers),
seek medical advice as soon as possible.
2. Do not smoke during use. Nicotine reduces
the blood supply to the hands and fingers,
increasing the risk of vibration-related injury.
3. Wear suitable gloves to reduce the
vibration effects on the user.
4. Use tools with the lowest vibration
when there is a choice.
5. Include vibration-free periods each day of work.
6. Grip tool as lightly as possible (while still keeping
safe control of it). Let the tool do the work.
7. To reduce vibration, maintain the tool as
explained in this manual. If any abnormal
vibration occurs, stop use immediately.
Ground Fault Circuit Interrupter Protection
This Drain Cleaner is provided with a ground-fault circuit-interrupter (GFCI) built into the plug of the power-
supply cord. This device provides additional protection from the risk of electric shock. Should replacement of
the plug or cord become necessary, use only identical replacement parts that include GFCI protection.
SAVE THESE INSTRUCTIONS.

Page 5For technical questions, please call 1-888-866-5797.Item 59533 59534
SAFETYOPERATIONMAINTENANCE SETUP
GROUNDING INSTRUCTIONS
This appliance must be grounded. In the event of malfunction or breakdown, grounding provides a path of
least resistance for electric current to reduce the risk of electric shock. This appliance is equipped with a
cord having an equipment-grounding conductor and a grounding plug. The plug must be plugged into an
appropriate outlet that is properly installed and grounded in accordance with all local codes and ordinances.
DANGER - Improper connection of the equipment-grounding conductor can result in a risk of electric shock.
The conductor with insulation having an outer surface that is green with or without yellow stripes is the equipment-
grounding conductor. If repair or replacement of the cord or plug is necessary, do not connect the equipment-
grounding conductor to a live terminal. Check with a qualified electrician or serviceman if the grounding instructions
are not completely understood, or if in doubt as to whether the appliance is properly grounded. Do not modify the
plug provided with the appliance – if it will not fit the outlet, have a proper outlet installed by a qualified electrician.
This appliance is for use on a nominal 120 V circuit, and has a grounding plug
that looks like the plug illustrated in 3-Prong Plug and Outlet.
3-Prong Plug and Outlet

Page 6 For technical questions, please call 1-888-866-5797. Item 59533 59534
SAFETY OPERATION MAINTENANCESETUP
Extension Cords
1. Grounded tools require a three wire extension cord.
If an extension cord (or a longer detachable
power-supply cord) is used:
a. The marked electrical rating of the
detachable power-supply cord or extension
cord should be at least as great as the
electrical rating of the appliance,
b. If the appliance is of the grounded
type, the extension cord should be a
grounding-type 3-wire cord, and
c. The longer extension cord (or a longer
detachable power-supply cord) should
be arranged so that it will not drape over
the countertop or tabletop where it can
be tripped over, snagged, or pulled on
unintentionally (especially by children).
2. As the distance from the supply outlet increases,
you must use a heavier gauge extension cord.
Using extension cords with inadequately sized
wire causes a serious drop in voltage, resulting
in loss of power and possible tool damage.
(See Table A on page 6.)
3. The smaller the gauge number of the wire, the
greater the capacity of the cord. For example,
a 14 gauge cord can carry a higher current
than a 16 gauge cord. (See Table A.)
4. When using more than one extension cord
to make up the total length, make sure
each cord contains at least the minimum
wire size required. (See Table A.)
5. If you are using one extension cord for more
than one tool, add the nameplate amperes
and use the sum to determine the required
minimum cord size. (See Table A.)
6. Make sure the extension cord is properly wired
and in good electrical condition. Always replace
a damaged extension cord or have it repaired
by a qualified electrician before using it.
7. Protect the extension cords from sharp objects,
excessive heat, and damp or wet areas.
8. Store appliance indoors when not in
use. Keep out of reach of children.
TABLE A: RECOMMENDED MINIMUM WIRE
GAUGE FOR EXTENSION CORDS* (120/240 VOLT)
NAMEPLATE
AMPERES
(at full load)
EXTENSION CORD
LENGTH
25´ 50´ 75´ 100´ 150´
0 – 2.0 18 18 18 18 16
2.1 – 3.4 18 18 18 16 14
3.5 – 5.0 18 18 16 14 12
5.1 – 7.0 18 16 14 12 12
7.1 – 12.0 18 14 12 10 -
12.1 – 16.0 14 12 10 - -
16.1 – 20.0 12 10 - - -
* Based on limiting the line voltage drop to five volts at
150% of the rated amperes.

Page 7For technical questions, please call 1-888-866-5797.Item 59533 59534
SAFETYOPERATIONMAINTENANCE SETUP
Symbology
VVolts
~Alternating Current
AAmperes
n0xxxx/min. No Load Revolutions per Minute (RPM)
WARNING marking concerning Risk
of Eye Injury. Wear ANSI-approved
safety goggles with side shields.
Read the manual before
set-up and/or use.
WARNING marking
concerning Risk of Fire.
Do not cover ventilation ducts.
Keep flammable objects away.
WARNING marking concerning
Risk of Electric Shock.
Properly connect power cord
to appropriate outlet.
Specifications
Electrical Rating 120V~, 60Hz, 4.6A
Motor Speed RPM n0: 1750 / min
Power Cord 6ft with GFCI plug
Cable Type Ø1/2″ x 50ft
Drain Pipe Capacity 2″ to 4″ I.D.
Drum Dimensions 13″ x 6.3″
Drum Capacity
up to 75′ of 1/2″ Cable
(Not Included)
up to 100′ of 3/8″ Cable
(Not Included)
59533 includes Power Feed
For Household and Commercial Use.

Page 8 For technical questions, please call 1-888-866-5797. Item 59533 59534
SAFETY OPERATION MAINTENANCESETUP
Setup - Before Use:
Read the ENTIRE IMPORTANT SAFETY INFORMATION section at the beginning of this
manual including all text under subheadings therein before set up or use of this product.
Functions
Rotation Switch
Quick-Change
Enclosed
Drum
Cable
Sealed Air
Activated
Foot Switch
Frame
Belt Guard
Tool Tray
Wheel Power-Feed Lever
Tension Knob
Handle Locking Knobs
Ground Fault
Interrupter
Cable
Belt Guard
Frame
Tool Tray
(not shown)
Model 59534
Quick-Change
Enclosed
Drum
Sealed Air
Activated
Foot Switch
Rotation Switch
Ground Fault
Interrupter
Model 59533

Page 9For technical questions, please call 1-888-866-5797.Item 59533 59534
SAFETYOPERATIONMAINTENANCE SETUP
Cutting Tool Accessories
Four Cutting Tools are included with each Drain Cleaner. Select appropriate
tool for the cleaning job and attach to Cable. See table below.
Arrow Cutter Boring Bulb Cutter C-Cutter Spade Cutter Removal Tool
Cutter Tool Applications
Arrow Cutter Starting tool; ideal for cutting and scraping
Boring Bulb Cutter Starting tool; ideal for removing loose objects
C-Cutter Finishing tool; ideal for grease stoppages and cleaning pipe walls.
Spade Cutter Finishing tool; used for scraping the inside edges of pipes.
Removal Tool Tool changing; used for removing cutting tools once installed.
NOTICE: If cause of obstruction is unknown, use Boring Bulb Cutter to explore
obstruction and, if possible, retrieve a piece to inspect. Once cause of obstruction is
known, select appropriate tool for the job. Run the smallest available tool through blockage
to allow backed up water to flow and carry away debris as drain is cleaned.
Once drain is flowing, more appropriate tools can be used on remaining blockage.
Keep in mind that the largest tool used should be no bigger than drain’s inside diameter, minus an inch.
Properly used, Drain Cleaners and Accessories will not damage a drain in good condition and properly
designed, constructed, and maintained. If Drain is in poor condition or not properly designed, drain
cleaning work may damage drain. If possible, visually inspect drain’s quality before operation.
To Install Cutting Tool:
1. Align Cutting Tool Coupler and Cable
Coupler grooves, with Cutting Tool
Coupler Chamfer facing Plunger.
2. Slide Couplers together until
Plunger locks into place.
Note: Check Plunger frequently for proper
movement and lubricate as necessary.
Cable
Coupler
Cutting Tool
Coupler
Plunger
Chamfer
To Remove Cutting Tool:
1. Insert Removal Tool into Cutting Tool Coupler hole
with Wedge facing towards Cable Coupler Plunger.
2. Slide Couplers apart.
Cable
Coupler
Cutting Tool
Coupler
Removal
Tool
Wedge

Page 10 For technical questions, please call 1-888-866-5797. Item 59533 59534
SAFETY OPERATION MAINTENANCESETUP
Assembly for 59533
Note: No assembly needed for Model 59534.
TO PREVENT SERIOUS INJURY FROM ACCIDENTAL OPERATION:
Turn the Rotation Switch of the tool to its “OFF” position and unplug the tool from its
electrical outlet before assembling or making any adjustments to the tool.
Note: For additional information regarding the parts listed in the following pages,
refer to the Assembly Diagrams near the end of this manual.
Step 1: Slide
Handles into slots
Step 2: Lock Handles
into place using
locking knobs

Page 11For technical questions, please call 1-888-866-5797.Item 59533 59534
SAFETYOPERATIONMAINTENANCE SETUP
Operating Instructions
Read the ENTIRE IMPORTANT SAFETY INSTRUCTIONS section at the beginning of this
manual including all text under subheadings therein before set up or use of this product.
TO PREVENT SERIOUS INJURY FROM ACCIDENTAL OPERATION:
Make sure that the Rotation Switch is in the off-position and unplug the tool from
its electrical outlet before performing any procedure in this section.
Tool Set Up - Inspection
TO PREVENT SERIOUS INJURY:
DO NOT OPERATE WITH ANY GUARD DISABLED, DAMAGED, OR REMOVED.
Wear ANSI-approved safety goggles, heavy-duty LEATHER workgloves, and other appropriate
protective equipment when setting up your Drain Cleaner. For extra protection from chemicals and
bacteria on the machine and in the work area, we recommend wearing latex, rubber or other liquid
barrier gloves under the heavy-duty work gloves. Before use, inspect gloves to be sure they are
free of defects or loose sections that could be caught in the Drain Cleaner. Rubber soled, non-slip shoes
can help prevent slipping and electric shock, especially on wet surfaces.
TO PREVENT SERIOUS INJURY FROM ELECTRIC SHOCK, TWISTED/BROKEN CABLES, CHEMICAL BURNS,
INFECTIONS AND OTHER CAUSES AND PREVENT DRAIN CLEANER DAMAGE:
Before each use, inspect Drain Cleaner and correct any problems.
1. Once Drain Cleaner is assembled, check machine
and cutters for signs of wear and damage. If
necessary, replace worn or damaged parts prior
to use. Dull or damaged cutting tools can lead to
binding, cable breakage, and slow drain cleaning.
2. Verify Drain Cleaner is unplugged and inspect
power cord, Ground Fault Circuit Interrupter (GFCI)
and plug for damage. If plug has been modified,
is missing grounding prong or cord is damaged,
to avoid electrical shock, do not use machine until
cord has been replaced by a qualified electrician.
3. Clean oil, grease or dirt from equipment
handles and controls to prevent the machine
or control from slipping during use.
4. Verify Foot Switch is attached to Drain Cleaner.
5. Verify Drain Cleaner is properly assembled.
Inspect machine for broken, worn, missing,
misaligned or binding parts or other condition
which prevents safe and normal operation.
6. Make sure switches and handles move smoothly
between positions and lock in place, and bumpers
at bottom of handle are present and firmly attached.
7. Rotate drum and confirm it turns
freely without binding.
8. Check warning labels are present,
firmly attached and readable.
9. Confirm Belt Guard is securely
fastened to Drain Cleaner.
10. Check cable for wear and damage. If any section of
cable is worn or flattened, replace cable before use.
11. Verify cable does not have multiple or excessive
kinks (greater than 15°). Kinks weaken the
cable and cause cable failure. Replace cables
that have multiple or excessively large kinks.
12. Look for spaces between cable coils.
Kinking, stretching (pulling cable by hand) or
running cable in reverse can deform cable. Cables
with spaces between coils should be replaced.
13. Check for excessive corrosion. Corrosion weakens
the cable, making it brittle. This is caused by
storing cable wet or using cable with corrosive
chemicals (found in chemical clog removers).
Excessively corroded cable should be replaced.
14. Before use, fully retract cable with a maximum
of 2″ of cable outside of machine. This will keep
cable from “whipping” when machine is turned on.
15. Set Rotation Switch to OFF position.

Page 12 For technical questions, please call 1-888-866-5797. Item 59533 59534
SAFETY OPERATION MAINTENANCESETUP
16. With dry hands, plug cord into grounded outlet
and move Rotation Switch into Forward position.
WARNING! TO PREVENT ELECTRIC SHOCK AND
DEATH: Test Ground Fault circuit interrupter
(GFCI) before each use. The GFCI does not protect
against electrical shock due to contact with both
circuit conductors or a fault in any wiring supplying
in this device. Do not alter or disable the GFCI.
17. Plug GFCI Power Plug into grounded,
120VAC electrical outlet.
a. Press RESET button. Indicator should light up.
b. Press TEST button. Indicator light will go
out and power to machine should cut off.
c. WARNING! TO PREVENT SERIOUS
INJURY: If Indicator does not go out when
TEST button is pushed, machine should
not be used until repairs can be made.
d. To restore power after test, push RESET button.
CAUTION! If machine doesn’t start, stops
while running, or you experience a mild
shock, do not use machine. Have it repaired
or replaced by a licensed electrician.
Test Reset
Indicator
Note: Power Cord is not GFCI protected from
GFCI unit to 3-prong plug in electrical outlet.
18. Move Feed Lever to exactly in-between
F and R settings or cable will start
moving in or out during test.
19. Press Foot Switch and note direction of rotation
of drum. If Foot Switch does not control
Drain Cleaner’s operation, do not use machine
until Foot Switch has been repaired.
20. Drum should rotate clockwise when seen from
front of drum. It will match drum direction shown
on warning label and arrow on drum. If rotation is
not correct, do not use machine until repaired.
21. After inspection, set Rotation Switch to OFF,
dry off your hands, and unplug Drain Cleaner.
22. Once verified that Drain Cleaner is in
good working order, inspect work area
where machine will be used.

Page 13For technical questions, please call 1-888-866-5797.Item 59533 59534
SAFETYOPERATIONMAINTENANCE SETUP
Work Area Set-Up
1. Verify work area has adequate lighting for job.
2. Confirm work area is free of flammable liquids,
vapors or dust that may ignite. Sparks can be
generated during Drain Cleaner operation.
Do not work in area until sources of ignition
have been identified and corrected.
3. Choose a firm, stable location for machine
and operator that will remain relatively dry.
Do not use machine while standing in water.
If needed, remove water from work area.
4. Verify electrical outlet is properly grounded.
A three-prong or GFCI outlet may not be
properly grounded. If in doubt, have outlet
inspected by a licensed electrician.
5. Make sure a clear, unobstructed path from
Drain Cleaner to electrical outlet exists.
6. Inspect drain to be cleaned. Determine best
access point(s) to drain, size(s) and length(s)
of drain, distance to tanks or mainlines, nature
of blockage, presence of drain cleaning
chemicals or other chemicals, etc.
7. If chemicals are present in drain, read and adhere
to specific safety measures required to work around
those chemicals. Contact chemical manufacturer
for required safety instructions and information.
8. If necessary, remove fixture (toilet, sink, etc.)
to allow access to drain. Do not feed cable
through a fixture. This could damage
Drain Cleaner and fixture.
9. Determine correct drain cleaning cable size for drain
cleaning job. See Cable/Pipe Size chart below.
Cable
Size
Pipe
Size Typical Applications
1/2″
(included)
2″ to 4″ Roof stacks and small
floor drains (no roots)
3/8″ 1-1/2″ to 3″ Roof stacks, laundry lines
and small drains (no roots)
10. If needed, place protective covers over
work area floor. Cleaning a clogged
drain can be a messy operation.
11. Make sure Drain Cleaner handle is locked in
upright position for transport. If Drain Cleaner
needs lifted, use proper lifting techniques or
seek assistance. Use caution when moving
equipment up and down stairs. Wear appropriate
footwear to prevent slipping on floor.
12. Set Drain Cleaner so drum opening is within 2
feet of drain access. The greater the distance
from drain access, the higher risk
of cable twisting or kinking.
13. If machine cannot be placed with drum opening
within 2′ of drain access, use appropriate-
sized pipes and fittings to extend drain access
back to within 2′ of drum opening. Improper
cable support can allow cable to kink and twist
and damage cable or injure the operator.
14. If needed, set up barriers to keep bystanders away
from Drain Cleaner and work area during operation.
15. Select proper cutting tool.
(See Cutting Tool Accessories on page 9).
16. Install tool to end of cable as described in
Cutting Tool Accessories on page 9.
17. Position Foot Switch for easy accessibility. You
must be able to hold and control cable, control
Foot Switch, and reach Rotation Switch.
18. Confirm Rotation Switch is in OFF position.
19. Run cord along clear path. With dry hands, plug
Drain Cleaner into properly grounded outlet.
20. If power cord is not long enough, use extension
cord in good condition and has a three prong plug
similar to that supplied on Drain Cleaner. Keep
connection off ground to prevent it getting wet.
21. Verify that extension cord is rated for
outdoor use is marked with a suffix letter
W or W-A in cord designation.
22. Verify extension cord has sufficient wire size
for length (see Extension Cords on page
6.) Undersized wires can overheat, melting
insulation or causing a fire or other damage.
23. When using an extension cord, GFCI on
Drain Cleaner does not protect extension cord. If
outlet is not GFCI protected, use plug-in type GFCI
between outlet and extension cord to reduce risk
of shock if there is a fault in the extension cord.

Page 14 For technical questions, please call 1-888-866-5797. Item 59533 59534
SAFETY OPERATION MAINTENANCESETUP
Manual Feed Operation (For Item 59534)
TO PREVENT SERIOUS INJURY FROM TWISTED OR BROKEN CABLES, CABLE ENDS WHIPPING AROUND,
MACHINE TIPPING, CHEMICAL BURNS, INFECTIONS, ELECTRIC SHOCK AND OTHER CAUSES:
Follow operating instructions for your model explicitly.
Since drains likely contain hazardous chemicals or bacteria, wear
appropriate protective equipment, such as:
• ANSI-approved splash-resistant safety goggles and respirator under face shield.
• Latex, rubber or other liquid barrier gloves under heavy-duty LEATHER work gloves.
Do not use a glove you are not currently wearing or a rag to hold the rotating cable. Cloth materials
can tangle in the rotating cable, leading to serious personal injury. Before use, inspect gloves
to be sure they are free of defects or loose sections that could get caught in Drain Cleaner.
• Rubber soled, non-slip shoes to help prevent slipping and electric shock.
1. Position the Drain Cleaner two feet from drain.
2. Position Drain Cleaner so you can operate
Foot Switch while having one hand on
cable at all times. This will keep cable from
hazardously “whipping” when activating
Drain Cleaner. Confirm Rotation Switch on
top of Drain Cleaner is within reach.
WARNING! Only one person should feed cable
and operate Foot Switch. Do not operate
Drain Cleaner with one person controlling cable
and another person controlling Foot Switch.
This can cause cable to kink, twist, or break,
which can also lead to serious personal injury.
3. Make sure Rotation Switch is in Forward position.
4. With Drain Cleaner off, pull cable out of
drum and feed into drain. Gradually work
cable as far into drain as it will go.
5. Step on Foot Switch and continue
feeding cable into drain.
6. As you feed cable, you may feel and see
cable slow down and/or start to wind or load
up (a “twisting” or “squirming” motion). This
indicates a change in drain line (such as a drain
trap, elbow, etc.), a build up in drain (mud or
grease), or actual blockage. Continue to slowly
feed cable until cable reaches blockage.
CAUTION! Do not allow cable to build up
outside drain. This can cause cable to
twist, kink or break. When working with larger
sewers or septic tanks, minimize the amount of
cable fed to prevent kinking and knotting of cable.
7. If cable becomes lodged in a narrow part of
drain or in a drain trap, allow cable to try and
work itself past the obstruction. If cable still
won’t pass obstruction, release pressure from
Foot Switch and use sharp downward thrusts to
try and pass obstruction. Once cable is past,
press Foot Switch and continue feeding.
NOTICE
Rotation Switch controls rotation of drum only. DO NOT USE ROTATION SWITCH
REVERSE POSITION WHILE REMOVING CABLE FROM PIPE. Use reverse direction
only momentarily for relieving pressure or untangling cable from a blockage.
Warranty void if cable damaged from allowing motor to twist
excessively against blockage, or if drum is run in reverse long enough to unwind cable.

Page 15For technical questions, please call 1-888-866-5797.Item 59533 59534
SAFETYOPERATIONMAINTENANCE SETUP
Working Through a Blockage
1. If cutting tool becomes lodged in blockage
and Drain Cleaner is still operating, cable will
start to wind up or twist. If so, immediately
turn off, let tension release, and pull back on
cable to free cutting tool from drain blockage.
If cable cannot be freed by pulling back, briefly
turn motor on in REV setting to free tool.
WARNING! TO PREVENT SERIOUS INJURY:
Do not keep cable rotating if tool is lodged in a
blockage. If tool stops turning and drum keeps rotating,
cable can twist, kink, break, or tangle in the drain.
2. Once tool is free of blockage and is turning again,
slowly feed rotating cutting tool back into blockage.
Do not force tool through blockage.
3. Allow spinning and cutting to break up
and work its way through blockage.
NOTICE: While working through blockage, tool and
cable can get clogged with debris and cuttings from
blockage, preventing further cleaning. Cable and tool
will need to be retrieved from drain and debris removed.
See Retrieving Drain Cleaner Cable on page 15.
If Cutting Tool Lodges in Drain:
1. If cutting tool stops turning and cable cannot
be pulled from blockage, release Foot Switch
while holding cable with both hands.
CAUTION! Do not remove hands from cable
or cable may kink, twist and break.
2. The Drain Cleaner motor will stop and
cable and drum will turn backwards
until tension in cable is released.
WARNING! TO PREVENT SERIOUS
INJURY: Do not remove hands from cable
until all the tension is released.
3. Place Rotation Switch in OFF position.
Freeing Lodged Cutting Tool
1. Release Foot Switch and turn
Rotation Switch to OFF position.
2. Pull back on cable to free it from blockage.
If tool will not come free, place
Rotation Switch in Reverse position.
WARNING! TO PREVENT SERIOUS INJURY: Do not
operate Drain Cleaner in Reverse for any longer
than is needed to free cutting tool from blockage
(for no more than several seconds at a time).
3. Hold cable with gloved hands, press
Foot Switch for several seconds, then release,
and pull on cable until free of blockage.
4. Place Rotation Switch in Forward position
and continue cleaning drain.
Retrieving Drain Cleaner Cable
1. Once drain is clear, turn on faucet or
use hose to flush debris out.
NOTE: Pay attention to water level.
There could be blockages farther down in drain.
WARNING! Do not pull cable from
drain while cable is still rotating. Cable end
can whip around, causing serious injury.
2. Pull cable from drain by hand and feed into
Drain Cleaner until cable is a couple of feet from
drain opening. A flow of water down the line will
help clean cable as it is retrieved. (If necessary,
change cutting tool and continue cleaning.)
3. Set Rotation Switch to OFF position, dry your
hands, and unplug machine before removing end
of cable from drain and returning it to the drum.
NOTICE
Rotation Switch controls rotation of drum only. DO NOT USE ROTATION SWITCH
REVERSE POSITION WHILE REMOVING CABLE FROM PIPE. Use reverse direction
only momentarily for relieving pressure or untangling cable from a blockage.
Warranty void if cable damaged from allowing motor to twist
excessively against blockage, or if drum is run in reverse long enough to unwind cable.

Page 16 For technical questions, please call 1-888-866-5797. Item 59533 59534
SAFETY OPERATION MAINTENANCESETUP
Power Feed Operation (For Item 59533)
TO PREVENT SERIOUS INJURY FROM TWISTED OR BROKEN CABLES, CABLE ENDS WHIPPING AROUND,
MACHINE TIPPING, CHEMICAL BURNS, INFECTIONS, ELECTRIC SHOCK AND OTHER CAUSES:
Follow operating instructions for your model explicitly.
Since drains likely contain hazardous chemicals or bacteria, wear
appropriate protective equipment, such as:
• ANSI-approved splash-resistant safety goggles and respirator under face shield.
• Latex, rubber or other liquid barrier gloves under heavy-duty LEATHER work gloves.
Do not use a glove you are not currently wearing or a rag to hold the rotating cable. Cloth materials
can get wrapped around the moving cable, leading to serious personal injury. Before use, inspect
gloves to be sure they are free of defects or loose sections that could get caught in Drain Cleaner.
• Rubber soled, non-slip shoes to help prevent slipping and electric shock.
1. Position Drain Cleaner two feet from drain.
2. Release all tension from Tension Knob,
then grab cable with both gloved hands and
push cable into drain until at least one foot of
cable is in drain. Retighten Tension Knob.
Power Feed Lever
Tension
Knob
3. Confirm Rotation Switch is in Forward position,
Tension Knob has been retightened, and
Power Feed Lever is in Forward (down)
position. Press Foot Switch to start feeding
cable further into drain. Make sure you can
operate Foot Switch while having at least one
hand on cable at all times. Also make sure
Rotation Switch on top of Drain Cleaner and
Power Feed Lever are within reach.
WARNING! Only one person should operate the
cable feed and the Foot Switch. Do not operate
Drain Cleaner with one person controlling the cable
and another person controlling the Foot Switch.
This can cause cable to kink, twist, and break,
which can also lead to serious personal injury.
4. If cable becomes lodged (e.g., in a narrow part of
drain, in a drain trap, etc.), put Power Feed Lever
in Neutral position and allow cable to try
and work itself past obstruction. If cable still
won’t pass obstruction, release pressure from
Foot Switch and use sharp downward thrusts to
try and pass obstruction. Once cable is past, put
Power Feed Lever in Forward (down) position,
press Foot Switch, and continue feeding.
NOTICE
Rotation Switch controls rotation of drum only. DO NOT USE ROTATION SWITCH
REVERSE POSITION WHILE REMOVING CABLE FROM PIPE. Use reverse direction
only momentarily for relieving pressure or untangling cable from a blockage.
Warranty void if cable damaged from allowing motor to twist
excessively against blockage, or if drum is run in reverse long enough to unwind cable.

Page 17For technical questions, please call 1-888-866-5797.Item 59533 59534
SAFETYOPERATIONMAINTENANCE SETUP
Working Through a Blockage
1. If cutting tool becomes lodged in blockage and
Drain Cleaner is still operating, cable will start
to wind up or twist. If so, release pressure from
Foot Switch and Drain Cleaner motor will stop.
CAUTION! Do not let cable build up outside drain.
2. Cable and drum will turn backwards
until tension in cable is released.
WARNING! TO PREVENT SERIOUS
INJURY: Do not remove gloved hand from
cable until all tension is released.
3. Put Power Feed Lever in Reverse (up) position to
pull cable back and free cutting tool from blockage.
4. If motor can’t pull cable out, release pressure from
Foot Switch and allow cable to stop spinning.
Once cable has stopped spinning, grab cable
with both gloved hands and pull cable free.
5. Once tool is free of blockage and is turning again,
slowly feed rotating cutting tool back into blockage.
Do not force tool through blockage.
Allow cutting tip to break up and
work through blockage.
NOTICE: While working through blockage, tool and
cable can get clogged with debris from blockage,
preventing further cleaning. Cable and tool will then
need to be retrieved from drain and debris removed.
See Retrieving Drain Cleaner Cable on page 17.
Retrieving Drain Cleaner Cable
1. Once drain is clear, turn on faucet or
use a hose to flush debris out.
NOTE: If water flow slows or stops, resume using drain
cleaner to locate and clear blockage further down drain.
2. To retrieve cable, set Power Feed Lever
in Reverse (up) position but make sure
Rotation Switch is still in Forward position.
WARNING! TO PREVENT SERIOUS
INJURY: Do not retrieve cable with
Rotation Switch set in Reverse position.
3. Keep one hand on cable. The cable can
get caught while being retrieved.
4. Continue retrieving cable until you can pull cable
by hand. Release foot from Foot Switch.
WARNING! Do not pull cable from drain
while cable is still rotating. The cable can
whip around, causing serious injury.
5. Place Rotation Switch in OFF position,
dry your hands, unplug machine.
6. Release Tension Knob tension and pull
remaining cable from drain by hand and
feed into Drain Cleaner. If needed, change
cutting tool and continue cleaning.
NOTICE
Rotation Switch controls rotation of drum only. DO NOT USE ROTATION SWITCH
REVERSE POSITION WHILE REMOVING CABLE FROM PIPE. Use reverse direction
only momentarily for relieving pressure or untangling cable from a blockage.
Warranty void if cable damaged from allowing motor to twist
excessively against blockage, or if drum is run in reverse long enough to unwind cable.

Page 18 For technical questions, please call 1-888-866-5797. Item 59533 59534
SAFETY OPERATION MAINTENANCESETUP
Maintenance and Servicing
Procedures not specifically explained in this manual must
be performed only by a qualified technician.
TO PREVENT SERIOUS INJURY FROM ACCIDENTAL OPERATION:
Turn the Rotation Switch of the tool to its “OFF” position and unplug the tool from its electrical
outlet before performing any inspection, maintenance, or cleaning procedures.
TO PREVENT SERIOUS INJURY FROM TOOL FAILURE:
Do not use damaged equipment. If abnormal noise or vibration
occurs, have the problem corrected before further use.
Cleaning Drain Cleaner Cables
1. Thoroughly flush Drain Cleaner cables with
clean water after every use. Doing so will
help prevent build-up of sediment and any
drain cleaning chemicals still on cable.
2. Once cables have been flushed,
carefully tip Drain Cleaner forward to
empty out remaining debris.
3. Once cable is clean and dry, pull cable from drum.
4. Lubricate with oily rag as you feed
cable back into drum.
WARNING! TO PREVENT SERIOUS INJURY:
Do not attempt to remove a rotating cable.
Cleaning/Lubricating Housing
1. Drain Cleaner should be cleaned as needed
with hot, soapy water and/or disinfectants.
WARNING! TO PREVENT SERIOUS INJURY:
Risk of shock! Do not allow water to get into
motor or other electrical components.
2. Dry Drain Cleaner before storing or using again.
3. For Model 59533 (Power Feed Drain Cleaner),
hose out power-feed assembly with clean water.
4. Once dry, thoroughly lubricate with
lightweight machine oil.
5. If Drain Cleaner drum is removed or changed,
grease bearings with good general purpose grease.
Removing and Installing Belt
1. Loosen Belt Guard Knob and slide Belt
Guard off top of Drain Cleaner motor.
2. Use screwdriver to slide belt off
back of Drain Cleaner drum.
3. Slide new belt into belt pulley above drum.
4. Slide new belt onto rear of drum
until securely in place.
5. Slide Belt Guard pack into place above
Drain Cleaner drum. Tighten Belt Guard
Knob to lock Belt Guard back into place.
WARNING! TO PREVENT SERIOUS INJURY: Do not
operate Drain Cleaner without Belt Guard in place.
Installing Replacement Cable
1. Remove old cable by pulling cable completely out.
Separate cable from drum-connecting cable.
2. Connect new cable to drum-connecting
cable and feed cable back into drum.

Page 19For technical questions, please call 1-888-866-5797.Item 59533 59534
SAFETYOPERATIONMAINTENANCE SETUP
General Cleaning, Maintenance, and Lubrication
1. BEFORE EACH USE, inspect the general
condition of the tool. Check for:
• loose hardware,
• misalignment or binding of moving parts,
• cracked or broken parts,
• damaged electrical wiring, and
• any other condition that may
affect its safe operation.
2. AFTER USE, wipe external surfaces
of the tool with clean cloth.
3. WARNING! TO PREVENT SERIOUS
INJURY: If the supply cord of this power
tool is damaged, it must be replaced only
by a qualified service technician.
Troubleshooting
Problem Probable Cause(s) Solution(s)
Motor shuts off
during use.
1. Motor may have been shut off
by its internal thermal protection
switch, or auto reset breaker.
2. GFCI breaker tripped.
1. Turn motor off. Allow motor to cool off
completely before restarting and stay clear
of cable when turning motor back on.
2. Make sure all electrical components
are dry and all insulation is in good
repair. Press reset button. If GFCI
trips again, have machine serviced by
qualified electrician before further use.
Cable kinks, twists,
or breaks.
1. Too much force on cable.
2. Too much slack between
Drain Cleaner and drainpipe inlet.
3. Cable used is wrong
size for drain pipe.
4. Cable exposed to acid.
5. Cable worn out.
1. Do not force cable. Let cutter do the work.
2. Move Drain Cleaner to within
two feet of drainpipe inlet.
3. Change cable size.
4. Clean and oil cable regularly.
5. Replace cable.
Cable tangles in drum. 1. Too much force on cable.
2. Motor running in reverse.
3. Distributor tube frozen.
1. Do not force cable. Let cutter tool do the work.
2. Retract Cable with Motor Direction
Switch in Forward position.
3. Technician should lubricate
distributor tube bearings.
Power Cord GFCI
trips when unit is
plugged in or when
Foot Pedal is pressed.
1. Motor Direction Switch defective.
2. Frayed Power Cord.
3. Short circuit in Motor.
4. Excess moisture touching Power
Cord or Drain Cleaner.
5. Faulty GFCI unit.
1. Repair or replace Motor Direction Switch.
2. Repair or replace Power Cord.
3. Have Motor repaired by a qualified
technician; Replace Motor.
4. Dry cord and unit.
5. Electrician must Replace Power Cord with GFCI.
Motor does not
operate or Foot
Pedal sticks.
Pneumatic Foot Pedal may have a leak. Check for leaks in air line leading from
Foot Pedal. Check for tears and holes
in Foot Pedal. Replace if needed.
“Forward/Reverse”
Switch does not work.
Centrifugal switch requires motor to
come to a complete stop before it will
allow direction of motor to be changed.
Move “Forward/Reverse” Switch to “Off” position
and allow motor to stop before changing from
“Forward” to “Reverse” or vice versa.

Page 20 For technical questions, please call 1-888-866-5797. Item 59533 59534
SAFETY OPERATION MAINTENANCESETUP
Parts List and Diagram
Parts List 59533
Part Description Qty
1 Circlip Ø48 1
2 Cover 1
3 Power Feed Lever M8 1
4 Plastic Ball M8 1
5Terminal A 1
6 Front Seat 1
7 Spring Pin Ø8×20 3
8 Washer 20
9 Bearing 3
10 Spring Pin Ø5×40 3
11 Terminal B 3
12 Spring 1
13 Terminal C 1
14 Nuts M10 1
15 Bolt M10×30 1
16 Lock Nut 1
17 Circlip Ø25 2
18 M8 Plastic Nut 3
19 Front Post 1
20 Spring Washer Ø8 12
21 Screw M8×16 3
22 Screw 1
23 M8 Hex Lock Nut 1
24 Cable 1
25 Bolt M8×20 10
26 Drum Connecting Cable 1
27 Bolt M6×20 5
28 Front Hub Bushing 1
29 Bolt M8×20 9
30 U-Type Rubber Seal 2
31 Drum 1
32 Cable/Nut/Washer 3
33 Distributor Tube/Inner Drum 1
34 Retaining Ring Ø25 2
35 Flat Washer Ø18ר34×2 2
36 Rear Hub 1
37 Rear Hub Sleeve 1
38 Washer Ø27 1
39 Drum Shaft 1
40 Spacer Ø32.6ר43.5×14 1
41 Screw M8×6 2
42 Screw M5×35 2
43 Rubber Foot 2
44 Nut M5 2
45 Frame 1
46 Rubber Leg Tip 2
47 Nut M10 2
48 8" Wheel 2
49 Rubber Foot 2
50 Drum Shaft Retaining Pin 1
51 Retaining Pin Spring Ø8.2ר1×26.5 1
52 Pin Sleeve 1
Part Description Qty
53 Retaining Pin Screw/Set Screw M4×10 7
54 Bolt M8×35 3
55 Tool Holder 1
56 Screw St4.8×20 2
57 Taper Nut M6 1
58 Screw M6×10 1
59 Tool Holder Cover 1
60 Nut M2.5 1
61 Spoke M2.5×140 1
62 Folding Handle 1
63 Electrical Box Cover 1
64 Insulating Mat 1
65 Rotation Switch 1
66 Wire 18awg 140mm 2
67 Electrical Box 1
68 Screw M4×6 6
69 Washer Ø4 6
70 Fuse 1
71 Insulating Mat 1
72 External Tooth Washer Ø4 1
73 Screw M4×8 1
74 Motor 1
75 Washer Ø8.5ר16×1 8
76 Washer Ø6ר20×2 1
77 Nut M6 1
78 V-Belt Pulley 1
79 Screw M6×18 1
80 V-Belt (A1118) 1
81 Foam Pad 1
82 Belt Guard 1
83 Motor Support 1
84 Motor Support Spring 1
85 Bolt M6×18 2
86 Foot Switch 1
87 Power Cord 1
88 Screw M4×8 1
89 GFCI 1
90 Current Protector 1
91 Switch 1
92 Waterproof Connector 1
93 Power Feed Assembly 1
94 Adapter Coupling 1
95 Screw 2
96 Side Cutter 2
97 Adapter Coupling 1
98 C-Cutter 1
99 Star Washer 1
100 Nut 1
101 Adapter Coupling 1
102 Arrowhead Cutter 1
103 Boring Bulb Cutter 1
104 Removal Tool 1
Other manuals for 22202E-B
1
This manual suits for next models
1
Table of contents
Other Bauer Vacuum Cleaner manuals

Bauer
Bauer 1952E-B9 User manual

Bauer
Bauer 1952E-B3 User manual

Bauer
Bauer 1952E-B6 User manual

Bauer
Bauer 1952E-B3 Assembly instructions

Bauer
Bauer 1952E-89 Assembly instructions

Bauer
Bauer 1852C-B User manual

Bauer
Bauer 1952E-B14 Assembly instructions

Bauer
Bauer 58310 Assembly instructions

Bauer
Bauer 1952E-B14 User manual

Bauer
Bauer 1852C-B Assembly instructions