Bauknecht Domino 300 User manual

3
210 mm 280 mm
180 mm145 mm 145 mm 180 mm210 mm
Domino 300 Domino 380 77x35
DEUTSCH Gebrauchsanweisung Seite 4
ENGLISH Instructions for use Page 11
FRANÇAIS Mode d’emploi Page 18
NEDERLANDS Gebruiksaanwijzing Pagina 25
ITALIANO Istruzioni per l’uso Pagina 32
41902042D.fm Page 3 Wednesday, June 22, 2011 10:41 AM

4
Dieses Handbuch enthält wichtige Sicherheitshinweise und
Informationen zur Verwendung und Wartung Ihres neuen
Kochfeldes. Bitte lesen Sie diese Anleitung sorgfältig durch und
bewahren Sie sie zum späteren Nachschlagen an einem gut
zugänglichen Ort gut auf.
Hinweise und allgemeine Ratschläge
1. Dieses Kochfeld entspricht allen gesetzlichen Vorschriften
über Sicherheit und elektromagnetische Verträglichkeit.
Träger von HERZSCHRITTMACHERN müssen sich
jedoch von diesem Elektrohaushaltsgerät fernhalten. Es
kann nicht garantiert werden, dass alle marktgängigen
Geräte (Herzschrittmacher) mit den Vorschriften
konform sind, auf deren Grundlage dieses Kochfeld
getestet wurde. Daher können schädliche Interferenzen
nicht hundertprozentig ausgeschlossen werden.
2. Entsorgung von Verpackungsmaterialien: Die einzelnen
Verpackungsteile dürfen nicht weggeworfen, sondern
müssen in Übereinstimmung mit den geltenden lokalen
Bestimmungen recycelt werden.
3. Dieses Induktionskochfeld ist ausschließlich als Kochgerät
für private Haushalte konzipiert. Jede andere
Verwendung ist untersagt. Der Hersteller übernimmt
keine Verantwortung für Schäden aufgrund von
unsachgemäßer oder falscher Verwendung.
4. Das Gerät darf ohne Aufsicht weder von Kindern noch
von Personen mit herabgesetzten körperlichen,
sensuellen oder mentalen Fähigkeiten oder ohne die
erforderliche Erfahrung und Kenntnis benutzt werden, es
sei denn, sie wurden durch für ihre Sicherheit
verantwortliche Personen entsprechend eingewiesen.
5. Die Kochzonen heizen sich während des Betriebs stark
auf: Halten Sie Kinder vom Gerät fern, um die Gefahr von
Verbrennungen und Verbrühungen zu vermeiden.
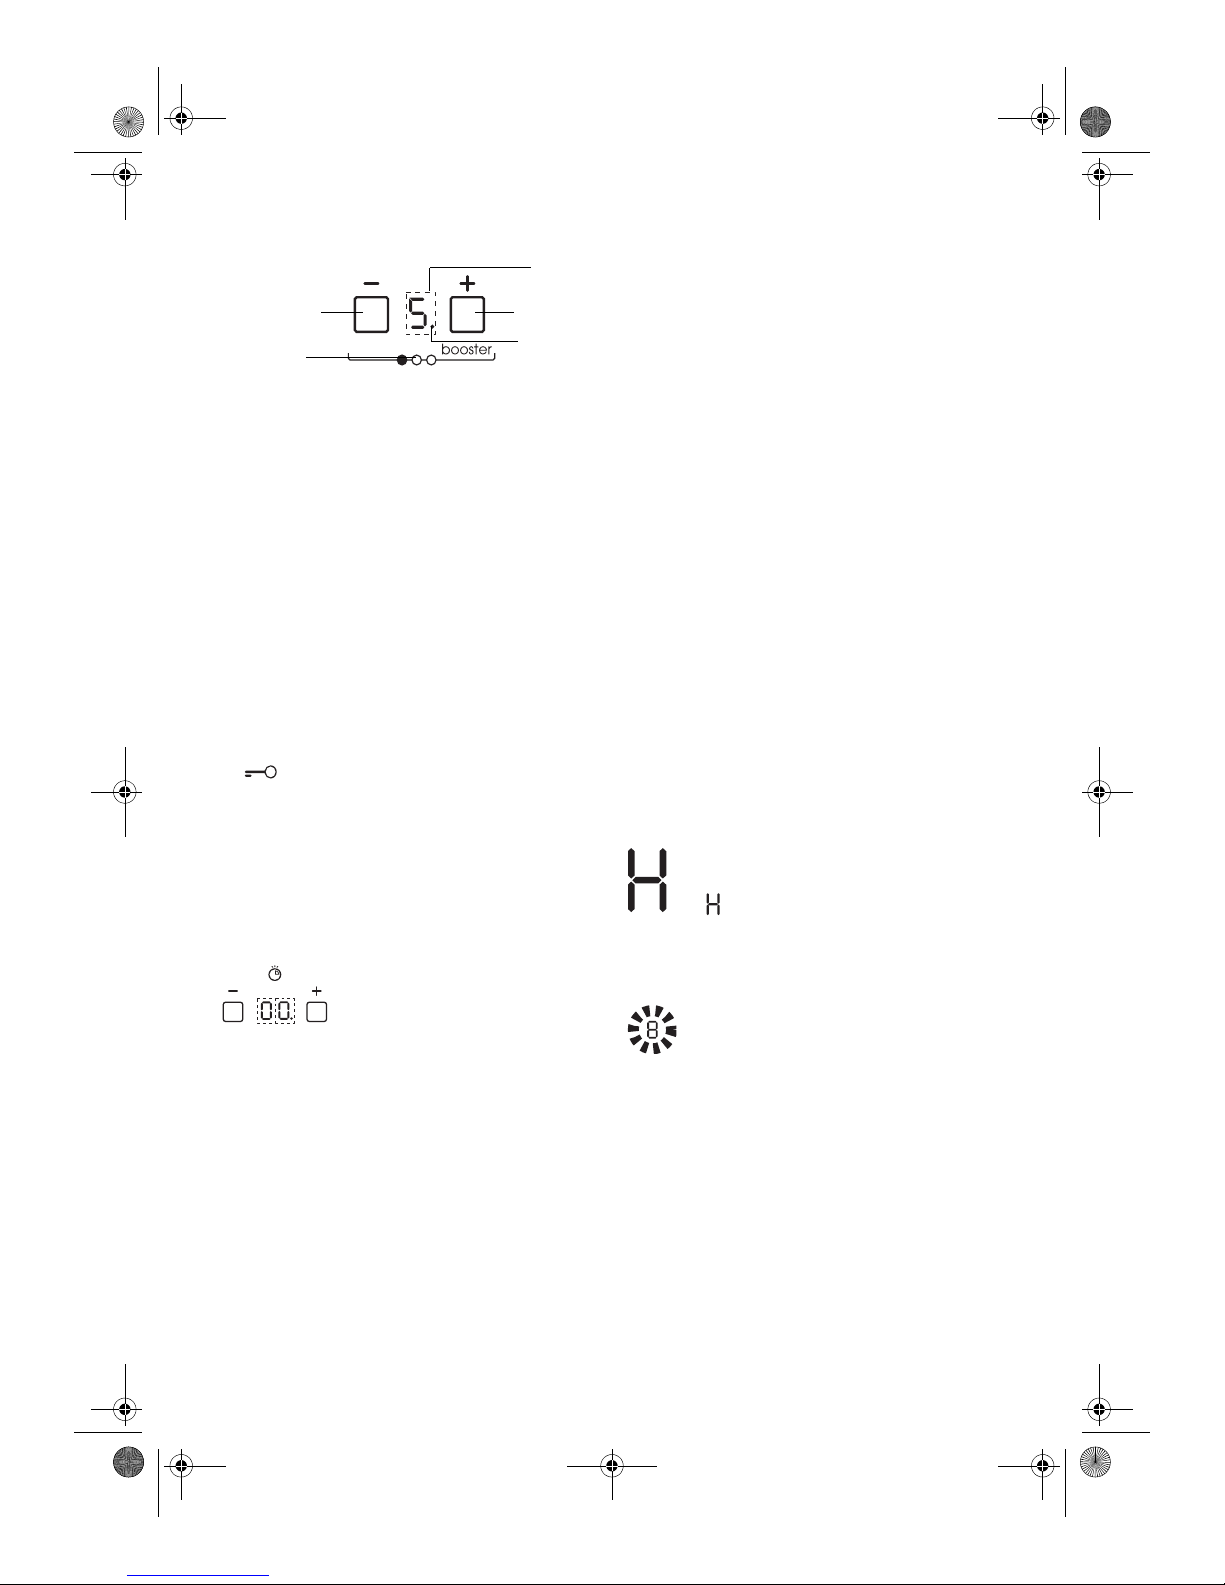
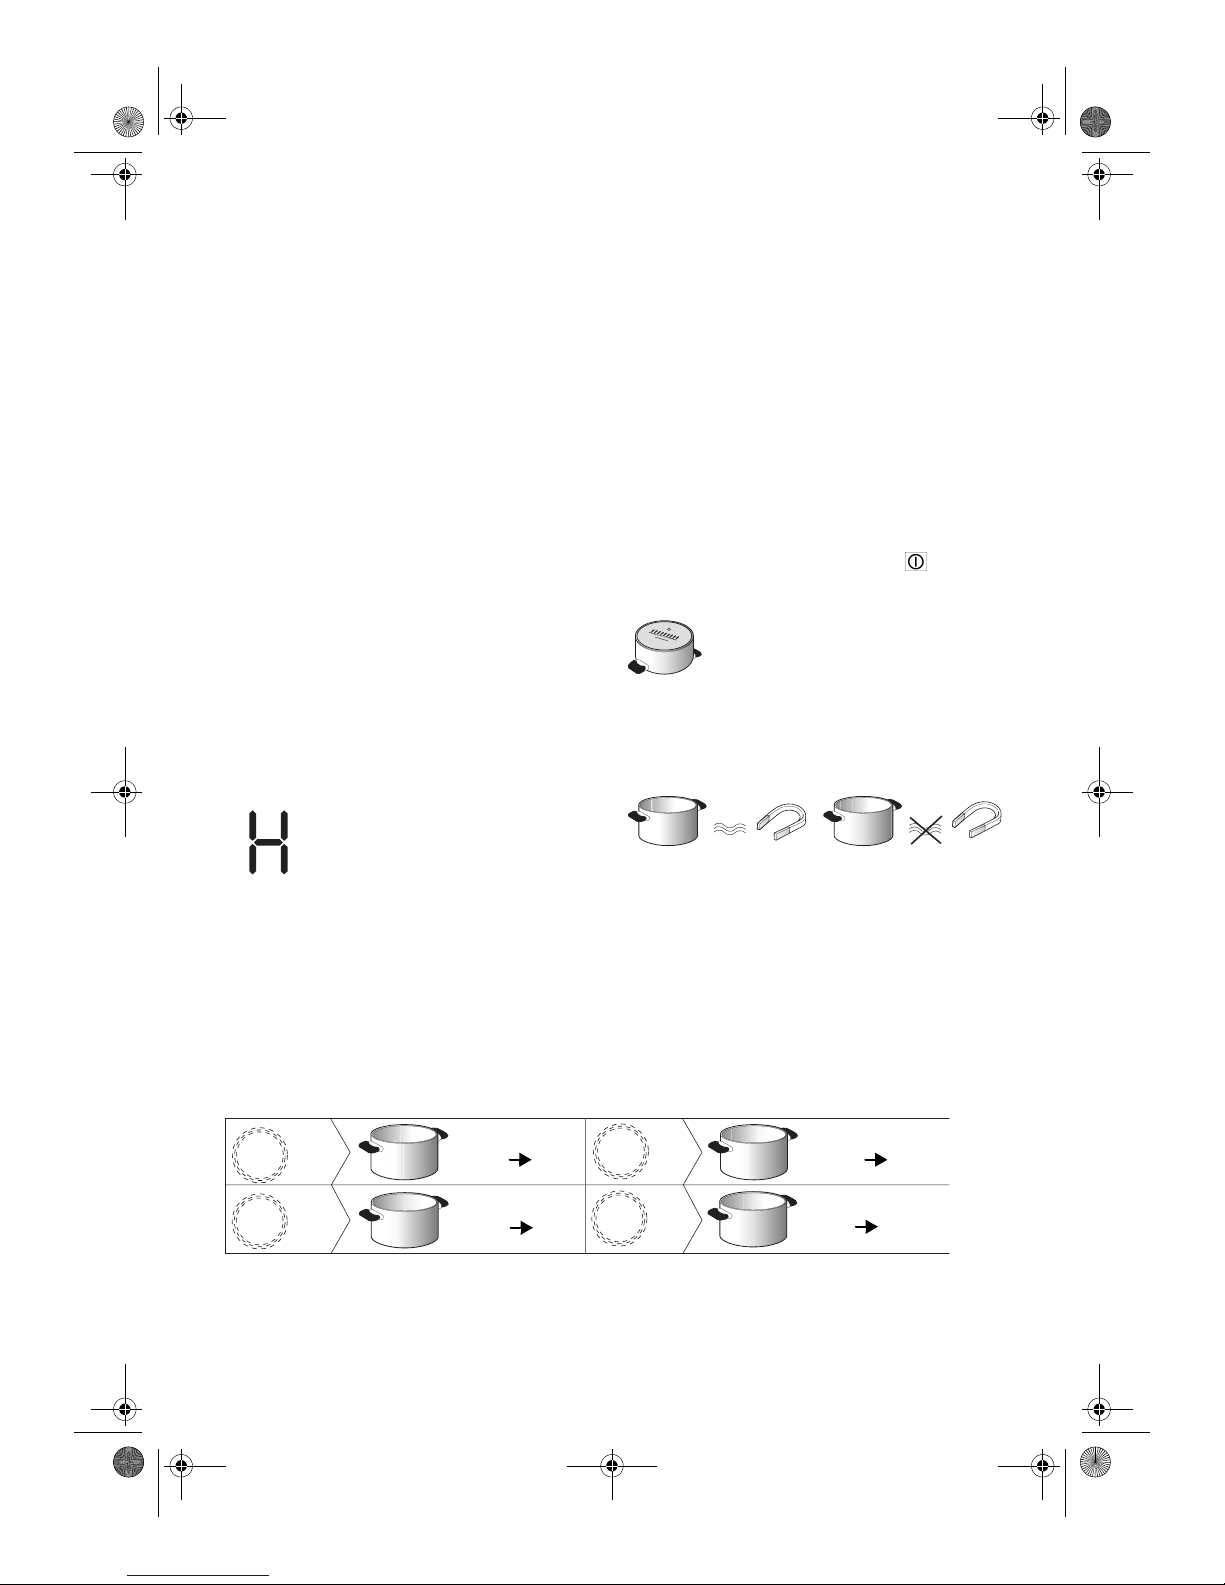
6. Die Bezeichnung “H” erscheint auf dem
Bedienfeld, um auf die “Restwärme” der
entsprechenden Kochzone hinzuweisen: Das
bedeutet, dass die Temperatur der Kochzone
über 60 °C beträgt. Berühren Sie die Kochzone
nicht und stellen Sie keine Gegenstände darauf ab,
solange das “H” nicht erloschen ist.
7. Verwenden Sie das Kochfeld nicht, wenn die Glaskeramik
gebrochen oder gerissen ist. Rufen Sie den Kundendienst.
8. Eventuelle Reparaturen oder Eingriffe müssen durch
Fachpersonal vorgenommen werden.
9. Dieses Kochfeld verfügt über einen Überhitzungsschutz,
um das Risiko von Beschädigungen der internen
Schaltkreise des Gerätes durch eine überhöhte
Temperatur zu vermeiden, die durch externe
Wärmequellen verursacht wird (z. B. Einbauherd unter
dem Kochfeld). Sobald die Temperatur der Schaltkreise
die maximal zulässige Temperatur überschreitet, schaltet
der Überhitzungsschutz das Kochfeld automatisch ab.
Das Display zeigt eine Fehlermeldung an (vgl. Abschnitt
“Störung - Was tun?”). Sobald die Temperatur wieder auf
sichere Werte absinkt, kann das Kochfeld wieder normal
verwendet werden.
10. Stellen Sie sicher, dass die Kochzonen und der
Unterboden des Kochgeschirrs vor dem Gebrauch
trocken sind.
11. Legen Sie keine Metallgegenstände wie Küchenutensilien
(Messer, Gabeln, Löffel), Deckel o. Ä. auf das Kochfeld, da
diese heiß werden können.
12. Garvorgänge, bei denen heißes Öl oder Fett verwendet
wird, sollten wegen potentieller Entzündungsgefahr
ständig beaufsichtigt werden. Verwenden Sie niemals
Wasser, um brennendes Öl zu löschen: Schalten Sie das
Kochfeld aus und decken Sie den Topf sofort mit einem
Deckel zu. Lassen Sie den Topf auf der Kochzone
abkühlen. Entsorgen Sie das Öl vorschriftsgemäß.
13. Drücken Sie nach dem Kochen die Taste .
Vor Gebrauch
Wichtig: Die Induktionszonen arbeiten nicht,
wenn die Töpfe nicht den korrekten
Abmessungen entsprechen.
Verwenden Sie ausschließlich Töpfe und
Pfannen mit der Aufschrift “INDUCTION
SYSTEM” (siehe nebenstehende Abbildung).
Stellen Sie den Topf vor dem Einschalten des
Kochfeldes auf die gewünschte Kochzone.
Bereits vorhandenes Kochgeschirr:
Mit einem Magneten lässt sich prüfen, ob das Kochgeschirr für
das Induktionskochfeld geeignet ist: Nicht magnetische Töpfe
sind ungeeignet.
1. Stellen Sie sicher, dass der Unterboden des Topfes nicht
rau ist, da er die Glaskeramikoberfläche des Kochfeldes
zerkratzen könnte. Überprüfen Sie das Kochgeschirr.
2. Erhitzen Sie keine leeren Töpfe, vor allem, wenn es sich
um Emaille- oder Aluminium-Töpfe handelt. Der Boden
des Kochgeschirrs und die Glaskeramikoberfläche des
Kochfeldes könnten beschädigt werden.
3. Stellen Sie niemals heiße Töpfe oder Pfannen auf das
Bedienfeld des Kochfeldes. Dieses könnte Schaden
nehmen.
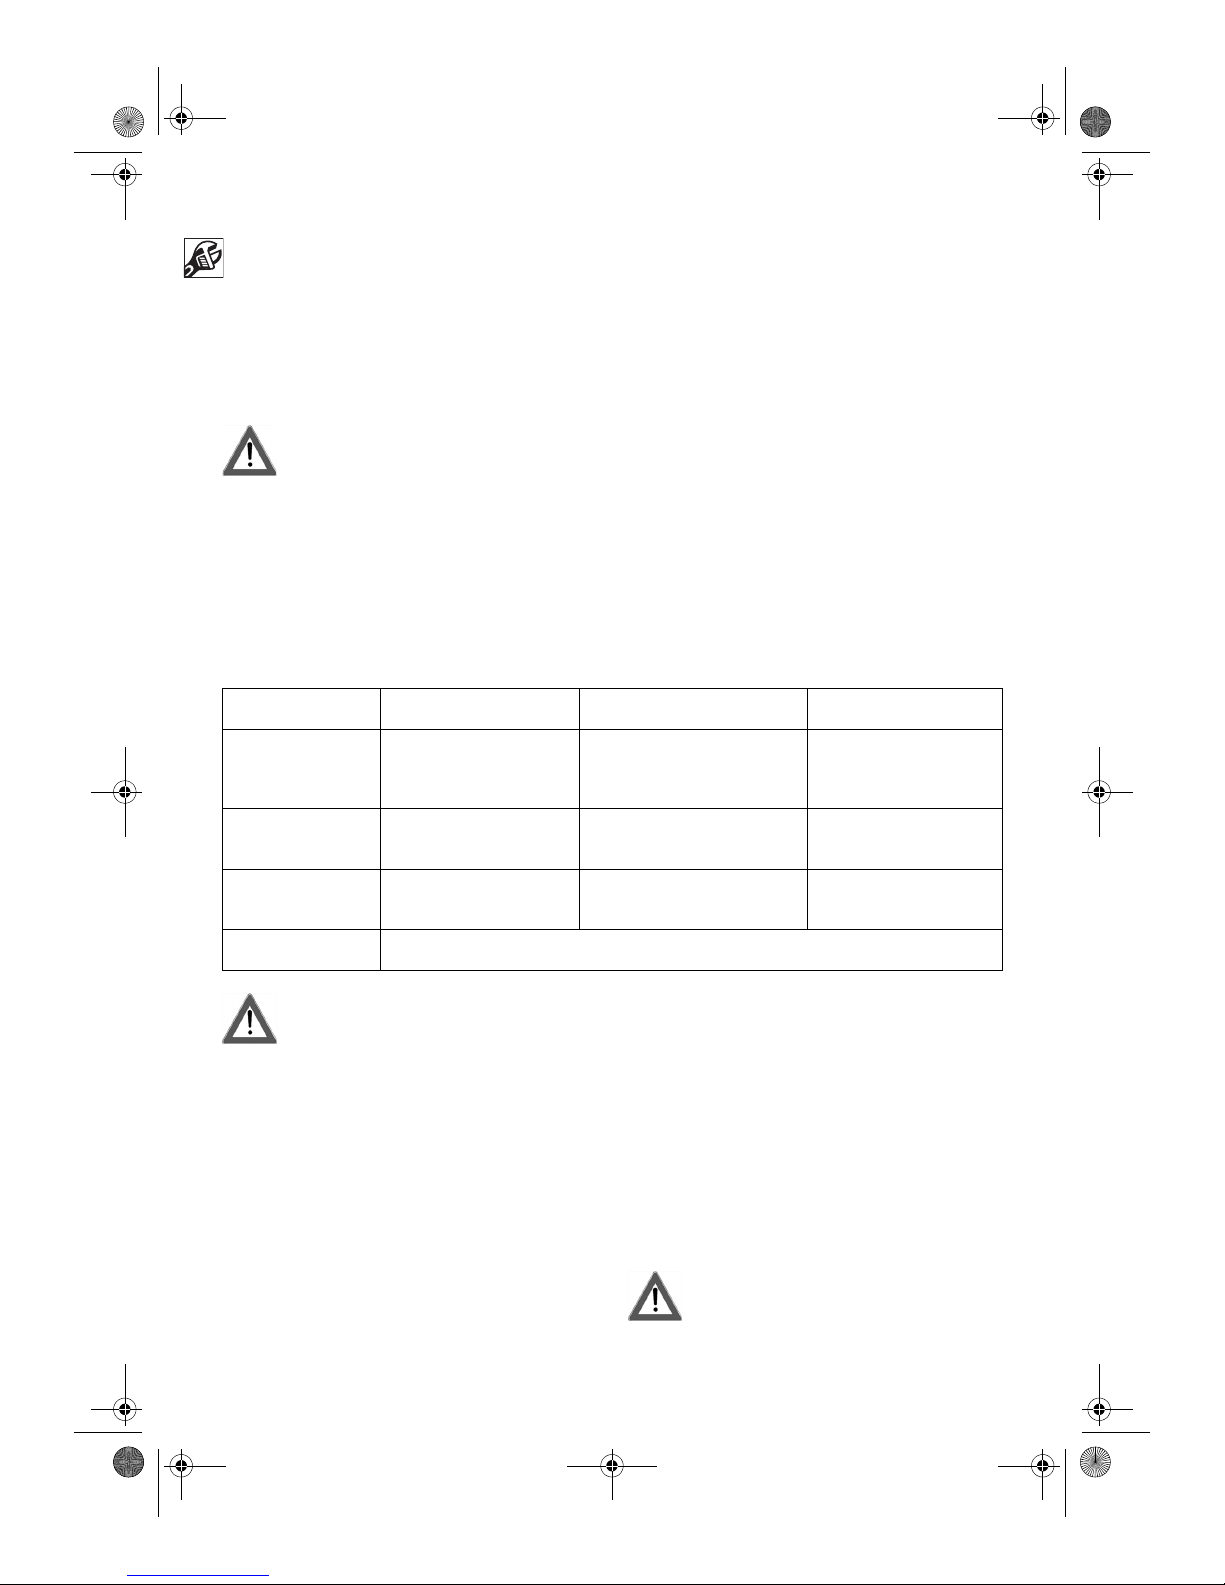
Empfohlene Durchmesser des Kochgeschirrs
(Bitte bewahren sie diese anweisungen gut auf)
WICHTIGE SICHERHEITSHINWEISE
OK NEIN
Ø
26 cm
XL
Ø
17 cm 26 cm
Ø
21 cm
L
Ø
14 cm 21 cm
Ø
18 cm
M
Ø
14,5 cm
S
Ø
12 cm 18 cm
Ø
9 cm 14,5 cm
41902042D.fm Page 4 Wednesday, June 22, 2011 10:41 AM

5
Warnung! Das Kochfeld muss von einem
Elektriker installiert werden, der mit allen
gängigen Sicherheits- und
Montagevorschriften vertraut ist.
Der Hersteller haftet nicht für eventuelle Verletzungen
von Personen oder Tieren und für Sachschäden durch
Missachten der in diesem Kapitel genannten Richtlinien.
Elektrischer Anschluss
•Der elektrische Anschluss muss erfolgen, bevor das Gerät
über das Netzkabel an die Stromversorgung angeschlossen
wird.
•Vor allem muss der elektrische Anschluss gemäß den
Richtlinien des örtlichen Stromanbieters vorgenommen
werden.
•Die Spannung auf dem Typenschild an der Geräteunterseite
muss der Spannung des Stromnetzes in Ihrer Wohnung
entsprechen.
•Die Erdung des Gerätes ist gesetzlich vorgeschrieben:
Verwenden Sie nur Leitungen (einschließlich
Erdungsleitungen) der entsprechenden Größe.
•Verwenden Sie für den elektrischen Anschluss ein H05 RR--
F-Kabel (siehe Anschlussplan “Netzspannung”).
Anschluss an die Klemmenleiste
Verbinden Sie das gelb-grüne Erdungskabel muss mit der
Klemme mit dem Symbol . Es muss länger als die anderen
Kabel sein.
1. Nehmen Sie den Klemmenleistendeckel (A) nach
Entfernen der Schraube ab und setzen Sie ihn in das
Scharnier (B) der Klemmenleiste ein.
2. Entfernen Sie etwa 70 mm der Ummantelung des
Netzkabels.
3. Entfernen Sie etwa 10 mm der Ummantelung der Leiter.
Setzen Sie das Kabel in die Kabelklemme ein und schließen
Sie die Leiter wie auf dem Anschlussplan neben der
Klemmenleiste dargestellt an die Klemmenleiste an.
4. Befestigen Sie das Netzkabel mit der Kabelklemme.
5. Schließen Sie den Deckel (C) und schrauben Sie ihn mit
der vorher entfernten Schraube auf der Klemmenleiste
fest - Schritt (1).
Bei jedem Netzanschluss führt das Kochfeld eine
automatische Kontrolle durch, die ein paar Sekunden
dauert.
Warnung! Das Netzkabel muss lang genug
sein, um das Kochfeld von der Arbeitsplatte
entfernen zu können, und so angebracht
werden, dass Schäden oder Überhitzung
durch Kontakt mit dem Sockel vermieden werden.
Verwenden Sie keine Verlängerungskabel.
Netzspannung
Falls das Kochfeld schon mit einem Netzkabel
ausgerüstet ist, gehen Sie den Anweisungen auf dem
Schildchen am Netzkabel entsprechend vor.
Bei der Installation muss ein allpoliger Trennschalter
mit einer Kontaktöffnungsweite von mindestens 3 mm
vorgesehen werden.
INSTALLATION und ELEKTRISCHER ANSCHLUSS
DOMINO
Leiter Anzahl x Größe
230 V ~ + 3 x 4 mm2(3 x 2,5 mm2Domino)
230-240 V ~ + 3 x 4 mm2(nur Australien)
(3 x 2,5 mm2Domino)
230 V 3 ~ + 4 x 1,5 mm2
400 V 3N ~ + 5 x 1,5 mm2
400V 2N ~ + 4 x 1,5 mm2
230V
230V
230V
230V
230V
230V
230V
230V
230V
230V
230V
AB
C
400 V 3N ~ 230 V ~
230-240 V~ NUR FÜR AU
230 V~ NUR FÜR GB
400 V 2N ~ 230 V 3~
NUR FÜR BELGIEN
400 V 2N~
NUR FÜR NL
77 x 35
41902042D.fm Page 5 Wednesday, June 22, 2011 10:41 AM

6
Installation und Befestigung
Warnung! Das beauftragte
Installationspersonal haftet für Sachschäden
infolge fehlerhaften Einbaus.
Um die einwandfreie Funktion des Gerätes zu gewährleisten,
muss die Installation auf einer völlig ebenen Oberfläche
durchgeführt werden.
Die Arbeitsplatte muss eine Stärke von 20--50 mm haben.
Führen Sie sämtliche erforderlichen Sägearbeiten am
Unterbaumöbel und an der Arbeitsplatte aus. Säubern Sie den
Ausschnitt von eventuellen Sägespänen, da diese
Funktionsstörungen des Gerätes verursachen können.
Für die Abmessungen des Ausschnitts beachten Sie bitte das nachstehende Schema.
Um die einwandfreie Funktion des Gerätes zu gewährleisten,
muss die Installation auf einer völlig ebenen Oberfläche
durchgeführt werden.
Die Arbeitsplatte muss eine Stärke von 20-50 mm haben.
Führen Sie sämtliche erforderlichen Sägearbeiten am
Unterbaumöbel und an der Arbeitsplatte aus. Säubern Sie den
Ausschnitt von eventuellem Staub, da dieser
Funktionsstörungen des Gerätes verursachen kann.
Der Abstand zwischen der Unterseite des
Induktionskochfeldes und Unterschrank oder Trennwand
muss den auf der nebenstehenden Abbildung angegebenen
Maßen entsprechen. Wird ein Hochschrank neben dem
Kochfeld installiert, so ist ein Abstand von mindestens 100 mm
zum Rand des Kochfelds einzuhalten.
Montage
1. Sind die Klammern (A) noch nicht montiert, so bringen Sie
diese an den dafür vorgesehenen Stellen am Rahmen des
Kochfeldes (Abb. 3) an.
2. Messen Sie die Mitte der senkrechten Seiten des Ausschnitts
(Abb. 1).
3. Die Oberseite der Winkel (C) muss mit der Oberseite der
Arbeitsplatte (Abb. 2) bündig sein.
4. Befestigen Sie die Winkel mit den vier mitgelieferten
Schrauben (B) in den vorgesehenen Löchern.
5. Setzen Sie das Kochfeld in den Ausschnitt ein. Die
Klammern (A) müssen an den entsprechenden
Gegenstücken der Winkel (Abb. 4) einrasten.
490
+2
0
288
510
484
267
min. 50
770
325
350
743
R min. 6,5
max. 8
min. 50
51
+1
0
275
+2
0330
+2
0
52
+1
0
R min. 6,5
max. 8
Maße in mm
750
+2
0
490
+2
0
380
510
484
342
min. 50
51
+1
0
350
+2
0
R min. 6,5
max. 8
Domino
300
Domino
380
77 x 35
min.
5
min. 20
min. 5
C
B
Abb. 2Abb. 1
41902042D.fm Page 6 Wednesday, June 22, 2011 10:41 AM

7
Montage eines Einbauherdes unter dem
Kochfeld:
•Soll unter dem Kochfeld ein Backofen (aus unserer
Produktion) eingebaut werden, so vergewissern Sie sich,
dass dieser über ein Kühlsystem verfügt. Halten Sie die auf
der nebenstehenden Abbildung angegebenen Abstände ein.
•Zwischen Kochfeld und Ofen dürfen sich keine
Querschienen, Platten, Winkel usw. befinden.
Bedienungsleiste
Die in der vorliegenden Anleitung abgebildeten
grafischen Symbole des Bedienfelds können von
denen auf Ihrer Kochmulde abweichen. Die
Funktionen der Tasten sind für alle Kochmulden aller
Modelle identisch.
Ein-/Ausschalten des Kochfeldes
Zum Einschalten des Kochfeldes halten Sie die Taste etwa
zwei Sekunden lang gedrückt, bis die Anzeigen der Kochzonen
aufleuchten. Zum Ausschalten drücken Sie die Taste, bis alle
Anzeigen erlöschen. Alle Kochzonen werden abgeschaltet.
Falls das Kochfeld bereits benutzt wurde, bleibt die
Restwärmeanzeige “H” leuchten, bis die Kochzonen abgekühlt
sind.
Wird innerhalb von ca. 10 Sekunden keine der
Funktionen gewählt, so schaltet sich die Kochmulde
automatisch wieder aus
A
Abb. 4
Abb. 3
5mm
BEDIENUNGSANLEITUNG
Kindersicherung
Kochzonen-Bedienelemente und Anzeigen
Ein/Aus
Zeitschaltuhr (Timer)
Symbole nicht aktiv!
Zur Auswahl der
gewünschten
Funktionen
berühren Sie die
darunter
befindlichen
Bereiche.
41902042D.fm Page 7 Wednesday, June 22, 2011 10:41 AM

8
Einschalten und Einstellen der Kochzonen
Nach dem Einschalten des Kochfeldes und nachdem der Topf
auf die gewünschte Kochzone gestellt wurde, muss die
Leistungsstufe mit der Taste + gewählt werden. Beim
Einschalten wird die Stufe 5 angezeigt.
Jede Kochzone hat verschiedene Leistungsstufen, die mit den
Tasten +/- von “1” (niedrigste Stufe) bis “9” (höchste Stufe)”
eingestellt werden können. Einige Kochzonen haben eine
Boosterfunktion zum Schnellkochen, die mit dem Buchstaben
“P” angezeigt wird”.
Schnellkochfunktion (Booster)
Diese Funktion ist nur bei bestimmten Kochfeldern verfügbar
und gestattet die maximale Ausnutzung der Kochfeldleistung
(z. B. zum schnellen Sieden von Wasser). Drücken Sie zum
Aktivieren der Funktion die Taste “+”, bis “P” angezeigt wird,
oder nach dem Einschalten des Kochfeldes direkt die Taste “-
” der gewünschten Kochzone. Auch dann wird “P” angezeigt.
Nach 10 Minuten schaltet das Gerät die Kochzone
automatisch auf die Stufe 9 zurück.
Abschalten der Kochzonen
Wählen Sie die Kochzone, die abgeschaltet werden soll, durch
Drücken der Taste “+” oder “-” an (der untere rechte Punkt
der Leistungsstufe wird angezeigt).
Drücken Sie die Taste “-”, bis die Stufe “0” erscheint.
Die Kochzone kann auch durch gleichzeitiges Drücken der
Tasten “+” und “-” abgeschaltet werden. Die Kochzone
schaltet ab und die Restwärmeanzeige “H” erscheint.
Kindersicherung
Die Funktion Kindersicherung sperrt die Bedienung des
Kochfelds vollkommen, um zu verhindern, dass Kinder es
versehentlich einschalten. Zum Aktivieren der
Kindersicherung schalten Sie das Kochfeld ein und halten Sie
die Taste drei Sekunden langgedrückt. Ein Signalton und
eine Leuchtanzeige unter dem Schlüsselsymbol bestätigen die
erfolgte Aktivierung. Das Bedienfeld ist mit Ausnahme der
Abschaltfunktion gesperrt. Zum Abschalten der
Kindersicherung wiederholen Sie die beschriebene
Vorgehensweise. Der Leuchtpunkt erlischt und das Kochfeld
ist wieder betriebsbereit.
Wasser zum Reinigen, aus dem Kochgeschirr übergetretene
Flüssigkeiten und Gegenstände aller Arten, die auf die Taste
unter dem Symbol geraten, können zum unbeabsichtigten
Auslösen oder Aufheben der Kindersicherung führen.
Zeitschaltuhr (Timer)
Mit dem Timer kann jeweils eine einzige
Kochzone auf einen Kochbetrieb vom
maximal 99 Minuten (1 Stunde und
39 Minuten) vorprogrammiert werden.
Wählen Sie die Kochzone, die
vorprogrammiert werden soll (ein
Leuchtpunkt erscheint unten rechts neben der
Leistungsstufenanzeige). Wählen Sie dann die gewünschte Zeit
mit den Tasten “+” und “-” der Timer-Funktion (siehe obige
Abbildung). Einige Sekunden nach der letzten Berührung fängt
der Timer an rückwärts zu zählen und der Leuchtpunkt der
gewählten Kochzone blinkt. Nach Ablaufen der Zeit ertönt ein
Signalton und die Kochzone schaltet automatisch ab.
Um den Timer zu deaktivieren, drücken Sie die Taste “-”, bis
“0:0” angezeigt wird, oder gleichzeitig die Tasten “+” und “-”
des Timers.
Wichtig! Mit dem Timer kann jeweils nur eine Kochzone
programmiert werden.
Kurzzeitwecker
Der Kurzzeitwecker lässt sich nur bei abgeschaltetem Gerät
verwenden und auf eine Höchstzeit von 99 min. einstellen.
Drücken Sie die Taste “+” unter dem Display der
Zeitschaltuhr: Am Display erscheinen die einzustellenden
Minuten.
Stellen Sie die gewünschte Zeit mit den Tasten + und - ein.
Nach einigen Sekunden fängt der Timer an rückwärts zu
zählen. Nach Ablaufen der Zeit ertönt ein Signalton.
Wichtig! Die Funktion Kurzzeitwecker lässt sich nur bei
ausgeschalteter Kochmulde verwenden. Wird das Gerät
eingeschaltet, so schaltet sich der Kurzzeitwecker automatisch
ab.
Bedienfeldanzeigen
Restwärmeanzeige
Das Kochfeld ist mit einer Restwärmeanzeige für jede
Kochzone ausgestattet. Diese Anzeige weist auf noch
heiße Kochzonen hin.
Wird angezeigt, so ist die Kochzone noch heiß.
Solange die Anzeige leuchtet, kann auf der Kochzone eine
Speise warm gehalten oder Butter geschmolzen werden.
Erst nach Abkühlen der Kochzone erlischt die Anzeige.
Anzeige falsch positioniertes oder fehlendes
Kochgeschirr
Das Kochfeld ist mit einem System zur
automatischen Kochgeschirrerfassung für alle
Kochzonen ausgestattet. Wird kein Kochgeschirr
erfasst, blinkt die Leistungsstufenanzeige der
Kochzone. Vergewissern Sie sich, dass das Kochgeschirr
korrekt positioniert ist und die in Abschnitt “Vor Gebrauch”
angeführten Eigenschaften aufweist.
Taste -
Leistungsanzeige
Anzeige der gewählten
Kochzone
Taste +
Position der
Kochzone
41902042D.fm Page 8 Wednesday, June 22, 2011 10:41 AM

9
Pflege und Wartung
Es wird empfohlen, das Kochfeld nach jedem Gebrauch zu
reinigen, um zu vermeiden, dass die Glaskeramikoberfläche
beschädigt wird und sich schwer zu entfernende Speisereste
ablagern. Vor dem Reinigen müssen die Kochzonen
ausgeschaltet und die Restwärmeanzeige (“H”)
erloschen sein.
• Verwenden Sie keine Dampfstrahlreiniger!
• Kontrollieren Sie die Kochmulde an den
Kühlöffnungen unter dem Gerät regelmäßig
auf Staubablagerungen. Staub verhindert
die Luftzirkulation in der Kochmulde, was zu
Überhitzung der Elektronik und Nachlassen
der Kochleistung führen kann.
Tipps zum Reinigen:
1. Verwenden Sie ein weiches, sauberes Tuch,
Küchenpapier oder spezielle Reinigungsmittel für
Glaskeramik-Kochfelder. Verwenden Sie keine
Scheuerschwämme oder eiserne Topfreiniger.
2. Lassen Sie Speisereste nicht antrocknen, sondern
entfernen Sie diese sofort. Zucker oder stark
zuckerhaltige Speisen beschädigen das Kochfeld und
müssen sofort mit einem Schaber für Glas entfernt
werden. Solche Schaber sind sehr scharf: Vorsicht beim
Gebrauch!
3. Entfernen Sie alle Rückstände mit dem Schaber oder
spezifischen Produkten.
4. Salz, Zucker und Sand verkratzen die
Störung - Was tun?
•Bevor Sie den Kundendienst rufen:
•Lesen Sie die Anweisungen in Abschnitt
“Bedienungsanleitung” und befolgen Sie diese.
•Schließen Sie das Kochfeld an das Stromnetz an und prüfen
Sie, ob Strom fließt.
•Trocknen Sie die Glaskeramikoberfläche des Kochfeldes
nach dem Reinigen gut ab.
•Wenn nach dem Einschalten des Kochfeldes
alphanumerische Codes angezeigt werden, gehen Sie der
nachfolgenden Tabelle entsprechend vor.
Warnung! Wenn sich die Gklaskochmulde nach Gebrauch nicht abschalten läßt, ziehen Sie sofort den Netzstecker aus
der Steckdose.
Kundendienst
Bevor Sie den Kundendienst rufen:
•Versuchen Sie, den Fehler selbst zu beheben (siehe
“Störung - Was tun?”).
•Schalten sie das Gerät ab, warten Sie 30 Sekunden und
schalten Sie es wieder ein. Prüfen Sie, ob die Störung
beseitigt ist.
Falls die Störung nach den vorstehend beschriebenen
Kontrollen weiter besteht oder erneut auftritt, rufen Sie bitte
den Kundendienst an.
Machen Sie dabei folgende Angaben:
•Kurze Beschreibung der Störung,
•Gerätetyp und Modellnummer,
•die Servicenummer (die Zahl nach dem Wort SERVICE auf
dem Typenschild), die Sie unter dem Kochfeld oder im
Garantieheft finden,
•Ihre vollständige Anschrift und Telefonnummer.
Sollte eine Reparatur erforderlich sein, wenden Sie sich bitte
an den Kundendienst eines Vertragshändlers, wie in den
Garantiebestimmungen festgelegt ist.
Warnung! Die Nichtbeachtung dieser
Anweisungen kann die Sicherheit und die
Qualitätseigenschaften des Geräts gefährden.
WARTUNG
FEHLERCODE BESCHREIBUNG MÖGLICHE URSACHEN BEHEBUNG DER
STÖRUNG
Die Kochmulde schaltet
ab. Nach 30 Sekunden
ertönt alle 4 Sekunden
ein Signalton.
Dauerdruck auf dem
Bedienfeld
Wasser oder Küchenutensilien auf
dem Bedienfeld
Räumen und trocknen Sie das
Bedienfeld ab.
C81, C82 Bedienfeld schaltet wegen
Überhitzung ab.
Die intere Temperatur der
elektronischen Komponenten ist zu
hoch.
Warten Sie, bis sich das
Kochfeld abgekühlt hat, bevor
Sie es benutzen.
F42 oder F43 Es liegt nicht die korrekte
Netzspannung an.
Der Sensor erfasst eine vom
Anschluss abweichende Spannung.
Trennen Sie das Kochfeld vom
Stromnetz und prüfen Sie den
Anschluss.
F12, F21, F25, F36, F37,
F40, F47, F56, F58, F60 Rufen Sie den Kundendienst und geben Sie den Fehlercode an.
41902042D.fm Page 9 Wednesday, June 22, 2011 10:41 AM

10
Typenschild
Energiespartipps
Um bestmögliche Ergebnisse zu erzielen, berücksichtigen Sie
folgende Hinweise:
•Verwenden Sie nur Töpfe und Pfannen, deren
Bodendurchmesser dem der Kochzone entspricht.
•Verwenden Sie nur Töpfe und Pfannen mit flachem Boden.
•Lassen Sie beim Kochen den Deckel möglichst auf dem
Topf.
•Kochen Sie Gemüse, Kartoffeln usw. mit wenig Wasser, um
die Garzeit zu verkürzen.
•Durch Verwendung eines Schnellkochtopfes können Sie
noch mehr Energie und Zeit sparen.
•Stellen Sie den Topf stets mittig auf die gekennzeichneten
Kochzonen des Induktionsfeldes.
Hinweise zum Umweltschutz
Verpackung
Das Verpackungsmaterial ist zu 100 % wieder verwertbar und
trägt das Recycling-Symbol.
Elektrogeräte
Dieses Gerät ist in Übereinstimmung mit der Europäischen
Richtlinie 2002/96/EC “Waste Electrical and Electronic
Equipment” (WEEE) gekennzeichnet. Durch die
vorschriftsmäßige Entsorgung trägt der Benutzer dazu bei,
schädliche Auswirkungen auf Umwelt und Gesundheit zu
vermeiden.
•Das Symbol auf dem Gerät bzw. auf dem beiliegenden
Informationsmaterial weist darauf hin, dass dieses Gerät
kein normaler Haushaltsabfall ist, sondern in einer
Sammelstelle für Elektro- und Elektronik-Altgeräte entsorgt
werden muss. Beachten Sie daher bei der Entsorgung die
örtlichen Verordnungen zur Abfallbeseitigung. Für
genauere Information für das Behandeln, Entsorgen und
Recycling dieses Gerätes wenden Sie sich bitte an Ihre
örtliche Verwaltungsstelle oder Ihre Müllabfuhr.
Konformitätserklärung
•Diese Kochmulde ist für den Kontakt mit Lebensmitteln
geeignet und entspricht der EG-Richtlinie 1935/2004.
•Die Geräte sind ausschließlich zum Kochen bestimmt. Jeder
andere Gebrauch (z. B. das Heizen von Räumen) ist
bestimmungsfremd und somit gefährlich.
•Diese Geräte werden in Übereinstimmung mit den
folgenden Richtlinien entworfen, hergestellt und verkauft:
•Sicherheitsanforderungen der
“Niederspannungsrichtlinie” 2006/95/CE (die 73/23/CEE
und nachfolgende Änderungen ersetzt),
•Schutzvorschriften der EMV-Richtlinie 2004/108
“Elektromagnetische Verträglichkeit”,
•Vorschriften der EU-Richtlinie 93/68/EWG.
MODELL SERIENNUMMER
HERSTELLER
TIPPS FÜR DEN NUTZER
WICHTIG
Kleben Sie hier einen der Aufkleber mit den Produktdaten
ein, die sich in zweifacher Ausfertigung im Garantieheft befinden.
41902042D.fm Page 10 Wednesday, June 22, 2011 10:41 AM

11
This manual contains important information regarding
safety, the use and maintenance of your new hob. Read the
manual and keep it in an easily accessible place for future
consultation.
Precautions and Advice
1. This cooktop complies with all applicable safety and
electromagnetic compatibility legislation.
However, individuals fitted with a heart pacemaker
should maintain a safe distance from the appliance.
This is because it is not possible to guarantee that all
pacemakers on the market comply with the standards
in compliance with which this appliance was tested so
it is not possible to provide an absolute guarantee of
the absence of potentially harmful interference.
2. Disposal of packaging materials: dispose of the various
packing materials responsibly, in full compliance with
local authority regulations governing waste disposal.
3. This induction hob is designed solely for use as a
domestic appliance. No other type of use is permitted.
The manufacturer declines all responsibility for
inappropriate use.
4. The appliance is not intended for use by people
(children included) with physical, sensory or mental
impairment or without experience and knowledge of
the appliance, unless supervised or previously
instructed in its use by those responsible for their
safety.
5. The cooking zones become extremely hot during use:
keep children away from the appliance to avoid the
risk of scalding or burns.
6. The letter “H” will appear on the control
panel display to indicate “residual heat” in the
corresponding cooking zone: the temperature
of the cooking zone is above 60 °C: do not
touch the cooking zone or place any object on
it while the letter “H” remains lit.
7. If the surface of the hob should become damaged
(cracked or broken glass), do not use the appliance
and call the After-sales Service immediately.
8. Any repairs or work on the appliance must be carried
out by a qualified technician.
9. This hob is equipped with a thermoprotector to
prevent the risk of its internal circuits being damaged
by high temperatures from external heat sources
(e.g. an undercounter oven). If the temperature of the
electronic circuits exceeds the safety threshold, the
thermoprotector activates, automatically switching off
the hob. The display shows an error message
(see. section “Troubleshooting Guide”). When the
temperature returns to within normal levels the hob is
able to be switched on again.
10. Make sure the cooking zones and the bottoms of pots
are dry before use.
11. Do not place metal objects such as kitchen utensils
(knives, forks, spoons, …), lids or other similar items
on the cooking zones as they can become very hot.
12. Be extremely vigilant when cooking food with boiling
oil or fat since these can catch fire. In the event of oil
catching fire, never attempt to put it out with water:
switch the hob off and cover the pot immediately with
a lid; leave the pot on the cooking zone to cool down.
Dispose of the oil in compliance with current
regulations.
13. When you finish cooking, press button .
Before use
Important: The induction cooking zones
will not switch on if pots and pans are not of
the correct dimensions.
Only use pots bearing the symbol
“INDUCTION SYSTEM” (See figure
opposite).
Before switching the hob on, position the pot on the
desired cooking zone.
Existing pots and pans:
Use a magnet to check whether pots or pans are suitable
for use on the induction hob: pots are unsuitable if they
cannot be magnetically detected.
1. Ensure pots have a smooth bottom, otherwise they
may scratch the hob's glass ceramic surface. Check
dishes.
2. Do not use empty pots on the hob, especially
enamelled or aluminium ones. This could result in
damage to both the glass ceramic surface and the
bottom of the pots.
3. Never place hot pots or pans on the hob's control
panel. This could result in damage.
Recommended diameters of pot bottoms
(Save these instructions)
IMPORTANT SAFETY INFORMATION
OK NO
Ø
26 cm
XL
Ø
17 cm 26 cm
Ø
21 cm
L
Ø
14 cm 21 cm
Ø
18 cm
M
Ø
14.5 cm
S
Ø
12 cm 18 cm
Ø
9 cm 14.5 cm
41902042GB.fm Page 11 Wednesday, June 22, 2011 10:28 AM

12
Warning! Installation must be carried out by
a qualified electrician who is fully aware of
current safety and installation regulations.
The manufacturer declines all liability for
injury to persons or animals and for damage to
property resulting from failure to observe the
regulations provided in this chapter.
Electrical connections
•Hob electrical connection must be made before
connecting the appliance to the electricity supply.
•Electrical connection must be carried out in compliance
with the regulations of the local electric utility company.
•Make sure that the voltage indicated on the rating plate
on the underside of the appliance corresponds to the
domestic power supply voltage.
•Regulations require that the appliance is earthed: use
conductors (including the earth conductor) of the
appropriate size only.
•For electrical connection, use an H05 RR-F type cable as
specified in the table “Power supply voltage”.
Connecting to the terminal board
Connect the yellow/green earth wire to the terminal with
the symbol . This wire must be longer than the other
wires.
1. Remove the terminal block cover (A), undoing the
screw and inserting the cover in the terminal block
hinge (B).
2. Strip approx. 70 mm of sheath from the power supply
cable.
3. Strip approx. 10 mm of sheath from the wires. Insert
the power supply cable into the cable clamp and
connect the wires to the terminal board as indicated in
the diagram next to the terminal board itself.
4. Secure the power cable with the cable clamp.
5. Close the cover (C) and screw it on the terminal block
with the removed screw - point (1).
Each time the cooktop is connected to the mains it
carries out an automatic check which lasts several
seconds.
Warning!The power supply cable must be
long enough to allow the hob to be removed
from the worktop and must be positioned
so as to avoid damage or overheating
caused by contact with the base of the hob itself. Do
not use extension leads.
Power supply voltage
If the hob already has a power cable, follow the
instructions given on the label attached to the
cable.
Connect the appliance to the electricity supply by
means of an all-pole disconnect switch with minimum
contact gap of 3 mm.
INSTALLATION and ELECTRICAL CONNECTION
DOMINO
Wires Amount x size
230V ~ + 3 X 4 mm2(3X2.5 mm2Domino)
230-240V ~ + 3 X 4 mm2(Australia only)
(3X2.5 mm2Domino)
230V 3 ~ + 4 X 1.5 mm2
400V 3N ~ + 5 X 1.5 mm2
400V 2N ~ + 4 x 1.5 mm2
230V
230V
230V
230V
230V
230V
230V
230V
230V
230V
230V
AB
C
400V 3N ~ 230V ~
230-240V~FOR AU ONLY
230V~FOR UK ONLY
400V 2N ~ 230V 3~
ONLY FOR BELGIUM
400V 2N~
FOR NL ONLY
77X35
41902042GB.fm Page 12 Wednesday, June 22, 2011 10:28 AM

13
Installation and fixing
Warning! The installer is responsible for any
damage or injury resulting from incorrect
installation.
To guarantee correct operation, the appliance
must be installed on a perfectly flat surface.
The worktop must be 20-50mm thick.
If necessary, cut the kitchen unit and worktop to fit before
installing the hob. Clean the cutout of any chips that could
compromise appliance operation.
For cut-out dimensions, see the figure below.
To guarantee correct operation, the appliance must be
installed on a perfectly flat surface.
The worktop must be 20-50 mm thick.
If necessary, cut the kitchen unit and worktop to fit before
installing the hob. Clean the cutout of any remaining dust
that could compromise appliance operation.
For the distance between the underside of the induction
hob and the kitchen unit (or separating panel), observe the
dimensions given in the figure at the side. If a column unit
is installed adjacent to the hob, leave a distance of at least
100 mm from the edge of the hob.
Assembly
1. Position the clips (A) in the spaces provided on the
hob trim (fig. 3) if not already positioned.
2. Measure the centre point of the vertical sides of the
cut-out (fig. 1)
3. Fit the brackets (C) in the centre of the vertical sides,
aligning the upper edge of the brackets so that they are
flush with the worktop surface (fig. 2).
4. Fix the brackets with the 4 screws supplied (B) using
the holes provided.
5. Insert the hob in the cutout, making sure the clips (A)
are secured in the spaces provided (fig. 4).
490
+2
0
288
510
484
267
min. 50
770
325
350
743
R min. 6.5
max. 8
min. 50
51
+1
0
275
+2
0330
+2
0
52
+1
0
R min. 6.5
max. 8
Dimensions
in mm
750
+2
0
490
+2
0
380
510
484
342
min. 50
51
+1
0
350
+2
0
R min. 6.5
max. 8
Domino
300
Domino
380
77x35
min.
5
min. 20
min. 5
C
B
fig. 2fig. 1
41902042GB.fm Page 13 Wednesday, June 22, 2011 10:28 AM

14
Undercounter oven installation:
•If an oven (which must be of our manufacture) is to be
installed under the hob, ensure it is equipped with a
cooling system and observe the distances given in the
figure to the side.
•There must be nothing between the cooktop and the
oven (cross rails, panels, brackets, etc.).
Control panel
Control panel graphics shown in these instructions
might not match exactly the graphics of your hob.
Button’s functions are the same for all hob models.
Switching the hob ON/OFF
To switch the hob on, press the button for approx.
2 seconds until the cooking zone displays light up. To
switch off, press the same button until the displays switch
off. All the cooking zones are switched off.
If the hob has been in use, the residual heat indicator “H”
remains lit until the cooking zones have cooled down.
The hob automatically switches off if no function is
selected within 10 seconds of switching on.
A
fig. 4
fig. 3
5mm
OPERATING INSTRUCTIONS
Child lock
Cooking zone controls and corresponding display
On/Off
Timer
the symbols are not
active! To select the
desired functions,
touch the
areas below.
41902042GB.fm Page 14 Wednesday, June 22, 2011 10:28 AM

15
Switching on and adjusting cooking zones
After switching on the hob and positioning the pot on the
chosen cooking zone, adjust the heat setting using the
button +. When switched on, the display shows level 5.
Each cooking zone has different heat settings that can be
adjusted using the buttons +/-, which go from “1”: min.
heat setting to “9”: max. heat setting. Some cooking zones
have a fast boil function (Booster), shown on the display
with the letter “P”.
Fast boil function (Booster)
This function, only present on some cooking zones, makes
it possible to exploit the hob's maximum power (for
example to bring water to the boil very quickly). To select
this function, press the button “+” until “P” appears on the
display or, after switching the hob on, press the “-” button
for the selected cooking zone. In this case too, “P” appears
on the display. After 10 minutes' use of the booster
function, the appliance automatically sets the zone to
level 9.
Switching off cooking zones
Select the cooking zone to be switched off by pressing the
“+” or “-” key (a dot lights up at the bottom right hand
side of the heat setting indicator).
Press the key “-” to set the level to “0”.
The cooking zone can also be switched off by pressing keys
“+” and “-” at the same time. The cooking zone switches
off and the residual heat indicator “H” lights up
Child lock
This function locks the hob controls to prevent accidental
switching on by children. To activate the child lock
function, switch on the hob then press and hold the
button for three seconds: an acoustic signal and a
luminous indicator under the key symbol signal activation.
The control panel is locked with the exception of the OFF
function. To unlock the controls, repeat the child lock
activation procedure. The illuminated dot switches off and
the hob is active again.
The presence of cleaning water, liquid spilled from pots or
any objects resting on the button below the symbol can
accidentally activate or deactivate the child lock function.
Timer
The timer can be used to set a max.
cooking time of 99 minutes (1 hour and
39 minutes) for one cooking zone only.
Select the cooking zone to be used with
the timer (an illuminated dot appears to
the bottom right hand side of the heat setting indicator on
the display), then set the desired cooking time using the
buttons “+” and -“-” of the timer function (see figure
above). A few seconds after the button is pressed, the
timer begins the countdown (the luminous dot of the
selected cooking zone starts flashing). Once the set time
has elapsed, an acoustic signal sounds and the cooking zone
switches off automatically.
To deactivate the timer, press the button “-” until the
display shows “0:0” or press the buttons “+” and “-” of the
timer at the same time.
Important! The timer function can only be used with one
cooking zone at a time.
Minute minder
The minute minder can only be used when the hob is not
in use and allows a maximum setting of 99 min.
Press the button “+” below the timer indicators: the
display shows the minutes for setting.
Select the time desired using the buttons + and -.
After a few seconds the minute minder starts to count
down. Once the set time has elapsed an acoustic signal
sounds.
Important! The minute minder function can only be used
when the hob is switched off; if it is then switched on, the
minute minder countdown is automatically cancelled.
Control panel indicators.
Residual heat indicator.
The hob is fitted with a residual heat indicator for
each cooking zone. These indicators alert the user
when cooking zones are still hot.
If the display shows , the cooking zone is still hot.
If the residual heat indicator of a given cooking zone is lit,
that zone can be used, for example, to keep a dish warm
or to melt butter.
When the cooking zone cools down, the display switches
off.
Incorrect or missing pot indicator.
The hob features an automatic pot detection
system for all cooking zones. If no pot is detected,
the display with the cooking zone power level
indicator flashes. Make sure the pot is correctly
positioned and that it has the characteristics given in the
section “Before use”.
Button -
Heat setting indicator
Selected cooking zone
indicator
Button +
Cooking zone
positioning
41902042GB.fm Page 15 Wednesday, June 22, 2011 10:28 AM

16
Care and maintenance
Clean the hob after each use in order to avoid damaging
the surface and to prevent the formation of baked-on
deposits which are difficult to remove. Before cleaning,
make sure the cooking zones are switched off and that the
residual heat indicator (“H”) is not displayed.
• Never clean the hob with a steam cleaner!
• Periodically check for dust under the
appliance, near the cooling air inlet or the
outlet openings. This could hinder the
ventilation and cooling of the electronic
module and decrease the effectiveness of
the hob.
To clean the hob, proceed as follows:
1. use a soft clean cloth, absorbent kitchen wipes or a
proprietary cleaner for glass ceramic hobs. Do not use
abrasive sponges and/or metal scouring pads.
2. Food spills should be cleaned off before they bake
onto the glass ceramic surface. Sugar and foods with a
high sugar content damage the glass ceramic surface
and must be immediately removed using a scraper for
glass. Glass scrapers must be handled with care.
3. Remove any stubborn food residues with a scraper or
proprietary detergents.
4. Salt, sugar and sand can scratch the glass ceramic hob:
clean up any such spills on the hob immediately.
Troubleshooting Guide
•Before contacting After-sales Service:
•read and follow the instructions given in the section
“Operating instructions”.
•Connect the hob to the electricity supply and check that
the supply has not been shut off.
•Clean the hob and dry it thoroughly.
•If, when the hob is switched on, alphanumeric codes
appear on the display, consult the following table for
instructions.
Warning! If you are unable to turn the glass-ceramic hob off after using it, disconnect it immediately from the
power supply.
After-sales Service
Before contacting After-sales Service:
•Try to solve the problem (see “Troubleshooting Guide”).
•Switch the appliance off, wait 30 seconds then switch it
on again. to see if the fault persists.
If after the above checks the fault persists, contact the
nearest After-sales Service.
Always provide:
•a brief description of the fault;
•the exact type and model;
•the service number (number after the word Service on
the rating plate) is located on the underside of the
cooktop or on the warranty booklet;
•your complete address and phone number.
If any repairs are required, please contact an authorized
After-sales Service as indicated in the warranty.
Warning! Failure to comply with these
instructions may compromise the safety and
quality of the product.
MAINTENANCE
ERROR CODE DESCRIPTION POSSIBLE CAUSES REMEDY
The hob switches off
and after 30 seconds
emits an acoustic signal
every 4 seconds
Continuous pressure on
control panel area Water or utensils on control panel Clean the control panel
C81, C82
The control panel switches off
because of excessively high
temperatures
The internal temperature of
electronic parts is too high
Wait for the hob to cool down
before using it again
F42 or F43 The connection voltage is
wrong
The sensor detects a discrepancy
between the appliance voltage and
that of the mains supply
Disconnect the hob from the
mains and check the electrical
connection
F12, F21, F25, F36, F37,
F40, F47, F56, F58, F60 Call the After-Sales Service and specify the error code
41902042GB.fm Page 16 Wednesday, June 22, 2011 10:28 AM

17
Appliance data plate
Energy saving tips
For optimum results, observe the following advice:
•Use pots and pans whose bottom diameter is equal to
that of the cooking zone.
•Only use flat-bottomed pots and pans.
•If possible, keep pot lids on when cooking.
•Cook vegetables, potatoes, etc. with little water in
order to cut down cooking time.
•Use a pressure cooker to to save even more energy and
time.
•Make sure you place the pot or pan in the centre of the
cooking zone outlined on the hob.
Safeguarding the environment.
Packaging
The packaging material is 100% recyclable and marked
with the recycling symbol
Electrical Appliances.
This appliance is marked in compliance with European
Directive 2002/96/EC on Waste Electrical and Electronic
Equipment (WEEE). By ensuring that this appliance is
scrapped suitably, you can help prevent potentially
damaging consequences for the environment and health.
•The symbol on the appliance, or on documentation
enclosed with the appliance, indicates that this product
must not be treated as household waste, but must be
delivered to the nearest collection centre for the
recycling of electrical and electronic appliances. Disposal
must be carried out in accordance with local
environmental regulations for waste disposal. For further
information on the treatment, recovery and recycling of
this appliance, contact your competent local authority,
the collection service for household waste.
Declaration of Conformity
•This hob is suitable for contact with foodstuffs and
complies with EEC (CE) regulation n. 1935/2004.
•The appliances are designed solely for use as cooking
appliances. Any other use (e.g. for room heating) is
considered as improper use and potentially dangerous.
•The appliances are designed, built and sold in
compliance with:
•safety objectives of the “Low Voltage” Directive
2006/95/EC (which replaces 73/23/EEC and
subsequent amendments);
•Protection requirements of EMC Directive
2004/108/EC “Electromagnetic compatibility”;
•the requirements of Directive 93/68/EEC.
MODEL SERIALNUMBER
BRAND
USER ADVICE
IMPORTANT
Attach here one of the two appliance
data plate stickers found in the warranty booklet
41902042GB.fm Page 17 Wednesday, June 22, 2011 10:28 AM

18
Ce manuel contient des indications importantes au sujet de la
sécurité, de l’emploi et de l’entretien de votre nouvelle table
de cuisson. Lire ce manuel et le conserver dans un lieu
facilement accessible pour toute consultation future.
Précautions et conseils
1. Cette table de cuisson est conforme à toutes les lois en
matière de sécurité et compatibilité électromagnétique.
Malgré tout, les porteurs de PACE-MAKER doivent rester
à l’écart de cet appareil électroménager. Il est impossible
de garantir que tous les appareils (pace-maker) présents
sur le marché sont conformes aux normes selon lesquelles
la table de cuisson a été testée ce qui empêche d’assurer
l’absence totale d’interférences dangereuses.
2. Élimination de l’emballage : les différents éléments de
l’emballage doivent être recyclés conformément aux
règlements locaux en vigueur ; ne pas les jeter avec les
ordures ménagères.
3. Cette table de cuisson à induction a été conçue
uniquement comme appareil ménager. Toute autre
utilisation est considérée comme impropre. Le fabricant
ne pourra être tenu pour responsable en cas de
dommages résultant d’une utilisation impropre.
4. Cet appareil ne peut être utilisé par des personnes
(enfants y compris) à capacités réduites ou
portant un pace maker, ou ne possédant ni
l’expérience ni la connaissance du produit, à moins qu’une
personne responsable de leur sécurité n’assure la
surveillance initiale ou ne leur fournisse les instructions
nécessaires à l’utilisation de l’appareil.
5. Les foyers atteignent des températures élevées durant
l’emploi : Éloignez les enfants de l’appareil pour éviter les
risques de brûlures.
6. L’indication “H” apparaîtra sur le bandeau de
commande pour indiquer “chaleur résiduelle”
dans la zone de cuisson correspondante: la
température des foyers est supérieure à 60° C il
est recommandé de ne pas la toucher ni d’y
déposer d’objets jusqu’à l’extinction de la
lettre “H”.
7. Si la surface de la table s’abîme (fissures ou rupture du
verre), il est impératif de stopper l’utilisation de la plaque,
de couper l’alimentation électrique du secteur et de
contacter immédiatement le service après vente.
8. Toute réparation ou intervention éventuelle devra être
réalisée exclusivement par un technicien qualifié.
9. Cette table de cuisson est équipée de protection
thermique pour éviter que les circuits internes de la table
ne soient endommagés par une température élevée
provoquée par des sources de chaleur extérieures à la
table (par exemple un four sous le plan). Si la température
des circuits électroniques dépasse le niveau de sécurité, la
protection thermique s’active et éteint automatiquement
la table de cuisson. L ’afficheur visualise un message
d’erreur (voir. section “Diagnostic des pannes”). Dès que
la température retourne dans les valeurs de sécurité, la
table pourra être utilisée normalement.
10. Avant l’emploi, vérifier que les foyers de cuisson et le fond
des casseroles sont secs.
11. Ne déposer aucun objet métallique comme les ustensiles
de cuisine (couteaux, fourchettes, cuillers, …), couvercles
ou autres sur les foyers car ils pourraient chauffer.
12. Nous recommandons de surveiller constamment la
préparation des aliments pour lesquels on utilise des huiles
ou matières grasses bouillantes car ils pourraient prendre
feu. Au cas où l’huile prendrait feu, n’utiliser jamais d’eau
pour l’éteindre : éteindre la table de cuisson et couvrir
immédiatement la casserole avec un couvercle ; laisser la
casserole refroidir sur le foyer. Eliminer l’huile selon les
normes en vigueur.
13. Dès que la cuisson est terminée, appuyez sur la touche
.
Avant utilisation
Remarque importante : Si les casseroles
ne sont pas des dimensions correctes, les
foyers ne s’allument pas.
Utiliser exclusivement des casseroles qui
portent le symbole “INDUCTION SYSTEM”
(Figure ci-contre)
Avant d’allumer la table de cuisson, positionner
la casserole sur le foyer désiré.
Récipients pré-existants :
Pour vérifier si le récipient est approprié à la table de cuisson
à induction, utiliser un aimant : les casseroles ne sont pas
appropriées si l’aimant ne colle pas dessus.
1. Vérifier que le fond des casseroles n’est pas rêche afin de
ne pas érafler la surface de la table de cuisson. Contrôler
la vaisselle.
2. Éviter la cuisson avec des casseroles vides surtout s’il s’agit
de plats émaillés ou en aluminium. Le fond des casseroles
et la surface du plan vitrocéramique pourraient
s’endommager.
3. Ne jamais poser les casseroles et les poêles chaudes sur la
surface du bandeau de commande de la table de cuisson.
Elles pourraient l’endommager.
Diamètres fond casserole conseillés
(Conserver les présentes instructions)
INFORMATIONS IMPORTANTES POUR LA SÉCURITÉ
OK NON
Ø
26 cm
XL
Ø
17 cm 26 cm
Ø
21 cm
L
Ø
14 cm 21 cm
Ø
18 cm
M
Ø
14,5 cm
S
Ø
12 cm 18 cm
Ø
9 cm 14,5 cm
41902042F.fm Page 18 Wednesday, June 22, 2011 10:30 AM

19
Avertissement ! L’appareil doit être installé
par un technicien qualifié, connaissant
parfaitement les réglementations en vigueur
en matière de sécurité et d’installation. Le
fabricant décline toute responsabilité en cas de
dommages aux personnes, animaux ou choses résultant
du non-respect des normes fournies dans ce chapitre.
Branchement électrique
•Le branchement électrique de la table doit être effectué
avant de connecter l’appareil au secteur.
•Le branchement électrique doit être réalisé conformément
aux réglementations de la société locale de distribution
d’électricité.
•S’assurer que la tension indiquée sur la plaque signalétique
située sur le fond de l’appareil correspond à la tension
d’alimentation de votre habitation.
•La mise à la terre de l’appareil est obligatoire aux termes de
la loi : utilisez uniquement des conducteurs (y compris le fil
de terre) de section appropriée.
•Pour le branchement électrique, utilisez un câble de type
H05 RR-F, comme indiqué dans le tableau “Tension
d’alimentation”.
Connexions au bornier
Relier le fil de terre jaune/vert à la borne portant le
symbole . Le fil susmentionné doit être plus long que les
autres.
1. Enlever le couvercle du bornier (A) en dévissant la vis et
insérer le couvercle dans la charnière (B) du bornier.
2. Dénuder environ 70 mm de la gaine du cordon
d’alimentation électrique.
3. Dénuder la gaine des fils d’environ 10 mm. Introduire
ensuite le cordon d’alimentation dans le serre-câble et
connecter les fils sur les borniers et les shunts en fonction
du type d’alimentation électrique, en suivant les
indications données sur le schéma.
4. Fixer le cordon d’alimentation avec le serre-câble.
5. Fermer le couvercle (C) et le visser sur le bornier avec la
vis enlevée - point (1).
La table effectue un contrôle automatique de
quelques secondes à chaque branchement au secteur.
Avertissement ! Le cordon d’alimentation doit
être suffisamment long pour permettre de
retirer la table de cuisson du plan de travail et
doit être positionné de façon à éviter tout
risque de dommage ou de surchauffe causé par
un contact avec la base de la table. N’utilisez pas de
rallonges.
Tension d’alimentation
Si la table est déjà équipée de cordon d’alimentation,
suivre les instructions de la plaquette présente sur le
cordon d’alimentation.
Effectuer le branchement au secteur au moyen d’un
sectionneur omnipolaire ayant une distance
d’ouverture entre les contacts d’au moins 3 mm.
INSTALLATION et BRANCHEMENT ÉLECTRIQUE
DOMINO
Conducteurs Nombre x section
230 V ~ + 3 X 4 mm2(3X2,5 mm2Domino)
230-240V ~ + 3 X 4 mm2(solo Australia)
(3X2,5 mm2Domino)
230 V 3 ~ + 4 X 1,5 mm²
400 V 3N ~ + 5 X 1,5 mm2
400 V 2N ~ + 4 X 1,5 mm²
230V
230V
230V
230V
230V
230V
230V
230V
230V
230V
230V
AB
C
400 V 3N ~ 230 V ~
230-240V~ UNIQUEMENT POUR
AU
230V~ UNIQUEMENT POUR UK
400 V 2N ~ 230 V 3~
UNIQUEMENT POUR
BELGIQUE
400 V 2N~
UNIQUEMENT POUR NL
77X35
41902042F.fm Page 19 Wednesday, June 22, 2011 10:30 AM

20
Installation et fixation
Avertissement ! Le personnel chargé sera
considéré comme responsable des éventuels
dommages provoqués par une installation
incorrecte.
Pour garantir le fonctionnement correct de l’appareil,
l’installation doit être effectuée sur une surface
d’appui parfaitement plate.
Le plan de travail doit avoir une épaisseur comprise entre 20
et- 50 mm.
Si nécessaire, réaliser des opérations de coupe du plan de
travail et du meuble. Nettoyer le trou des éventuels copeaux
qui pourraient compromettre la fonctionnalité de l’appareil.
Pour les dimensions du trou, se référer à la figure ci-dessous.
Pour garantir le fonctionnement correct de l’appareil, l’installation
doit être effectuée sur une surface d’appui parfaitement plate.
Le plan de travail doit avoir une épaisseur comprise entre 20
et 50 mm.
Si nécessaire, réaliser des opérations de coupe du plan de travail
et du meuble. Nettoyer le trou de l’éventuelle poussière qui
pourrait compromettre la fonctionnalité de l’appareil.
La distance entre la partie inférieure de la table de cuisson à
induction et le meuble (ou le panneau de séparation) doit
respecter les dimensions indiquées sur la figure ci-contre. Si
l’on installe un meuble à colonne à côté de la table de cuisson,
la distance minimum à respecter est de 100 mm du bord de la
table.
Assemblage
1. Positionnez les attaches (A) sur le cadre de la table de cuisson
(fig. 3) au cas où elles ne seraient pas déjà positionnées.
2. Mesurer le milieu des côtés verticaux du trou pour
l’encastrement (fig. 1)
3. Centrer les étriers (C) sur les côtés verticaux, en alignant
la partie supérieure des étriers avec la surface du plan de
travail (fig. 2).
4. Fixer les étriers avec les 4 vis fournies (B) en utilisant les
trous appropriés.
5. Enfiler la table de cuisson dans le trou pratiqué en veillant
à ce que les attaches (A) se bloquent dans les espaces
prévus à cet effet (fig. 4).
490
+2
0
288
510
484
267
mini 50
770
325
350
743
R mini 6,5
maxi 8
mini 50
51
+1
0
275
+2
0330
+2
0
52
+1
0
R mini 6,5
maxi 8
Mesures en
mm
750
+2
0
490
+2
0
380
510
484
342
mini 50
51
+1
0
350
+2
0
R mini 6,5
maxi 8
Domino
300
Domino
380
77x35
mini
5
mini 20
mini 5
C
B
fig. 2fig. 1
41902042F.fm Page 20 Wednesday, June 22, 2011 10:30 AM

21
Montage four sous le plan :
•Si la table de cuisson est installée au-dessus d’un four (de
notre production), vérifier qu’elle est équipée d’un système
de refroidissement et respecter les distances mentionnées
sur la figure ci-contre.
•Rien ne doit encombrer l’espace entre la table de cuisson et
le four (traverses, panneaux, supports, etc.).
Bandeau de commandes
Les symboles graphiques du bandeau de commandes
illustré dans ces instructions pourraient être différents
de ceux indiqués sur le plan de cuisson acheté. Les
fonctions des touches sont identiques pour toutes les
tables de cuisson de tous les modèles.
Allumage/extinction table de cuisson
Pour allumer la table, appuyer pendant 2 secondes environ
sur la touche jusqu’à l’allumage des afficheurs des foyers. Pour
éteindre, toucher cette même touche jusqu’à l’extinction des
afficheurs. Tous les foyers sont désactivés.
Au cas où la table aurait déjà été utilisée, l’indicateur de la
chaleur résiduelle “H” restera actif jusqu’au refroidissement
des foyers.
Si dans les 10 secondes qui suivent aucune fonction
n’est sélectionnée, la table de cuisson s’éteint
automatiquement pour des raisons de sécurité.
A
fig. 4
fig. 3
5mm
MODE D’EMPLOI
Sécurité enfants
Commandes réglage foyers et afficheur correspondant
Marche/Arrêt
Minuterie
les symboles ne sont
pas actifs ! Pour
sélectionner les
fonctions désirées,
toucher les
champs sous-
jacents.
41902042F.fm Page 21 Wednesday, June 22, 2011 10:30 AM

22
Activation et Réglage foyers
Après avoir allumé la table de cuisson et positionné la
casserole sur la zone choisie, régler le niveau de puissance avec
la touche +. À l’allumage, le niveau 5 est visualisé sur
l’afficheur.
Chaque foyer a différents niveaux de puissance, réglables avec
les touches +/-, qui vont de “1” : puissance minimum à “9” :
puissance maximale. Certains foyers ont la fonction ébullition
rapide (Booster), visualisée sur afficheur par la lettre “P”.
Fonction ébullition rapide (Booster)
Fonction présente seulement sur certains foyers qui permet
de bénéficier au maximum de la puissance de la table (par
exemple, pour faire bouillir l’eau rapidement). Pour activer la
fonction, appuyer sur la touche “+” jusqu’à ce que l’afficheur
visualise “P” ou bien, après avoir allumé la table de cuisson,
appuyer directement sur la touche “-” relative au foyer
sélectionné. Dans ce cas également, “P” apparaît sur
l’afficheur. Dix minutes après avoir activé la fonction Booster,
l’appareil règle automatiquement la puissance du foyer au
niveau 9 .
Désactivation foyers
Sélectionner le foyer à éteindre en appuyant sur la touche “+”
ou “-” (le point en bas à droite du niveau de puissance est
visualisé sur l’afficheur).
Appuyer sur la touche “-” jusqu’à mettre le niveau à “0”.
Il est également possible de désactiver le foyer en touchant
simultanément les touches “+” et “-”. Le foyer se désactive et
l’indicateur “H” de la chaleur résiduelle apparaît
Sécurité enfants
La fonction bloque les commandes de la table de cuisson pour
prévenir l’activation accidentelle de cette dernière de la part
d’enfants. Pour activer la sécurité enfants, allumer la table de
cuisson, appuyer pendant trois secondes sur la touche un
signal acoustique et un indicateur lumineux sous le symbole de
la clé signalent l’activation. Le bandeau de commandes est
bloqué, exception faite de la fonction d’extinction. Pour
désactiver le bloc commandes, répéter la procédure
d’activation de la sécurité enfants. Le point lumineux s’éteint et
la table est à nouveau active.
La présence d’eau, de liquide ayant débordé des casseroles ou
d’objets en général posés sur la touche sous le symbole
peuvent provoquer l’activation ou la désactivation involontaire
de la fonction Sécurité Enfants.
Minuterie
Le minuteur est un interrupteur horaire
qui offre la possibilité de programmer une
durée de cuisson pendant un temps
maximum de 99 minutes (1 heure et
39 minutes) à associer à un seul foyer.
Sélectionner le foyer que l’on désire
associer à la minuterie (un point lumineux apparaît en bas à
droite de l’indicateur du niveau de puissance sur l’afficheur),
puis introduire le temps désiré à l’aide des touches “+” et “-”
de la fonction minuterie (voir figure ci-dessus). Quelques
secondes après, le minuteur commence le compte à rebours
(le point de sélection foyer commence à clignoter). À la fin du
temps, un signal sonore retentit et le foyer s’éteint
automatiquement.
Pour désactiver la minuterie, appuyer sur la touche “-” jusqu’à
l’apparition de l’indication “0:0” sur l’afficheur ou appuyer
simultanément sur les touches “+” et “-” de la minuterie.
Remarque importante ! Il est possible d’associer la
minuterie à un seul foyer à la fois.
Minuteur
Il peut être utilisé alors que la table de cuisson est éteinte ; il
permet de programmer un temps maximum de 99 min.
Appuyer sur la touche “+” se trouvant sous les indicateurs de
la minuterie : l’afficheur montre les minutes à programmer.
Sélectionner le temps désiré à l’aide des touches + et -.
Quelques secondes après, le minuteur commence le compte à
rebours. À la fin du temps, un signal sonore retentit.
Remarque importante ! La fonction minuteur peut être
utilisée seulement quand la table de cuisson est éteinte; en cas
d’allumage, le compteur de minutes est automatiquement
annulé.
Avis du bandeau de commande
Voyant de chaleur résiduelle.
La table est équipée d’un indicateur de chaleur
résiduelle pour chaque foyer. Cet indicateur signale
quels sont les foyers encore à température élevée.
Si l’afficheur visualise , le foyer est encore chaud. Si
le foyer présente cette signalisation, il est possible, par
exemple, de maintenir un plat au chaud ou de faire fondre du
beurre.
Lorsque le foyer refroidit, l’afficheur s’éteint.
Indicateur de casserole incorrecte ou absente.
La table est équipée d’un système automatique de
détection présence casserole, sur tous les foyers. Si la
casserole n’est pas détectée, l’afficheur avec le niveau
de puissance du foyer clignote. Vérifier si la casserole
est correctement positionnée et si elle possède les
caractéristiques indiquées dans la section “Avant utilisation”.
Touche -
Afficheur indicateur puissance
Indication foyer
sélectionné
Touche +
Positionnement
foyer
41902042F.fm Page 22 Wednesday, June 22, 2011 10:30 AM
This manual suits for next models
2
Table of contents
Languages:
Other Bauknecht Cooktop manuals

Bauknecht
Bauknecht CTAI8740FSIN User manual

Bauknecht
Bauknecht ETI 6646 User manual

Bauknecht
Bauknecht ETI 6160 IN User manual

Bauknecht
Bauknecht CTAI6360IN User manual

Bauknecht
Bauknecht BS 5760C CPFT User manual

Bauknecht
Bauknecht EK 4460/01 User manual

Bauknecht
Bauknecht ESPIF 8950 IN User manual

Bauknecht
Bauknecht BVH 92 2B K User manual
Popular Cooktop manuals by other brands

KitchenAid
KitchenAid KGCP463KSS05 parts list

Whirlpool
Whirlpool GJD3044RB02 parts list

Blanco
Blanco CGG905WTFFC Instructions and recommendations for the use, installation and maintenance

Bosch
Bosch NIT3065UC use and care manual

Thermador
Thermador PCG304E Care and use manual

Cusimax
Cusimax CMHP-B101 instruction manual