manuals.online logo
Brands
  1. Home
  2. •
  3. Brands
  4. •
  5. Viking
  6. •
  7. Cooktop
  8. •
  9. Viking RDECU2065BSB User manual

Viking RDECU2065BSB User manual

Other manuals for RDECU2065BSB

3

This manual suits for next models

3

Other Viking Cooktop manuals

Viking DGCU105-4B User manual

Viking

Viking DGCU105-4B User manual

Viking RVGC3305BSS User manual

Viking

Viking RVGC3305BSS User manual

Viking VECU1064BSB User manual

Viking

Viking VECU1064BSB User manual

Viking VGRT530 User manual

Viking

Viking VGRT530 User manual

Viking RVEC336 User manual

Viking

Viking RVEC336 User manual

Viking 3 Series Troubleshooting guide

Viking

Viking 3 Series Troubleshooting guide

Viking VGWT User manual

Viking

Viking VGWT User manual

Viking 30" W User manual

Viking

Viking 30" W User manual

Viking 30" Four-Burner User manual

Viking

Viking 30" Four-Burner User manual

Viking Professional VICU266-6B User manual

Viking

Viking Professional VICU266-6B User manual

Viking VCCU1054BSB User manual

Viking

Viking VCCU1054BSB User manual

Viking 30" Four-Burner User manual

Viking

Viking 30" Four-Burner User manual

Viking VGRT36 User manual

Viking

Viking VGRT36 User manual

Viking RVEC3305B User manual

Viking

Viking RVEC3305B User manual

Viking Designer DECU105 User manual

Viking

Viking Designer DECU105 User manual

Viking Designer DGVU User manual

Viking

Viking Designer DGVU User manual

Viking VGRT5606GQSS User manual

Viking

Viking VGRT5606GQSS User manual

Viking VGSU103 User manual

Viking

Viking VGSU103 User manual

Viking RDGSU2005BSB User manual

Viking

Viking RDGSU2005BSB User manual

Viking RVGC3301 User manual

Viking

Viking RVGC3301 User manual

Viking Professional Custom VGRT530-4BSS User manual

Viking

Viking Professional Custom VGRT530-4BSS User manual

Viking F20111C User manual

Viking

Viking F20111C User manual

Viking VICU2064BSB User manual

Viking

Viking VICU2064BSB User manual

Viking Designer DERT362-5B User manual

Viking

Viking Designer DERT362-5B User manual

Popular Cooktop manuals by other brands

Fisher & Paykel CE302CBX2 manual

Fisher & Paykel

Fisher & Paykel CE302CBX2 manual

Whirlpool GJC3634RB00 parts list

Whirlpool

Whirlpool GJC3634RB00 parts list

Whirlpool ACH7324/BLV Use, care and installation guide

Whirlpool

Whirlpool ACH7324/BLV Use, care and installation guide

Frigidaire Professional FPDF4085KF Important safety instructions

Frigidaire

Frigidaire Professional FPDF4085KF Important safety instructions

Bonnet OPTIMUM 700 Technical instructions

Bonnet

Bonnet OPTIMUM 700 Technical instructions

Jenn-Air JGCP430 installation instructions

Jenn-Air

Jenn-Air JGCP430 installation instructions

Bompani BO374AA/E User instructions

Bompani

Bompani BO374AA/E User instructions

Kleenmaid cooking GCTK9011 Instructions for use and warranty details

Kleenmaid

Kleenmaid cooking GCTK9011 Instructions for use and warranty details

Waldorf RN8603E-B Technical data sheet

Waldorf

Waldorf RN8603E-B Technical data sheet

Whirlpool SMP658CNEIXL quick guide

Whirlpool

Whirlpool SMP658CNEIXL quick guide

Electrolux E36IC80ISS - 36" Induction Cooktop Wiring diagram

Electrolux

Electrolux E36IC80ISS - 36" Induction Cooktop Wiring diagram

Wolf CI243C/B Use and care guide

Wolf

Wolf CI243C/B Use and care guide

Fulgor Milano F5PGK305S1 installation instructions

Fulgor Milano

Fulgor Milano F5PGK305S1 installation instructions

Wells WV-2HFG owner's manual

Wells

Wells WV-2HFG owner's manual

Samsung NA36N9755 installation manual

Samsung

Samsung NA36N9755 installation manual

Miele KM 404 operating instructions

Miele

Miele KM 404 operating instructions

Lacor 69562 Instructions for use and maintenance

Lacor

Lacor 69562 Instructions for use and maintenance

Keating Of Chicago MG-2 manual

Keating Of Chicago

Keating Of Chicago MG-2 manual

manuals.online logo
manuals.online logoBrands
  • About & Mission
  • Contact us
  • Privacy Policy
  • Terms and Conditions

Copyright 2025 Manuals.Online. All Rights Reserved.

F20967 EN (032112)
Viking Range Corporation
111 Front Str t
Gr nwood, Mississippi 38930 USA
(662) 455-1200
For product information, call 1-888-VIKING1 (845-4641)
or visit th Viking W b sit at vikingrang .com
Built-In Electric Cooktops
Us & Car
Getting Started
Warnings and Important Information ____________________________4
B for Using Cooktop_________________________________________7
Product Controls
Cooktop F atur s ____________________________________________9
Surfac Op ration ___________________________________________12
Cooking Substitut s Charts ___________________________________14
Product Care
Cl aning and Maint nanc ___________________________________15
S rvic Information __________________________________________19
Warranty ___________________________________________________20
Tabl of Cont nts
Congratulations and w lcom to th lit world of Viking own rship.
W hop you will njoy and appr ciat th car and att ntion w hav
put into v ry d tail of your n w, stat -of-th -art cooktop.
Your Viking cooktop is d sign d to off r y ars of r liabl s rvic . This
Us and Car Manual will provid you with th information you n d
to b com familiar with your cooktop’s car and op ration.
Your compl t satisfaction is our ultimat goal. If you hav any
qu stions or comm nts about this product, pl as contact th d al r
from whom you purchas d it, or contact our Consum r Support C nt r
at 1-888-VIKING1 (845-4641).
W appr ciat your choic of a Viking cooktop and hop that you will
again s l ct our products for your oth r major applianc n ds.
For mor information about th compl t and growing s l ction
of Viking products, contact your d al r or visit us onlin
at vikingrang .com.
Congratulations
32
5
Getting Started
4
Warning and Important Safety Instructions appearing in this manual
are not meant to cover all possible conditions and situations that
may occur. Common sense, caution, and care must be exercised
when installing, maintaining, or operating this appliance.
ALWAYS contact th manufactur r about probl ms or conditions you
do not und rstand.
Recognize Safety Symbol , Word , Label
Read and follow all instructions before using this appliance
to pr v nt th pot ntial risk of fir , l ctric shock, p rsonal injury or
damag to th applianc as a r sult of improp r usag of th
applianc . Us applianc only for its int nd d purpos as d scrib d
in this manual.
To ensure proper and safe operation: Applianc must b prop rly
install d and ground d by a qualifi d t chnician. DO NOT att mpt to
adjust, r pair, s rvic , or r plac any part of your applianc unl ss it
is sp cifically r comm nd d in this manual. All oth r s rvicing should
b r f rr d to a qualifi d s rvic s.
Hazard or un afe practice which WILL re ult in
evere per onal injury or death
Hazard or un afe practice which COULD re ult in
death or evere per onal injury
DANGER
Hazard or un afe practice which COULD re ult in
minor per onal injury or property damage.
All safety messages will identify the hazard, tell you
how to reduce the chance of injury, and tell you what can happen
if the instructions are not followed.
WARNING
CAUTION
IMPORTANT– Pl as R ad and Follow IMPORTANT– Pl as R ad and Follow
Getting Started
• Us this applianc only for its int nd d us as d scrib d in this
manual. NEVER us your applianc for warming or h ating th
room.
• Your unit should b install d by a qualifi d t chnician. Th
applianc must b install d and l ctrically ground d according to
local cod s.
•DO NOT att mpt to r pair or r plac any part of this applianc
unl ss sp cifically r comm nd d in this manual. All s rvicing should
b r f rr d to a qualifi d t chnician. Warranty s rvic must b
p rform d by an authoriz s rvic ag ncy.
• Th “push-to-turn” knobs of this applianc ar d sign d to b
childsaf . How v r, childr n should not b l ft alon in th kitch n
whil th cooktop is in us .
• Gr as is flammabl and should b handl d car fully. DO NOT us
wat r on gr as fir s. N v r pick up a flaming pan. Smoth r sh t
or flat tray. Flaming gr as outsid of ut nsil can b xtinguish d
with baking soda or, if availabl , a multipurpos dry ch mical or
foam typ xtinguish r. L t fat cool b for att mpting to handl it.
Wip up spillov rs imm diat ly.
• If you ar “flaming” liquors or oth r spirits und r an xhaust,
TURN THE FAN OFF. Th draft could caus th flam s to spr ad
out of control.
•NEVER l av th surfac ar a unatt nd d at high h at s tting.
Boilov rs caus smoking and gr asy spillov rs, which may ignit .
• Loos -fitting or hanging garm nts should NEVER b worn whil
using th applianc .
• Us prop r pan siz . This applianc is quipp d with on or mor
surfac units of diff r nt siz . S l ct ut nsil having flat bottoms
larg nough to cov r th surfac unit h ating l m nt. Th us of
und rsiz d ut nsils will xpos a portion of th h ating l m nt to
dir ct contact and may r sult in ignition of clothing. Prop r
r lationship of ut nsil to surfac unit will also improv ffici ncy.
• Us only dry pothold rs. Moist or damp pothold rs on hot surfac s
may r sult in burns from st am. DO NOT l t pothold rs touch hot
surfac ar as. DO NOT us a tow l or oth r bulky cloth.
CAUTION
DO NOT store items of interest to children over the unit. Children
climbing to reach items could be seriously injured.
7
Getting Started
6
Getting Started
IMPORTANT– Pl as R ad and Follow B for Using Cooktop
•DO NOT TOUCH SURFACE UNITS OR AREAS NEAR UNITS.
Surfac ar as may b com hot nough to caus burns. Surfac
l m nts may b hot v n though th y ar dark in color. During
and aft r us , do not touch or l t flammabl mat rials contact
h ating l m nts until th y hav had tim to cool.
• To r duc th risk of burns, ignition of flammabl mat rials, and
spillag du to unint ntional contact with th ut nsil, th handl of
a ut nsil should b position d so that it is turn d toward th c nt r
of th rang so that it do s not xt nd ov r adjac nt surfac
l m nts.
• K p ar a cl an and fr from combustibl mat rial, gasolin , and
oth r flammabl liquids. Combustibl it ms (pap r, plastic, tc.)
may ignit and m tallic it ms may b com hot and caus burns.
•DO NOT h at unop n d food contain rs; build-up of pr ssur may
caus th contain r to xplod and r sult in injury.
• Cl an th cooktop with caution. If a w t spong or cloth is us d to
wip spills on a hot cooking ar a, b car ful to avoid st am burns.
Som cl ans rs can produc noxious fum s if appli d to a hot
surfac .
•DO NOTcook on a brok n cooktop. Spillov rs or cl aning solution
may p n trat a brok n glass top and cr at a risk of l ctrical
shock. Contact a qualifi d t chnician imm diat ly should your
cooktop b com brok n.
• Only c rtain typ s of glass, glass/c ramic, c ramic, arth nwar or
oth r glaz d ut nsils ar suitabl for glass cooktop us without
br aking du to th sudd n chang in t mp ratur .
All products ar wip d cl an with solv nts at th factory to r mov any
visibl signs of dirt, oil, and gr as which may hav r main d from th
manufacturing proc ss.
Glass Cooktop
Cl an your glass top b for th first tim you us it. A thorough
cl aning with a glass top cl an r is r comm nd d. It only tak s a
minut and puts a cl an, shiny coating on th glass top b for its
initial us .
Cooking Utensils
Each cook has his or h r own pr f r nc for th particular cooking
ut nsils that ar most appropriat for th typ of cooking b ing don .
Only c rtain typ s of glass, glass/c ramic, c ramic, arth nwar , or
oth r glaz d ut nsils ar suitabl for glass cooktop us without
br aking du to th sudd n chang in t mp ratur . This is a matt r of
p rsonal choic . As with any cookwar , yours should b in good
condition and fr from xc ssiv d nts on th bottom to provid
maximum p rformanc and conv ni nc .
Operating Single Elements
All burn rs hav variabl controls. Turn th knob count r-clockwis on
click l ft to achi v th low st s tting. Continu turning clockwis
through th M d to M d-Hi S ttings. Th final s tting onc you hav
turn d th knob count r-clockwis to its max is th Hi s tting.
Operating Double Elements
All burn rs hav variabl controls. Turn th knob count r-clockwis on
click l ft to achi v th high st s tting for th c nt r l m nt.
Continu turning clockwis through th M d-Hi, M d, and down to
th Lo s tting.
Continuing to turn count r-clockwis will bring you into th Lo s tting
with both l m nts now activat d. From h r , continu turning
count r-clockwis to activat th Lo-M d, M d, and M d-Hi s ttings of
both l m nts. Th final s tting onc you hav turn d th knob
count r-clockwis to its max is th Hi s tting with both l m nts
activat d.
CAUTION
Using cast iron cookware on the glass cooktop is not recommended.
Cast iron retains heat and may result in cooktop damage.
9
Product Controls
8
Operating Triple Elements
All burn rs hav variabl controls. Turn th knob count r-clockwis on
click l ft to achi v th high st s tting for th c nt r singl l m nt.
Continu turning count r-clockwis through th M d-Hi, M d, and
down to th Lo s tting.
Continuing to turn count r-clockwis will bring you into th Hi s tting
for th two inn r l m nts combin d. From h r , continu turning
count r-clockwis to go into th M d-Hi, M d, Lo-M d, and into th
Lo s ttings of both l m nts.
Finally,continuing to turn count r-clockwis will bring you into th Hi
s tting for all thr l m nts combin d. Continu turning count r-
clockwis to turn th l m nts down into th M d-Hi, M d, Lo-M d
and into th Lo s tting.
Hot Surface Indicator Lights
Th cooktop has hot surfac indicator lights. Th y ar locat d on th
front of th glass cooktop. Th hot surfac indicator light will glow r d
wh n th corr sponding l m nt is turn d on. Th light will r main on
until th corr sponding l m nt has cool d to a saf t mp ratur .
B for Using Cooktop
Getting Started
Cooktop F atur s
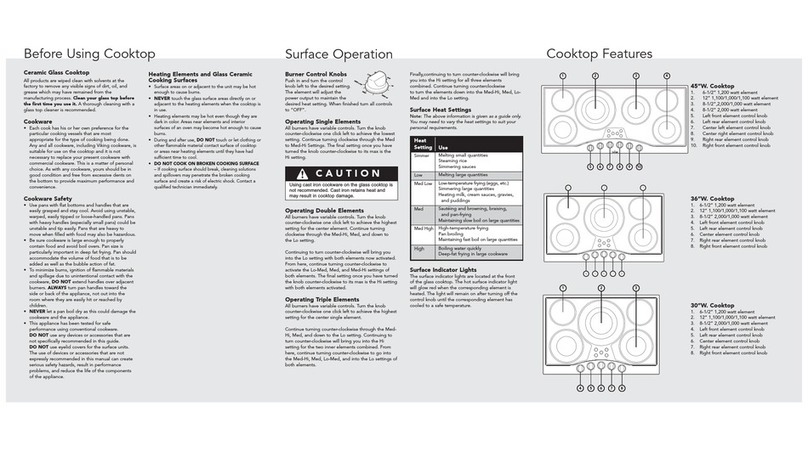
30”W. Cooktop
7 8
6
5
4
1 2 3
1. 6-1/2” 1,200 watt l m nt
2. 11-7/8” 1,100/1,000/1,100 watt l m nt
3. 8-1/2” 2,000/1,000 watt l m nt
4. L ft front l m nt control knob
5. L ft r ar l m nt control knob
6. C nt r l m nt control knob
7. Right r ar l m nt control knob
8. Right front l m nt control knob
11
Product Controls
10
Product Controls
Cooktop F atur s
36”W. Cooktop
7 8
6
5
4
1 2 3
1. 6-1/2” 1,200 watt l m nt
2. 11-7/8” 1,100/1,000/1,100 watt l m nt
3. 8-1/2” 2,000/1,000 watt l m nt
4. L ft front l m nt control knob
5. L ft r ar l m nt control knob
6. C nt r l m nt control knob
7. Right r ar l m nt control knob
8. Right front l m nt control knob
Cooktop F atur s
45”W. Cooktop
8 9 10
7
6
5
1 2 3 4
1. 6-1/2” 1,200 watt l m nt
2. 1,100/1,000/1,100 watt l m nt
3. 2,000/1,000 watt l m nt
4. 8-1/2” 2,000 watt l m nt
5. L ft front l m nt control knob
6. L ft r ar l m nt control knob
7. C nt r l ft l m nt control knob
8. C nt r right l m nt control knob
9. Right r ar l m nt control knob
10. Right front l m nt control knob
13
Operation
12
Operation
Surfac Op ration
Food
Start at setting Complete at setting
Ric
Hi - cov r, bring wat r
to a boil
Lo - cov r, finish timing
according to dir ctions
Chocolat
Lo - until m lt d
Candy Lo - cook Follow r cip
Pudding,
pi filling
Lo - cook according to
dir ctions
Eggs - in sh ll
fri d
poach d
Hi - cov r, bring to boil
Hi - until pan is hot
Hi - bring wat r to boil
OFF - l t s t to d sir d don n ss
Lo - Med, cook to d sir d don n ss
Lo - finish cooking
Sauc s Hi - m lt fat Lo-Med, finish cooking
Soups, st ws Hi - h at up liquid Lo-Med, finish cooking
V g tabl s Hi - pr h at skill t Lo-Med, finish cooking until
d sir d t nd rn ss is r ach d
Br ads - fr nch
toast, pancak s
Med-Hi, pr h at
skill t
Lo - cook to d sir d brown ss
Cook d c r als,
grits, oatm al
Hi - cov r, bring wat r
to a boil
Lo-Med, add c r al and cook
according to dir ctions
Bacon, sausag s Hi - pr h at skill t Med - cook to d sir d don n ss
Swiss st aks Hi - m lt fat,
Med-Hi - to brown m at
Lo - add liquid, cov r, simm r
until t nd r
Chick n, fri d Hi - m lt fat
Med-Hi - to brown crust
Lo - cook until t nd r
Hamburg rs,
pork chops
Hi - pr h at skill t Med - to brown m at and cook to
d sir d brown ss
Pasta Hi - bring salt d wat r
to a boil, add pasta
slowly
Med - maintain boil until t nd r
Surface Cooking Guide - Suggested Heat Setting
Surfac Op ration
Type
Responses to
Temperature Changes
Recommended
Usage
Aluminum H ats and cools quickly. Frying, braising, roasting.
May l av m tal markings
on glass.
Cast Iron H ats and cools quickly. Not r comm nd d.
R tains xc ssiv h at and may
damag cooktop.
Copp r,
Tin lin d
H ats and cools quickly. Gourm t cooking, win sauc s,
gg dish s.
Enam l War R spons d p nds on
bas m tal.
Not r comm nd d.
Imp rf ctions in nam l may
scratch cooktop.
Glass C ramic H ats and cools slowly. Not r comm nd d.
H ats too slowly.
Imp rf ctions in nam l may
scratch cooktop.
Stainl ss St l H ats and cools at
mod rat rat .
Soups, sauc s, v g tabl s,
g n ral cooking.
Cooking Utensil Guidelines
15
Product Care
14
Cl aning and Maint nanc
Any pi c of quipm nt works b tt r and lasts long r wh n
maintain d prop rly and k pt cl an. Cooking quipm nt is no
xc ption. Your cooktop must b k pt cl an. Mak sur all controls
ar in th “OFF” position.
Glass Ceramic Top
Cl aning of glass c ramic tops is diff r nt from cl aning a standard
porc lain finish. To maintain and prot ct th surfac of your n w glass
c ramic top, follow th s basic st ps:
For normal, light soil:
1. Rub a f w drops of a glass c ramic cl aning cr am to th cool
soil d ar a using a damp pap r tow l.
2. Wip until all soil and cr am ar r mov d. Fr qu nt cl aning
l av s a prot ctiv coating which is ss ntial in pr v nting
scratch s and abrasions.
For h avy, burn d soil:
1. Rub a f w drops of glass c ramic cl aning cr am to th cool soil d
ar a using a damp pap r tow l.
2. Car fully scrap r maining soil with a singl - dg d razor blad .
Hold th blad at a 30˚ angl against th c ramic surfac .
3. If any soil r mains, r p at th st ps abov . For additional
prot ction, aft r all soil has b n r mov d, polish th ntir surfac
with th cl aning cr am.
4. Buff with a dry pap r tow l. As th cl aning cr am cl ans, it l av s
a prot ctiv coating on th glass surfac . This coating h lps to
pr v nt build-up of min ral d posits (wat r spots) and will mak
futur cl aning asi r.
Note: Dishwashing detergents remove this protective coating and
therefore, make the glass ceramic top more susceptible to staining.
Cooking Substitut s Charts
In many cas s, a r cip r quir s an ingr di nt which is not r adily
availabl or calls for a unit of m asur that is not asily r cogniz d.
Th following charts hav b n provid d as us ful guid s in th s
situations.
Ingredient Substitutes
Recipe calls for: Substitute with:
1 tbsp. cornstarch 2 tbsp. flour (thick ning)
1 whol gg
2 gg yolks plus 1 tbsp. wat r
1 c. whol milk
1 c. skim milk plus 2 tbsp. margarin or
1/2 c. vaporat d milk plus 1/2 c. wat r
1 oz. unsw t n d chocolat
3 tbsp. cocoa powd r plus 1 tbsp. margarin
1 tbsp. baking powd r
1/2 tsp. cr am of tartar plus 1/4 tsp. baking
soda
1/2 c. butt r
7 tbsp. margarin or short ning
1 c. dairy sour cr am
1 tbsp. l mon juic plus 1 c. vaporat d milk
Measure Equivalent Metric*
1 tbsp. 3 tsp 15 mL
2 tbsp. 1 oz 30 mL
1 jig.
1-1/2 oz 45 mL
1/4 c.
4 tbsp. 60 mL
1/3 c.
5 tbsp. plus 1 tsp. 80 mL
1/2 c.
8 tbsp. 125 mL
1 c.
16 tbsp. 250 mL
1 pt. 2 c. 30 g
1 lb. 16 oz 454 g
2.21 lb. 35.3 oz 1 kg
Note: Rounded for easier measuring.
Kitchen Equivalent and Metrics
Operation
17
Product Care
16
Product Care
Cl aning and Maint nanc
Problem
Cause To Prevent To Remove
M tal
markings
(silv r/gray
marks)
Sliding or scraping
m tal cookwar
on glass top.
DO NOT slid
m tal obj cts
across top.
R mov m tal
marks b for th
glass top is us d
again. Apply
cl aning cr am
with a damp
pap r tow l and
scrub with a nylon
scrub pad or
brush. Rins
thoroughly and
dry.
Hard wat r
spots
Cond nsation
from cooking may
caus min rals
found in wat r
and acids to drip
on to glass top
and caus gray
d posits (th
spots ar oft n so
thin th y app ar
to b in th glass
top).
Mak sur th
bottom of
cookwar is dry
b for cooking.
Daily us of
cl aning cr am will
h lp k p top fr
from hard wat r
min ral d posits
and food
discoloration.
Mix cl aning
cr am with wat r
and apply a thick
past to stain d
ar a. Scrub
vigorously. If stain
is not r mov d,
r apply cl an r
and r p at
proc ss. Also
try cl aning
proc dur for
sm aring and
str aking.
Pitting or
flaking
Boil ov r of sugar
syrup on glass top.
This can caus
pitting if not
r mov d
imm diat ly.
Watch sugar and
syrups car fully to
avoid boil ov rs.
Turn l m nt to
LO; us s v ral
pap r tow ls to
wip th spill
imm diat ly. L t
glass top cool and
car fully scrap off
r maind r of burn-
off with a singl -
dg d razor blad
h ld at a 30° angl .
Cleaning Problems on Glass Ceramic Top (cont.)Cleaning Problems on Glass Ceramic Top
Problem
Cause To Prevent To Remove
Brown
str aks and
sp cks
Cl aning with
spong or cloth
containing soil-
lad n d t rg nt
wat r.
Us cl aning
cr am with
cl an damp pap r
tow l.
Us a light
application of
cl aning cr am
with a cl an damp
pap r tow l.
Black n d
burn d on
spots
Spatt rs or
spillov rs onto a
hot cooking ar a
or accid ntal
m lting of a
plastic film, such
as a br ad bag.
Wip all spillov rs
as soon as it is
saf and DO NOT
put plastic it ms
on a warm
cooking ar a.
Cl an ar a with
cl aning cr am
and a damp pap r
tow l, non-
abrasiv nylon pad
or scouring brush.
If burn-on is not
r mov d, cool
cooktop, and
car fully scrap
ar a with a singl -
dg d razor blad
h ld at a 30°
angl .
Fin
brown/gray
lin s, fin
scratch s, or
abrasions
which hav
coll ct d
soil
Coars particl s
(salt, sugar) can
g t caught on th
bottom of
cookwar and
b com
mb dd d
into top.
Us of abrasiv
cl aning mat rials.
Scratch s from
rough c ramic
glass, or c ramic
coat d cookwar .
Wip th bottom
of cookwar
b for cooking.
Cl an top daily
with cl aning
cr am. DO NOT
us c ramic or
c ramic coat d
cookwar .
Fin scratch s
ar not r movabl
but can b
minimiz d by
daily us of
cl aning cr am.
Sm aring or
str aking
Us of too much
cl aning cr am
or us of a soil d
dishcloth.
Us a small
amount of cr am.
Rins thoroughly
b for drying. Us
only pap r tow ls
or nylon scrub pad
or brush.
Damp n pap r
tow l with a
mixtur of vin gar
and wat r and
wip surfac .
Wip ar a with
damp pap r tow l
or lint fr cloth.
Cl aning and Maint nanc
1918
Product Care
S rvic Information
If s rvic is r quir d, call your d al r or authoriz d s rvic ag ncy.
Th nam of th authoriz d s rvic ag ncy can b obtain d from th
d al r or distributor in your ar a.
Hav th following information r adily availabl :
• Mod l numb r
• S rial numb r
• Dat purchas d
• Nam of d al r from whom purchas d
Cl arly d scrib th probl m that you ar having. If you ar unabl to
obtain th nam of an authoriz d s rvic ag ncy, or if you continu
to hav s rvic probl ms, contact Viking Rang Corporation at
1-888-VIKING1 (845-4641), or writ to:
VIKING RANGE CORPORATION
PREFERRED SERVICE
1 03 Hwy 2W
Greenwood, Mississippi 3 930 USA
Th mod l and s rial numb r for your cooktop can b found by
looking und r th unit.
R cord th information indicat d b low. You will n d it if s rvic is
v r r quir d.
Mod l no._____________________ S rial no. ________________________
Dat of purchas _______________ Dat install d ___________________
D al r’s nam __________________________________________________
Addr ss ________________________________________________________
_______________________________________________________________
If s rvic r quir s installation of parts, us only authoriz d parts to
insur prot ction und r th warranty.
Keep this manual for future reference.
Cooktop Surfaces
S v ral diff r nt finish s hav b n us d in your cooktop. Cl aning
instructions for ach surfac ar giv n b low. NEVER USE AMMONIA,
STEEL WOOL PADS OR ANY ABRASIVE CLOTHS AND MATERIALS
SUCH AS CLEANSERS, OVEN CLEANERS, OR ABRASIVE POWDERS.
THEY CAN PERMANENTLY DAMAGE YOUR COOKTOP.
Control Knobs
MAKE SURE ALL CONTROL KNOBS POINT TO THE “OFF” POSITION
BEFORE REMOVING. Pull th knobs straight off. Wash in d t rg nt and
warm wat r. Dry compl t ly and r plac by pushing firmly onto st m.
Stainless Steel Parts
All stainl ss st l body parts should b wip d r gularly with hot, soapy
wat r at th nd of ach cooling p riod and with a liquid cl an r
d sign d for that mat rial wh n soapy wat r will not do th job. DO NOT
us st l wool, abrasiv cloths, cl ans rs, or powd rs. If n c ssary, scrap
stainl ss st l to r mov ncrust d mat rials, soak th ar a with hot
tow ls to loos n th mat rial, th n us a wood n or nylon spatula or
scrap r. DO NOT us a m tal knif , spatula, or any oth r m tal tool to
scrap stainl ss st l. DO NOT p rmit citrus or tomato juic to r main on
stainl ss st l surfac , as citric acid will p rman ntly discolor stainl ss
st l. Wip up any spills imm diat ly.
Cl aning and Maint nanc