Bay-Tek DreamWorks Trolls User manual

SERVICE MANUAL

2
FACTORY CONTACT INFORMATION
All games are proudly manufactured at our factory in Pulaski, Wisconsin, USA
JOIN OUR SERVICE FIRST NETWORK!
This free service is intended to keep you up to date on the latest game
information, early notification of parts specials, pertinent technical bulletins,
updates on retro fit parts, software upgrades, and much more.
Log on to : http://www.baytekent.com
Then click on the Register tab.
SALES
Phone: (920) 822-3951
Fax: (920) 822-8936
PARTS
Phone: (920) 822-3951 Ext 1101
Fax: (920) 822-1496
SERVICE
Phone: (920) 822-3951 Ext 1102
Fax: (920) 822-1496
Open Monday - Friday
8 AM - 5PM C.S.T.
BAY TEK ENTERTAINMENT
TOWER OF TICKETS TROLLS
Pulaski Industrial Park
IS AN ELAUT GAME,
1077 East Glenbrook Drive
BUILT WITH PERMISSION BY
Pulaski, WI 54162 USA
BAYTEK ENTERTAINMENT

3
TABLE OF CONTENTS
FACTORY CONTACT INFORMATION ……..………………….………. 2
TABLE OF CONTENTS...……………………………………………….. 3
WELCOME TO Trolls ……………………………………...…….………. 4
GAME SPECIFICATIONS ……………………………………….….…… 5
SAFETY PRECAUTIONS …………………………………………..…… 5
GAME SET UP ………………………………………………………. 6 - 7
OPTIONAL POWER DROP SETUP……………….………..…………. 8
CHECK ARM HEIGHT …………….…………………………...………. 9
HOW TO PLAY ……………………..…………………………………… 10
PRIZE TOWER KITS ………………………………..…………..……. 11
TICKET PAYOUT PATTERNS ……………………………….……….. 12
VOLUME & DIPSWITCH SETTINGS ……………...……………… 13
DOOR BOARD DIPSWITCH SETTINGS …………………..………… 13
CARD SWIPE INSTALLATION ……………………………………….. 14
CIRCUIT BOARD LAYOUT …………………………………………… 15
WIRING DIAGRAMS ……………………………………………… 16 - 20
TROUBLESHOOTING GUIDE …………………………………. 21 - 26
FAQ ……………………….………………………...………………….. 27
AVAILABLE BLANKING PLATES …………………………………….. 27
POWER SUPPLY DIAGNOSTICS …………………………………… 28
BILL ACCEPTOR DIAGNOSTICS …………………………………… 28
HOW TO SET COIN COMPARITOR MECHS ………………….…. 29
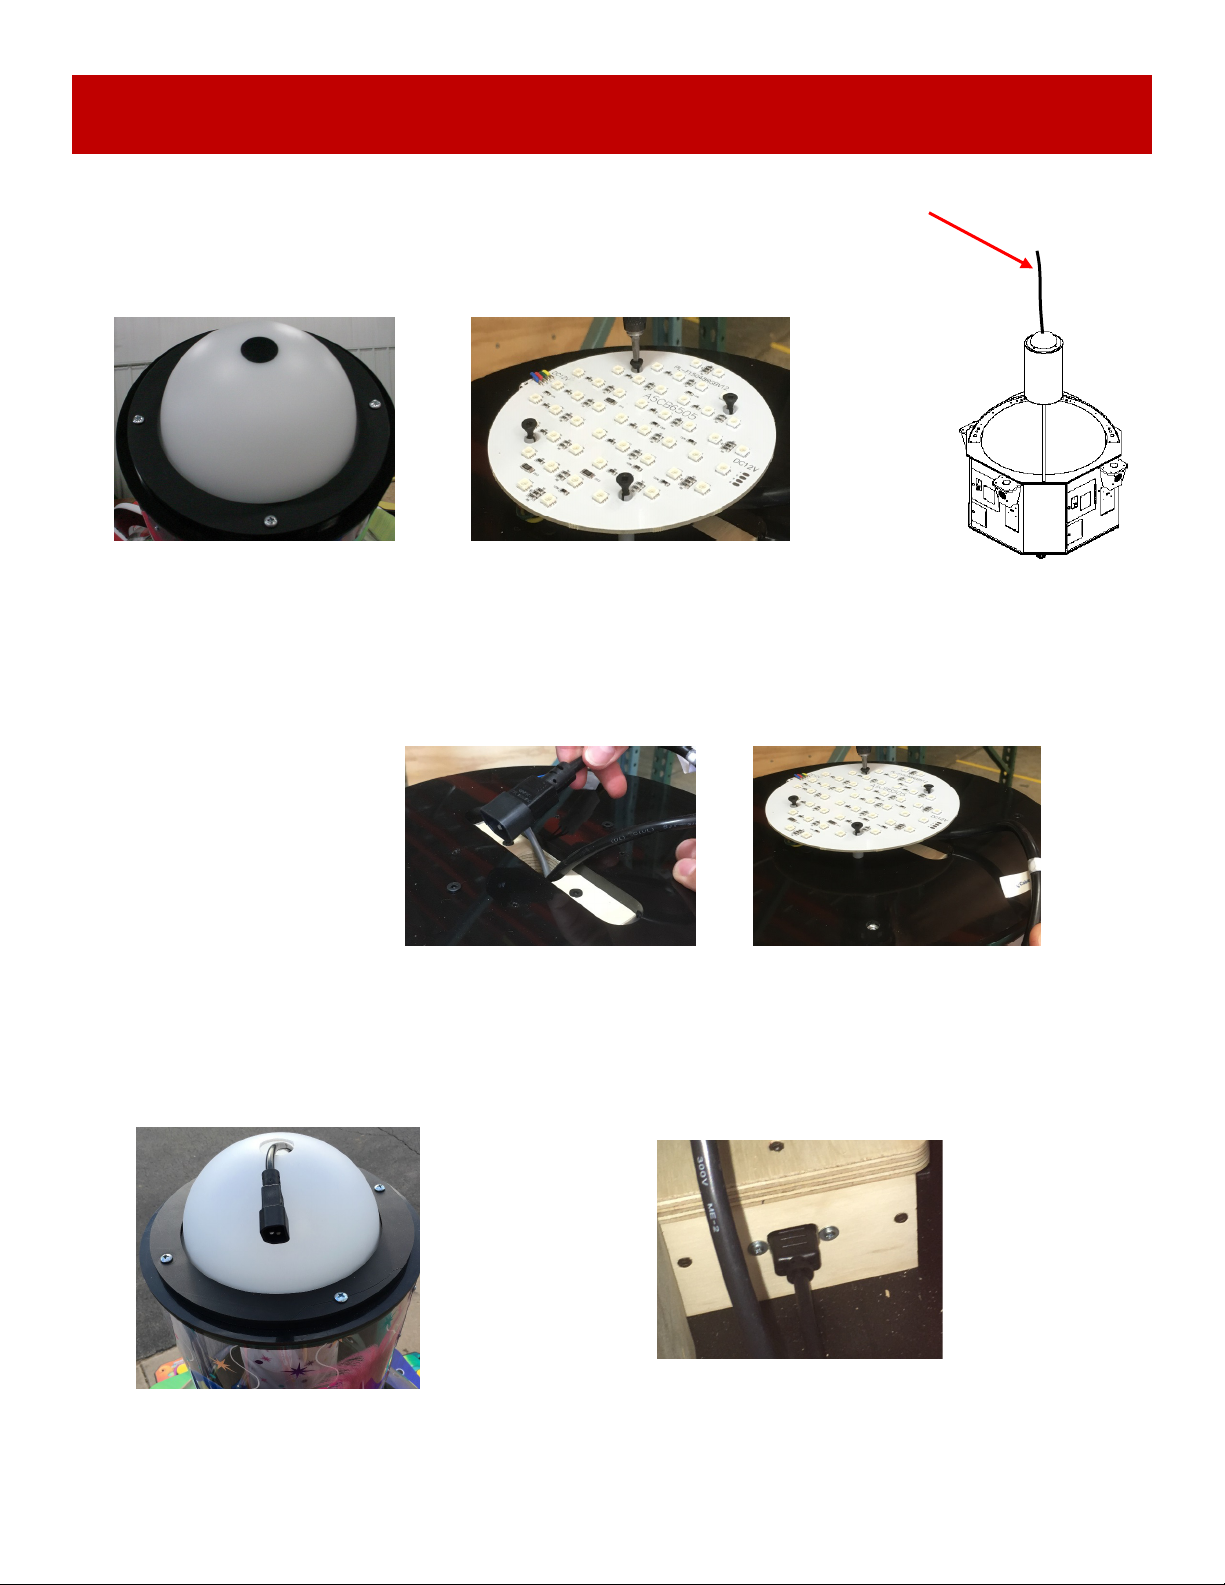
HOW TO OPEN DOME ………………………………….…………. 30
HOW TO UPDATE SOFTWARE ………………………………….…. 30
HOW TO CHANGE TURNTABLE MOTOR ……………………… 31
HOW TO ACCESS COMPONENTS ………….. ……………...……. 32
GAME DIMENSIONS ……………………………..……………...……. 32
PARTS LIST …………………...…………………………………… 33 - 34
PARTS PICTURES ……………………………………………...… 35 - 36
DECAL DIAGRAM ……………………………………………………… 37
MAINTENANCE LOG ………………………………………………….. 38
TECHNICAL SUPPORT ……………………………………………….. 39
WARRANTY …………………………………………………………….. 40
S
Manual Revision 4/15/2019 - Motherboard Version: 4.2.4 , Door Board Version 2.0.0

4
WELCOME TO TROLLS
GAME INSPECTION
Please inspect the game for any damaged, loose, or missing parts.
If damage is found, please contact your freight carrier first.
Then, contact Bay Tek Entertainments’ Service Department at
(920) 822-3951 Ext. 1102

5
SAFETY PRECAUTIONS
GAME SPECIFICATIONS
WEIGHT
GAME WEIGHT 480 lbs. 218 kg
SHIP WEIGHT 540 lbs. 245 kg
GAME DIMENSIONS
WIDTH 54 1/4” 138 cm
DEPTH 54 1/4” 138 cm
HEIGHT 82 1/2” 210 cm
OPERATING TEMPERATURE
FAHRENHEIT 45 - 80 F
CELSIUS 7.2 - 26.7 C
SHIPPING DIMENSIONS
PALLET 50”x 48”x 90” 540 lbs. class 125
POWER REQUIREMENTS
INPUT VOLTAGE
RANGE
100 to 120
VAC
220 to 240
VAC
INPUT FREQUENCY
RANGE 60 Hz
50 Hz
MAX OPERATING CURRENT
4.5 AMPS @ 110 VAC / 3 AMPS @ 220VAC
Note: Control panels can be removed to allow access through a 45” door.
Small dome on top of game can be removed to reduce height to under 80”

6
A5WAFL060
GAME SETUP
Remove the cardboard from the pallet.
The game is screwed down to the pallet in 2 locations.
Remove the bag of keys from the cabinet ledge and open all 4 main doors.
Remove the lag screw from inside the door above the wood support below
game using 9/16” wrench.
Remove game from pallet and roll the game into final position in room.
Lock wheel casters so the game is harder to move.
The game will arrive on a pallets surrounded by cardboard. Please inspect the pallet for
shipping damage and report immediately to the freight company if any damage found.
There will be about 1/2 hours of assembly time needed.
Tools Needed:
9/16” Wrench 7/16” Wrench
2 people # 2 Square head screwdriver bit
Open Dome: Reach inside and above the pink, blue, and
green main doors and unlatch the 3 latches
directly above the lock brackets.
Lift the dome from the pink side; it will hinge
back and rest in an open position.
Remove set of towers and the 4 boxes from glass mirror turntable.
These are the player stations and will be attached to the game.
Open the Pink Station’s cash box and remove the hardware kit.
Attach the 4 player stations to the sides of the cabinet using the
washers and lock nuts from the hardware kit using a 7/16” wrench.
Be sure to match the color of the player stations to the cabinet side
colors.
A5NULO050

7
GAME SETUP
Plug in the 3 cables to connect the player station to the cabinet:
Ground Wire: CE5180 plugs into CE5168
Button: CE5155 plugs into CE5155
Speaker: Black connector of speaker plugs into the black
connector of CE5159
Note: Do not plug into the pink connector!
Evenly distribute the tower set over the glass mirror turntable.
Refer to “Prize Tower Kits” for more information on quantity and
values of tower sets.
Close dome and secure the 3 latches above the pink, blue, and
green main doors.
Pull the power cord from the bottom of the game, and plug into a
standard electrical outlet.
Turn on the power strip, located inside the blue side main door.
Your ready to play!

8
OPTIONAL POWER DROP SETUP
The Trolls game is pre-wired, ready to accept incoming AC voltage from the top
of the game from a location’s drop cord.
However, there is some modification to the game that must be done.
Remove 4 screws from the top
half dome of game using a
Phillips screwdriver.
Remove the black filler plug.
Remove 4 screws from the
LED light board using a #2
square bit drive.
Pull the black power cord
up through the hole.
Reinstall the LED light
board using a #2 square
bit drive. The power cord
will extend out from under
this board.
Place the half dome back onto game,
making sure to pull power cord out the
hole in the top of the half dome.
Open the pink station’s main door and unplug
the existing AC power cord from the line filter.
Plug in the spare secondary AC power cord that
is coming from the top of the cabinet.

9
CHECK ARM HEIGHT
Check the height of the arms above the glass mirror turntable.
If the arms are too low, they will catch the edge of the mirror and snap
backward causing towers to tip over on their side.
A tower on it’s side will not score, and block the win tray for actual player
wins.
The arms must not be touching the glass, and should be 1/4” above the
glass mirror turntable surface.
To Adjust Height:
Use a Phillips screwdriver to turn this screw.
Turn clockwise for arm to go up.
Turn counterclockwise for arm to go down.
You may need to do these for each of the 4 arms.

10
Choose one of the four brightly-colored
player stations.
Simply press the button to activate the
swinging arm.
Time your move just right to push a ticket
prize off the rotating platform.
Score tickets when the prize lands on the
win platform!
HOW TO PLAY

11
PRIZE TOWER KITS
Each Troll’s game includes a large bag of RFID programmed towers.
There are different options depending on ticket payout needs.
95% of customers use the Standard Tower Set
(Part # A5TA11002-STD):
- 40 of 150 value ticket towers
- 1 of “Bonus Set” (packaged separately to prevent the hair
from making a mess on the rest of the towers) with:
2 of 300 tickets
1 of 500 tickets
1 of 1000 tickets
- 1 of “Payout Adjustment Set” (packaged separately as many
times it is not needed) to adjust payout higher or lower with:
5 of 100 tickets
1 of 200 tickets
1 of 750 tickets
1 of 1000 tickets
The other 3 tower sets sold by Baytek:
20 Pence Tower Set - Part # A5TA11002-UDC
30 of 50 tickets
5 of 30 tickets
5 of 20 tickets
2 of 150 tickets
1 of 250 tickets
1 of 1000 tickets
Nickel Tower Set - Part # A5TA11002-CEC
40 of 10 tickets
5 of 30 tickets
2 of 30 tickets
2 of 100 tickets
Point Set - Part # AATA11002-PTS - Same as Standard Set but with the word “Points”
used instead of “Tickets”
Payout Adjustment Set Included:
5 of 10 tickets
1 of 100 tickets
1 of 200 tickets
1 of 500 tickets
Payout Adjustment Set Included:
5 of 5 tickets
1 of 20 tickets
1 of 50 tickets
1 of 100 tickets
To order replacement RFID prize towers, contact BayTek Entertainment:
Phone: (920) 822-3951 Ext 1101
Email: parts@baytekent.com
We recommend filling the playfield with all 40 of the 150 towers and all 4 of the “Bonus Set” towers.
Only use the “Payout Adjustment Set” if you would want to increase or decrease your average ticket payout
over time. Refer to the “Ticket Payout Pattern” for information on recommended tickets per game.

12
TICKET PAYOUT PATTERNS
Table describing the values of RFID towers to be placed on the playfield
for the corresponding tickets per game.
Factory default is highlighted in yellow.
Average Desired
Tickets per Game Prize Tower Kit Tower Values
26 - 30
Standard Set, modified
40 of 150 towers, 1 of 200 tower, 2 of 300 towers,
1 of 500 tower, 1 of 750 tower, 2 of 1000 towers
22 - 26
Standard Set, modified
40 of 150 towers, 2 of 300 towers,
1 of 750 tower, 2 of 1000 towers
18 - 22
Standard Set, modified 40 of 150 towers, 2 of 300 towers, 2 of 1000 towers
15 - 19
Standard Set
40 of 150 towers, 2 of 300 towers,
1 of 500 tower, 2 of 1000 towers
13 - 17
Standard Set, modified
35 of 150 towers, 5 of 100 towers, 1 of 200 tower,
1 of 300 tower, 1 of 500 tower, 1 of 750 tower
8 - 12
20 Pence Set
30 of 50 towers, 5 of 30 towers, 5 of 20 towers,
2 of 150 towers, 1 of 250 tower, 1 of 1000 tower
5 - 9
20 Pence Set, modified
30 of 50 towers, 5 of 30 towers, 5 of 20 towers,
2 of 150 towers, 1 of 250 tower, 1 of 500 tower
3 - 7
20 Pence Set, modified
30 of 50 towers, 5 of 30 towers, 5 of 20 towers,
1 of 100 towers, 1 of 200 tower, 1 of 250 tower
1 - 5
Nickel Set ($.05) 40 of 10 towers, 2 of 30 towers, 1 of 100 towers

13
VOLUME & DIPSWITCH SETTINGS
1 2 COINS PER PLAY
OFF OFF 1 Coin Per Play ($0.25)
OFF ON 2 Coins Per Play ($0.50)
ON OFF 4 Coins Per Play ($1.00)
ON ON 6 Coins Per Play ($1.50)
3 ATTRACT SOUNDS
ON Attract Mode On
OFF Attract Mode Off
4 Not Used
Dipswitch Settings
Attract Volume Setting
Game Volume Setting
Volume adjustment and game setting dipswitches are located on the motherboard, located inside the
Pink station main door.
* Factory settings are highlighted in yellow below *
DOOR BOARD DIPSWITCH SETTINGS
Mercy tickets are tickets that are given at the end of the game if no tower has been won.
This is especially useful in card swipe installations where the name game can be played faster when
a mercy ticket is given.
These dipswitches are located on the door board in the inside of each station’s main door.
All 4 door boards should be set at the same values.
* Factory settings are highlighted in yellow below *
Dipswitches
1 2 3 4 5
No Mercy Ticket OFF OFF OFF
Not
Used
Not
Used
1 Mercy Ticket ON OFF OFF
2 Mercy Tickets OFF ON OFF
3 Mercy Tickets ON ON OFF
4 Mercy Tickets OFF OFF ON
5 Mercy Tickets ON OFF ON
10 Mercy Tickets OFF ON ON

14
CARD SWIPE INSTALLATION
Please contact Baytek Games if any further questions. (920) 822-3951 Ext. 1102
The Trolls game is pre-wired with a UCL (Universal Card Link) connector to accept Card Swipe
systems from many different manufactures.
Please follow these instructions to make full use of this capability.
Notes:
- Many card swipe systems have a voltage threshold that can be adjusted in the card swipe menu.
Please set this “Game Drive Threshold” to 2 Volts.
Game Adjustments:
On the motherboard inside the blue station main door, set dipswitches #1 and #2 to ON. (1 Credit per play)
On the 4 door boards inside all 4 main doors, set dipswitches #1 to ON, all others OFF. (1 mercy ticket)
Option #1:
Card swipe systems may come with a standard
9 pin Molex connector. This is the UCL connector.
Simply plug this connector into your
card swipe reader.
Option #2:
If your card swipe systems does not have a standard 9 pin
Molex connector, then you will have to splice wires into the
AACE5169 harness. Black wire is ground. (common)
White wire is coin signal.
Red wire is +12 Volts DC
This would
normally plug
into coin
mechanism.
UCL Connector
Card Swipe system cable
would be plugged into this
connector.
AACE5169
UCL Connector
Card Swipe system cable
would be plugged into this
connector.
AACE5169

15
CIRCUIT BOARD LAYOUT
Station 1 Ribbon
AACE5167
Power Supply In
AACE5192
Marquee Speaker
ACE5175
Station Speakers 1-4
AACE5159
Station 4 Ribbon
AACE5167
Station 3 Ribbon
AACE5167
Station 2 Ribbon
AACE5167
Beacon
AACE5183
Tilt Bob
AACE5153
LED’s Under Cabinet
AACE5171
Mother Board
AAMB5100
Tickets
AACE5169
Power In
AACE5191
Side Cabinet
LED
AACE5154
Support LED
AACE51600 to
AACE5163
Support LED
AACE5176 to
AACE5179
Counters
AACE5156
Push Button
AACE5155 DBA
AACE5169
Arm LED
AACE5166
Reload Motor
AACE5185
Arm Motor
AACE5168
Coin
AACE5169
Motor Sensor
AACE5188
Low Ticket Switch
AACE5184
LowTix Light
AACE5187
Main Board Ribbon
AACE5167
RFID
AACE5187
MOTHERBOARD (AAMB5100)
DOOR BOARDS (AACB5159D-A-TR) X 4
DOOR BOARD
AACB5159D-A-TR
Note: The motherboard
is accessed through the
Blue Door

16
TICKET DISPENSER, COIN MECH, DBA, LOW TICKET SWITCH
WIRING DIAGRAM
To Bill Acceptor (Part # A5AC9091)
Optional – Not included with game. A5PL4200
(Mounting Plate) needed to install DBA.
A5TD1
Ticket Dispenser
To Ticket
Dispenser
Part # A5TD1
12 Volt Power
Enable Signal
Com Ground
Notch Signal
UCL Connector
Card Swipe system cable
would be plugged into this
connector.
Low Ticket Switch
Wired Normally Open
AASW200
1/4” Spacer A5SENY020
AACE5184
Low Ticket LED
AACE5193
AACE1527
Coin Jumper
The AACM-AS-COMP coin mechanism
will come with a cable.
2 Options:
AACE1527-P
Coin Jumper
AACM-AS-COMP
Coin Mechanism
Large Connector
AACE5169
AACE5169
AACE5169
Small Connector
AACE5187
DOOR BOARD
AACB5159D-A-TR
AACE5167
Ribbon Cable to
Motherboard
Coin mechanism switch should
be set up for Normally Closed

17
ARM MOTOR & SENSOR, RELOAD TRAY MOTOR & SENSOR
WIRING DIAGRAM
Game
Counter
Ticket
Counter
AACO1000
AACE5156
A5MO5155
Reload Motor
175-200 Ohms
AACE5185
To Game
Ground
To Game
Ground
AACB5190A
Arm Sensor
A5MO5154
Arm Motor
45-50 Ohms
AACE5168
AACE5155
AACE5155
A5PB7300
Push Button
DOOR BOARD
AACB5159D-A-TR
AACB5157
RFID Sensor Board
AACE5189
AACE5188
AACB5190A
Reload Sensor

18
LED’S: CORNER, ARM, AND DOME SUPPPORT
WIRING DIAGRAM
DOOR BOARD
AACB5159D-A-TR
+ -
AACE5173
AACE5154
Lower Side
Corner LEDs to
the left of door
AACE5165
Installed in outside
edge of playfield to
the left of Win Tray
AACE5165
Installed in outside
edge of playfield to
the right of Win Tray
AACE5164
Installed in pusher
arm of station
LED Lights
installed in the outside
edge of dome support
AACE5163 inside Door 1
AACE5162 inside Door 2
AACE5160 inside Door 3
AACE5161 inside Door 4
LED Lights
installed in the inside
edge of dome support
AACE5179 inside Door 1
AACE5178 inside Door 2
AACE5176 inside Door 3
AACE5177 inside Door 4
+ -
+ -
AACE5166

19
SPEAKERS, BEACON, LED’S UNDER GAME, & TILT
WIRING DIAGRAM
AACE5171
LED’s Under Cabinet
AACE5153
All 4 sides are driven
by the same amplifier
on mother board.
Volume Control
for all 4 sides
Speaker
AACE8811
AACE5159
Speaker
AACE8811
AACE5159
Speaker
AACE8811
AACE5159
Speaker
AACE8811
AACE5159
Top of Dome
Tower Above Dome
AACE5183
AACE5183
4
3 1
2
AACE5170
AACE5170
Power from
Power Supply
AACE5167
4 Ribbon Cables
to Door Boards
MOTHERBOARD
AAMB5100
Note: The
mother board
is accessed
through the
Blue Door
Note: Tilt is accessed through the Pink Door
Speaker
AACE8811
AACE5175
A5TI1001
Tilt Plumb Bob
AACE11008
AACE11007
+ -
+ -
+ -
+ -
+ -
+ -
+ -
+ -
+ -
+ -
+ -
+ -
+ -
+ -
+ -
+ -
AACE11002 LED
Lights in Top Tower
AACE11001
+ -
AACE11000
LED Lights in
Lower Tower
AACB5158
Marquee Light
Control Board
AALB11000
Top Light
A5CORD11000
Optional AC
Power In to
top of game
A5CORD11001
To line filter in
bottom of game

20
110 VOLT AC AND 12 VOLT DC
WIRING DIAGRAM
A5FI9010
Line Filter
A5CORD5-A
Power In from bottom of game
A5CORD5-A
A5PS1013
Power Supply
AACE5192
Power to Motherboard
AACE5151
AC Power to
Turntable Motor
AACE5169
AC power to Bill
Acceptors on the
4 doors
MOTHERBOARD
AAMB5100
AACE5191
Power In
DOOR BOARD
AACB5159D-A-TR
Note: AAMO5152
220 VAC Turntable
Motor (Red Wires)
4
3 1
2
AACE5170 to
top tower lights
IN from
Power
Supply
4 Door Board
are located
inside each
door
POWER DISTRIBUTION
BOARD AACB5156
AACE5152
Outlet Strip
Note: The power supply is
accessed through the Pink Door
Note: The power strip
is accessed through
the Blue Door
Note: The power distribution
board is accessed through the
Orange Door
2 Options for AC Power In
Only 1 option can be used at a time
AAMO5151
110 VAC Turntable
Motor (Black wires)
A5CORD11000
Optional AC Power
In to top of game
A5CORD11001
Table of contents
Other Bay-Tek Game manuals
Popular Game manuals by other brands

LAPPSET
LAPPSET SONA installation manual

Franklin
Franklin KAKURO KUR-325-01 user guide

Tiger Games
Tiger Games Paintball Trainer 42792 instructions

Radica Games
Radica Games Pocket Blackjack21 17009 instruction manual

Triumph
Triumph 2-in-1 BAG instruction manual

MD SPORTS
MD SPORTS AWH096_068E Assembly instructions

MD SPORTS
MD SPORTS TP300Y20019 Assembly instructions

MD SPORTS
MD SPORTS TP100Y20022 Assembly instructions

MD SPORTS
MD SPORTS AC108Y20010 Assembly instructions

Goldmedal
Goldmedal 7756 instruction manual

MD SPORTS
MD SPORTS AH048Y19005 Assembly instructions

GreatGadgets
GreatGadgets Las Vegas instruction manual