Bayco Products, Inc. • 640 South Sanden Blvd. • Wylie, TX 75098 • 1-800-233-2155 • 1-469-326-9400 • www.baycoproducts.com
INS-SL-655-17
Manual de Instrucción
SL-655
CLASIFICACIÓN ELÉCTRICA - 125 VOLTIOS 60 HZ
PRECAUCIÓN
yADVERTENCIA - PARA REDUCIR EL RIESGO DE DESCARGAS ELÉCTRICAS Y
FUEGO - PULL ENCHUFE AL DAR SERVICIO,
yPRECAUCIÓN: NO use este carrete de cable en atmósferas explosivas, cerca de
líquidos inamables, o donde las lámparas a prueba de explosión son obligatorios.
yNO lo use en la proximidad de vehículos o equipos cuando hay un riesgo de líquidos
inamables entren en contacto con la lámpara de mano
yNO lo sumerja en agua
yNO lo use en áreas donde el agua se puede acumular o en la lluvia o la niebla
yPRECAUCIÓN: Riesgo de descarga eléctrica - For Light lugar seco Deber uso
exclusivo
USO GENERAL CARRETE DE CABLE DE SOLO. NO PARA EL USO DURO. PARA
USO EN INTERIORES LUGAR SECO SOLO PARA USO DE LUZ DE SERVICIO
RESIDENCIALES
ADVERTENCIA: NO ES PARA USO POR ENCIMA DE LUGARES PELIGROSOS
PRECAUCIÓN: NO UTILICE EN LUGARES PELIGROSOS QUE PRESCRIBE EL
CÓDIGO ELÉCTRICO CANADIENSE, PARTE I
INSTRUCCIONES DE SEGURIDAD:
Este producto tiene un enchufe polarizado (una pata es más ancha que la otra).
Como medida de seguridad, este enchufe calzará en un tomacorriente polarizado de
una sola manera. Si el enchufe no encaja completamente en el tomacorriente, invierta
el enchufe. Si aún así no encaja, póngase en contacto con un electricista calicado.
Nunca utilice con un cable de extensión a menos que el enchufe pueda insertarse
completamente. No intente anular esta característica de seguridad.
PRECAUCIÓN: NO PERMITA QUE EL CABLE DE RETRACTACIÓN POR SÍ MISMO
COMO DAÑOS O LESIONES PUEDEN OCURRIR DE VELOCIDAD EXCESIVA
REWIND
ATENCIÓN: YESO NO SOPORTAR EL PESO DE EL CONJUNTO DEL CARRETE
PRECAUCIÓN: LEA Y ENTIENDA LAS INSTRUCCIONES DE MONTAJE ANTES DE
INTENTAR LA INSTALACIÓN Y EL USO DE ESTE PRODUCTO
OPERACIÓN
yPara operar, se conectan a una de 120 voltios 60 Hz conectado a tierra.
yTire de la longitud deseada de cable. Nota un chasquido cuando se tira. Cordón se
quedará en la longitud deseada en hacer clic y rebobinado después de un tirón más
allá del sonido de clic. Longitud extendida cuando se retractó se puede ajustar por
deslizamiento pelota de goma en la posición deseada.
yMovimiento que-O cambiar a posición «I». Lámpara puede parpadear varias veces
antes de la iluminación, especialmente en climas fríos. Apague moviendo la posición
«O».
PRECAUCIÓN: NO PERMITA QUE EL CABLE RETORNO POR SI MISMO, COMO
DAÑO AL EQUIPAMIENTO EXTREMO DEL CORDÓN PUEDE OCURRIR DE
VELOCIDAD EXCESIVA REBOBINAR.
PARA LIMPIAR EL EXTERIOR DE LA UNIDAD:
Desenchufe la unidad antes de limpiar a fondo y seque antes de volver a usar.
Utilice un paño suave con detergente suave. NO utilizar disolventes como gasolina,
aguarrás, etc, para limpiar la unidad. NUNCA sumerja el carrete o accesorios de cable
de nal (receptáculos o lámparas) en el agua.
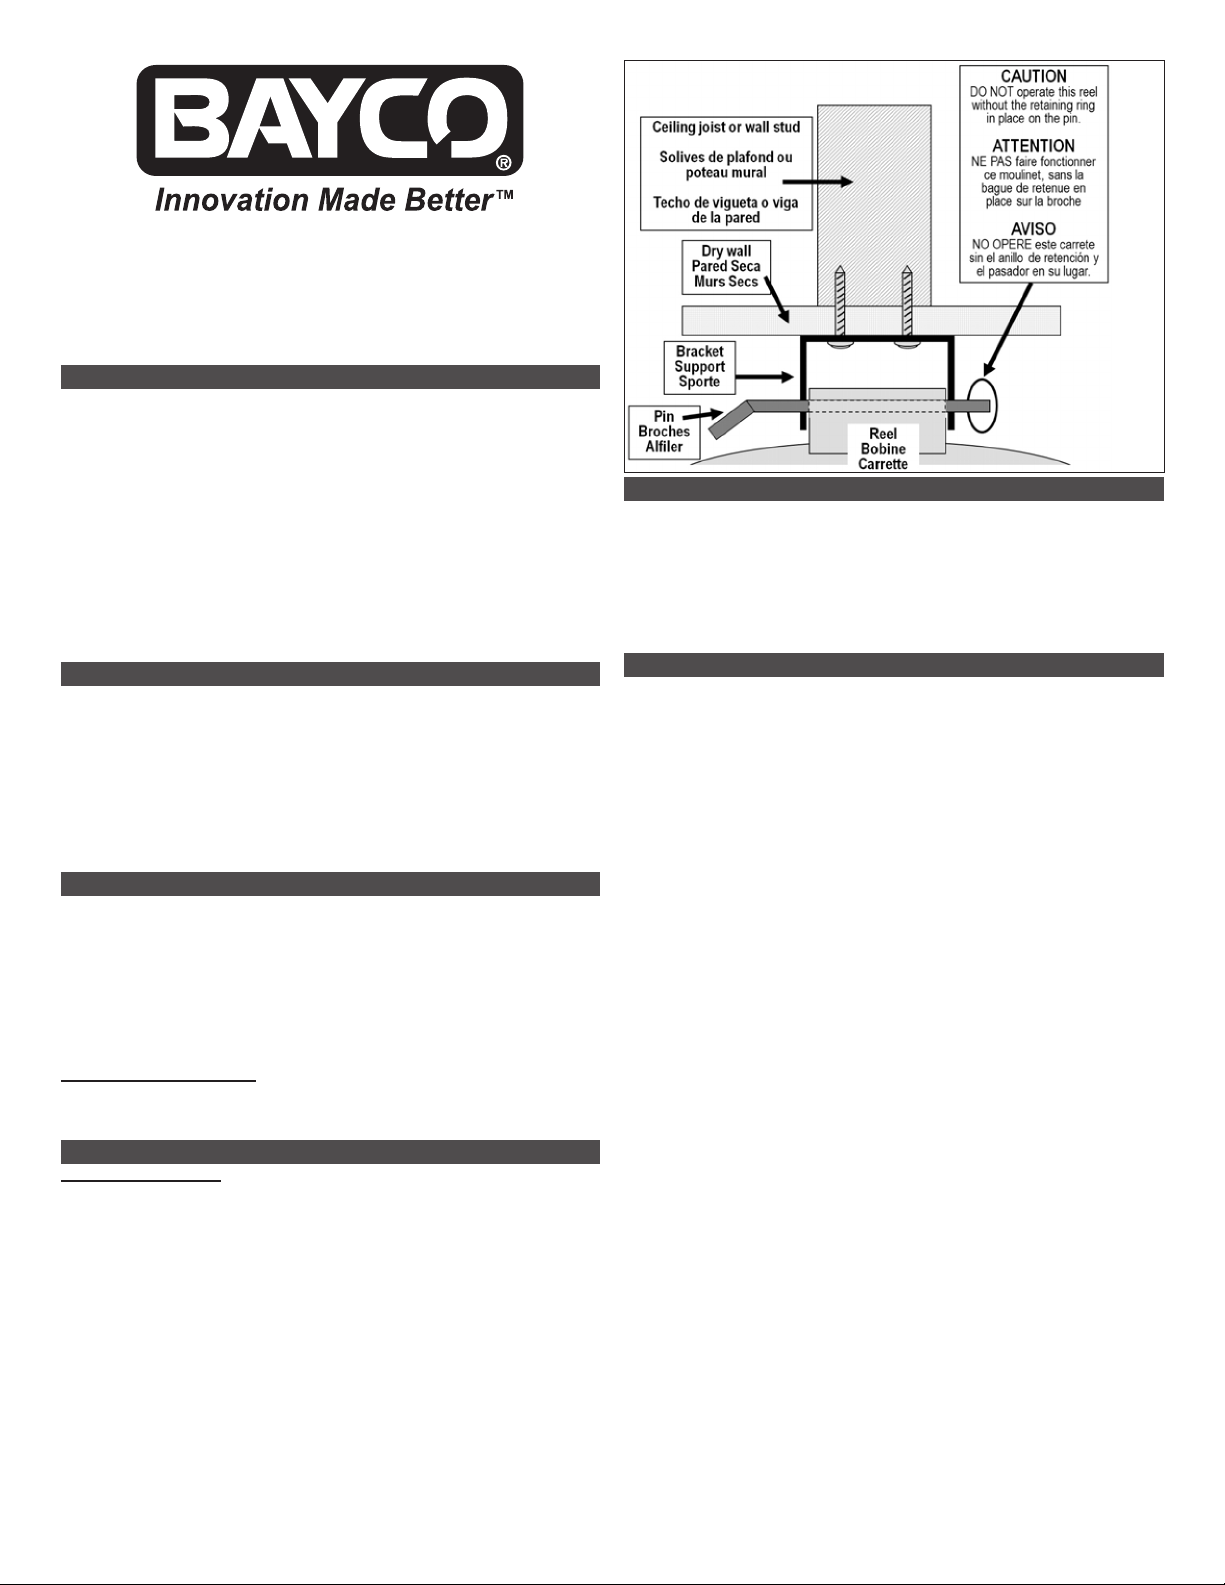
INSTRUCCIONES DE MONTAJE
Instalación de techo o de pared
ySelecione una ubicación dentro de 2 pies de un toma corriente. El toma corriente de
un abridor de puerta de garaje es deseable.
yLas paredes de yeso no sujetara el suporte del montaje asi que localize un semental
del cielo raso
yde pared fuerte y con el soporte de montaje como plantilla, marque los agujeros para
que sean centrados en las vigas del techo.
yFije el soporte de montaje usando los 2 tornillos de madera proporcionados.
yAlinee los oricios en el lado del carrete con los oricios en el lado del soporte de
montaje e inserte el pasador.
yColoque el anillo de retención en el pasador y girar hasta que el anillo entero este
a travez del hueco y el pasador. NO OPERE este carrete sin el anillo de retención y
el pasador en su lugar.
MEDIDAS DE SEGURIDAD
PRECAUCIÓN: NO PERMITA QUE EL CABLE SE RETRAIGA POR SÍ MISMO
COMO EL DAÑO O LESIÓN PUEDE OCURRIR POR EXCESO DE VELOCIDAD DE
REBOBINADO.
yAjuste el cable de dejar de mantener el recipiente a la longitud deseada cuando el
cable se retrae.
yAntes de limpiar el carrete siempre desenchúfelo de la fuente de alimentación.
yLimpie el exterior de la bobina de cable solamente. Utilice un paño suave con
detergente suave. No utilizar derivados del petróleo para limpiar el carrete de cable.
No sumerja nunca el carrete de cable o las tomas o las luces de trabajo en el agua.
Seque completamente antes de intentar volver a conectar a la fuente de poder.
GARANTÍA
GARANTÍA LIMITADA DE 1 AÑO
Bayco Products, Inc. garantiza que este producto está libre de defectos de mano
de obra y materiales para el comprador original durante un año a partir de la fecha de
compra e incluye los LED, la carcasa, los lentes, la electrónica, los interruptores, las
pilas recargables y los cargadores. Las bombillas (excepto los LED) están cubiertas
durante 90 días a partir de la fecha de compra.
Repararemos o reemplazaremos este producto si lo determinamos como
defectuoso. Esta es la única garantía, expresa o implícita, incluyendo cualquier garantía
de comerciabilidad o idoneidad para un propósito particular.
Para obtener una copia completa de la garantía, visite www.baycoproducts.com/
bayco-product-support/warranties. Conserve su recibo para comprobar la compra.