BBQ 146.23770310 User manual

OWNER'S MANUAL
BBQ PRO 4BURNER GAS GRILL
Product code: 23770 /0-05307038-9
Item: 146.23770310
UPC code: 182995000903
Date of purchase: / /

If you smell gas:
I. Shut off gas to the appliance.
2. Extinguish any open flame.
3. Open lid.
4. If odor continues, keep away from the
appliance and immediately call your gas
supplier or your fire department.
1. Do not store or use gasoline or other
flammable liquids or vapors in the vicinity of
this or any other appliance.
2. An LP cylinder not connected for use shall not
be stored in the vicinity of this or any other
appliance.
Call Grill Service Center For Help And Parts
If you havequestionsor needassistanceduring assembly,
pleasecall 1-888-287-0735.Youwill be speaking toa
representativeof the grillmanufacturer.Toorder new partscall
at 1-800-4-MY-HOME®.
Product Record
IMPORTANT:Fill out the product record information below.
Model Number
Serial Number
Seeratinglabelongrillforserialnumber.
Date Purchased
For residential use only. Do not use for commercial
cooking.
2o146.23770310
Installation Safety Precautions
• Please readthis User'sManualin its entirety beforeusingthe
grill.
• Failureto follow the providedinstructioncan result in seriously
bodilyinjuryand/orproperty damage.
• Some partsof this grill mayhave sharpedges. Pleasewear
suitable protectivegloves.
• Use grill,as purchased,onlywith LP (propane)gas and the
regulator/valveassembly supplied.
• Grill installationmustconformwith localcodes,or in their
absence of localcodes,with either the National Fuel Gas
Code,ANSI Z223. 1/NFPA 54, Natural Gasand Propane
Installation Code,CSA B149.1,or PropaneStorageand
HandlingCode, B149.2, or the StandardforRecreationa
Vehicles,ANSl A 119.2/NFPA1192,and CSAZ240 RV Serles,
Recreational VehicleCode,as applicable.
• All electricalaccessories(such as rotisserie)mustbe
electrically groundedin accordancewith localcodes,or
NationalElectrical Code,ANSI / NFPA 70or Canadian
ElectricalCode, CSAC22,1,Keep anyelectrical cordsand/or
fuel supply hosesaway from any hotsurfaces.
• This grill is safety certifiedfor usein the United Statesand/or
Canadaonly. Donot modifyfor use inany other location.
Modificationwill result in a safety hazard.
IMPORTANT:This grill is intendedforoutdoor useonly and is not
intendedto be installedin or on recreationalvehiclesor boats.
NOTETO INSTALLER: Leavethis User's Manualwith the
customer after deliveryand/or installation.
NOTETO CONSUMER:Leavethis User'sManualin a convenient
placefor future reference.
Safety Symbols
The symbolsand boxesshown belowexplainwhat each heading
means. Readand followall of themessagesfound throughout
the manual.
DANGER: Indicates an imminently hazardous situation
which, if not avoided, will result in death or serious injury.
WARNING: Indicates an potentially hazardous situation
which, if not avoided, could result in death or serious injury
CAUTION: Indicates a potentially hazardous situation or
unsafe practice which, if not avoided, may result in minor
or moderate injury.

ForYourSafety•..
GrillServiceCenter•••
ProductRecordInformation...
InstallationSafety Precautions...
SafetySymbols ...
BBQ PRO GrillWarranty•••
Use and Care•••
Parts List•••
Parts Diagram ..
BeforeAssembly•..
Assembly•..
Troubleshooting...
2
2
2
2
2
3
...4-10
...11
..12
•. •13-14
•15-22
•23-25
CALIFORNIA PROPOSITION 65
1. Combustion by-productsproducedwhen using
this productcontainchemicalsknownto the State
of Californiato causecancer, birthdefects,and
other reproductiveharm.
2. Thisproductcontainschemicals,includinglead
and leadcompounds,knowntothe State of
Californiato causecancer, birthdefectsor other
reproductiveharm.
Wash your hands after usinq this product.
BBQ PROGRILL WARRANTY
One Year Full Warranty on BBQ PRO Grill
If this grillfails due to a defect in materialor workmanship
within one year from thedate of purchase,call 1-800-4-MY
HOME®toarrangefor free repair (or replacementif repair
provesimpossible).
COOKINGGRIDSand HEATDIFFUSERS:1yearLIMITED
warranty;doesnotcoverdropping,chipping,scratching,or
surfacedamage.
STAINLESSSTEELPARTS:1yearLIMITEDwarrantyagainst
perforation;doesnotcovercosmeticissueslikesurfacecorrosion,
scratchesand rust.
ALL OTHERPARTS:1yearLIMITEDwarranty(Includes,butnot
limitedto,valves,frame,housing,cart,controlpanel,igniter,
regulator,hoses).Doesnotcoverchipping,scratching,cracking
surfacecorrosion,scratchesor rust.
Limited Warranty on Burners
Forone yearfrom the date of purchase,any burner that
ruststhroughwill be replacedfree of charge.After the first
year from thedate of purchase,youpay for labor ifyou wish
to have itinstalled.
All warranty coverageis void ifthis grill isever usedfor
commercial or rentalpurposes•All warrantycoverage applies
only if this grill is usedin the United States•
This warrantygives you specific legal rights,and you may
also haveother rightswhich vary from state to state•
Kmart Corporation
HoffmanEstates, IL 60179
Installation Service
Forprofessionalinstallationof homeappliances,garage
door openers, water heaters, and other major home items, in
the U.S.A.call 1-800-4-MY-HOME®.
146.23770310 • 3

• NEVERstore a spare LP cylinder underor near the
appliance or in an enclosed area.
• Never fill a cylinder beyond 80%full.
• If the information in the two points above is not
followed exactly, a fire causing death or serious
injury mayoccur.
• An overfilled or improperly stored cylinder is a
hazard due to possible gas release from the safety
relief valve. This could cause an intense fire with
risk of property damage, serious injury or death.
• If you see, smell or hear gas escaping, immediately
get away from the LP cylinder and appliance and
call your fire department.
LP Tank Removal, Transport And Storage
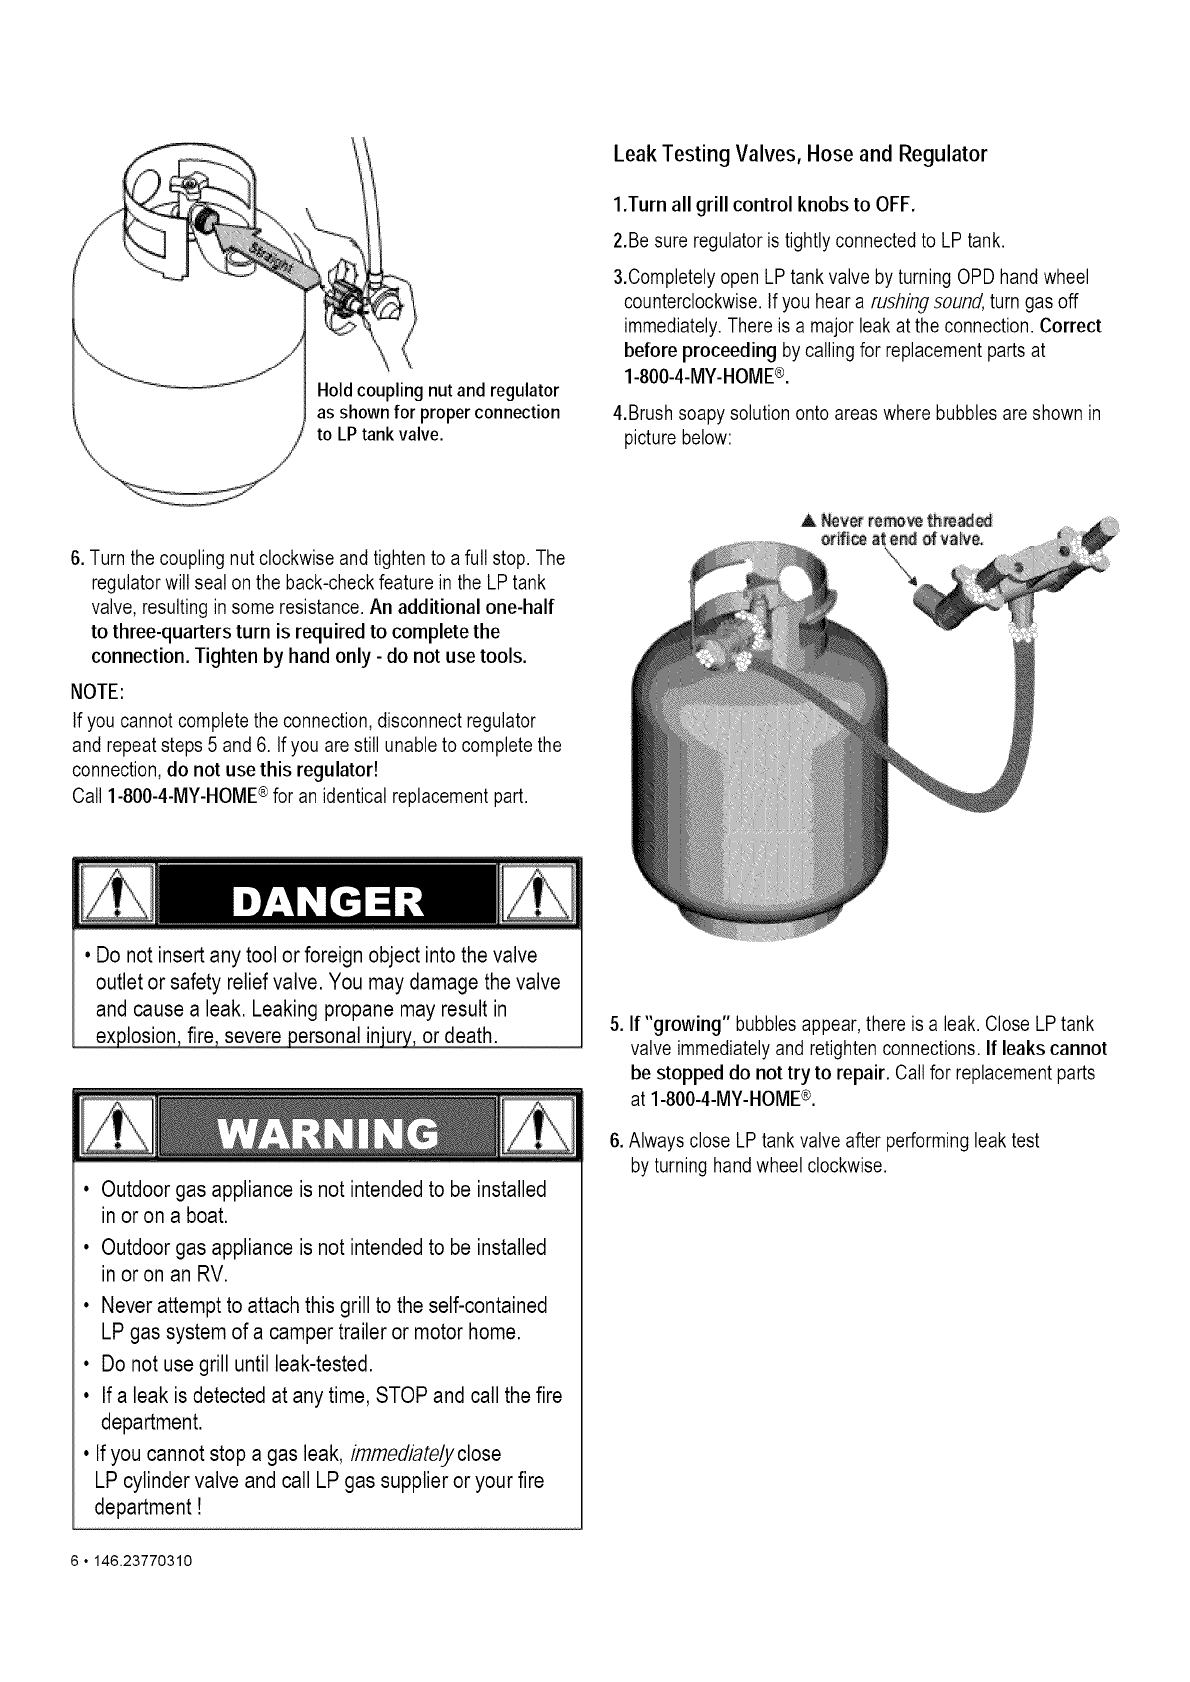
• Turn OFFall control knobs and LP tank valve. Turncoupling
nutcounterclockwisebyhand only - do not usetools to
disconnect. Lift LP tankwire upwardoff of LP tank collar, then
lift LP tank up and off of support bracket. Installsafety caponto
LP tank valve.Alwaysuse capand strap suppliedwith valve.
Failure to use safety cap as directed may result in serious
personal injuryand/or property damage.
LPTankValve_
"\,.'_.J "X_Safety Cap
°_et'ain erStrap
• A disconnected LP tank in storage or being transportedmust
have a safety cap installed (as shown). Do not store an LP
tank in enclosed spaces such as a carport, garage, porch,
covered patio or other building.Never leavean LP tank inside
a vehiclewhich may become overheatedby thesun.
• Donot storean LP tank in an area where childrenplay.
LP Cylinder
• The LPcylinder usedwith your grill mustmeet the
following requirements:
• Use LP cylindersonlywith these required measurements: 12"
(30.5cm)(diameter)x 18" (45.7cm) (tall)with 20 lb.(9 kg.)
Capacitymaximum.
• LP cylindersmustbe constructedand marked in accordance
with specificationsfor LPcylindersof the U.S. Departmentof
Transportation (DOT)or for Canada, CAN/CSA-B339,
cylinders, spheres and tubesfor transportationof dangerous
goods. TransportCanada (TC).See LP cylinder collarfor
marking.
• LP cylindervalve must have:
• Type 1 outlet compatiblewith
regulatoror grill.
•Safetyrelief valve.
• UL listed Overfill Protection OPDHandWheel
Device(OPD). This OPDsafety
feature isidentified bya uniquetriangular handwheel. Use
only LP cylinders equipped with this type of valve.
• LP cylinder mustbe arrangedfor vaporwithdrawal and
includecollarto protectLP cylinder valve.Always keepLP
cylinders in uprightposition during use,transit or storage.
LP cylinderin uprightpositionfor vaporwithdrawal
LP (Liquefied Petroleum Gas)
• LP gas isnontoxic, odorlessand colorlesswhen produced. For
Your Safety, LPgas has beengiven an odor (similar torotten
cabbage)so that itcan be smelled.
• LP gas ishighlyflammableand may igniteunexpectedlywhen
mixedwith air.
LP Cylinder Filling
• Use onlylicensed and experienceddealers.
• LP dealer must purge new cylinder beforefilling.
• DealershouldNEVER fill LP cylinder morethan80% of LP
cylindervolume.Volumeof propanein cylinder will vary by
temperature.
• A frosty regulatorindicatesgasoverfill. Immediatelyclose LP
cylindervalve and call localLP gas dealerfor assistance.
• Donot releaseliquid propane (LP) gasinto theatmosphere.
This isa hazardouspractice.
• Toremove gasfrom LP cylinder,contact an LP dealer or call a
localfire departmentfor assistance. Checkthetelephone
directoryunder"Gas Companies"for nearest certifiedLP
dealers.
4•146.23770310

LP Tank Exchange Connecting Regulator To The LP Tank
• Manyretailers that sellgrills offer youthe optionof replacing
your emptyLP tank throughan exchange service. Use only
those reputableexchange companiesthat inspect,precisionfill,
test and certify theircylinders. Exchange your tank only for
an OPDsafety feature-equipped tank as described in the
"LP Tank" section of this manual.
• Always keepnewand exchangedLP tanks in uprightposition
during use, transitor storage.
• Leaktest new and exchanged LP tanks BEFORE
connecting to grill.
1. LP tank must be properlysecured ontogrill. (Referto
assemblysection.)
2. Turnall control knobsto the OFF position.
3. TurnLP tank OFFbyturning OPDhand wheelclockwiseto a
full stop.
4. Removethe protectivecapfrom LP tank valve.Always use
capand strap suppliedwith valve.
LP Tank Leak Test
For your safety
• Leaktest mustbe repeatedeachtime LP tank isexchanged
or refilled.
• Donot smokeduring leaktest.
• Donot usean open flame to checkfor gas leaks.
• Grill mustbe leaktested outdoorsin a well-ventilatedarea,
away from ignitionsourcessuch as gasfired or electrical
appliances. Duringleak test, keepgrill away from open
flamesor sparks.
• Usea cleanpaintbrush and a 50/50 mildsoapand water
solution. Brushsoapysolution onto areasindicated byarrows
infigure below. Leaksare indicatedby growingbubbles.
Safety
OPD Hand Wheel
_e1 outlet with
thread on outside
/
StrapandCap
Do not inserta POL transportplug
(plastic part with external threads)
into the type 1 valve outlet. It will
defeat the Safety Relief Valve
feature.
ADo not use household cleaning agents. Damageto thegas
train components(valve/hose/reclulator)can result.
5. Holdregulatorand insert nippleinto LP
tank valve. Hand-tightenthecoupling
nut, holding regulatorin a straight line
with LP tank valve so as notto crossth-
threadthe connection.
Nipple has to be
centeredinto theLPtank
146.23770310 • 5

Hold coupling nut and regulator
as shown for proper connection
to LP tank valve.
Leak Testing Valves, Hose and Regulator
1.Turn all grill control knobs to OFF.
2.Be sureregulatoris tightlyconnectedto LP tank.
3.Completelyopen LP tank valve by turningOPDhand wheel
counterclockwise.Ifyou hear a rushingsound,turn gasoff
immediately.There isa majorleakat the connection.Correct
before proceeding bycallingfor replacementparts at
1-800-4-MY-HOME®.
4.Brush soapy solutiononto areaswhere bubblesare shown in
picture below:
6.Turn thecoupling nutclockwiseand tighten to a full stop.The
regulatorwill sealon the back-checkfeature in the LP tank
valve, resulting insome resistance.An additional one-half
to three-quarters turn isrequired to complete the
connection. Tighten by hand only- do not use tools.
NOTE:
If you cannot completethe connection,disconnect regulator
and repeatsteps 5 and 6. If you are still unable tocompletethe
connection,do not use this regulator!
Call 1-800-4-MY-HOME®for an identical replacementpart.
• Do not insert any tool or foreign object into the valve
outlet or safety relief valve. You may damage the valve
and cause a leak. Leaking propane may result in
explosion, fire, severe personal injury, or death.
• Outdoor gas appliance is not intended to be installed
in or on a boat.
• Outdoor gas appliance is not intended to be installed
in or on an RV.
• Never attempt to attach this grill to the self-contained
LP gas system of a camper trailer or motor home.
• Do not use grill until leak-tested.
• If a leak is detected at any time, STOP and call the fire
department.
• If you cannot stop a gas leak, immediately close
LP cylinder valve and call LP gas supplier or your fire
department!
5.If "growing" bubblesappear,there is a leak. Close LP tank
valve immediatelyand retighten connections.If leaks cannot
be stopped do not try to repair. Callfor replacementparts
at 1-800-4-MY-HOME®.
6.Alwaysclose LP tank valve after performingleaktest
by turninghand wheelclockwise.
6 o146.23770310

Safety Tips
• Beforeopening LP cylinder valve,checkthe couplingnutfor
tightness.
• Whengrill is not in use, turnoff all control knobsand LPcylinder
valve.
• Never move grillwhile in operationor still hot.
• Use long-handledbarbecueutensilsand oven mitts toavoid burns
and splatters.
• Maximumload for sideshelf is 10 Ibs.
• Thegreasetray must be inserted intogrill and emptied after each
use. Do notremove greasetray until grill hascompletelycooled.
• Cleangrill often, preferablyafter eachcookout. Ifa bristle brushis
usedto cleanany ofthe grill cooking surfaces,ensure no loose
bristlesremainon cooking surfaces prior to grilling.It is not
recommendedto cleancooking surfaceswhile grill is hot.
• If you notice greaseor other hotmaterial drippingfrom grill
Determinethecause, correctit, thenclean and inspectvalve,
Keep ventilationopeningsin cylinder enclosure(grill cart) free and
clearof debris.
• Do notstore objectsor materialsinsidethegrill cart enclosure that
wouldblock theflow ofcombustion air to the undersideof either
thecontrol panel or the firebox bowl.
• Theregulator may makea hummingor whistling noiseduring
operation.This will not affectsafety or useof grill.
• If you havea grill problemseethe "TroubleshootingSection':
• If the regulatorfrosts, turn off grill andLPcylinder valve
immediately.This indicatesa problemwith the cylinderand it
shouldnot be usedon any product.
! I
Putting out grease fires by closingthe lid is not possible.
Grills are well ventilatedfor safety reasons.
Do not usewater on a grease fire. Personal injury may
result. Ifa grease fire develops, turn knobs and LP
cylinder off.
Do not leavegrill unattendedwhile preheating or burning
off food residueon HI. Ifgrill has not been regularly
cleaned, a grease fire can occur that may damage the
product.
IVlainBurner Ignitor Lighting
• Do not lean over grill while lighting.
1. Open lid during lighting.
2. Turn ON valve from source or tank.
3. Pushand turn Ignition Burnercontrol knobto _ HI and
immediatelypress and hold ElectronicIgnition button.
4. If ignitiondoes NOT occur in 5 seconds, turn IgnitionBurner
control knobOFF,wait 5 minutes,and repeatthe lighting
instructions.
5. To LightOtherBurnersturn control knobto HI.
If ignitordoes notwork, follow Match Lighting instructions.
After Lighting:Turn knobs to HI positionfor 5 minutes to
pre-heatgrill.Then turn knobto desiredsettingfor cooking.
146.23770310 • 7

Turn controls and gas source or tank OFFwhen not
in use.
If ignition does NOT occur in 5 seconds, turn the
burner controls OFF, wait 5 minutes and repeat the
lighting procedure. If the burner does not ignite with
The valve open, gas will contiune to flow out of the
burner and could accidently ignite with risk of injury
Match-Lighting
ADo not lean over grill while lighting.
1. Open lid during lighting.
2. Placematch intomatchholder (hangingfrom sideof cart).
Lightmatch, placeinto lightinghole on left side offirebox.
3. Pushin and turn right knobto Hi position.Be sureburner lights
and stay lit.
4. Lightother burnersfollow with steps 3.
Burner Flame Check
• Removecookinggrates and flame tamers. Lightburners, rotate
knobsfrom HIGHto LOW.You shouldsee a smaller flame in
LOWpositionthan seen on HIGH. Performburner flame check
on sideburner,also.Always checkflame priorto each use. If
onlylowflame isseen referto "Sudden drop or lowflame" in
the TroubleshootingSection. HI
LO
Turning Grill Off
• Turnall knobsto OFF position.Turn LP cylinderoff byturning
Ignitor Check
• Turn gas off at LP cylinder. Pressand holdelectronic ignitor
button."Click" shouldbe heard and spark seen eachtime
betweencollector boxor burnerand electrode.See
"Troubleshooting'if no click or spark.
Valve Check
• Important: Make sure gas is off at LP cylinder before
checking valves. Knobslock in OFF position.Tocheck
valves,first push in knobs and release,knobs shouldspring
back. If knobsdo notspring back,replacevalve assembly
beforeusinggrill. Turn knobsto LOWposition thenturn back to
OFF position.Valves shouldturnsmoothly.
Hose Check
• Beforeeach use, checkto see if hosesare cut or worn.
Replacedamaged hosesbefore usinggrill. Useonly
valve/hose/regulatoras specifiedin the parts list of this Use & Care
Guide.
General Grill Cleaning
• Do notmistake brownor blackaccumulationof greaseand
smokefor paint. Interiorsof gasgrills are not paintedat the
factory (and should never be painted). Apply a strong solution
ofdetergent and water or use a grill cleanerwith scrub brush
on insides ofgrill lid and bottom. Rinseand allow tocompletely
air dry. Donot apply a caustic grill/oven cleaner to painted
surfaces.
• Porcelain surfaces: Becauseofglass-like composition,most
residuecan be wipedaway with bakingsoda/water solutionor
speciallyformulatedcleaner. Use nonabrasivescouringpowder
forstubborn stains.
• Painted surfaces: Wash with milddetergentor nonabrasive
cleanerand warm soapy water.Wipedry with a soft
nonabrasivecloth.
• Cooking surfaces: If a bristlebrush is usedto cleanany of
thegrill cooking surfaces,ensure no loosebristlesremainon
cookingsurfaces prior to grilling.It is not recommendedto
cleancooking surfaceswhile grill is hot.
8 • 146.23770310

CAUTION
SPIDER ALERT!
IMPORTANT:Always ensure that the venturi burner tubes
are clean.A venturi burner tube has a narrow area in
whichspiders tend to build nests.
If you notice thatyour grill is getting hard to light or that
the flame isn't as strong as it should be,take the time to
checkand clean the venturi's.
Spiders or small insects have been knownto create "flashback"
problems. The spiders spinwebs, build nests and lay eggs inthe
grill's venturi tube(s) obstructing the flow of gas to the burner. The
backed-up gas can ignite in the venturi behindthe control panel.
This is known as aflashback and it can damage your grill and even
causeinjury.
Topreventflashbacksandensuregoodperformancetheburnerand
venturiassemblyshouldberemovedfromthegrillandcleaned
Storing Your Grill
•Cleancooking grates.
•Store in drylocation.
•When LPcylinder is connectedtogrill, store outdoors in a
well-ventilatedspace and out of reachofchildren.
•Cover grill if storedoutdoors. Choosefrom a variety ofgrill
covers offeredby manufactureronceavailable.
•Storegrill indoorsONLYif LP cylinder isturned off and
Disconnected,removefrom grill and stored outdoors.
• When removinggrill from storage,follow "Cleaningthe Burner
Assemb/y' instructionsbeforestartinggrill.
Cleaning the Burner Assembly
Followthese instructionsto cleanand/orreplace partsof burner
assembly or if you havetroubleignitinggrill.
1. Turn gas off at control knobs and LP cylinder
2. Removecooking grates and heatdiffusers.
3. Removecarryovertubes from rearof burners.
4. Removecotter pin from rear of burners.
5. Carefullylift eachburner up and away from valve openings.
We suggestthreeways to cleanthe burner tubes.Use theone
easiestfor you.
(A) (Benda stiff wire (a lightweight coat hangerworks well)
intoa small hook. Runthe hookthrougheach burner
tubeseveral times.
(B) Usea narrowbottle brushwith a flexible handle (do not
usea brasswire brush), run the brushthrougheach
burner tubeseveral times.
(C)Wear eye protection: Use an air hoseto force air into
the burnertube and out theburner ports.Check each
portto make sureair comesouteach hole.
6. Wire brushentireouter surfaceof burner to remove
food residueand dirt.
7. Cleanany blockedports with a stiff wire such asan
open paper clip.
8. Checkburnerfor damage,due to normalwear and
corrosion some holesmay become enlarged.If any
large cracks or holes are foundreplaceburner.
VERY IMPORTANT: Burner tubes must reengage
valve openings. See illustrations at hr..
9. Carefullyreplaceburners.
10. Attach burnersto brackets with cotter pins.
11. Repositioncarryovertubes and attach
to burners. Replaceheatdiffusers and
cookinggrates.
146.23770310,9

Indirect Cooking
Poultry and large cutsof meat cook slowlyto perfectionon the grill
by indirectheat. Placefood over unlitburner(s); theheat from lit
burnerscirculates gentlythroughout thegrill, cooking meator
poultrywithout thetouch of a direct flame.This methodgreatly
reducesflare-ups whencooking extra fatty cuts becausethere is no
direct flame to ignitethefats andjuices that drip during cooking.
1 Burner Cooking
Cook with direct or indirect heat.
Best for smaller meals or foods
Consumes less fuel.
Indirect Cooking Instructions
• Always cook with the lid closed.
• Dueto weatherconditions, cookingtimes may vary. During
coldand windy conditionsthe temperaturesetting may
need to be increasedto insuresufficientcooking
temperature.
• Placefoodover over unlitburner(s).
2Burner Cooking
Great indirect cooking on low.
Produces slow, even heating.
Ideal for slow roasting and baking.
Food Safety
Foodsafety isa very importantpartof enjoyingthe outdoor
cooking experience.To keepfood safe from harmful bacteria,
follow thesefour basic steps:
Clean: Wash hands, utensils, and surfaceswith hotsoapywater
beforeand after handlingraw meatand poultry.
Separate: Separaterawmeatsand poultryfrom ready-to-eat
foods to avoidcrosscontamination.Use a clean platter and
utensilswhen removingcooked foods.
Cook: Cookmeat and poultrythoroughly to killbacteria. Usea
thermometerto ensureproper internalfood temperatures.
Chill: Refrigeratepreparedfoods and leftovers promptly.For
more information call: USDA Meat and Poultry Hotline at
1-800-535-4555(In Washington, DC (202)720-3333,10:00 am
4:00 pm EST).
How To Tell If Meat Is Grilled Thoroughly
• Meat and poultry cooked on a grill often browns very fast
on the outside. Use a meat thermometer to be sure food
has reacheda safe internal temperature, and cut intofood
tocheckfor visual signs of doneness.
• Wholepoultry shouldreach 180° F; breasts, 170° F. Juices
shouldrun clearand flesh should notbe pink.
• Hamburgers made of any ground meat or poultry should
reach 160° F, and be brown in the middle with no pink
juices. Beef, veal and lamb steaks, roasts and chops can
be cookedto 145° F. All cutsof pork shouldreach 160° F.
• NEVER partiallygrill meat or poultry and finish cooking
later. Cookfood completelyto destroyharmful bacteria.
• Whenreheatingtakeoutfoods or fully cooked meats like
hotdogs, grill to 165° F, or untilsteaminghot.
WARNING: To ensurethat it is safe toeat, food must be cooked
to the minimuminternaltemperatureslisted in the tablebelow.
USDA_Recommended Safe MinimumInternal Temperatures
Beef,Veal,Lamband Pork- WholeCuts** 145° F
Fish 145° F
Beef,Veal,Lamband Pork- Ground 160° F
Egg Dishes 160° F
Turkey, Chicken & Duck - Whole, Pieces & 165°F
Ground
* UnitedStates Departmentof Agriculture
**Allow meatto rest three minutesbeforecarving or consuming.
10 o146.23770310

KEY DESCRIPTION QUANTITY PART NUMBER
1 Warming Rack 1 40800109
2 Cooking Grate 2 408D00110
3 Ignitor Wire, Main Burner 1 50300214
4 Side Shelf 2 408D00040
5 Electronic Ignition Module 1 408D00116
6 Control Panel 1 408D00029
7 Gas Valve, Main Burner 4 40800111
8 Manifold, Main Burner 1 408D00037
9 Bezel, Control Knob 4 40800034
10 Control Knob 4 408D00112
11 Regulator 1 408D00115
12 Right Leg Assembly 1 40800079
13 Wheel 2 40800124
14 Axle Rod Space 2 408D00126
15 Hex Nut 3 110011
16 Cotter Pin 10 110050
17 Axle Washer 3 110018
18 Axle Rod 1 408D00125
19 Bottom Shelf 1 40800089
20 Tank Holder 1 40800130
21 Leg Extender, Front 1 40800D126
22 Leg Extender, Rear 1 40800127
23 Hose Retaining Pin 1 40800134
24 Match Holder Bracket 1 40800129
25 Match Holder 1 40800128
26 Left Leg Assembly 1 40800068
27 Tank Baffle 1 408D00090
28 Front Panel 1 408D00087
29 Back Rail 1 40800085
30 Grease Accumulate Tray 1 40800025
31 Grease Cup 1 40800026
32 Grease Cup Clip 1 40800131
33 Firebox 1 408D00007
34 Lid 1 408D00019
35 Silicone Rubber Bumper 4 40700103
36 Bezel, Temperature Gauge 1 40800105
37 Temperature Gauge 1 40800104
38 Heat Diffuser 4 40800023
39 Flame Carry Over Tube 3 40800022
40 Main Burner 4 40700125
41 Rotate Rod, Lid 2 50300207
No pictured
Hardware pack
Manual 1 408D00176
1 408D00148 If you are missing hardware or have
damaged parts after unpacking grill,
call 1-888-287-0735for replacement.
To order replacement parts after using grill,
call 1-800-4-MY-HOME®
146.23770310 • 11

\
\\\\
12"146.237703_0

PLEASE READ AND FOLLOW THE INSTRUCTIONS BELOW TO CORRECTLY UNPACK GRILL PARTS
FROM SHIPPING BOX.
Step 1: Open shipping box by slicing down its edges with a box cutter, take out hardware pack, manual,
right leg assembly, bottom shelf from top. Next remove left leg assembly, back brace from front. Remove
all packing materials, take out axle rod, grease cup and grease cup bracket from left Styrofoam, take out
front panel from right Styrofoam.
146.23770310,13

Step 2: Open grill lid, take out the three boxes packed in it. Remove all packing materials, take out the
parts from these boxes.
14 o146.23770310

PLEASE READ AND FOLLOW THEINSTRUCTIONS CAREFULLY STEP BY STEP
Tools Required:
• Adjustable wrench (not provided)
• Screwdriver (not provided)
• 7/16"Combination wrench (not provided)
• The following hardware is provided in blister pack:
Item Description Figure Quantity
M4X10 screw
M6X13 screw
M6 compression washer
AAA Battery
15 pcs
16 pcs
8 pcs
1pc
146.23770310 • 15

DBottomShelfto Legs
[] Placebottomshelf end with cut out holefor LP cylinder betweenlegswith axle holes.Attach to rightand
left leg assemblieswith (6) M4xl0 screws.
[] Tightensecurely.
t,,,,
M4xl0 screw 6 pcs
Leg Assembly
Front
LeftLegAssembly
Axle hole
Rear/
BottomShelf
16 • 146.23770310

Wheels and Leg Extendersto Cart
[] Turnassemblyupsidedown.
[] Attachbottomshelfto fourlegswith (4) M6x13screws.
[] Insertaxle rod throughwheel, axle rod spacer,two right legs, anotheraxle rod spacer and other wheel.
Attachwith (1)Axlewasher,nut and hitchpin.
[] Hammerlegextendersintoleft legs.
M6x13screw 4 pcs
Leg Extender,Front
Leg Extender,Rear Axle Rod
Axle Rod Spacers
Hitch Pin
Nut
/AxleWasher
146.23770310,17

Front Panel
[] Standcart upright.
[] Attachback braceto topof cartwith (4) M4xl0 screws.
[] Attachfront panelto line up with top of cart with (3)M4xl0 screwsand leavethe bottomhole of left front
leg uninstalled.
[] Attachone side of tank baffleon front panel to the bottomhole of left front legwith (1) M4xl0 screw;and
othersideto bottomshelfwith tl) M4xl0 screw.
M4xl0 screw 9 pcs
BackBrace tank baffle
i
18 • 146.23770310

H Grill Headto Cart
[] Standcart upright.
[] This step requirestwo peopleto lift and positiongrill head ontocart.
[] Carefully lower the grill head onto the cart. Makesure the regulator hose is hanging outside the cart.
Attachwith (4) MGx13screwsand (4) M6compressionwashers.
M6x13screw 4 pcs
M6compressionwashers 4 pcs
\\
146.23770310 • 19

Left& RightSide Shelf
[] Attachleft shelf tofireboxas follows:
- Frominsideto outsideoffireboxwith (2)M6x13screws and(2) M6compressionwashers.
- Fromoutsideto insideoffireboxwith (2) M6x13screws.
Repeatabovestepfor therightside shelf.
M6x13screw 8 pcs
M6compressionwashers 4 pcs
ii
ii
20 • 146.23770310
This manual suits for next models
1
Table of contents
Languages:
Other BBQ Grill manuals

BBQ
BBQ GPC2618J Installation instructions

BBQ
BBQ PC Signature Series User manual

BBQ
BBQ GSF2818KMN User manual

BBQ
BBQ Grillware 164826 User manual

BBQ
BBQ Grillware GSF2616 Instruction Manual

BBQ
BBQ 22.5in ROUND KETTLE GRILL User manual

BBQ
BBQ GSF2818K User manual

BBQ
BBQ 16122 User manual

BBQ
BBQ 0-05329646-3 User manual

BBQ
BBQ 17760011-1 User manual