BCF Technology Duo-Scan Axial User manual
Instruction manual
Your animal imaging partner

2
Contents
Introduction 3
System features 4
Operator safety 4
Display layout 5
1 Operating instructions 6
1.1 Preliminary switch on 6
1.2 Power 6
1.3 Imaging display device connection 7
1.4 Scanning 7
2 Care & maintenance 10
2.1 Power packs 10
2.2 Probe 11
Technical specification 14
Accessories 15
Service centres 16

3
Introduction
Since 1983 BCF Technology Ltd has been developing, manufacturing and distributing worldwide
animal husbandry equipment becoming market leader in the development and production for real
time ultrasound scanners for most animal species.
BCF, in consultation with leading experts in animal husbandry applications, have combined the best
features of the Duo-Scan Axial with the latest state of the art technology. The result is the new
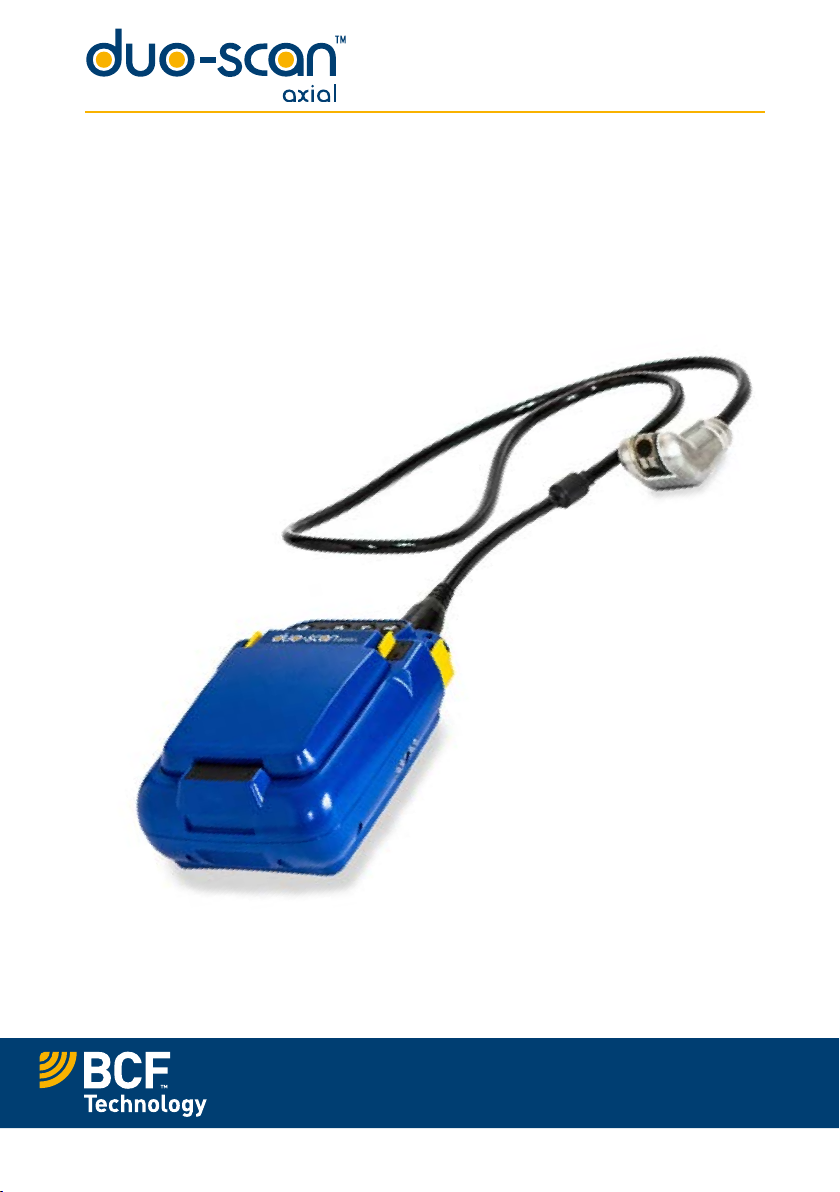
Duo-Scan Axial, an ultrasound scanner which is small, light, robust, portable and easy to work with.
The Duo-Scan Axial is designed and manufactured in Scotland at:
BCF Technology td
Imaging House, Phoenix Crescent
Strathclyde Business Park
Bellshill, ML4 3NJ
Scotland, UK
Tel: +44(0) 1506460023
info@bcftechnology.com
www.bcftechnology.com
As specialists in providing ultrasound imaging equipment for veterinary and animal husbandry
applications, we realise the importance of equipment reliability and speed of response should service
assistance be required. Our engineers and their appointed agents are available to provide a rapid
service assistance to ensure optimum performance of BCF Systems.
The Duo-Scan Axial meets all essential and safety requirements of all current relevant European
Directives. The CE mark on the rear panel is a symbol of this conformance. If you require any further
information regarding these directives please contact us directly. This product is classed as electronic
equipment. At the end of its useful life it should not be disposed of with general waste, it should be
taken to a recycling point for electrical/electronic equipment. The crossed-out wheelie bin symbol is
placed on the rear panel as a reminder in conformance with the European WEEE Directive.
Note: All BCF Technology products are to be used for animal applications only.

4
System features
Duo-Scan Axial is optimised for mobile real time ultrasound scanning, giving crisp imaging in target
applications with minimum need for operator adjustments.
• The fixed wide angle probe supports a wide application range from magnified superficial
study to deep penetration pregnancy work
• The image may be viewed on a choice of displays. Display options include head mounted
goggles display and remote monitor using wireless video link
• Lightweight unit for less strain
• Four hours continuous use from external rechargeable battery
• The unit is water resistant to IP65 (see comments later in manual)
• Easily cleaned; all component parts can be wiped down to clean
Operator safety
Duo-Scan Axial is designed to run from its external battery latched to the scanner.
The batteries must be charged using only the BCF Standalone charger, powered from the car power
outlet (12 V DC) or the BCF mains power supply. If the unit must be charged using the mains adapter,
use only in dry conditions.
Although the Duo-Scan Axial runs from a low voltage source, high voltages are generated inside the
unit. For this reason no attempt should be made to disassemble the scanner.
5
Display layout
1. The current range, operating frequency, power and gain settings are displayed at the top left
hand corner of the screen.
2. The grey bar contains 32 of the 256 shades of grey. This helps with the adjustment of brightness
and contrast and gives a comparison of grey intensity for the ultrasound picture.
3. The current function of the ‘soft’ keys is displayed along the bottom of the screen. The menu
disappears after approximately 6 seconds, leaving only the scan and voltage displayed. To
switch the menu back on, press any button on the scanner.
4. A battery indicator reading is displayed in the lower corners of the display.
RANGE = 22 CM
FREQ = 3.5 MHZ
POWER = 9
GAIN = 6
MODE 1 GAIN
1
.
3
.
2.
4.
6
1 Operating instructions
1.1 Preliminary switch on
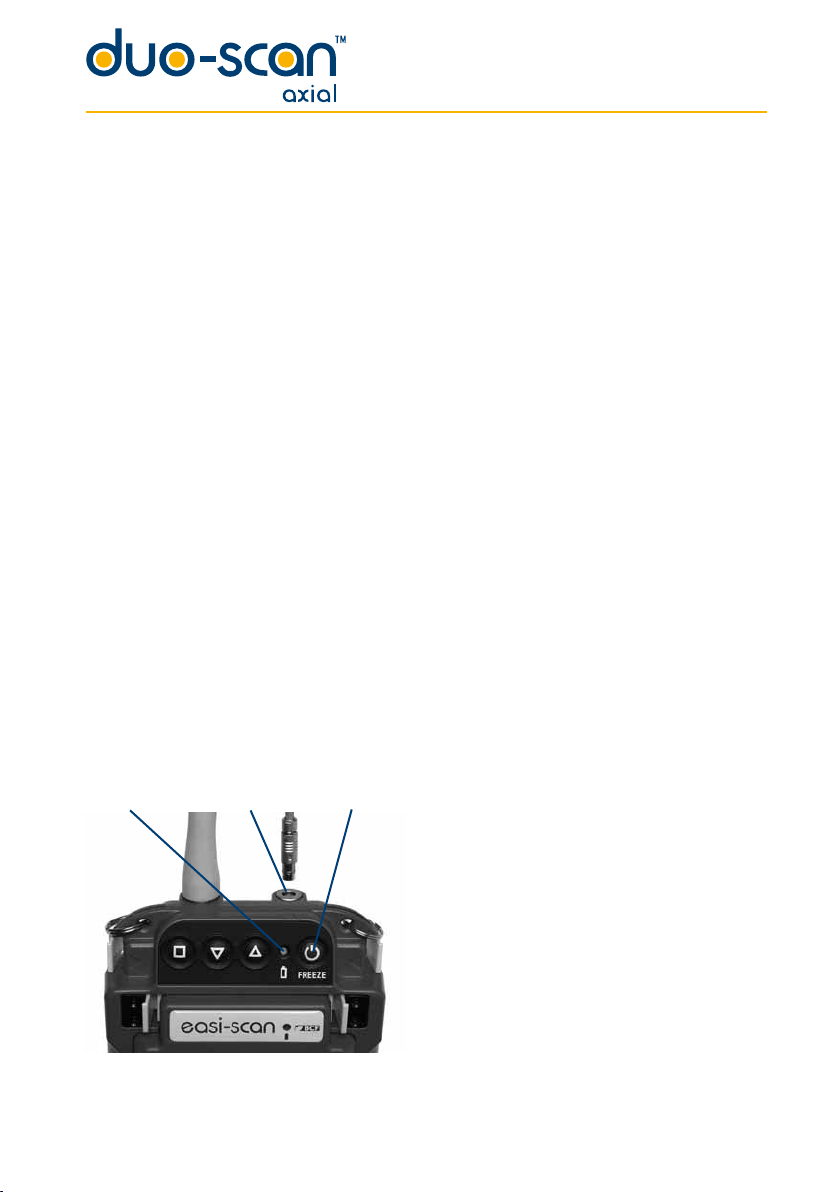
Ensure that the external battery is securely latched to the top of the scanner.
Switch on the remote video monitor (if used), ensuring correct receive channel selected. Attach the
goggles to the user connector port on top of the scanner (fig 1). Check the plug and socket are free
from debris. Align the dots on the plug and socket and push to click in place.
1.2 Power
To turn the scanner on, press and hold the power button (fig 2) until the scanner beeps. The control
panel LED (fig 3) will illuminate green.
The probe will start to rotate.
If the imaging display device is connected, its screen will be illuminated.
The sector scan and settings will be displayed on the screen.
The buzzer will sound twice; the second indicates that the system initialisation is complete and the
system is ready to function.
If the supply voltage is too low (flat battery) the system will power down.
To switch the scanner off, press and hold the power button until the scanner shuts down.
(fig 2)
Fig 3 Fig 1 Fig 2

7
1.3 Imaging display device connection
The Duo-Scan accessories allow the ultrasound image to be viewed on the display headset or monitor
options.
Before connecting an imaging display device, be sure the connector is free from dirt.
Displays are connected to the user connector port.
If you are using a wireless monitor you do not need to connect it to the console. If the monitor uses a
video cable, follow the instructions above.
1.4 Scanning
All functions of the console are set using the front panel keys shown below.
Menu, Select Down Up Power On / Off
Freeze

8
1.4.1 Standard operation
Duo-Scan Axial comes with 6 preset modes for pregnancy and abdominal scanning. See list below:
Mode 1: Range 12 cm, Frequency 5 MHz
Mode 2: Range 16 cm, Frequency 5 MHz
Mode 3: Range 19 cm, Frequency 5 MHz
Mode 4: Range 19 cm, Frequency 3.5 MHz
Mode 5: Range 22 cm, Frequency 3.5 MHz
Mode 6: Range 25 cm, Frequency 3.5 MHz
Note: Probe stop should be used if scanner losses synchronisation
The shorter ranges are for use in nearer imaging for improved detail, the longer ranges for deeper
penetration.
As the range is altered, the speed of the probe varies to provide the best quality image. The smaller the
range, the faster the probe rotates.
The scanner always powers on in Mode 1.
To scroll through preset modes press

9
1.4.2 Gain and power adjustment.
Both ultrasound gain and power can be adjusted by the user. The menu along the bottom of the screen
will display either “Gain”, “Power” or “Mode” in the 2nd box.
To switch between gain, power and mode, press the Select button.
To adjust the Gain or Power values, use the Up and Down keys on the front panel.
1.4.3 Freeze image
To freeze the image, press the power button briefly.
Pressing this button briefly once more returns the scanner to live imaging.

10
2 Care & Maintenance
2.1 Power packs
The Duo-Scan Axial is designed for reliability in the veterinary and animal husbandry marketplace.
Our engineers and their appointed agents are available to provide rapid service assistance to ensure
optimum performance of BCF systems. However there is no substitute for careful usage.
We state that the Duo-Scan Axial is splashproof, indeed it is sealed to IP65, but you should note the
following important points:
1. The unit is not sealed against jets of water. Water will penetrate your scanner if it is hosed down
or rinsed under a fast flowing tap
2. The unit is NOT corrosion proof and thus it should not be left wet
3. Some types of goggles are not waterproof and care should be taken to avoid submersion
4. The standalone charger, battery charger and charging carry case are not waterproof – avoid
getting them wet
Cleaning
• Antibacterial wet wipes are particularly effective for scanner, battery and probe wipedown, and
reduce the need for drying. This prevents problems related to corrosion following washdown
• The plastic scanner, power pack and carry pack can also be cleaned using a cloth, soap and
warm water
• Sponging down or even brief, shallow submersion is less aggressive than rinsing or hosing down
• Thoroughly dry the scanner before storage or charging. Take care to detach the external power
pack and ensure interconnect areas are dry also
• Neoprene Scanner waist pouch may be machine washed

11
Warning: The scanner and power pack must not be stored damp – severe corrosion will result.
See separate section for probe care
Your equipment should be returned periodically to a BCF qualified service engineer. The service
agent will use special test equipment to thoroughly check the instrument and advise of any work
that appears to be necessary. Any other service problems should be referred to our qualified service
engineers
2.2 Probe
• Always clean the probe immediately after use and before any contamination can dry in. The
probe head can be immersed in warm (not hot) water to clean.
• Do not knock or scrape the transducer window, this may cause the window to burst. Do not
push against the probe window, the sealing may be damaged or fluid may be forced out of the
internal expansion tube. If a window or its seal leaks then the probe must be returned to BCF.
Further use of the probe with a window leakage will further damage other internal parts of the
probe due to dirt from outside contaminating the internal gears.
• Do not forcibly bend or pull the cable connecting the probe to the module.
• Examine the probe regularly for any damage, especially the window. The chamber behind the
window is filled with a silicon fluid and it is normal for a small bubble, about 1 mm diameter,
to be present. A large bubble or signs of leaking fluid should be referred to a BCF Service
Engineer.
• Any other problems or maintenance queries should be referred to a BCF Service Engineer.

12
2.3 Battery charging
The external battery can be unclipped from the scanner and charged in the standalone charger.
The battery LED will flash slowly while charging with the colour indicating the current state of charge
(Red = less than 25%, Amber = 25% – 75%, Green = more than 75%. Once fully charged the LED will
either show continuous green or a rapid flashing green.
All batteries will be charged within five hours, but will not be damaged by continued charging.
The NiMH batteries in the battery pack are paired with charge management circuits to give several
hundred recharge cycles. While the battery is in a good condition and is fully charged, the scanner will
run for the duration below. This time will vary depending on the display option used.
• Duo-Scan Axial with power pack latched 4 hours
Electrical connection to the power pack is through the gold pads on battery and scanner. Power pack
output is protected with a resetting fuse but care should be taken to prevent short circuiting the gold
connector pins and pads. Battery metering relies on internal calculation. Repeated cycling without
complete discharge or charge completion will result in increasingly inaccurate battery level indication.
For peak performance, and for most accurate battery meter indication, batteries should occasionally
be run flat followed by a complete charge cycle.
Occasionally (every ten cycles, or once a fortnight) discharge until the scanner automatically switches
off, followed by a complete charge in one go (preferably from the mains supply).

13
Notes
:
Notes
:
The biggest difference you can make towards battery longevity is the occasional full
discharge-recharge cycle. When charging in short bursts e.g. top-up charging between
jobs, or in-car with Cigar power cycling on engine start etc the charger uses a less
accurate method to terminate charging. Occasional full charge-discharge cycle not only
helps maintain maximum capacity, but ensures updated calibration of the integrated
charge control circuit for optimum charge control which in turn ensures maximum
battery lifetime. Corrections are also made to battery level metering for continued
accuracy of on-screen battery level display.
‘Memory effect’ - if NiMH batteries are not used regularly (weekly) or fully (repeatedly
using only a fraction of full capacity) there will be a temporary reduction in available
capacity, with resulting reduced run times. After the battery has been “exercised” the
full capacity returns. A return to almost full capacity is achieved with a complete charge
/ discharge cycle. Further marginal improvement in capacity may be seen progressively
over two to three complete charge/discharge cycles.
Do not store the scanner for extended periods without occasional exercise. Store the scanner fully
charged – particularly in hot climates.
This is only relevant if your scanner will remain unused for 6 months or more. Some
permanent reduction in capacity can be incurred through prolonged storage without
occasional recharging. Battery charge will not be maintained very long in storage – par-
ticularly at higher ambient temperatures. Batteries can lose as much as 30% of their
charge in 1 month’s storage.
Warning:
To reduce the risk of burns, fire, electric shock, or injury to persons an
appliance should never be left unattended when plugged into mains or
12V cigarette lighter.

14
Technical specification
Digital ultrasound scanner with fixed probe
Size 22x15x7 cm / 6x8.5x2.5 in
Weight 2.75 kg / 6 lbs (with battery)
Mechanical Splashproof, rugged plastic casing
User operation
Sealed 4 button key pad with LED
User functions
• Selection of operating depth ranges.
Frequency & post processing settings
are automatically optimised according
to the selected depth range.
User output
User connector provides video output.
• Composite NTSC video format for
display headset Video review or Video
printer accessories using adapter lead
(accessory)
Probe
• 3.5 and 5.0 MHz split dual axial scan
probe – 170 degree only
Power
• External battery gives 4 hours conti-
nuous use
• Charging time 5 hours
Temperature range
• -10 ºC to 40 ºC / 14 ºF to 104 ºF
Please note that frequent usage above 35 ºC / 95
ºF will shorten battery lifetime. Video link stability
maybe affected below -10 ºC / 14 ºF until scanner
has warmed up.
15
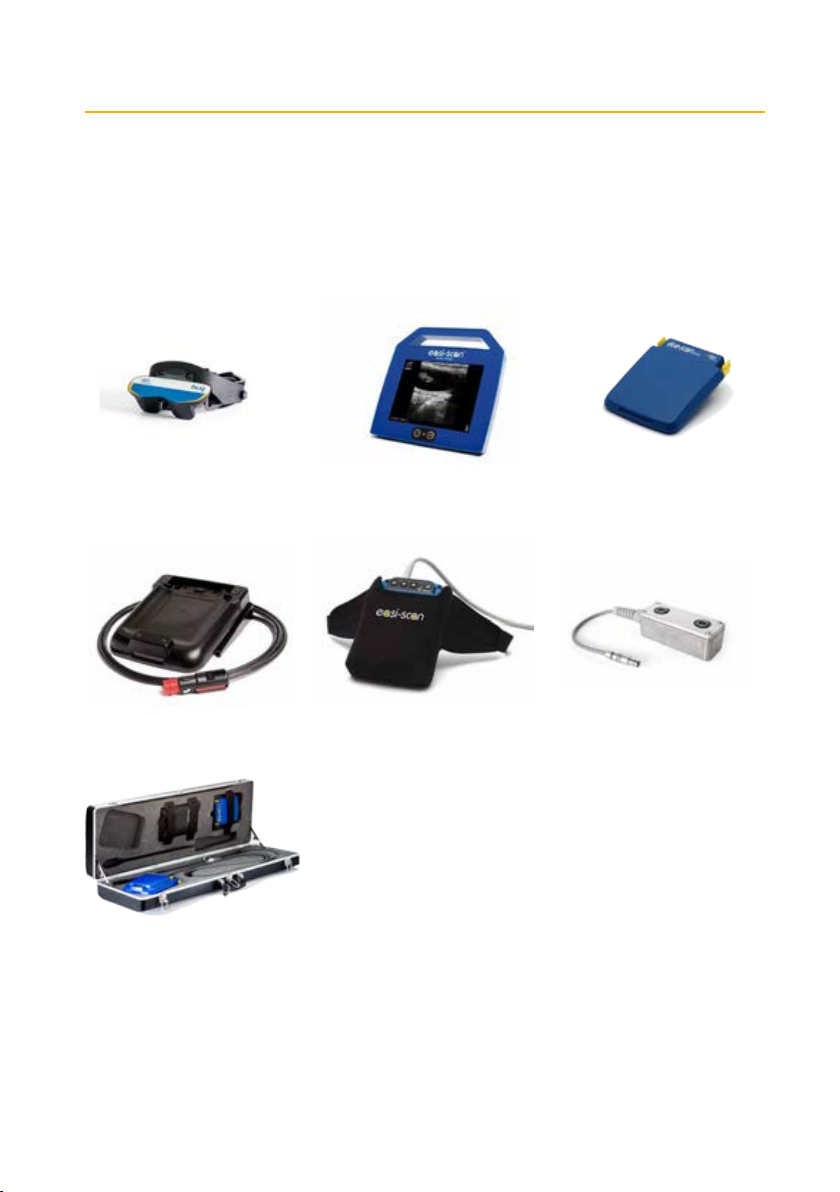
Accessories
BUG
(BCF Universal Goggles)
Battery charger Carry bag
Battery packRemote Display
Video splitter
Protective carrycase

16 © BCF Technology Ltd, June 2014
Service centres
If your Duo-Scan Axial requires servicing please contact official authorised service centres below or
distributor in your country. Distributors contact details can be found at www.bcftechnology.com
In the UK:
BCF Technology Ltd
Imaging House, Phoenix Crescent
Strathclyde Business Park
Bellshill, ML4 3NJ
Scotland, UK
T +44 (0)1506 460 023
F +44 (0)1506 460 045
info@bcftechnology.com
www.bcftechnology.com
In Ireland:
BCF Technology Ltd
Unit 2, Quayside Business Park
Mill Street, Dundalk
Co Louth, Ireland
T +353 (0)42 932 0070
ireland@bcftechnology.com
www.bcftechnology.com
In North America:
BCF Technology USA Ltd, LLC
2900 43rd Street NW, Suite 600
Rochester, Minnesota 55901
USA
T 507-529-8200
T 800-210-9665
F 507-529-8205
contact@bcftechnology.com
www.bcftechnology.com
In Australasia:
BCF Ultrasound Australasia Pty Ltd
10/56 Norcal Road
Nunawading 3131
Melbourne, Victoria
Australia
T +61 (0)3 9894 8980
www.bcfultrasound.com
For further information on care and maintenance of the Duo-Scan Axial please visit the “Customer
support“ section of the BCF website www.bcftechnology.com
Table of contents
Other BCF Technology Pet Care Product manuals


