All items can be returned for any reason within 60 days of the receipt and will receive a full refund as long
as the item is returned in its original product packaging and all accessories from its original shipment are
included. All returned items will receive a full refund back to the original payment method. All returned
items will not be charged a re-stocking fee.
All returned items require an RA (Return Authorization) number, which can only be provided by a Best
Choice Products Customer Service Representative when the return request is submitted. Items received
without an RA may not be accepted or may increase your return processing time. Once an item has been
received by Best Choice Products, refunds or replacements will be processed within 5 business days.
All returns must be shipped back to the Best Choice Products Return Center at the customer’s expense. If
the reason for return is a result of an error by Best Choice Products then Best Choice Products will provide
a pre-paid shipping label via email. Boxes for return shipping will not be provided by Best Choice Products,
and is the customer’s responsibility to either use the original shipping boxes or purchase new boxes.
Pictures may be required for some returns to ensure an item is not damaged prior to its return. Items
returned are not considered undamaged until they are received by Best Choice Products and verified as
such. All damages to items are the customer’s responsibility until the item has been received by and
acknowledge by Best Choice Products as undamaged.
© 2023 Best Choice Products, Inc. All rights reserved. Distributed by Best Choice Products, Inc. Tustin, CA 92780
PRODUCT WARRANTY INFORMATION
Manufacturer and seller expressly disclaim any and all liability for personal injury, property damage or
loss, whether direct, indirect, or incidental, resulting from the incorrect attachment, improper use,
inadequate maintenance, unapproved modification, or neglect of this product.
HELP CENTER
Product Assembly
Product InquiryChat Support Returns & Refunds
Orders FAQ
WARNING
Question about your product? We're here to help. Visit us at:
help.bestchoiceproducts.com
CHAT
US!
If strings are dicult to play or do not play correctly:
Replacing guitar strings can remedy many problems involving poor sound. All strings can be changed at
once or strings can be changed individually. To change a guitar string, the old string should be
completely removed before attaching the new string. After the new string is attached, the guitar will need
to be re-tuned.
Installing New Strings:
1. Remove the bridge pin of your guitar. Bridge pins can stick to the guitar, and may take some time to get
o; the edge of a peg winder (available at any local music store) can be used to help. Locate the proper
string to replace your old string. Then, from the end of the string that does NOT have a ball at the end,
feed the string through the bridge via the open hole exposed by removing the pin. Then, press the
bridge pin back into place gently with the slot facing forward, and while holding your finger on the pin,
run the string through until the ball on the end of the string is flush to the bottom of the pin.
2. Secure the string to the headstock via the
tuning machine. To do so, make sure the
eye/hole of the tuning machine is parallel to the
neck/headstock of the guitar. Feed the string
through the eye of the tuning machine and pull
the string fairly taut. The string should have a
bit of slack (about 1-2 inches).
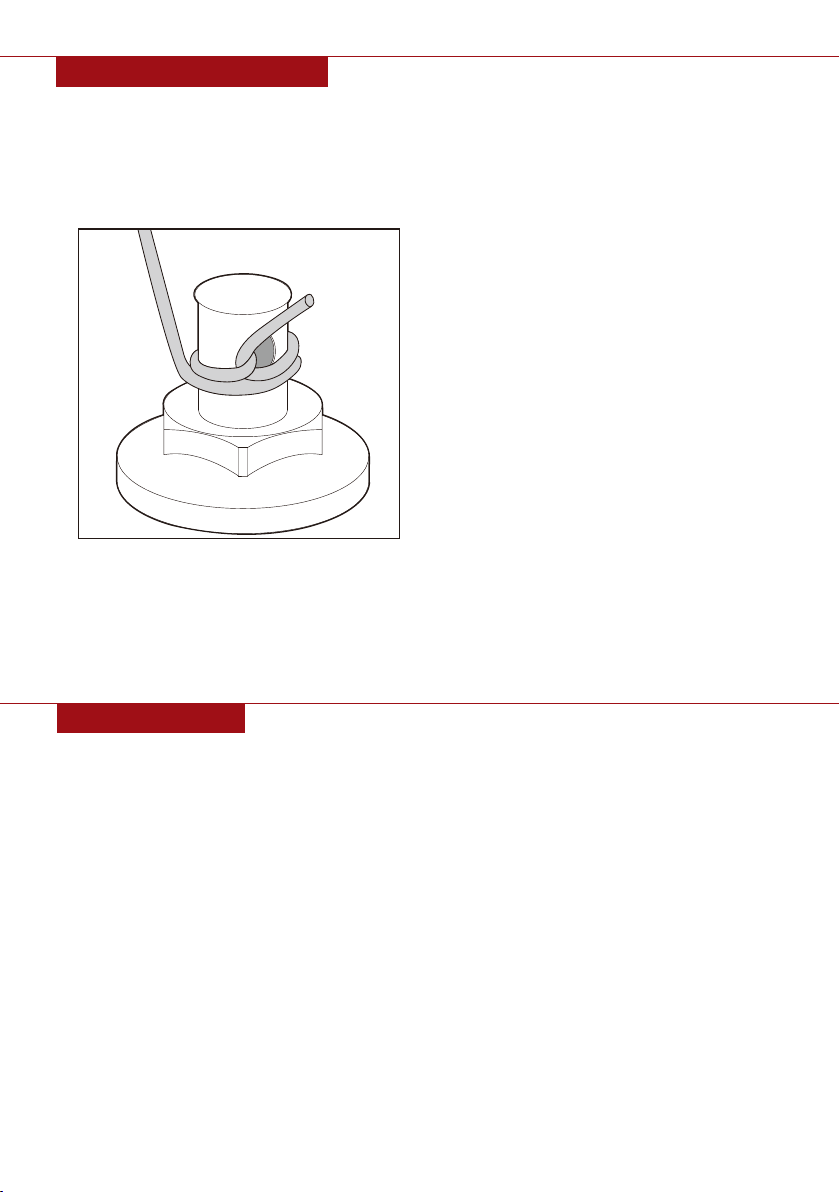
3. While holding the string taut, secure it to the
tuning machine by turning the corresponding
tuning peg to wrap the string around. For extra
security, route the string through itself on the
initial wrap around (see diagram).
- For treble strings (G,B,E), wind the strings
clockwise. For bass strings (E, A, D), wind the
strings counter-clockwise.
4. Begin to tune the string by winding the tuning peg until the desired sound is produced. After reaching
the desired tone, pull the string lightly. The string will go slightly out of tune. Readjust the tuning peg
until receiving the desired tone again. Repeat the process a few more times. This will ensure that your
string will stay in tune while playing.
5. You may cut o the excess string, but it is important to leave some excess still attached (about ¼-1
inch) in case the guitar string needs to be restrung again. Remember, it is easy to cut more o later,
but impossible to add string back.