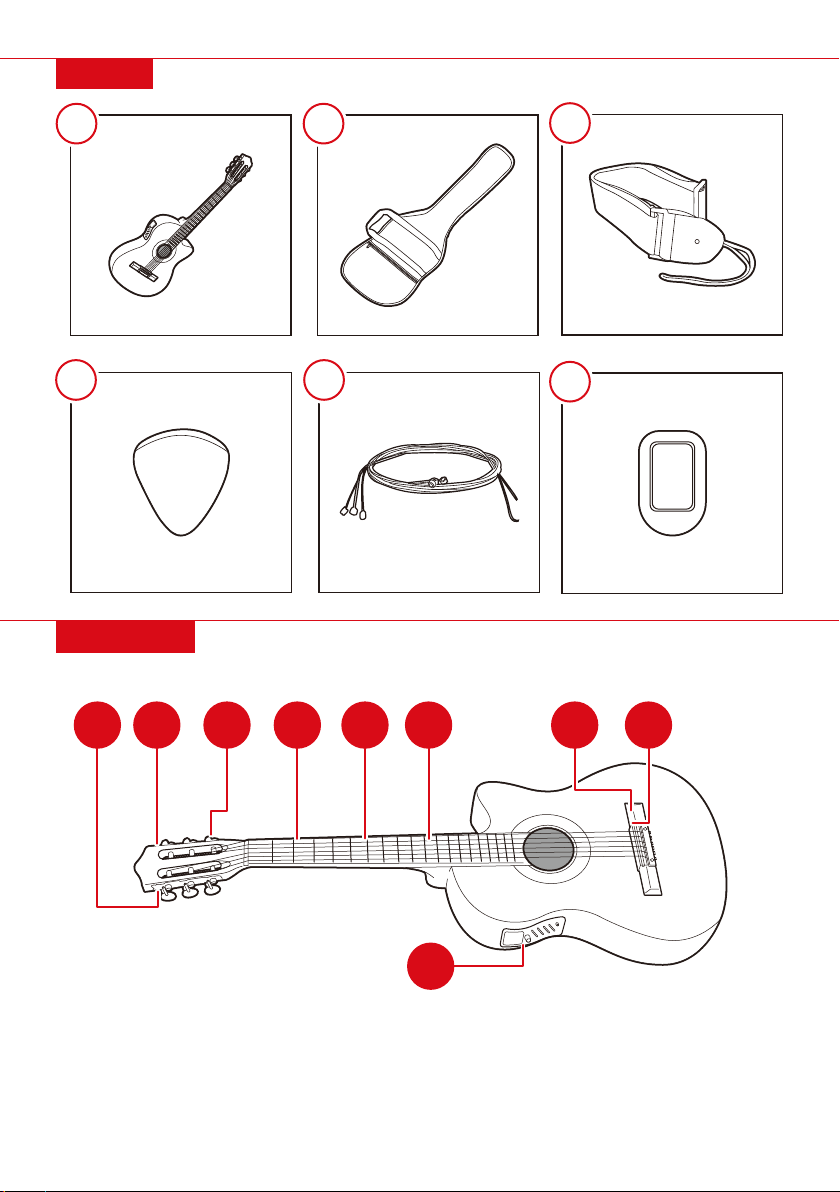
BCP SKY5657 User manual

SKY5657 + SKY5660 + SKY5661 + SKY5662 + SKY5663
Ver. 1
INSTRUCTION
MANUAL
38-Inch Acoustic Electric
Cutaway Guitar

As shoppers, we’re always trying
to find the perfect balance between
quality & value. At BCP, we believe
we’ve achieved that. Our diverse
catalog of everyday essentials is
tailored especially to our customers
& guaranteed to hit that sweet
spot of high quality & low price.
Always.

| 3
PARTS
1 PC
GUITAR
1 PC
CARRYING BAG
1 PC
1 PC
TUNER
D
3 PCS
GUITAR PICK
AB
F
E
1 SET
EXTRA STRINGS
STRAP
C
Please retain these instructions for future reference.
DIAGRAM
1. Tuning Pegs
2. Tuning Machine
3. Headstock/Head
4. Neck
5. String
6. Fret
7
128
3456
9
7. Bridge
8. Saddle
9. Equalizer

4|
1. Battery compartment: Install a 9-volt battery
2. Pres (presence): Adjust the fullness of the sound by manipulating high end frequencies
3. Batt check: Press and hold to check the level of the 9-volt battery; light illuminates to indicate battery
has power
EQUALIZER
VOLUME
BATT.
CHECK
123
1. Install a 3V CR2032 battery in the tuner. Attach the tuner to the headstock of the guitar.
2. Turn tuner on and tune the guitar strings accordingly.
- Standard tuning is as follows (low to high): E, A, D, G, B, E
TUNING STRINGS
Dust and other foreign matter can harm the quality of your guitar. Make sure to regularly clean and
maintain your guitar, including around the tuning pegs and bridge. To clean your guitar, use a dry, soft
cloth. If desired, guitar polish can be bought from any local music store. Do not leave your guitar exposed
to the sunlight or elements, and be aware that guitars are made of wood and are therefore sensitive to
changes in temperature, humidity, and altitude.
GUITAR CARE
If Strings Are Dicult To Play Or Do Not Play Correctly:
Replacing guitar strings can remedy many problems involving poor sound. All strings can be changed
at once or strings can be changed individually. To change a guitar string, the old string should be
completely removed before attaching the new string. After the new string is attached, the guitar will
need to be re-tuned.
GUITAR STRING MAINTENANCE

| 5
CHANGING STRINGS
Installing New Strings:
1. Remove the bridge pin of your guitar. Bridge pins can stick to the guitar, and may take some time to
get o; the edge of a peg winder (available at any local music store) can be used to help. Locate the
proper string to replace your old string. Then, from the end of the string that does NOT have a ball at
the end, feed the string through the bridge via the open hole exposed by removing the pin. Then, press
the bridge pin back into place gently with the slot facing forward, and while holding your finger on the
pin, run the string through until the ball on the end of the string is flush to the bottom of the pin.
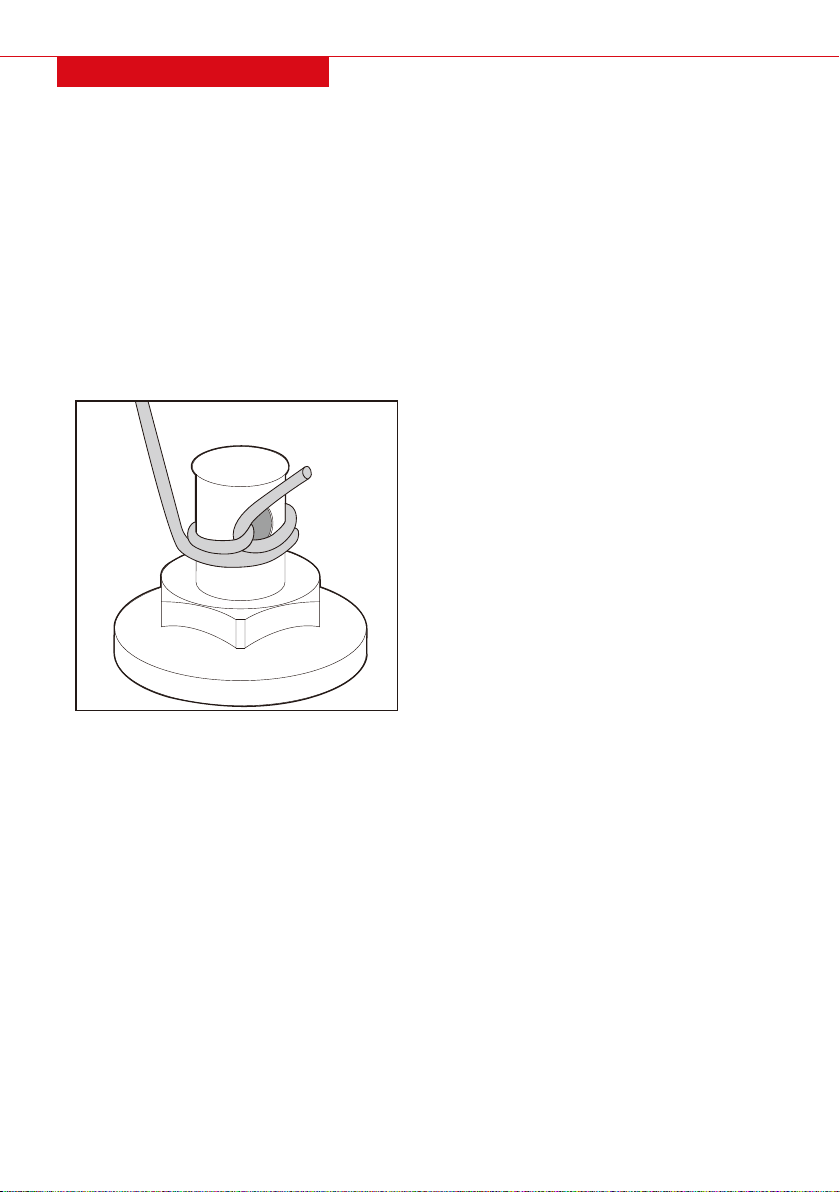
2. Secure the string to the headstock via the
tuning machine. To do so, make sure the
eye/hole of the tuning machine is parallel to the
neck/headstock of the guitar. Feed the string
through the eye of the tuning machine and pull
the string fairly taut. The string should have a
bit of slack (about 1-2 inches).
3. While holding the string taut, secure it to the
tuning machine by turning the corresponding
tuning peg to wrap the string around. For extra
security, route the string through itself on the
initial wrap around (see diagram).
- For treble strings (G,B,E), wind the strings
clockwise. For bass strings (E, A, D), wind the
strings counter-clockwise.
4. Begin to tune the string by winding the tuning peg until the desired sound is produced. After
reaching the desired tone, pull the string lightly. The string will go slightly out of tune. Readjust the
tuning peg until receiving the desired tone again. Repeat the process a few more times. This will
ensure that your string will stay in tune while playing.
5. You may cut o the excess string, but it is important to leave some excess still attached (about ¼-1
inch) in case the guitar string needs to be restrung again. Remember, it is easy to cut more o later,
but impossible to add string back.
Removing Old Strings:
1. To remove a guitar string, find the tuning peg and tuning machine that the string is attached to. Loosen
the string by winding the tuning peg until the string has no tension.
2. Continue to wind the string loose until the string can be pulled loose from the top. The strings can be
pulled out via the bridge at the bottom of the guitar.
3. If you do not wish to use the old string again, you can cut the string near the middle of the strings via
wire cutters. If you choose to do this, be careful and hold the string securely next to the cut;
otherwise, the string will pop up and can potentially harm you.

Check out more great products:
bestchoiceproducts.com

Earn points while you shop. Join today!
bestchoiceproducts.com
Give your friends 15% o their first order! For each
successful referral you’ll receive 100 points.

All items can be returned for any reason within 60 days of the receipt and will receive a full refund as long
as the item is returned in its original product packaging and all accessories from its original shipment are
included. All returned items will receive a full refund back to the original payment method. All returned
items will not be charged a re-stocking fee.
All returned items require an RA (Return Authorization) number, which can only be provided by a Best
Choice Products Customer Service Representative when the return request is submitted. Items received
without an RA may not be accepted or may increase your return processing time. Once an item has been
received by Best Choice Products, refunds or replacements will be processed within 5 business days.
All returns must be shipped back to the Best Choice Products Return Center at the customer’s expense. If
the reason for return is a result of an error by Best Choice Products then Best Choice Products will provide
a pre-paid shipping label via email. Boxes for return shipping will not be provided by Best Choice Products,
and is the customer’s responsibility to either use the original shipping boxes or purchase new boxes.
Pictures may be required for some returns to ensure an item is not damaged prior to its return. Items
returned are not considered undamaged until they are received by Best Choice Products and verified as
such. All damages to items are the customer’s responsibility until the item has been received by and
acknowledge by Best Choice Products as undamaged.
PRODUCT WARRANTY INFORMATION
Manufacturer and seller expressly disclaim any and all liability for personal injury, property damage or
loss, whether direct, indirect, or incidental, resulting from the incorrect attachment, improper use,
inadequate maintenance, or neglect of this product.
HELP CENTER
Product Assembly
Product InquiryChat Support Returns & Refunds
Orders FAQ
WARNING
Question about your product? We're here to help. Visit us at:
help.bestchoiceproducts.com
CHAT
US!
This manual suits for next models
4
Table of contents
Other BCP Musical Instrument manuals