Beachcomber 500 Series User manual

Beachcomber Hot Tub
Owner’s Guide
the green hot tub company™

Table of Contents
Your Beachcomber Hot Tub.............................................................................................................................3
Important Safety Instructions ......................................................................................................................... 4
• Beachcomber’s Safety Features ..........................................................................................................5
• Starting Up a Beachcomber Hot Tub.....................................................................................................6
• Basic Hot Tub Configurations .............................................................................................................. 7
Equipment Configuration Diagrams ................................................................................................................. 8
Digital Systems Programming and Operation ................................................................................................. 10
• ET-7 Control Panel ...........................................................................................................................10
• User Edit Menu ................................................................................................................................12
• ET-70 Control Panel .........................................................................................................................13
• ET-50 Control Panel..........................................................................................................................15
• ET-30 Control Panel..........................................................................................................................17
Water Care and Chemistry............................................................................................................................19
Hot Tub Care and Maintenance .................................................................................................................... 20
Operation of Beachcomber Hot Tub Interior Features ..................................................................................... 21
Draining Your Beachcomber Hot Tub.............................................................................................................. 23
Vacation Instructions .................................................................................................................................... 23
Winter Operation Information ........................................................................................................................ 24
Shut Down Procedures................................................................................................................................. 24
Do’s and Don’ts .......................................................................................................................................... 25
Diagnostic Display Message & Trouble Shooting Guide .................................................................................. 25
The Beachcomber Guarantee........................................................................................................................ 28
The Beachcomber Premium Guarantee ......................................................................................................... 30
Audio Equipment Information........................................................................................................................ 32
Take Part in an Online Survey ....................................................................................................................... 32
Hot Tub Care Details Chart............................................................................................................................ 33
Beachcomber Hot Tub Care and Maintenance Record.....................................................................................33
CONGRATULATIONS ON THE PURCHASE OF YOUR BEACHCOMBER HOT TUB!
Your hot tub is an investment in your health and happiness. Your Beachcomber Hot Tub will bring you relaxation, great
family moments, romance, therapy and so much more. This Owner’s Guide is intended to give you instructions on the
basic operation of your hot tub. SAVE THESE INSTRUCTIONS for easy reference; for the most up-to-date and current
statistics you can also find this Owner’s Guide online, at: www.beachcomberhottubs.com
This Owner’s Guide is for hot tubs manufactured from November 1st, 2008.
2
My Serial No:

Important details of your new Beachcomber Hot Tub
Record information about your hot tub in the space below, so that you can have it on hand if you need to contact your local store:
MODEL NUMBER: DATE OF PURCHASE:
HOT TUB SERIAL NUMBER: STORE NAME:
GUARANTEE NUMBER: STORE PHONE:
The Basic Components of Your Beachcomber Hot Tub
Please use the diagram below to familiarize yourself with the basic components of your Beachcomber Hot Tub.
Read this entire document, so that you and your family know how to safely enjoy your Beachcomber Hot Tub.
Cover Locks with Straps
Microfilter
Quintessential
Surround Sound
System
Acrylic Surface
SafeAxiss Double
Tiered Safety Step
(Hybrid Edition
hot tubs only)
Heatshield Cover
Suction Fitting
Massage Inserts,
or Jets
RFM Diverter Valve
Topside Controls
Cabinetry
Dual Side Electrical
Conduit Access
Energy Saver
Management System
Hot Tub Light
Perma-Seal
Foundation
Footwell
Gravity Floor Drain
Air Injection Controls
3

Important Safety Instructions
A green colored terminal, or wire connector marked GroundGround
is provided within the control box. To reduce the risk of
electric shock, connect this terminal or connector to the
grounding terminal of the electric service or supply panel
with a continuous copper wire equivalent in size to the circuit
conductors supplying this equipment. In addition bonding lugs
are provided and marked Bonding Lugs. To reduce the risk ofBonding Lugs. To reduce the risk of. To reduce the risk of
electric shock, connect the bonding lugs in accordance with
the local electric code.
At least two lugs marked Bonding Lugs are provided on theBonding Lugs are provided on theare provided on the
external surface of the supply terminal box. To reduce the
risk of electrical shock connect the local common binding
grid in the area of the hot tub to these terminals with an
insulated or bare copper conductor not smaller than No.6
AWG. Note: this is factory installed.Note: this is factory installed.
All field-installed metal components such as rails, ladders,
drains or other similar hardware within 10 ft /3m of the
hot tub shall be bonded to the equipment grounding bus
with copper conductors not smaller than #6AWG.
CAUTION: WIRING CONNECTED IN THIS BOX
MUST BE RATED AT 600V.
There are no user serviceable parts within the
management system. The high voltage can cause injury
or death. The hot tub must be hooked up to a Ground
Fault Circuit Interrupter (G.F.C.I.) by a licensed electrician.G.F.C.I.) by a licensed electrician.) by a licensed electrician.
Use the test button on your G.F.C.I. monthly to ensure it isG.F.C.I. monthly to ensure it ismonthly to ensure it is
working properly.
Always make sure there is an adequate sanitizer level in
your hot tub before entering. Failure to do so may cause
skin irritations or illness. Use a test kit or test strips to
check prior to entry.
CAUTION: WATER TEMPERATURE IN EXCESS OF
100ºF/38ºC MAY BE INJURIOUS TO YOUR HEALTH.
AVOID PROLONGED EXPOSURE TO HOT WATER.
WATER TEMPERATURE MAY NEED TO BE DECREASED
FOR CHILDREN OR THE ELDERLY.
THE MAXIMUM RECOMMENDED TEMPERATURE OF
YOUR HOT TUB WATER IS 104ºF/40ºC.
To reduce the risk of drowning from hair and body
entrapment, install suction fitting(s) with a marked flow
rate that is not less than the flow rate marked on the
remote packaged unit. Note: these are factory installed.Note: these are factory installed.
Do not operate the hot tub with any of the suction fitting
covers off. These covers prevent hair or objects from being
sucked into the plumbing. See figure 1.
IMPORTANT! READ AND FOLLOW ALL
INSTRUCTIONS AND KEEP FOR EASY
REFERENCE.
WARNING
figure 1
4

CAUTION: THE EQUIPMENT AND CONTROLS
SHALL BE LOCATED NOT LESS THAN 3.5 ft OR 1m
HORIZONTALLY FROM THE HOT TUB.
Hyperthermia occurs when the internal temperature of
the body reaches a level of several degrees above normal
body temperature of 98.6ºF/37ºC. The symptoms of
hyperthermia include drowsiness, lethargy and an increase
of internal temperature of the body.
The Effects:
• unawareness of impending hazard;
• failure to perceive heat;
• failure to recognize the need to exit the hot tub;
• physical inability to exit the hot tub;
• fetal damage in pregnant women; and
• Unconsciousness and danger of drowning.
Recommended time in water at 100ºF/38ºC is 15
minutes. Lower temperatures will permit longer bathing
times. Always check the temperature of the water before
entry with a thermometer.
Beachcomber’s Safety Features
Molded Interior Steps
Beachcomber Hot Tubs are made with anti-slip checker plate
flooring, designed to make entry and exit safer. Always use
extreme caution during entry and exit, as hot tub surfaces are
slippery when wet.
Body Molded Handgrips
Use handgrips to prevent slipping, and to promote ease of
movement while entering, soaking and exiting the hot tub.
See figure 2.
Heatshield Cover Locks
To prevent unwanted entry by children or unauthorized users,
use the cover lock assemblies that come as a standard
feature with each hot tub. Screw the female half on to the hot
tub cabinet with the stainless screws provided. See figure 3.
THE USE OF ALCOHOL OR DRUGS CAN
GREATLY INCREASE THE RISK OF FATAL
HYPERTHERMIA IN HOT TUBS.
WARNING
PERSONS WITH THE FOLLOWING
CONDITIONS SHOULD CONSULT THEIR
PHYSICIAN BEFORE USING A HOT TUB: DIABETES, LOW
OR HIGH BLOOD PRESSURE, PERSONS WITH INFECTIOUS
DISEASES, OBESITY, HEART DISEASE, CIRCULATORY
PROBLEMS, PREGNANT WOMEN OR THOSE TAKING
MEDICATION PRESCRIBED BY THEIR PHYSICIAN. DO
NOT ALLOW ELECTRICAL DEVICES SUCH AS PORTABLE
STEREOS,TV’S, HAIR DRYERS WITHIN 5 FEET/1.5 METERS
OF THE HOT TUB. FAILURE TO DO SO COULD CAUSE
ELECTROCUTION RESULTING IN INJURY OR DEATH
SHOULD THE DEVICE FALL IN THE WATER.
WARNING
DO NOT ALLOW CHILDREN TO
USE A HOT TUB WITHOUT ADULT
SUPERVISION. PREVENT UNAUTHORIZED CHILD ACCESS
TO AVOID THE RISK OF DROWNING.
WARNING
figure 3
figure 2
THE HEATSHIELD IS STRONG ENOUGH
TO WITHSTAND UP TO 2 FEET OF
SNOW. IT IS NOT DESIGNED TO SUPPORT THE WEIGHT
OF CHILDREN, PETS OR ADULTS. THIS WILL BREAK THE
FOAM INNERS AND LEAD TO PREMATURE FAILURE OF
THE HEATSHIELD.
WARNING
5

Starting up a Beachcomber Hot Tub
Once the Hybrid equipment is hooked up using the separate
instructions provided with the Hybrid Equipment box, and the
electrical connection is made by a qualified electrician, do the
following:
1. Check all union fittings on the
Hybrid
or Portable
equipment to ensure that they are tight. Hand-tightened
is sufficient. If leaking is noted at these fittings you may
need to tighten further or the gasket may be missing or
not seated properly. Unscrew the union and check.
2. Open all knife valves that are pointing up. See figure 4.
Leave all valves that are facing down in the closed
position. Fill the hot tub with water from a garden hose.
You can hang the hose over the edge of the hot tub or
hook it up to the drain/fill valve located down by the
pumps and fill from the bottom. It is recommended you
run your water through your garden hose to waste for a
few seconds before filling the hot tub.
3. Fill the hot tub to half way up the skimmer opening.
Note: If your hot tub is Hush Pump™ equipped your
level can be lowered to one third up the skimmer
opening. This will allow for more displacement if the hot
tub is subjected to use by more than the recommended
amount of people for that model. See Figure 5.
OVER FILLING WILL NOT ALLOW ROOM
FOR DISPLACEMENT FROM PEOPLE
ENTERING THE HOT TUB. UNDER FILLING COULD CAUSE AN
AIRLOCK IN THE SYSTEM AND COULD LEAD TO PUMP AND
HEATER DAMAGE NOT COVERED BY YOUR GUARANTEE.
WARNING
ENSURE YOUR HOT TUB IS SITUATED ON
A LEVEL, HARD SURFACE CAPABLE OF
SUPPORTING BOTH THE WEIGHT OF THE HOT TUB,AND THE
WATER IN IT. SEE PAGE 33 FOR DETAILS.
WARNING
figure 4
figure 5
6
WATER LINE

MICROFILTER REMOVAL AND MAINTENANCE
The Microfilter in the hot tub should be cleaned
approximately every two weeks or more if bather load
is high. Failure to clean the Microfilter can result in
cloudy water, odor and potential equipment damage due
to decreased flow. To remove the Microfilter, turn off
power to the hot tub at the GFCI breaker or at the power
disconnect.
To remove, twist the trim ring to unlock it and remove with
the floating weir assembly, then lift out the basket and
then pull out the Microfilter. See figure 8. Remove any
hair or debris from the basket. Soak the Microfilter in a
cleaner such as Filter Pure overnight and then remove
and rinse thoroughly with a hose spray nozzle to remove
cleaner residue. It is recommended that you alternate
Microfilter cleaning each month with Filter Cure. It is also
advisable to have two Microfilters, to alternate while the
other is soaking in the cleaner.
4. Open the air bleed valve to release any air trapped in
the external plumbing (see equipment configuration
diagrams in this guide). There is one on the 300 and
500 series hot tubs, two on a 500 series with Hush
Pump™ and a standard 700 series and three on a 700
series with Hush Pump™. Once all air is bled from the
system, open any knife valves that are facing down.
5. With the air bled from the system, you can now turn on
the power at the GFCI. Once the control panel is on, use
the instructions on the following pages to complete your
start up. Refer to the instructions for the control panel
that matches your system.
Basic Hot Tub Configurations
Beachcomber manufactures hot tubs in two
configurations, one of which you now own.
The Hybrid Edition™ features the equipment outside of
the hot tub cavity under a safety step. See Figure 6.
The Original Portable features the equipment tucked inside
the hot tub cabinetry. A plank style step is available for this
style of construction. See your store for details.
See Figure 7.
Beachcomber Original Portable
A plank style step is available as an optional accessory.
figure 6
figure 7
Beachcomber Hybrid Edition
Includes the SafeAxiss Steps.
figure 8
7

Original Portable Hot Tub, Hush Pump™ & Turbo Version
™
™
Original Portable Hot Tub, 2 Speed Pump Version
™
Equipment Configuration Diagrams
Please use these diagrams for component location on all Beachcomber models.
Please Note: Your hot tub may or may not be equipped with features shown in this Owner’s Guide. Beachcomber makes continual changes, upgrades and
improvements; if you need more specific information on your hot tub, please call your local Beachcomber store, or use the contact information in this guide.
8

Hybrid Edition Hot Tub,
2 Speed Pump Version
Hybrid Edition Hot Tub,
Hush Pump™ & Turbo Version
™
™
Please Note: Your hot tub may or may not be equipped with features shown in this Owner’s Guide. Beachcomber makes continual changes, upgrades and
improvements; if you need more specific information on your hot tub, please call your local Beachcomber store, or use the contact information in this guide.
9

START UP
When your hot tub is first activated, it will go into priming mode (after
displaying some configuration information). The priming mode will last
up to 4 minutes; then circulation will start, then heat icon will come on
for 6 seconds, and then flicker for 90 seconds. Then heater will come
on to heat water to set temperature. It is recommended that priming
mode be allowed to finish, preventing any pumps from operating dry. If
you are positive all pumps are primed you can exit priming mode early
by pressing or .
TEMPERATURE ADJUSTMENT
Temp range is: 80°F - 104°F/26.0°C – 40.0°C The factory pre-set
temperature is set at 100°F/37.5°C. The last measured temperature
is constantly displayed on the LCD. See edit menu in Owner’s Guide to
select F° or C°. Note: On non HushPump™ hot tubs the current
water temperature will only be displayed if the 2 speed filter
pump has been running for two minutes.
WARM / COOL
Press the or button twice to display the set temperature.
Each time either button is pressed again, the set temperature will increase
or decrease depending on which button is pressed. After three seconds,
the LCD will automatically display the last measured water temperature.
HEATING MODES
This button is used to switch between Standard, Economy, and Sleep
modes. Press to enter mode programming, press to cycle
through to desired mode (LCD flashes until confirmed), then press
to confirm selection.
Standard Mode
maintains the set temperature at all times. Note
that the last measured hot tub temperature displayed is current
only when the pump has been running for at least 2 minutes. The
STANDARD icon will display until the mode is changed.
Economy Mode
heats the hot tub to the set temperature only during
filter cycles. The ECONOMY icon will display until mode is changed.
Pressing 1while in Economy mode puts the hot tub in
Standard-In-Economy mode, which operates the same as Standard
Mode, then reverts to Economy Mode automatically after 1 hour.
Use this mode to activate the heater if using the hot tub when not in
filter cycle. During this time, a press of the button will revert to
Economy Mode immediately.
Sleep Mode heats the hot tub within 20°F (11°C) of the set
temperature only during filter cycles. The SLEEP icon will display until
mode is changed. Use this mode when going on holidays.
MASSAGE 1
Press 1button once to turn pump 1 on to low speed, press
1again for the pump’s high speed, and once more to turn off the pump.
Low speed turns off automatically after 2 hours and high speed turns
off automatically after 15 minutes. Massage pump 1 comes on for a 1
minute purge at the start of each filter cycle.
MASSAGE 2
Press 2button once to turn pump 2 on to low speed, press
2again for the pump’s high speed, and once more to turn off the pump.
Low speed and high speed turn off automatically after 15 minutes.
Massage pump 2 comes on for a 1 minute purge at the start of each
filter cycle.
TURBO (optional)
Press the button to turn Turbo on and off. Turbo will
automatically turn off after 15 minutes. Turbo comes on for a 10
second purge at the start of each filter cycle.
LIGHT
Press the button to turn the hot tub light on, press again to turn
off. Light will automatically turn off after 3 hours.
STANDBY MODE
Pressing or followed by
2
will turn off all hot tub
functions temporarily.
SbY
will appear on your display.
This is helpful
when changing a Microfilter cartridge. Press any button to exit standby
mode. Note: If hot tub is in a heat cycle when standby is selected the 2
speed pump or HushPump™ will run for approximately 15 seconds.
ET-7 TOPSIDE CONTROL PANEL OPERATING INSTRUCTIONS
TurboLightWarm
Cool Massage1 2
Time
Mode/Prog
TurboLightWarm
Cool Massage1 2
Time
Mode/Prog
TurboLightWarm
Cool Massage1 2
Time
Mode/Prog
F2
TL
F1
PL
F2
TL
F1
PL
F2
TL
F1
PL
10

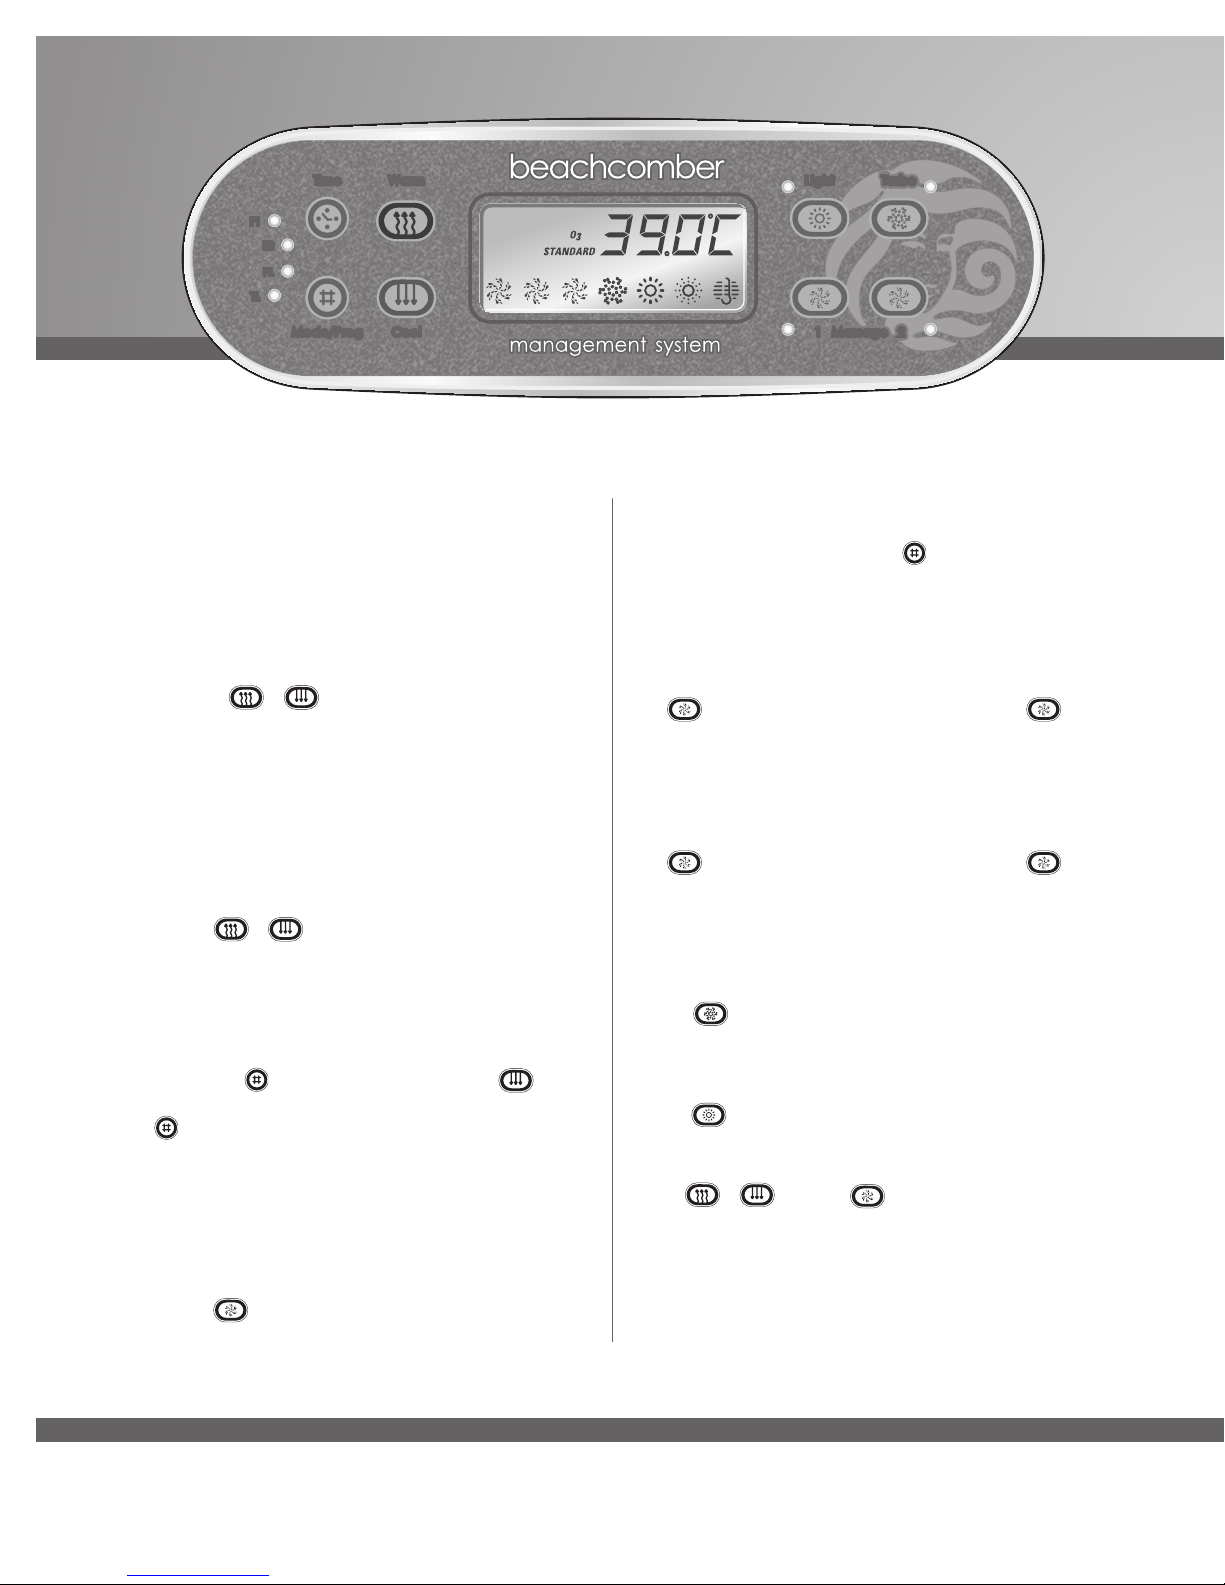
TIME OF DAY AND FILTER CYCLES SETTING
On all systems, the 2 speed filter pump or HushPump™
and ozone generator will run during filtration. There are two
filter cycles per day. The start/end times of each cycle are
programmable. Programming filter times on HushPump™
equipped hot tubs are used to tell the system how many hours a
day to turn the heater on when in Economy mode.
To Program:
1. Press then .
2. Use the and buttons to adjust the time of
day in hours, press the again to adjust the time in
minutes. Use the and buttons to adjust the
minutes. Press to enter new time.
3. You will see PROGRAM, FILTER 1 (F1), START
TIME appears on the display. Press or
to choose the filter start time hour. Enter the hour by
pressing .
4. Press or to choose the filter start time
minutes. Each press will change the start time by 5
minutes. Enter the minutes by pressing .
5. Press to see the PROGRAM, FILTER 1(F1),
END TIME. Adjust the time as done above.
6. Press to see the PROGRAM, FILTER 2(F2),
START TIME. Proceed as above.
7. Press to see PROGRAM, FILTER 2(F2),
END TIME. Adjust the time as done above.
8. The time that now appears allows you to turn your hot tub
light on automatically. Adjust time as done above.
9. Program the time you want your light to turn off.
10. Press will enter the new filter cycle times into the
system and display the current water temperature.
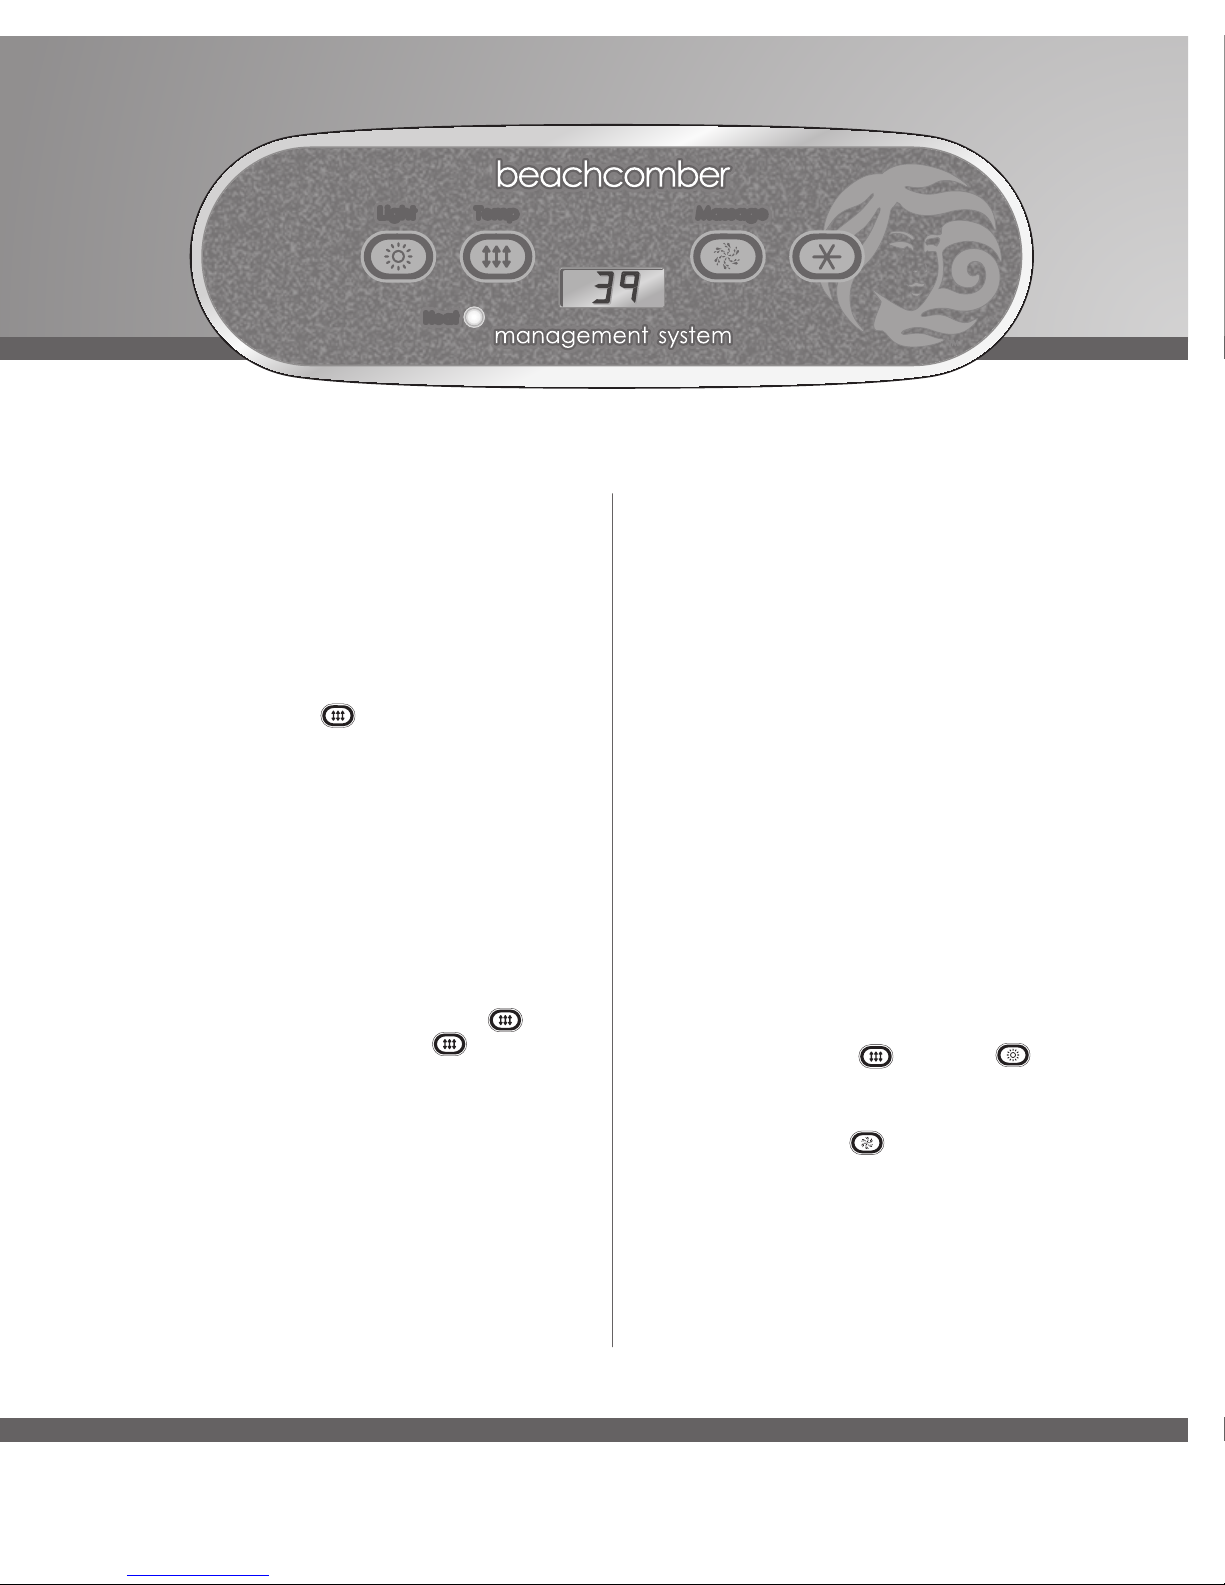
PANEL INVERSION
Press the or button, followed by the or
button to change the numbers in the display to read upside
down. Press the same sequence to set back.
LOCKING THE PANEL
Press , 1then within 3 seconds. When locked, the
PL indicator light will light up. All buttons are frozen except the
button. To unlock the panel, press , 1then .
LOCKING THE SET TEMPERATURE
Press or then , 1and within 3
seconds to activate the lock. The TL indicator light will light up
when temperature is locked. To unlock the set temperature, press
or then
, 1and .
PERIODIC REMINDER MESSAGES
(press the button to reset a displayed reminder message)
rPH:Test and adjust pH chemical levels as per Beachcomber
instructions. Reminder is every 7 days.
rCL:Remove, clean, and reinstall Microfilter as per
Beachcomber instructions. Reminder is every 30 days.
rt9:Test & reset GFCI as per Beachcomber instructions.
Reminder is every 30 days.
rdr: Drain and refill hot tub as per Beachcomber instructions.
Reminder is every 90 days.
rCO:Clean and condition Heatshield as per Beachcomber
instructions. Reminder is every 180 days.
rCH:Install new Microfilter. Reminder is every 365 days.
To suppress reminders, refer to the user edit menu on
page 12.
DIAGNOSTIC DISPLAY MESSAGES
OHH or OHS: Overheat-DO NOT ENTER HOT TUB
ICE: Potential Freeze
SnA:Hot tub is shut down
Snb: Hot tub is shut down
SnS: Sensor out of balance
HFL: Could indicate flow problem
LF: Persistent low flow problems
dr: Inadequate water detected
drY: Inadequate water detected
Pr: Hot tub in priming mode
- - : Temperature unknown
---: Temperature not current or in Economy or Sleep mode.
PLEASE REFER TO TROUBLE SHOOTING GUIDE
STARTING ON PAGE 25 FOR A COMPLETE
EXPLANATION OF DIAGNOSTIC MESSAGES.
SHOCK HAZARD!
NO USER SERVICEABLE PARTS.
DO NOT ATTEMPT SERVICE OF THIS CONTROL.
CONTACT YOUR RETAIL STORE OR SERVICE PROVIDER
FOR ASSISTANCE. FOLLOW ALL OWNER’S GUIDE POWER
CONNECTION INSTRUCTIONS. INSTALLATION MUST
BE PERFORMED BY A LICENSED ELECTRICIAN AND
ALL GROUNDING CONNECTIONS MUST BE PROPERLY
INSTALLED.
WARNING
TAMPERING WITH OR MODIFYING
THIS EQUIPMENT MAY VOID YOUR
GUARANTEE.
WARNING
ALWAYS TEST WATER TEMPERATURE
PRIOR TO ENTRY USING THE TOPSIDE
CONTROL PAD. ENSURE COMFORT BY ALSO CHECKING
WATER WITH A THERMOMETER.
WARNING
11

USER EDIT MENU
This feature is only available on 700 Series tubs that have the
Energy Saver Management System remote installed.
There are three selections in the User Edit Menu:
Suppress Reminders: This SST2 system will display a
number of reminders prompting you to perform certain
maintenance tasks. If you do not want these reminders to
be displayed you can suppress them.
Temperature Display: You can change your temperature
read out from Fahrenheit to Celsius.
Time Display: You can change the time clock display from
12 hour am/pm to 24 hour Military.
ACCESSING THE USER EDIT MENU
Press the then 1, then , USr will be
displayed. Then press 1 to display Sr.n(Suppress
reminders). To suppress press 1 again to make the n
flash. Press to change the nto a Yand then press
1 to confirm, then button twice to exit. Reminders will now
be removed.
If you want to change the temp display from Fahrenheit to
Celsius use the same procedure as above to get to Sr.nbut
then press to go to tc.nthen 1 to make the n
flash, to change the nto Y and then 1 to confirm.
If you want to change the time display from am/pm to 24 use
the same procedures as above to get to Sr.nand then press
twice to get to 24.nthen press 1 to get the nto
flash, press to change the nto Y and then 1 to
confirm then twice to exit.
1.
2.
3.
12
TOPSIDE CONTROL PANEL STANDBY FEATURE
The Standby feature is used primarily to temporarily shut the circulation pump off
before removing the Micro Filter for cleaning or replacement. This prevents debris
or objects from entering the circulation pump while the skimmer basket and filter
are out. Standby can also be used if the user wants to have total quiet while
using the hot tub but during this time the tub will not heat.
Do not use Standby to drain and refill your hot tub.
Use the instructions below to put your hot tub into Standby.
LightWarm
Cool Massage1 2
Time
Mode/Prog
LightWarm
Cool Massage1 2
Time
Mode/Prog
LightWarm
Cool Massage1 2
Time
Mode/Prog
ET-70 TOPSIDE CONTROL PANEL ON 700 SERIES TUBS
Press then to put the tub into Standby. Press any button to take the
hot tub out of standby.
LightLightLight TempTempTemp MassageMassageMassage
HeatHeatHeat
ET- 50 TOPSIDE CONTROL PANEL ON 500 SERIES TUBS
MassageMassageMassage TempTempTemp LightLightLight
ET- 30 TOPSIDE CONTROL PANEL ON 300 AND 160 SERIES TUBS
For the ET-50 or ET-30, press then to put the hot tub into Standby.
Press any button to take the hot tub out of standby.
Note: For ET-7 standby instructions, See page 10.

START UP
Before turning on the power make sure you have read the
Start Up instructions on page 6. When your hot tub power is
first turned on it will display a series of numbers identifying the
software version and the voltage input. It will then go into a 4
minute priming mode indicated by a Pr on the LCD display.
During priming mode the Hush Pump™ will circulate the water
through the filter and heating system to allow the temperature to
be read. If your tub is not Hush Pump™ equipped the jet pump
will not turn on until the prime mode times out or the
button is pressed to time out early. During prime mode the jet
pumps can be turned on to make sure they are fully primed and
moving water in the tub. Do not allow an unprimed jet pump
to run for more than 10 seconds. If the fill water temperature
is below 44°F/ 7°C freeze protection will activate all pumps
immediately. While the circulation pump is running the display
will show a - - °Findicating current temperature is not known.
This will take two minutes. Once temperature is known it will be
displayed on the LCD.
TEMPERATURE ADJUSTMENT
The temperature range is 80°F - 104°F / 26.0°C – 40.0°C.
The default is 100°F/37.5°C. Any temp changes are saved in
the system memory if power is interrupted. Use the button
to increase and the button to lower the set points. After
showing set temp the LCD will revert back to current water temp.
Note: if set temp is lowered more than 3°F/1.5°C below current
water temp the Hush Pump™ will stop. The circulation will
restart every 30 minutes to check if water temp has come down
to set temp. It will also run continually during programmed times.
HEATING MODES
Std –
Standard Mode
: (Default mode) In Standard Mode the
water is always heated to the set temperature. The display will
show the current temperature and the word STANDARD.
Ecn –
Economy Mode
: In Economy Mode the water is heated
only during the filter cycle times. Default times are 8:00 am to
10:00 am for cycle 1 and 8:00 pm to 10:00 pm for cycle 2. If
using economy you may need to alter these times to make sure
the water is at your desired temp during your usual tub use
times. The display will alternate between Ecn and the current
temperature and display the word ECONOMY.
SLP –
Sleep Mode
: In Sleep Mode the water is only heated
to within 20°F/11°C of your set point and the heater only comes
on during the programmed filter cycle times. This mode is
typically only used for vacation time. The display will alternate
between the current temperature and SLP.
To change heating modes press the button then the
button.
MASSAGE 1
To activate this jet pump press the 1 button once to
activate low speed, The icon will flash off and on, on the
LCD display. Press again to activate high speed and the icon
will become solid on the display. Press a third time to turn the
pump off. The low speed will turn off automatically after 4 hours
and the high speed will turn off after 15 minutes.
Note: If tub is Hush Pump™ equipped the low speed of
Massage 1 will come on automatically for 1 minute at the start
of each filter cycle to purge the plumbing lines. If the purge time
is not at the time of day you want, change the filter times.
MASSAGE 2
To activate this jet pump press the 2 button once to
activate low speed, The icon will flash off and on, on the
LCD display. Press again to activate high speed and the
icon will become solid on the display. Press a third time to turn
the pump off. The low speed and the high speed will turn off
automatically after 15 minutes.
ET-70 TOPSIDE CONTROL PANEL OPERATING INSTRUCTIONS
LightWarm
Cool Massage1 2
Time
Mode/Prog
LightWarm
Cool Massage1 2
Time
Mode/Prog
LightWarm
Cool Massage1 2
Time
Mode/Prog
13

Note: If tub is Hush Pump™ equipped the low speed of Massage
2 will come on automatically for 1 minute at the start of each filter
cycle to purge the plumbing lines. If the purge time is not at the
time of day you want change the filter times.
LIGHT
To activate, press the button once to turn on and again to
turn off. The light will automatically turn off after 4 hours. If your
tub has an Everlite™6 or any additional lighting features see the
instructions in this manual.
TURBO (OPTIONAL)
To activate, press the button once to turn on and again to
turn off. The Turbo will turn off automatically after 15 minutes. The
Turbo will come on automatically for 30 seconds at the start of
each filter cycle to purge the Turbo plumbing. If the purge time is
not at the time of day you want change the filter times.
SETTING TIME CLOCK AND FILTER CYCLES
Time Set
To set the time clock to your local current time press the
button, then the button and Set Time appears. Press the
button to advance the time or the to back up the time.
The time will advance quickly 5 seconds after pressing the
or buttons. Use the same button to stop the clock at the
desired time.
Filter Cycle Setting
Changing filter cycles is not necessary as it comes preset from
the factory as outlined in Economy heat mode, but if you want to
change them follow instructions below.
Once time of day is set press the button to set start time of
Filter cycle 1. If your tub is Hush equipped changing filter cycles
does not affect the time the Hush runs. It tells the system when
to turn on the heater if you are using the Economy heat setting. If
your tub is non Hush changing the cycle time tells the two - speed
pump 1 when to operate for a filter cycle. Avoid programming a
long filter cycle that runs during the day time hours in hot summer
weather as it could cause the water to overheat. Use the or
buttons to advance or backup the Filter 1 start time. Press
the same button to stop the time once you reach the desired start
time. Press the button to advance to the Filter 1 stop time and
use the same procedure as above to adjust. Press the again
to select Filter 2 start time then use the same procedure as above
to adjust, then press to select Filter 2 stop time and once set,
press to exit the menu.
Make sure you do not program the cycles to overlap the start or
stop time of either cycle.
Any changes to filter cycles and time are stored in the system
memory and will be retained in the event of a power outage.
PANEL LOCK
This feature might be used if you do not want anyone to operate
the tub in your absence. To lock the panel press, , then
then within three seconds. A pad lock icon will appear on
the LCD. To unlock press then then 1, then
within three seconds.
TEMPERATURE LOCK
This feature might be used to prevent other tub users such as
children from adjusting the tub set temperature. To lock the set
temperature press, then then 1 then within
3 seconds. To unlock press then then 1 then
within 3 seconds.
DIAGNOSTIC DISPLAY MESSAGES
Power to Hot Tub is off
--°FCurrent temperature not known
OHH Possible overheated heater: do not enter Hot Tub
OHS Possible overheated Hot Tub: do not enter Hot Tub
SnA Sensor problem
Snb Sensor problem
SnS Sensors out of balance
HFL Possible flow through heater problem
LF Confirmed flow through heater problem
dr Possible dry heater problem
drY Confirmed dry heater problem
ICE Freeze condition sensed
Refer to diagnostic and trouble shooting section on page 25 for
more detailed information.
SHOCK HAZARD!
NO USER SERVICEABLE PARTS.
DO NOT ATTEMPT SERVICE OF THIS CONTROL. CONTACT
YOUR RETAIL STORE OR SERVICE PROVIDER FOR
ASSISTANCE. FOLLOW ALL OWNER’S GUIDE POWER
CONNECTION INSTRUCTIONS. INSTALLATION MUST
BE PERFORMED BY A LICENSED ELECTRICIAN AND
ALL GROUNDING CONNECTIONS MUST BE PROPERLY
INSTALLED.
WARNING
TAMPERING WITH OR MODIFYING
THIS EQUIPMENT MAY VOID YOUR
GUARANTEE.
WARNING
ALWAYS TEST WATER TEMPERATURE
PRIOR TO ENTRY USING THE TOPSIDE
CONTROL PAD. ENSURE COMFORT BY ALSO CHECKING
WATER WITH A THERMOMETER.
WARNING
14
1

STARTUP
Before turning on the power, make sure you have read the Start Up
instructions on page 6. When your hot tub power is first turned on
it will display a series of numbers identifying the software version
and the voltage input. It will then go into a 4 minute priming mode
indicated by a Pr on the LCD display. During priming mode the
Hush Pump will circulate the water through the filter and heating
system to allow the temperature to be read. If your hot tub is not
Hush Pump equipped, the jet pump will not turn on until the prime
mode times out or the button is pressed to time out early.
During prime mode the jet pump can be turned on to make sure
they are fully primed and moving water in the hot tub. Do not
allow an unprimed jet pump to run for more than 10 seconds. If
the fill water temperature is below 44°F/ 7
°
C freeze protection
will activate all pumps immediately. While the circulation pump is
running the display will show a - - indicating current temperature
is not known. This will take two minutes. Once temperature is
known it will be displayed on the LCD.
TEMPERATURE ADJUSTMENT
The temperature range is - 104°F / 26.0°C – 40.0°C. The
default is 100°F/37.5°C. Any temp changes are saved in the
system memory if power is interrupted. Press the button
to increase or lower the set points. If the is pressed the set
point will flash. Each press will move the set point 1 degree. If the
set point is moving the wrong direction then stop pressing, let the
temperature display stop flashing, then press again to move the
set point in the other direction. After adjusting the set temp, the
LCD will revert back to the current water temperature.
Note: if set temp is lowered more than 3°F/1.5C below current
water temp, the Hush Pump will stop. The circulation will restart
every 30 minutes to check if water temp has come down to set
temp. It will also run continually during programmed times.
HEATING MODES
St –
Standard Mode (Default Mode
) In Standard Mode the
water is always heated to the set temperature. The display will
show the temperature always with Hush Pump equipped systems.
If non Hush Pump™, current water temperature will be shown
when the pump is running and – when pump is not running. If
your hot tub is not equipped with a Hush Pump, the 2 speed pump
will come on every 30 minutes outside of filter cycles to poll for
current water temperature. If you do not want this to happen, use
the Economy mode below.
Ec –
Economy Mode:
In Economy Mode the water is heated
only during the filter cycle times. The factory default is F4 (4
hours), 2C (twice a day). If using the Economy mode, you may
need to alter these times to make sure the water is your desired
temperature during your usual hot tub usage times. The first filter
cycle starts 6 minutes after power is turned on. The display will
alternate between the current temperature and Ec.
SL –
Sleep Mode:
In Sleep Mode the water is only heated to
within 20°F/11°C of your set point and the heater only comes on
during the programmed filter cycle times. This mode is typically
only used for vacation time. The display will alternate between the
current temperature and SL
To change heating modes, press the button then the
button.
MASSAGE
To activate this jet pump, press the button once to activate
low speed, twice to activate high speed and three times to turn the
pump off. The low speed will turn off automatically after 4 hours
and the high speed will turn off after 15 minutes. If the hot tub is
Hush Pump™ equipped, the low speed of the jet pump will come
on automatically for 1 minute at the start of each filter cycle to
purge the plumbing lines.
LightLightLight TempTempTemp MassageMassageMassage
HeatHeatHeat
ET-50 TOPSIDE CONTROL PANEL OPERATING INSTRUCTIONS
15

LIGHT
To activate this press the button once to turn on and again
to turn off. The light will automatically turn off after 4 hours. If your
tub has an EverLite™ 6 or any additional lighting features see the
instructions on page 20 of this manual.
TURBO (OPTIONAL)
To activate this press the button once to turn on and twice to
turn off. The Turbo will turn off automatically after 15 minutes. The
Turbo will come on automatically for 30 seconds at the start of each
filter cycle to purge the Turbo plumbing.
SETTING FILTER CYCLES
Changing filter cycles is not necessary as it comes preset from the
factory as outlined in Economy heat mode instructions, but if your
tub is not equipped with Hush Pump™ and you want to change
them, use the following instructions. Press the then press
to bring up F2 keep pressing to select F4, F6, F8, FC
(12 hours). Then press to bring up 2C (two cycles per day). If
you want to change press to select 1d (day cycle) and again
to select 1n (night cycle). Press to exit programming.
DIAGNOSTIC DISPLAY MESSAGES
Power to Hot Tub is off
-- Current temperature not known
HH Possible overheated heater: do not enter Hot Tub
HS Possible overheated Hot Tub: do not enter Hot
Tub
SA Sensor problem
Sb Sensor problem
Sn Sensors out of balance
HL Possible flow through heater problem
LF Confirmed flow through heater problem
dr Possible dry heater problem
dY Confirmed dry heater problem
IC Freeze condition sensed
Refer to diagnostic and trouble shooting section starting on page
25 for more detailed information.
SHOCK HAZARD!
NO USER SERVICEABLE PARTS.
DO NOT ATTEMPT SERVICE OF THIS CONTROL. CONTACT
YOUR RETAIL STORE OR SERVICE PROVIDER FOR
ASSISTANCE. FOLLOW ALL OWNER’S GUIDE POWER
CONNECTION INSTRUCTIONS. INSTALLATION MUST
BE PERFORMED BY A LICENSED ELECTRICIAN AND
ALL GROUNDING CONNECTIONS MUST BE PROPERLY
INSTALLED.
WARNING
TAMPERING WITH OR MODIFYING
THIS EQUIPMENT MAY VOID YOUR
GUARANTEE.
WARNING
ALWAYS TEST WATER TEMPERATURE
PRIOR TO ENTRY USING THE TOPSIDE
CONTROL PAD. ENSURE COMFORT BY ALSO CHECKING
WATER WITH A THERMOMETER.
WARNING
16

STARTUP
Before turning on the power make sure you have read the Start up
instructions on page 6. When your hot tub power is first turned on it
will display a series of numbers identifying the software version and the
voltage input. It will then go into a 4 minute priming mode indicated by a
Pr on the LCD display. During priming mode the Hush Pump will circulate
the water through the filter and heating system to allow the temperature
to be read. If your tub is not Hush Pump equipped the jet pump will not
turn on until the prime mode times out or the button is pressed
to time out early. During Prime mode the jet pump can be turned on to
make sure they are fully primed and moving water in the hot tub. Do not
allow an unprimed jet pump to run for more than 10 seconds. If the fill
water temperature is below 44°F/ 7°C, freeze protection will activate all
pumps immediately. While the circulation pump is running the display will
show a - - indicating current temperature is not known. This will take two
minutes. Once temperature is known it will be displayed on the LCD.
TEMPERATURE ADJUSTMENT
The temperature range is 80°F - 104°F /26.0°C – 40.0°C. The default
is 100°F/37.5°C. Any temp changes are saved in the system memory
if power is interrupted. Press the button to increase or lower the
set points. If the is pressed the set point will flash. Each press will
move the set point 1 degree. If the set point is moving the wrong direction
then stop pressing, let the temperature display stop flashing then press
again to move the set point in the other direction. After adjusting the set
temp the LCD will revert back to current water temp.
Note: if set temp is lowered more than 3°F/1.5C below current water
temp the Hush Pump will stop. The circulation will restart every 30
minutes to check if water temp has come down to set temp. It will also
run continually during programmed times.
HEATING MODES
St –
Standard Mode (Default Mode):
In Standard Mode the
water is always heated to the set temperature. The display will show the
temperature always with Hush Pump equipped systems. If non Hush,
current water temperature will be shown when the pump is running and
– when pump is not running. If your tub is not equipped with a Hush
Pump the 2 speed pump will come on every 30 minutes outside of filter
cycles to poll for current water temperature. If you do not want this to
happen, use the Economy mode below.
Ec –
Economy Mode:
In Economy Mode the water is heated only
during the filter cycle times. The factory default is F4 - 4 hours, twice a
day. If using the Economy mode, you may need to alter these times to
make sure the water is at your desired temp during your usual tub use
times. The first cycle starts 6 minutes after power is turned on.The display
will show the will alternate between Ec and the current temperature.
SL –
Sleep Mode
: In Sleep Mode the water is only heated to within
20°F/11°C of your set point and the heater only comes on during the
programmed filter cycle times. This mode is typically only used for
vacation time. The display will alternate between the current temperature
and SL.
To change heating modes press the button then the button.
MASSAGE
To activate this jet pump press the button once to activate low
speed, twice to activate high speed and three times to turn the pump off.
The low speed will turn off automatically after 4 hours and the high speed
will turn off after 15 minutes. If the hot tub is Hush Pump equipped, the
low speed of the jet pump will come on automatically for 1 minute at the
start of each filter cycle to purge the plumbing lines.
MassageMassageMassage TempTempTemp LightLightLight
ET-30 TOPSIDE CONTROL PANEL OPERATING INSTRUCTIONS
17

LIGHT
To activate this press the button once to turn on and again to turn off.
The light will automatically turn off after 4 hours. If your tub has an EverLite™
6 or any additional lighting features see the instructions in this guide.
TURBO (OPTIONAL)
To activate this press the button once to turn on and twice to turn off.
The Turbo will turn off automatically after 15 minutes. The Turbo will come on
automatically for 30 seconds at the start of each filter cycle to purge the Turbo
plumbing.
SETTING YOUR FILTER CYCLES
Changing filter cycles is not necessary as it comes preset from the factory as
outlined in Economy heat mode instructions, but if your tub is not equipped
with Hush Pump™ and you want to change them, use the following
instructions. Press the then press to bring up F4 keep pressing
to select F4, F6, F8 or FC (12 hours). Then press to bring up
2C (two cycles per day). If you want to change press to select 1d (day
cycle) and again to select 1n (night cycle). Press to exit programming.
DIAGNOSTIC DISPLAY MESSAGES
Power to Hot Tub is off
-- Current temperature not known
HH Possible overheated heater: do not enter Hot Tub
HS Possible overheated Hot Tub: do not enter Hot Tub
SA Sensor problem
Sb Sensor problem
Sn Sensors out of balance
HL Possible flow through heater problem
LF Confirmed flow through heater problem
dr Possible dry heater problem
dY Confirmed dry heater problem
IC Freeze condition sensed
Refer to diagnostic and trouble shooting section starting on page 25
for more detailed information.
SHOCK HAZARD!
NO USER SERVICEABLE PARTS.
DO NOT ATTEMPT SERVICE OF THIS CONTROL. CONTACT
YOUR RETAIL STORE OR SERVICE PROVIDER FOR
ASSISTANCE. FOLLOW ALL OWNER’S GUIDE POWER
CONNECTION INSTRUCTIONS. INSTALLATION MUST
BE PERFORMED BY A LICENSED ELECTRICIAN AND
ALL GROUNDING CONNECTIONS MUST BE PROPERLY
INSTALLED.
WARNING
TAMPERING WITH OR MODIFYING
THIS EQUIPMENT MAY VOID YOUR
GUARANTEE.
WARNING
ALWAYS TEST WATER TEMPERATURE
PRIOR TO ENTRY USING THE TOPSIDE
CONTROL PAD. ENSURE COMFORT BY ALSO CHECKING
WATER WITH A THERMOMETER.
WARNING
18

BEACHCOMBER’S RECOMMENDED PARAMETERS
FOR BALANCED HOT TUB WATER
Your dealer may recommend slightly different levels
depending on your local source water. Please see your
store for more information by taking a water sample in to
be analyzed.
Water Care and Chemistry
This is a very important component to protect your hot tub
and its equipment. Failure to maintain proper water balance
could damage your hot tub and equipment and affect your
guarantee. Your retail store can provide you with free water
analysis, treatment and home testing products.
SANITIZER LEVEL
Always maintain an adequate sanitizer level. Failure to do
so will result in cloudy water, odor and skin or respiratory
problems. The ideal range is 3 - 5 ppm. Check daily with
test strips or a test kit available from your Beachcomber
store.
• Keep out of reach of children;
• Do not mix products together;
• Add one product at a time;
• Add chemical to water, not water to chemicals;
• Store chemicals in a cool, dry place,
• Do not allow liquids to freeze.
PH LEVEL: IDEAL 7.2 - 7.8
This determines the acidity or alkalinity of your water, 7.0
being neutral. Water that is too acidic or too alkaline can
damage your hot tub; Test your pH every week or more
often if possible. Use
pH Plus
or
pH Minus
to adjust.
TOTAL ALKALINITY: IDEAL 100 - 120 ppm
Balance total alkalinity to stabilize your pH level, prevent
scaling and ensure your sanitizer works at peak efficiency.
Use Resist to increase the level or pH Minus to lower.
Adjust at initial fill and when refilling or topping up.
CALCIUM HARDNESS: IDEAL 150 - 200 ppm
Too high a level can cause cloudy water or scaling on the hot
tub surface and heating element. Too low a level can lead
to excess foaming in the water. Use Protect to increase the
level, use fresh water dilution to lower. Adjust at initial fill and
when refilling.
OTHER IMPORTANT CONDITIONERS
1. Metal and mineral sequestering product must be added
to keep any metals or minerals in the water in solution.
Use
Eliminate #1
at initial fill.
2.
Scale inhibitor prevents calcium buildup forming on
surfaces in the hot tub.
Use Eliminate Plus #2 at initial fill and weekly.
3. Beachcomber’s
Clarifier agglomerates tiny particles in the
water making them easier to be picked up by the Microfilter.
It also provides lubrication to seals. Use Pure Blue at initial
fill and weekly.
4. Enzymes, a natural compound, eliminates scum and
organic contaminants.
Use Purezyme #3 at initial fill and weekly.
Beachcomber offers a full line of recommended water care
products to get the most from your Beachcomber Hot Tub.
Since 1978, we have been providing Beachcomber owners
with custom formulated products to meet the needs of your
hot tub. Always follow the directions on product labels.
Now, Beachcomber offers “Judy Scentsations” to add the
healing touch of aromatherapy to your hot tub experience.
See your Beachcomber store for more details.
PH LEVEL: 7.2 - 7.8
SANITIZER LEVEL (CHLORINE
OR BROMINE): 3 - 5 PPM
CALCIUM HARDNESS: 150 - 200 PPM
TOTAL ALKALINITY: 100 - 120 PPM
TOTAL DISSOLVED SOLIDS:
NO MORE THAN 1500 PPM
19
ALWAYS LEAVE THE HEATSHIELD OPEN
FOR ONE HOUR WHEN SHOCK TREATING
THE WATER.THE HIGH LEVELS OF SANITIZER CAN DAMAGE THE
UNDERSIDE OF YOUR HEATSHIELD.THIS IS NOT COVERED BY
YOUR GUARANTEE.
WARNING
DO NOT ALLOW CHILDREN TO
USE A HOT TUB WITHOUT ADULT
SUPERVISION. PREVENT UNAUTHORIZED CHILD ACCESS
TO AVOID THE RISK OF DROWNING.
WARNING
DO NOT ENTER A HOT TUB WITHOUT
ADEQUATE SANITIZATION/DISINFECTION.
WARNING
ALWAYS FOLLOW THE LABEL
INSTRUCTIONS ON WATER CARE
CHEMICAL BOTTLES.
WARNING

EverLite™ 6 Operating Instructions
1. Beachcomber Mode A -
Light will sequence from
Red, to Green, to Blue continuously.
Press the
light button once to start the ‘Beachcomber
Mode A’. Light will stay on each solid color for three
seconds. The color will blend with the next color for four
seconds before the next color becomes a solid. To turn
off, press button once. *
2. Freeze Mode -
As it cycles through the
‘Beachcomber
Mode A’
, the light can be frozen on any solid or blended
color.
Choose a color, and then touch the button twice
(off, then on) within four seconds to switch to ‘Freeze
Mode’. To turn off, press button once.
3. Pulse Mode -
This is a random cycling mode, which
imitates the soothing rhythm of a heartbeat.
When in
the ‘Freeze Mode’, touch the button twice (off, then
on) within four seconds to switch to ‘Pulse Mode’. To
turn off, press button once.
4. White Mode -
This mode recreates natural white light.
When in the ‘Pulse Mode’, touch the button twice
(off, then on) within four seconds to switch to ‘White
Mode’. To turn off, press button once.
5. Beachcomber Mode B - All lights above waterline,
(including Eclipse Lighting, and Waterfall Light), are
turned on, while all underwater lights are off. When in
the ‘White Mode’, touch the button twice (off, then on)
within four seconds to switch to ‘Beachcomber Mode
B’. To turn off, press button once.
6. Beachcomber Mode C - All lights below waterline
are turned on, while all lights above water, (including
Eclipse Lighting, and Waterfall Light), are off. When
in the ‘Beachcomber Mode B’, touch the button
twice (off, then on) within four seconds to switch to
‘Beachcomber Mode C’. To turn off, press button once.
*
Note: If the light is left off for more than ten seconds, it will
revert back to ‘Beachcomber Mode A’ when switched back on.
Hot Tub Care and Maintenance
CLEANING OF THE ACRYLIC SURFACE
The acrylic surface is very easy to maintain and care for. Use
Tub Clean to remove water level scum lines with warm water
and a damp cloth; wipe down, avoiding contact with the water
as Tub Clean can cause foaming.
HEATSHIELD
As with any vinyl product that is exposed to the weather,
the better the care, the longer it will last. Use a mild dish
soap solution to remove dirt on the Heatshield and then
treat the vinyl by applying Cover All as per the label. Avoid
application in the hot sun.
HOT TUB CABINETRY AND STEPS
The cabinet and step of your hot tub is made from a
synthetic plastic called Enviroskirt™. If dirty, simply wipe
down with a mild soap solution and rinse well. If your
hot tub cabinet is natural cedar and you want to keep it
looking new, use Beachcomber’s “Nu Wood Stain” Clear
once a year. If the cedar is weathered some, use Nu Wood
Natural or Twilight to bring back the color. Prior sanding
with 100 grit sandpaper may be necessary if weathering
is advanced.
NEVER USE A CLEANER THAT CONTAINS
AMMONIA. THIS COULD DAMAGE YOUR
ACRYLIC SURFACE. DO NOT LEAVE THE HOT TUB EMPTY
AND THE ACRYLIC EXPOSED TO HOT SUN. ALWAYS PUT THE
HEATSHIELD BACK ON THE HOT TUB WHEN IT IS NOT IN USE.
WARNING
ZONED MODE
ZONED MODE
NOTE:
POINTS 1
THROUGH
4 APPLY TO
EVERLITE 4.
THE EVERLITE 6
INCLUDES ALL
SIX POINTS.
20
This manual suits for next models
16
Table of contents