Beachcomber 750 User manual

Owner’s Guide

Table of Contents
Your Beachcomber Hot Tub......................................................................................................... 3
Important Safety Instructions ..................................................................................................... 4
• Beachcomber’s Safety Features ......................................................................................... 5
• Starting Up a Beachcomber Hot Tub ............................................................................... 6
• Basic Hot Tub Configurations .......................................................................................... 7
Equipment Configuration Diagrams ........................................................................................... 8
Digital Systems Programming and Operation .......................................................................... 10
• ET-7 Control Panel........................................................................................................... 10
• ET-5 Control Panel........................................................................................................... 12
• ET-3 Control Panel........................................................................................................... 14
Edit Menu ................................................................................................................................... 16
Water Care and Chemistry ......................................................................................................... 17
Hot Tub Care and Maintenance ............................................................................................... 18
Operation of Beachcomber Hot Tub Interior Features .......................................................... 19
Draining Your Beachcomber Hot Tub....................................................................................... 21
Vacation Instructions .................................................................................................................. 21
Winter Operation Information.................................................................................................. 22
Shut Down Procedures ............................................................................................................... 22
Do’s and Don’ts.......................................................................................................................... 23
Diagnostic Display Message & Trouble Shooting Guide ......................................................... 23
The Beachcomber Guarantee.................................................................................................... 26
The Beachcomber Premium Guarantee ................................................................................... 28
Important Audio Equipment Information................................................................................ 30
Take Part in an Online Survey ................................................................................................... 30
Hot Tub Care Details Chart........................................................................................................ 31
Beachcomber Hot Tub Care and Maintenance Record........................................................... 31
CONGRATULATIONS ON THE PURCHASE OF YOUR BEACHCOMBER HOT TUB!
Your hot tub is an investment in your health and happiness. Your Beachcomber Hot Tub
will bring you relaxation, great family moments, romance, therapy and so much more.
This Owner’s Guide is intended to give you instructions on the basic operation of your
hot tub. SAVE THESE INSTRUCTIONS for easy reference; you can also find this Owner’s
Guide online, at:
www.beachcomberhottubs.com
2
This Owner’s Guide is for hot tubs manufactured from January 1st, 2007.

3
Important details of your new Beachcomber Hot Tub
Record information about your hot tub in the space below, so that you can have it on hand if you
need to contact your local dealership:
MODEL NUMBER:____________________________ DATE OF PURCHASE:___________________________
HOT TUB SERIAL NUMBER:____________________ DEALERSHIP NAME:___________________________
GUARANTEE NUMBER:________________________ DEALERSHIP PHONE:___________________________
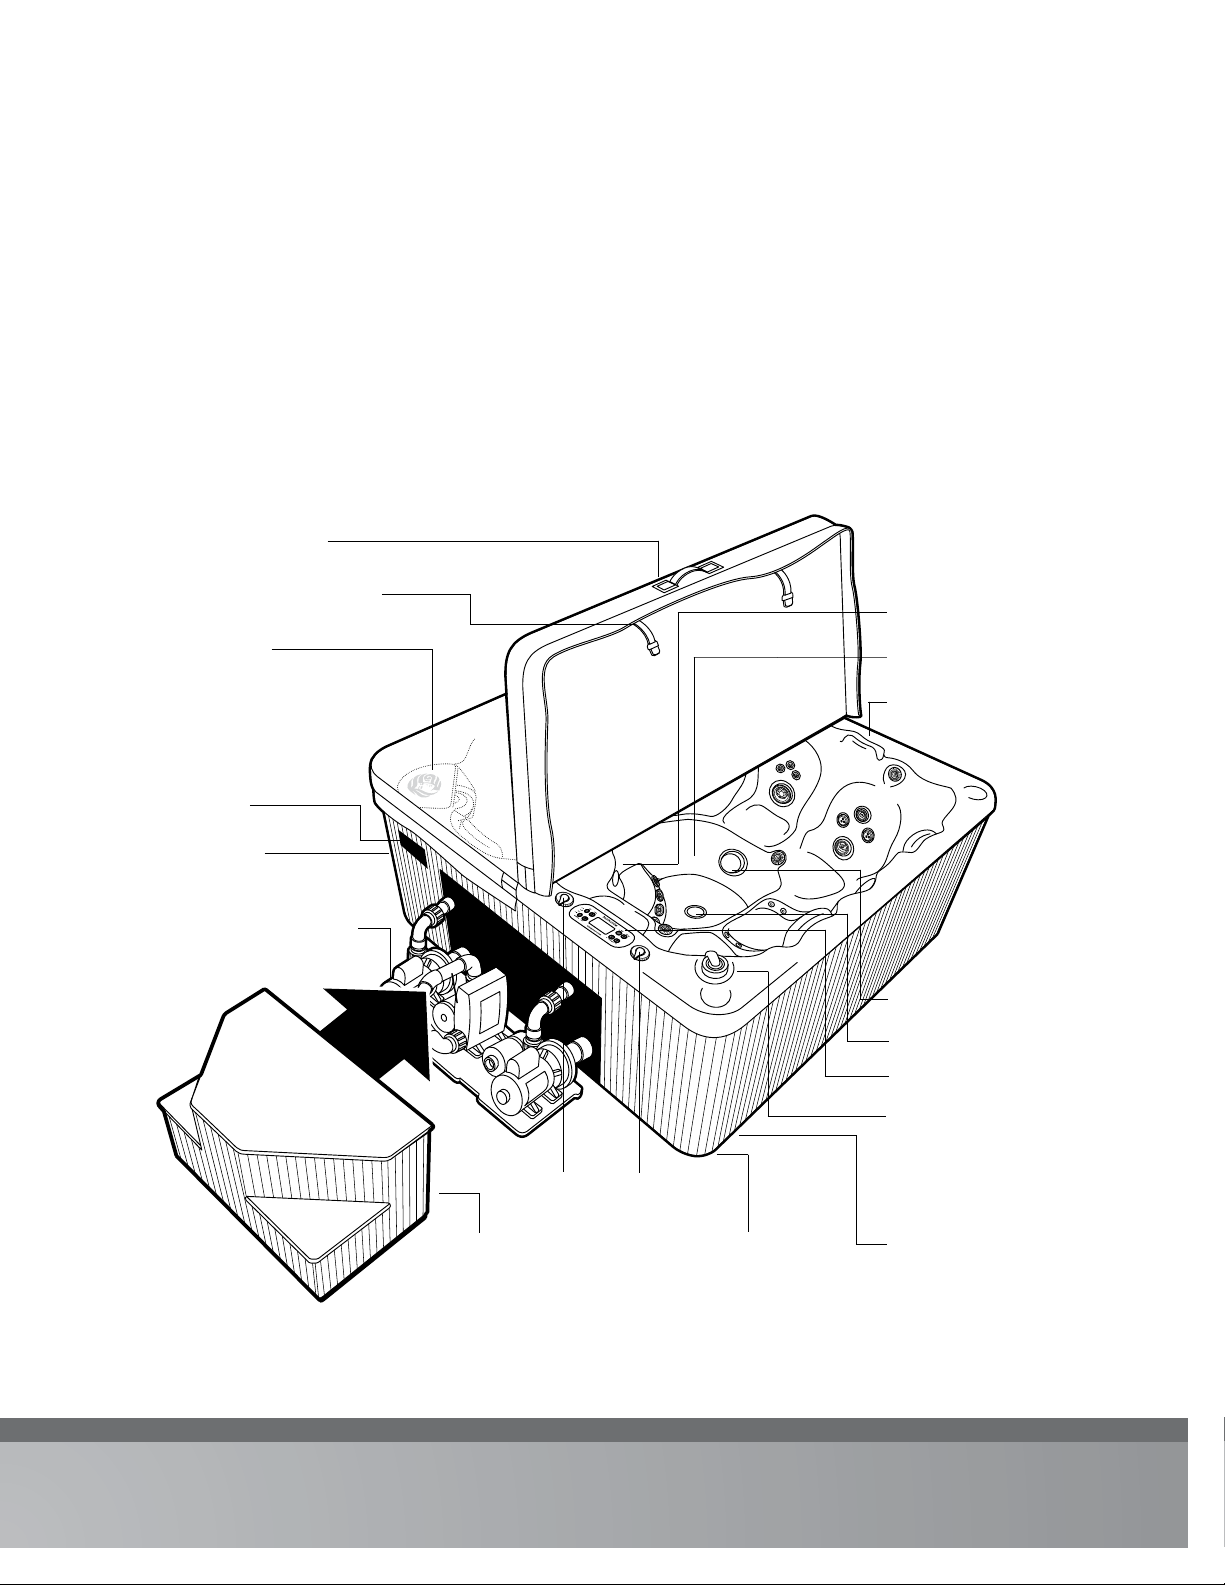
The Basic Components of Your Beachcomber Hot Tub
Please use the diagram below to familiarize yourself with the basic components of your
Beachcomber Hot Tub. Read this entire document, so that you
and your family know how to safely enjoy your Beachcomber Hot Tub.
Cover Locks with Straps
Microfilter
Aquacoustics
Surround Sound
System
Acrylic Surface
Protec Double Tiered
Safety Step
(Limited Edition
hot tubs only)
Heatshield Cover
Suction Fitting
Massage Inserts,
or Jets
RFM Diverter Valve
Topside Controls
Cabinetry
Dual Side Electrical
Conduit Access
Hot Tub Equipment with
Management System
Hot Tub Light
PermaSeal
Foundation
Footwell
Gravity Floor Drain
Air Injection Controls

Important Safety Instructions
A green colored terminal, or wire connector
marked Ground is provided within the control
box. To reduce the risk of electric shock, connect
this terminal or connector to the grounding
terminal of the electric service or supply panel
with a continuous copper wire equivalent in
size to the circuit conductors supplying this
equipment. In addition bonding lugs are
provided and marked Bonding Lugs. To reduce
the risk of electric shock, connect the bonding
lugs in accordance with the local electric code.
At least two lugs marked Bonding Lugs are
provided on the external surface of the supply
terminal box. To reduce the risk of electrical
shock connect the local common binding grid in
the area of the hot tub to these terminals with an
insulated or bare copper conductor not smaller
than No.6 AWG. Note: this is factory installed.
All field-installed metal components such as
rails, ladders, drains or other similar hardware
within 10 ft(3m) of the hot tub shall be bonded
to the equipment grounding bus with copper
conductors not smaller than #6AWG.
CAUTION: WIRING CONNECTED IN THIS BOX
MUST BE RATED AT 600V.
There are no user serviceable parts within
the management system. The high voltage
can cause injury or death. The hot tub must
be hooked up to a Ground Fault Circuit
Interrupter (G.F.C.I.) by a licensed electrician.
Use the test button on your G.F.C.I. monthly to
ensure it is working properly.
Always make sure there is an adequate sanitizer
level in your hot tub before entering. Failure to
do so may cause skin irritations or illness. Use a
test kit or test strips to check prior to entry.
CAUTION: WATER TEMPERATURE IN EXCESS OF
100ºF/38ºC MAY BE INJURIOUS TO YOUR HEALTH.
AVOID PROLONGED EXPOSURE TO HOT WATER.
WATER TEMPERATURE MAY NEED TO BE DECREASED
FOR CHILDREN OR THE ELDERLY.
THE MAXIMUM RECOMMENDED TEMPERATURE OF
YOUR HOT TUB WATER IS 104ºF/40ºC.
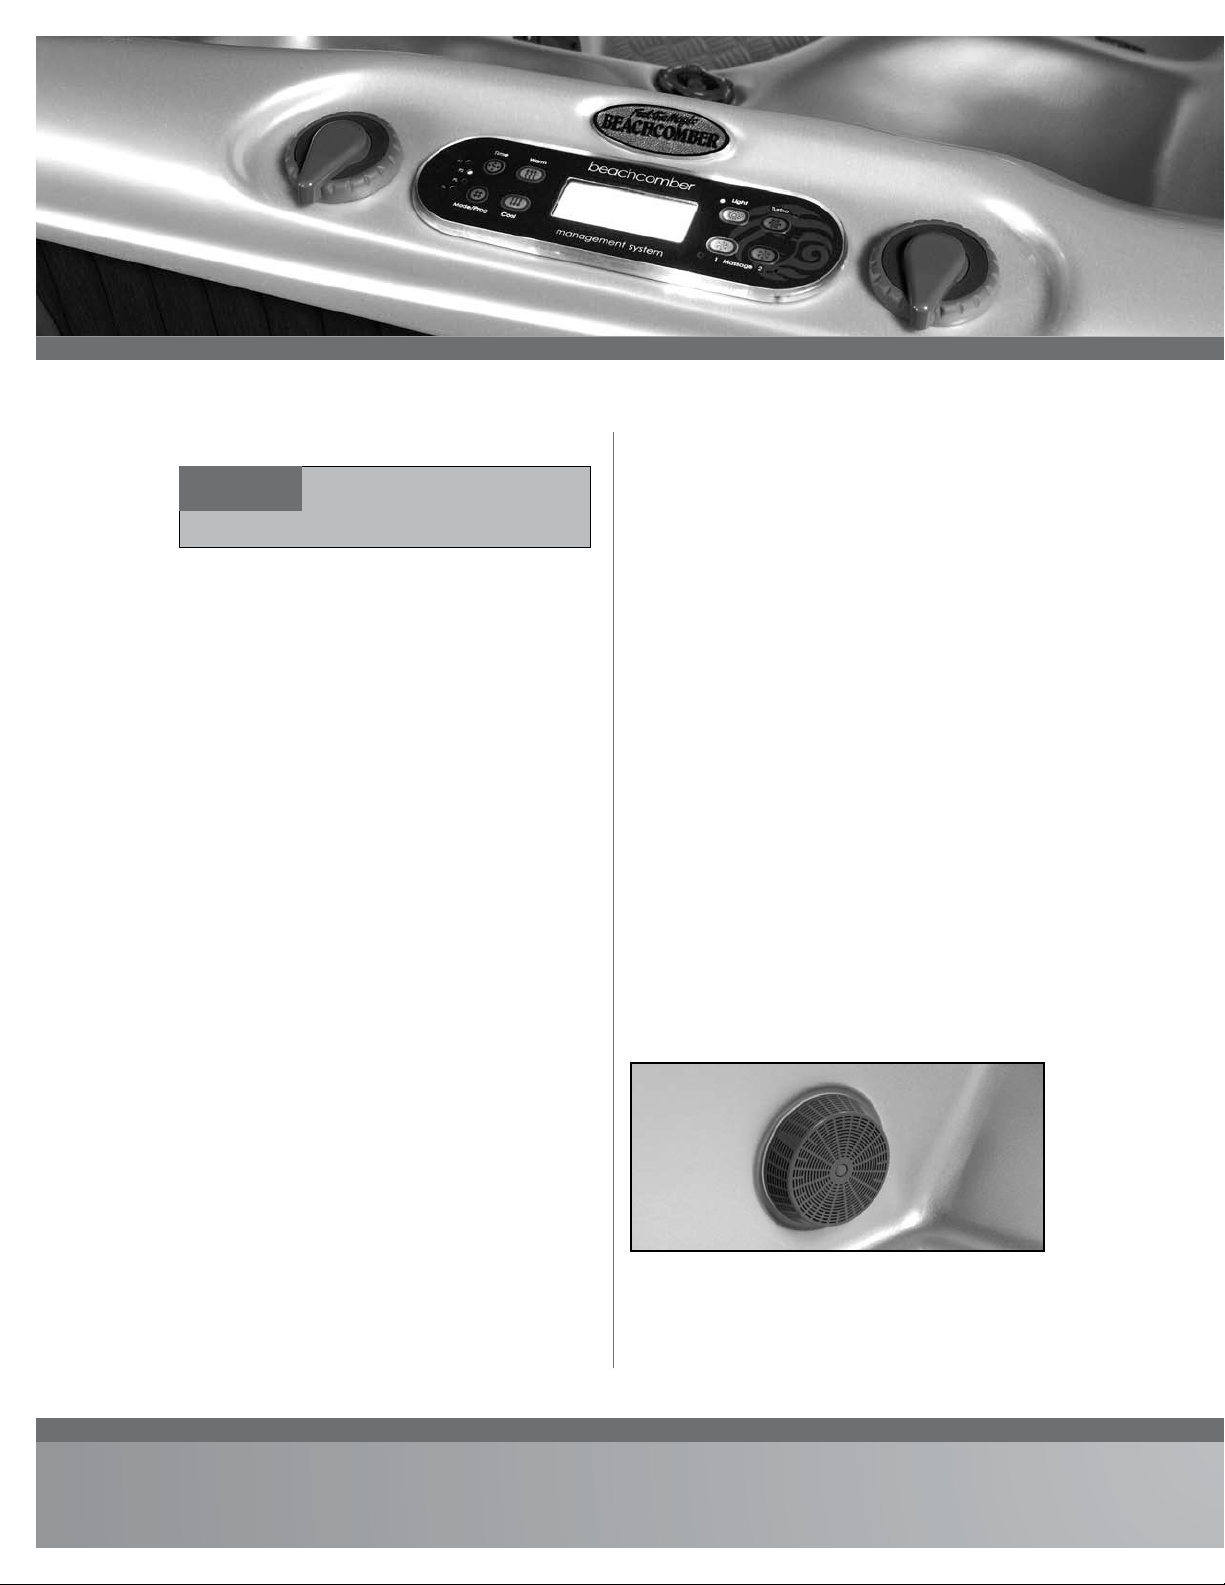
To reduce the risk of drowning from hair and
body entrapment, install suction fitting(s) with
a marked flow rate that is not less than the flow
rate marked on the remote packaged unit. Note:
these are factory installed. Do not operate the hot
tub with any of the suction fitting covers off.
These covers prevent hair or objects from being
sucked into the plumbing. See figure 1.
4
IMPORTANT! READ AND FOLLOW ALL
INSTRUCTIONS AND KEEP FOR EASY
REFERENCE.
WARNING
figure 1

5
CAUTION: THE EQUIPMENT AND CONTROLS
SHALL BE LOCATED NOT LESS THAN 3.5 ft OR 1m
HORIZONTALLY FROM THE HOT TUB.
Hyperthermia occurs when the internal
temperature of the body reaches a level of
several degrees above normal body temperature
of 98.6ºF (37ºC).The symptoms of hyperthermia
include drowsiness, lethargy and an increase of
internal temperature of the body.
The Effects:
• unawareness of impending hazard;
• failure to perceive heat;
• failure to recognize the need to exit the hot tub;
• physical inability to exit the hot tub;
• fetal damage in pregnant women; and
• Unconsciousness and danger of drowning.
Recommended time in water at 100ºF/38ºC
is 15 minutes. Lower temperatures will permit
longer bathing times. Always check the
temperature of the water before entry with a
thermometer.
Beachcomber’s Safety Features
Molded Interior Steps
Beachcomber Hot Tubs are made with anti-slip
checker plate flooring, designed to make entry and
exit safer. Always use extreme caution during entry
and exit, as hot tub surfaces are slippery when wet.
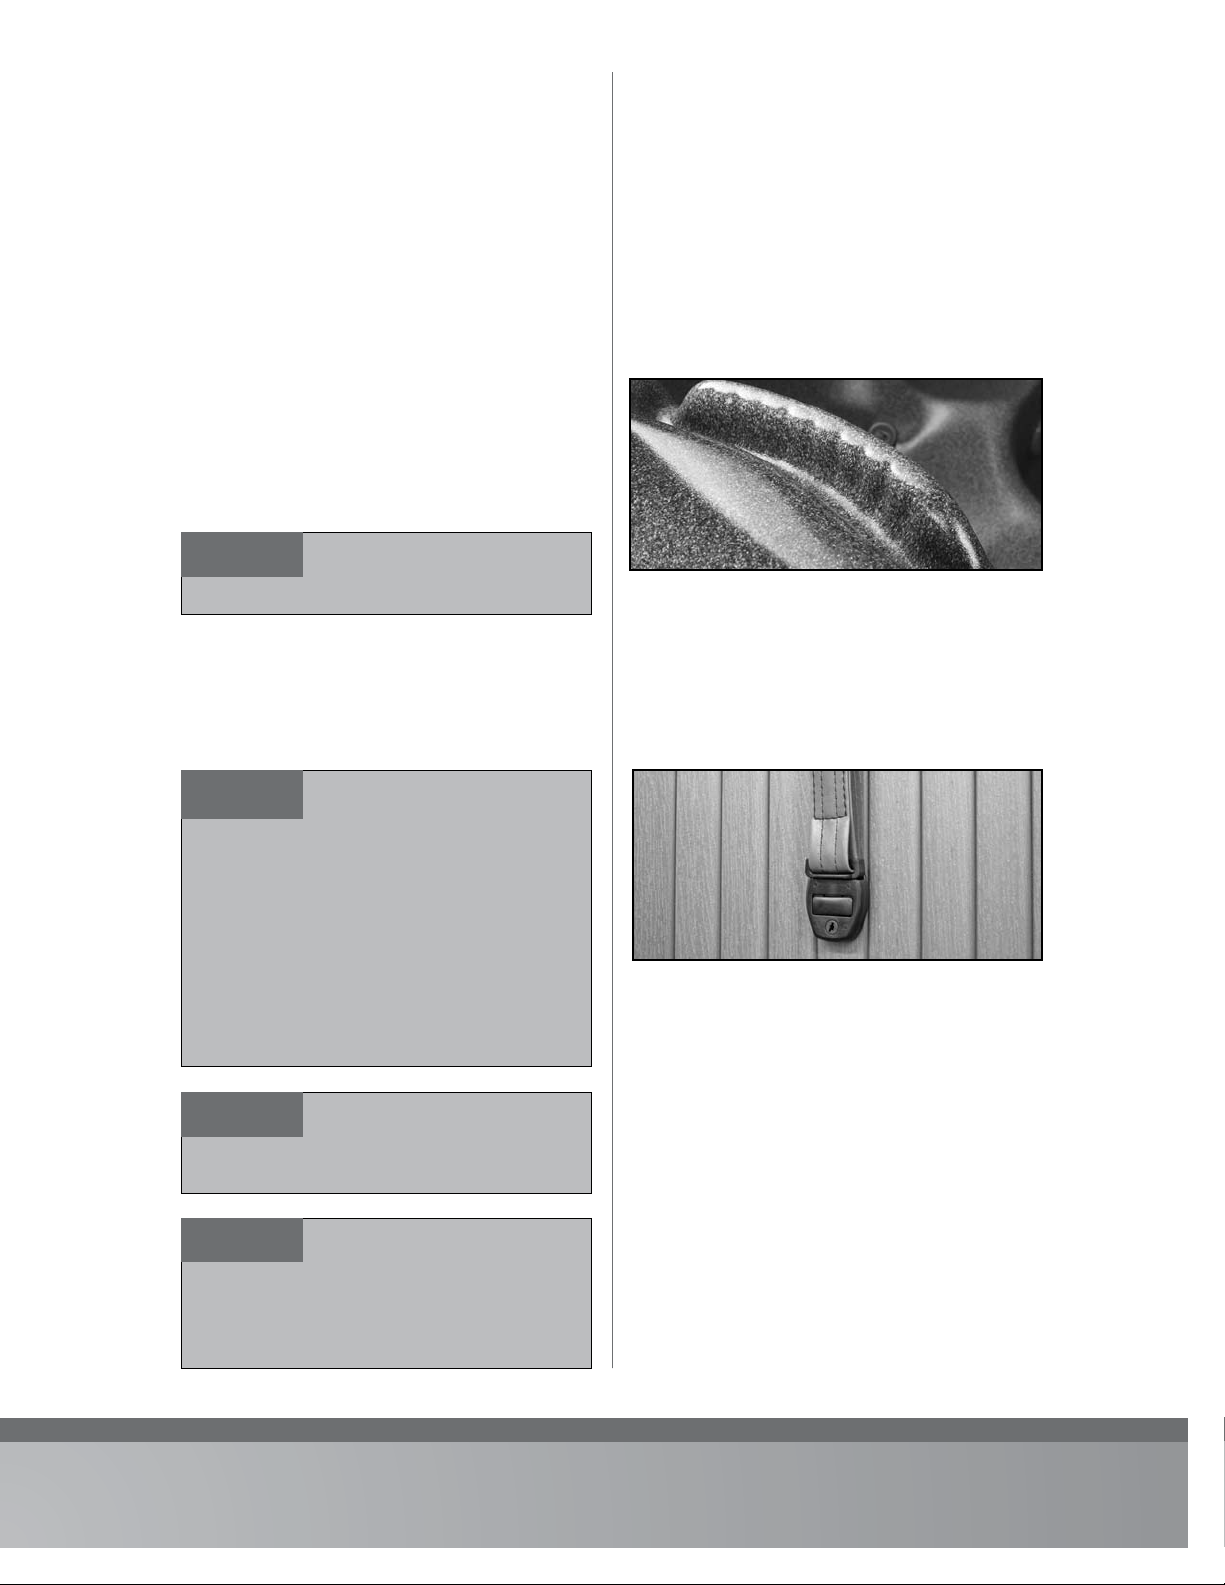
Body Molded Handgrips Use handgrips to prevent
slipping, and to promote ease of movement
while entering, soaking and exiting the hot tub.
See figure 2.
Heatshield Cover Locks
To prevent unwanted entry by children or
unauthorized users, use the cover lock assemblies
that come as a standard feature with each hot tub.
Screw the female half on to the hot tub cabinet
with the stainless screws provided. See figure 3.
THE USE OF ALCOHOL OR DRUGS CAN
GREATLY INCREASE THE RISK OF FATAL
HYPERTHERMIA IN HOT TUBS.
WARNING
PERSONS WITH THE FOLLOWING
CONDITIONS SHOULD CONSULT THEIR
PHYSICIAN BEFORE USING A HOT TUB: DIABETES, LOW
OR HIGH BLOOD PRESSURE, PERSONS WITH INFECTIOUS
DISEASES, OBESITY, HEART DISEASE, CIRCULATORY
PROBLEMS, PREGNANT WOMEN OR THOSE TAKING
MEDICATION PRESCRIBED BY THEIR PHYSICIAN. DO
NOT ALLOW ELECTRICAL DEVICES SUCH AS PORTABLE
STEREOS,TV’S, HAIR DRYERS WITHIN 5 FEET/1.5 METERS
OF THE HOT TUB. FAILURE TO DO SO COULD CAUSE
ELECTROCUTION RESULTING IN INJURY OR DEATH
SHOULD THE DEVICE FALL IN THE WATER.
WARNING
DO NOT ALLOW CHILDREN TO
USE A HOT TUB WITHOUT ADULT
SUPERVISION. PREVENT UNAUTHORIZED CHILD ACCESS
TO AVOID THE RISK OF DROWNING.
WARNING
figure 3
figure 2
THE HEATSHIELD IS STRONG ENOUGH
TO WITHSTAND UP TO 2 FEET OF
SNOW. IT IS NOT DESIGNED TO SUPPORT THE WEIGHT
OF CHILDREN, PETS OR ADULTS. THIS WILL BREAK THE
FOAM INNERS AND LEAD TO PREMATURE FAILURE OF
THE HEATSHIELD.
WARNING

6
Starting up a Beachcomber Hot Tub
Once the Protec equipment is hooked up using
the separate instructions provided with the Protec
Equipment box, and the electrical connection is
made by a qualified electrician, do the following:
1. Check all union fittings on the Protec or
Portable equipment to ensure that they are
tight. Hand-tightened is sufficient. If leaking
is noted at these fittings you may need to
tighten further or the gasket may be missing
or not seated properly. Unscrew the union
and check.
2. Open all knife valves that are pointing up.
See figure 4. Leave all valves that are facing
down in the closed position. Fill the hot
tub with water from a garden hose. You can
hang the hose over the edge of the hot tub
or hook it up to the drain/fill valve located
down by the pumps and fill from the bottom.
It is recommended you run your water
through your garden hose to waste for a few
seconds before filling the hot tub.
3. Fill the hot tub to half way up the
skimmer opening. Note: If your hot tub
is HushPump™ equipped your level
can be lowered to one third up the
skimmer opening. This will allow for more
displacement if the hot tub is subjected to
use by more than the recommended amount
of people for that model. See Figure 5.
OVER FILLING WILL NOT ALLOW ROOM
FOR DISPLACEMENT FROM PEOPLE
ENTERING THE HOT TUB. UNDER FILLING COULD CAUSE AN
AIRLOCK IN THE SYSTEM AND COULD LEAD TO PUMP AND
HEATER DAMAGE NOT COVERED BY YOUR GUARANTEE.
WARNING
ENSURE YOUR HOT TUB IS SITUATED ON
A LEVEL, HARD SURFACE CAPABLE OF
SUPPORTING BOTH THE WEIGHT OF THE HOT TUB,AND THE
WATER IN IT. SEE PAGE 31 FOR DETAILS..
WARNING
figure 5
figure 4
WATER LINE

7
4. Open the air bleed thumb screws to release
any air trapped in the external plumbing.
(See Figure 4) There is one on the 300 and
500 series hot tubs, two on a 500 series with
HushPump™ and a standard 700 series and
three on a 700 series with HushPump™. See
the equipment configuration diagrams on
the next page to locate the air bleed thumb
screws. Once all air is bled from the system,
open any knife valves that are facing down.
5. With the air bled from the system, you can
now turn on the power at the GFCI. Once
the control panel is on, use the instructions
on the following pages to complete your start
up. Refer to the instructions for the control
panel that matches your system.
Basic Hot Tub Configurations
Beachcomber Manufactures hot tubs in two
configurations, one of which you now own.
The Limited Edition, or Protec Hot Tub,
features the equipment outside of the hot tub
cavity under a safety step. See Figure 6.
The Original Portable features the equipment
tucked inside the hot tub cabinetry. A
plank style step is available for this style of
construction. See your dealership for details.
See Figure 7.
Beachcomber Original Portable
A plank style step is available as an optional accessory.
figure 6
figure 7
Beachcomber Limited Edition
Includes the Double Tiered Safety Step.
MICROFILTER REMOVAL AND MAINTENANCE
The Microfilter in the hot tub should be
cleaned approximately every two weeks or
more if bather load is high. Failure to clean the
Microfilter can result in cloudy water, odor and
potential equipment damage due to decreased
flow. To remove the Microfilter, put the hot tub
on stand-by (see digital operation instructions for
your model). Stand-by prevents debris from the
Microfilter or objects in the water from being
sucked into the pump. Note: The hot tub will stay
in stand-by mode until the sensors detect 50ºF / 10ºC
or the temperature sensors sense a temperature more
than 20ºF / 6ºC below set point.
To remove, twist the trim ring to unlock it
and remove with the floating weir assembly,
then lift out the basket and then pull out the
Microfilter. See figure 8 Remove any hair or
debris from the basket. Soak the Microfilter
in a cleaner such as Filter Pure overnight and
then remove and rinse thoroughly with a hose
spray nozzle to remove cleaner residue. It is
recommended that you alternate Microfilter
cleaning each month with Filter Cure. It is also
advisable to have two Microfilters, to alternate
while the other is soaking in the cleaner.
figure 8

8
Original Portable Hot Tub, Hush Pump & Turbo Version
Original Portable Hot Tub, 2 Speed Pump Version
Equipment Configuration Diagrams
Please use these diagrams for component location on all Beachcomber models.
Please Note: Your hot tub may or may not be equipped with features shown in this Owner’s Guide. Beachcomber makes continual changes, upgrades and
improvements; if you need more specific information on your hot tub, please call your local Beachcomber Dealership, or use the contact information in this guide.

9
Protec Hot Tub,
2 Speed Pump Version
Protec Hot Tub,
Hush Pump & Turbo Version
Please Note: Your hot tub may or may not be equipped with features shown in this Owner’s Guide. Beachcomber makes continual changes, upgrades and
improvements; if you need more specific information on your hot tub, please call your local Beachcomber Dealership, or use the contact information in this guide.

10
START UP
When your hot tub is first activated, it will go into priming mode (after
displaying some configuration information). The priming mode will last
up to 4 minutes; then circulation will start, then heat icon will come on
for 6 seconds, and then flicker for 90 seconds. Then heater will come
on to heat water to set temperature. It is recommended that priming
mode be allowed to finish, preventing any pumps from operating dry. If
you are positive all pumps are primed you can exit priming mode early
by pressing or .
TEMPERATURE ADJUSTMENT
Temp range is: (80°F - 104°F/26.0°C – 40.0°C) The factory pre-set
temperature is set at 100°F/37.5°C. The last measured temperature
is constantly displayed on the LCD. See edit menu in Owner’s Guide
to select F° or C°. Note: On non HushPump™ hot tubs the
current water temperature will only be displayed if the 2
speed filter pump has been running for two minutes.
WARM / COOL
Press the or button twice to display the set temperature.
Each time either button is pressed again, the set temperature will increase
or decrease depending on which button is pressed. After three seconds,
the LCD will automatically display the last measured water temperature.
HEATING MODES
This button is used to switch between Standard, Economy, and Sleep
modes. Press to enter mode programming, press to cycle
through to desired mode (LCD flashes until confirmed), then press
to confirm selection.
Standard Mode
maintains the set temperature at all times. Note
that the last measured hot tub temperature displayed is current
only when the pump has been running for at least 2 minutes. The
STANDARD icon will display until the mode is changed.
Economy Mode
heats the hot tub to the set temperature only during
filter cycles. The ECONOMY icon will display until mode is changed.
Pressing 1while in Economy mode puts the hot tub in
Standard-In-Economy mode, which operates the same as Standard
Mode, then reverts to Economy Mode automatically after 1 hour.
Use this mode to activate the heater if using the hot tub when not in
filter cycle. During this time, a press of the button will revert to
Economy Mode immediately
Sleep Mode heats the hot tub within 20°F (11°C) of the set
temperature only during filter cycles. The SLEEP icon will display until
mode is changed. Use this mode when going on holidays.
MASSAGE 1
Press 1button once to turn pump 1 on to low speed, press
1again for the pump’s high speed, and once more to turn off the pump.
Low speed turns off automatically after 2 hours and high speed turns
off automatically after 15 minutes. Massage pump 1 comes on for a 1
minute purge at the start of each filter cycle.
MASSAGE 2
Press 2button once to turn pump 2 on to low speed, press
2again for the pump’s high speed, and once more to turn off the pump.
Low speed and high speed turn off automatically after 15 minutes.
Massage pump 2 comes on for a 1 minute purge at the start of each
filter cycle.
TURBO(optional)
Press the button to turn Turbo on and off. Turbo will
automatically turn off after 15 minutes. Turbo comes on for a 10
second purge at the start of each filter cycle.
LIGHT
Press the button to turn the hot tub light on, press again to turn
off. Light will automatically turn off after 3 hours.
STANDBY MODE
Pressing or followed by
2
will turn off all hot tub
functions temporarily. SBY will appear on your display.
This is helpful
when changing a Microfilter cartridge. Press any button to exit standby
mode. Note: If hot tub is in a heat cycle when standby is selected the 2
speed pump or HushPump™ will run for approximately 15 seconds.
ET-7 CONTROL PANEL INSTRUCTIONS
TurboLightWarm
Cool Massage1 2
Time
Mode/Prog
TurboLightWarm
Cool Massage1 2
Time
Mode/Prog
TurboLightWarm
Cool Massage1 2
Time
Mode/Prog
F2
TL
F1
PL
F2
TL
F1
PL
F2
TL
F1
PL

TIME OF DAY AND FILTER CYCLES SETTING
On all systems, the 2 speed filter pump or HushPump™
and ozone generator will run during filtration. There are two
filter cycles per day. The start/end times of each cycle are
programmable. Programming filter times on HushPump™
equipped hot tubs are used to tell the system how many hours a
day to turn the heater on when in Economy mode.
To Program:
1. Press then .
2. Use the and buttons to adjust the time of
day in hours, press the again to adjust the time in
minutes. Use the and buttons to adjust the
minutes. Press to enter new time.
3. You will see PROGRAM, FILTER 1 (F1), START
TIME appears on the display. Press or
to choose the filter start time hour. Enter the hour by
pressing .
4. Press or to choose the filter start time
minutes. Each press will change the start time by 5
minutes. Enter the minutes by pressing .
5. Press to see the PROGRAM, FILTER 1(F1),
END TIME. Adjust the time as done above.
6. Press to see the PROGRAM, FILTER 2(F2),
START TIME. Proceed as above.
7. Press to see PROGRAM, FILTER 2(F2),
END TIME. Adjust the time as done above.
8. The time that now appears allows you to turn your hot tub
light on automatically. Adjust time as done above.
9. Program the time you want your light to turn off.
10. Press will enter the new filter cycle times into the
system and display the current water temperature.
PANEL INVERSION
Press the or button, followed by the or
button to change the numbers in the display to read upside
down. Press the same sequence to set back.
LOCKING THE PANEL
Press , 1then within 3 seconds. When locked, the
PL indicator light will light up. All buttons are frozen except the
button. To unlock the panel, press , 1then .
LOCKING THE SET TEMPERATURE
Press or then , 1and within 3
seconds to activate the lock. The TL indicator light will light up
when temperature is locked. To unlock the set temperature, press
or then
, 1and .
PERIODIC REMINDER MESSAGES
(press the button to reset a displayed reminder
message)
rPH: Test and adjust pH chemical levels as per Beachcomber
instructions. Reminder is every 7 days.
rCL: Remove, clean, and reinstall Microfilter as per Beachcomber
instructions. Reminder is every 30 days.
rt9: Test & reset GFCI as per Beachcomber instructions.
Reminder is every 30 days.
rdr: Drain and refill hot tub as per Beachcomber instructions.
Reminder is every 90 days.
rCO: Clean and condition Heatshield as per Beachcomber
instructions. Reminder is every 180 days.
rCH: Install new Microfilter. Reminder is every 365 days.
To suppress reminders, refer to the edit menu on page
16.
DIAGNOSTIC DISPLAY MESSAGES
OHH or OHS: Overheat-DO NOT ENTER HOT TUB
ICE: Potential Freeze
SNA: Hot tub is shut down
SNB: Hot tub is shut down
SNS: Sensor out of balance
HFL: Could indicate flow problem
LF: Persistent low flow problems
DR: Inadequate water detected
DRY: Inadequate water detected
PR: Hot tub in priming mode
- - : Temperature unknown
---: Temperature not current or in Economy or Sleep mode.
PLEASE REFER TO TROUBLE SHOOTING GUIDE
STARTING ON PAGE 23 FOR A COMPLETE
EXPLANATION OF DIAGNOSTIC MESSAGES.
11
SHOCK HAZARD!
NO USER SERVICEABLE PARTS.
DO NOT ATTEMPT SERVICE OF THIS CONTROL. CONTACT
YOUR DEALERSHIP OR SERVICE PROVIDER FOR
ASSISTANCE. FOLLOW ALL OWNER’S GUIDE POWER
CONNECTION INSTRUCTIONS. INSTALLATION MUST
BE PERFORMED BY A LICENSED ELECTRICIAN AND
ALL GROUNDING CONNECTIONS MUST BE PROPERLY
INSTALLED.
WARNING
TAMPERING WITH OR MODIFYING
THIS EQUIPMENT MAY VOID YOUR
GUARANTEE.
WARNING
ALWAYS TEST WATER TEMPERATURE
PRIOR TO ENTRY USING THE TOPSIDE
CONTROL PAD. ENSURE COMFORT BY ALSO CHECKING
WATER WITH A THERMOMETER.
WARNING

12
STARTUP
When your hot tub is first activated, it will go into priming mode
(after displaying some configuration information). The priming
mode will last up to 4 minutes; then circulation will start, then heat
light will come on for 6 seconds, and then flicker for
90 seconds
.
Then heater will come on to heat water to set temperature. It is
recommended that priming mode be allowed to finish, preventing
any pumps from operating dry. If you are positive all pumps are
primed you can exit priming mode early by pressing .
TEMPERATURE ADJUSTMENT
Temp range is: (80°F - 104°F/26.0°C – 40.0°C) The factory pre-set
temperature is set at 100°F/37.5°C. The last measured temperature
is constantly displayed on the LCD. See edit menu in Owner’s Guide
to select F° or C°. Note: On non HushPump™ hot tubs the
current water temperature will only be displayed if the 2
speed filter pump has been running for two minutes.
Press the button once to display the temperature
previously set. To change the set temperature, press the
button a second time before the LCD stops flashing. Each
press of the will continue to cause the set temperature
to increase or decrease depending on what direction was last
chosen. Each press to follow will change the set temperature
in the same direction. If the opposite direction is desired,
release the pad and let the display revert to the actual water
temperature. Press the pad to display the set temperature, and
again to make the temperature change in the desired direction.
Actual water temperature will reappear on the display after
changing the temperature setting.
HEATING MODES
A button combination is used to switch between Standard,
Economy, and Sleep modes. Press followed by to
enter mode programming, press to cycle through to the
desired mode (LCD flashes until confirmed), then press to
confirm selection.
Standard Mode maintains the set temperature at all times.
STD will appear on the display momentarily when you switch
into Standard Mode.
Economy Mode heats the hot tub to the set temperature only
during filter cycles. ECN will appear solid when the temperature
is not current and will alternate with the temperature when the
temperature is current. On a HushPump™ equipped hot tub the
heater will come on if required for up to 2 hours twice a day (total
of 4 hrs). Pressing while in economy mode puts the hot tub
in Standard-In-Economy mode, SE, which operates the same
as standard mode, then reverts to Economy mode automatically
after 1hour. Use this mode to activate the heater if using tub
when not in filter cycle. During this time, pressing followed
by will revert the mode to Economy immediately.
Sleep Mode heats the hot tub within 20°F (11°C) of the set
temperature only during filter cycles. SLP will appear on the display
until mode is changed. Use this mode when going on holidays.
MASSAGE
Press the button once to activate the pump’s low speed, again
for the pump’s high speed, and once more to turn off the pump. The
pump’s low speed turns off automatically after 2 hours. The pump’s
high speed will turn off automatically after 15 minutes. Massage
pump comes on for a 1 minute purge at the start of each filter cycle.
TURBO (OPTIONAL)
Press the button to turn Turbo on and off. Turbo will
automatically turn off after 15 minutes. Turbo comes on for a 10
second purge at the start of each filter cycle.
LIGHT
Press the button to turn the hot tub light on, press again to
turn off. Light will automatically turn off after 3 hours.
Heat
LightTemp
TurboMassage
Heat
LightTemp
TurboMassage
Heat
LightTemp
TurboMassage
ET-5 CONTROL PANEL INSTRUCTIONS

13
STANDBY MODE
Pressing followed by or will turn off all hot tub
functions temporarily. SBY will appear on your display. This is
helpful when changing a Microfilter cartridge. Pressing any button
exits Standby mode. Note: If the hot tub is in a heat cycle
when standby is selected the 2 speed filter pump or
HushPump™ will run for approximately 15 seconds.
FILTER CYCLES
The first filter cycle (day) begins 6 minutes after the hot tub is
powered up. The second filter cycle (night) begins 12 hours later.
If the hot tub is not HushPump™ equipped, filter duration is
programmable for 1-12 hours (F1-F12). The default filter time is
2 hour cycles twice a day.
To program:
1. Press button then
2. Press to select the filter duration.
3. Press to select the number of filter cycles.
4. Display will show DN (both day and night cycles);
or D(day cycle only); or N (night cycles only). Press
to adjust
5. Press to exit programming mode.
6. HushPump™ equipped hot tubs will automatically
filter 2-12 hour cycles per day. No programming is
available on HushPump™ equipped hot tubs due to
the energy efficiency of the HushPump™.
Changing filter cycles on HushPump™ equipped tubs will only
affect the times the heater comes on if using the Economy
Heating mode. It does not the change the amount the
HushPump™ runs.
PERIODIC REMINDER MESSAGES
(press the button to reset a displayed reminder message)
rPH: Test and adjust pH chemical levels as per Beachcomber
instructions. Reminder is every 7 days.
rCL: Remove, clean, and reinstall Microfilter Cartridge as per
Beachcomber instructions. Reminder is every 30 days.
rt9: Test & reset GFCI as per Beachcomber instructions.
Reminder is every 30 days.
rdr: Drain and refill hot tub as per Beachcomber instructions.
Reminder is every 90 days.
rCO: Clean and condition Heatshield as per Beachcomber
instructions. Reminder is every 180 days.
rCH: Install new Microfilter cartridge. Reminder is every 365 days.
To suppress reminders, refer to the edit menu on page
16 of this Owner’s Guide.
DIAGNOSTIC DISPLAY MESSAGES
OHH or OHS: Overheat-DO NOT ENTER HOT TUB
ICE: Potential Freeze
SNA: Hot tub is shut down
SNB: Hot tub is shut down
SNS: Sensor out of balance
HFL: Could indicate flow problem
LF: Persistent low flow problems
DR: Inadequate water detected
DRY: Inadequate water detected
PR: Hot tub in priming mode
- - : Temperature unknown
STD: Hot tub is in Standard mode
ECN: Hot tub is in Economy mode
SE: Hot tub is in Standard-Economy mode
PLEASE REFER TO TROUBLE SHOOTING GUIDE
ON PAGE 23 FOR A COMPLETE EXPLANATION OF
DIAGNOSTIC MESSAGES.
SHOCK HAZARD!
NO USER SERVICEABLE PARTS.
DO NOT ATTEMPT SERVICE OF THIS CONTROL. CONTACT
YOUR DEALERSHIP OR SERVICE PROVIDER FOR
ASSISTANCE. FOLLOW ALL OWNER’S GUIDE POWER
CONNECTION INSTRUCTIONS. INSTALLATION MUST
BE PERFORMED BY A LICENSED ELECTRICIAN AND
ALL GROUNDING CONNECTIONS MUST BE PROPERLY
INSTALLED.
WARNING
TAMPERING WITH OR MODIFYING
THIS EQUIPMENT MAY VOID YOUR
GUARANTEE.
WARNING
ALWAYS TEST WATER TEMPERATURE
PRIOR TO ENTRY USING THE TOPSIDE
CONTROL PAD. ENSURE COMFORT BY ALSO CHECKING
WATER WITH A THERMOMETER.
WARNING

14
STARTUP
When your hot tub is first activated, it will go into priming mode
(after displaying some configuration information). The priming
mode will last up to 4 minutes; then circulation will start,
then heat light will come on for 6 seconds, and then flicker
for
90 seconds
. Then heater will come on to heat water to set
temperature. It is recommended that priming mode be allowed
to finish, preventing any pumps from operating dry. If you are
positive all pumps are primed you can exit the priming mode
early by pressing .
TEMPERATURE ADJUSTMENT
Temp range is: (80°F - 104°F/26.0°C – 40.0°C) The factory pre-set
temperature is set at 100°F/37.5°C. The last measured temperature
is constantly displayed on the LCD. See edit menu in Owner’s Guide
to select F° or C°. Note: On non HushPump™ hot tubs the
current water temperature will only be displayed if the 2
speed filter pump has been running for two minutes.
Press the button once to display the temperature previously
set. To change the set temperature, press the button a
second time before the LCD stops flashing. Each press of the
will continue to cause the set temperature to increase or
decrease depending on what direction was last chosen. Each press
to follow will change the set temperature in the same direction. If
the opposite direction is desired, release the pad and let the display
revert to the actual water temperature. Press the pad to display the
set temperature, and again to make the temperature change in the
desired direction. Actual water temperature will reappear on the
display after changing the temperature setting.
HEATING MODES
A button combination is used to switch between Standard, Economy,
and Sleep modes. Press followed by to enter mode
programming, press to cycle through to the desired mode
(LCD flashes until confirmed), then press to confirm selection.
Standard Mode
maintains the set temperature at all times. STD
will appear on the display momentarily when you switch into
Standard Mode.
Economy Mode
heats the hot tub to the set temperature only
during filter cycles. ECN will appear solid when the temperature
is not current and will alternate with the temperature when the
temperature is current. On a HushPump™ equipped hot tub the
heater will come on if required for up to 2 hours twice a day (total
of 4 hrs). Pressing while in economy mode puts the hot tub
in Standard-In-Economy mode, SE, which operates the same as
standard mode, then reverts to Economy mode automatically after
1hour. Use this mode to activate the heater if using tub when not in
filter cycle. During this time, pressing followed by will
revert the mode to Economy immediately.
Sleep Mode heats the hot tub within 20°F (11°C) of the set
temperature only during filter cycles. SLP will appear on the display
until mode is changed. Use this mode when going on holidays.
MASSAGE
Press the button once to activate the pump’s low speed, again
for the pump’s high speed, and once more to turn off the pump. The
pump’s low speed turns off automatically after 2 hours. The pump’s
high speed will turn off automatically after 15 minutes. Massage
pump comes on for a 1 minute purge at the start of each filter cycle.
LIGHT
Press the button to turn the hot tub light on, press again to turn off.
Light will automatically turn off after 3 hours.
Massage Temp Light
Massage Temp Light
Massage Temp Light
ET-3 CONTROL PANEL INSTRUCTIONS

15
STANDBY MODE
Pressing
followed by or will turn off all hot tub
functions temporarily. SBY will appear on your display. This
is helpful when changing a filter element. Pressing any button
exits Standby mode.
Note: If the hot tub is in a heat cycle when
standby is selected the 2 speed filter pump or HushPump™ will
run for approximately 15 seconds.
FILTER CYCLES
The first filter cycle (“day”) begins 6 minutes after the hot tub is
powered up. The second filter cycle (“night”) begins 12 hours
later. If the hot tub is not HushPump™ equipped filter duration is
programmable for 1-12 hours (F1-F12). The default filter time is
2 hour cycles twice a day.
To Program:
1. Press button then
2. Press to select the filter duration.
3. Press to select the number of filter cycles.
4. Display will show DN (both day and night cycles);
or D(day cycle only); or N (night cycles only). Press
to adjust
5. Press to exit programming mode.
6. HushPump™ equipped hot tubs will automatically
filter 2-12 hour cycles per day. No programming
is available on Hush equipped hot tubs due to the
energy efficiency of the HushPump™.
Changing filter cycles on HushPump™ equipped tubs will only
affect the times the heater comes on if using the Economy
Heating mode. It does not the change the amount the
HushPump™ runs.
PERIODIC REMINDER MESSAGES
(press the button to reset a displayed reminder message)
rPH: Test and adjust pH chemical levels as per Beachcomber
instructions. Reminder is every 7 days.
rCL:
Remove, clean, and reinstall Microfilter Cartridge as per
Beachcomber instructions. Reminder is every 30 days.
rt9: Test & reset GFCI as per Beachcomber instructions.
Reminder is every 30 days.
rdr: Drain and refill hot tub as per Beachcomber instructions.
Reminder is every 90 days.
rCO: Clean and condition Heatshield as per Beachcomber
instructions. Reminder is every 180 days.
rCH: Install new Microfilter cartridge. Reminder is every
365 days.
To suppress reminders, refer to the edit menu on page
16 of this Owner’s Guide.
DIAGNOSTIC DISPLAY MESSAGES
OHH or OHS: Overheat-DO NOT ENTER HOT TUB
ICE: Potential Freeze
SNA: Hot tub is shut down
SNB: Hot tub is shut down
SNS: Sensor out of balance
HFL: Could indicate flow problem
LF: Persistent low flow problems
DR: Inadequate water detected
DRY: Inadequate water detected
PR: Hot tub in priming mode
- - : Temperature unknown
STD: Hot tub is in Standard mode
ECN: Hot tub is in Economy mode
SE: Hot tub is in Standard-Economy mode
PLEASE REFER TO TROUBLE SHOOTING GUIDE
ON PAGE 23 FOR A COMPLETE EXPLANATION OF
DIAGNOSTIC MESSAGES.
ALWAYS TEST WATER TEMPERATURE
PRIOR TO ENTRY USING THE TOPSIDE
CONTROL PAD. ENSURE COMFORT BY ALSO CHECKING
WATER WITH A THERMOMETER.
WARNING
SHOCK HAZARD!
NO USER SERVICEABLE PARTS.
DO NOT ATTEMPT SERVICE OF THIS CONTROL.
CONTACT YOUR DEALERSHIP OR SERVICE PROVIDER
FOR ASSISTANCE. FOLLOW ALL OWNER’S GUIDE POWER
CONNECTION INSTRUCTIONS. INSTALLATION MUST
BE PERFORMED BY A LICENSED ELECTRICIAN AND
ALL GROUNDING CONNECTIONS MUST BE PROPERLY
INSTALLED. TAMPERING WITH OR MODIFYING THIS
EQUIPMENT MAY VOID YOUR GUARANTEE.
WARNING
TAMPERING WITH OR MODIFYING
THIS EQUIPMENT MAY VOID YOUR
GUARANTEE.
WARNING

16
Edit Menu
There are three selections available in the Edit
Menu.
Suppress Reminders: Your system will periodically
remind you to perform certain maintenance
tasks on your hot tub. If you do not want these
reminders to display, you can suppress them.
See the Control Panel section for a complete
list of the reminders and what they mean.
Temperature display: You have the option of
changing the default temperature display from
Fahrenheit to Centigrade.
24 hour Time Display: If your hot tub is a 700
series you can select whether your clock is in 24
hours (Military) format or 12 hour (am/pm).
TO ENTER THE EDIT MENU
160, 300 & 500 Series
Press
,
,
and then
700 Series
Press
or
, 1, , and 1
Press
(
or
for the ET-7) to scroll
through the following available sub-menus.
• SRN OR SRY (Suppress Reminders)
• TCY OR TCN (Temperature Display)
• 24Y OR 24N (24 Hour Time Display)
Once a selection is made you will see one of
the following on your display:
SRN OR SRY
Press
( 1 for the ET-7) and the Nor Y
will flash. Press
(
or for the ET-7)
to choose Yto suppress reminders or Nto not
suppress reminders. Press
( 1 for the
ET-7) to accept your selection. Press (
or for the ET-7) to go to the next setting
selection.
TCY OR TCN
Press
( 1 for the ET-7) and the Nor Y
will flash. Press
(
or for the ET-7)
to choose Yfor Celsius or Nfor Fahrenheit.
Press or ( 1 for the ET-7) to accept your
selection. Press ( or for the ET-7)
to go to the next setting selection.
24Y OR 24N
Press 1 and the Nor Ywill flash. Press
or to select either Yfor Military or Nfor
am/pm. Press 1 to accept your selection.
Press or to go to the next setting
selection.
To exit Edit Menu press twice.

17
BEACHCOMBER’S RECOMMENDED PARAMETERS
FOR BALANCED HOT TUB WATER
Your dealer may recommend slightly different
levels depending on your local source water.
Please see your dealer for more information by
taking a water sample in to be analyzed.
Water Care and Chemistry
This is a very important component to protect your
hot tub and its equipment. Failure to maintain
proper water balance could damage your hot tub
and equipment and affect your guarantee. Your
dealer can provide you with free water analysis,
treatment and home testing products. Also see the
booklet, Beachcomber’s Guide to Hot Tub Water Care for
additional information.
SANITIZER LEVEL
Always maintain an adequate sanitizer level.
Failure to do so will result in cloudy water, odor
and skin or respiratory problems. The ideal
range is 3 - 5 ppm. Check daily with test strips
or a test kit available from your Beachcomber
Dealership.
Always follow the label instructions on
water care chemicals:
• Keep out of reach of children;
• Do not mix products together;
• Add one product at a time;
• Add chemical to water, not water to chemicals;
• Store chemicals in a cool, dry place,
• Do not allow liquids to freeze.
PH LEVEL: IDEAL 7.2 - 7.8
This determines the acidity or alkalinity of your
water, 7.0 being neutral. Water that is too acidic
or too alkaline can damage your hot tub; Test
your pH every week or more often if possible.
Use
pH Plus
or
pH Minus
to adjust.
TOTAL ALKALINITY: IDEAL 100 - 120 ppm
Balance total alkalinity to stabilize your pH level,
prevent scaling and ensure your sanitizer works
at peak efficiency. Use Resist to increase the level
or pH Minus to lower. Adjust at initial fill and
when refilling or topping up.
CALCIUM HARDNESS: IDEAL 150 - 200 ppm
Too high a level can cause cloudy water or scaling
on the hot tub surface and heating element.
Too low a level can lead to excess foaming in the
water. Use Protect to increase the level, use fresh
water dilution to lower. Adjust at initial fill and
when refilling.
OTHER IMPORTANT CONDITIONERS
1. Metal and mineral sequestering product
must be added to keep any metals or
minerals in the water in solution.
Use
Eliminate #1
at initial fill.
2.
Scale inhibitor prevents calcium buildup
forming on surfaces in the hot tub.
Use Eliminate Plus #2 at initial fill and weekly.
3.
Clarifier agglomerates tiny particles in the water
making them easier to be picked up by the
Microfilter. It also provides lubrication to seals.
Use Pure Blue at initial fill and weekly.
4. Enzymes, a natural compound, eliminates
scum and organic contaminants.
Use Purezyme #3 at initial fill and weekly.
Beachcomber offers a full line of recommended
water care products to get the most from your
Beachcomber Hot Tub. Since 1978, we have
been providing Beachcomber owners with
custom formulated products to meet the needs
of your hot tub. Now, Beachcomber offers
“Judy Scentsations” to add the healing touch of
aromatherapy to your hot tub experience. See
your Beachcomber dealership for more details.
PH LEVEL: 7.2 - 7.8
SANITIZER LEVEL (CHLORINE
OR BROMINE): 3 - 5 PPM
CALCIUM HARDNESS: 150 - 200 PPM
TOTAL ALKALINITY: 100 - 120 PPM
TOTAL DISSOLVED SOLIDS:
NO MORE THAN 1500 PPM
ALWAYS LEAVE THE HEATSHIELD OPEN
FOR ONE HOUR WHEN SHOCK TREATING
THE WATER.THE HIGH LEVELS OF SANITIZER CAN DAMAGE THE
UNDERSIDE OF YOUR HEATSHIELD.THIS IS NOT COVERED BY
YOUR GUARANTEE.
WARNING
DO NOT ALLOW CHILDREN TO
USE A HOT TUB WITHOUT ADULT
SUPERVISION. PREVENT UNAUTHORIZED CHILD ACCESS
TO AVOID THE RISK OF DROWNING.
WARNING

18
EverLite™ 6 Operating Instructions
1. Beachcomber Mode A -
Light will sequence from
Red, to Green, to Blue continuously.
Press the
light button once to start the ‘Beachcomber
Mode A’. Light will stay on each solid color
for three seconds. The color will blend with
the next color for four seconds before the
next color becomes a solid. To turn off, press
button once. *
2. Freeze Mode -
As it cycles through the
‘Beachcomber Mode A’
, the light can be frozen on
any solid or blended color.
Choose a color, and
then touch the button twice (off, then on)
within four seconds to switch to ‘Freeze Mode’.
To turn off, press button once.
3. Pulse Mode -
This is a random cycling mode,
which imitates the soothing rhythm of a heartbeat.
When in the ‘Freeze Mode’, touch the button
twice (off, then on) within four seconds
to switch to ‘Pulse Mode’. To turn off, press
button once.
4. White Mode -
This mode recreates natural white
light.
When in the ‘Pulse Mode’, touch the
button twice (off, then on) within four
seconds to switch to ‘White Mode’. To turn off,
press button once.
5. Beachcomber Mode B - All lights above waterline
are turned on, while all underwater lights are off.
When in the ‘White Mode’, touch the button
twice (off, then on) within four seconds to
switch to ‘Beachcomber Mode B’. To turn off,
press button once.
6. Beachcomber Mode C - All lights below
waterline are turned on, while all lights above
water are off. When in the ‘Beachcomber Mode
B’, touch the button twice (off, then on)
within four seconds to switch to ‘Beachcomber
Mode C’. To turn off, press button once.
*
Note: If the light is left off for more than ten seconds, it will
revert back to ‘Beachcomber Mode A’ when switched back on.
Hot Tub Care and Maintenance
CLEANING OF THE ACRYLIC SURFACE
The acrylic surface is very easy to maintain and
care for. Use Tub Clean to remove water level scum
lines with warm water and a damp cloth; wipe
down, avoiding contact with the water as Tub
Clean can cause foaming.
HEATSHIELD AND STEP TOPS
As with any vinyl product that is exposed to the
weather, the better the care, the longer it will
last. Use a mild dish soap solution to remove
dirt on the Heatshield and then treat the vinyl
by applying Cover All as per the label. Avoid
application in the hot sun.
HOT TUB CABINETRY AND STEPS
The cabinet and step of your hot tub is made
from a synthetic plastic called Enviroskirt™.
If dirty, simply wipe down with a mild soap
solution and rinse well. If your hot tub cabinet
is natural cedar and you want to keep it looking
new, use Beachcomber’s “Nu Wood Stain”
Clear once a year. If the cedar is weathered
some, use Nu Wood Natural or Twilight to
bring back the color. Prior sanding with 100
grit sandpaper may be necessary if weathering
is advanced.
NEVER USE A CLEANER THAT CONTAINS
AMMONIA. THIS COULD DAMAGE YOUR
ACRYLIC SURFACE. AVOID LEAVING THE HOT TUB EMPTY
AND THE ACRYLIC EXPOSED TO HOT SUN. ALWAYS PUT THE
HEATSHIELD BACK ON THE HOT TUB WHEN IT IS NOT IN
USE.
WARNING
ZONED MODE
ZONED MODE
NOTE:
POINTS 1
THROUGH
4 APPLY TO
EVERLITE 4.
THE EVERLITE 6
INCLUDES ALL
SIX POINTS.

19
PLASTIC COMPONENTS
The jets should be removed periodically and
rinsed out to remove debris from the spinning
assemblies. If calcium build-up is present, soak
the parts in Filter Cure to loosen the calcium
and then scrub with a brush and rinse off. If
a lot of hair and debris is present on suction
covers located in the foot well, this can reduce
water flow to the pumps. Manually remove
when the hot tub is empty or full.
Operation of Hot Tub Interior Features
MASSAGE INSERTS OR JETS
The jets in a Beachcomber Hot Tub are known
as Energ-Jets™ in three sizes; small, medium
and large. They are interchangeable within
the same sizes. See Figure 9 Simply turn them
counterclockwise until they click and pop
out. To re-install, line up the small protrusion
on the back of the face plate with the slot on
the white WaterPort and then turn clockwise
and push in until they click in. The jets can
also be individually turned off/on. Simply
turn clockwise to turn off the water flow and
counterclockwise to turn on water flow.
To turn on the neck jet on the model 350 or 500
and 700 series hot tubs turn counterclockwise
to turn on and clockwise to turn off. If this jet
does not turn off then carefully pry the face
plate off with a flat head screw driver, and screw
the internal portion back in by hand. Then pop
the face plate back on and turn it clockwise to
tighten in the internal portion.
AIR CONTROL VALVES
There are two air control valves located on
either side of the touch pad. See Figure 10. In
the six o’clock position they are off, meaning
no air can be drawn to the jets. To allow air
to be drawn in, turn the lever to the 2 o’clock
position. On 300, and 500 series hot tubs the
left air control services the seat jets on the left
of the hot tub and jets in the foot well. The
right air control services seat jets on the right
side of the hot tub. These air controls improve
the massage experience in your hot tub by
adding more turbulence to the water flow.
On the 350 model and 500 series hot tubs with the
Reflex Foot Massage (RFM) option, the right air
control services the RFM jets when the water flow
is diverted to them and the left air control services
all the seat jets. On the 700 series, the left air
control allows air flow to jets running off Massage
Pump 1. The right air control allows air flow to jets
running off Massage Pump 2. The right air control
would also allow air flow to the RFM jets if the
diverter valve is diverting water flow from Massage
Pump 2 to the RFM jets. On all models more air is
drawn in when the jet pump is on high speed than
when the pump is on low speed.
RFM DIVERTER VALVE
The purpose of this valve is to divert water flow
between either the RFM foot jets or the seat jets.
See figure 11
. On 700 series hot tubs it diverts water
flow from massage 2 pump between the RFM foot
jets or the seat jets on the left side of the hot tub.
Always turn the pump to low speed or off before
attempting to turn the RFM Diverter Valve. Failure
to do this could cause the handle to break due
to the high velocity of water moving through the
valve. Note: when the hot tub is not being used,
NEVER USE AN ABRASIVE CLEANER
FOR CLEANING THE ENVIROSKIRT™
CABINET AS THIS WILL DAMAGE THE FINISH.
WARNING
figure 9
figure 10
PROTRUSION
GROOVE

20
the diverter valve handle must be left in the center
position. This ensures that water in both zones is
always in circulation during periods of non use.
AQUACOUSTIC SURROUND SOUND SYSTEM™ (ACSS)
If your hot tub is equipped with the ACSS feature
simply lift up the front cover, insert your CD or
select a radio station, then select a volume level
between 28-34. If you purchased the optional
remote see the remote control reference card for
operation instructions. The remote is waterproof
but not meant to be left in the water for storage.
If you have the optional True Bass™ ACSS System
the CD player fader control should be left in the
zero position. For more in depth instruction on
the CD player see your CD Player owners manual.
HOT TUB LIGHTING
All Beachcomber tubs come standard with either
a 12 volt incandescent light or an EverLite™ LED
light. To replace either unit drain your tub and
locate your lens removal tool to unscrew the light
lens. Carefully pull out the light and replace with
a new one. Screw the lens back in until tight, but
do not over tighten.
WATERFALL
If your tub is equipped with a waterfall feature there
is a top side control valve to increase or decrease
the amount of water flow. The Waterfall feature
receives its flow from the HushPump™ or 2 speed
circulation pump.
TURBO
The purpose of the Turbo Option is to increase the
amount of air that comes out of the jets. The benefit
is a dramatic increase in the feel of the jet pressure
and more turbulence in the water. If the Turbo is
activated and the air controls are closed, the air
from the Turbo will come out of the 4 salt shaker
relief jets found in the foot well of the hot tub.
OZONE GENERATOR
Your hot tub may be factory equipped with an
ozonator unit, or factory pre-plumbed to accept
the installation of an ozonator. Ozone gas is
produced to oxidize organic contaminants in
the water.
The ozonator is equipped with a small viewing
window. When ozone gas is produced, the
window shows a purple glow, best seen at night.
This diminishes over time. When no purple
glow is seen during filtration cycles (not heating
cycles), the chip will require replacement. The
chip is rated at 9000 hours.
NO USER SERVICEABLE PARTS.
THE USE OF AN OZONATOR IS NOT
A REPLACEMENT FOR A WATER SANITIZING PROGRAM.
FAILURE TO PROPERLY SANITIZE HOT TUB WATER CAN
CAUSE IRRITATION AND/OR DISEASE.
WARNING
figure 11
This manual suits for next models
15
Table of contents
Other Beachcomber Hot Tub manuals