BEALE DP600BT User manual
OWNER’S MANUAL
DP600BT DIGITAL PIANO
WITH BLUETOOTH CONTROL
A part of Australian history since 1893.
PRECAUTIONS
Location
Using the unit in the following locations
can result in a malfunction.
• In direct sunlight
• Locations of extreme temperature
or humidity
• Excessively dusty or dirty locations
• Locations of excessive vibration
• Close to magnetic elds
Power Supply
Please connect the designated AC adapter
to an AC outlet of the correct voltage. Do
not connect it to an AC outlet of voltage
other than that for which your unit is
intended.
Interference with other
electrical devices
Radios and televisions placed nearby
may experience reception interference.
Operate this unit at a suitable distance
from radios and televisions.
Care
If the exterior becomes dirty, wipe it with a
clean, dry cloth. Do not use liquid cleaners
such as benzene or thinner, or cleaning
compounds or ammable polishes.
Handling
To avoid breakage, do not apply excessive
force to the switches or controls.
Keep foreign matter out of your
equipment
Never set any container with liquid in
it near the unit. If liquid gets into the
equipment, it could cause a breakdown,
re, or electrical shock.
Be careful not to let metal objects
get into the unit.
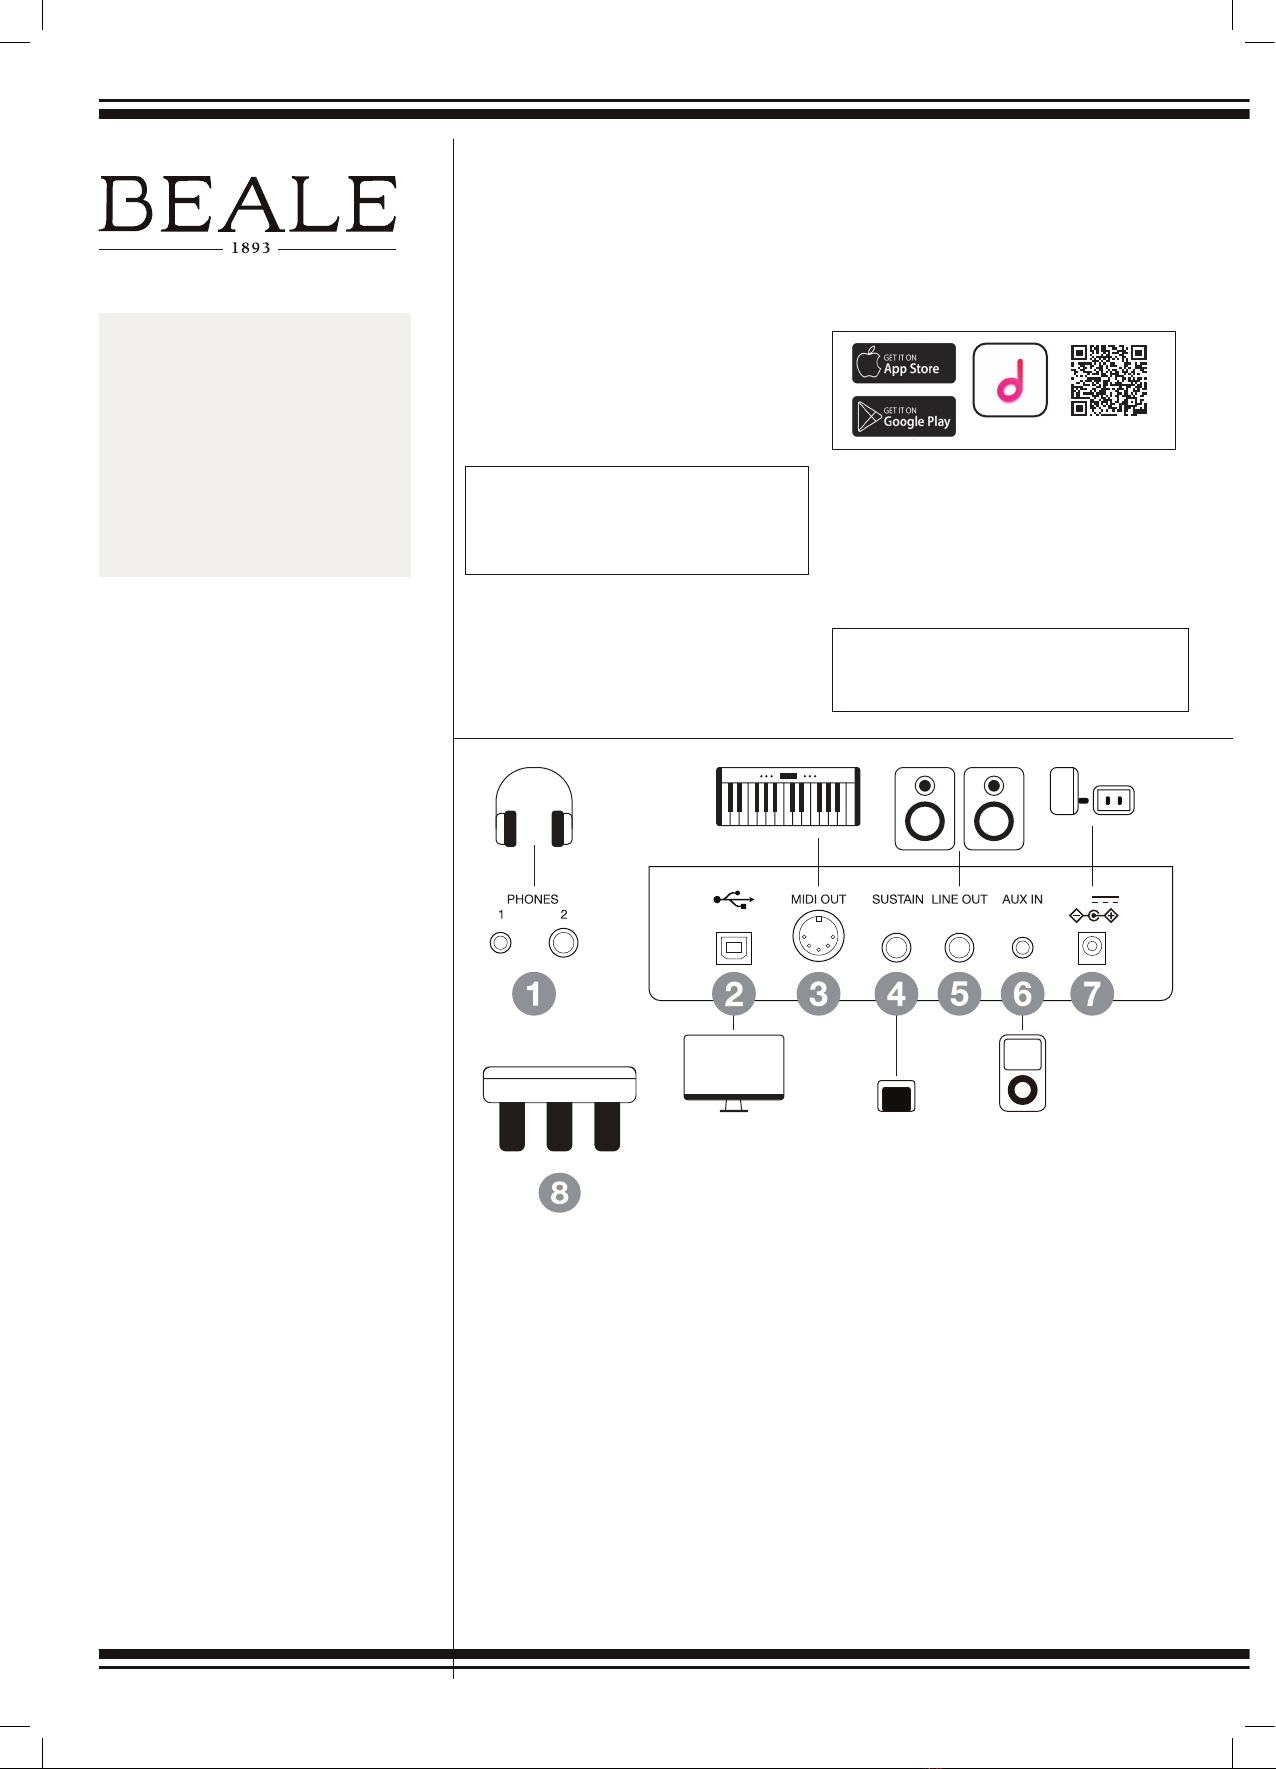
1. PHONE JACKS
For connecting to head-hones. When
headphones are connected, the internal
speakers will be muted. The sound can
only be heard from the headphones.
2. USB JACKS
For connecting to a computer or a
mobile device via cable. An additional
adapter may be needed to connect to
mobile devices.
3. MIDI OUT JACK
For connecting to an external MIDI device.
4. SUSTAIN JACK
For connecting to a sustain pedal.
5. LINE OUT JACK
For connecting to the INPUT jack of
external audio equipment such as a
sound system or PA speaker.
6. AUX IN JACK
For connecting to the OUTPUT jack of
external audio source such as an MP3
player.
7. DC IN JACK
For connecting to the specied power
adapter.
8. UNIT PEDAL JACK (OPTIONAL)
For connecting an optional Pedal Stand,
DPSTAND (Soft Pedal, Sostenuto Pedal and
Sustain Pedal) to the pedal jack located on
the bottom of the instrument.
CAUTION
The normal function of this product
may be disturbed by strong electro
magnetic Interference. If so, simply
reset the product to resume normal
operation, or use the product in an
alternate location.
KEEP THIS MANUAL
After reading this manual,
please keep it for later reference.
TURNING THE POWER ON OR OFF
1.
Make sure the instrument is properly
connected to the power supply.
2. Press the [POWER] switch. The panel
LED’s light up - the power is turned on.
3. Rotate the [VOLUME] knob to set the
volume to the desired level.
4. To turn o the power, press [POWER]
switch for a second. The panel LED’s
will turn o.
CONNECTING THE “PIANO TOOLBOX”
APP VIA BLUETOOTH MIDI
1. Turn on the instrument and ensure
the instrument and the smart device
are in range of each other.
NOTE : You can use a keyboard command to disconnect
Bluetooth MIDI, hold SHIFT and press A#0 and B0 at the
same time. You can also connect the app through camera
connection kit on iOS and through USB on Android devices.
NOTE : In order to save power, the instrument will
automatically shut down after 30 minutes of not being
used. You can turn o the power protection by using a
keyboard command; hold SHIFT and press C1, C#1 at
the same time. Please unplug the instrument when it is
not in use or during an electrical storm.
12V
12V
2. On the smart device, open “Settings”,
then turn on Bluetooth.
3. Download and install the ‘Piano Toolbox’
app from the Apple App Store for IOS
devices, or Google Play Store for Android
Devices.
PIANO TOOLBOX APP
4. Open Bluetooth MIDI function in the
app and select “Piano BT MIDI xxxx” to
establish Bluetooth connection. When
the connection is established, the power
button will turn blue.
NOW YOU CAN CONTROL THE
INSTRUMENT REMOTELY FROM THE APP.

SPECIFICATIONS
Keyboard
88 Weighted,
graded hammer action
Touch Response
5 types, O
Polyphony
192 notes (max)
Sound
25
Layer
Left, Right 1, Right 2
Split
Yes
Twinova
Yes
Metronome / Rhythm
50
Metronome /
Rhythm Control
Start / Stop
Metronome / Rhythm
volume
Tempo
20 - 280
Eect
D.A.S.
Reverb (2 types)
Chorus (1 type)
Songs
100
Sequencer
1 User song,
(1 melody track).
Connectivity
2 Headphones,Sustain
Pedal Stand, Unit Pedal,
MIDI Out, USB MIDI,
Aux In, Line Out
Power
DC 12V / 2A
Amplier
20W x 2
Speaker
(16 x 7) cm Oval x 2,
3 cm x 2
Dimension (LWH)
136.5. x 36.6 x 13.4 cm
Weight
12.5 kg
SOUND LIST
1German Grand
2Bright German Grand
3Japanese Grand
4Warm Grand
5Electric Grand
6Vintage EP
7Warm EP
8Reed EP
9DARK EP
10 FM EP
11 Clavinet
12 Harpsichord
13 Tonewheel Organ
14 Classic Organ
15 Church Organ
16 Synth Pad
17 Strings
18 Choir
19 Square Lead
20 Saw Lead
21 Bell
22 Celesta
23 Nylon Guitar
24 Electric Bass
25 Acoustic Bass
19 Innocence
20 Tchaikovsky Waltz
21 Barcarolle
22 Robot Doll
23 Consolation
24 Invention A 2 Voix
25 Minuet In G Major
(BWV Anh. 114)
26 Barcarolle
27 Norwegian Dance No.2
28 Moseta Dance
29 The Small Gathering
30 The Return
31 The Wagtail
32 Bulie Dance
33 Tender Blossom
34 Grace
35 Cherish The Memories
36 Chopsticks
37 Progress
38 Eclogue
39 The Limpid Stream
40 Brave Cavalier
41 The Chatterbox
42 Tarantella
43 Frankness
44 Tender Grieving
45 The Farewell
46 The Chase
47 Sonata K.545
48 Maple Leaves Ragtime
49 The Nightingale
Was Singing
50 Gipsy Rondo
51 Fountain
52 Fur Elise
53 Dove
54 Knight
55 Ave Maria
56 Prelude in G BWV902a
57 The Angels Singing
58 The Entertainer
59 Swallow
60 Minute Waltz
61 Danse Des Mirlitons
62 Wedding March
63 The Hip Hop’s Night
64 Prelude And Fugue
No. 30 In D Minor
65 Minuets In F
66 Red River Valley
67 Troika
68 Oh Susanna
69 Wave Of Danube
70 Long Long Ago
71 Old Folks At Home
72 Jambalaya
73 Ding! Dong!
74 Battle Hymn
75 The Old Gray Mare
76 American Patrol
77 Christmas Coming
78 Sipping Cider
79 Christmas Sound
80 On London Bridge
81 House Of Rising
82 The Blue Bells
83 Beautiful Dreamer
84 Been A Long Time
85 O Sole Mio
86 Der Deitcher’s Dog
87 Joy To The World
88 Silent Night
89 Ave Maria
90 Five Hundred Miles
91 Happy New Year
92 Like Christmas
93 Jeanie With The
Light Brown Hair
94 Music Box Dancer
95 Tell It On Mountain
96 Entertainer
97 Annie Laurie
98 Rumba Romance
99 The Last Rose
of Summer
100 The Old King Cole
23 Adult Ballad
24 Organic Ballad
25 Tango
26 Slow Waltz
27 Cha Cha
28 Rumba
29 Samba
30 Techno 1
31 Hip Hop
32 Techno 2
33 Classic Disco
34 Funk 1
35 Funk 2
36 Swing 1
37 Swing 2
38 Funky Jazz
39 Bernard Shue
40 Bluegrass
41 Country Step
42 Country Folk
43 Bossa Nova
44 Latin
45 Mambo
46 Waltz
47 Vienna Waltz
48 Polka
49 March
50 6/8 March
METRONOME /
RHYTHM LIST
1Simple Count
24/4 Beat
32/4 Beat
43/4 Beat
53/8 Beat
66/8 Beat
75/4 Beat
85/8 Beat
97/8 Beat
10 10/8 Beat
11 8Beat 1
12 8Beat 2
13 16Beat 1
14 16Beat 2
15 Rock
16 Ska
17 Slow Rock
18 70’s Rock
19 Texas Rock
20 Sweet Ballad
21 6/8 Soul
22 Fusion Shue
SONG LIST
1Prelude In C# Major
2Lyrical Rondo
3Rialto Ripples (Rag)
4Neapolitan Song
5Waltzes
6Turkish March
7Schos Doll’s Dance No. 2
8Minuet In D Major
9Inquietude
10 Italian Polka
11 The Rag-Time Dance
12 Piano Sonata
In C Major, K.330. III
13 Piano Sonata
In A Major, K.331. I
14 Waltz For Piano
In G-Sharp Minor
15 L’ Arabesque
16 Austria Variation
17 Schos Doll’s Dance No. 7
18 To A Wild Rose
REC TEMPO
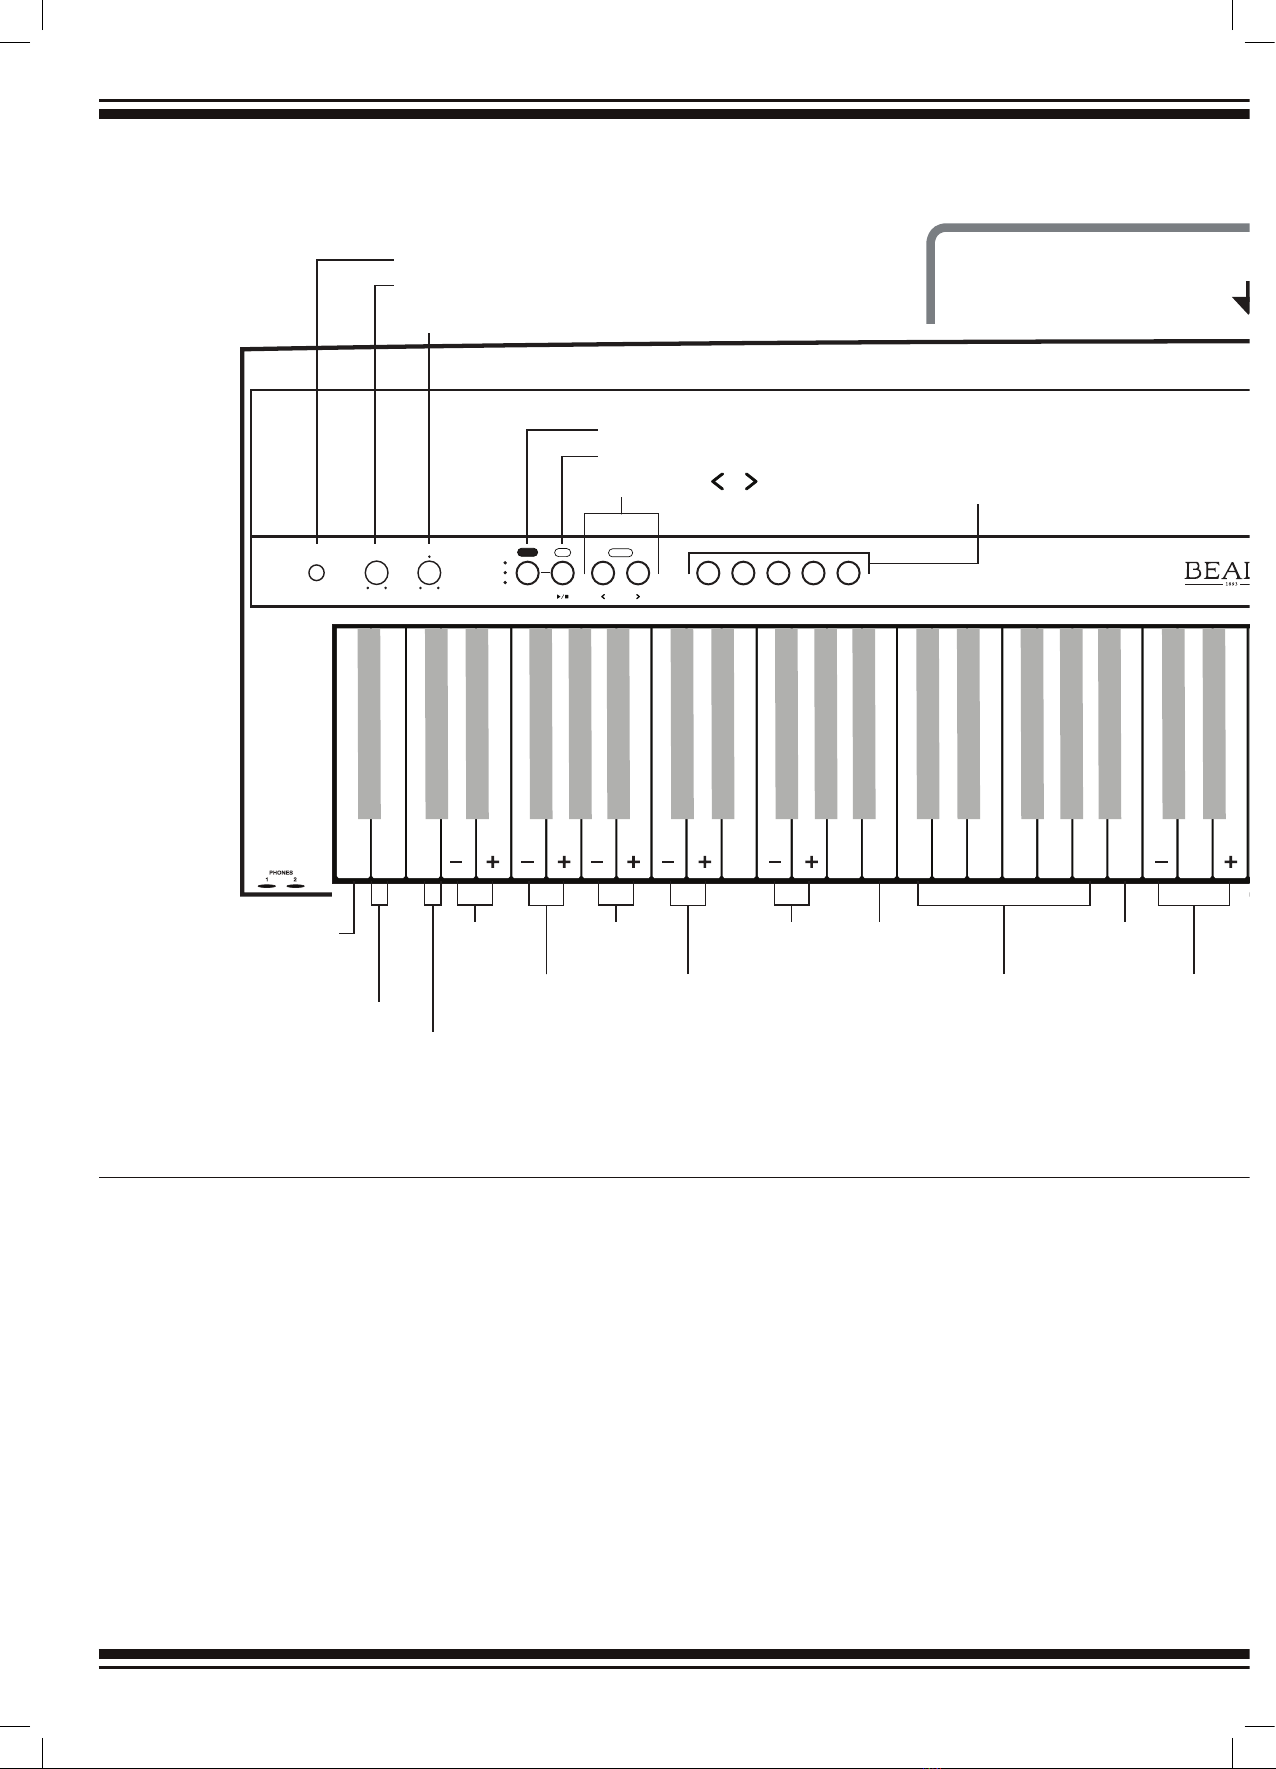
SHIFT
METRONOME
SONG
RECORD
POWER VOLUME BRILLIANCE PIANO EP KEYBOARD SYNTH OTHERMODE
REVERB
TEMPERAMENT CHORUS
TOUCH
SOUND 2
TWINOVA
JUST MINOR
JUST MAJOR
VOLUME -
TYPE: ROOM/HALL
OCTAVE -
OCTAVE +
EQUAL
ON/OFF
VOLUME +
FIX
SHIFT Button
REC - PLAY/STOP Button
TEMPO - / Buttons SOUND Buttons
POWER Switch
VOLUME Knob
BRILLIANCE Knob
Music Stand
(DOUBLE PRESS)
BEEP NOTE ON/OFF
-6 -4 -2 +1 +3
-5 -3 -1 0 +2 +4 +5
TRANSPOSE
METRONOME/RHYTHM, SONG
& RECORD PLAYBACK
ON/OFF
D.A.S.
ON/OFF
ON/OFF
VOLUME +
VOLUME -
NUMBER
ON/OFF
ON/OFF
ON/OFF
ON/OFF
ON/OFF
LID
HAMMER
NOISE
DAMPER
NOISE
DAMPER
RES
STRING
RES
RESET TO
DEFAULT
TUNINGTEMPO
(DOUBLE PRESS)
BLUETOOTH
DISCONNECTION
(DOUBLE PRESS)
AUTO POWER OFF ON/OFF
1 3 5 6 8 0
2 4 7 9
Hold SHIFT and press the corresponding key(s) to use the keyboard command you need.
DP600BT
PLAYING SOUNDS
1. Press one of the [SOUND] buttons.
The corresponding sound LED lights up.
2. Press the same [SOUND] button
repeatedly to circulate through the
selected sound group and select a
sound. (Refer to Sound List for details).
3. Play the keyboard to use the selected
sound for performance.
LAYER MODE
Turn on the Layer function.
Hold a [SOUND] button and then press
another to turn on the Layer function.
The corresponding sound LED’s light up.
The rst sound you press will be set as the
upper sound “SOUND R1”, and the second
sound you press will be set as the Layer
sound “SOUND R2”.
SPLIT MODE
Turn on the Split function.
Press two [SOUND] buttons respectively
and hold them, then press a key on the
keyboard to assign as the split point.
The corresponding sound LED’s light
up after releasing the buttons.
The rst sound you press will be set as the
upper sound “SOUND R1”, and the second
sound you press will be set as the lower
sound “SOUND L”.
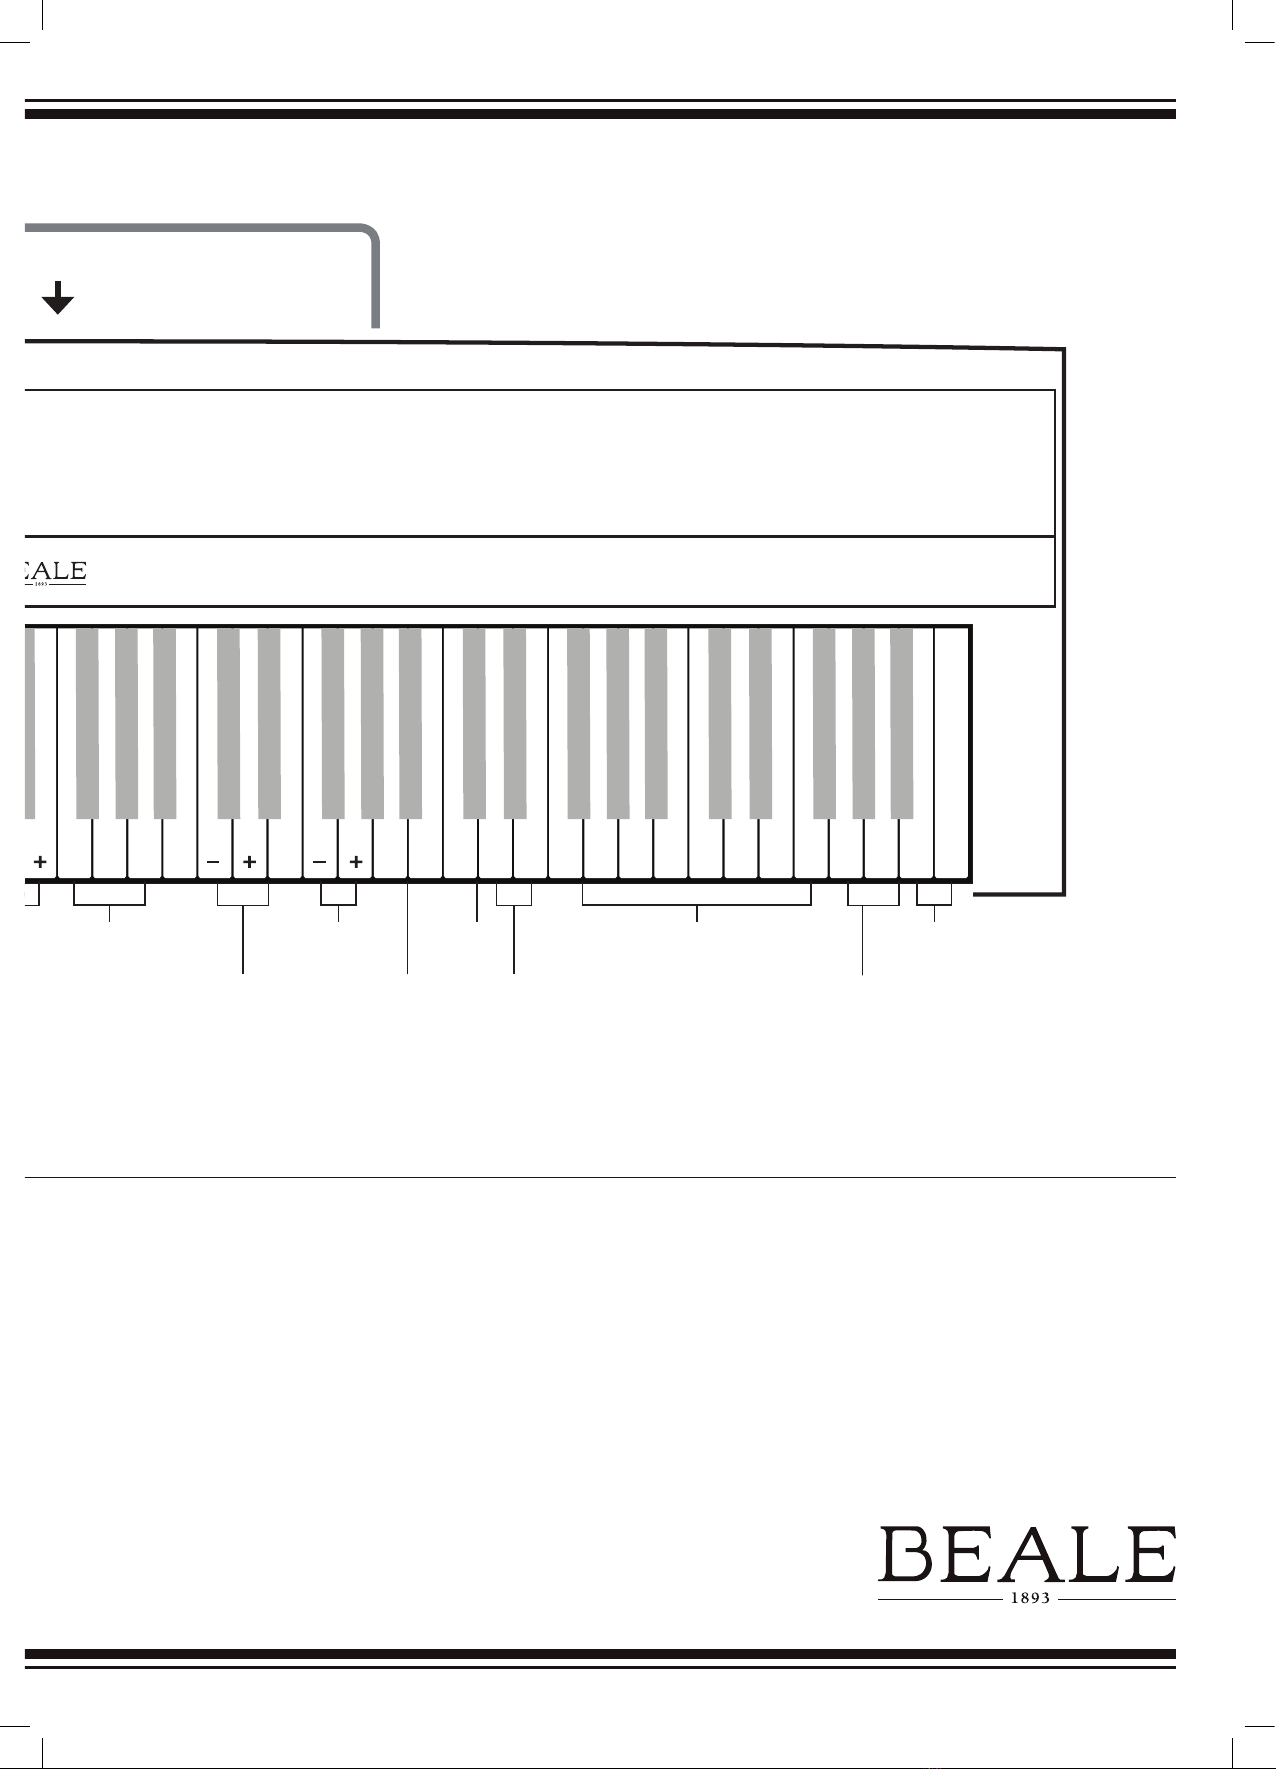
REC TEMPO
SHIFT
METRONOME
SONG
RECORD
POWER VOLUME BRILLIANCE PIANO EP KEYBOARD SYNTH OTHERMODE
REVERB
TEMPERAMENT CHORUS
TOUCH
SOUND 2
TWINOVA
JUST MINOR
JUST MAJOR
VOLUME -
TYPE: ROOM/HALL
OCTAVE -
OCTAVE +
EQUAL
ON/OFF
VOLUME +
FIX
SHIFT Button
REC - PLAY/STOP Button
TEMPO - / Buttons SOUND Buttons
POWER Switch
VOLUME Knob
BRILLIANCE Knob
Music Stand
(DOUBLE PRESS)
BEEP NOTE ON/OFF
-6 -4 -2 +1 +3
-5 -3 -1 0 +2 +4 +5
TRANSPOSE
METRONOME/RHYTHM, SONG
& RECORD PLAYBACK
ON/OFF
D.A.S.
ON/OFF
ON/OFF
VOLUME +
VOLUME -
NUMBER
ON/OFF
ON/OFF
ON/OFF
ON/OFF
ON/OFF
LID
HAMMER
NOISE
DAMPER
NOISE
DAMPER
RES
STRING
RES
RESET TO
DEFAULT
TUNINGTEMPO
(DOUBLE PRESS)
BLUETOOTH
DISCONNECTION
(DOUBLE PRESS)
AUTO POWER OFF ON/OFF
1 3 5 6 8 0
2 4 7 9
Hold SHIFT and press the corresponding key(s) to use the keyboard command you need.
DP600BT
SELECT SOUNDS
Press a [SOUND] button repeatedly to
circulate through this sound group and
select a sound.
Turn o the layer/split function.
Long-press either the upper or the
second [SOUND] button to disengage
the targeted sound. The corresponding
sound LED is unlit. The layer/split function
is turned o. Alternatively, press a [SOUND]
button other than the upper or second
[SOUND] buttons. The layer/split function
will be turned o. The pressed sound will
be selected and the corresponding LED
lights up.
NOTES
1. Please quickly press the second
[SOUND] button after you press the
rst [SOUND] button. Otherwise,
your operation may be recognised
as long-press and the layer/split
function will be turned o.
2. If you press multiple keys when
assigning the split point, it will set the
last key you press as the split point.
3. The layer and the split functions
cannot be used at the same time.

TWINOVA
Twinova function splits the keyboard into two
areas with the same sound and octave range,
for the convenience of playing together with
a friend or an instructor.
Turn Twinova on or o.
Press and hold the [SHIFT] button, then
press the key [C#6] to turn Twinova on
or o. The split point is E4/F4.
Select a sound for Twinova.
The upper sound selected before entering
Twinova will become the default sound for
both areas. But you can press the sound
buttons to select a desired sound.
Note:
The Twinova mode and layer / split
functions cannot be used at the same
time. During song playback, Twinova
mode is not selectable.
PIANO PARAMETERS
Piano Parameters
1. Press and hold the [SHIFT] button,
then use the keyboard to turn the
piano parameters on or o, or set
the corresponding eect depth.
Piano Parameters (String Resonance,
Damper Resonance, Damper Noise,
Hammer Noise, Lid) apply to Piano Sound
no.1 to no.4 only. These parameters are
not available when using other sounds.
2. When a piano parameter is turned on,
it will revert to the previously set level.
3. When a piano parameter is turned o,
pressing the corresponding [-] key will not
respond. But the eect depth will increase
from 1 (except the Lid depth which will
change from 2/4 Open to Full Open) when
you press the corresponding [+] key.
PLAYING METRONOME / RHYTHMS
Press the [MODE] button to select
Metronome mode. The corresponding
mode LED lights up. The instrument will
enter Metronome mode by default every
time the power is turned on.
1. Start playing Metronome/Rhythms.
In Metronome mode, press the [START/STOP]
button to start playing metronome/rhythms.
The [START/STOP] button LED will blink
according to the metronome/rhythm tempo.
2. Select a metronome/rhythm pattern.
Press the [<] [>] button to select a desired
metronome/rhythm pattern.
PLAYING SONGS
Press the [MODE] button to select Song
mode. The corresponding mode LED
lights up.
1. Start playing a song
In Song mode, press the [START/STOP]
button to start playing a song. The [START/
STOP] button LED will blink according to
the song tempo.
2. Select a Song
Press the [<] [>] button to select a
desired song.
Press and hold the [<] or [>] button to
quickly jump to the nearest eleventh.
For example, if the currently song is No.1,
long press the [>] button and it will quickly
select No.11.
Alternatively, press and hold the [SHIFT]
button, then use the keys [C3 - A3] to enter
a song number. When using the keyboard
to enter a number, you always need to press
three keys total. For example, press A3, A3,
C3 (001) in sequence to select Song no.1.
(Refer to Song List for details)
3. Stop playing the song.
When a song is playing, press the [START/
STOP] button to stop the playback.
Alternatively, press the [MODE] button to
enter other modes. The song playback will
be stopped.
Press and hold the [<] or [>] button to quickly
jump to the nearest eleventh. For example,
if the current pattern is No.5, long press the
[>] button and it will quickly select No.11.
Alternatively, press and hold the [SHIFT]
button, then use the keys [C3 - A3] to enter
a metronome/rhythm pattern number.
When using the keyboard to enter a number,
you will need to press two keys total.
For example, press A3, C3 in sequence to
select Metronome/Rhythm no.1. (Refer
to Metronome/Rhythm List for details)
3. Stop playing Metronome/Rhythm. When
metronome/rhythm is playing, press the
[START/STOP] button to stop the playback.
Alternatively, press the [MODE] button to
move to Song mode. Metronome/rhythm
playback will be stopped.

ADJUSTING THE TEMPO
1. Press the [MODE] button to select
metronome/rhythm mode or Song mode.
2. Press and hold the [SHIFT] button,
then press the [<] [>] buttons to change
the tempo. Pressing both [<] and [>]
buttons at the same time will reset to the
default tempo of the current metronome/
rhythm or song.
Hold [SHIFT] and long-press the [<] or [>]
button to quickly adjust the value to the
nearest tens. For example, if the current
tempo is 126, long press the [>] button
and it will jump to 130.
Alternatively, hold [SHIFT], and press the
[TEMPO] key, then use the keys [C3 - A3]
to enter a value. Please press three number
keys total to enter a tempo value.
Note:
In Metronome mode, when playback stops,
changing the metronome/rhythm pattern
will reset the tempo. However, changing the
metronome/rhythm pattern during playback
will not result in tempo change.
RECORDING
Press the [MODE] button to select
Record mode. The corresponding mode
LED lights up.
1. Prepare and start recording.
In Record mode, hold the [SHIFT] button,
then press the [REC] button to put the
recorder on standby. The mode button
LED will blink.
Play the keyboard to start recording. During
recording, the [REC] button LED will blink.
2. Stop recording.
Press the [REC] button to stop recording.
The [REC] button LED stops blinking. The
recorded data will be saved automatically.
Note:
The saved recorded data will not be lost
after power o.
3. Play back recording.
In Record mode, press the [START/STOP]
button to play back the recorded song.
During playback, the [START/STOP]
button LED will blink. But if there is no
recorded data, pressing the [START/STOP]
button will not respond.
TROUBLESHOOTING
The speakers produce a pop sound
whenever the power is turned ON/OFF
This is normal and is no cause for alarm.
Speakers do not produce sound
when the keyboard is played
Check if the master volume is set too low.
Check if headphones are plugged into the
PHONES Jacks.
The speakers produce noise when
a mobile phone is put near them
Using a mobile phone in close proximity to
the instrument may produce interference.
To prevent this, turn o the mobile phone
or use it further away from the instrument.
Certain notes seem to be in the
wrong pitch
Make sure tuning is reset to default
setting. Restart the instrument to reset
to the default settings.
When connecting to computer, the
instrument cannot be recognised
Check if the USB cable is rmly connected.
Try connecting another USB port on the
computer.
This instrument is plug and play which
should work without installing a driver.
It shuts down after a period of time.
The auto power o function will turn o
the instrument after a preset period of
time (30 mins) when the instrument is
not in use.
WARRANTY
Congratulations on the purchase of
your Beale Product. This DP600BT is
guaranteed for 3 years from the date
of purchase.
Beale (a division of Australis Music Group
Pty. Ltd. ACN 114 446 007) warrants that
on this Beale product, it will replace any
part to be found defective (in materials or
workmanship) within 3 years of the original
retail purchase.
Beale products authorised dealers will
underwrite the labour costs associated
with such parts replacements for a period
of 3 years from the date of original
purchase. This warranty only extends
to the purchaser for products from any
authorised retailer of Beale and the related
serial number to such purchase.
This warranty shall not apply to Beale
products which have been subject to
alteration, misuse, accident, neglect
(such as extremes of temperature and/or
moisture) or wear resulting from normal
usage. If the Beale product must be
returned by the dealer to Beale Pty. Ltd.
for repair, transportation charges to and
from the Beale distributor shall be borne
by the owner.
You must contact Australis Music Group
within the warranty period to register a
claim. Our goods come with guarantees
that cannot be excluded under the
Australian Consumer Law. You are entitled
to a replacement or refund for a major
failure and for compensation for any other
reasonably foreseeable loss or damage.
You are also entitled to have the goods
repaired or replaced if the goods fail to be
of acceptable quality and the failure does
not amount to a major failure.
Australis Music Group Pty. Ltd.
w: www.australismusic.com.au
p: +61 2 9698 4444
Register your Beale Product Warranty at
www.bealemusic.com

bealepianos.com.au
Table of contents
Other BEALE Musical Instrument manuals


