manuals.online logo
Brands
  1. Home
  2. •
  3. Brands
  4. •
  5. Kurzweil
  6. •
  7. Musical Instrument
  8. •
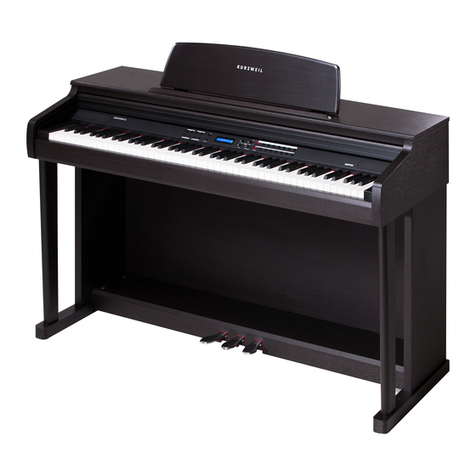
  9. Kurzweil RE-110 User manual

Kurzweil RE-110 User manual

10107 South Tacoma Way, Suite A-3 Lakewood, WA 98499
Tel:(253)589-3580 Fax:(253)589-3585
AND Music Corporation
178-353 Gajwa-dong, Seo-gu, Incheon, KOREA
Tel:82-32-580-1500 Fax:82-32-584-4863
2006. 3. 10 Rev.A
RE-110
Digital Piano
Owner’s Manual
www.ycpiano.co.kr
www.kurzweilmusicsystems.com
Table of Contents
Important Safety & Installation
Instructions
Important Safety Instructions
The Panel of the E-110
Introduction
The Features of the RE-110
Setting up the Instrument
VOICE Button
Main Voice
Reverb & Chorus
Demo Song
SPLIT Button
Split Point
Lower Voice
Upper Voice
Lower Octave Shift
Upper Octave Shift
4-Hand Setup
FUNCTION Button
Touch
Tune
Transpose
MIDI Receive and Transmit Channel
Local Control
Reset
Pedals
Sustain Pedal
Sostenuto Pedal
Soft Pedal
MIDI
MIDI Connection
MIDI Channels
Miscellaneous
Headphone
Audio In Jack
Audio Out Jack
MIDI Implementation Chart
Appendix
Specifications
Quick Operation Guide
4
5
6
7
8
12
13
14
15
15
15
16
16
16
17
17
18
19
20
20
21
21
21
22
23
24
24
24
25
26
27
The lightning flash with the arrowhead symbol, within an equilateral triangle, is intended to
alert the user to the presence of uninsulated “dangerous voltage” within the product’s
enclosure that may be of sufficient magnitude to constitute a risk of electric shock to
persons.
The exclamation point within an equilateral triangle is intended to alert the user to the
presence of important operating and maintenance (servicing) instructions in the literature
accompanying the product.
IMPO TANT SAFETY & INSTALLATION INST UCTIONS
INSTRUCTIONS PERTAINING TO THE RISK OF FIRE, ELECTRIC SHOCK, OR INJURY TO PERSONS
ADIO AND TELEVISION INTE FE ENCE
SAVE THESE INST UCTIONS
WA NING
: When using elec ric produc s, basic precau ions should always be
followed, including he following:
1. Read all of he Safe y and Ins alla ion Ins ruc ions and Explana ion of
Graphic Symbols before using he produc .
2. Do no use his produc near wa er-for example, near a ba h ub, washbowl,
ki chen sink, in a we basemen , or near a swimming pool, or he like.
3. This produc should only be used wi h a s and or car ha is recommended
by he manufac urer.
4. This produc , ei her alone or in combina ion wi h an amplifier and speakers
or headphones, may be capable of producing sound levels ha could cause
permanen hearing loss. Do no opera e for a long priod of ime a a high
volume level or a a level ha is uncomfor able. If you experience any
hearing loss or ringing in he ears, you should consul an audiologis .
5. The produc should be loca ed so ha i s loca ion or posi ion does no
in erfere wi h i s proper ven ila ion.
6. This produc should be loca ed away from hea sources such as radia ors,
hea regis ers, or o her produc s ha produce hea .
7. This produc should be connec ed o a power supply only of he ype
described in he opera ing ins ruc ions or as marked on he produc .
8. This produc may be equipped wi h a polarized line plug (one blade wider
han be o her). This is a safe y fea ure. If you are unable o inser he plug
in o he ou le , con ac an elec rician o replace your obsole e ou le . Do no
defea he safe y purpose of he plug.
9. The power supply cord of he produc should be unplugged from he ou le
when lef unused for a long period of ime. When unplugging he power
supply cord, do no pull on he cord, bu grasp i by he plug.
10. Care should be aken so ha objec s do no fall and liquids are no spilled
in o he enclosure hrough openings.
11. The produc should be serviced by qualified service personnel when:
A. The power supply cord or he plug has been damaged;
B. Objec s have fallen, or liquid has been spilled in o he produc ;
C. The produc has been exposed o rain;
D. The produc does no appear o be opera ing normally or exhibi s a
marked change in performance;
E. The produc has been dropped, or he enclosure damaged.
12. Do no a emp o service he produc beyond ha described in he user
main enance ins ruc ions. All o her servicing should be referred o qualified
service personnel.
13.
WA NING
: Do no place objec s on he produc ’s power supply cord, or
place he produc in a posi ion where anyone could rip over, walk on, or roll
any hing over cords of any ype. Do no allow he produc o res on or be
ins alled over cords of any ype. Improper ins alla ions of his ype crea e
he possibili y of a fire hazard and/or personal injury.
WA NING
: Changes or modifica ions o his ins rumen no expressly
approved by KURZWEIL could void your au hori y o opera e he ins rumen .
IMPO TANT
: When connec ing his produc o accessories and/or o her
equipmen use only high quali y shielded cables.
NOTE
: This ins rumen has been es ed and found o comply wi h he limi s for
a Class B digi al device, pursuan o Par 15 of he FCC Rules. These limi s are
designed o provide reasonable pro ec ion agains harmful in erference in a
residen ial ins alla ion. This ins rumen genera es, uses, and can radia e radio
frequency energy and, if no ins alled and used in accordance wi h he
ins ruc ions, may cause harmful in erference o radio communica ions. However,
here is no guaran ee ha in erference will no occur in a par icular ins alla ion.
If his ins rumen does cause harmful in erference o radio or elevision
recep ion, which can be de ermined by urning he ins rumen off and on, he
user is encouraged o ry o correc he in erference by one or more of he
following measures:
󳢯
Reorien or reloca e he receiving an enna.
󳢯
Increase he separa ion be ween he ins rumen and he receiver.
󳢯
Connec he ins rumen in o an ou le on a circui o her han he one o which
he receiver is connec ed.
󳢯
If necessary consul your dealer or an experienced radio/ elevision
echnician for addi ional sugges ions.
NOTICE
This appara us does no exceed he Class B limi s for radio noise emissions
from digi al appara us se ou in he Radio In erference Regula ions of he
Canadian Depar men of Communica ions.
AVIS
Le presen appareil numerique n’eme pas de brui s radioelec riques depassan
les limi es applicables aux appareils numeriques de la class B prescri es dans le
Reglemen sur le brouillage radioelec rique edic e par le minis ere des
Communica ions du Canada.
IMPO TANT SAFETY INST UCTIONS
1. Read hese ins ruc ions.
2. Keep hese ins ruc ions.
3. Heed all warnings.
4. Follow all ins ruc ions.
5. Do no use his appara us near wa er.
6. Clean only wi h dry clo h.
7. Do no block any of he ven ila ion openings. Ins all in accordance wi h he manufac urer’s ins ruc ions.
8. Do no ins all near any hea sources such as radia ors, hea regis ers, s oves, or o her appara us (including amplifiers) ha produce
hea .
9. Do no defea he safe y purpose of he polarized or grounding- ype plug. A polarized plug has wo blades wi h one wider han he
o her. A grounding ype plug has wo blades and a hird grounding prong. The wide blade or he hird prong are provided for your
safe y. If he provided plug does no fi in o your ou le , consul an elec rician for replacemen of he obsole e ou le .
10. Pro ec he power cord from being walked on or pinched, par icularly a plugs, convenience recep acles, and he poin where hey
exi from he appara us.
11. Only use a achmen s / accessories specified by he manufac urer.
12. Use only wi h a car , s and, ripod, bracke , or able specified by he manufac urer, or sold wi h he
appara us. When a car is used, use cau ion when moving he car / appara us combina ion o avoid
injury from ip-over.
13. Unplug his appara us during ligh ning s orms or when unused for long periods of ime.
14. Refer all servicing o qualified service personnel. Servicing is required when he appara us has been damaged in any way, such as
power-supply cord or plug is damaged, liquid has been spilled or objec s have fallen in o he appara us, he appara us has been
exposed o rain or mois ure, does no opera e normally, or has been dropped.
15. Allow adequa e ven ila ion for he power adap er. Do no hide i under a carpe or behind a cur ain or place i in an enclosed space
where hea buildup can occur.
WA NING
: To reduce he risk of fire or elec ric shock, do no expose his appara us o rain or mois ure. Do no expose his equipmen
o dripping or splashing and ensure ha no objec s filled wi h liquids, such as vases, are placed on he equipmen .
To comple ely disconnec his equipmen from he AC Mains, disconnec he power supply cord plug from he AC recep acle.
To reduce he danger of explosion if he li hium ba ery is incorrec ly replaced, replace only wi h he same or equivalen ype.
6
The Panel of the RE-110
The Panel of the E-110
󳞘Volume
Adjust the volume level using this control
󳞙Function
Modify parameters of Touch, Tune, Transpose and MIDI channel
󳞚Split
Divide the keyboad into two different sounds
󳞛Voice
Select voices from 0 primary sounds and more, select various reverb effects
󳞜Power
Turn the power On or Off
7
Introduction
Introduction
Welcome to the world of the KURZWEIL RE- 0 Digital Piano.
The RE- 0 gives you easy access to KURZWEIL's high-quality sound technology. Authentic
digital representations of musical instrument sounds are the starting points. The RE- 0
reproduces the finest details of the original sounds; you'll even hear differences in tone as you
play from bass to treble and from soft and loud, just as in the original instruments.
The eature of the RE-110
■88 Notes, Hammer type keys
■3 Pedals
■5 Different levels of keyboard
sensitivity
■32 Preset voices
■Transpose, Tune
■4 Reverbs, Chorus effect
■Split keyboard mode
■5 Demo songs
■Line In/Out
■MIDI In/Out
■2 Headphone jacks
■25 Watt Stereo sound system
8
Setting up the Instrument
Item No. Item
①
Keyboard EA
②
Side Panel (Left) EA
No.
⑦
Screws for Side Panel and Keyboard
⑧
Screws for Side Panel and Pedal Box
4EA
4EA
③
Side Panel (Right) EA
⑨
Screws for Rear Panel 2EA
④
Pedal Box EA
⑩
Screws for Rear Panel and pedal Box 4EA
⑤
Rear Panel EA
⑪
Cable Clamp EA
⑥
Headphone Hanger EA
Check that all of the following items are present.
①
⑥
⑤
⑦
②
④
⑨
⑩
③
⑧
⑦⑧ ⑨⑩⑪
Setting up the Instrument
9
Setting up the Instrument
Side Panel and Pedal Box assembly
󳢯We do not recommend attemting to assemble the RE- 0 alone. The job can be easily
accomplished, however, with only two people.
󳢯Use only the screws provided or replacement of exactly the specified size. Using
screws of the wrong size can result in demage to the instrument and personal injury.
. Place the pedal box ④on the side panel ③
and then use ⑧screws to fasten the side
panel.
2. Place the Pedal Box ④on the side panel ②
and then use ⑧screws to fasten the side
panel.
3. You can find the pedal cable in the pedal box
④. Untie and straighten out the cable attached
to the bottom of the pedal box.
②
③
④
⑧
ear Panel assembly
. Fit into the holes ⑨in the side panel
brackets and then use the screw ⑨to fasten
the rear panel.
2. Use the screw ⑩to fasten the bottom of the
rear panel.
⑨⑩
⑤
⑨
⑨
⑩
⑧
10
Setting up the Instrument
Attach the Keyboard
. Place the keyboard on the stand so that the wood pegs on the bottom of the keyboard fit into the
holes in the side panel brackets.
2. Fasten the keyboard to the side panel using screw numer ⑦.
3. Insert the pedal cable connector into the pedal jack located on the bottom of the keyboard.
4. Rotate the pedal adjuster until it comes in firm contact with the floor surface. If the adjuster is not
in firm contact with the floor, the pedal will wobble and cause malfunctions.
5. Install the headphone hanger as shown in the figure.
Screws to fasten
the keyboard with
side panel
Pedal cable jack
Headphones jack
⑦
25mm
Pedal adjuster
Be sure that the connector is inserted in the correct orientation.
Make sure that the cable clamp fastens to the pedal cable.
11
Setting up the Instrument
Turning on the Instrument (Power)
The RE- 0 operates on AC adapter power. A power cord is included with the AC adapter to
connect it to an AC outlet. Before connecting the power cord, be sure that the power switch,
located left side of the keyboard, is off. First plug the adapter's small, round plug in the
matching jack in the back of the piano. Then plug the power cord into an AC outlet. Once the
power cord is connected, you can turn the power switch on.
Setting the Volume
To be sure that you can hear the instrument, turn the Volume knob (on the upper side of the
left panel) to the middle of its range. This should be a reasonably comfortable level of volume
which you can adjust if you wish the sound to be louder or softer.
12
Voice Button
VOICE Button
To select one of the 0 primary voices, hold down the
Voice
button then press and release a
keyboard key between C and A . Then release the
Voice
button. For example, to select
Digital E. Piano, hold down
Voice
, press and release the E key, then release
Voice
. Now
when you play the keys you should hear the Digital E. Piano voice.
To select any of the 32 available voices, hold down the
Voice
button then "enter" the voice's
number ( ~32) by pressing the number keys (C2~A2) then press the "Enter" key (A#2), then
release
Voice
. For example, to select Voice #23 (Ballad Organ ), hold down
Voice
, press
and release D2 (2), press and release D#2 (3), press and release A#3 (Enter), then release
Voice
. For voice numbers between and 9, you need only press one number key.
If you get confused, just release the
Voice
button for a second then try again from the
beginning.
For your reference, below is a list of the available voices, their number, and for the primary
voices, their key.
MAIN VOICE
No Key Voice No Key Voice
C Grand Piano (Deflult) 7 Tremolo Digital E. Piano
2Grand Piano 2 8 Stereo Hard E. Piano
3C# Stage Piano 9 E Digital E. Piano
4Stage Piano 2 20 G#
Digital E. Piano + Strings Pad
5Bright Piano 2 F Rock Organ
6Sustain Piano 22 Rock Organ 2
7D Stage Piano + Strings 23 Ballad Organ
8Piano + Strings Pad 24 Ballad Organ 2
9Tack Piano 25 F# Perc Organ
0 Tight E. Grand 26 Organ + Piano
Bright E. Grand 27 G Fast Strings
2 Warm E. Grand 28 Fast Strings 2
3 Classic E. Grand 29 Touch Strings
4 Digital E. Grand 30 A Stereo Slow Strings
5 D# Dyno E. Piano 3 Stereo Slow Strings Pad
6 Hard Dyno E. Piano 32 Slow Digital Pad
Please refer to the Voice Button section of the Quick Operation Guide on page 27 while
reading the following sections.
13
Voice Button
REVERB & CHORUS
everb
"Wet/dry mix" is a term that describes how loud the effect sound (wet sound = reverberation
or chorus) is compared to the direct sound (dry sound = played notes). A ratio of 0% for
example will be mostly direct sound with very little effect sound. A ratio of 50% will be about
half and half while 90% will be nearly all effect sound.
Adjust the reverb wet/dry amount for the selected reverb type by pressing one of the C4 ~ A#4
keys while holding down the
Voice
button. The wet/dry mix range is from 0 to 00%. The
default reverb type and wet/dry amount are Room and 0% respectively.
everb Wet/Dry Mix
Key everb Wet/Dry
C4 0
C#4 0 (Default)
D4 20
D#4 30
E4 40
F4 50
F#4 60
G4 70
G#4 80
A4 90
A#4 00
Key Chorus Wet/Dry
C5 0 (Default)
C#5 0
D5 20
D#5 30
E5 40
F5 50
F#5 60
G5 70
G#5 80
A5 90
A#5 00
While holding down the
Voice
button, press one of
the C3 ~ E3 keys to select a reverb type. If you
select Effect Off (E3 key), both reverb and chorus
will be turned off.
Key everb Type
C3 Room (with Chours)(Default)
C#3 Stage(with Chours)
D3 Hall (with Chours)
D#3 Large Hall (with Chours)
E3 Effect Off
14
Voice Button
While holding down the
Voice
button, press one of the C5 ~ A#5 keys to select the chorus
wet/dry amount. The default wet/dry amount for chorus is 0%. If you select Effect Off for the
reverb type, then the chorus effect will also be turned off and you will only hear the direct
sound.
Chorus Wet/Dry Mix
Key Demo Song
C6 Demo Witches Dance Macdowell
C#6 Demo 2 Arabesque Debussy
D6 Demo 3 French Suite No 5 Bach
D#6 Demo 4 Capriccio in B Op76 No 2 Brahms
E6 Demo 5 Oriental Granados
F6 Repeat All (Demo ~ Demo 5)
While holding down the
Voice
button, press one of the C6 ~ F6 keys to select and play a
demo song. If you want all demo songs to be played in a loop, press the F6 key. While playing
the demo, the
Voice
LED is blinking. To stop the demo song playback, press the
Voice
button again.
DEMO SONG
15
Split Button
SPLIT Button
Press the
Split
button to activate split mode. The
Split
button indicator will light.
Splits are an easy way to make one performer sound like two. When you play the keyboard,
your right hand plays one voice and your left hand plays another. To exit split mode, press the
Voice
button.
While holding down the
Split
and
Function
buttons simultaneously, press any key of the
keyboard to set the split point. The split point is the point on the keyboard where the left sound
and right sound meet. The default split point set at the factory is F#3.
SPLIT POINT
The Lower Voice is the Left Sound as described above. To select one of the 0 primary voices
as the lower voice, hold down the
Split
button then press and release a keyboard key between
C and A . To select any of 32 available voices as the lower voice, hold down the
Split
button then "enter" the voice's number ( ~32) by pressing the number keys (C2~A2) then
press the "Enter" key (A#2), then release
Split
. See Page 2 for the voice list.
LOWER VOICE
The upper voice in Split Mode is the same as the main voice. It's not necessary to select the
upper voice separately.
UPPER VOICE
16
Split Button
You can shift the left sound pitch up one or two
octaves if you wish. To do this, press and hold the
Split
button then press C#3 for a one octave shift,
D3 for two octaves, or C3 to restore normal pitch.
LOWER OCTAVE SHI T
You can shift the right sound pitch down one or two
octaves if you wish. To do this, press and hold the
Split
button then press F#3 for a one octave shift,
F3 for two octaves, or G3 to restore normal pitch.
UPPER OCTAVE SHI T
Key Lower Octave
C3 0 (Default)
C#3 +
D3 +2
The 4-hand setup makes it easy to set the Split Point
and Octave Shifts for 2-person (4-hand) playing. To
enable 4-Hand Setup, press and hold
Split
then
press and release the C4 (Middle C) key. This will
set the upper and lower voice, the split point, and
octave shifts as shown below. If any of these
defaults are not suitable, they can be changed using
the methods described earlier.
4-HAND SETUP
Key 4-Hand Setup
C4
Lower Voice Grand Piano
Upper Voice Grand Piano
Split Point C4
Lower Octave +2
Upper Octave -2
Key Upper Octave
F3 -2
F#3 -
G3 0 (Default)
17
Function Button
You can adjust the touch sensitivity of the entire keyboard - how the dynamics of the sounds
respond to key velocity.
While holding down the
Function
button, press one of the C ~ E keys to select the touch
sensitivity.
TOUCH
Key Touch
C Light
C# Light 2
D Normal (Default)
For players who have a light touch-that is, you can play
more lightly and still get the same attack velocity values.
Light 2 is a bit more sensitive than Normal, Light is the
most sensitive.
The standard value
D# Hard
E Hard 2
For players who have a heavier touch-that is, you can play
harder and still get the same attack velocity values. Hard
is less sensitive than Normal, Hard 2 is the least sensitive.
You can finely tune the pitch of the RE- 0 up or
down. This function is useful when you play the
RE- 0 along with other instruments that can't be
easily retuned.
While holding down the
Function
button, press the
C#2 or D#2 key to adjust the pitch by steps of
cent. The C2 or E2 key adjust the pitch in steps of 5
cents. The tuning range is 64 cents flat to 64 cents
sharp.
TUNE
UNCTION Button
Key Tune Value
C2 -5 (Step)
C#2 - (Step)
D2 0 (440Hz-Default)
D#2 + (Step)
E2 +5 (Step)
18
Function Button
Transpose allows you to play the keyboard in one key and have the notes sound in another
key. This is useful when accompanying singing, if the key of the written music is too high or
too low for the singer, or when playing music written for a transposing instrument, such as a
clarinet. The transpose function makes it possible to shift the pitch of the entire keyboard up or
down in semitone intervals up to six semitones.
While holding down the
Function
button, press one of the F#2 ~ F#3 keys to set the desired
amount of transposition.
TRANSPOSE
Key Transpose Value
F#2 -6
Key Transpose Value
C#3 +
G2 -5 D3 +2
G#2 -4 D#3 +3
A2 -3 E3 +4
A#2 -2 F3 +5
B2 - F#3 +6
C3 0 (Default)
19
Function Button
Key eceive Channel
C4 Ch (Default)
C#4 Ch 2
D4 Ch 3
D#4 Ch 4
E4 Ch 5
F4 Ch 6
F#4 Ch 7
G4 Ch 8
G#4 Ch 9
A4 Ch 0
A#4 Ch
B4 Ch 2
C5 Ch 3
C#5 Ch 4
D5 Ch 5
D#5 Ch 6
Key Transmit Channel
C6 Ch (Default)
C#6 Ch 2
D6 Ch 3
D#6 Ch 4
E6 Ch 5
F6 Ch 6
F#6 Ch 7
G6 Ch 8
G#6 Ch 9
A6 Ch 0
A#6 Ch
B6 Ch 2
C7 Ch 3
C#7 Ch 4
D7 Ch 5
D#7 Ch 6
The MIDI channels of the receiving and transmitting equipment must be matched for proper
data transfer. This function enables you to specify the channel on which the RE- 0 transmit
and receives MIDI data.
While holding down the
Function
button, press one of the C4 ~ D#5 keys to set the desired
MIDI receive channel. And press one of the C6 ~ D#7 keys to set the desired MIDI transmit
channel. See Page 22 for more about your RE- 0's MIDI features.
Notes transmited are the actual keyboard keys pressed irrespective of splitting, transposition,
and octave shift. Notes recieved are treated just like keypresses and may be modified by the
current split, transpose, and octave shift settings.
Program Changes recieved will only affect the current Upper Voice if the keyboard split is
active.
MIDI RECEIVE AND TRANSMIT CHANNEL

Other manuals for RE-110

1

Other Kurzweil Musical Instrument manuals

Kurzweil Andante CUP220 User manual

Kurzweil

Kurzweil Andante CUP220 User manual

Kurzweil MPG100 User manual

Kurzweil

Kurzweil MPG100 User manual

Kurzweil m230 User manual

Kurzweil

Kurzweil m230 User manual

Kurzweil V150 User manual

Kurzweil

Kurzweil V150 User manual

Kurzweil MPG200 User manual

Kurzweil

Kurzweil MPG200 User manual

Kurzweil RG100 User manual

Kurzweil

Kurzweil RG100 User manual

Kurzweil Forte User manual

Kurzweil

Kurzweil Forte User manual

Kurzweil MP15 User manual

Kurzweil

Kurzweil MP15 User manual

Kurzweil Forte SE User manual

Kurzweil

Kurzweil Forte SE User manual

Kurzweil Forte User manual

Kurzweil

Kurzweil Forte User manual

Kurzweil RG200 User manual

Kurzweil

Kurzweil RG200 User manual

Kurzweil MarkPro TWOi User manual

Kurzweil

Kurzweil MarkPro TWOi User manual

Kurzweil sp88x User manual

Kurzweil

Kurzweil sp88x User manual

Kurzweil MP20 User manual

Kurzweil

Kurzweil MP20 User manual

Kurzweil RE-210 User manual

Kurzweil

Kurzweil RE-210 User manual

Kurzweil MARK 6 User manual

Kurzweil

Kurzweil MARK 6 User manual

Kurzweil KP10 User manual

Kurzweil

Kurzweil KP10 User manual

Kurzweil DIGITAL GRANDE DC 150 User manual

Kurzweil

Kurzweil DIGITAL GRANDE DC 150 User manual

Kurzweil PC4-7 User manual

Kurzweil

Kurzweil PC4-7 User manual

Kurzweil MPS110 User manual

Kurzweil

Kurzweil MPS110 User manual

Kurzweil MarkPro TWOiS User manual

Kurzweil

Kurzweil MarkPro TWOiS User manual

Kurzweil SPS4-8 User manual

Kurzweil

Kurzweil SPS4-8 User manual

Kurzweil K2700 User manual

Kurzweil

Kurzweil K2700 User manual

Kurzweil MARK 3 User manual

Kurzweil

Kurzweil MARK 3 User manual

Popular Musical Instrument manuals by other brands

Roland FR-4X owner's manual

Roland

Roland FR-4X owner's manual

Panasonic SXF100 - ELECTRONIC ORGAN operating manual

Panasonic

Panasonic SXF100 - ELECTRONIC ORGAN operating manual

Galileo my1stpiano Operation manual

Galileo

Galileo my1stpiano Operation manual

Kawai ES110 owner's manual

Kawai

Kawai ES110 owner's manual

Yamaha PortaTone PSR-6000 owner's manual

Yamaha

Yamaha PortaTone PSR-6000 owner's manual

Accordions International Concerto DA300 user manual

Accordions International

Accordions International Concerto DA300 user manual

Floyd Rose Floyd Rose Tremolo Diagram

Floyd Rose

Floyd Rose Floyd Rose Tremolo Diagram

Roland JV-1000 Service notes

Roland

Roland JV-1000 Service notes

Rodgers 595 owner's manual

Rodgers

Rodgers 595 owner's manual

Kawai ANYTIMEX3 owner's manual

Kawai

Kawai ANYTIMEX3 owner's manual

Yamaha Clavinova CLP-122S owner's manual

Yamaha

Yamaha Clavinova CLP-122S owner's manual

myToys 25995204 instructions

myToys

myToys 25995204 instructions

SomaEnergetics SomaTuners quick start guide

SomaEnergetics

SomaEnergetics SomaTuners quick start guide

Johannus LIVE user manual

Johannus

Johannus LIVE user manual

Rocktile 00024361 manual

Rocktile

Rocktile 00024361 manual

Casio CTK-710 Service manual

Casio

Casio CTK-710 Service manual

Roland VS-1880 Appendices

Roland

Roland VS-1880 Appendices

Yamaha Saxophone owner's manual

Yamaha

Yamaha Saxophone owner's manual

manuals.online logo
manuals.online logoBrands
  • About & Mission
  • Contact us
  • Privacy Policy
  • Terms and Conditions

Copyright 2025 Manuals.Online. All Rights Reserved.