Beau mark Airwave 8 User manual

MODEL: BM838 Black / BM839 White
PLEASE READ CARFULLY BEFORE OPERATION YOUR
NEW APPLIANCE AND KEEP FOR FUTURE
REFERENCE.
INSTRUCTION MANUAL
8L CAPACITY

C O N T E N T S
2
9
3
4
5
7
8
9
10
Important Safeguards
Product Functions & Features
Parts Identification
Operating Instructions
Cooking Operation
Control Panel
Care and Cleaning
Specifications
Recipes For Reference
INTRODUCTION
IMPORTANT SAFEGUARDS
Thank you for purchasing a quality BEAUMARK appliance. We trust that you will have a pleasant
experience with your new product. To guarantee safety and best efficiency, please read this
manual carefully and keep a copy for future reference.
WARNING
When using the product, basic safety precautions should always be followed:
1. This product is intended for household use only, it is not intended for commercial use.
2. This appliance is not intended for use by persons (including children) with reduced physical,
sensory or mental capabilities, or lack of experience and knowledge, unless they have been
given supervision or instruction concerning use of the appliance by a person responsible for their
safety.
3. Do not operate the appliance near explosive and/or flammable solvents/fumes such as petrol or
kerosene.
4. Do not place non heat-resistant containers in the base bowl.
5. The use of accessory attachments not recommended by the appliance manufacturer may cause
injuries.
6. To protect against electric shock, DO NOT immerse the power cord, power plug or the main
body in water or any other liquids.
7. NEVER leave the appliance operating without supervision.
8. Do not obstruct the air vents on the back and sides of the appliance with any objects. Avoid
escaping steam from the air vents during operation.
9. CAUTION: Do not touch hot surfaces during operation.
10. When lifting the hinged heater/control assembly always take extreme care to avoid contact with
escaping hot steam. Ensure it is directed away from your face and skin.
11. For safety reasons it is recommended NOT to touch the edge of the inner bowl that is HOT.
12. Do not move the appliance with hot food inside it. Allow it to cool down first before moving. Use
extreme caution when removing the hot base bowl, cooking racks or rotisserie.
13. Ensure the appliance is properly earthed always.
14. Ensure the Air-Wave Health Cooker is placed on a flat stable, dry heat-resistant surface when in
operation.
15. Remove all accessories and discard all packaging before using.
16. Always move the appliance by handling the base cover handle.
17. Do not operate any appliance with a damaged power cord or power plug or after the appliance
malfunctions or has been damaged in any manner. Bring it to a qualified technician for
examination, repair or electrical or mechanical adjustment.
2

PARTS IDENTIFICATION
1. Lid Inner Cover
2. Heater Protection Cover
3. Inner pot
4. Lid Button
5. Base Cover
6. Lid Handle
7. Lid Cover
8. Power Cord
9. Base
10. Ventilation Hole
11. Control Panel
12. Transparent Window
13. Lid Cover Plate
14. Fan
15. Halogen Tube
16. Shaft Pilot Hole
17. Inner Cover
18. Drive Hole
19. Inner Pot
20. Shaft Bracket
4
IMPORTANT SAFEGUARDS
PRODUCT FUNCTIONS & FEATURES
PRECAUTIONS
1. Before operating the appliance, detach the base bowl and all accessories for cleaning.
2. Press the “Lid button” and hold the “Lid handle” to open the lid.
3. Hold the “Lid handle” to close the lid.
4. Place the food 3cm distance away from the protection cover.
5. During cooking, open the lid to add ingredients like sauce and close the lid when done.
6. When the appliance achieves the preset temperature, the infra-red light will disappear and
appear again should actual temperature fall below the preset temperature. The infra-light will
cycle on and off throughout the product process maintaining the desired preset temperature
selected.
3
Chicken Rotisserie with Shaft
Tong
Fries Basket
The New generation AIRWAVE uses a high efficiency infrared heating system and high speed
heated air convection system. It can produce highly heated air inside it within a brief time
span through the intelligent program that controls cooking time and temperature. Experiment
with the different rotisserie and accessories to enjoy smoke-free, fast and delicious cooking
for you and your family.
SMOKE-FREE COOKING
● Roast food with hot air, fat and grease will come out without smoke
RAPID COOKING
● with high efficiency infrared heating system and high speed heated air convection system for
even cooking.
● Use the intelligent program to control cooking times and temperature for convenience and energy
saving
● Use different rotisserie accessories for different food preparation to ensure even heating with
360° rotation.
EASY VISUAL COOKING
● Transparent cover design for visual cooking and observation of the entire cooking process.
SAFE AND CONVENIENT COOKING
● DIY cooking time and temperature with desired program setting.
● Removable inner pot for easy cleaning.
● Double wall design with cool touch feature.
● Lid hinge structure for easy and convenient operation.
● Auto Power off when lid is open for safety operation.
*TIP: Place the FryPan under the High/Low Rack (If not in use) to catch fats, makes cleaning
easier.
1
2
High/Low Rack FryPan

OPERATING INSTRUCTIONS
OPENING THE LID
● Press lid button once (figure 1)
● The lid will be opened 2-3cm (figure 2)
● Hold the lid handle to open the lid vertically (figure 3&4)
5
CLOSING THE LID
● Hold the Lid handle to close it (figure 5)
HOW TO PLACE THE BASE BOWL
● Hold the handles and place the base bowl in position
making sure that the Shaft pilot hole on the base
bowl is in behind (figure 6)
● Place the base bowl in the inner cover securely
(figure 7)
ASSEMBLING AND DISMANTLING THE ROTISSERIE ACCESSORIES
1. For chicken, use the Chicken Rotisserie or racks for cooking.
ASSEMBLING THE CHICKEN ROTISSERIE
● Push the Rotisserie Shaft through the chicken.
Position the Rotisserie Forks onto the Rotisserie
Shaft and screw down the holding screw until the fork
connects with the food (figure 8)
● Place the assembled Rotisserie in position on the
main body of the appliance, ensuring that the
squared end of the rod connects with the drive hole
on the main body and the round end of the rod
connects with the shaft bracket (figure 9)
DISMANTLING THE CHICKEN ROTISSERIE
● Use the Tong to detach the Chicken Rotisserie (figure 10)
2. For Fries or Nuts, use the High/Low Rack and Fries Basket together.
Place the food on the Basket (figure 11)
3. For Pizza or Cakes, use the High/Low Rack and FryPan together.
Place the food on the Pan (figure 12)
4. For other foods, use the High/Low Rack.
Place the food directly on the Rack (figure 13)
(figure 11)
(figure 12)
(figure 13)
6

CONTROL PANEL
DISPLAY SCREEN
7
1. Open the Lid and place the Base Bowl in position on the Main Body of the appliance as
previously described in this booklet.
2. Select the required accessory if required. Always make sure to leave sufficient space between
the food and the cover.
3. Close the Lid as previously described in this booklet.
4. Connect the appliance to the power supply. The appliance will beep once.
The Power/Menu/Rotation indication light will flash, the display screen will show “----- “ indicating
Standby Mode.
5. MENU SELECT
● In state of standby mode, press the “Menu” button to select the functions for “DIY” →
“Burger” → “Chicken” → “Cake” → “Skewer” → “Steak” → “Fries” → “Fish”. The screen will
show the menu selected. The indication light of temperature/timer will be also shown for
each menu.
● Select the DIY function, set the temperature/cooking time according to the below instruction.
After setting, the appliance will begin operation automatically.
Note: Temperature/ Timer button is not available for other menus.
● Timer setting
In standby mode or cooking process, press Timer (+) or Timer (–) button to increase or
decrease time by minutes; long press on Timer (+) or Timer (–) button allows the time to
increase or decrease by a 5-minute interval. It will stop upon reaching the maximum 99
minutes or minimum 1 minute.
● Temperature setting
Press this button to adjust temperature in standby mode. The last three digits will flash when
the Temperature button is pressed. Press “+” “–” to increase or decrease the temperature.
The adjusted temperature range is 80°C~210°C. Press “+” “–”, to increase or decrease
temperature by 5°C; long press on “+” “–” allows the temperature to increase or decrease by
10°C and will stop upon reaching the maximum 210°C or minimum 80°C.
6. ROTATION BUTTON
● When cooking by Drum or Rotisserie Forks, press this button to select the rotation modes.
The rotation indication light will be turned on when it is rotating.
● Press this button again to stop rotation.
7. START/CANCEL
● During standby mode, press the Start button to operate the appliance and the timer will
begin countdown.
● If appliance is not in standby mode, pressing the Cancel button will cancel the current
position and return to the standby mode.
8. After cooking has completed
● The Screen will show “-----”.
8
COOKING OPERATION
Cancel Button
Temperature ( ) ºC
Button Rotation
Button Start Button
Timer
Button
Timer/Temperature (+)
Button Display Screen
Timer/Temperature (-)
Button
Menu Button
Rotation
Indication Light
Operating
Indication Light Power
Indication Light
Temperature
Indication
Light
Timer
Indication
Light
Menu Indication Light
COOKING OPERATION
CARE & CLEANING
9. HOW TO TAKE OUT THE FOODS
● Open the lid.
● Wait for the food and accessories to cool down.
● Use the clamp to remove the food.
10. STOP COOKING
● Switch off power plug
1. Disconnect the appliance from the power supply and allow to cool completely before attempting
any cleaning.
2. The exterior of the Main Body Heater/Control assembly can be cleaned by wiping with a damp
cloth and drying thoroughly by wiping over with a soft dry cloth. Do not wash or immerse the
Main Cooker Body, Heater/Control Assembly in water or any other liquids.
3. The Base Bowl and all accessories may be washed in warm soapy water and dried with a soft
cloth. All are dishwasher safe also.
9 10
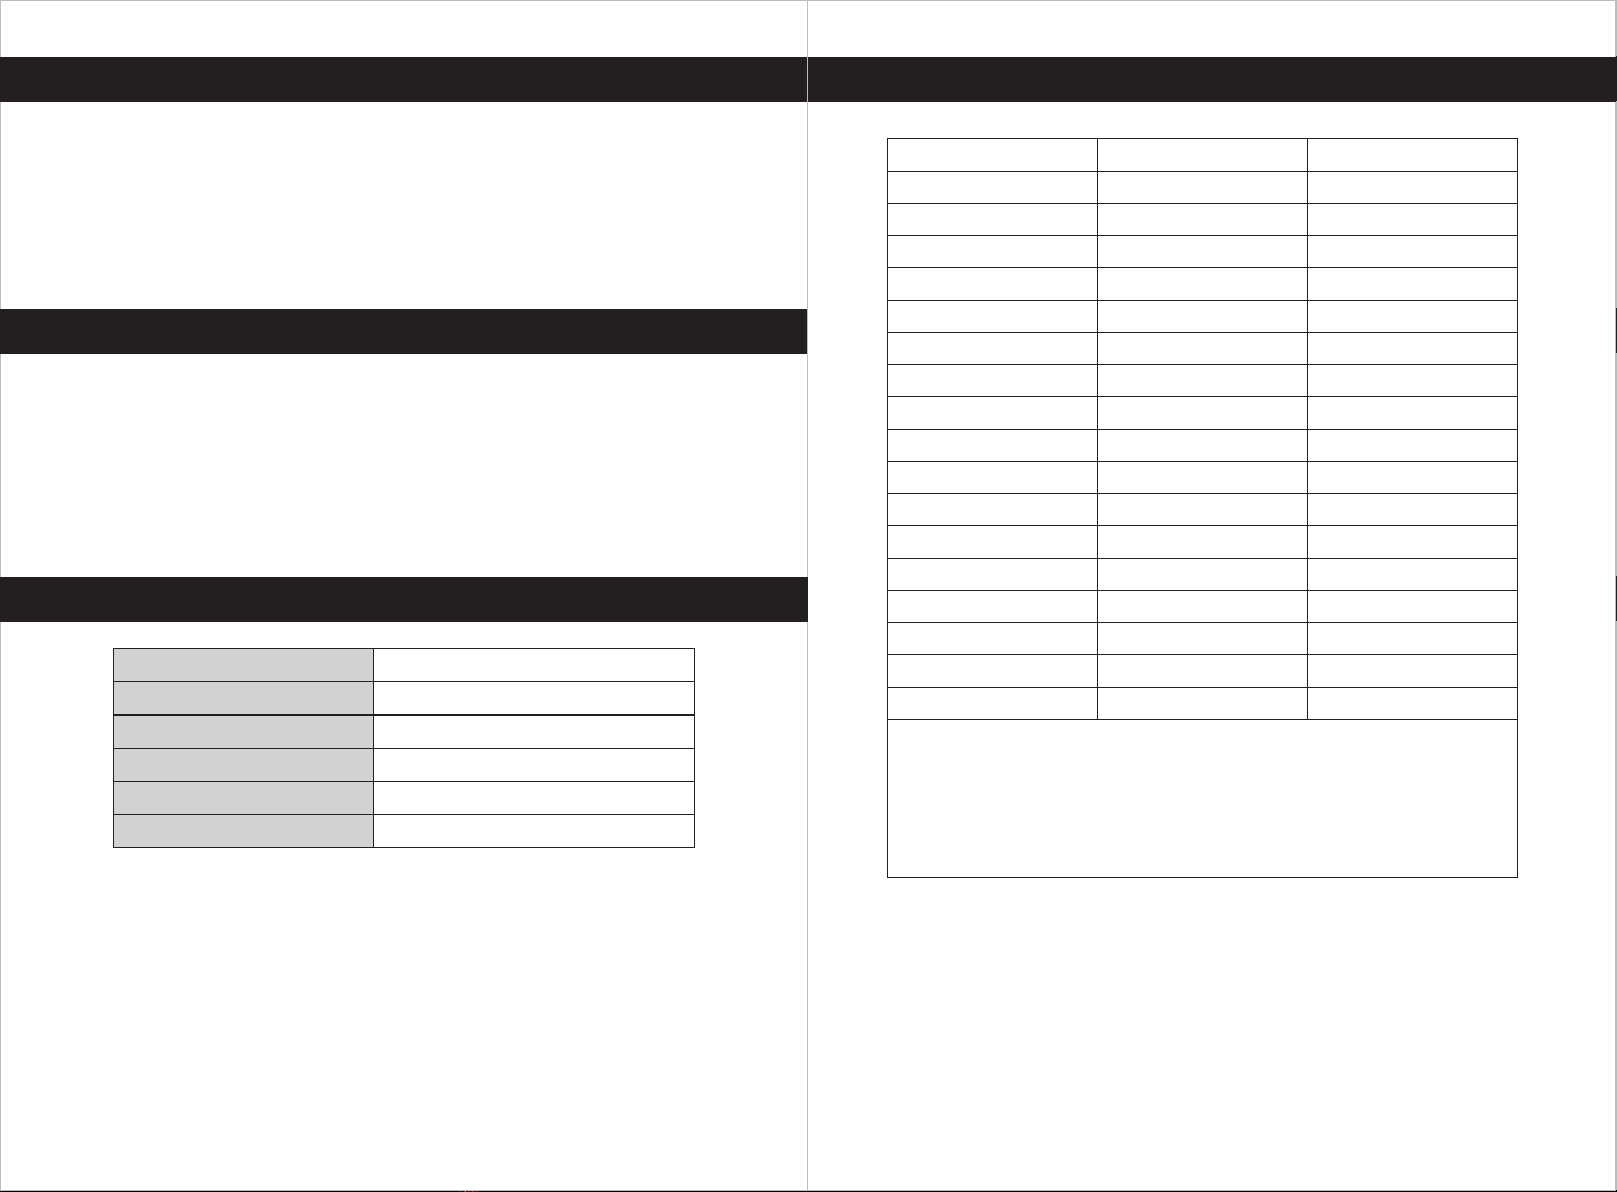
RECIPES FOR REFERENCE
SPECIFICATIONS
220-240V
50/60Hz
1200W
80°C-210°C
1-99(MIN)
8L
Voltage
Frequency
Power
Temperature adjustment range
Time setting range
Container capacity
TIME(min) TEMPERATURE (°C)
28-33
12-17
4-9
15-20
15-20
8-13
18-23
8-13
13-18
3-8
20-25
13-18
25-30
10-15
25-30
210
210
180
210
210
200
200
200
200
200
180
200
180
180
210
FOOD
Chicken
Chicken wings
Sausage
Steak
Meat
Kebabs
Fish
Shrimp
Pizza
Bread
Cake
Cookie
French Fries
Peanut
Fries
25-3
18-23
210
200
Sweet potato
Corn
REMARK: Adjust the cooking time and temperature appropriately according
to the foods and one's taste.
NOTE: No pre-heating is needed with your AIRWAVE 8. This saves you up to
25 minutes in time.
Frozen foods that say “Cook From Frozen” should be cooked to
producers time advised.
This manual suits for next models
2
Table of contents


