Becker BDGP-1 User manual

BDGP-1
owner’s manual
digital piano


1) Make sure you have the following parts, which are supplied in the package:
A) Piano cabinet
B) Right Leg
C) Left Leg
D) Rear Panel
E) Bottom crossbar with three pedals group
F) Chippendale 2x)
G) Pedal clog
H) Headphone hang
and the fixing accessories to be found into a nylon bag:
L) M6x20 TC screw 6X)
M) WL 4x20 TC screws 4x)
N) M6x40 TC screw 4x)
P) WL 4x12 TC screw 2x)
R) Adhesive clamp 5x)
S) Phillips screwdriver
2) Remove the nylon protection and white foam on the wooden parts, free the pedals cable
under the crossbar as shown in Fig. 3
3) Fix on pedals group the pedal clog G) as shown in Fig.1.
4) Fix the right leg B) to crossbar E) with screws N).
5) Fix the left leg C) to crossbar E) with screws N).
6) Fix the rear panel D) to the crossbar E) with screws M) and to the legs B) and C) with
screws L) as shown in Fig.1.
7) Insert the two Chippendale bars F) on the two legs B) and C) as shown in Fig.1.
8) Place the piano cabinet A) on stand, fix it by using the 4 hand wheel L) as shown in Fig.1
by paying particular attention to the position of the hook, as shown in Fig.2.
9) Fix the headphone hang H) whit screws P) as Fig. 1
10) Attach the adhesive clamps R) as shown in Fig.4
11) Insert the MINI DIN pedals cable plug into the proper socket of I/O group under the piano
cabinet A) and fix the cable on the adhesive clamp R) of Fig. 4.
12) Place the piano in its final location and adjust on floor the clog G) of pedals group.
Assembl instruction


TABLE OF CONTENTS
Control Panel ...................................................................................... 1
Starting instruments ............................................................................ 2
Main volume set up ............................................................................. 2
Connecting headphones ....................................................................... 2
Demo listening.................................................................................... 2
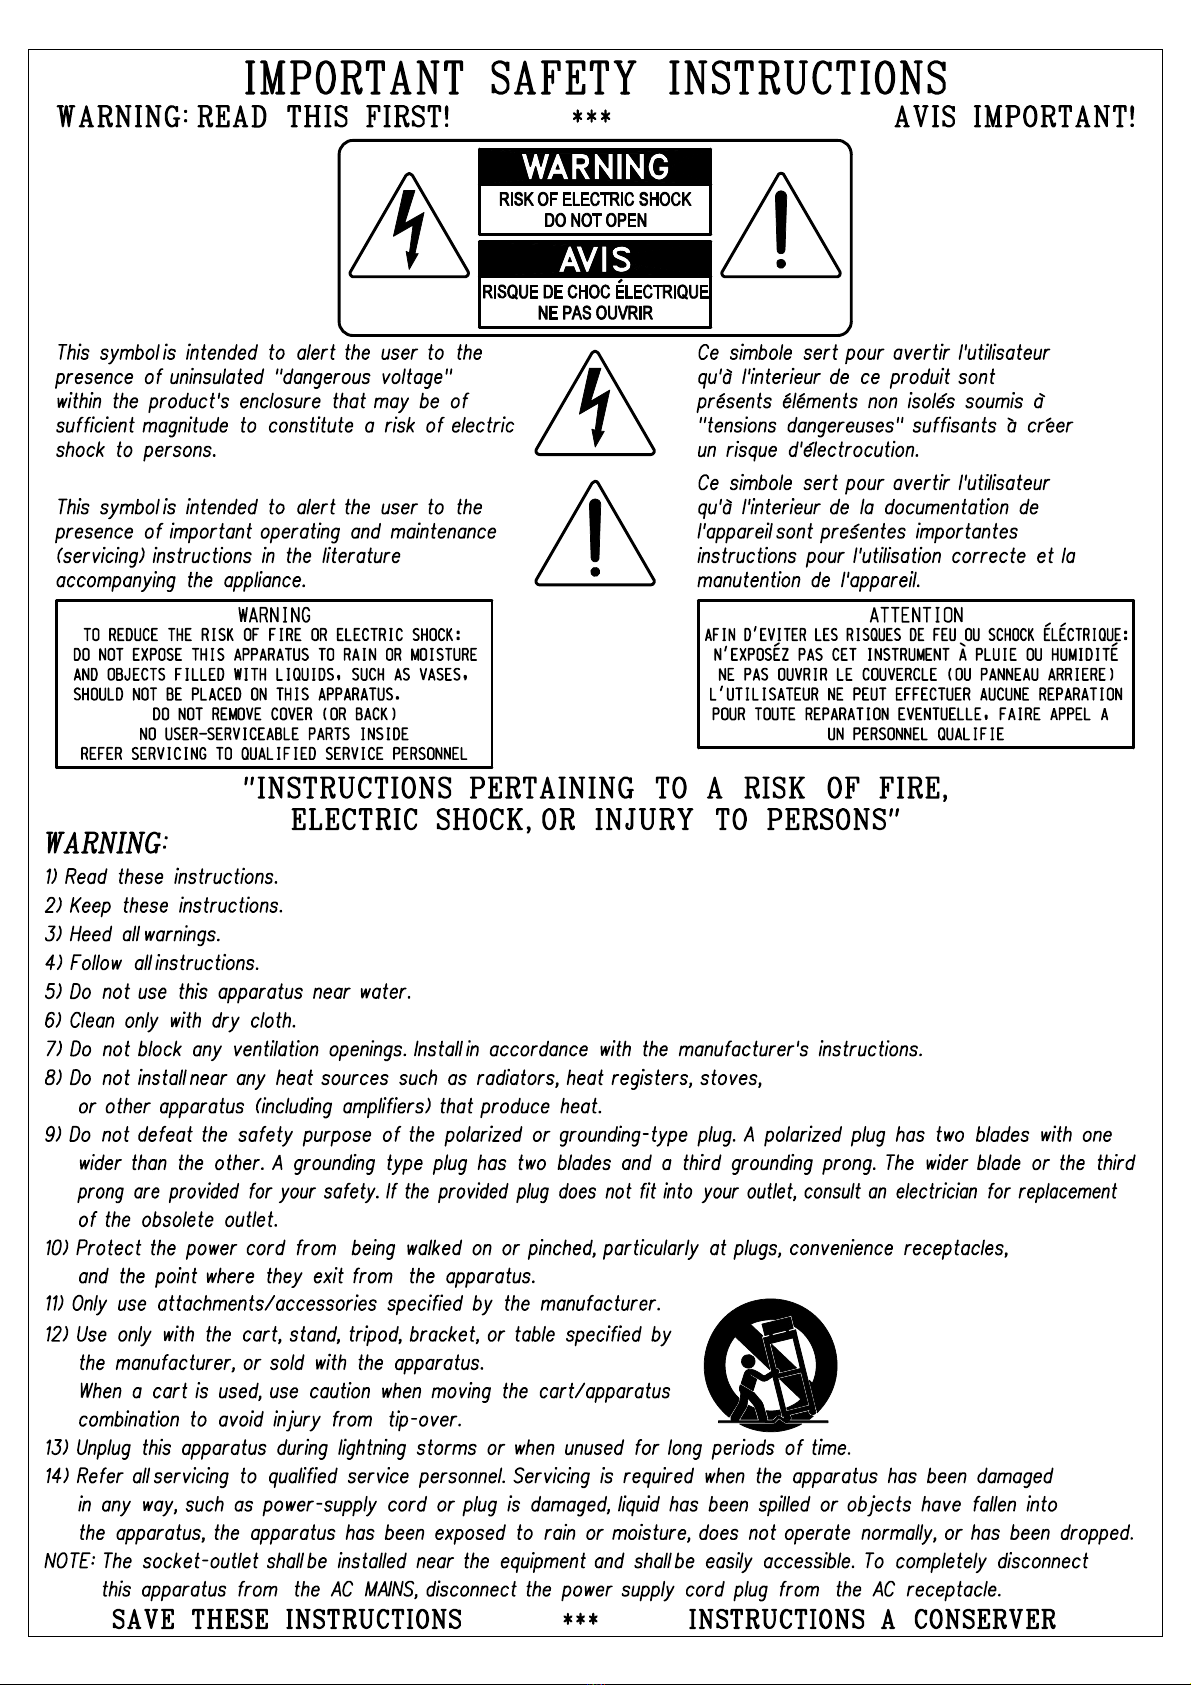
Presets selection ................................................................................. 3
Presets Variation ................................................................................. 3
Layering Presets ................................................................................. 3
Level Select key ................................................................................. 4
Split .................................................................................................. 4
Change the split point......................................................................... 4
Metronome......................................................................................... 5
Metronome parameters editing............................................................. 5
Tempo ............................................................................................... 5
Transpose .......................................................................................... 5
Reverb Selecting or modifying a reverb in a preset)............................... 6
Effects Selecting or modifying a effect in a preset) ............................... 6
MAF: Selecting MAF Multiple Acoustic Feel) .......................................... 7
Touch ................................................................................................ 7
Song Player/Rec.................................................................................. 8
Program ............................................................................................. 9
Function ............................................................................................ 9
Piano Function menu ........................................................................... 9
Tune ............................................................................................ 10
Temperament ................................................................................ 10
Volume metronome........................................................................ 10
Equalizer ...................................................................................... 10
Decay Env. .................................................................................... 11
Transpose Lower............................................................................ 11
Transpose Upper............................................................................ 11
MIDI ............................................................................................ 11
Backup ......................................................................................... 12
Help ............................................................................................. 12
Restore defaults............................................................................ 12
Firmware version ........................................................................... 12
Standby........................................................................................ 12
Preset & Variation list ....................................................................... 13
Rear Panel ....................................................................................... 13
Technical Specifications ..................................................................... 14

1
BDGP-1
owner’s manual
VOLUME: Adjusts
the master Volu-
me.
Level Select: Adjust
parameter of Balance/
Brillance)
Level: Adjusts the brillance or
two sounds balance.
DEMO: Starts the Built-in
DEMO.
SPLIT: Divides the keyboard in two
parts and assigns a suitable bass
sound for the left part.
PRESETS: Recalls the Pia-
no Sound Presets
DISPLAY: Shows the
numeric value of the
various parameters.
METRONOME:
Switches the
metronome ON/
OFF.
TEMPO DATA:
Sets parameters
in control menus
and adjusts the
m e t r o n o m e
speed.
TRANSPOSE:
Allows you to
transpose the
piano +/- 12
semitones).
R ev er b / Ef f e c t :
select the different
reverb and effect
presets.
MAF: Recalls the
different MAF
effect presets
only on the Piano
Sound).
TOUCH: select
keyboard touch
sensitive
R E C O R D E R :
S e l e c t s
R e c o r d i n g
Functions Rec.-
Stop-Play/pause)
CONTROL PANEL
All the functions of your digital piano can be found on the control panel.
PROGRAM:Access
the Function Menu.
Congratulations! We thank you for selecting the all-new BDGP-1 digital piano!Whether you
are a student, teacher or professional, your piano will impress you with its musical
quality and stylish design - providing years of enjoyment. In addition, your digital
piano is equipped with a high-performance Hammer Action keyboard, for a realistic touch that
allows you to express yourself in endless varieties of shade and color.
For these and many other reasons, you will discover your BDGP-1 is an absolute pleasure to
play! To get the absolute most out of your new piano, we recommend that you read this
manual carefully so that you can take full advantage of all the advanced and convenient
functions. We also recommend that you keep this manual in a safe and handy place for
quick and easy reference in the future.
If you’re enjoying your BDGP-1 piano, please tell a friend!
Delay
Stage
Hall
Room
Tremolo
Phaser
Chorus 2
Chorus 1

2
BDGP-1
owner’s manual
STANDBY/ON switch
Demo listening
Connecting headphones
Master volume set up
Move the volume slider on the control panel to set the instrument
volume. Moving the slider to the left will decrease the volume, moving
it to the right will increase the volume.
Warning! Excessive volume especially with headphones connected)
can be harmful to your hearing.
In addition to the internal amplification system, You can connect
two sets of standard stereo headphones. The headphones inputs
are located underneath the left hand side of your keyboard.
Move the volume slider to set the headphone volume.
Your piano features 8 demo songs. This is a great way to become familiar with the variety of
sounds on your instrument in a quick and easy manner. To start a demo song, simply press the
corresponding button to the demo song of your choice. Min. Max.
Whenever the DEMO button is pressed the preset selection button will start flashing. You will
need to select any of the flashing buttons within 2 seconds. The demo song assigned to that
button will begin.
NOTE:The headphones connection disables the internal speaker system.
12
Connect the power cord to a power outlet, your BDGP-1 is now in power
saving mode standby) and the red LED indicates the status. At this
point, press the standby button located on the right side of the keyboard
to turn on the instrument, the LED turns from red to green ON).
Press the standby button again to switch to power saving mode, the LED
changes from green to red standby / OFF).

3
owner’s manual
Presets selection
The presets are the internal sounds on your BDGP-1 digital piano. Your piano has 16
professional sounds which may be played separately, or in combinations of two. They have
been selected & optimized with the associated effects and control parameters to provide you
with the most exciting combinations.
Selecting sounds is very easy. First locate the presets section on the control panel. Next,
simply press the sound button you want to recall.
The selected preset is indicated by an illuminated blue led on the button.
Piano preset, led-light on button will be illuminated
Presets Variation
Each of the piano sounds features one ‘variation’.
Dual Presets
Your piano allows you to easily use dual sounds i.e.: Piano + Strings).
To select dual sounds, press two voice buttons at the same time or press one voice button
while holding another). The voice led-light of both selected voices will be illuminated when
Dual mode is active.
Dual PIANO1 & STRINGS1
NB. When you are in
dual mode, the “level”
slider changes
automatically to adjust
the balance of the two
sounds.
NOTE: Pressing any of the sound buttons individually, your piano will switch back to Single mode.
To recall a sound variation press the same sound
button a second time. The led light will change from blue
to red. You can now play the
sound variation.
BDGP-1

4
BDGP-1
owner’s manual
SPLIT (divide the ke board in two parts)
SPLIT Bass:
To activate the Bass Sound on
the left hand press the BASS
button. The Bass sound selection
is illustrated by the
corresponding led on the panel.
Press the Bass button to change
the Bass Sound. To exit the Split
Bass mode press the button until
the LED associated with the
sound is off.
The split controls allow you to activate the split divide the keyboard in two parts), to select
the active split sounds, and select the split points for your Bass and upper part Sounds
LEVEL Select
The Level slider has two different functions, it can adjust Brilliance
or Balance.
By pressing the Level Select button you can alternatively switch
between the two modes. The amount of the two functions is
controlled by the potentiometer.
Brilliance: allows you to change the brightness of the sound
produced by BDGP-1. To lower the sound brilliance simply move the
slider to the left, moving the slider to the right will increase brilliance
and you will get a brighter sound.
Balance: allows you to modify the balance between the three sound
parts of BDGP-1 when you are playing in dual or split mode. Below we
see the part configurations and how these are influenced by Balance:
1. If you play the piano in “single mode” the level select is locked to brilliance.
If Balance is active, and you switch from one configuration with multiple parts to a single
sound, Level Select automatically selects Brilliance.
When Brilliance is active and you switch from a single sound to a multi-part configuration,
Level Select automatically selects Balance. Whenever you change level select mode from
Brilliance to Balance and vice versa), the current level of the old mode is stored in memory,
while the last stored level of the new mode will become the current level.
2. In the “Layer mode” you can adjust the balance between the two sounds that compose the
Layer.
3. In the “Split mode” with Bass/Sound + Single Sound, the level slider controls the balance
between Bass/Sound and Single Sound.
4. In the “Split mode” with Bass/Sound + Layer Sound, the level slider controls the balance
between Bass/Sound and Layer, and the two layered sounds are adjusted by the same amount
SPLIT Sound:
To activate the Sound Preset on the left hand press the Sound button. To select a Sound
preset, press and hold the Sound button the button light will start flashing and will turn the
active PRESET), select the desired PRESET, then press the SOUND button that turns on with
the chosen sound.

5
BDGP-1
owner’s manual
TRANSPOSE
METRONOME: pla ing with a metronome guide
Press the METRONOME button to enable the metronome feature. The button led-light starts
flashing while the display will show the current metronome value given in bpm , beats per
minute). The metronome default value is 120 BPM and can be changed in a range from 30 to 250
BPM.
Metronome parameters editing
By holding the METRONOME button for more than 2 seconds,
the piano will enter the metronome editing menu. The display
shows the first parameter: TIME SIGNATURE.
Using the TEMPO/DATA button you can set the meter you desire
1/4 - 2/4 – 3/4 - 4/4 – 5/4 – 6/4 – 7/8 – 3/8 – 6/8 – 7/8 – 9/
8 – 128) .
Press the METRONOME button a second
time to turn off the metronome.
Use the TEMPO/DATA buttons to
change the current beat value.
press the METRONOME button to exit.
Your piano can be transposed by +/-12 semitones. Press and hold the
TRANSPOSE buttons on the control panel for more than 2 seconds - the
corresponding led blinks.
Press the TEMPO/DATA buttons to change the current value.
The first time you press the buttons the display will show the current
value default=0, C=C). The next time you press the buttons the value
will be modified.
Press the TRANSPOSE button to exit the transpose edit status. The button
led stops flashing but remains ON, to show the current transposed status
of the piano.
Press the TRANSPOSE button again, to quit the transpose, restoring your
piano to normal/default mode.
Change the Split point:
To change the Split Point Press and hold the Bass button down for two
seconds, the four LEDs on the Bass section will begin to flash and the
display shows the current Split Point. Play the note on your piano or use
the TEMPO/DATA buttons) to assign a new split point. Press both the
TEMPO/DATA buttons at the same time to return to the default split-point
C3. Press the Bass button again to confirm the split point
TEMPO/DATA
METRONOME
METRONOME
TRANSPOSE

6
BDGP-1
owner’s manual
Each of your BDGP-1 sounds can include a reverb effect. The reverb type Room - Hall 1 -
Hall 2 - Stage) selection is indicated by the corresponding led on the panel. Press the reverb
button to change the reverb type.
REVERB: Selecting or modif ing a reverb in a preset
Edit the effect send value for a selected preset
EFX: Each of your BDGP-1 sounds can include digital effect Chorus - Phaser - Tremolo -
Delay). The effect type selection is illustrated by the corresponding led-light on the panel.
Press the EFX button to change the effect.
EFFECTS: Selecting or modif ing a effects in a preset
Edit the "reverb send" value for a selected preset
It is possible to customize the default reverb level set from the factory. Keep the REVERB
button pressed for two seconds. The current reverb led-light will start flashing and the display
shows the current send level value from 1 to 10).
To modify the value press the DATA button.
Note: it is possible to change the reverb send for any Sound Preset.
The preset PIANO1 has the
effect OFF all led-light are off).
It is possible to customize the default effect level set from the factory. Keep the EFX button
pressed for two seconds. The current effect led-light will start flashing and the display shows
the current send level value from 1 to 10).
Note: it is possible to change the effect send for any Sound Preset.
Reverb OFF
all leds off).
decrease value increase value
Effects OFF all
led-light off).
To modify the value press the DATA button.
decrease value increase value
EFFECTS
Reverb
Delay
Stage
Hall
Room
EFFECTS
Reverb
Delay
Stage
Hall
Room
EFFECTS
Reverb
Delay
Stage
Hall
Room
EFFECTS
Reverb
Delay
Stage
Hall
Room
EFFECTS
Reverb
Delay
Stage
Hall
Room
EFFECTS
Reverb
Delay
Stage
Hall
Room
Effect
Tremolo
Phaser
Chorus 1
Effect
Tremolo
Effect
Tremolo
Chorus 2
Chorus 1 Chorus 1
Chorus 2 Chorus 2
Phaser Phaser
Effect
Tremolo
Chorus 1
Chorus 2
Phaser
Effect
Tremolo
Chorus 1
Chorus 2
Phaser
Effect
Tremolo
Chorus 1
Chorus 2
Phaser

7
BDGP-1
owner’s manual
The MAF cabinet and mechanical sound simulation – physical modelling) selection is available
on the piano sound only. The MAF type Classic - Baby Grand - Grand ) selection is indicated
by the corresponding led-light on the panel. Press the MAF button to change the MAF type.
MAF OFF all led-lights off).
MAF: Selecting MAF (Multiple Acoustic Feel)
TOUCH: selects ke board touch sensitivities
The TOUCH parameter sets the touch sensitivity on your piano. In this way it is possible to
adapt the instrument to the piano technique that best suits your playing style.
The piano default
uses a NORMAL
touch sensitivity.
Programming a fix d namic value
No dynamic sensitivity fixed value)
Highest dynamic sensitivity recommended for
those who play with a light touch)
Optimal sensitivity default value)
Reduced dynamic sensitivity recommended for
those who play with a heavy touch)
FIXED
SOFT
NORMAL
HARD
Select first the
TOUCH FIX mode
no light on
Keep the TOUCH button
pressed for more than
2 sec. the display shows
the current fixed
dynanic value:
Now by pressing the TEMPO/DATA buttons you can set the dynamic value transmitted by
the keyboard.
MAF OFF all
leds off).
decrease value
1
increase value
2
min. max

8
BDGP-1
The following steps will guide you to the recording of a song:
1. Choose the combination of sound and volume you want.
2. Press the Rec button. It begins to flash and the display
will show "rEC", indicating that BDGP-1 is waiting for
the execution of the song.
At this stage, you can enable the metronome and change the
tempo the display will show momentarily the tempo, and then
return to show "rEC").
owner’s manual
SONG PLAYER/REC: recording a song
BDGP-1 allows you to easily record and playback your
performances.
3. The recording of the song starts as soon as you press a key
or a foot pedal. The led of the Rec button lights up and the
display reverts to showing the information of the tempo.
4. To stop recording, press the Stop button or the Rec button.
If the metronome was on during registration, it will be
switched off. The song recorded is automatically stored by
BDGP-1.
Note: Each time you record a new song, the system overwrites the previous song.
To listen the recorded song, press the Play / Pause button, the
button light turns on and the metronome, in case it been turned
on, it turns off.
While playing the recorded song, you can use the Play / Pause
button to pause and resume playback.
NOTE: The control panel parameters are stored in the song, and then every time the Play is
performed, the configuration of the control panel recalls the settings recorded song type of
effect, Maf, Touch, etc ...)

9
BDGP-1
owner’s manual
Function
FUNCTION button allows to enter the function menù . The
function , LED starts flashing and the display shows F 1
first function).
To select other MENU function F1...F12) use the DATA
buttons.
Enter
Press ENTER button to select your desired function
F1...F12)
The display shows the current value.
Use the DATA buttons to edit the value
Press the ENTER button to confirm any modification, the
display shows the function selected.
Press the FUNCTION button to exit
Piano FUNCTION menu
PROGRAM:
The piano functions menu allows you to adjust your piano to different operating situations.
Functions parameter range
F1
F3
F4
F5
F6
F7
F8
F9
F10
F11
F12
Tune
Temperament
Volume metronome
Equalizer
Decay Env.
Transpose lower
Transpose upper
MIDI
Back-up
Help
Restore defaults
Firmware version
From -99 to 99 cent
Equal default), Pythagorean, Vallotti, Meantone,
Werckmeister, Kirnberger
From 0 to 10
ON/OFF
F2
ON/OFF
-3, -3, -1, 0, +1, +2, +3)
-3, -3, -1, 0, +1, +2, +3)
ON/OFF
ON/OFF
Yes/No
Number of firmware version
CHN / LOC
TEMPO/DATA
Enter Function
PROGRAM
TEMPO/DATA
Enter Function
PROGRAM
TEMPO/DATA
Enter Function
PROGRAM
F13 Standby ON/OFF

10
BDGP-1
owner’s manual
1. Equal default)
2. P thagorean
3. Vallotti
4. Meantone
5. Werckmeister
6. Kirnberger
(F2)Temperament
This function allows you to select different temperaments type of
tunings):
the display shows the current temperament value 1...6)
(F1)Tune
This function allows you to adjust the piano's pitch:
the display shows the current tune value 0 by default.
Edit the value using the TEMPO/DATA buttons, from -99 to 99
cent of tone. 0=standard pitch A=440Hz
Change the temperament
using the TEMPO/DATA
buttons.
(F3)Volume metronome
This function allows you to modify the volume of metronome:
the display shows the current value 0...10)
Edit the value using the TEMPO/DATA buttons.
(F4)Equalizer
This menu turns the internal equalizer ON or OFF.
the display shows the current value ON) by default.
Set OFF using the DATA buttons.
decrease value increase value

11
BDGP-1
owner’s manual
(F5)Deca Env.
(F6)Transpose Lower
This function allows you to traspose by octaves the
Sound on the left side of the keyboard Lower part).
Pressing the ENTER button the display shows the
current value default: 0, No transpose). Press the
TEMPO/DATA button to edit the value -3, -2, -1,
0, +1, +2, +3)
(F7)Transpose Upper
This function allows you to traspose by octaves the
Sound on the right side of the keyboard Upper part).
Pressing the ENTER button the display shows the
current value default: 0, No transpose). Press the
TEMPO/DATA button to edit the value -3, -2, -1, 0,
+1, +2, +3)
TEMPO/DATA
TEMPO/DATA
TEMPO/DATA
TEMPO/DATA
Enter Function
PROGRAM
Allows you to edit the envelope of all the presets that do not normally have decay Organ,
Strings, Choir), replacing the sustain phase with a decay one.
These sounds will benefit from this effect only in the case where they are in one layer with a
sound with decay Grand Piano, El Piano, Vibes, Harpsichord, Guitar).
It 'a very useful feature if you are playing a layer such as Grand Piano+ Strings: the envelope
of all the sounding notes, including the notes of strings, will decay slowly as it does for the
sound of the piano.
Values:
ON default): Organ, Strings and Choir, when coupled to a sound having decay, also will decay.
OFF: Organ, Strings and Choir sound at their normal envelope that provides the sustain phase.
(F8)MIDI
This function allows you to edit the piano MIDI configurations on your piano.
The ENTER button allows you to choose one of these functions: CHN - LOC.
Select a function by using the TEMPO/DATA button. Press ENTER to edit the function.
CHN: This function allows you to select the MIDI channel
for both receiving and transmitting data In and OUT),
from 1 to 16. To set the midi channel valid for both
transmitting and receiving data) choose the number using
the TEMPO/DATA in a range from 01 to 16.
Edit the the value using the TEMPO/DATA buttons.
Press ENTER to confirm.

12
BDGP-1
owner’s manual
(F9) Backup
With this function you can decide which configuration to start the piano when turned on. You can
choose to use the Factory settings Backup OFF) or your custom settings Backup ON), which
includes all of the panel settings Sounds, Reverb, Effects, Sends, Touch, etc.).
Default: OFF. Use the TEMPO/DATA button to edit the value
(F10) Help
To disable or enable the voice-help in the function menu.
Default: ON.
(F11) Restore deafaults
This will Restore Factory Settings on the piano. The sequencer memory will be erased.
Default: YES.
Set NO using the TEMPO/DATA buttons.
Set YES and press ENTER to confirme the factory reset: the piano will re-start.
(F12) Firmware version
This function will illustrate the software release number on your BDGP-1 piano.
Set OFF using the DATA buttons.
Default: OFF.
Set OFF using the DATA buttons.
(F13) Standb
Enable ON) or Disable OFF) the auto-off function of the piano, after a period of inactivity.
The default value is set to ON and implies that the instrument goes into standby mode after 30
minutes of inactivity. Set the value to OFF to disable the standby function.
Default: ON.
LOC: This function allows you to properly connect the piano to a computer or to a MIDI device.
If you select OFF, MIDI messages will be sent only to the connected device and not to the
generation of the instrument.
Default: ON.
To change the status of this feature On / Off) use the buttons TEMPO/DATA.

13
BDGP-1
owner’s manual
REAR PANNEL
PRESET E VARIATION LIST
prg Preset prg Variation prg Bass
1
2
3
4
5
6
7
8
9
10
11
12
13
14
15
16
Grand Piano (MAF) Bright Piano (MAF)
Vibraphone
Digital Piano
Harpsichord Clavi
El. Vintage Piano
N lon Guitar
Church Organ
Strings Ensamble Slow Strings Ensamble
Choir Warm Pad
Jazz Organ
Jazz Guitar
Marimba
17 Acoustic
18 Electric
19 Fretless
20 Acou+Ride
(2) (3) (4) (5)
(1)
(*)To connect BDGP-1 to a computer it is necessary to have the USB cable
not supplied). Once you have connected the two units, follow the installation
wizard of the MIDI driver on your computer.
At this point BDGP-1 will be recognized between MIDI devices.
MAIN OUT
Right e Left/Mono Connect the instrument to an external speaker system.
(2)
(3)
(4)
(5) INPUT
Right e Left/Mono
Connect an instrument to the internal speaker system CD,
Mp3 player, etc.).
MIDI
In-Thru-Out
Socket to connect the pedals Damper, Soft, Sostenuto).
PEDAL
Standard MIDI connection.
(1) USB (*) USB connection.

14
BDGP-1
owner’s manual
Technical Specifications
gloss black - gloss white
with a sliding keyboard cover)
Keys with hammer action
128 note max
volume, balance/brillance, demo, split, metronome, play/pausa, stop, rec,
tempo/data, transpose, preset e variation selection, split, reverb send
edit), efx send edit), MAF 3 preset: Classic - Baby Grand - Grand - OFF,
touch 3 curve di dinamica + fix mode), functions menu: global tune,
temperament 6 tipi), volume metronome, equalizer on/off, decay env.
on/off, transpose lower, transpose upper, midi menu receive/transmit
channel), back up mode, Standby mode.
Whole, Layer, Dual volume balance adjustable), Split progr.)
20 presets
Viscount Sound Generator VEGA Versatile Engine Generator Audio)
MAF technology Multiple Acoustic Feel)
operating mode
4 riverb and 4 modulation , assignable with separate sends
sequencer 1 track, 11.000 events, metronome, 8 demo songs
displa led 3 digits
stereo in/out L mono)/R, MIDI in/thru/out), headphone X 2, AC In, USB
soft, sostenuto,sustain
50W + 50W 6 Speakers)
mm 1466 x 1017 x 927)
Kg 95
ke board
poliphon
sounds
controls
technolog
digital effects
connections
pedals
cabinet
amplification
dimensions
WxDxH)
weight

Disposal of old Electrical & Electronic Equipment (Applìcable throughout the European Union
and other European countries with separate collection programs)
Dir. 2002/95/CE, 2002/96/CE e 2003/108/CE
This syrnbol, found on your product or on its packaging, indicates that this product should not be
treated as household waste when you wish to dispose of it. Instead, it should be handed overt to an
applicable collection point for the recycling of electrical and electronic equipment. By ensuring this
product is disposed of correctly, you will help prevent potential negative consequences to the
environment
and human health, which could otherwise be caused by inappropriate disposal of this product. The
recycling of materials will help to conserve natural resources. For more detailed information about the
recycling of this product, please contact your local city offi ce, waste disposal service or the retail store
where you purchased this product.
This product complies with the requirements of EMCD 2004/108/EC and LVD 2006/95/EC.
FCC RULES
NOTE: This equipment has been tested and found to comply with the limits for a Class B digital Device, persuant to Part 15 if the FCC
Rules. These limits are designed to provide reasonable protection against harmful interference in a residential installation. This
equipment generates, uses and can radiate radio frequency energy and, if not installed and used in accordance with the instruction,
may cause harmful interference to radio comunications. However, there is no guarantee that the interference will not occur in a
particular installation. If this equipment does cause harmful interference to radio or television reception, which can be determinated by
turning the equipment off and on, the user is encuraged to try to correct the interference by one or more of the following measures:
-Reorient or relocate the receiving antenna.
-Increase the separation between the equipment and receiver.
-Connect the equipment into an outlet on a circuit different from that to which the receiver is connected.
-Consult the dealer or an experienced Radio/Tv technician for help.
The user is cautioned that any changes or modification not expressly approved by the party responsable for compliance could void the
user’s authority opearate the equipment.
INFORMATIONS FCC
NOTE : Cet instrument a été controlé et il est garanti pour etre en conformité avec les spécifications techniques établies pour les
dispositifs numériques de la « Classe B » selon les normes de protection contre les interférences avec d’autres dispositifs électroniques
environnants. Cet appareil produit et utilise des fréquences radio. S’il n’est pas installé et utilisé selon les instructions contenues dans le
mode d’emploi, il peut générer des interférences. L’observation des normes FCC ne garanti pas qu’il y aura aucune interférence. Si cet
appareil est la cause d’ interférences avec une réception Radio ou TV, il est possible
de le vérifier en éteignant puis en allumant l’instrument : Vous pouvez alors résoudre le problème en suivant les procédures suivantes :
-déplacer ou orienter l’antenne de l’appareil avec lequel se manifeste l’interférence.
-déplacer cet instrument ou l’appareil avec lequel se produit l’interférence
-connecter cet instrument à une prise de courant différente afin de mettre les deux appareils sur deux circuits différents.
-consulter le revendeur ou un technicien radio/tv pour d’autres renseignements.
D’éventuelles modifications non approuvées par le constructeur peuvent annuler votre garantie de l’appareil.
Table of contents
Other Becker Musical Instrument manuals