Becker BSP-100 User manual

BSP-100
owner’s manual
digital piano

Selecting and Playing a Rhythm ..........................12
Playing Along with an Arranger.................................12
Selecting and Playing an Arranger ........................12
Chord Fingering..........................................12
Recording Your Performances ...................................14
Recording .....................................................14
Preparing Your Recording.................................14
Start Recording ..........................................14
Stop Recording...........................................14
Playingback Your Recording ....................................14
Internal Piano Song .............................................15
Playingback Internal Song ......................................15
Playing along with Internal Song ...............................15
Detailed Function Settings (Function Mode)......................16
Entering the Function Mode ....................................16
Objects for setting .............................................16
Tone List .......................................................17
Internal Song List ...............................................18
Accompaniment List ............................................20
Chord Fingering List ............................................21
Main Specications .............................................22
USING THE UNIT SAFELY.........................................23
Contents
Look What You Can Do!...........................................4
Panel Description ................................................6
Getting Ready ...................................................7
Music Rest ......................................................7
Using a Stand ...................................................7
Getting Ready ...................................................8
Turning the Power On and O ...................................8
Turning the Power On .....................................8
Turning the Power O .....................................8
Listening to the Demos..........................................8
Performing ......................................................9
Performing with Various Sounds .................................9
Switching Tones ..........................................9
Performing with Two Layered Tones........................9
Playing Dierent Tones with the Right and Left Hands
(Split Play) ..................................9
Performing with the Metronome ...............................10
Changing the Metronome’s Tempo. . . . . . . . . . . . . . . . . . . . . . . .10
Changing the Metronome’s Time Signature ...............10
Changing the Metronome’s Volume.......................10
Adjusting the Sound to Your Taste ..............................10
Adding Reverberation (Ambience) ........................10
Adding Chorus Eect.....................................11
Using Pedal ..............................................11
Shifting the Pitch (Transpose) ..................................11
Adding Accompaniment to Your Performance ....................12
Playing Along with a Rhythm ...................................12

Playthe Piano
♦
Play various sounds
The BSP-100 features more than 100 different tones for you to
enjoy. You can freely select and perform using these tones.
♦Play two layered tones
You can layer two tones on a single key.
♦Play dierent tones with your left and right hands
You can divide the keyboard into left and right zones, and select a dierent tone for each zone.
♦Play twin piano
You can divide the keyboard into left and right zones; each zone has the same tone and key range for two
persons playing almost the same piano. It is useful for music teaching..
♦
Sound a metronome
You can sound a metronome.
♦
Play pedals
When the BSP-100 is equipted with optional stand B-Stand-100, you can play three pedals like real piano.
Page 9
Page 10
Page 11
Look What You Can Do!
RecordSongs
♦Record your performances
You can record your performance, including accompaniment.
Page 14
Playing with Accompaniment
♦Play along with a rhythm
The BSP-100 features 30 different rhythms that can accompany you as you play.
♦Play along with a chord pattern
The BSP-100 has 30 built-in chord patterns that you can play along with.
Lets you enjoy performing as though you’re playing with a backup band.
Page 12
Page 12
1
Before using this unit, carefully read the sections entitled: “USING THE UNIT SAFELY” (p. 23) . These
sections provide important information concerning the proper operation of the unit. Additionally, in
order to feel assured that you have gained a good grasp of every feature provided by your new unit,
Owner’s manual should be read in its entirety. The manual should be saved and kept on hand as a
convenient reference.
Page 9
Page 10
Page 9

2
Practice Along with songs
♦Internal songs for practice
The BSP-100 has 99 Internal songs. You can exercise right, left and both hand performance along with
the songs.
DesigningSounds
♦Add reverberation to the sound
You can add reverberation (ambience) to create the sensation of performing in a concert hall.
♦Add chorus eect to the sound
You can add reverberation (ambience) to create the sensation of performing in a concert hall.
♦Adjust the tone color
You can use the equalizers to adjust the sound’s tone color
♦Adjust the string resonance
You can adjust the string resonance effect to the desired level for playing piano.
♦Adjust the damper pedal resonance
You can adjust the resonance effect to the desired level for playing the damper pedal.
Page 10
Page 11
16 页
Page 16
Page 16
Page 16
LivePerformance Features
♦Transpose the pitch of the keyboard
You can transpose the pitch of the keyboard, allowing you to change the key of your
performance quickly and easily.
♦Adjust the keyboard touch
You can adjust the touch sensitivity of the keys.
♦Adjust the pitch of the sound
You can ne tune the sound pitch to match other musical instrument.
11 页
Page 16
Page 16
Personalize your Setup
♦Functional setup
You can setup many functionalities per your demand such as Auto save, Local On/
Off, Recover factory setting etc.
Page 16
Look What You Can Do!
Page 15
Page 16

3
Single sustain pedal
Front Panel
Use these buttons and knobs to control the BSP-100
OUTPUT Jacks
Panel Description
Rear side
NOTE
* To prevent malfunction and equipment failure, always turn down the volume, and turn o all the units before making any connections.
DC IN Jack
Connect the included AC
adaptor here.
USB COMPUTER Port
You can use commerically available USB cable to
connect the BSP-100 to your computer. You can
then use MIDI-related software to record and play
back BSP-100 performances.
[ ] Power Switch
Turns the power on
and o.
Page 13
Pedal unit cable
What is MIDI?
MIDI stands for Musical Instrument Digital Interface. This is a world
wide standard communication interface that enables electronic
musical instruments and computers to communicate with each other.
External MIDI device
Headphone Jack
Connect your headphones
(sold separately) here.
Pluging into the jack [1] will
mute the piano speakers;
Pluging into the jack [2] will
keep the piano speakers
sound.
Damper pedal
If you connect these jacks to amplified
speakers, the sound of BSP-100 will be
heard through them
Connect these jacks to external MIDI
devices.
Fix the pedal unit
cable with the cable
clips.
Page 7

4
Music Rest
Attach the included music rest as shown below.
Using a Stand
Please use the Becker stands B-Stand-100 to support your BSP-100, this is an optional and you should purchase separately.
Refer to the following diagram to assemble the stand. You should install the rear panel in the back side; when assemble the pedal cross bar, you
should turn the stand over then install it.
1. Align the bottom of the BSP-100 with the top slots of the stand; fix the piano with 4 knobbed screws.
2. Plug the pedal unit cable jack into the [PEDAL UNIT ONLY] socket in the rear panel (Page 6).
Getting Ready
Four M4X16 screws
Rear panel
Pedal Cross bar
Four M6X25 screws
Peel o protection lm on
the pedal unit cable clip;
stick the clips in proper
location in the stand.
Four knobbed screws

5
Turning the Power On and Off
Turning the Power On
NOTE
Once everything is properly connected (p. 6), be sure to follow
the procedure below to turn on their power. If you turn on
equipment in the wrong order, you risk causing malfunction or
equipment failure
1. Rotate the [MASTER] knob all the way anticlockwise
to minimize the volume.
2. Press the [ ] switch.
The unit turns on and a TONE button along with other buttons light
up.
* This unit is equipped with a protection circuit. A brief interval (a
few seconds) after turning the unit on is required before it will
operate normally
3. Rotate the [MASTER] knob to adjust the volume .
* Before turning the unit on/o, always be sure to turn the volume
down. Even with the volume turned down, you might hear some
sound when switching the unit on/o. However, this is normal
and does not indicate a malfunction
Turning the Power Off
1. Rotate the [MASTER] knob all the way anticlockwise to
minimize the volume.
2. Press and hold the [ ] switch until the display turns o.
The unit turns o.
Concerning the Auto Off function
The power to this unit will be turned o automatically after
a predetermined amount of time has passed since it was
last used for playing music, or its buttons or controls were
operated (Auto O function). If you do not want the power to
be turned o automatically, press and hold down the most
left white key then turn on the power, release the white key
until “01: Grand Piano” appeares on the disply..
Any settings that you are in the process of editing will be lost
when the power is turned o. If you have any settings that
you want to keep, you should engage the Auto Save feature
in Setup menu (Page 16).
Listening to the Demos
The BSP-100 comes with 99 bult-in piano songs. Here’s how to
listen to the demo songs.
1. Selecting a song
Press the [SONG] button repeaditely until the PRESET indicator
lights up, song number and its name will appears on the screen .
Press the [+/Yes] or [-/NO]button to select a song.
After 4 seconds, the display will turn to tone screen, the indicator
of TUNE button will light up. If you want to see song name and
number once more, press the [SONG] again, then you may select
another song by [+/Yes] or [-/NO]button. Please refer to < Song
List> to nd all songs.
2. Playing the song
Press the [PLAY/STOP] button and it will light, the selected song
will start to play.
3. Stop playing
The playing will stop automatically when the song is nished,
the [PLAY/STOP] lighting will go out. You may stop the playing
anytime by pressing the [PLAY/STOP] button again.
NOTE
* No data for the music that is played will be output from the MIDI
OUT connector and USB port.
* All rights reserved. Unauthorized use of this material for
purposes other than private, personal enjoyment is a violation
of applicable laws.
S01:Valse 34-1
Getting Ready

6
Performing
Performing with Various Sounds
In addition to Becker multi-sampled 88-key piano sounds, the
BSP-100 lets you enjoy performing with 102 other sounds
including Chinese folk instruments.
These sounds are called“Tones”. The tones are organized into ten
groups, and each group is assigned to a TONE button
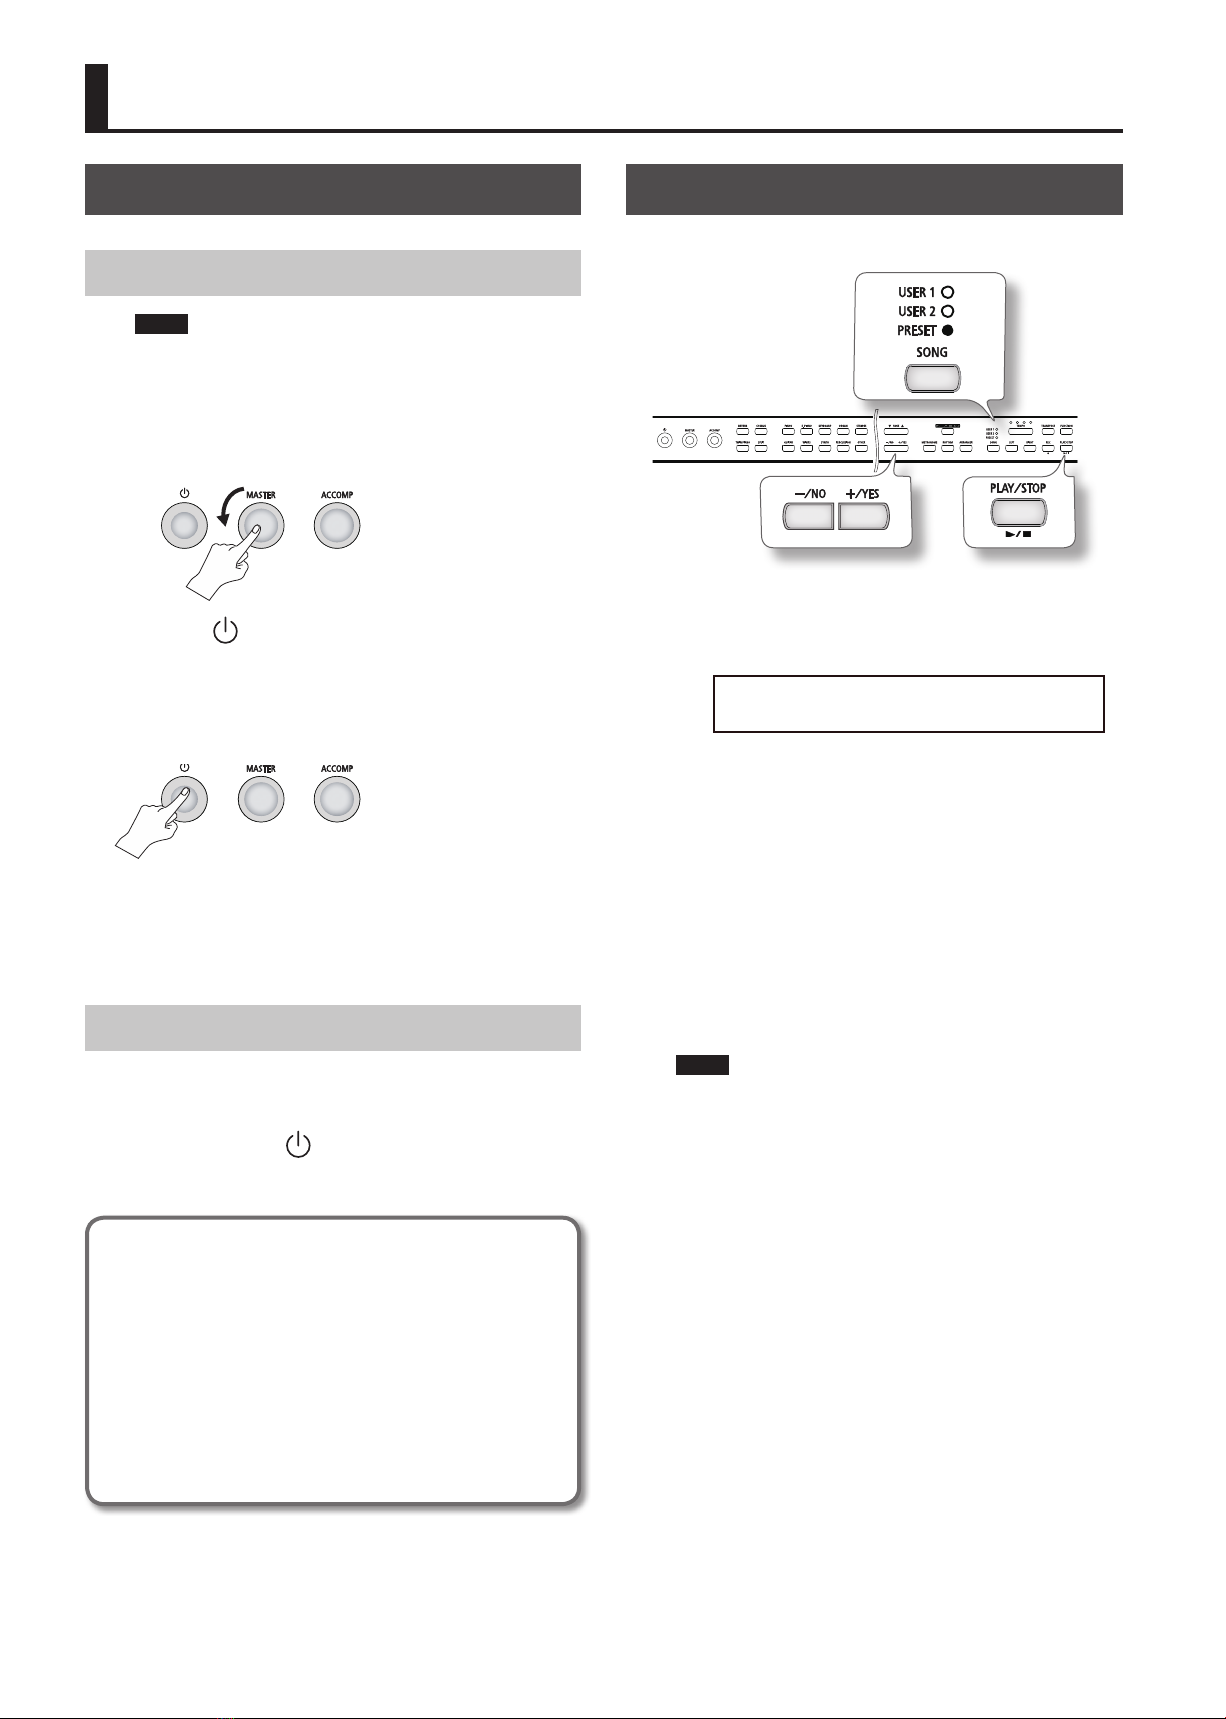
Switching Tones
When the piano is powered on, the tone is Grand piano.
Press the [ONE TOUCH PIANO] button anytime to recover the Grand
piano tone and stop played music.
You can also switch to other tones.
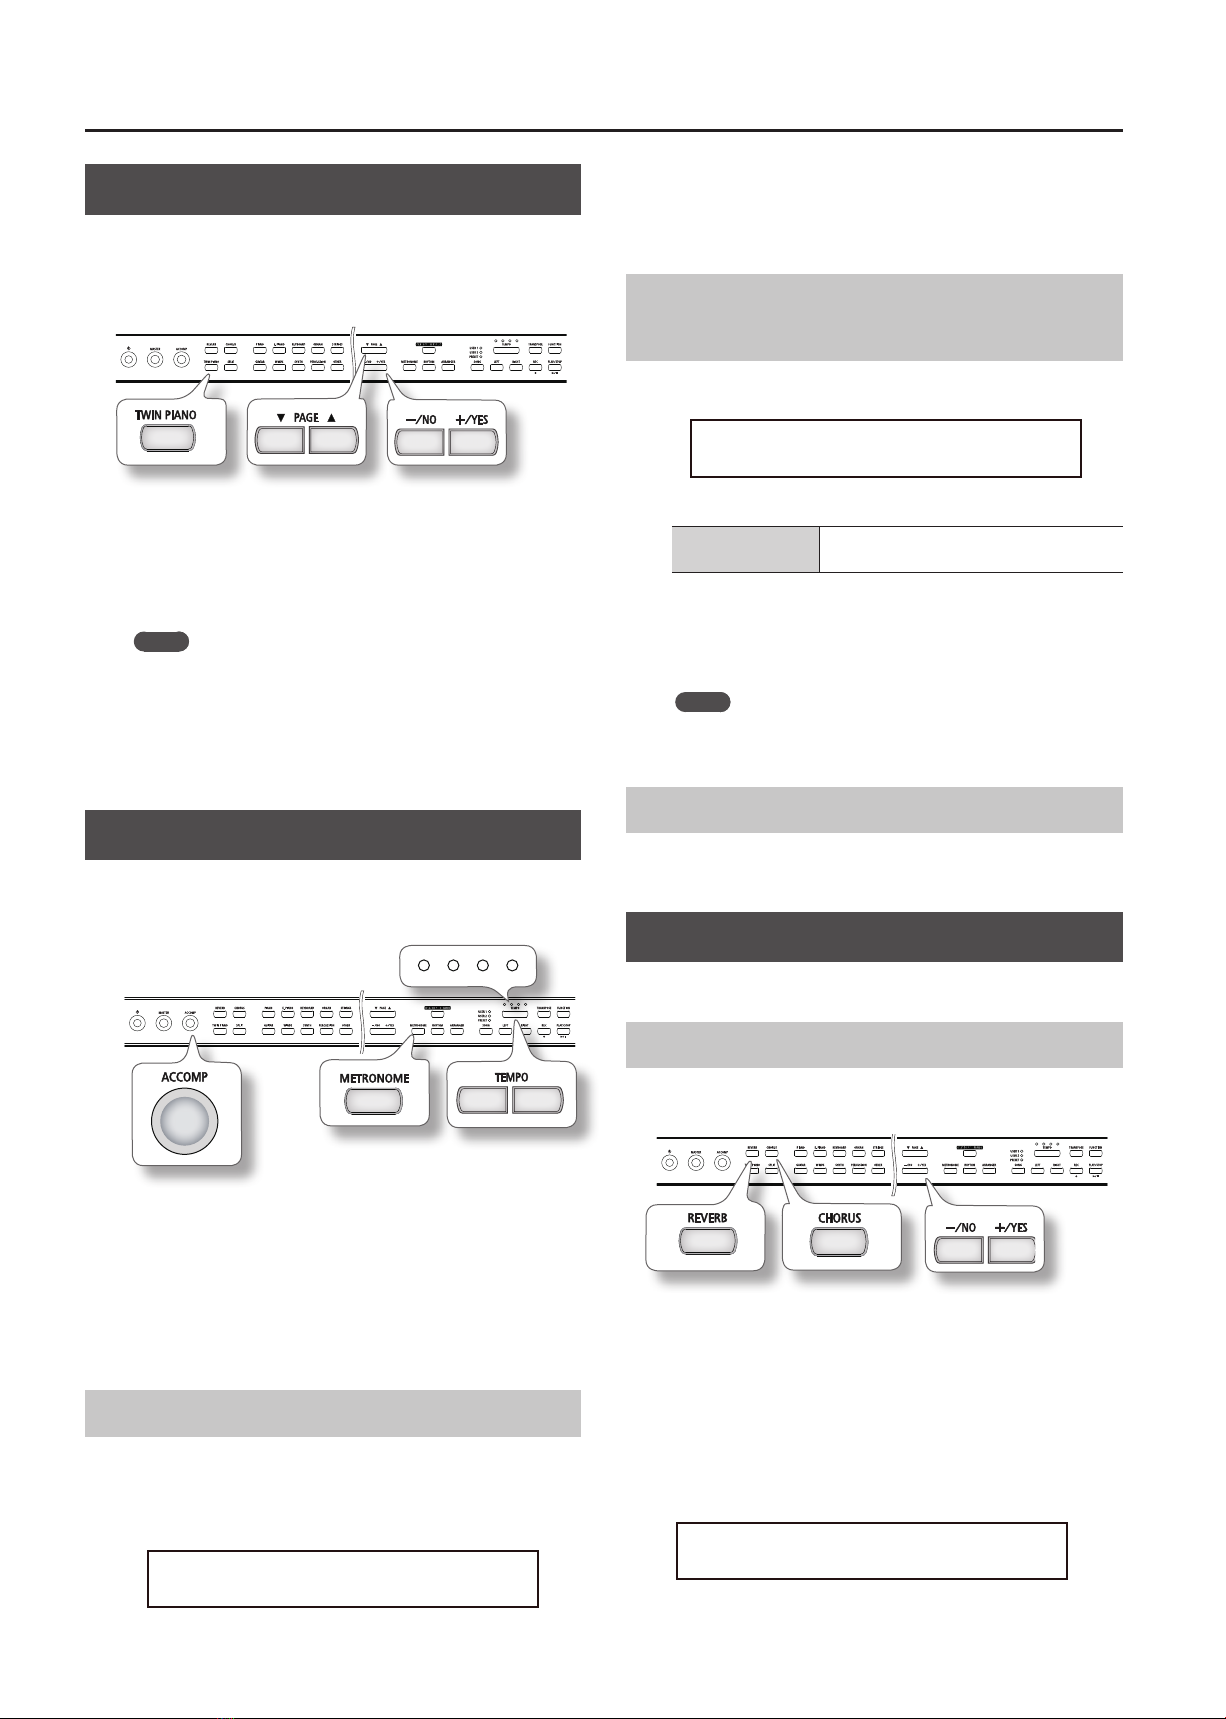
1. Press the [TONE] button to select the tone group.
The currently selected tone number and tone name are displayed.
Button Explanation
[PIANO] Allows you to select various historical instruments,
including grand pianos, or harpsichords.
[E. PIANO] Allows you to select various electric piano sounds used
in pop or rock.
[KEYBOARD] Allows you to select various chromatic percussion
instruments such as celesta, marimba etc.
[ORGAN] Allows you to select various organ tones.
[STRINGS]
Allows you to select the sounds of string instruments
such as violins, as well as other instruments used in
orchestras, which are appropriate when used for Dual
Play with a piano sound..
[GUITAR] Allows you to select various guitar tones.
[WINDS] Allows you to select various brass, reed and pipe tones
[SYNTH] Allows you to select various guitar tones
[PERCUSSION] Allows you to play percussion instrument by keyboard.
[OTHER] Allows you to select other GM tones and Chinese tones
You can switch the tone group by [PAGE ▼],[PAGE ▲] buttons.
REFERENCE
For details on the tones, refer to “Tone List” (p. 17).
2. Press the [-/NO], [+/YES] button to select a tone in the
current group.
* For some tones, there are keys that produce no sound.
NOTE
The [TONE] button will light
up in tone selection mode.
Performing with Two Layered Tones
You can play two tones simultaneously from each note of the
keyboard. This feature is called “Dual Play.”
1. Press a tone button to select the master tone.
The currently selected tone number and tone name are displayed.
You can use the [-/NO], [+/YES] button to change the tone.
2. Hold the master tone button and press another tone
button to select layered tone.
The currently selected tone number and tone name are displayed.
You can use the [-/NO], [+/YES] button to change the tone.
As an example, if you selected piano and strings tones, when you
play the keyboard, you’ll hear both the piano and the strings tones.
3. Press the [PAGE ▼], [PAGE ▲] button to adjust the volume
of the layered tone when the layered tone number and
name are displayed on screen.
4. To exit Dual Play, press one of the TONE buttons.
NOTE
* When Dual Play is engaged, Split Play and Twin Piano feature
will be disabled automatically (P. 10).
* If you do not use the [-/NO],[+/YES] or [Page]button in 4
Seconds, the display will return to master tone screen.
Playing Different Tones with the Right
and Left Hands (Split Play)
You can play dierent tones in the left and right sides of the
keyboard.This feature is called“Split Play,” and the key at which the
keyboard is divided is called the “Split Point”, which is E3 key.
1. Select the master tone which is for the right side playing.
2. Press the [SPLIT] button.
The [SPLIT] button will light, and the split screen appears to display
tone number and name of the split tone..
Use the [-/NO], [+/YES] button to change the tone, use the [PAGE
▼],[PAGE ▲] button to adjust its volume. The display will return
to master tone screen after 4 seconds.
3. Press the [SPLIT] button again to exit Split Play.
NOTE
* When Split Play is engaged, Dual Play and Twin Piano feature
will be disabled automatically (P. 10)
* Sustain pedal is applied for master tone only in this mode.
* in master tone screen,hold the [SPLIT] button then use the [-/
NO], [+/YES] or [PAGE] button to change split tone or volume.
C1 D1A0 B0 C2 C3 C4 C5 C8
…
Tone for the right side
Tone for the left side
01: Grand Piano
Layer Volume: 116

7
Performing with Twin Piano
The keyboard could be spitted into two sections; tone and key
range of two sections are the same (Twin Piano). Two persons can
paly almost the same piano together. It is useful for teaching.
The key divides right and left section is C4.
1. Press the [TWIN PIANO] button.
The [SPLIT] button will light; the tone number and name will be
displayed. You can use Tone and [-/NO], [+/YES] to select tone.
1. Press the [TWIN PIANO] button again to exit .
NOTE
* When Twin Piano is engaged, Dual Play and Split play feature
will be disabled automatically (P. 9).
* When the B-Stand-100 stand is installed, the right pedal is
applied as sustain pedal for the right section; the left pedal for
left section sustain and the mid pedal has no function. When
use attached single sustain pedal, it is for the right section only.
Performing with the Metronome
You can sound the metronome while you play.
You can also change the metronome’s tempo and time signature.
If a song or rhythm is playing, the metronome will sound according
to the song or rhythm’s tempo and time signature
1. Press the [METRONOME] button.
The [METRONOME] button will light and the metronome will sound.
The Beat Indicator will blink according to the currently selected
time signature and tempo.
2. Press the [METRONOME] button again to stop it.
Changing the Metronome’s Tempo
1. Press the [METRONOME] button.
Press the left [TEMPO] button to slow down the tempo;
press the right button to speed up. The range of
adjustment is 20 – 250(fourth note per minute)
Press the right and left [TEMPO] buttons simultaneously to recall
the default Tempo of 120. When you engage the rhythm or
arranger, the tempo will be set to its default value (P. 12)
After 4 sec. of inactivity, the display will return to previous window.
Changing the Metronome’s Time
Signature
When the tempo appears on the display, you can use the [-/NO], [+/
YES] button to select time signature as listed on the table below.
After 4 sec. of inactivity, the display will return to previous window.
Time signature 2/4, 3/4, 4/4, 5/4, 6/4, 3/8, 4/8, 5/8, 6/8, 7/8,
9/8, 12/8
When you record your performance, it will be recorded using the
time signature you specify here.
When you play back a song or rhythm, the metronome’s time
signature will be set to the time signature of that song or rhythm.
NOTE
* You can’t change the metronome’s time signature while a song
or rhythm is playing.
Changing the Metronome’s Volume
Rotate the [ACCOMP] knob to adjust metronome’s volume
. Turn the knob to the right to increase the volume and vice versa.
Adjusting the Sound to Your Taste
You can add sound eects to modify the tone color.
Adding Reverberation (Ambience)
You can add a pleasant reverberation to the sounds of the BSP-100,
producing the impression that you are performing in a concert hall.
This eect is called “Ambience.”
1. Press the [REVERB] button
Use this button to switch the ambience effect On/Off.
When the effect is On, the button will light. When power is
turn on, this effect is turned on automatically.
2. Hold the [REVERB] button then press the [-/NO], [+/YES]
button.
The ambience level is displayed. Use the [-/NO], [+/YES] button to
change it ranged 0-127, the larger value, the more eect.
Tempo 120
Metronome 3/4
Reverb Level: 100
Performance
Beat Indicator

8
After 4 sec. of inactivity, the display will return to previous window.
NOTE
* The setting of the ambience eect is not for individual tone;
it applies to all of tones.
Adding Chorus Effect
This eect enriches sound by adding depth and texture. It is called
“Chorus”.
1. Press the [CHORUS] button.
Use this button to switch the chorus eect On/O. When the eect
is On, the button will light. When power is turn on, this eect is
turned o automatically.
2. Hold the [CUORUS] button then press the [-/NO], [+/YES]
button.
The Chorus level is displayed. Use the [-/NO], [+/YES] button to
change it ranged 0-127, the larger value, the more eect
After 4 sec. of inactivity, the display will return to previous window
NOTE
* The setting of the Chorus eect is not for individual tone; it
applies to all of tones.
Using Pedal
Accessories of the BSP-100 include a single pedal. Plug it in
the PEDAL socket, it will work as sustain pedal.
When the B-Stand-100 stand is installed, you will have three pedals.
Sustain Pedal
When press this pedal, the piano keys will sustain as they are
played. The piano notes will decay gradually. Some tones will keep
sound as you keep pressing the piano key.
On an acoustic piano, pressing the damper pedal allows other
strings to resonate sympathetically with the notes you play,
producing a rich and spacious resonance. The BSP-100 simulates
this natural damper resonance.
Sostenuto Pedal
When press this pedal, the keys that were previously played will
sustain after they are released. Keys that are played after this pedal
is pressed are not aected.
Soft pedal
When press this pedal, the piano volume is reduced and the timbre
is slightly altered on the notes that are played. It simulates the left
pedal on the acoustic piano.
Shifting the Pitch (Transpose)
“Transpose” means to shift the pitches of songs and the keyboard.
The Transpose function makes it easy to do the following.
• You can use unchanged ngering to accompany a singer who is
singing in a key dierent than the original music.
• A song written in a dicult key with numerous sharps ( ) or
ats ( ) can be performed in a key that’s easier for you to play.
For example, if the song is written in E major but you want to play it
using the ngering of the key of C major, you would set Transpose
to “4.”
If you play C E G It will sound E G B
1. Press the [TRANSPOSE] button.
The transpose function is activated and the [TRANSPOSE] button
will light, if you did set transpose shift value (i.e. not 0).
When power is turn on, the transpose is 0.
2. While holding down the [TRANSPOSE] button, press the
[+/YES],[-/NO] buttons.
The display will indicate the amount of transposition in unit of
semitone. Use the [+/YES],[-/NO] to change the value rangered
-6 to 5.
You can also press a key while holding down the [TRANSPOSE]
button to determine the transpose value shift from the C note.
Value Explanation
-6–0–+5
(semitone steps)
Positive (+) values raise the pitch in semitone
steps, and negative (-) values lower the pitch in
semitone steps.
NOTE
* Setting of transpose does not apply to song.
3. To cancel the transposition, press the [TRANSPOSE]
button once again.
The [TRANSPOSE] button will go out.
Transpose 4
Performance
Soft pedal
Sostenuto pedal
Sustain pedal

9
Adding Accompaniment to Your Performance
Playing Along with a Rhythm
The BSP-100 has two types of accompaniment: Percussive rhythm
(Rhythm)and musical pattern which matches the chord you play
automatically (Arranger).
Selecting and Playing a Rhythm
1. Press the [RHYTHM] button.
The [RHYTHM] button will light and the rhythm screen appears to
display Rhythm number with‘R” prex and name. The rhythm will
start play and you can play on keyboard follow it.
The Beat indicator will ash according to the time signature and
tempo of the rhythm. Several lamps will light at the rst beat; only
one lamp will light at the follow-up beats
REFERENCE
* For details on the rhythm, refer to“Rhythm List” (p. 20).
The [STYLE] button will light up and the [TONE] indicator will
O. The Rhythm and Arranger cannot be activated at same time;
therefore, the [ARRANGE] indicator will o as well.
2. Press the [-/NO],[+/YES] button to select a rhythm.
3. Press the [START/STOP] or [RHYTHM]button to stop
rhythm palying.
When press the [START/STOP] button to stop, the [RHYTHM]
indicator still lights; the display shows rhythm number and name;
you can use the [-/NO],[+/YES] button to select rhythm.
When press the [RHYTHM] button to stop, the [RHYTHM] indicator
will O; the [STYLE] indicator will O and the [TONE] indicator lights
up.
NOTE
* You can use the [TEMPO] button to change the tempo of the
rhythm. Press the left [TEMPO] button to slow down the tempo
and the right button to speed up. Press both [TEMPO] buttons
simultaneously to recover the default tempo of the rhythm.
* You can use the [ACCOMP] knob to adjust the rhythm volume.
Playing Along with an Arranger
The BSP-100 has 30 different musical patterns (Arranger) in
various styles. You can play it as background music and play on
the keyboard. The chord of the arranger will change per your
playing automatically. It is called Auto Chord Accompaniment.
Selecting and Playing an Arranger
1. Press the [ARRANGER] button.
The [ARRANGER] button will light and the display shows the
Arranger number with ‘A”prex and name. The beat indicator will
blink; the arranger is under stand-by status.
The accompaniment will start as soon as you play on the keyboard
and the chord will change according to your playing. The root note
and type of the chord will be displayed.
NOTE
The [STYLE] button will light up and the [TONE] indicator will
O. The Rhythm and Arranger cannot be activated at same time;
therefore, the [RHYTHM] indicator will o as well.
2. Press the [-/NO],[+/YES] button to select an arranger.
The arranger has two types; No. 1 to No. 20 are orchestra
accompaniment and No. 21 to No. 30 are piano accompaniment.
3. Press the [START/STOP] or [ARRANGER] button to stop
arranger palying.
When press the [START/STOP] button to stop arranger, the
[ARRANGER] indicator still lights; the arranger number and name
are displayed; you can use the [-/NO],[+/YES] button to select. At
this time, the beat indicator blinks, the arranger is under stand-by
status.
When press the [ARRANGER] button to stop, the [ARRANGER]
indicator will O; the [STYLE] indicator will O and the [TONE]
indicator lights up
NOTE
* You can use the [TEMPO] button to change the tempo of the
arrange. Press both [TEMPO] buttons simultaneously to recover
the default tempo of the arranger.
* You can use the [ACCOMP] knob to adjust the arrange volume.
Chord Fingering
The arranger generates auto chord only if you play a chord
the system can recognize. If you play an unknown chord,
the current chord will keep no change; also, the unknown
chord cannot start the accompaniment when the arranger
is in stand-by stage. There are 2 fingering modes:
1. Basic ngering mode
You can play on whole keyboard complying with the rule of
recognized chord ngering. There 31 types of these chords; please
refer to the <Chord Fingering List> (P. 21) .
NOTE
The single finger chord in Becker Intelligent fingering system
cannot be recognized in this mode
R01:8Beat_Med
A01:8Beat_Med
C m7

10
2. Press the [SPLIT] button to select Becker Intellinget fingering mode.
The [SPLIT] button lights up. When the Arranger is activated, the keyboard is divided to two sections with the same split point as
split plying. You can use minimum fingers in the left section of keyboard to generate 7 most useful chord types as shown bellow.
● symbal: Indicates the constituent notes of chords.
★ symbal: Chords shown with an “ ”can be played by pressing just the key marked with the “ ..
*The basic ngering is available in this mode as well.
C M C# M D M E E M F M
CM7 C#M7 DM7 E M7 EM7 FM7
C7 C#7 D7 E 7 E7 F7
Cm C#m Dm E m Em Fm
Cm7 C#m7 Dm7 E m7 Em7 Fm7
Cdim C#dim Ddim E dim Edim Fdim
CmM7 C#mM7 DmM7 E mM7 EmM7 FmM7
F# M G M A A M B B M
F#M7 GM7 A M7 AM7 B M7 BM7
F#7 G7 A 7 A7 B 7 B7
F#m Gm A m Am B m Bm
F#m7 Gm7 A m7 Am7 B m7 Bm7
F#dim Gdim A dim Adim B dim Bdim
F#mM7 GmM7 A mM7 AmM7 B mM7 BmM7
M
M M
Adding Accompaniment to Your Performance

11
Recording Your Performances
The BSP-100 can record all details of your performance
including notes and their volume, tone, accompaniment, pedal
etc.. The recording is saved in the piano and nonvolatile. It will
not be lost even the power is turned off.
Recording
Preparing Your Recording
1. Select the tone that you want to play on the keyboard.
Dual paly and Split play (P. 9) can be recorded as well.
2. If desired, you can select an accompaniment to be played
while you’re recording.
You can record your performance togetther with Rhythm or
Arranger accompaniment.
REFERENCE
Refer to <Adding Accompaniment to Your Performance> (P. 12)
3. Select an user song for recording into.
The BSP-100 can record 2 songs (USER1 and USER2). Press the
[SONG] button repeatedly till the indicator of the desired song
lights up.
4. If desired, you can open the metronome (P. 10) .
The metronome is reference for your playing only. Tts sound of it
will not be recorded.
5. Press the [REC ●] button.
[REC ●] button and the beat indicator will blink to indicate the
recording stand-by status. The user song name and recording status
will appears on the display.
If you want to cancel the recording, press the [REC ●]
button once again.
Start Recording
The recording will start as soon as you play on the keyboard, the
[REC ●] button and the beat indicator will stop blink but keep
lignting. The display will show the user song name and recording
symbal ●
Aternatively, press the [PLAY/STOP] button. After one measure of
metronome leading sound, the recording will start, no matter
you play on keyboard or not.
The [TONE] button will light and you can change the tone for
recording. If you press the [STYLE] button, you can change the
accompaniment.
The default setting of recording tempo is 120; when the
accompaniment is activated, the tempo will match selected rhythm
or arranger. You can use the [TEMPO] button to change the tempo.
Stop Recording
Press the [REC ●] button once again to stop the recording; its
indicator will o. “Save to User1?”will appear on the display. If you
desire, use the [SONG] button to change the song for saving.
Press the [+/Yes] button to conrm. If you select a song number
that already contains a song, the recorded song will be overwritten.
If you do not want to overwrite the previously recorded song, press
the [-/NO] to give up.
The memory of each song can save 13000 notes in Max., when the
memory is full, the recording will stop automatically.
Playingback Your Recording
1. Select an user song you want to playback.
Press the [SONG] button repeatedly till the indicator of the desired
song lights up.
2. Play selected song.
Press the [PLAY/STOP] button and it will light up; the song starts
playing. You can play on the keyboard along with the song.
[TONE] button will light, you can change the tone.
You can also change the tempo using [TEMPO] buttons.
Press the [PLAY/STOP] button once again, the playing will stop and
its indicator will o.
NOTE
* When you purchase the piano, the User songs have no contents
of it. If you press the [PLAY/STOP] button, there is no response.
* When the song is playing, no playing information will be
transmitted through the MIDI OUT and USB COMPUTER
connectors of the piano.
Rec UserSong1
Save to User1?
Rec UserSong1

12
BSP-100 has 99 Internal piano songs for your enjoyment
and practice as teaching songs.
Playingback Internal Song
1. Select a Internal song you want to playback.
Press the [SONG] button repeatedly till the PRESET indicator lights
up. the display shows the song number with‘S”prex and name.。
Use the [-/NO], [+/YES] button to select song. After 4 sec. of
inactivity, the display will return to tone selection window; the
[TONE] button will light up.
If you want to watch the song name again, press the [SONG] button
once again. When the song number and name appear, use the [-/
NO], [+/YES] button to select song.
REFERENCE
For details on the Internal songs, refer to“Song List” (p. 18).
2. Play the Internal song
Press the [PLAY/STOP] button and it will light up; the selected song
starts playing. After nishing of the song playing, the lighting
of the [PLAY/STOP] button will o. You can stop the playing by
pressing the [PLAY/STOP] button any time.
During the playing, you can use the [TEMPO] buttons to change the
tempo.
NOTE
* When the Internal song is playing, the rhythm and arranger
are disabled; therefore, the light of these buttons is o
automatically.
Playing along with Internal Song
You can play on the keyboard along with the Internal song. When
the [TONE] button lights, you can select tone to play,including dual
and split playing.
All the Internal songs are piano songs consist of melody played by
the right hand and the accompaniment played by the left hand. You
can mute one of these parts and play it as excise, or play both parts
by yourself.
If you want to excise certain part of the song but not from very
beginning every time, you can assign the start measure in advance.
When the song name appears on the display, press the [PAGE ▼],
[PAGE ▲] button to select the start measure which is shown in the
most right of the screen.
3. Excise the right hand playing
Press the [RIGHT] button and its light o. The melody part of the
song will mute and you can play it by your right hand.
4. Excise the left hand playing
Press the [LEFT] button and its light o. The accompaniment part of
the song will mute and you can play the it by your left hand.
Internal Piano Song
S01:Valse 34-1
S01:Valse 34-1 12
Measure number

13
Detailed Function Settings (Function Mode)
You can set 8 objects in the Function mode for detailed control
of the BSP-100.
Entering the Function Mode
1. Press the [FUNCTION] button.
The [FUNCTION] button will light up. The rst object and its
changeable parameter appear on the dislay.
2. Press the [PAGE ▼] or [PAGE ▲] button to select an object
for setting.
3. Use the [+/Yes], [-/NO] button to set.
4. Press the [FUNCTION] button once again to exit the
function mode.
The light of the [FUNCTION] button will o, the [TONE] button light
up and recover the tone selection mode.
Objects for setting
1. Key Touch Respomse
The way in which the keyboard responds to your playing strength
can be adjusted to your personal taste. You have 4 options:
Medium: For normal palying. This is the default setting.
Heavy: You should play harder to get the same playing volume.
Light: You could play softer to get the same playing volume.
Fixed: The playing volume is xed and not rely on the playing
strnth.
2. Master Tuning
When playing ensemble with other instruments, you can match
the reference pitch with another instrument. The reference pitch
generally refers to the pitch of the note of the middle A key which is
440.0 Hz. You can ne tune the pitch ranged 415.3 to 466.1 Hz.
3. Local Control
In some case, for example, when you have a MIDI sequencer
connected, you can set“Local O” to disconnect the internal (local)
sound generator while the piano transmits MIDI message. The
factory default setting is local On.
4. Equalizer
You can use the equalizer to modify the tone color by boosting or
reducing the low or high-frequency range of the sound.
The BSP-100 has 6 types of equalizer preset for your selection.
3 Equalizers for piano that is Piano1 - 3: Three options specially for
piano sound,
B.Boost: Boost the bass to make sound richer and thicker.
Bright: Increase hi-frequency to have brighter color of the sound.
Flat: Keep the original color of the sound.
5. String Resonance
In the acoustic piano, the string vibration caused by hitting the
key will make other string’s resonances. The BSP-100 emulates
this effect. You can adjust the string resonance level. Higher the
level, more the string resonance.
6. Damper Resonance In the acoustic piano, the pressing the
sustain pedal makes other
string’s resonances. The BSP-100 emulates this effect. You can
adjust the resonance level. Higher the level, more the demper
resonance.
7. Auto Save
All of your settings will be lost when the power is turned o except
the recording contents. Set the Auto Save to On, these settings will
be saved and will not be lost. The factory default setting is O.
8. Reset
Recover all the factory default settings and clean the recording
contents. Use the [+/Yes] button to conrm this operation. Reset
OK?” will appear on the display for safety.
Press the [-/NO] button to cancel the reset operation; press [+/Yes]
button again to reconrm.“Resetting…”will appear on the display.
After the resetting, the display will recover to the tone selection
window and exit from the Function mode.
Objects List
Object Display Range Default
Key touch Response Key Touch Medium Medium
Heavy
Light
Fixed
Master Tuning Master Tune 415.3 - 466.1 440
Local Control Local ON, OFF ON
Equalizer EQ Pst Piano1 – 3 Piano1
B.Boost
Bright
Flat
String Resonance String Reson 0 - 127 25
Damper Resonance Damper Reson 0 - 127 78
Auto Save Auto Save Yes, No No
Reset Reset Yes, No No
Key Touch: Medium
Reset OK?
12
3
Resetting...

14
Tone List
No. Name Display No. Name Display No. Name Display
PIANO 2 Trumpet Trumpet 21 Fretless Bass Fretless Bs.
1 Acoustic Grand Piano Grand Piano 3 French Horns French Horns 22 Violin Violin
2 Bright Acoustic Piano Bright Piano 4 Synth Brass2 SynthBrass2 23 Viola Viola
3 Mellow Piano Mellow Piano 5 Clarinet Clarinet 24 Cello Cello
4 Honky-tonk Piano Honky-tonk 6 Flute Flute 25 Contrabass Contrabass
ELECTRIC PIANO SYNTHS 26 Tremolo String Tremolo Str
1 Electric Piano 1 E.Piano 1 1 Crystal Crystal 27 Timpani Timpani
2FM E.Piano FM E.Piano 2 Square Lead Square Lead 28 Synth Strings2 Syn.Strings2
3 Electric Grand Piano E.G.Piano 3 Calliop Lead Calliop Lead 29 Voice Oohs Voice Oohs
4 Electric Piano 2 E.Piano 2 4 Voice Lead Vox Lead 30 Trombone Trombone
KEY BOARD 5 Halo Pad Halo Pad 31 Synth Brass1 SynthBrass1
1 Harpsichord Harpsichord 6 Synth Voice Syn.Voice 32 Soprano Sax Soprano Sax
2 Clavichord Clav. PERCUSSIONS 33 Tenor Sax Tenor Sax
3 Vibraphone Vibraphone 1 Standard Set Standard Set 34 Oboe Oboe
4 Marimba Marimba 2 Orchestra Set OrchestraSet 35 English Horn English Horn
5 Celesta Celesta 3 Chinese Set Chinese Set 36 Piccolo Piccolo
6 Accordion Accordion 4 SFX Set SFX Set 37 Pan Flute Pan Flute
ORGAN OTHERS 38 Bottle Blow Bottle Blow
1 Church Organ Church Organ 1 Erhu Erhu 39 Shakuhachi Shakuhachi
2 Drawbar Organ Draw Organ 2 Zheng Zheng 40 Whistle Whistle
3 Rock Organ Rock Organ 3 Yangqin Yangqin 41 Saw Lead Saw Lead
4 Percussive Organ Perc Organ 4 Erhu+Yangqin Erhu+Yangqin 42 Chier Lead Chier Lead
STRINGS 5 Suona Suona 43 Fantasia Fantasia
1 String Ensemble Strings 6 Pipa Pipa 44 Warm Pad Warm Pad
2 Slow String Ensemble Slow Strings 7 Xun Xun 45 Polysynth Polysynth
3 Synth Strings1 Syn.Strings1 8 Dizi Dizi 46 Space Voice Space Voice
4 Choir Choir 9 Banhu Banhu 47 Atmosphere Atmosphere
5 Pizzicato Strings PizzicatoStr 10 Sheng Sheng 48 Brightness Brightness
6 Harpsichord Harp 11 Glockenspiel Glockenspiel 49 Sitar Sitar
GUITAR 12 Music Box Music Box 50 Banjo Banjo
1 Steel-Strings Guitar Steel-str.Gt 13 Xylophone Xylophone 51 Shamisen Shamisen
2 Nylon-Strings Guitar Nylon-str.Gt 14 Tubular-bell Tubular-bell 52 Koto Koto
3 Clean Guitar Clean Gt. 15 Santur Santur 53 Kalimba Kalimba
4 Acoustic Bass Acoustic Bs. 16 Reed Organ Reed Organ 54 Bagpipe Bagpipe
5 Fingered Bass Fingered Bs. 17 Harmonica Harmonica 55 Shanai Shanai
6 Picked Bass Picked Bass 18 Bandoneon Bandoneon 56 Tinkle Bell Tinkle Bell
WINDS 19 Jazz Guitar Jazz Gt. 57 Steel Drums Steel Drums
1 Alto Sax Alto Sax 20 Slap Bass 1 Slap Bass 1
NOTE
The BSP-100 can support all GM tones when receiving MIDI message through MIDI or USB connection.

15
Internal Song List
No. Song Name Display Composer
1 Valse, op.34-1 Valse 34-1 Fryderyk Franciszek Chopin
2 Polonaise op.53 Polonaise 53 Fryderyk Franciszek Chopin
3 Nocturne No.20 Nocturne 20 Fryderyk Franciszek Chopin
4 La Fille aux Cheveux de Lin La Fille aux Claude Achille Debussy
5 La Campanella LaCampanella Franz Liszt
6 Étude, op.10-12 Etude 10-12 Fryderyk Franciszek Chopin
7 Sonate No.15 Sonate 15 Wolfgang Amadeus Mozart
8 Liebesträume 3 Liebestraume Franz Liszt
9 Étude, op.10-3 Etude 10-3 Fryderyk Franciszek Chopin
10 Je te veux Je te veux Erik Satie
11 Valse, op.64-1 Valse 64-1 Fryderyk Franciszek Chopin
12 Fantaisie-Impromptu Fantaisie Fryderyk Franciszek Chopin
13 Arabesque 1 Arabesque 1 Claude Achille Debussy
14 An der schönen, blauen Donau Blauen Donau Johann Strauss, Sohn
15 Gymnopédie 1 Gymnopedie 1 Erik Satie
16 Clair de Lune Clair d Lune Claude Achille Debussy
17 Étude, op.10-5 Etude 10-5 Fryderyk Franciszek Chopin
18 Grande Valse Brillante Grande Valse Fryderyk Franciszek Chopin
19 La prière d'une Vierge PriereVierge Tekla Badarzewska
20 Course en Troïka Troika Peter Ilyich Tchaikovsky
21 Valse, op.64-2 Valse 64-2 Fryderyk Franciszek Chopin
22 Radetzky Marsch Radetzky Mch Johann Baptist Strauss
23 Träumerei Traumerei Robert Alexander Schumann
24 Moments Musicaux 3 MomentMusic3 Franz Peter Schubert
25 Prélude, op.28-15 Prelude28-15 Fryderyk Franciszek Chopin
26 Ungarische Tänze 5 HungryTanze5 Johannes Brahms
27 Tänkischer Marsch TurkyMarch_B Ludwig van Beethoven
28 Nocturne No.2 Nocturne 2 Fryderyk Franciszek Chopin
29 Frühlingslied Fruhlingslid Felix Mendelssohn
30 Pr鋖udium Praludium Johann Sebastian Bach
31 Passepied Passepied Claude Achille Debussy
32 Für Elise Fur Elise Ludwig van Beethoven
33 Tänkischer Marsch TurkyMarch_M Wolfgang Amadeus Mozart
34 Humoreske Humoreske Antonín Dvořák
35 Menuett G dur Minuet G Ludwig van Beethoven
36 Brautchor Brautchor Wilhelm Richard Wagner
37 Le Coucou Le Coucou Louis Claude Daquin
38 Menuett G dur Bach'sMinuet Johann Sebastian Bach
39 Spinnerlied Spinnerlied Albert Ellmenreich
40 Gavotte Gavotte François Joseph Gossec
41 Heidenröslein Heidenroslen Gustav Lange
42 La Cinquantaine Cinquantaine Gabriel Marie
43 Csikos Post Csikos Post Hermann Necke
44 Fly Free Fly Free John Maul
45 Czerny 100- 1 Czerny100-01 Carl Czerny

16
No. Song Name Display Composer
51 Czerny 100- 60 Czerny100-60 Carl Czerny
52 Czerny 100- 75 Czerny100-75 Carl Czerny
53 Czerny 100- 86 Czerny100-86 Carl Czerny
54 Czerny 100- 96 Czerny100-96 Carl Czerny
55 Openness Openness Friedrich Burgmüller
56 Arabesque Arabesque Friedrich Burgmüller
57 Pastoral Pastoral Friedrich Burgmüller
58 A Small Gathering Sm Gathering Friedrich Burgmüller
59 Innocence Innocence Friedrich Burgmüller
60 Progress Progress Friedrich Burgmüller
61 The Clear Stream Clear Stream Friedrich Burgmüller
62 Gracefulness Gracefulness Friedrich Burgmüller
63 The Hunt The Hunt Friedrich Burgmüller
64 Tender Flower TenderFlower Friedrich Burgmüller
65 The Young Shepherdess Shepherdess Friedrich Burgmüller
66 Farewell Farewell Friedrich Burgmüller
67 Consolation Consolation Friedrich Burgmüller
68 Austrian Dance Austrian Dnc Friedrich Burgmüller
69 Ballad Ballad Friedrich Burgmüller
70 Sighing Sighing Friedrich Burgmüller
71 The Chatterbox Chatterbox Friedrich Burgmüller
72 Restlessness Restlessness Friedrich Burgmüller
73 Ave Maria Ave Maria Friedrich Burgmüller
74 Tarantella Tarantella Friedrich Burgmüller
75 Angelic Harmony AngelHarmony Friedrich Burgmüller
76 Gondola Song Gondola Song Friedrich Burgmüller
77 The Return The Return Friedrich Burgmüller
78 The Swallow The Swallow Friedrich Burgmüller
79 The Knight Errant KnightErrant Friedrich Burgmüller
80 Hanon 1 Hanon 1 Charles Hanon
81 Hanon 2 Hanon 2 Charles Hanon
82 Hanon 3 Hanon 3 Charles Hanon
83 Hanon 4 Hanon 4 Charles Hanon
84 Hanon 5 Hanon 5 Charles Hanon
85 Hanon 6 Hanon 6 Charles Hanon
86 Hanon 7 Hanon 7 Charles Hanon
87 Hanon 8 Hanon 8 Charles Hanon
88 Hanon 9 Hanon 9 Charles Hanon
89 Hanon 10 Hanon 10 Charles Hanon
90 Hanon 11 Hanon 11 Charles Hanon
91 Hanon 12 Hanon 12 Charles Hanon
92 Hanon 13 Hanon 13 Charles Hanon
93 Hanon 14 Hanon 14 Charles Hanon
94 Hanon 15 Hanon 15 Charles Hanon
95 Hanon 16 Hanon 16 Charles Hanon
96 Hanon 17 Hanon 17 Charles Hanon
97 Hanon 18 Hanon 18 Charles Hanon
98 Hanon 19 Hanon 19 Charles Hanon
99 Hanon 20 Hanon 20 Charles Hanon
No. Song Name Display Composer
1 Valse, op.34-1 Valse 34-1 Fryderyk Franciszek Chopin
2 Polonaise op.53 Polonaise 53 Fryderyk Franciszek Chopin
3 Nocturne No.20 Nocturne 20 Fryderyk Franciszek Chopin
4 La Fille aux Cheveux de Lin La Fille aux Claude Achille Debussy
5 La Campanella LaCampanella Franz Liszt
6 Étude, op.10-12 Etude 10-12 Fryderyk Franciszek Chopin
7 Sonate No.15 Sonate 15 Wolfgang Amadeus Mozart
8 Liebesträume 3 Liebestraume Franz Liszt
9 Étude, op.10-3 Etude 10-3 Fryderyk Franciszek Chopin
10 Je te veux Je te veux Erik Satie
11 Valse, op.64-1 Valse 64-1 Fryderyk Franciszek Chopin
12 Fantaisie-Impromptu Fantaisie Fryderyk Franciszek Chopin
13 Arabesque 1 Arabesque 1 Claude Achille Debussy
14 An der schönen, blauen Donau Blauen Donau Johann Strauss, Sohn
15 Gymnopédie 1 Gymnopedie 1 Erik Satie
16 Clair de Lune Clair d Lune Claude Achille Debussy
17 Étude, op.10-5 Etude 10-5 Fryderyk Franciszek Chopin
18 Grande Valse Brillante Grande Valse Fryderyk Franciszek Chopin
19 La prière d'une Vierge PriereVierge Tekla Badarzewska
20 Course en Troïka Troika Peter Ilyich Tchaikovsky
21 Valse, op.64-2 Valse 64-2 Fryderyk Franciszek Chopin
22 Radetzky Marsch Radetzky Mch Johann Baptist Strauss
23 Träumerei Traumerei Robert Alexander Schumann
24 Moments Musicaux 3 MomentMusic3 Franz Peter Schubert
25 Prélude, op.28-15 Prelude28-15 Fryderyk Franciszek Chopin
26 Ungarische Tänze 5 HungryTanze5 Johannes Brahms
27 Tänkischer Marsch TurkyMarch_B Ludwig van Beethoven
28 Nocturne No.2 Nocturne 2 Fryderyk Franciszek Chopin
29 Frühlingslied Fruhlingslid Felix Mendelssohn
30 Pr鋖udium Praludium Johann Sebastian Bach
31 Passepied Passepied Claude Achille Debussy
32 Für Elise Fur Elise Ludwig van Beethoven
33 Tänkischer Marsch TurkyMarch_M Wolfgang Amadeus Mozart
34 Humoreske Humoreske Antonín Dvořák
35 Menuett G dur Minuet G Ludwig van Beethoven
36 Brautchor Brautchor Wilhelm Richard Wagner
37 Le Coucou Le Coucou Louis Claude Daquin
38 Menuett G dur Bach'sMinuet Johann Sebastian Bach
39 Spinnerlied Spinnerlied Albert Ellmenreich
40 Gavotte Gavotte François Joseph Gossec
41 Heidenröslein Heidenroslen Gustav Lange
42 La Cinquantaine Cinquantaine Gabriel Marie
43 Csikos Post Csikos Post Hermann Necke
44 Fly Free Fly Free John Maul
45 Czerny 100- 1 Czerny100-01 Carl Czerny
Internal Song List

17
Accompaniment List
Rhythm Arranger
No. Name Display No. Name Display
1 8 Beat_Med 8Beat_Med 1 8 Beat_Med 8Beat_Med
2 8 Beat_Slow 8Beat_Slow 2 8 Beat_Slow1 8Beat_Slow1
3 8 Beat_Fast 8Beat_Fast 3 8 Beat_Slow2 8Beat_Slow2
4 60s 60s 4 8 Beat Electric 8BtElectr
5 16 Beat_Med 16Bt_Med 5 8 Beat_Fast 8Beat_Fast
6 16 Beat_Slow 16Bt_Slow 6 16 Beat_Med 16Beat_Med
7 Disco Disco 7 16 Beat_Slow1 16Bt_Slow1
8 R&B R&B 8 16 Beat_Slow2 16Bt_Slow2
9 16 Beat Shuffle 16BtShffl 9 16 Beat_Slow3 16Bt_Slow3
10 Slow Rock SlowRock 10 Disco Disco
11 Shuffle Shuffle 11 R&B R&B
12 Rock and Shuffle RocknShff 12 Slow Rock SlowRock
13 Waltz Waltz 13 Waltz Waltz
14 Waltz Swing WaltzSwng 14 Waltz Swing WaltzSwng
15 2 Beat Polka 2Bt_Polka 15 2 Beat Polka 2Bt_Polka
16 2 Beat Foxtrot 2BtFoxtrt 16 2 Beat Foxtrot 2BtFoxtrt
17 March in 4/4 March_44 17 Bossa Nova BossaNova
18 March in 6/8 March_68 18 Rumba Rumba
19 Samba Samba 19 Beguine Beguine
20 Bossa Nova BossaNova 20 Swing Swing
21 Rhumba Rhumba 21 Pf Arpeggio PfArpeggio
22 Beguine Beguine 22 Pf Pop PfPop
23 Mambo Mambo 23 Pf Ballad PfBallad
24 ChaCha ChaCha 24 Pf Waltz PfWaltz
25 Salsa Salsa 25 Pf Clasic in 4/4 PfClasic_44
26 Tango Tango 26 Pf Clasic in 3/4 PfClasic_34
27 Reggae Reggae 27 Pf Polka PfPolka
28 Swing Swing 28 Pf Boogie PfBoogie
29 Swing Brsh SwingBrsh 29 Pf Ragtime PfRagtime
30 Jazz Waltz JazzWaltz 30 Pf Bossa Nova PfBossa

18
Chord Notation Notes
Major M 1-3-(5)
Major sixth M6 1-3-5-6
Major sixth add ninth 6 9 1-2-3-(5)-6
Major seventh M7 1-(3)-(5)-7
Major add ninth M add9 1-2-3-5
Major seventh ninth M9 1-2-3-(5)-7
Major seventh sharp eleventh M7#11 1-(2)-3-#4-(5)-7
Minor m 1-b3-(5)
Minor sixth m6 1-b3-5-6
Minor seventh m7 1-b3-(5)-b7
Minor seventh flatten fifth m7b5 1-b3-b5-b7
Minor add ninth m add9 1-2-b3-5
Minor seventh add ninth m9 1-2-b3-(5)-b7
Minor seventh add eleventh m11 1-(2)-b3-4-5-(b7)
Minor major seventh mM7 1-b3-(5)-7
Minor major seventh add ninth mM9 1-2-b3-(5)-7
Seventh 7 1-(3)-(5)-b7
Seventh flatted fifth 7b5 1-3-b5-b7
Seventh flatted ninth 7b9 1-b2-3-(5)-b7
Seventh add ninth 7 9 1-2-3-(5)-b7
Seventh sharp ninth 7#9 1-#2-3-(5)-b7
Seventh sharp eleventh 7#11 1-(2)-3-#4-(5)-b7
Seventh thirteenth 7 13 1-3-(5)-6-b7
Seventh flatten thirteenth 7b13 1-3-5-b6-b7
Diminished dim 1-b3-b5
Diminished seventh dim7 1-(b3)-b5-(6)
Augmented aug 1-3-#5
Seventh augmented 7-Aug 1-3-#5-b7
Major seventh augmented M7aug 1-3-#5-7
Suspended fourth sus4 1-4-5
Seventh suspend fourth 7sus4 1-4-5-b7
Chord Fingering List
the notes listed in parentheses can be omitted.
NOTE
The listed chord ngerings are all in root note position, other inversions can be used with the exception of: O
* The 6 9 chords are only recognized in root note position. All other inversions are interpreted as m.
* The M6 chords are only recognized in root note position. All other inversions are interpreted as m7.
* The m6 chords are only recognized in root note position. All other inversions are interpreted as m7b5.
* With aug and dim7 chords the lowest note played is assumed to be the root.
* With 7#11 chords the lowest note played is assumed to be the root or b7.
Rhythm Arranger
No. Name Display No. Name Display
1 8 Beat_Med 8Beat_Med 1 8 Beat_Med 8Beat_Med
2 8 Beat_Slow 8Beat_Slow 2 8 Beat_Slow1 8Beat_Slow1
3 8 Beat_Fast 8Beat_Fast 3 8 Beat_Slow2 8Beat_Slow2
4 60s 60s 4 8 Beat Electric 8BtElectr
5 16 Beat_Med 16Bt_Med 5 8 Beat_Fast 8Beat_Fast
6 16 Beat_Slow 16Bt_Slow 6 16 Beat_Med 16Beat_Med
7 Disco Disco 7 16 Beat_Slow1 16Bt_Slow1
8 R&B R&B 8 16 Beat_Slow2 16Bt_Slow2
9 16 Beat Shuffle 16BtShffl 9 16 Beat_Slow3 16Bt_Slow3
10 Slow Rock SlowRock 10 Disco Disco
11 Shuffle Shuffle 11 R&B R&B
12 Rock and Shuffle RocknShff 12 Slow Rock SlowRock
13 Waltz Waltz 13 Waltz Waltz
14 Waltz Swing WaltzSwng 14 Waltz Swing WaltzSwng
15 2 Beat Polka 2Bt_Polka 15 2 Beat Polka 2Bt_Polka
16 2 Beat Foxtrot 2BtFoxtrt 16 2 Beat Foxtrot 2BtFoxtrt
17 March in 4/4 March_44 17 Bossa Nova BossaNova
18 March in 6/8 March_68 18 Rumba Rumba
19 Samba Samba 19 Beguine Beguine
20 Bossa Nova BossaNova 20 Swing Swing
21 Rhumba Rhumba 21 Pf Arpeggio PfArpeggio
22 Beguine Beguine 22 Pf Pop PfPop
23 Mambo Mambo 23 Pf Ballad PfBallad
24 ChaCha ChaCha 24 Pf Waltz PfWaltz
25 Salsa Salsa 25 Pf Clasic in 4/4 PfClasic_44
26 Tango Tango 26 Pf Clasic in 3/4 PfClasic_34
27 Reggae Reggae 27 Pf Polka PfPolka
28 Swing Swing 28 Pf Boogie PfBoogie
29 Swing Brsh SwingBrsh 29 Pf Ragtime PfRagtime
30 Jazz Waltz JazzWaltz 30 Pf Bossa Nova PfBossa
Table of contents
Other Becker Musical Instrument manuals