Beckett SCK250 User manual

- 1 -
SMALL WATER GARDENING KIT INSTRUCTIONS
INSTRUCCIONES PARA EL KIT DE JARDÍN ACUÁTICO PEQUEÑO
Models: SCK250
Items needed- Articulos necesarios:
(Not supplied/ No Administrados)
•Rope or Garden Hose
•Shovel
•Carpenter’s Level
•
Straight 2” x 4” piece of Lumber
♦Cuerda o Manguera de Jardin
♦Pala/Escavadora
♦Nivel de Carpintero
♦Recta 2 "x 4" pedazo de madera
de construcción
A
C
E
H
G
I
TEM INCLUDED
-
ART
ÍCULO
S INCLUIDOS:
A(1) Pump DP250
(1) Pompa DP250
B(1) Adaptor
(1) Adaptador
C(1) Pre-Filter Core & Foam
(1) Centro del pre filtró y Espuma
D(1) Pump Base
(1) Base de la Pompa
E(1) 10’ x 8’ Liner
(1) 10 x 8 Forro
F(1) Waterbell Nozzle
(1) Tornillo
G(1) Nozzle Body
(1) Cuerpo de la boquilla
H(2) Extension Tube
(2) Tubo de Extension
D
F
HELPFUL HINTS
-
CONSEJOS UTILES
•
Most aquatic plants need a lot of sunlight to stay healthy so choose a site for your pond that will receive at least 4 - 6 hours of sunlight each day.
•
Choose a high-leveled sight that will not collect rainwater and will allow water drainage.
•
Check to ensure there are no buried utilities before you start to dig.
•
When digging, leave a marginal plant shelf about 10 inches wide and 10 inches below the top edge of your pond so you will have a place for plants.
•
Make the top edge of your pond as level as possible on all sides so that you do not have a high spot which always appears in need of water.
•
The excess dirt from the excavation may be piled at one end of the pond and used in the construction of a waterfall and the leveling of your pond.
♦
La mayoría de las plantas acuáticas necesitan mucha luz solar para mantenerse saludable por lo que debe elegir un sitio para su estanque donde reciba al menos 4 - 6
horas de luz solar cada día.
♦
Elija una vista de alto nivel donde no le vaya caer agua de lluvia y que permita el drenaje del agua.
♦
Asegurarse de que no haya servicios enterrados antes de empezar a escarbar.
♦
Cuando escarbé, deje un margen aproximadamente de 10 pulgadas de ancho y 10 pulgadas por debajo del borde superior de su estanque, para que tenga un lugar para
las plantas.
♦
Asegúrese que el borde superior de su estanque este lo más nivelado posible en todos los lados, de modo que usted no tenga un lugar alto que aparece siempre con la
necesidad de agua.
♦
El exceso de tierra de la excavación puede ser apilados en un extremo del estanque y utilizado en la construcción de una cascada y la nivelación de su estanque.
B
STEP 1:
Carefully select the site for your pond in a level area away from trees and not in a low area of your lawn.
The area should receive 4 to 6 hours of sunlight each day.
PASO 1:
Seleccione cuidadosamente el sitio para su estanque en una zona de nivel lejos de árboles y no en un área
baja de su césped. El área debe recibir de 4 a 6 horas de luz solar diarias.
STEP 2:
Outline the shape and size of your pond with a rope or garden hose. To determine the size of your pond you
must consider the dimensions of your liner minus the depth of the pond plus a 6-inch border. Fish and plants require a
depth of 16 to 30 inches depending on your winter climate and the type of water lilies being used. Once you have
decided on the depth for your pond, use the following equations to determine the maximum length and width:
Liner length minus 2 times pond depth minus 2 times 6” border = Maximum Pond Length
Liner width minus 2 times pond depth minus 2 times 6” border = Maximum Pond Width
Example: 120” – (2 x 20”) – (2 x 6”) =120” – 40” – 12” = 68” = 5’8” Length
PASO 2:
Trase la forma y el tamaño de su estanque con una manguera de jardín o cuerda. Para determinar el
tamaño de su estanque debe tener en cuenta las dimensiones de su trazador de líneas menos la profundidad del
estanque, además de un borde de 6 pulgadas. Peces y plantas requieren una profundidad de 16 a 30 pulgadas
dependiendo de su clima de invierno y el tipo de los lirios de agua que se utiliza. Una vez que haya decidido la
profundidad de su estanque, utilice las siguientes equaciones para determinar la longitud y el ancho máximo:
La longitud de la lona menos 2 veces la profundidad del estanque menos 2 veces 6" de borde = Máxima Longitud del
Estanque
El ancho del forro menos 2 veces la profundidad del estanque menos 2 veces 6" del borde = Máxima anchura del
Estanque
Ejemplo: 120” – (2 x 20”) – (2 x 6”) =120”– 40”– 12”= 68”= 5’8” Longitud
STEP 3:
Begin digging and always remember to stay inside your outline. Allow for plant ledges if desired. Level the
edge of your pond by using a carpenter’s level on straight 2 x 4 placed across your pond. This will show if one side
needs to be adjusted. Repeat this process for the width and length of your pond until the perimeter is completely level.
PASO 3:
Comienza la excavación y recuerde siempre permanecer dentro de su alineación. Permita que salgan
plantas si lo desea. Nivele el borde del estanque usando un nivel de carpintero en la recta 2 x 4 colocado de un lado
a otro de su estanque. Esto mostrará si un lado necesita ser ajustado. Repita este proceso para la anchura y la
longitud de su estanque hasta que el perímetro está completamente nivelado.
STEP 2/PASO 2
STEP 3/PASO 3
LIMITED WARRANTY
Each Beckett Corporation (“Beckett”) product is warranted to be free from defects in material and workmanship for the applicable Warranty Period (herein so
called) set forth below. The Warranty Period for each product commences on the date of purchase by the original purchaser. The Warranty Periods are as
follows:
Product Type or Name Warranty Period Product Type or Name Warranty Period
Pump Models: Liner Material:
FR, FC Series, DP800-1800, G Series, W Series …………2 Years 35 mil PVC…………………………………..20 Years
UL6500A; XL-6500A…………………….. 2 Years 40 mil EPDM………………………...………20 Years
Other Pump Models……………………….1 Year 20 mil PVC…………………………………..15 Years
Pre-Formed Poly Ponds………………………..………. 15 Years UV9/UV13 Filter……………………………. 1 Year
Waterfall Weir & Skimmer………………………..……… 5 Years All Other Beckett Products.……………………………90 Days
APPLICATION:
The warranty covers only properly installed and maintained Beckett products and is limited to application at normal temperature 32ºF to 86ºF (0ºC to
30ºC) pumping fluids with a specific gravity up to 1.1 and with a pH range of 5 to 9 (fresh water). Other liquid applications and extreme temperature uses must be approved
in advance by Beckett. The warranty does not apply to or cover damages or defects caused by external causes, including, but not limited to, improper or faulty installation
or unauthorized modification, lightning, electrical surges, abuse, misuse or abnormal use or misapplication, including use in a manner inconsistent with the product’s
intended function. The purchaser is responsible for determining the suitability of the product for its intended use. If products are damaged in transit, a claim should be filed
with the carrier.
REMEDY: If there has been a failure to conform to the warranty, Beckett will, at Beckett’s option, repair, replace or issue a refund for the particular nonconforming product
or part. Repair, replacement or refund, at Beckett’s option, is the exclusive remedy in the event of a failure to conform to the warranty. Warranty claims must be made
within 3 months after expiration of the applicable Warranty Period.
ADMINISTRATION: Warranty claims must be made by calling Beckett Corporation, Customer Service Dept., telephone (866) 466-4319. Proof of Purchase is required and
a $ 5.00 shipping and handling fee applies to all warranty replacements.
INSTALLATION, REMOVAL AND/OR SHIPPING CHARGES: The warranty does not cover any costs associated with the installation, removal or shipping of products
subject to warranty claims.
DISCLAIMER AND LIMITATION: THE EXPRESS WARRANTY AND REMEDIES SET FORTH ABOVE ARE EXCLUSIVE AND IN LIEU OF ALL OTHER WARRANTIES
AND REMEDIES, WHETHER ORAL OR WRITTEN, EXPRESS OR IMPLIED. TO THE FULL EXTENT PERMITTED BY LAW, BECKETT EXPRESSLY DISCLAIMS ANY
AND ALL IMPLIED WARRANTIES, INCLUDING, WITHOUT LIMITATION, THE IMPLIED WARRANTIES OF MERCHANTABILITY AND FITNESS FOR A PARTICULAR
PURPOSE. IF IMPLIED WARRANTIES CANNOT BE DISCLAIMED, ALL SUCH IMPLIED WARRANTIES ARE LIMITED TO THE DURATION OF THE APPLICABLE
EXPRESS WARRANTY.
BECKETT DOES NOT ACCEPT LIABILITY BEYOND THE REMEDIES EXPRESSLY SET FORTH IN THIS WARRANTY. IN NO EVENT SHALL BECKETT BE LIABLE
OR RESPONSIBLE FOR INCIDENTAL OR CONSEQUENTIAL DAMAGES. BECKETT’S AGGREGATE LIABILITY UNDER THIS WARRANTY OR WITH RESPECT TO
ANY PRODUCT COVERED HEREBY, UNDER ANY LEGAL THEORY, SHALL NOT EXCEED THE PURCHASE PRICE PAID FOR THE NONCONFORMING PRODUCT.
THE LIMITATIONS CONTAINED IN THIS PARAGRAPH SHALL NOT APPLY TO INJURY TO THE PERSON.
Some States do not allow the exclusion or limitation of incidental or consequential damages or exclusions or limitations on the duration of an implied warranty, so the above
limitations or exclusions may not apply to you. This warranty gives you specific legal rights and you may also have other rights that vary from State to State.
GARANTÍA LIMITADA
Cada uno de los producto de Beckett Corporation (“Beckett”) está garantizado por el Periodo de Garantía (como se define en esta garantía) que se menciona
abajo, contra defectos en material y manufactura. El Periodo de Garantía para cada producto comienza en el día de compra por el comprador original. El
Periodo de Garantía es el siguiente:
Tipo de Producto o Nombre Periodo de Garantía Tipo de Producto o Nombre Periodo de Garantía
Modelos de Bombas: Material Linear
FR, FC Series, DP800-1200, G Series, W Series...........2 años 35 mil PCV....................................20 años
UL6500A; XL-6500A......................................2 años 40 Mil EPDM.................................20 años
Otros modelos de Bombas............................1 año 20 mil PVC....................................15 años
Estanques de Poly Pre-Formados…………15 años Filtro UV9/UV13…………................1 año
Vertedero de la Cascada y espumadera…....................5 años Todos los demás productos Beckett.................90 días
APLICACIÓN: La garantía sólo cubre Productos de Beckett que hayan sido instalados y mantenidos correctamente y se limita a la aplicación a 32 °F de temperatura
normal de 86ºF (0ºC a 30ºC) fluidos de bombeo con una gravedad específico de hasta 1,1 y con un rango de pH de 5 a 9 (de agua dulce). Otras aplicaciones de líquidos y
usos extremos de temperatura deben ser aprobadas previamente por Beckett. La garantía no se aplica o cubre daños o defectos causados por causas externas,
incluyendo, pero no limitado a, la instalación incorrecta o modificación no autorizada, rayos, sobrecargas eléctricas, abuso, el mal uso o uso anormal o mala aplicación,
incluyendo el uso de una manera no compatibles con la función del producto. El comprador es responsable de determinar la conveniencia del producto para su uso
previsto. Si los productos se dañan en tránsito, una reclamación debe ser presentada ante el transportista.
SOLUCIÓN: Si se ha producido una falta de conformidad a la garantía, Beckett será, a elección de Beckett, reparación, reemplazo o emisión de un reembolso por el
producto no conforme en particular o parte. Reparación, reemplazo o reembolso, a elección de Beckett, es la única solucion en caso de que no se ajusta a la garantía. Las
reclamaciones de garantía deben hacerse dentro de los 3 meses después de la expiración del período de garantía aplicable.
ADMINISTRACIÓN: Los reclamos de garantía deben hacerse llamando a la Corporativo de Beckett, Departamento de Servicio al Cliente, teléfono (866) 466-4319. Se
requiere prueba de compra y una tarifa de $5.00 dlls por envío y manipulación se aplicara a todos los reemplazos de la garantía.
INSTALACIÓN, REMOVER Y/O GASTOS DE ENVIO: La garantía no cubre los costos asociados con la instalación, remover o envío de los productos sujetos a derechos
de garantía.
RENUNCIA Y LIMITACIÓN: LA GARANTÍA EXPRESA Y SOLUCIONES ESTABLECIDAS ARRIBA SON EXCLUSIVAS Y EN LUGAR DE TODAS LAS OTRAS
GARANTÍAS Y RECURSOS, YA SEA ORAL O ESCRITA, EXPRESA O IMPLICITA. EN LA MEDIDA PERMITIDA POR LA LEY, BECKETT EXPRESAMENTE RENUNCIA
A TODAS LAS GARANTÍAS IMPLÍCITAS, INCLUYENDO, SIN LIMITACIÓN, LAS GARANTÍAS DE COMERCIALIZACIÓN Y APTITUD PARA UN PROPÓSITO
PARTICULAR. SI LAS GARANTÍAS NO SE PUEDAN RECHAZAR, TODAS LAS GARANTÍAS IMPLÍCITAS ESTÁN LIMITADAS A LA DURACIÓN DE LA GARANTÍA
EXPRESA APLICABLE.
BECKETT NO ACEPTA RESPONSABILIDAD MÁS ALLÁ DE LOS RECURSOS EXPRESAMENTE ESTABLECIDAS EN ESTA GARANTÍA. EN NINGÚN CASO
BECKETT SERA RESPONSABLE POR DAÑOS DIRECTOS O INDIRECTOS. LA RESPONSABILIDAD TOTAL DE BECKETT EN VIRTUD DE ESTA GARANTÍA O CON
RESPECTO A CUALQUIER PRODUCTO CUBIERTO POR ESTE MEDIO, BAJO CUALQUIER TEORÍA LEGAL, NO DEBERÁ EXCEDER EL PRECIO DE COMPRA
PAGADO POR EL PRODUCTO NO CONFORME. LAS LIMITACIONES CONTENIDAS EN ESTE PÁRRAFO NO SE APLIQUA EN DAÑOS A PERSONAS.
Algunos estados no permiten la exclusión o limitación de daños o daños continuos o exclusiones o las limitaciones sobre la duración de una garantía implícita, por lo que
las limitaciones o exclusiones anteriores pueden no aplicarse en su caso. Esta garantía le otorga derechos legales específicos y usted también puede tener otros
derechos que varían de un Estado a otro.
Importador:
SERVICIOS HOME DEPOT, S.A. de C.V.
RICARDO MARGAIN ZOZAYA 555 EDIFICIO A,
FRACC. PARQUE CORP. SANTA ENGRACIA,
SAN PEDRO GARZA GARCÍA, NUEVO LEÓN, C.P. 66267
TEL. 81 55 70 00
BECKETT CORPORATION
3321 E. Princess Ann Rd.
Norfolk, Va. 23502
www.beckettpumps.com
Toll Free: 1-866-466-4319
© 2014 BECKETT CORPORATION All Rights Reserved
92312-RevA
- 2 -
STEP 4
-
PASO
4:
•
Remove all roots and sharp objects that may puncture the liner.
•
Line the bottom and sides of the excavation with Beckett’s Pond Underlayment to provide a
cushioned surface for the liner.
•
Drape your liner loosely into the excavation with an even overlap on all sides.
•
Secure the liner with bricks or stones on the corner.
•
Fill the pond with water. As the pond fills, continually smooth and fold the liner to minimize
wrinkles, but do not stretch the liner for it may tear.
♦
Remueve todas las raíces y objetos filosos que puedan perforar el forro.
♦
Cubra el fondo y los lados de la excavación con el forro de los estanques de Beckett para
proporcionar una superficie acolchada para el forro.
♦
Coloque el forro de manera libremente en la excavación traslapando todos los lados por igual.
♦
Asegure el forro con ladrillos o piedras en la esquina.
♦
Llene el estanque con agua. A medida que el estanque se llena, continuamente lisa doble el forro
para minimizar las arrugas, pero no estire el forro se podría romper.
STEP 5:
When the pond is full of water, landscape with rocks or bricks to cover the liner. If desired, the
excess liner may be trimmed to exceed the 6” border, BUT NO MORE THAN 10 INCHES BEYOND
THE BORDER! Landscaping with stones, bricks and dirt may cover the ends of the liner. Save the
trimming to place under your rocks for extra protection.
PASO 5:
Cuando el estanque este lleno de agua, adorna con rocas o ladrillos para cubrir el forro. Si
desea, puede recortar el exceso de forro para superar las 6” del borde, PERO NO MAS DE 10
PULGADAS MAS ALLA DE EL BORDE! Adornando con piedras, ladrillos y tierra puede cubrir los
extremos del forro. Guarde el recorte para colocar debajo de las piedras para una protección extra.
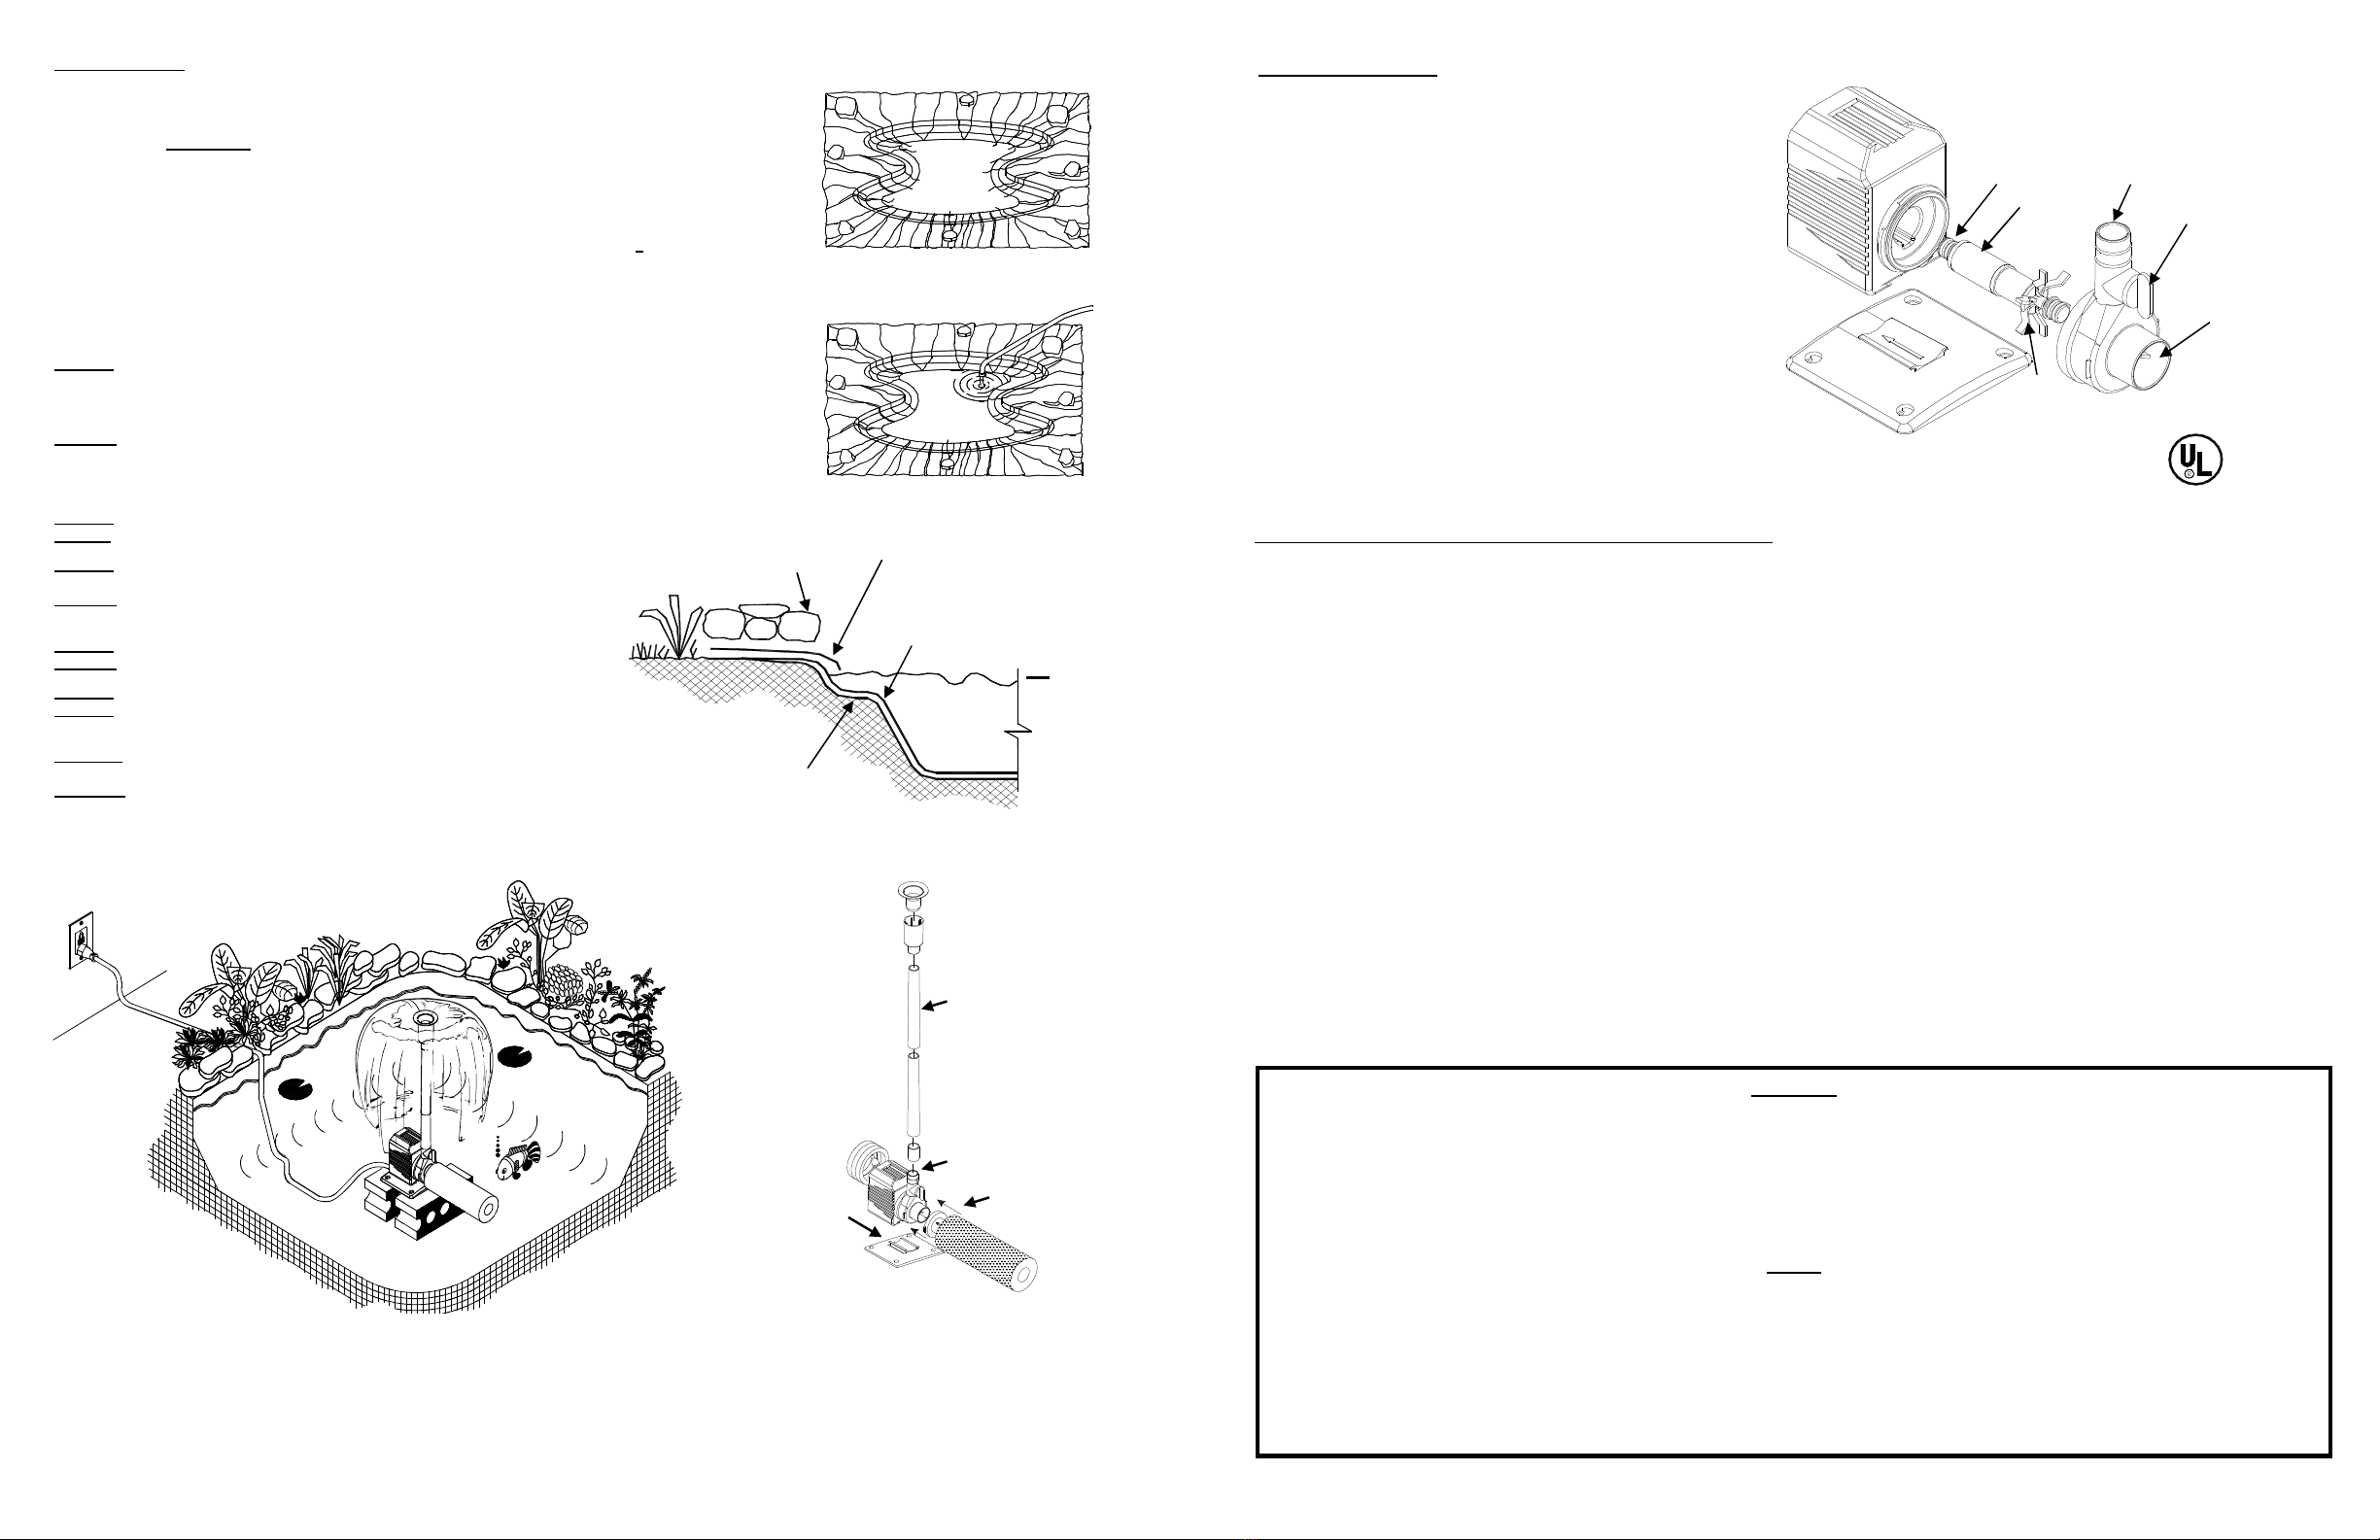
STEP 6:
Slip the pump base to the pump.
Paso 6:
Deslice la base de la bomba a la bomba.
STEP 7:
Twist the Pre-Filter Core & Foam onto the Pump’s
threaded Inlet until snug.
PASO 7:
Gire el Centro & Esponja del pre-filtro enroscando
la entrada de la bomba hasta que estén ajustados.
STEP 8:
Attach nozzle parts in order as shown.
PASO 8:
Conecte las tuercas en orden como se muestra.
STEP 9:
Attach combined parts to the pump’s discharge.
STEP 9:
Conecte las partes combinadas a la descarga
de la bomba.
STEP 10:
After the pump is submerged, plug the pump into
a Ground Fault Circuit Interrupter (GFCI) protected outlet.
PASO 10:
Después de que la bomba está sumergida,
conecte la bomba a un circuito de interruptor de falla a
tierra (GFCI) de salida protegida.
WARNING
•
RISK OF ELECTRICAL SHOCK - Always disconnect from power outlet before handling the pump or putting your hands into the water.
•
RISK OF ELECTRICAL SHOCK - This pump is supplied with a grounding conductor and a grounding-type attachment plug (3-prong plug). To reduce the
risk of electric shock, be certain that it is connected only to a properly grounded, grounding-type receptacle. Do not remove the grounding pin.
•
RISK OF SEVERE ELECTRICAL SHOCK - Connect only to a grounded receptacle protected by a ground-fault circuit-interrupter (GFCI). A GFCI must be
provided in accordance with Section 680-51 of the National Electric Code. Contact a qualified electrician if you cannot verify that the receptacle is protected
by the GFCI.
TO REDUCE THE RISK OF ELECTRICAL SHOCK
A.
Never use an extension cord to connect unit to electrical supply, provide a properly located GFCI outlet.
B.
Never bury the 3-prong plug of the cord, it is not waterproof and severe electric shock will occur.
AVISO
♦
RIESGO DE DESCARGA ELÉCTRICA - Siempre desconecte la bomba de la toma de corriente antes de manipularla o poner sus manos en el agua.
♦
RIESGO DE DESCARGA ELÉCTRICA - Esta bomba se suministra con un conductor a tierra y un enchufe con toma de tierra (enchufe de 3 patas). Para
reducir el riesgo de descarga eléctrica, asegúrese de que está conectada solo una conexión a tierra adecuada, receptáculo de conexión a tierra. No quite
la clavija de tierra.
♦
RIESGO GRAVE DE DESCARGA ELÉCTRICA- Conecte solamente a un receptáculo con conexión a tierra protegido por un interruptor de circuito por falla
a tierra (GFCI). Un circuito debe ser proporcionado de acuerdo con la Sección 680-51 del Código Eléctrico Nacional. Póngase en contacto con un
electricista calificado si usted no puede verificar que el receptáculo está protegido por el GFCI.
PARA REDUCIR EL RIESGO DE DESCARGA ELECTRICA
A. Nunca utilice un cable de extensión para conectar la unidad al suministro eléctrico, proporcionar una salida GFCI correctamente situado.
B. Nunca entierre el enchufe de 3 clavijas del cable, no es resistente al agua y severa descarga eléctrica se producirá.
Water Level
Nivel del agua
Design your Rock Ledge as
low in the water as possible
to minimize UV damage.
Diseña las rocas lo más bajo
del agua posible para
minimizar el daño de los
rayos ultravioleta.
Use Flat Stones, Round Rocks
or Bricks to hide liner.
Usa rocas planas, redondas o
ladrillos para tapar el forro.
Beckett pumps are carefully inspected and tested to ensure both safety and operating performance for pond and fountain applications. However, failure to
follow the instructions and warnings in this manual may result in pump damage and/or serious injury.
Las bombas de Beckett son cuidadosamente inspeccionadas y probadas para garantizarte la seguridad y el rendimiento operativo para las aplicaciones
del estanque y la fuente. Sin embargo, si no se siguen las instrucciones y advertencias en este manual puede dañar la bomba y / o lesiones graves.
BE SURE TO READ AND SAVE THIS MANUAL FOR FUTURE REFERENCE.
ASEGURESE DE LEER Y GUARDAR ESTE MANUAL PARA FUTURAS CONSULTAS.
Use Beckett’s Underlayment, Sand or
Carpet Padding to provide a protective
surface for the pond liner.
Utilice el piso de Beckett, arena o relleno de
alfombras para proporcionar una superficie
protectora para el forro del estanque.
Pond Liner
Forro del estanque
SERVICE AND MAINTENANCE--SERVICIO Y MANTENIMIENTO:
::
:
IF THE PUMP FAILS TO OPERATE, CHECK THE FOLLOWING:
•
Check the circuit breaker and try another outlet to ensure the pump is getting electrical power.
NOTE: Always disconnect from electrical outlet before handling the pump.
•
Check the pump discharge and tubing for kinks and obstructions. Algae build up can be flushed out with a garden hose.
•
Check the inlet screen to ensure it is not clogged with debris.
•
Remove the pump inlet to access the impeller area. Turn the impeller to ensure it is not broken or jammed.
•
If the impeller area is encrusted with minerals or corrosion, gently scrape the area clean, being careful not to damage the shaft seal, and apply a drop of light
oil to the shaft.
•
If your pump has been idle for an extended period, it may be necessary to apply a drop of light oil to the shaft and spin the impeller by hand until it turns
freely.
•
Monthly maintenance will add to your pump’s life.
•
Never attempt to replace or shorten the cord!
SI LA BOMBA NO FUNCIONA, REVISA LO SIGUIENTE:
♦
Revisa el cortacircuitos o pruebe en otra toma de corriente para asegurarse de que la bomba esté recibiendo energía eléctrica.
♦
OJO: Siempre desconecte la toma de corriente eléctrica antes de manipular la bomba.
♦
Revisa la descarga de la bomba y la tubería para torceduras y obstrucciones. La acumulación de algas puede ser lavado con una manguera de jardín.
♦
Revisa el filtro de entrada para asegurarse de que no esté obstruido con desechos.
♦
Retire la entrada de la bomba para acceder a la zona del impulsor. Gire el impulsor para asegurarse de que no está roto o atascado.
♦
Si el área del impulsor tiene incrustaciones de minerales o corrosión, raspe suavemente el área limpia, con cuidado de no dañar el sello del conducto, y
aplica una gota de aceite ligero al conducto.
♦
Si la bomba ha estado inactiva durante un período prolongado, puede ser necesario aplicar una gota de aceite ligero en el eje y girar el impulsor con la
mano hasta que gire libremente.
♦
Mantenimiento mensual, aumentara el tiempo de vida de su bomba.
♦
Nunca trates de reemplazar o cortar la extensión.
Use an excess liner strip to protect
the PVC Liner from sun (UV) damage.
Usa una tira sobrante de forro para
proteger el forro PVC de los rayos del
sol.
The various water heights give you different water shapes.
Experiment with the different nozzles to find your favorite!
La variedad de alturas de agua le dan diferentes formas de agua.
Experimente con diferentes tuercas para encontrar a su favorita!
Pump Model #
DP250
shown.
Modelo de bomba #DP250
CAUTION—CUIDADO:
::
:
•
Always disconnect from electrical outlet before handling the
pump.
•
Do not let the pump run dry. Damage to the shaft seal may
occur.
•
Do not lift the pump by the power cord.
•
Do not pump heated liquids.
•
Operate in fresh water only.
•
Operate pump completely submerged for proper cooling.
♦
Siempre desconecte la toma de corriente eléctrica antes de
manipular la bomba.
♦
No deje que la bomba funcione en seco. Puede producir daños
en el sello del conducto.
♦
No levante la bomba por el cable de alimentación.
♦
No bombee líquidos calientes.
♦
Opere solamente en agua fresca.
♦
Haga funcionar la bomba completamente sumergida para una
refrigeración adecuada.
Shaft
Conducto
Impeller
Impulsor
Discharge
Descarga
Volute
Voluta
Intake
Entrada
LISTED
552L
C US
Flow Control
Control de flujo
STEP 8/PASO 8
STEP 4/PASO 4
STEP 6/PASO 6 STEP 7/PASO 7
STEP 9/PASO 9
STEP 5/PASO 5
Other Beckett Lawn And Garden Equipment manuals

Popular Lawn And Garden Equipment manuals by other brands

Sunforce
Sunforce SOLAR user manual

GARDEN OF EDEN
GARDEN OF EDEN 55627 user manual

Goizper Group
Goizper Group MATABI POLMINOR instruction manual

Rain Bird
Rain Bird 11000 Series Operation & maintenance manual

Cub Cadet
Cub Cadet BB 230 brochure

EXTOL PREMIUM
EXTOL PREMIUM 8891590 Translation of the original user manual


Vertex
Vertex 1/3 HP Maintenance instructions

GHE
GHE AeroFlo 80 manual

Land Pride
Land Pride Post Hole Diggers HD25 Operator's manual

Yazoo/Kees
Yazoo/Kees Z9 Commercial Collection System Z9A Operator's & parts manual

Premier designs
Premier designs WindGarden 26829 Assembly instructions

Snapper
Snapper 1691351 installation instructions