GARANTÍA LIMITADA
Cada uno de los producto de Beckett Corporation (“Beckett”) esta garantizado por el Periodo de Garantía
(como se define en esta garantía) que se menciona abajo, contra defectos en material y manufactura. El
Periodo de Garantía para cada producto comienza en el día de compra por el comprador original. El Periodo
de Garantía es el siguiente:
Tipo de Producto o Nombre Periodo de Garantía Tipo de Producto o Nombre Periodo de Garantía
Modelos de Bombas: Material Linear
FR Series, DP800-1200, G Series, W Series......................2 años 35 mil PCV....................................20 años
UL6500A; XL-6500A......................................2 años 40 Mil EPDM.................................20 años
Otros modelos de Bombas............................1 año 20 mil PVC ................................15 años
Estanques de Poly Pre-Formados…………15 años Filtro UV9/UV13…………................1 año
Vertedero de la Cascada y desnatador…...........................5 años Todos los demás productos Beckett...............90 días
APLICACIÓN: La garantía únicamente cubre los productos Beckett que hayan sido correctamente instalados
y mantenidos y se limita a la aplicación de fluidos para bombas a una temperatura normal 32º F a 86º F, (0º
C a 30º C) con una la especificación gravitacional de hasta 1.1. y con un pH dentro del rango de 5 a 9 (agua
fresca). Cualquier otra aplicación de líquidos o uso de temperaturas extremas debe ser aprobado previamente
por Beckett. La garantía no aplica o cubre daños o defectos causados por causas externas, incluyendo pero
no limitándose a, instalación inapropiada o defectuosa, o modificaciones no autorizadas, tormentas eléctricas,
cambios de corriente eléctrica, abuso, uso no recomendado, uso anormal o aplicación incorrecta, incluyendo el
usar el producto de manera inconsistente con su finalidad. El comprador es responsable de determinar la
conveniencia del producto para el uso intencionado. Si el producto se daña en transito, cualquier queja o
demanda deber ser presentada con el transportista.
REMEDIOS: Si ha existido una falta en la garantía, Beckett, bajo su propia discreción, optará por reparar,
reemplazar, o generar un crédito o reembolso para la parte en particular disconforme. Reparar, reemplazar,
acreditar o rembolsar, a criterio de Beckett, será el único remedio en el caso que no se conforme a la garantía.
Los reclamos amparados por la garantía deben ser hechos dentro de los 3 meses siguientes a la expiración
del Periodo de Garantía.
ADMINISTRACIÓN: Los reclamos bajo la garantía deberán ser hechos regresando el producto defectuoso
con, gastos de envío prepagados, con comprobante de compra, a: Beckett Corporation, Customer Service
Dept., Irving, Texas, teléfono (888) 232-5388. Autorización telefónica por parte de Beckett es requerida antes
de regresar cualquier parte o producto inadecuado. Todos los productos o partes devueltas serán
inspeccionadas para determinar la causa de la falla antes de que se apruebe la garantía.
INSTALACIÓN, REMOCIÓN, Y/O GASTOS ENVÍOS: La garantía no incluye gasto asociados con la
instalación, remoción o flete de los productos sujetos a los reclamos bajo garantía.
RENUNCIAS Y LIMITACIONES: LA GARANTÍA EXPRESA Y LOS REMEDIOS DESCRITOS ARRIBA SON
LOS ÚNICOS Y EN LUGAR QUE CUALQUIER OTRA GARANTÍA O REMEDIOS, SEAN ORALES O
ESCRITOS, EXPRESOS O IMPLÍCITOS. DE LA MANERA MAS AMPLIA QUE PERMITA LA LEY, BECKETT
DE MANERA EXPRESA RENUNCIA CUALQUIER Y TODAS LAS GARANTÍAS IMPLÍCITAS, INCLUYENDO,
SIN LIMITACIÓN ALGUNA, LAS GARANTÍAS IMPLÍCITAS DE COMERCIALIDAD Y USO PARA UN FIN
ESPECIFICO. SI LAS GARANTÍAS IMPLÍCITAS NO PUEDEN SER RENUNCIADAS, TODAS LAS
GARANTÍAS IMPLÍCITAS ESTÁN LIMITADAS A LA DURACIÓN DE LA GARANTÍA EXPRESA APLICABLE.
BECKETT NO ACEPTA RESPONSABILIDAD SUPERIOR A LOS REMEDIOS MENCIONADOS DE MANERA
EXPRESA POR ESTA GARANTÍA. EN NINGÚN CASO BECKETT SERÁ CULPABLE O RESPONSABLE
POR DAÑO INCIDENTALES O CONSECUENCIALES. LA RESPONSABILIDAD AGREGADA DE BECKETT’S
BAJO ESTA GARANTÍA O RESPECTO A LOS PRODUCTOS CUBIERTOS POR LA MISMA, BAJO
CUALQUIER TEORÍA LEGAL, NO PODRÁN EXCEDER DEL PRECIO DE COMPRA PAGADO POR EL
PRODUCTO INADECUADO, LAS LIMITACIONES DE ESTE PÁRRAFO NO APLICARAN A DAÑOS A
PERSONAS
Algunos Estados no permiten la exclusión o limitación de daños incidentales o daños consecuenciales o la
exclusión o limitación de la duración de las garantías implícitas, así que las limitaciones o exclusiones arriba
mencionadas pueden no aplican en su caso. Esta garantía te da derechos legales específicos y usted a lo
mejor tienes otros derechos que pueden variar de Estado a Estado.
[ TRADUCCIÓN :Esta traducción se ha hecho de manera informativa para facilitar la lectura de la misma a
personas que hablan Español. Sin embargo, la versión en Ingles es la versión que prevalece, por lo que la
versión en Ingles regirá cualquier reclamo de garantía entre usted y Beckett. ]
LIMITED WARRANTY
Each Beckett Corporation (“Beckett”) product is warranted to be free from defects in material and
workmanship for the applicable Warranty Period (herein so called) set forth below. The Warranty Period
for each product commences on the date of purchase by the original purchaser. The Warranty Periods
are as follows:
Product Type or Name Warranty Period Product Type or Name Warranty Period
Pump Models: Liner Material:
FR Series, DP800-1800, G Series, W Series …………2 Years 35 mil PVC…………………………………..20 Years
UL6500A; XL-6500A…………………….. 2 Years 40 mil EPDM………………………...………20 Years
Other Pump Models……………………….1 Year 20 mil PVC…………………………………..15 Years
Pre-Formed Poly Ponds………………………..………. 15 Years UV9/UV13 Filter……………………………. 1 Year
Waterfall Weir & Skimmer………………………..……… 5 Years All Other Beckett Products.………………..90 Days
APPLICATION: The warranty covers only properly installed and maintained Beckett products and is
limited to application at normal temperature 32º F to 86º F, (0º C to 30º C) pumping fluids with a specific
gravity up to 1.1 and with a pH range of 5 to 9 (fresh water). Other liquid applications and extreme
temperature uses must be approved in advance by Beckett. The warranty does not apply to or cover
damages or defects caused by external causes, including, but not limited to, improper or faulty installation
or unauthorized modification, lightning, electrical surges, abuse, misuse or abnormal use or
misapplication, including use in a manner inconsistent with the product’s intended function. The purchaser
is responsible for determining the suitability of the product for its intended use. If products are damaged in
transit, a claim should be filed with the carrier.
REMEDY: If there has been a failure to conform to the warranty, Beckett will, at Beckett’s option, repair,
replace or issue a credit or refund for the particular nonconforming product or part. Repair, replacement,
credit or refund, at Beckett’s option, is the exclusive remedy in the event of a failure to conform to the
warranty. Warranty claims must be made within 3 months after expiration of the applicable Warranty
Period.
ADMINISTRATION: Warranty claims must be made by returning the nonconforming Beckett product,
freight prepaid, along with proof of purchase, to: Beckett Corporation, Customer Service Dept., Irving,
Texas, telephone (888) 232-5388. Telephone authorization from Beckett is required prior to returning
nonconforming products or parts. All products or parts returned will be inspected to determine cause of
failure before warranty is approved.
INSTALLATION, REMOVAL AND/OR SHIPPING CHARGES: The warranty does not cover any costs
associated with the installation, removal or shipping of products subject to warranty claims.
DISCLAIMER AND LIMITATION: THE EXPRESS WARRANTY AND REMEDIES SET FORTH ABOVE
ARE EXCLUSIVE AND IN LIEU OF ALL OTHER WARRANTIES AND REMEDIES, WHETHER ORAL OR
WRITTEN, EXPRESS OR IMPLIED. TO THE FULL EXTENT PERMITTED BY LAW, BECKETT
EXPRESSLY DISCLAIMS ANY AND ALL IMPLIED WARRANTIES, INCLUDING, WITHOUT LIMITATION,
THE IMPLIED WARRANTIES OF MERCHANTABILITY AND FITNESS FOR A PARTICULAR PURPOSE.
IF IMPLIED WARRANTIES CANNOT BE DISCLAIMED, ALL SUCH IMPLIED WARRANTIES ARE
LIMITED TO THE DURATION OF THE APPLICABLE EXPRESS WARRANTY.
BECKETT DOES NOT ACCEPT LIABILITY BEYOND THE REMEDIES EXPRESSLY SET FORTH IN
THIS WARRANTY. IN NO EVENT SHALL BECKETT BE LIABLE OR RESPONSIBLE FOR INCIDENTAL
OR CONSEQUENTIAL DAMAGES. BECKETT’S AGGREGATE LIABILITY UNDER THIS WARRANTY
OR WITH RESPECT TO ANY PRODUCT COVERED HEREBY, UNDER ANY LEGAL THEORY, SHALL
NOT EXCEED THE PURCHASE PRICE PAID FOR THE NONCONFORMING PRODUCT. THE
LIMITATIONS CONTAINED IN THIS PARAGRAPH SHALL NOT APPLY TO INJURY TO THE PERSON.
Some States do not allow the exclusion or limitation of incidental or consequential damages or exclusions
or limitations on the duration of an implied warranty, so the above limitations or exclusions may not apply
to you. This warranty gives you specific legal rights and you may also have other rights that vary from
State to State.
MAINTENANCE
WARNING:
DISCONNECT FROM ELECTRICAL SUPPLY BEFORE SERVICING.
All Beckett pumps are carefully tested prior to shipment to insure long,
trouble-free service. However, if pump is used in a dirty environment or is
pumping other than clear, condensate water, the tank should be removed
and cleaned periodically with soap and water. If pump fails to run please
check the following:
Be sure the pump is getting electrical power. Try another outlet to
be sure.
Examine discharge tubing for any kinks or blockages. Also, be
certain that intake tubing or pipe is not obstructed.
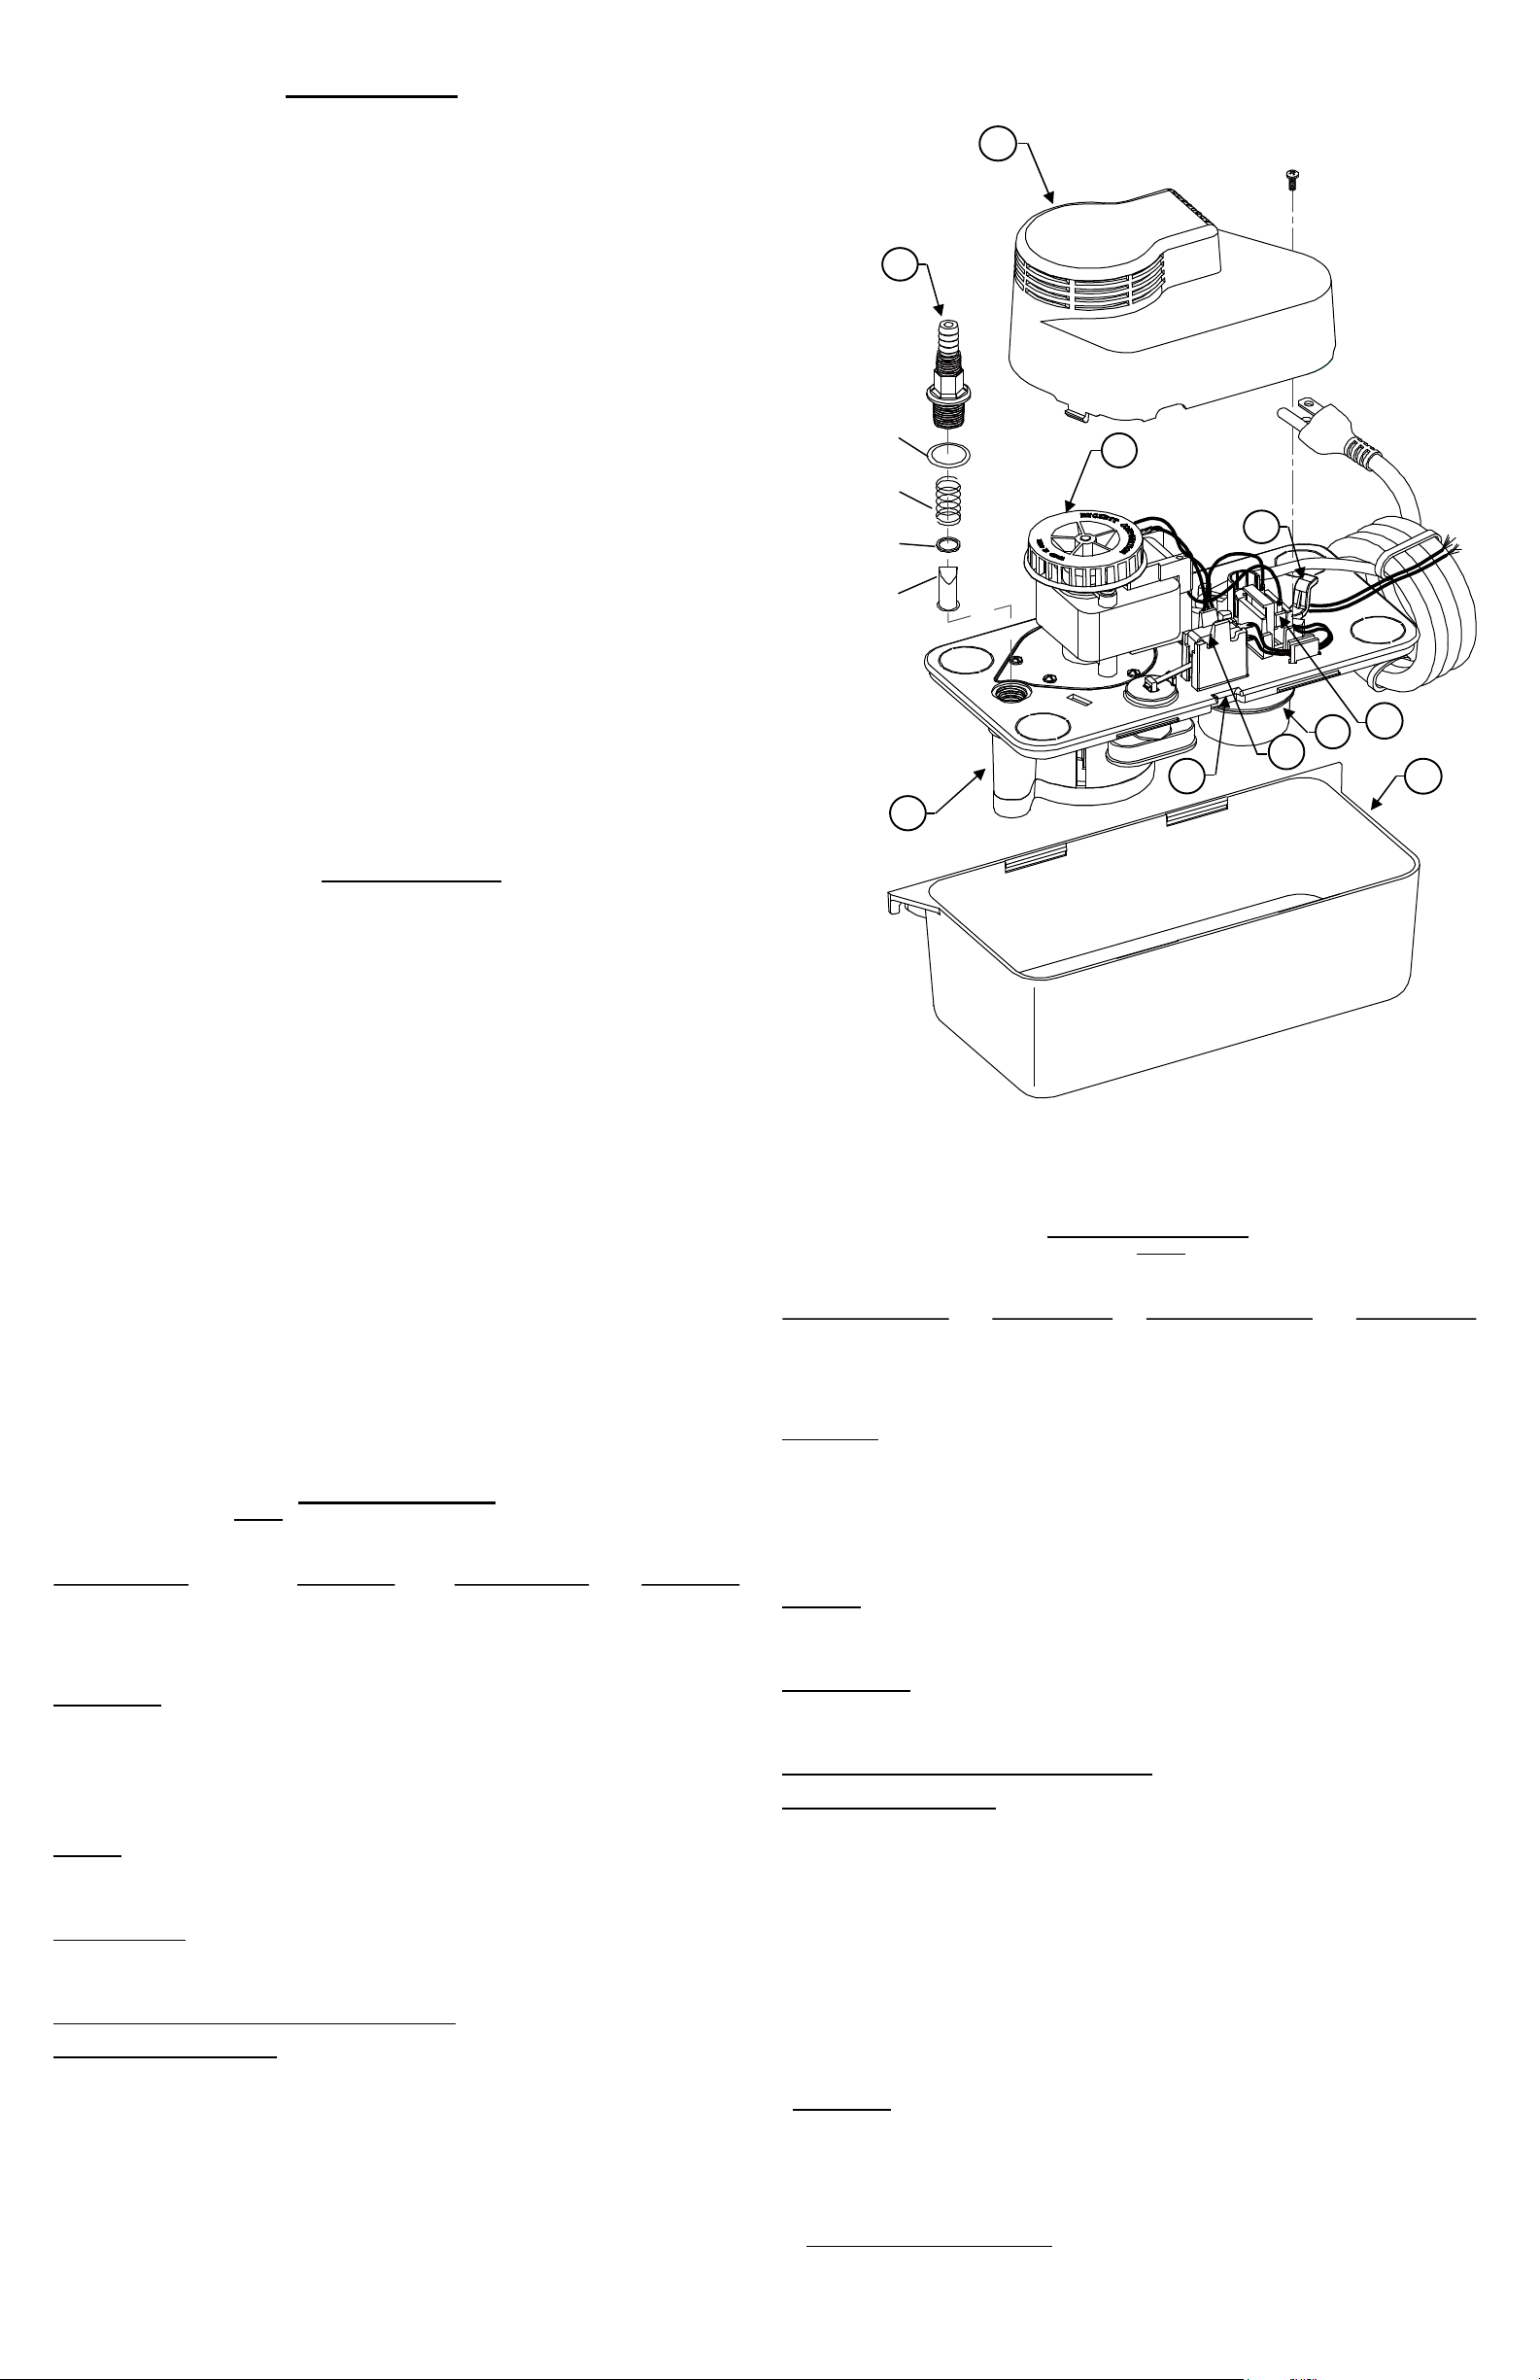
Connect the electrical power, lift the TEST TAB, item 1, up and
down, make sure the MAIN SWITCH, item 2, and MOTOR, item 5,
are working, and the FLOAT, item 3, moves freely.
Remove the ENCLOSURE, item 4, and spin the FAN, item 5, by
hand to be sure that the motor is free.
Be certain that the MAIN SWITCH, item 2, and the SAFETY
SWITCH, item 6, are fully “snapped” into their mounts.
If further disassembly is required, push the sides, item 7, on both
ends, to remove the TANK, item 8.
Examine the PUMP-CHECKVALVE ASSEMBLY, at its INTAKE,
item 9, for any obstructions. The CHECKVALVE, item 10, can be
removed by turning it counterclockwise.
MANTENIMIENTO
ADVERTENCIA:
DESCONECTE DE LA TOMA ELECTRICA ANTES DE DAR SERVICIO.
Todas las bombas Beckett son cuidadosamente probadas antes de su embarque para
asegurar largo servicio, libre de problemas. Sin embargo, si la bomba se usa en un
ambiente sucio, o se alimenta con otro líquido que no sea agua limpia,el tanque se debe
ser desmontando y limpiado periódicamente con agua y jabón. Si la bomba no funciona,
favor de ver lo siguiente.
Asegúrese de que la bomba está recibiendo energía eléctrica. Probar en otra toma
eléctrica para estar seguro.
Examine la tubería de descarga para ver si existen bloqueos o tubos doblados.
También asegúrese de que la tubería flexible o el tubo de entrada no esté obstruido.
Conecte la alimentación eléctrica, mueva la PALANCA DE PRUEBA, elemento 1, hacia
arriba y hacia abajo, asegúrese de que el INTERRUPTOR PRINCIPAL, elemento 2 y
el MOTOR, elemento 5, esten funcionando, y el FLOTADOR, elemento 3, se mueve
libremente.
Retire la CUBIERTA, articulo 4, y mueva a mano el VENTILADOR, articulo 5, para
asegurarse de que el motor está libre.
Asegúrese de que el INTERRUPTOR PRINCIPAL, articulo 6, y el INTERRUPTOR DE
SEGURIDAD, articulo 2, están completamente enganchados en sus montajes.
Si se requiere más desmontaje, retire el TANQUE, articulo 8, desprendiendo con un
destornillador por las RANURAS, articulo 7.
Examine el CONJUNTO DE BOMBA-VALVULA DE RETENCION, en su TOMA,
articulo 9, para ver si hay obstrucciones. El CHECKVALVE, el artículo 10, puede ser
quitado dándole vuelta a la izquierda.
5
10
7
3
O-Ring / Anillo O
Spring / Resorte
Washer / Arandela
Duckbill Valve
Válvula De Duckbill
BECKETT CORPORATION
Irving, Texas
www.beckettpumps.com
Toll Free: 1-888-232-5388
© 2019 BECKETT CORPORATION All Rights Reserved
6
1


