BedFin BFX Series Troubleshooting guide

Bedfin LLC User’s Guide revision A20130623.1. Call Bedfin LLC at (253)882-4112 for assistance.
This guide is provided based on typical installation and requirements for vehicles which Bedfin signage was designed. Every vehicle is different
in design and condition and strict attention to the vehicle limitations must be recognized and evaluated by installer and user. Bedfin accepts no
liability for units improperly installed and operated or any units installed on vehicles which Bedfin signage is not suitable. Product support may
be provided from Bedfin LLC by phone or in other mediums without obligating Bedfin LLC to any liability for damage, injury, or death.
Comprehensive and regular inspection of Bedfin signage is the responsibility of user to ensure safe operation.
Page1
A product and trademark of
BEDFIN LLC
www.BedFin.com
USER/INSTALLATION
GUIDE
BFX Series Product

Bedfin LLC User’s Guide revision A20130623.1. Call Bedfin LLC at (253)882-4112 for assistance.
This guide is provided based on typical installation and requirements for vehicles which Bedfin signage was designed. Every vehicle is different
in design and condition and strict attention to the vehicle limitations must be recognized and evaluated by installer and user. Bedfin accepts no
liability for units improperly installed and operated or any units installed on vehicles which Bedfin signage is not suitable. Product support may
be provided from Bedfin LLC by phone or in other mediums without obligating Bedfin LLC to any liability for damage, injury, or death.
Comprehensive and regular inspection of Bedfin signage is the responsibility of user to ensure safe operation.
Page2
CONTENTS
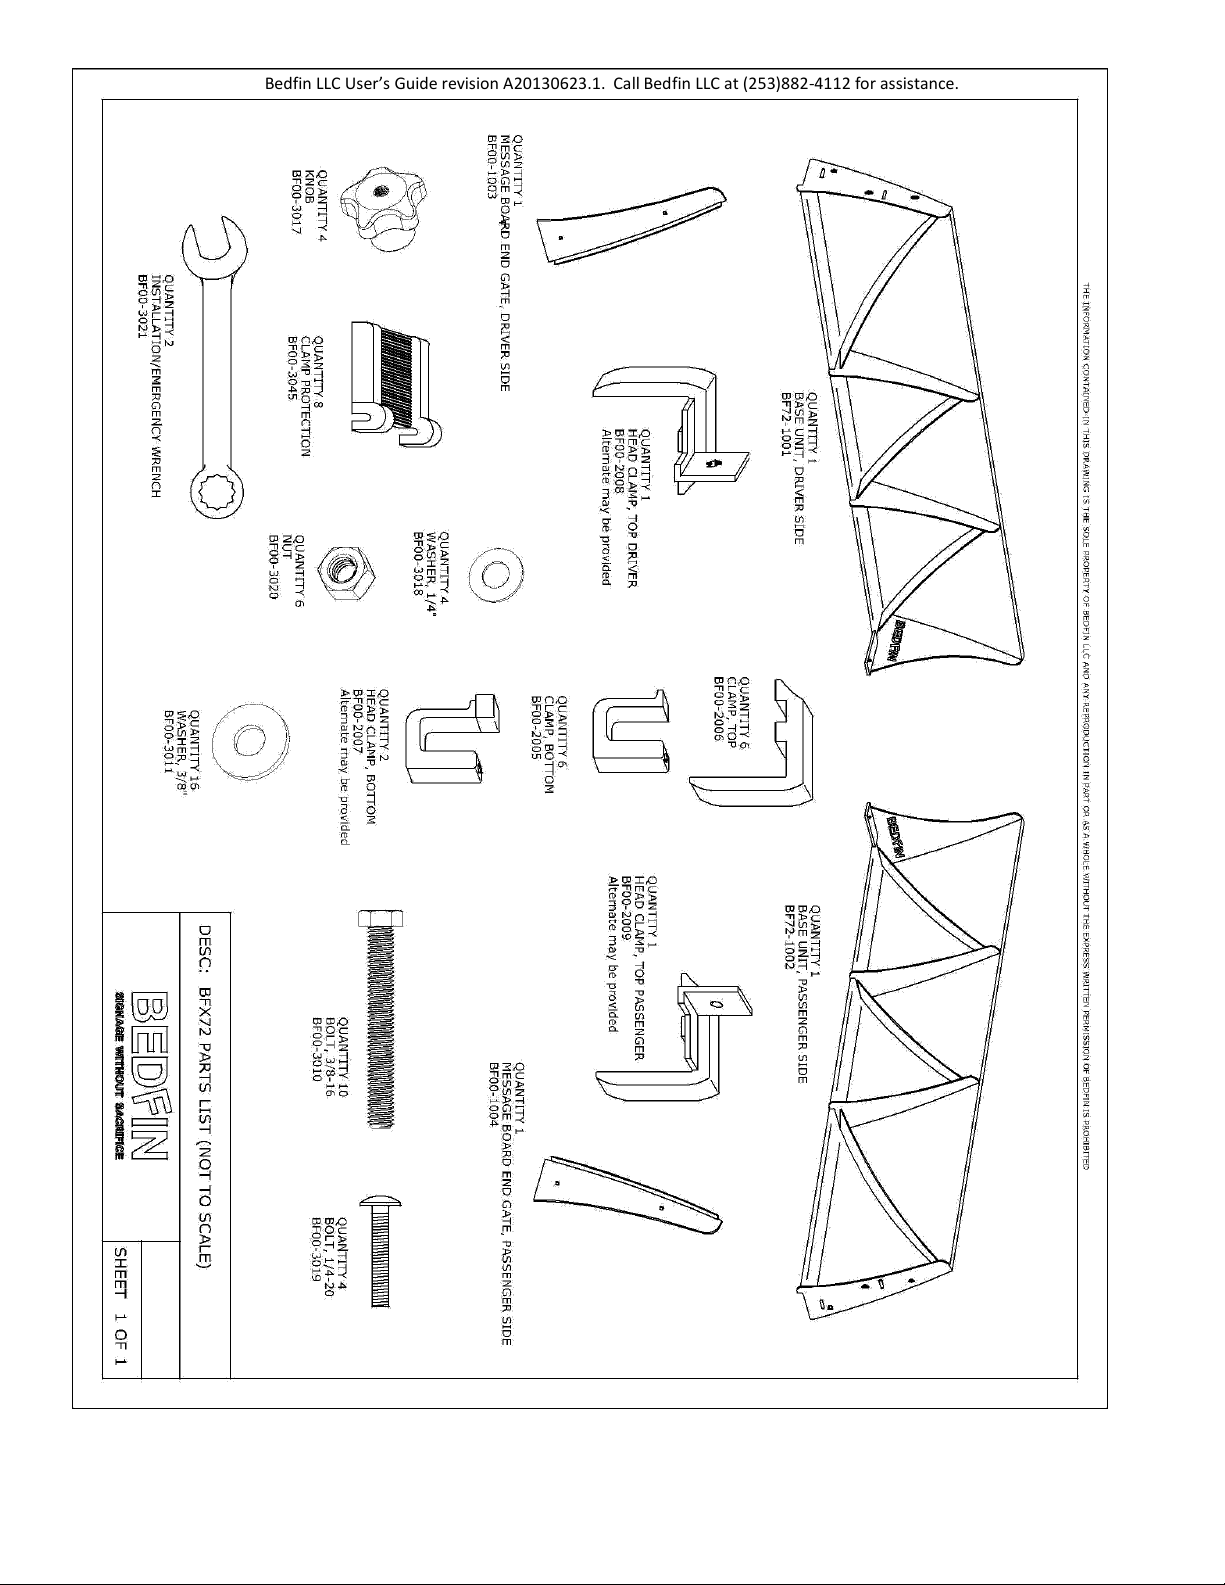
Parts List PAGE 3
Thank You / Overview PAGE 4
Dos & Don’ts PAGE 5
Typical Installation Base-unit PAGE 6
Wrench & Manual Storage PAGE 12
Operations Guide PAGE 13
Extension Installation PAGE 18
Uninstallation PAGE 21
Warranty PAGE 22
Bedfin LLC User’s Guide revision A20130623.1. Call Bedfin LLC at (253)882-4112 for assistance.
This guide is provided based on typical installation and requirements for vehicles which Bedfin signage was designed. Every vehicle is different
in design and condition and strict attention to the vehicle limitations must be recognized and evaluated by installer and user. Bedfin accepts no
liability for units improperly installed and operated or any units installed on vehicles which Bedfin signage is not suitable. Product support may
be provided from Bedfin LLC by phone or in other mediums without obligating Bedfin LLC to any liability for damage, injury, or death.
Comprehensive and regular inspection of Bedfin signage is the responsibility of user to ensure safe operation.
Page3

Bedfin LLC User’s Guide revision A20130623.1. Call Bedfin LLC at (253)882-4112 for assistance.
This guide is provided based on typical installation and requirements for vehicles which Bedfin signage was designed. Every vehicle is different
in design and condition and strict attention to the vehicle limitations must be recognized and evaluated by installer and user. Bedfin accepts no
liability for units improperly installed and operated or any units installed on vehicles which Bedfin signage is not suitable. Product support may
be provided from Bedfin LLC by phone or in other mediums without obligating Bedfin LLC to any liability for damage, injury, or death.
Comprehensive and regular inspection of Bedfin signage is the responsibility of user to ensure safe operation.
Page4
Thank you for purchasing a Bedfin signage system
Bedfin LLC created Bedfin signage to support you in your mission and wants you to get the most from its use. The
following information will help you safely achieve the most from your Bedfin unit. Read this entire guide and
contact Bedfin LLC with questions, so you fully understand the product prior to use. If you transfer ownership or
lend the Bedfin unit to another user, make sure the User Guide and Emergency-Wrenches are made available to
the user. All operators of vehicles with Bedfin signage installed must understand the dangers present when
operating during certain conditions or with an improper installation.
Closely follow the instructions and suggestions in this guide. Installing and operating Bedfin in a manner
inconsistent with this guide can be dangerous and may result in damage to property and injury or death to people.
Proper maintenance as described in this guide will ensure the Bedfin system’s long term performance.
No modifications to your vehicle should be made to accommodate the Bedfin signage system as it has been
designed for universality among different vehicle makes. If for any reason the unit will not install or operate as
described in this guide, contact Bedfin LLC for assistance. Bedfin signage installation requires the use of hand tools
only. Power assisted tools should not be used, as they may damage the hardware and could lead to product
failure. If at any time during installation any component of the system shows signs of defect, wear, or is
problematic, discontinue the installation, remove all installed components, and contact Bedfin LLC for support. Do
not attempt to repair or modify your Bedfin signage system.
Bedfin signage is not designed to restrain loads. Do not tie off, hook, or clamp anything to your unit which is not
provided by Bedfin as an accessory.
Thank you again for choosing Bedfin signage for your mission. Whether you are building a business, fundraising,
promoting your organization, or campaigning, Bedfin LLC wishes you all the best.

Bedfin LLC User’s Guide revision A20130623.1. Call Bedfin LLC at (253)882-4112 for assistance.
This guide is provided based on typical installation and requirements for vehicles which Bedfin signage was designed. Every vehicle is different
in design and condition and strict attention to the vehicle limitations must be recognized and evaluated by installer and user. Bedfin accepts no
liability for units improperly installed and operated or any units installed on vehicles which Bedfin signage is not suitable. Product support may
be provided from Bedfin LLC by phone or in other mediums without obligating Bedfin LLC to any liability for damage, injury, or death.
Comprehensive and regular inspection of Bedfin signage is the responsibility of user to ensure safe operation.
Page5
Don’ts
Violation of the following may void any warranty made by the manufacturer and may limit or eliminate the manufacturer’s
liability from claims of damage, injury, or death as a result of operating a vehicle with Bedfin unit installed.
Do not install or use Bedfin units if rust is present on truck areas which are structurally significant to the Bedfin unit function.
Do not operate your vehicle with Bedfin unit installed during high winds.
Do not use automated vehicle washes with Bedfin unit installed.
Do not drive at speeds in excess of 70 miles per hour with Bedfin signage installed.
Do not drive on bumpy surfaces without reducing speed to a level which protects unit from excessive vibration.
Do not over-tighten fastening hardware during installation.
Do not strap, tie, or affix any device to Bedfin unit which is not provided by the manufacturer as an accessory.
Do not operate vehicle with Bedfin unit improperly and/or partially installed.
Do not use any hardware with Bedfin unit which did not come from the manufacturer. Parts are available through Bedfin LLC.
Do not attempt to repair damaged Bedfin unit. Contact Bedfin LLC to receive replacement parts or authorized repairs.
Do not modify Bedfin unit in any way without express written consent from Bedfin LLC.
Do not use Bedfin unit to restrain a load in vehicle. Special tie down points are available through Bedfin LLC as an accessory.
Do not use message board sizes or materials other than as recommended by Bedfin LLC in the User’s Guide.
Do not install Bedfin unit or operate a vehicle with Bedfin unit which has not been designed for use with that vehicle.
Do not redistribute Bedfin unit without providing other party with a full set of this documentation and Emergency-wrenches.
Do not use solvents to clean Bedfin unit as it may damage the coating.
Do not clean Bedfin unit with message board installed unless advised by the message board supplier.
Do not display messages in Bedfin unit which are considered offensive, illegal, or may be in conflict with interests of Bedfin LLC.
Do not install or operate Bedfin unit on a vehicle which has been involved in a collision and/or may have weakened areas which
are structurally significant to the proper function of Bedfin unit.
Do
Failing to do the following may void any warranty made by the Bedfin LLC and limits or eliminates Bedfin LLC’s liability from
claims of damage, injury, or death as a result of operating a vehicle with Bedfin unit installed.
Do read User’s Guide, and other documents provided by Bedfin LLC prior to installing and operating a vehicle with Bedfin unit.
Do inspect Bedfin unit, vehicle, and hardware for damage or fatigue regularly as described in User’s Guide.
Do inspect Bedfin unit, vehicle, and hardware for loosening regularly as described in User’s Guide.
Do store Bedfin unit properly when not used to avoid damage resulting in damage, injury, or death when back in operation.
Do report all defects to Bedfin LLC immediately to ensure proper resolution and to guard against possible safety concerns.
Do operate your vehicle in a manner consistent with the safe operation guidelines as provided by the manufacturer.
Do remove Bedfin unit regularly to clean the unit and vehicle to protect the finish and ensure long term performance.
Do carry the proper tools for un-installation of Bedfin unit in case driving conditions become unsafe for proper operation.
Do supply future owners of Bedfin unit with all documentation and Emergency-Wrenches as provided by Bedfin LLC and check
website for updates.
Bedfin LLC User’s Guide revision A20130623.1. Call Bedfin LLC at (253)882-4112 for assistance.
This guide is provided based on typical installation and requirements for vehicles which Bedfin signage was designed. Every vehicle is different
in design and condition and strict attention to the vehicle limitations must be recognized and evaluated by installer and user. Bedfin accepts no
liability for units improperly installed and operated or any units installed on vehicles which Bedfin signage is not suitable. Product support may
be provided from Bedfin LLC by phone or in other mediums without obligating Bedfin LLC to any liability for damage, injury, or death.
Comprehensive and regular inspection of Bedfin signage is the responsibility of user to ensure safe operation.
Page6
Typical Installation Guide
Bedfin Model BFX72
(other BFX models require same installation process)
While one person may be able to install a Bedfin unit, to help prevent strain injuries or damage to your vehicle, it is
recommended to have the assistance of a second person. In each step, when maneuvering the Bedfin signage or
other components around your vehicle, take extra care to avoid bumping against your vehicle; your vehicle finish
and or the Bedfin unit could become damaged.
All parts and tools required for installation are included with the purchase of your Bedfin unit. Prior to installation,
ensure all necessary components have been included in your package. An illustrated contents list has been
provided. The clamps are preassembled with their hardware.
** USING POWER DRIVEN TOOLS FOR INSTALLATION IS NOT RECOMMENDED AND WILL VOID WARRANTY **
*** DRILLING IS NOT REQUIRED AND MODIFYING YOUR BEDFIN UNIT IN ANY WAY WILL VOID WARRANTY ***
**** PRIOR TO INSTALLATION OR OPERATION, READ AND FOLLOW ALL MANUALS AND DOCUMENTATION****
Bedfin LLC User’s Guide revision A20130623.1. Call Bedfin LLC at (253)882-4112 for assistance.
This guide is provided based on typical installation and requirements for vehicles which Bedfin signage was designed. Every vehicle is different
in design and condition and strict attention to the vehicle limitations must be recognized and evaluated by installer and user. Bedfin accepts no
liability for units improperly installed and operated or any units installed on vehicles which Bedfin signage is not suitable. Product support may
be provided from Bedfin LLC by phone or in other mediums without obligating Bedfin LLC to any liability for damage, injury, or death.
Comprehensive and regular inspection of Bedfin signage is the responsibility of user to ensure safe operation.
Page7
Step 1
Remove all contents from the packaging and verify the set is complete. Check for damage from transportation or
manufacturer defects prior to installation. An illustrated parts list has been provided as part of this guide (Page 3).
If any parts are missing or appear damaged, discontinue installation and contact Bedfin LLC for assistance.
Step 2
Remove any factory or aftermarket accessories from your truck which may prevent a solid connection between
your Bedfin unit and truck. Common equipment which may prevent Bedfin unit installation are contractor racks,
bed covers, truck boxes, canopies, and shell liners. Be sure your accessories can be removed safely and follow the
accessory manufacturer’s recommendations for removal.
Step 3
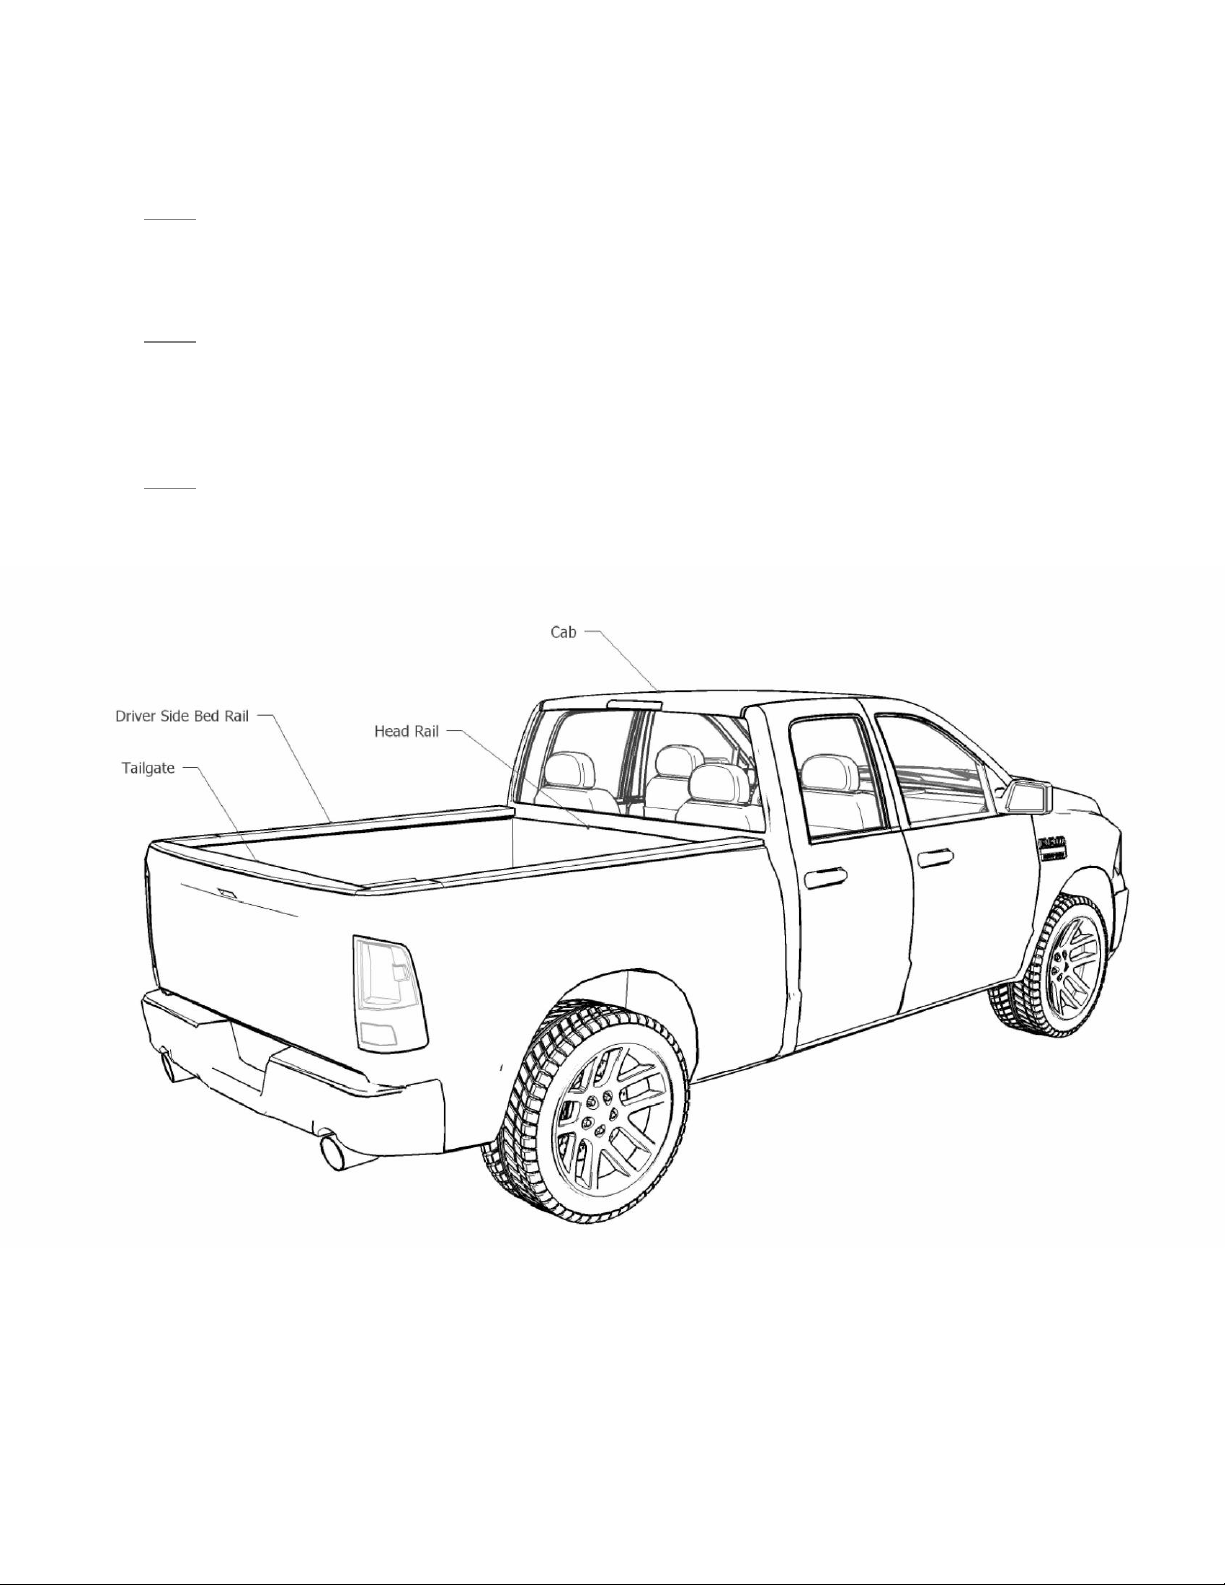
Clean your truck bed rails in preparation for mounting your Bedfin unit. Ensure the bed rails and head rail (Fig 7.1)
are free of debris which may damage your truck’s finish. For additional protection, you may elect to apply
protective tape to protect your bed rails (Fig 7.1) available at truck and canopy dealerships and Bedfin LLC.
FIGURE 7.1
Bedfin LLC User’s Guide revision A20130623.1. Call Bedfin LLC at (253)882-4112 for assistance.
This guide is provided based on typical installation and requirements for vehicles which Bedfin signage was designed. Every vehicle is different
in design and condition and strict attention to the vehicle limitations must be recognized and evaluated by installer and user. Bedfin accepts no
liability for units improperly installed and operated or any units installed on vehicles which Bedfin signage is not suitable. Product support may
be provided from Bedfin LLC by phone or in other mediums without obligating Bedfin LLC to any liability for damage, injury, or death.
Comprehensive and regular inspection of Bedfin signage is the responsibility of user to ensure safe operation.
Page8
Step 4
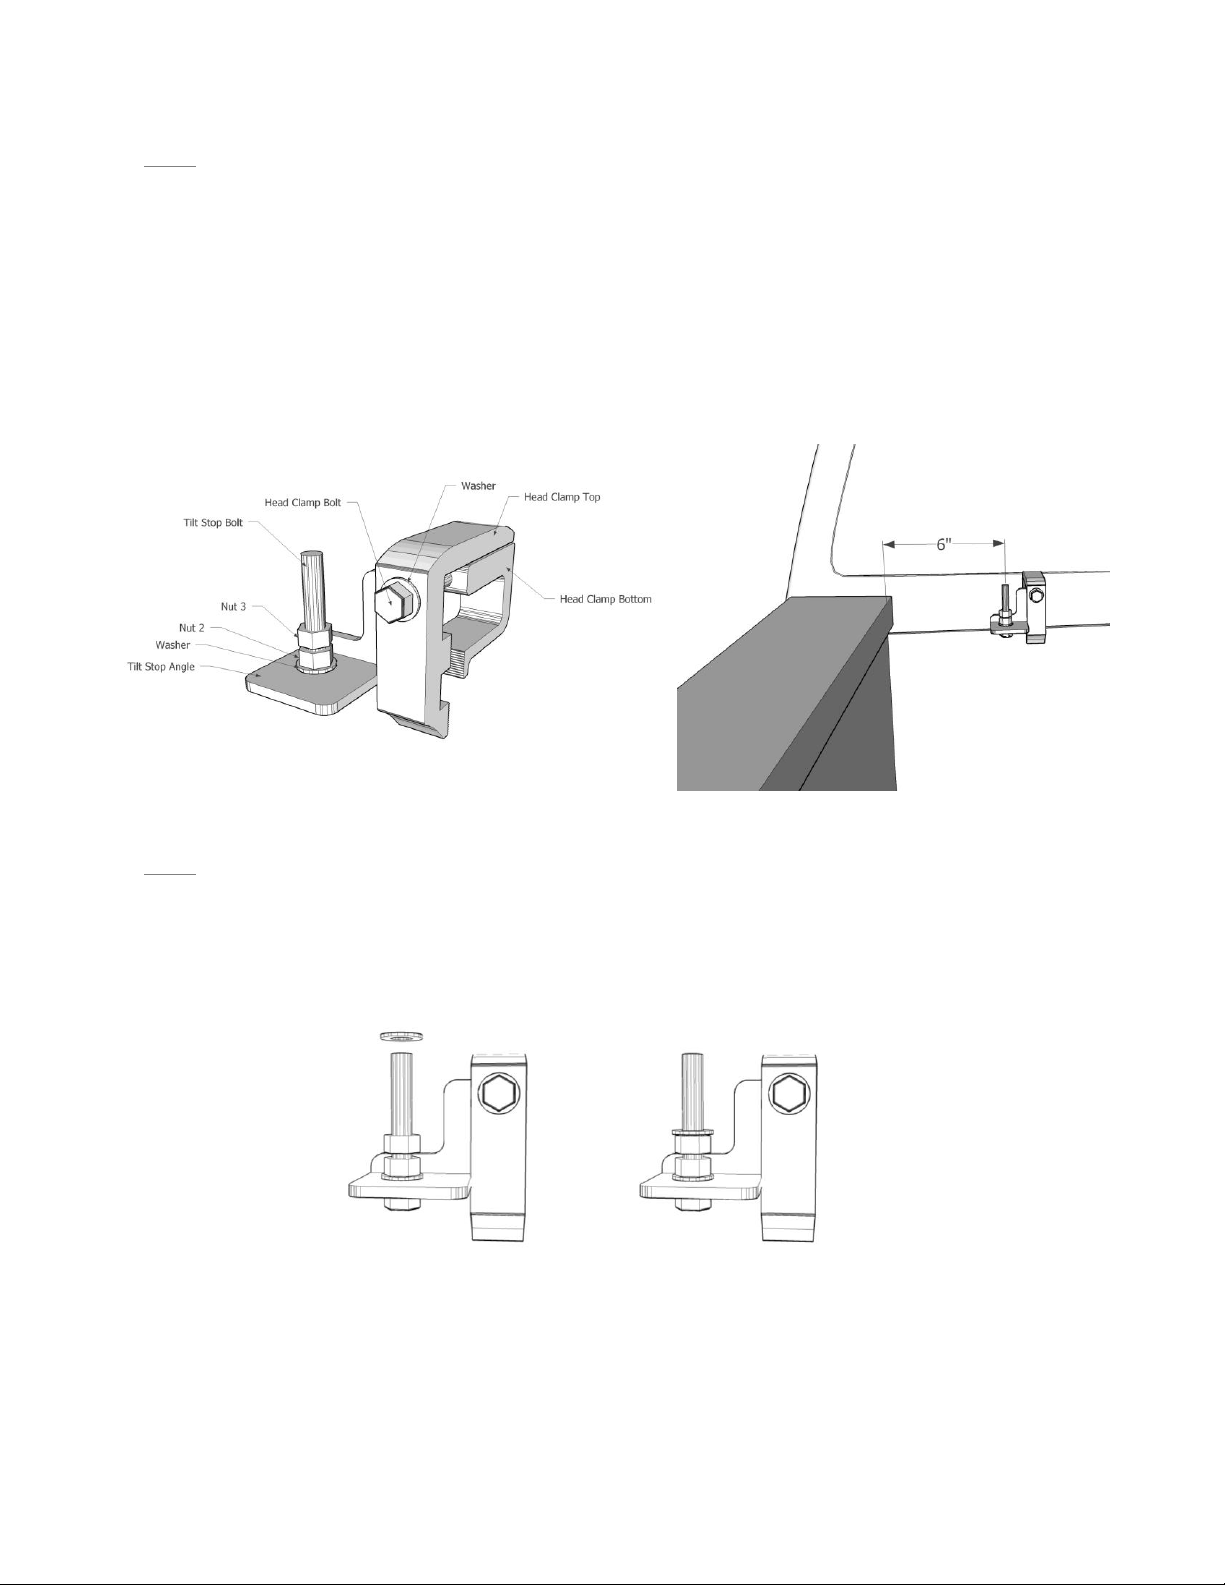
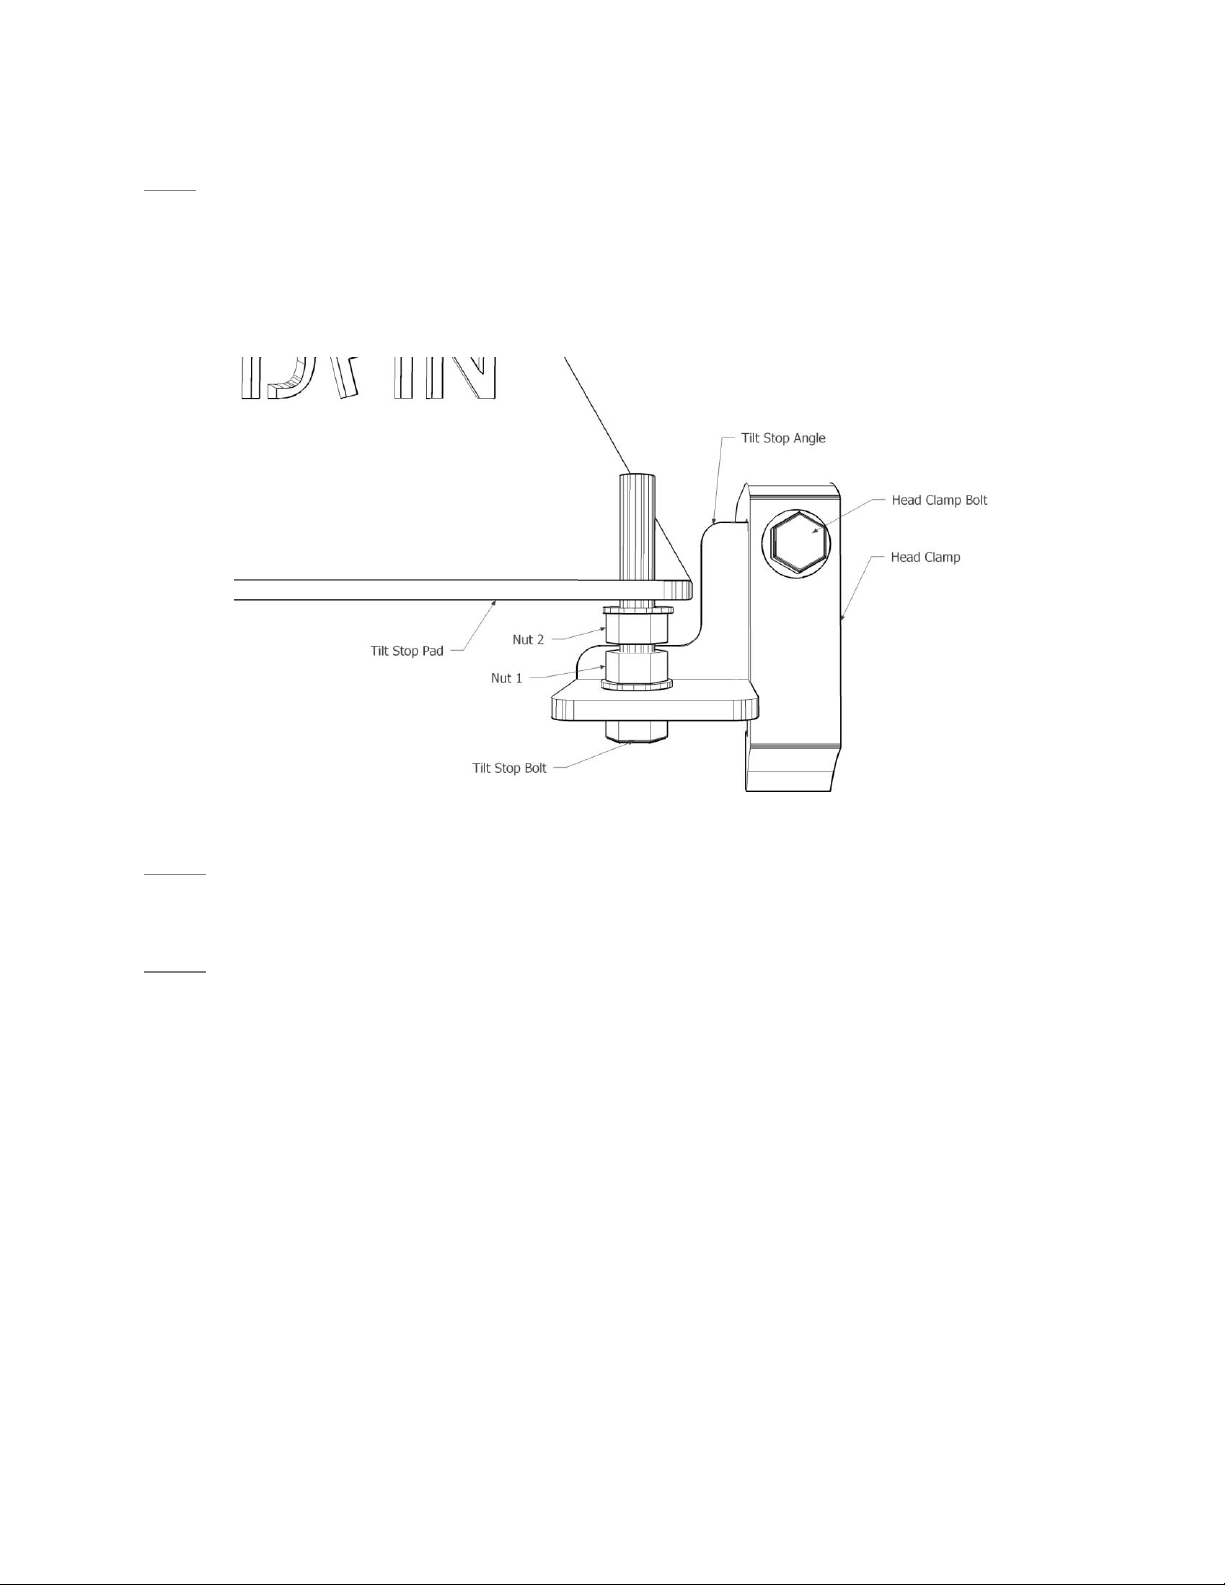
Position the driver side head-clamp on the head rail so the exposed tilt-stop-bolt is vertical and pointing upwards
(Fig 8.1). Locate the head-clamp so the tilt-stop-bolt is approximately 6” from the inside edge of the driver side
bed rail (Fig 8.2). You may place a clamp-protection-pad between the head-clamp and the inside of the truck bed
to protect the finish. Gently tighten the head-clamp-bolt enough to lightly hold its position.
- - - - - - IMPORTANT NOTES - - - - - -
1) The driver side and passenger side head-clamps are not interchangeable with one another.
2) The tilt-stop-bolt will be slightly loose at this stage (Fig 8.1).
3) If you experience clearance problems between the clamp hardware and your cab, or the clamp will not seat
securely against the clamping surfaces of your bed, you may require a custom set of head-clamps. Contact Bedfin
for assistance.
Step 5
Place a washer on the tilt-stop-bolt so it falls down and rests against the uppermost nut (Fig 8.3).
FIGURE 8.1
FIGURE 8.2
FIGURE 8.3

Bedfin LLC User’s Guide revision A20130623.1. Call Bedfin LLC at (253)882-4112 for assistance.
This guide is provided based on typical installation and requirements for vehicles which Bedfin signage was designed. Every vehicle is different
in design and condition and strict attention to the vehicle limitations must be recognized and evaluated by installer and user. Bedfin accepts no
liability for units improperly installed and operated or any units installed on vehicles which Bedfin signage is not suitable. Product support may
be provided from Bedfin LLC by phone or in other mediums without obligating Bedfin LLC to any liability for damage, injury, or death.
Comprehensive and regular inspection of Bedfin signage is the responsibility of user to ensure safe operation.
Page9
FIGURE 9.1
FIGURE 9.2
FIGURE 9.3
Step 6
Gently place the driver side base-unit on top of the bed rail while your assistant is watching to ensure the slotted
hole of the tilt-stop-pad slips over the tilt-stop-bolt on the head-clamp (Fig 9.1). Once set down ensure the base-
unit butts up tight against the inside edges of your bed rails. To do this you may need to loosen the head-clamp
slightly, allowing the Head-Clamp to reposition with the base-unit.
- - - - - - IMPORTANT NOTE - - - - - -
The driver side and passenger Base-Units are not interchangeable.
Step 7
While using an assistant to hold the Base-Unit in place, loosely place three of the standard clamps and the optional
clamp-protection-pads (not shown) in position along the length of the base-unit (Fig 9.2). Clamps should be
positioned as close to the vertical gussets as possible and oriented so the head of the bolt is at the top (Fig 9.3).
Step 8
Begin tightening each of the three standard clamps in succession getting progressively tighter with each cycle until
fully tightened.
- - - - - - IMPORTANT NOTES - - - - - -
1) The top half and bottom half of the clamp will slide closer together as the clamp is tightened. Enough room must
be left between the lower half of the clamp and the bed rail flange so the clamp can move unobstructed until fully
tightened.
2) Do not over tighten each clamp. Over tightening may strip/weaken the threads of your clamps or cause damage
to your truck.
Bedfin LLC User’s Guide revision A20130623.1. Call Bedfin LLC at (253)882-4112 for assistance.
This guide is provided based on typical installation and requirements for vehicles which Bedfin signage was designed. Every vehicle is different
in design and condition and strict attention to the vehicle limitations must be recognized and evaluated by installer and user. Bedfin accepts no
liability for units improperly installed and operated or any units installed on vehicles which Bedfin signage is not suitable. Product support may
be provided from Bedfin LLC by phone or in other mediums without obligating Bedfin LLC to any liability for damage, injury, or death.
Comprehensive and regular inspection of Bedfin signage is the responsibility of user to ensure safe operation.
Page10
FIGURE 10.1
Step 9
Slide the Head-Clamp towards either the driver side or passenger side slightly to ensure the tilt-stop-angle is not in
contact with the tilt-stop-pad (Fig 10.1). Then tighten the head-clamp-bolt to lock its position.
- - - - - - IMPORTANT NOTE - - - - - -
2) Do not over tighten Clamp. Over tightening may strip/weaken the threads of your clamps or cause damage to
your truck.
Step 10
Slide the tilt-stop-bolt to the position within the slot of the tilt-stop-angle so the tilt-stop-bolt is as vertical as
possible (Fig 10.1). Fully tighten nut-1 clockwise to lock the position of the tilt-stop-bolt on the tilt-stop-angle.
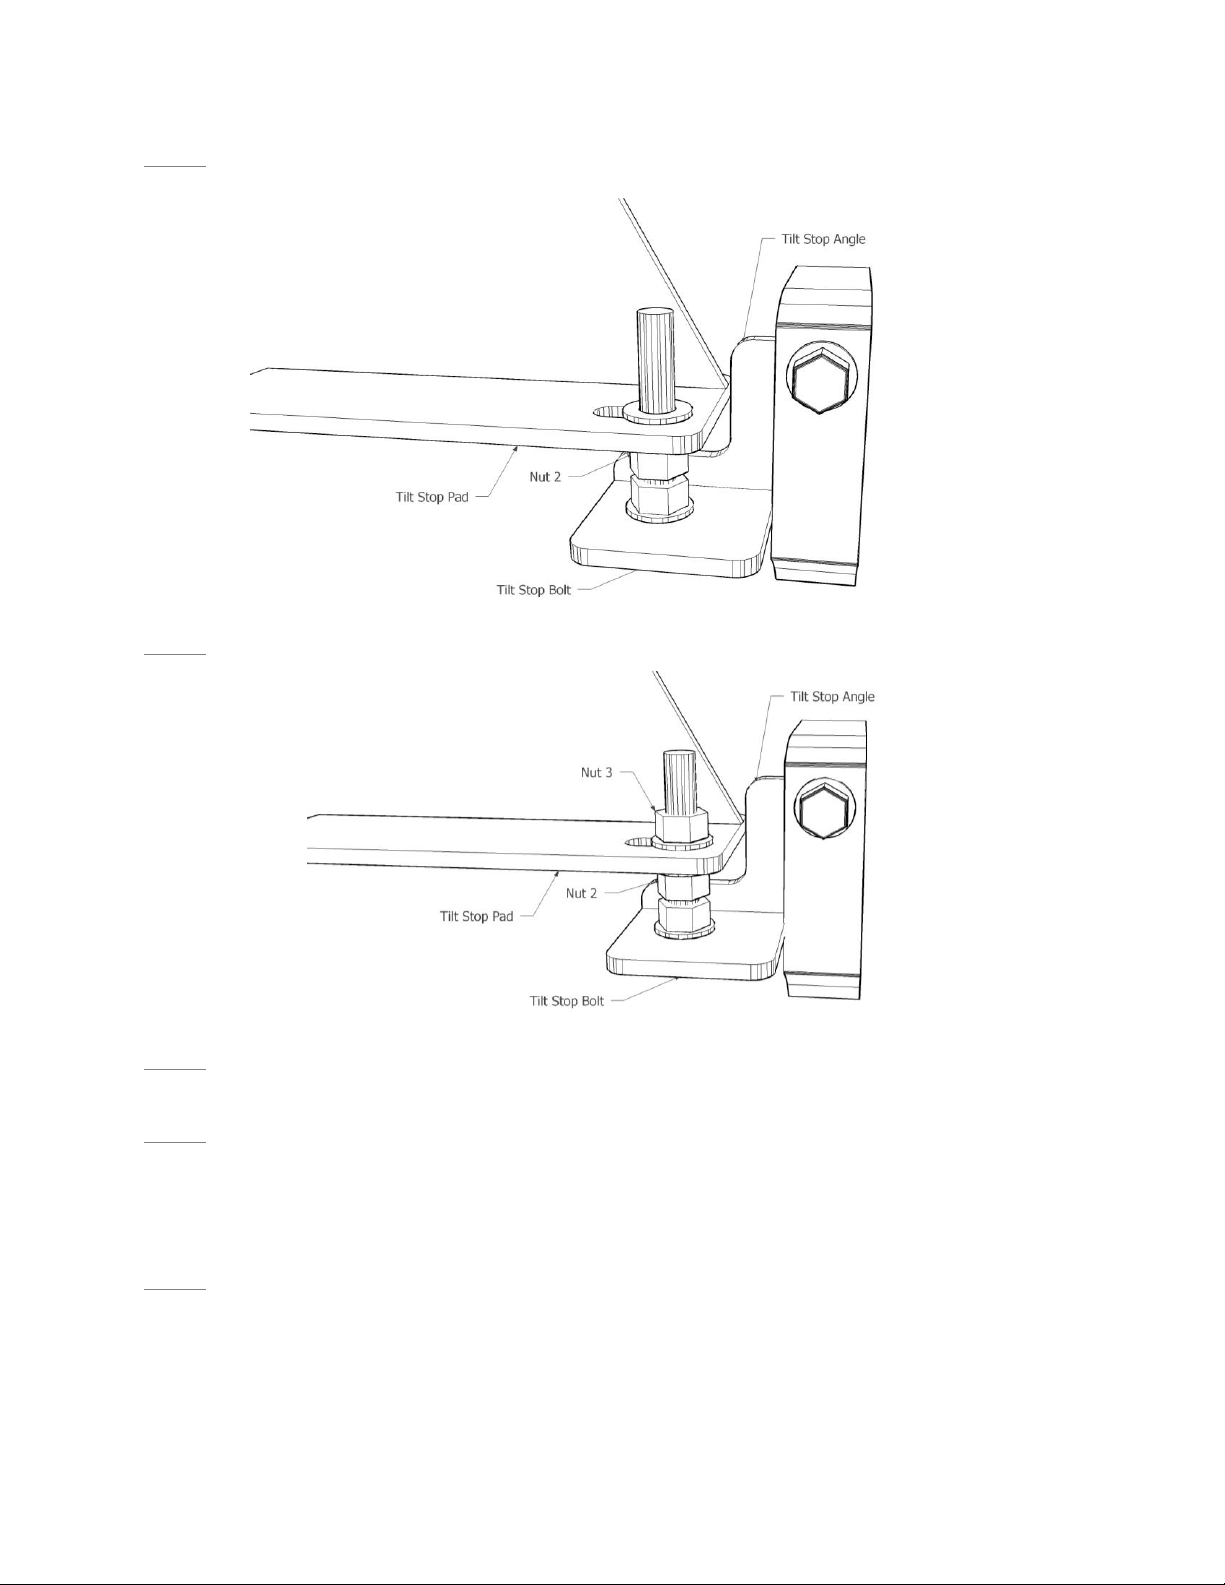
Step 11
While gently pulling inward on the top of the driver side base-unit (10-20 pounds of pressure), turn nut-2
counterclockwise until the loose washer is positioned up against the bottom of the tilt-stop-pad (Fig 10.1). Let go
of the driver side base-unit to allow it to relax. There should now be a gap between the loose washer and the
underside of the tilt-stop-pad. (This process will reduce movement due to vibration by putting everything in slight
tension once fully tightened.)
Bedfin LLC User’s Guide revision A20130623.1. Call Bedfin LLC at (253)882-4112 for assistance.
This guide is provided based on typical installation and requirements for vehicles which Bedfin signage was designed. Every vehicle is different
in design and condition and strict attention to the vehicle limitations must be recognized and evaluated by installer and user. Bedfin accepts no
liability for units improperly installed and operated or any units installed on vehicles which Bedfin signage is not suitable. Product support may
be provided from Bedfin LLC by phone or in other mediums without obligating Bedfin LLC to any liability for damage, injury, or death.
Comprehensive and regular inspection of Bedfin signage is the responsibility of user to ensure safe operation.
Page11
FIGURE 11.1
FIGURE 11.2
Step 12
Place a washer on the tilt-stop-bolt and allow it to fall and rest on top of the tilt-stop-pad (Fig 11.1).
Step 13
Thread nut-3 on the tilt-stop-bolt and fully tighten (Fig 11.2).
Step 14
Fully tighten the nut-2 against the underside of the tilt-stop-pad (Fig 11.2).
Step 15
Gently grasp the top front of the base-unit. Rapidly push and pull repeatedly for a few cycles using gentle to
moderate force (10 - 20 pounds) to ensure the unit does not experience excessive movement at the top edge.
Repeat at the rear end of base-unit (Fig 9.2). If excessive movement is experienced, check the clamps to ensure all
are properly tightened. If this fails to correct the problem, contact Bedfin LLC for assistance.
Step 16
Repeat steps 4-15 on the passenger side of your truck.
CONGRATULATIONS ON COMPLETION OF YOUR INSTALLATION.

Bedfin LLC User’s Guide revision A20130623.1. Call Bedfin LLC at (253)882-4112 for assistance.
This guide is provided based on typical installation and requirements for vehicles which Bedfin signage was designed. Every vehicle is different
in design and condition and strict attention to the vehicle limitations must be recognized and evaluated by installer and user. Bedfin accepts no
liability for units improperly installed and operated or any units installed on vehicles which Bedfin signage is not suitable. Product support may
be provided from Bedfin LLC by phone or in other mediums without obligating Bedfin LLC to any liability for damage, injury, or death.
Comprehensive and regular inspection of Bedfin signage is the responsibility of user to ensure safe operation.
Page12
FOR USE IN CASE OF EMERGENCY, THE UNEXPECTED NEED TO UNINSTALL
BEDFIN, AND FOR ROUTINE MAINTENANCE, PLACE THE WRENCHES AND THE
USER GUIDE PROVIDED IN THE VEHICLE ON WHICH THE BEDFIN UNIT IS
INSTALLED. IF YOU’VE INSTALLED BEDFIN AS A SERVICE FOR ANOTHER USER
MAKE THE WRENCHES AND USER GUIDE AVAILABLE TO THE USER.
ELECTRONIC COPY OF USER GUIDE IS AVAILABLE AT WWW.BEDFIN.COM
IF YOU HAVE ANY QUESTIONS OR EXPERIENCE ANY DIFFICULTY DURING
INSTALLATION, CALL BEDFIN LLC FOR ASSISTANCE. (253)882-4112

Bedfin LLC User’s Guide revision A20130623.1. Call Bedfin LLC at (253)882-4112 for assistance.
This guide is provided based on typical installation and requirements for vehicles which Bedfin signage was designed. Every vehicle is different
in design and condition and strict attention to the vehicle limitations must be recognized and evaluated by installer and user. Bedfin accepts no
liability for units improperly installed and operated or any units installed on vehicles which Bedfin signage is not suitable. Product support may
be provided from Bedfin LLC by phone or in other mediums without obligating Bedfin LLC to any liability for damage, injury, or death.
Comprehensive and regular inspection of Bedfin signage is the responsibility of user to ensure safe operation.
Page13
FIGURE 13.1
Operations Guide
Bedfin Series BFX
Your Bedfin unit is intended for use on suitably equipped and maintained full size pickup trucks in good operating
condition while traveling at speeds below 70 miles per hour in mild to moderate weather and on smooth surfaces.
Proper operation of your Bedfin unit as described in this guide is crucial to the safety and longevity of the system.
Operation of Bedfin in manners inconsistent with this guide and for any purposes other than as advertised by
Bedfin LLC may void warranty and may result in damage to your vehicle or other property and injury or death. If at
any time your Bedfin unit seems to be malfunctioning or fails to operate as described in this guide, discontinue use
and contact Bedfin LLC for assistance.
Loading a message board
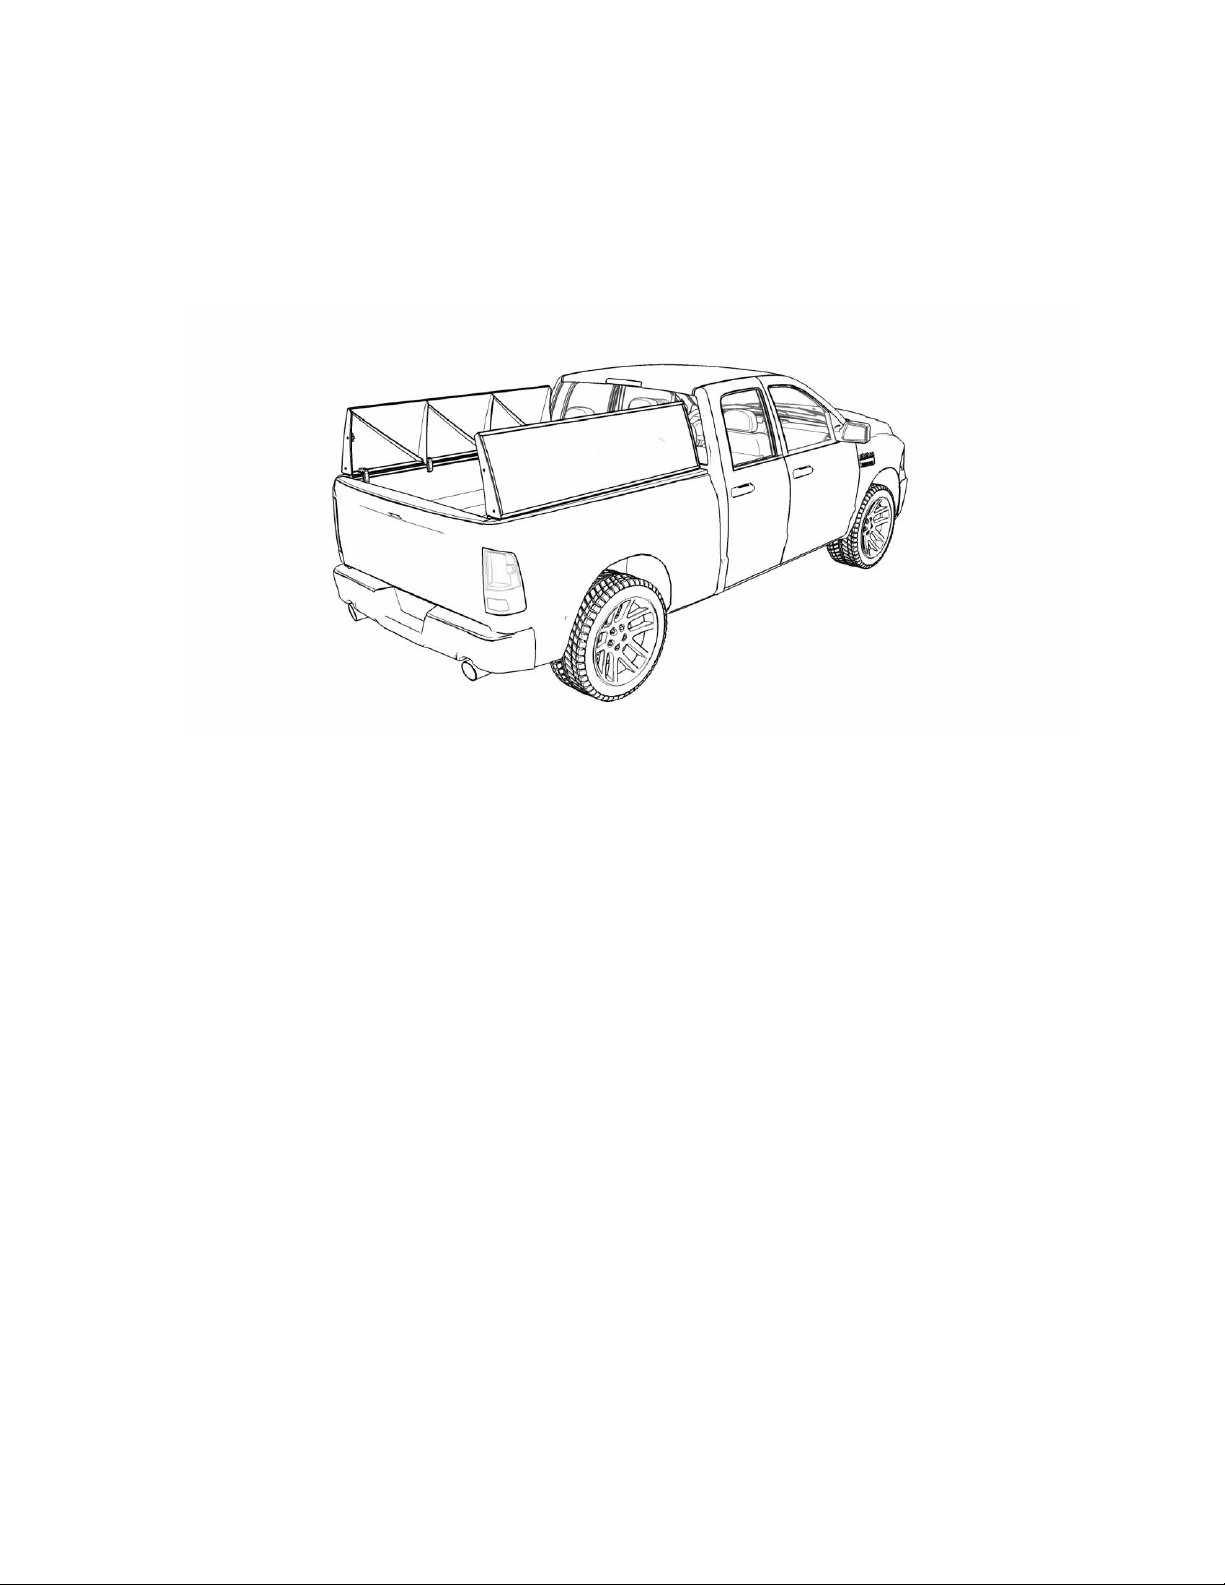
Before a message-board can be loaded into the unit, the message-board-end-gate must be unlocked and
disengaged from the base unit (Fig 13.1).
Bedfin LLC User’s Guide revision A20130623.1. Call Bedfin LLC at (253)882-4112 for assistance.
This guide is provided based on typical installation and requirements for vehicles which Bedfin signage was designed. Every vehicle is different
in design and condition and strict attention to the vehicle limitations must be recognized and evaluated by installer and user. Bedfin accepts no
liability for units improperly installed and operated or any units installed on vehicles which Bedfin signage is not suitable. Product support may
be provided from Bedfin LLC by phone or in other mediums without obligating Bedfin LLC to any liability for damage, injury, or death.
Comprehensive and regular inspection of Bedfin signage is the responsibility of user to ensure safe operation.
Page14
FIGURE 14.1
FIGURE 14.2
FIGURE 14.3
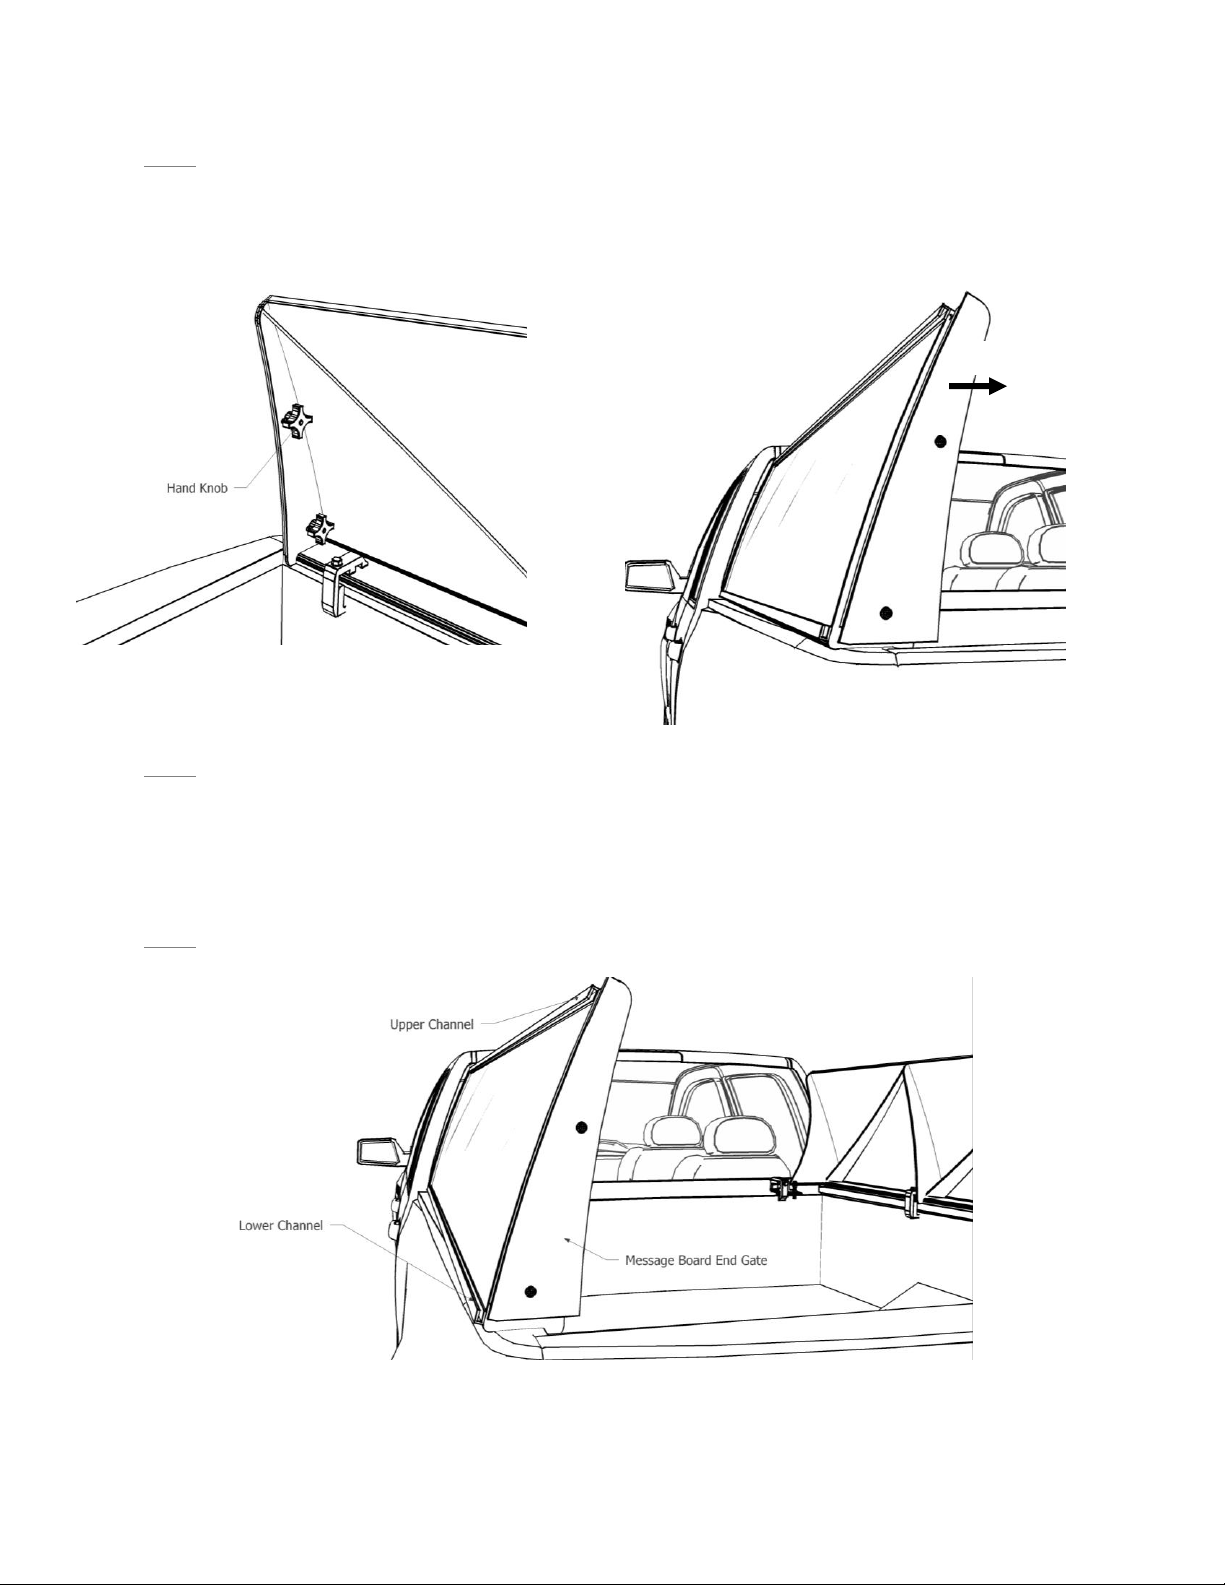
Pull and slide to unlock
Step 1
To unlock the message-board-end-gate, find the hand-knobs on the interior side at the rear of the base-unit, and
turn the knobs counterclockwise (Fig 14.1). This will loosen the message-board-end-gate from the base-unit. Back
the knobs off most of the way, but stop before they reach the end of the carriage bolt. If you back them off so far
they come off of the bolt, simply place the knob back on the bolt with a clockwise turn. Be sure to replace the
washer if it fell away.
Step 2
To disengage the message-Board-End-Gate, gently pull the message-board-end-gate straight back and away from
the base-unit. Once the message-board-end-gate is pulled back, gently slide it to toward the center of the bed (Fig
14.2). If you are loading the driver side unit you will need to slide it in the direction of the passenger side and do
the opposite for the passenger side. Doing this will expose the channels which restrain the message board (Fig
14.3).
Step 3
Guide the message-board into the upper and lower channels. Work slowly so as to not dent or bend your message
board (Fig 14.3).
Bedfin LLC User’s Guide revision A20130623.1. Call Bedfin LLC at (253)882-4112 for assistance.
This guide is provided based on typical installation and requirements for vehicles which Bedfin signage was designed. Every vehicle is different
in design and condition and strict attention to the vehicle limitations must be recognized and evaluated by installer and user. Bedfin accepts no
liability for units improperly installed and operated or any units installed on vehicles which Bedfin signage is not suitable. Product support may
be provided from Bedfin LLC by phone or in other mediums without obligating Bedfin LLC to any liability for damage, injury, or death.
Comprehensive and regular inspection of Bedfin signage is the responsibility of user to ensure safe operation.
Page15
FIGURE 15.1
Step 4
Once both top and bottom of the leading edge of the message-board are slid into the ends of the channel, feed the
rest of the message-board forward until it stops at the front of the base-unit. The message board may fail to slide
in completely due to being obstructed by the border up at the front of the base-unit. To resolve this, put some
slight pressure against the message-board surface at the front using both hands. Then push message-board
forward the rest of the way (approx. ½”).
Step 5
Replace the message-board-end-gate to its engaged position by sliding it to the far side opposite of the direction it
was slid in step 2. Then push the message-board-end-gate up against the base unit. Pinch the rear end of the
message-board with the end gate by slightly sliding the message-board-end-gate back towards the center of the
tailgate.
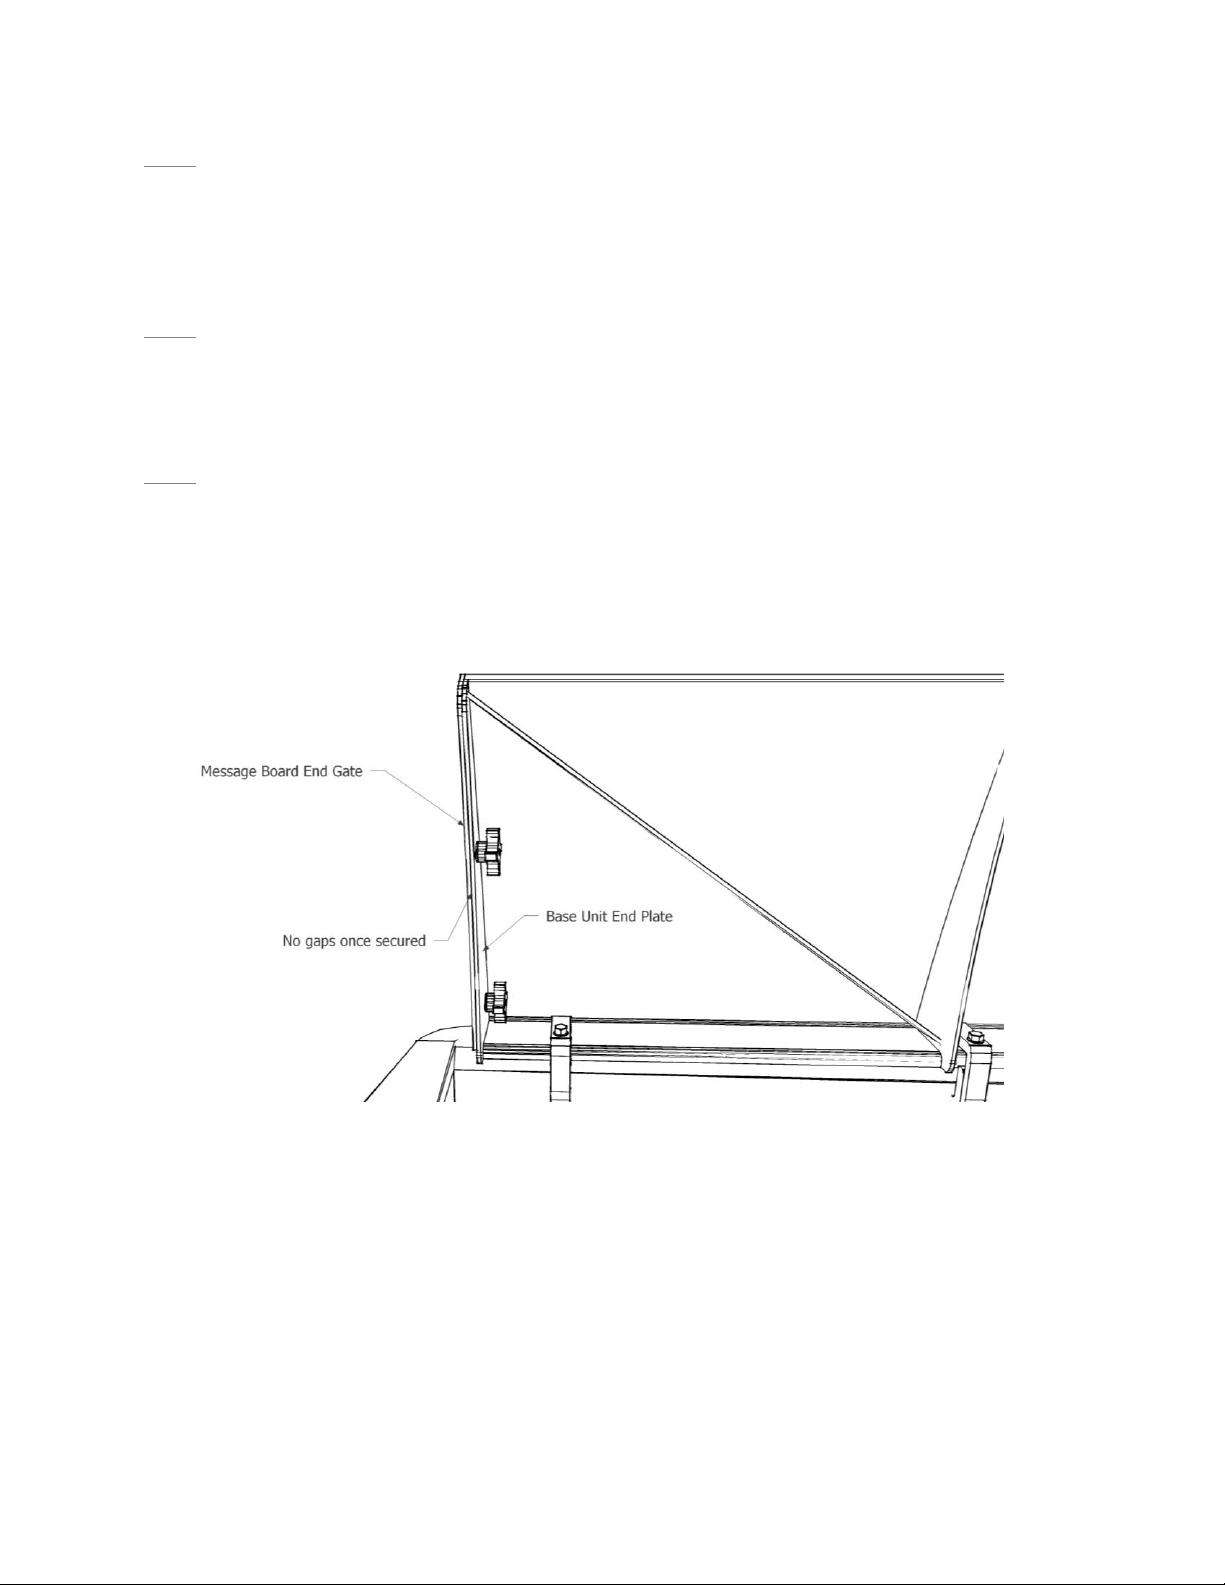
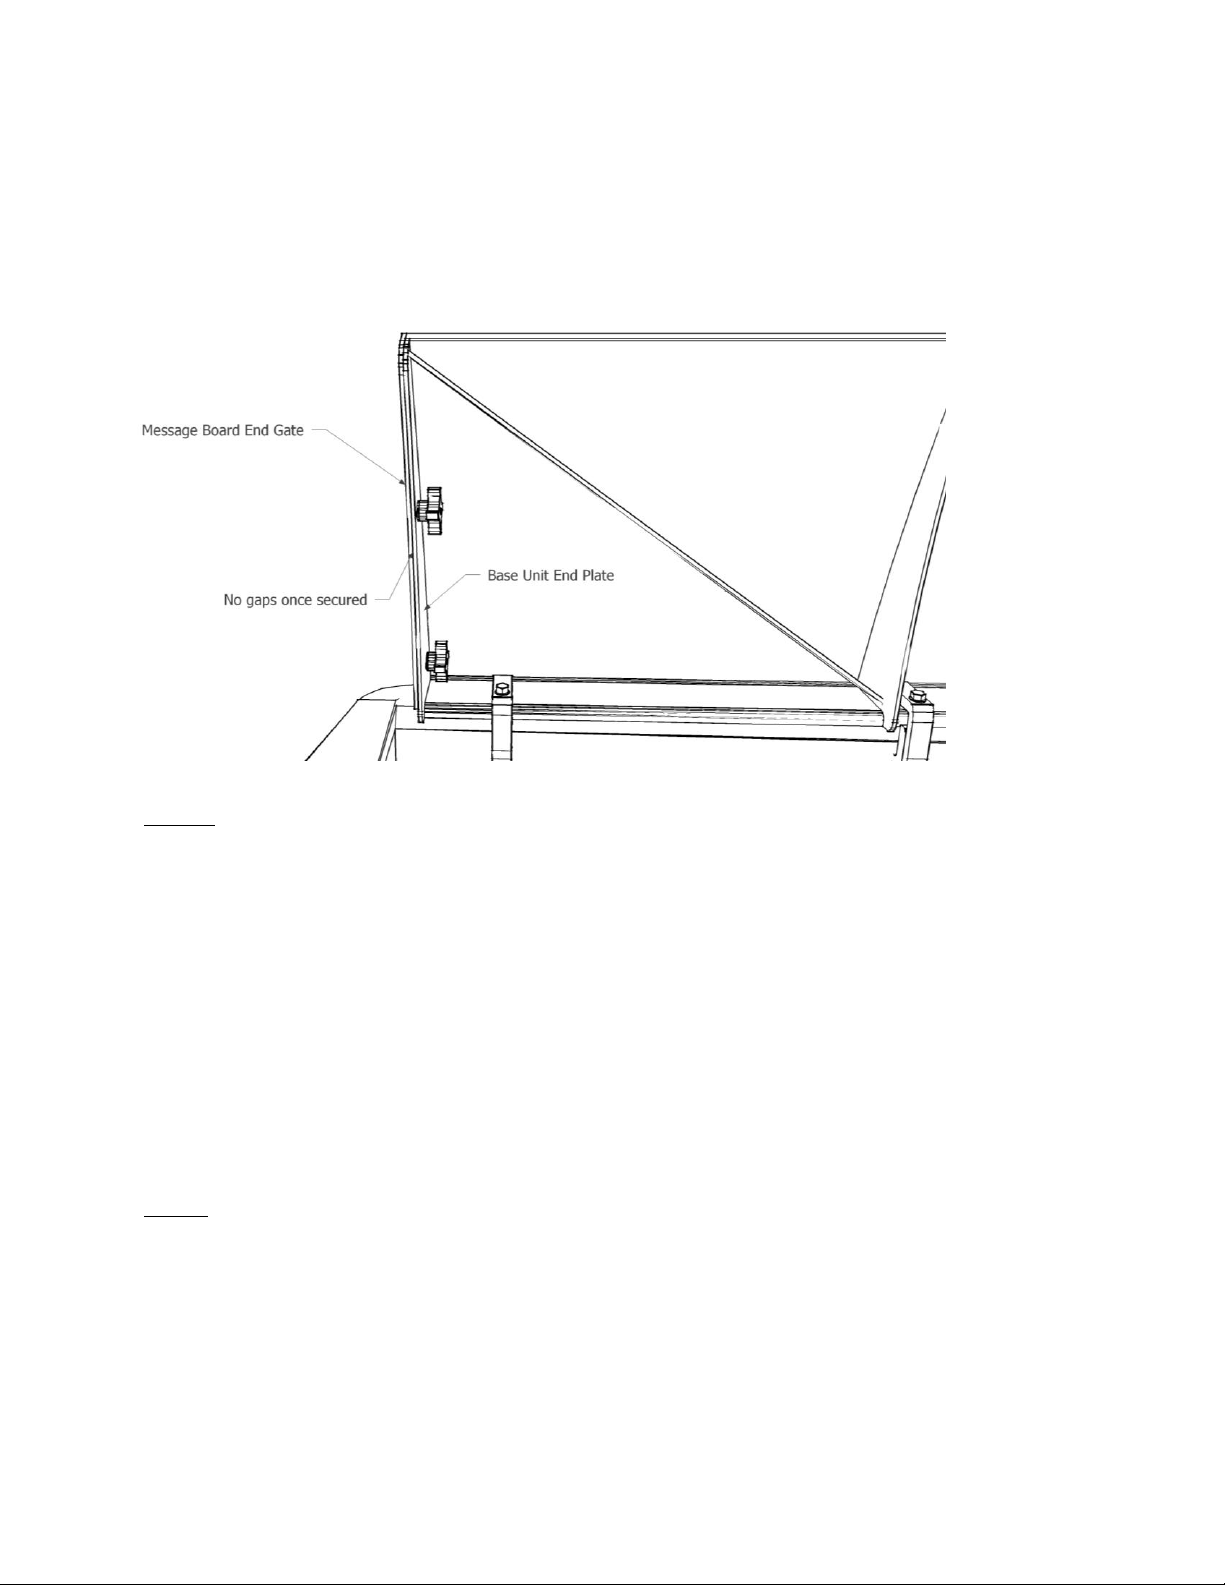
Step 6
While holding the message-board-end-gate in place with slight pressure, turn the hand knobs in a clockwise
position until tight. This will lock the message-board-end-gate in place, securing the message-board. There should
be no gaps between the message-board-end-gate and the end plate of the base-unit (Fig 15.1).

Bedfin LLC User’s Guide revision A20130623.1. Call Bedfin LLC at (253)882-4112 for assistance.
This guide is provided based on typical installation and requirements for vehicles which Bedfin signage was designed. Every vehicle is different
in design and condition and strict attention to the vehicle limitations must be recognized and evaluated by installer and user. Bedfin accepts no
liability for units improperly installed and operated or any units installed on vehicles which Bedfin signage is not suitable. Product support may
be provided from Bedfin LLC by phone or in other mediums without obligating Bedfin LLC to any liability for damage, injury, or death.
Comprehensive and regular inspection of Bedfin signage is the responsibility of user to ensure safe operation.
Page16
Message Board Requirements
Bedfin was designed for use with 5mm thick corrugated plastic sheet, such as Whitecap by Coroplast. The printing
can be provided by nearly all sign shops, however many may send the work out to a third party printer. The
printed sheets should only be printed on and cut down to a board size as specified in the space below. If you are
using an extension with your Bedfin unit, so that it fits a larger truck, you must add the length of the extension to
the length listed below. Do not use partial sheets to add up to the full size of your unit as it will be unsecure and
may become loose while the vehicle is moving. Likewise, do not use any board which is not properly sized as it
may not be completely restrained by the borders of your Bedfin unit. If a message-board does become unsecured
from your Bedfin unit while traveling it may cause damage to property and/or injury and death to people.
Bedfin message-board size in inches: ______________ High X _______________ Long
[Does not include additional length for extension]
Driving
Your Bedfin unit is designed to remain securely installed on your vehicle under normal driving conditions. Under
some extreme driving conditions, your Bedfin unit may be damaged and/or your vehicle may be damaged if Bedfin
is not uninstalled first. Operating with a damaged or unsecured Bedfin unit may result in damage to property
and/or injury and death to people. Avoid excessively bumpy roads, or reduce speed when avoiding such roads are
unavoidable. Large bumps, such as speed bumps and curbs are less problematic than small frequent bumps like
washboard roads and potholes. The smaller repeated bumps can cause a frequency of vibration which over time
may reduce the structural integrity of the weld joints. A good rule of thumb is, if it’s not good for your vehicle
suspension, it’s not good for your Bedfin unit.
Safety checks
Routinely check for loosening of hardware before each trip. A quick check of each clamp, the message-board-end-
gate and visual inspection of the overall unit will help ensure you are operating with your Bedfin safely.
To check the clamps, simply grab each clamp and with moderate force, try to wiggle them from side to side. They
should not have any movement. If they do move, visually inspect them for damage and tighten the hardware if
they appear to be in good working condition.
To check the head-clamp, grab the top end of the base-unit and push and pull repeatedly for a few cycles with light
to moderate force. If the base-unit has considerable play or the clamp pivots back and forth, the clamp will require
tightening. If tightening does not eliminate the movement, your clamp may need to be replaced or swapped for a
more suitable style. Contact Bedfin LLC for assistance.
Bedfin LLC User’s Guide revision A20130623.1. Call Bedfin LLC at (253)882-4112 for assistance.
This guide is provided based on typical installation and requirements for vehicles which Bedfin signage was designed. Every vehicle is different
in design and condition and strict attention to the vehicle limitations must be recognized and evaluated by installer and user. Bedfin accepts no
liability for units improperly installed and operated or any units installed on vehicles which Bedfin signage is not suitable. Product support may
be provided from Bedfin LLC by phone or in other mediums without obligating Bedfin LLC to any liability for damage, injury, or death.
Comprehensive and regular inspection of Bedfin signage is the responsibility of user to ensure safe operation.
Page17
FIGURE 17.1
To check the message-board-end-gate, look at the surface where the message-board-end-gate meets the base unit
and look for gaps (Fig 17.1). The surfaces should not have any significant gaps. If there are gaps, then tighten the
hand knobs. The hand-knobs should be checked regularly to ensure they are hand tight. Do not over tighten, as
they do not require much torque to function properly. Over tightening may damage the threads and result in an
unsecure message-board. Replacements knobs are available through Bedfin LLC.
Cleaning
To keep your Bedfin unit looking its best and to reserve its finish, clean it regularly. The interval of cleaning will
depend on the environment in which it is used. In coastal environments frequent cleaning is important to remove
salt deposited from marine air. In inland environments, less frequent cleaning may be required to remove dust
and road debris.
First remove the printed message-boards from the Bedfin unit. The base-unit may be left on the vehicle for
cleaning, so long as the agents used are suitable for use on your vehicle. Clean the Bedfin unit using a mild soap
and soft bristled brush, soft sponge, or soft terry towel. The powder coat finish is textured and can trap dirt, so
small circular motions will work best. Do not use a high pressure water stream from a power washer, as it may cut
into the coating and cause damage to the unit. Do not use an automated car wash, as it may damage the Bedfin
unit.
Follow the supplier recommendations for cleaning your message-board. Each provider may have a different set of
instructions to ensure the image is not damaged during cleaning.
Storage
When not in use, store your Bedfin unit in its original packaging or in an environment where it will not experience
scratching or impact from other stored items. If storing for a long duration of time, it is recommended that all
components be disassembled and packaged separately.

Bedfin LLC User’s Guide revision A20130623.1. Call Bedfin LLC at (253)882-4112 for assistance.
This guide is provided based on typical installation and requirements for vehicles which Bedfin signage was designed. Every vehicle is different
in design and condition and strict attention to the vehicle limitations must be recognized and evaluated by installer and user. Bedfin accepts no
liability for units improperly installed and operated or any units installed on vehicles which Bedfin signage is not suitable. Product support may
be provided from Bedfin LLC by phone or in other mediums without obligating Bedfin LLC to any liability for damage, injury, or death.
Comprehensive and regular inspection of Bedfin signage is the responsibility of user to ensure safe operation.
Page18
Installation Guide
Bedfin Extension Model BFX24
(other BFX extension models require same installation process)
While one person alone may be able to install a unit, to help prevent strain injuries or damage to your vehicle, it is
recommended to have the assistance of a second person. In each step, when maneuvering the Bedfin signage or
other components around your vehicle, take extra care to avoid bumping against your vehicle; your vehicle finish
and or the signage system could become damaged.
The BFX series extension is only to be used with a BFX series base unit. Only one extension should be used per
each side of the truck. All parts required for installation are included with your purchase of the Bedfin extension.
Prior to installation, ensure all necessary components have been included in your package. An illustrated contents
list has been provided.
**************** IMPORTANT ****************
IF YOU DO NOT HAVE THE INSTALLATION/EMERGENCY UNINSTALLATION WRENCHES WHICH CAME PROVIDED
WITH THE BASE UNIT, YOU WILL NEED 2 OF YOUR OWN 9/16” BOX WRENCHES OR ADJUSTABLE CRESCENT
WRENCHES. IT IS RECOMMENDED TO ALWAYS HAVE A SET OF APPROPRIATE WRENCHES AVAILABLE WITH YOUR
INSTALLED BEDFIN UNIT IN CASE AN ENEXPECTED UNINSTALLATION IS NECESSARY.
** USING POWER DRIVEN TOOLS FOR INSTALLATION IS NOT RECOMMENDED AND WILL VOID WARRANTY **
*** DRILLING IS NOT REQUIRED AND MODIFYING YOUR BEDFIN UNIT IN ANY WAY WILL VOID WARRANTY ***
**** PRIOR TO INSTALLATION OR OPERATION, READ AND FOLLOW ALL MANUALS AND DOCUMENTATION****
Bedfin LLC User’s Guide revision A20130623.1. Call Bedfin LLC at (253)882-4112 for assistance.
This guide is provided based on typical installation and requirements for vehicles which Bedfin signage was designed. Every vehicle is different
in design and condition and strict attention to the vehicle limitations must be recognized and evaluated by installer and user. Bedfin accepts no
liability for units improperly installed and operated or any units installed on vehicles which Bedfin signage is not suitable. Product support may
be provided from Bedfin LLC by phone or in other mediums without obligating Bedfin LLC to any liability for damage, injury, or death.
Comprehensive and regular inspection of Bedfin signage is the responsibility of user to ensure safe operation.
Page19
FIGURE 19.1
FIGURE 19.2
Step 1
Remove all contents from the packaging and verify the set is complete. Check for damage from transportation or
manufacturer defects prior to installation. An illustrated parts list has been provided. If any parts are missing or
appear damaged, discontinue installation and contact Bedfin LLC for assistance.
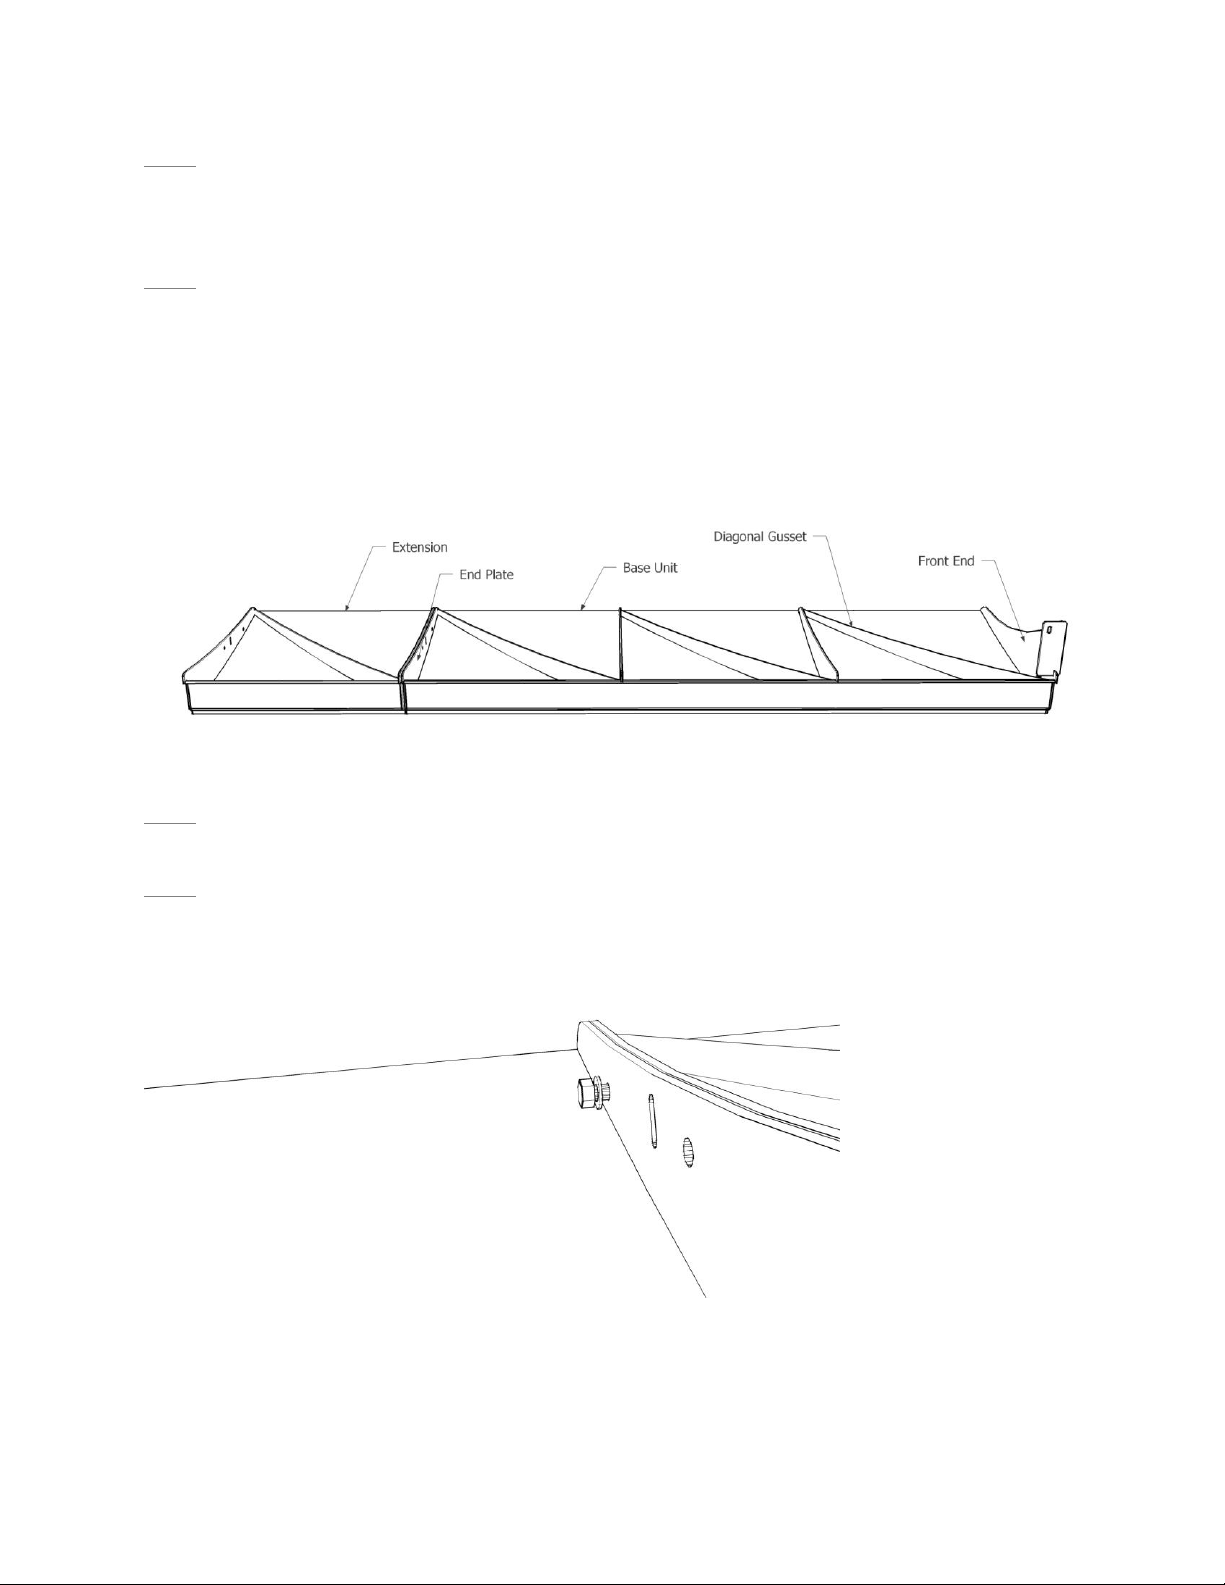
Step 2
With your Bedfin base-unit uninstalled from your truck and the message-board-end-gate removed (see Operations
Guide), lay both the driver side base-unit and the driver side extension end to end. (Fig 19.1) The extension should
be at the rear (Opposite of front end) of the base-unit so the two identical end plates are in contact with one
another.
- - - - - - IMPORTANT NOTE - - - - - -
The driver side and passenger side extensions are not interchangeable. Refer to figure 19.1 and verify diagonal
gussets are all aligned in the same orientation.
Step 3
Place a washer on one of the bolts provided.
Step 4
With the base unit and extension aligned, feed the bolt through any one of the round holes in the end plates
connecting the extension to the base-unit (Fig 19.2).
Bedfin LLC User’s Guide revision A20130623.1. Call Bedfin LLC at (253)882-4112 for assistance.
This guide is provided based on typical installation and requirements for vehicles which Bedfin signage was designed. Every vehicle is different
in design and condition and strict attention to the vehicle limitations must be recognized and evaluated by installer and user. Bedfin accepts no
liability for units improperly installed and operated or any units installed on vehicles which Bedfin signage is not suitable. Product support may
be provided from Bedfin LLC by phone or in other mediums without obligating Bedfin LLC to any liability for damage, injury, or death.
Comprehensive and regular inspection of Bedfin signage is the responsibility of user to ensure safe operation.
Page20
FIGURE 20.1
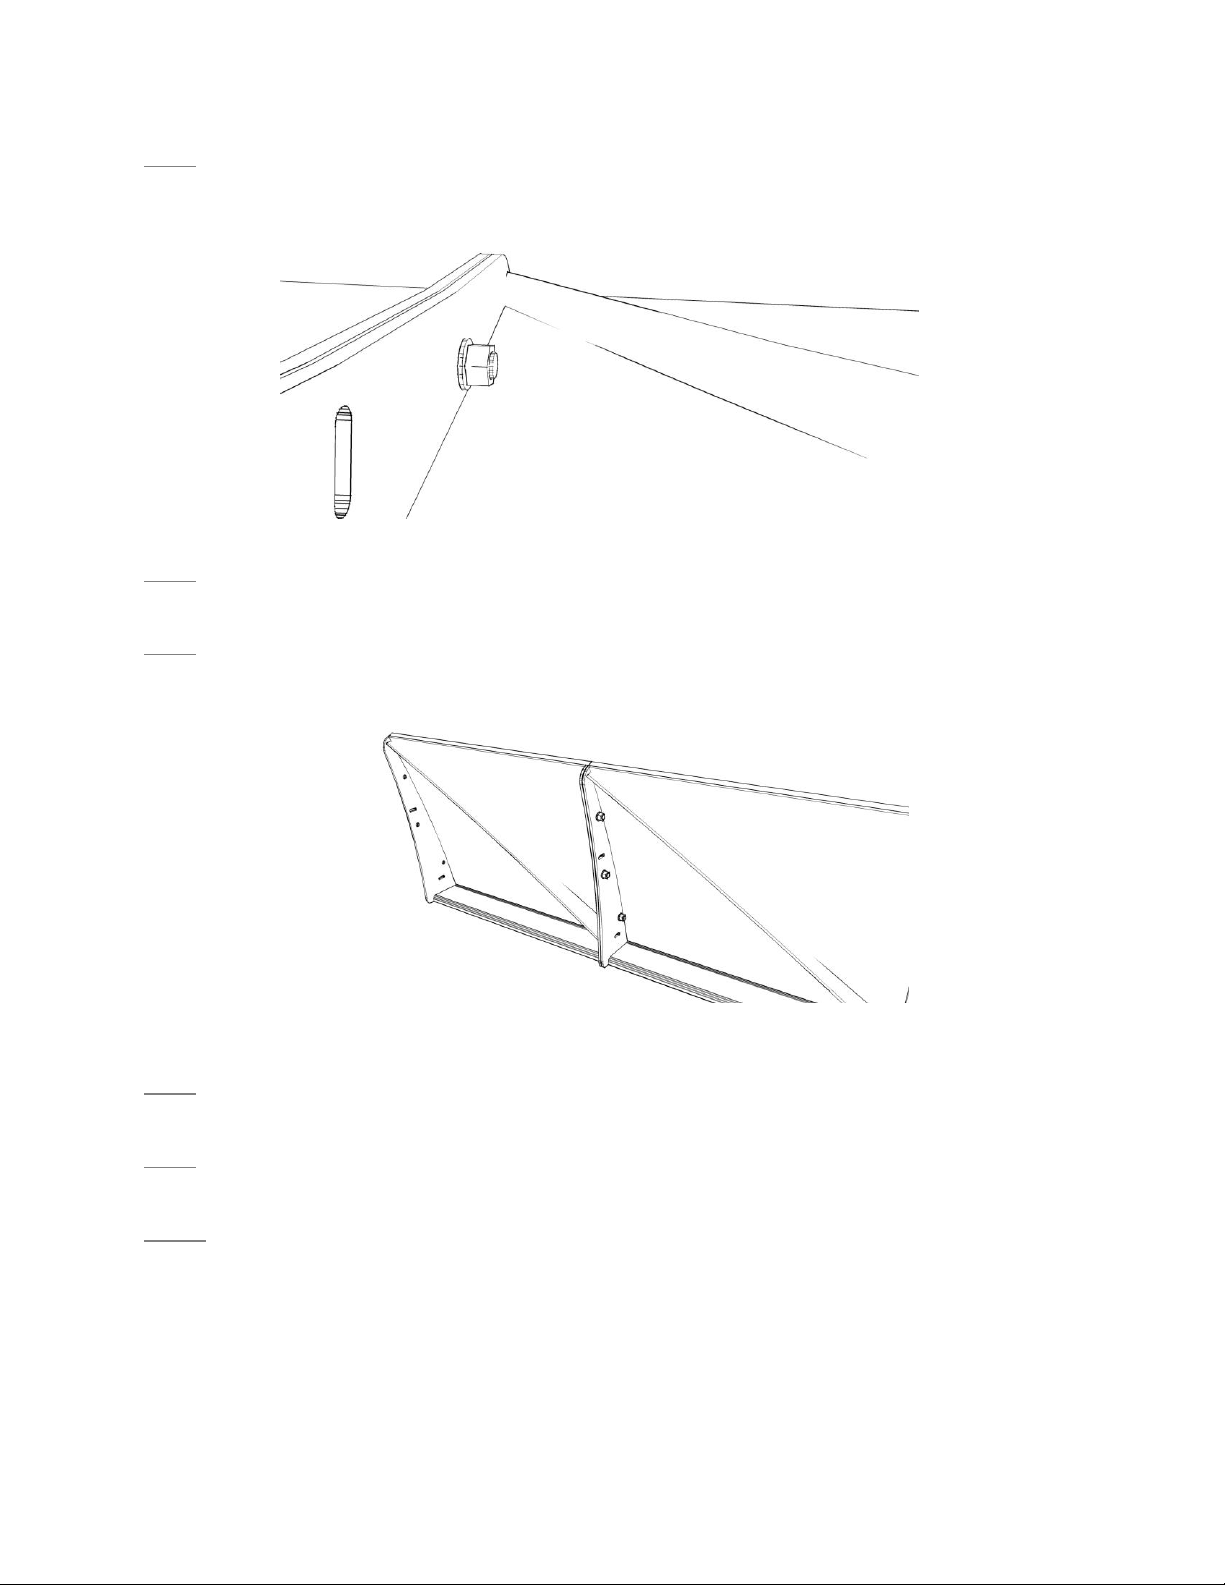
Step 5
While holding the bolt in place, place a washer on the end and then loosely attach a nut (Fig 20.1). Finger-tighten
only.
Step 6
Follow steps 3-5 for the two remaining round holes.
Step 7
While ensuring the base-unit and extension are perfectly aligned at the top and the bottom, loosely tighten the
nuts on each bolt using a wrench at the bolt head and a wrench on the nut (Fig 20.2).
Step 8
Repeat step 7 using more force to fully tighten each nut.
Step 9
Repeat steps 2-8 for passenger side extension.
Step 10
Follow the installation instructions as described for BFX72 to mount the extended unit on your truck.
- - - - - - IMPORTANT NOTE - - - - - -
When placing the three standard clamps as described in step 7 of the BFX72 installation guide, place the clamp
provided with your extension as close to the rear as you can without impeding the use of the hand knobs which
release the message-board-end-gate. Follow the tightening instructions per the BFX72 installation guide.
FIGURE 20.2
This manual suits for next models
1
Table of contents
Other BedFin Automobile Accessories manuals

Popular Automobile Accessories manuals by other brands


Adaptivlite
Adaptivlite ADVL-AU3 FITTING & USER GUIDE

Toyota
Toyota TOYOTA COMPUTER-CONTROLLED SYSTEM Training manual

Dakota Digital
Dakota Digital VHX-63F-GAL Instrument Installation

Whelen Engineering Company
Whelen Engineering Company M6 Series installation guide

Kuda
Kuda 291160 Installation instruction

Dräger
Dräger Interlock 7000 quick start guide