manuals.online logo
Brands
  1. Home
  2. •
  3. Brands
  4. •
  5. Befaco
  6. •
  7. Control Unit
  8. •
  9. Befaco KICKALL User manual

Befaco KICKALL User manual

K I C K A L L
U S E R A N U A L
K I C K A L L P O W E R & I N T R O
P O W E R I N G T H E
O D U L E
U S E R A N U A L
T H A N K S F O R P U R C H A S I N G A O D U L E F R O B E FA C O !
B E F O R E Y O U P L U G T H I S O D U L E I N . . .
1.
Disconnect our cabinet from the mains.
2.
Triple check the power cord polarit .
The coloured line on the cable
(pin number one) is the -12V rail.
3. If you plug the module backwards you might burn it out and
unfortunately this is not covered by the warranty.
4. If you have any questions about this product please send them to:
befacosynth@gmail.com
I N T R O D U C T I O N K I C K A L L
Kickall is an analog bassdrum module capable of generate a vast palette of kick sounds as well as others like
percussions or basslines. The module can also track with precise V/Oct scalling via its Tune input allowing you
to fit your kicks in the mix perfectly.
O D U L E
R E F E R E N C E PA N E L O V E R V I E W
1.
Volume Input
Voltage Control Input of the internal
VCA. Range: 0-10V.
2.
Trigg Input
This input trigs the internal VCA
Envelope. Input thresold: 3,5V
3.
Out
ain Output of the module.
4.
Tune
This knob controls the tune of the
sound around the first two octaves.
5.
Trigg Button
anual trigger for the internal VCA
envelope.
6.
Shape
This control morphs the signal
waveform from sine to square
.1
7.
Time
anual control for the Pitch Envelope
decay time
8.
Bend
This knob acts as attenuator for the
Pitch Envelope.
9.
Decay
anual control for the VCA Envelope
decay time.
10.
Tune Input
Voltage Control Input for Oscillator
tune. It tracks on V/Oct standard up
to ten octaves.
11.
Shape Input
Voltage Control Input of Shape
parameter. Range: 0-1 0V.
12.
Decay Input
Voltage Control Input of Decay
parameter. Range: +/-10V.
K I C K A L L B L O C K D I A G R A
O D U L E
R E F E R E N C E
U S E R A N U A L
K I C K A L L S I G N A L P A T H E X P L A N A T I O N
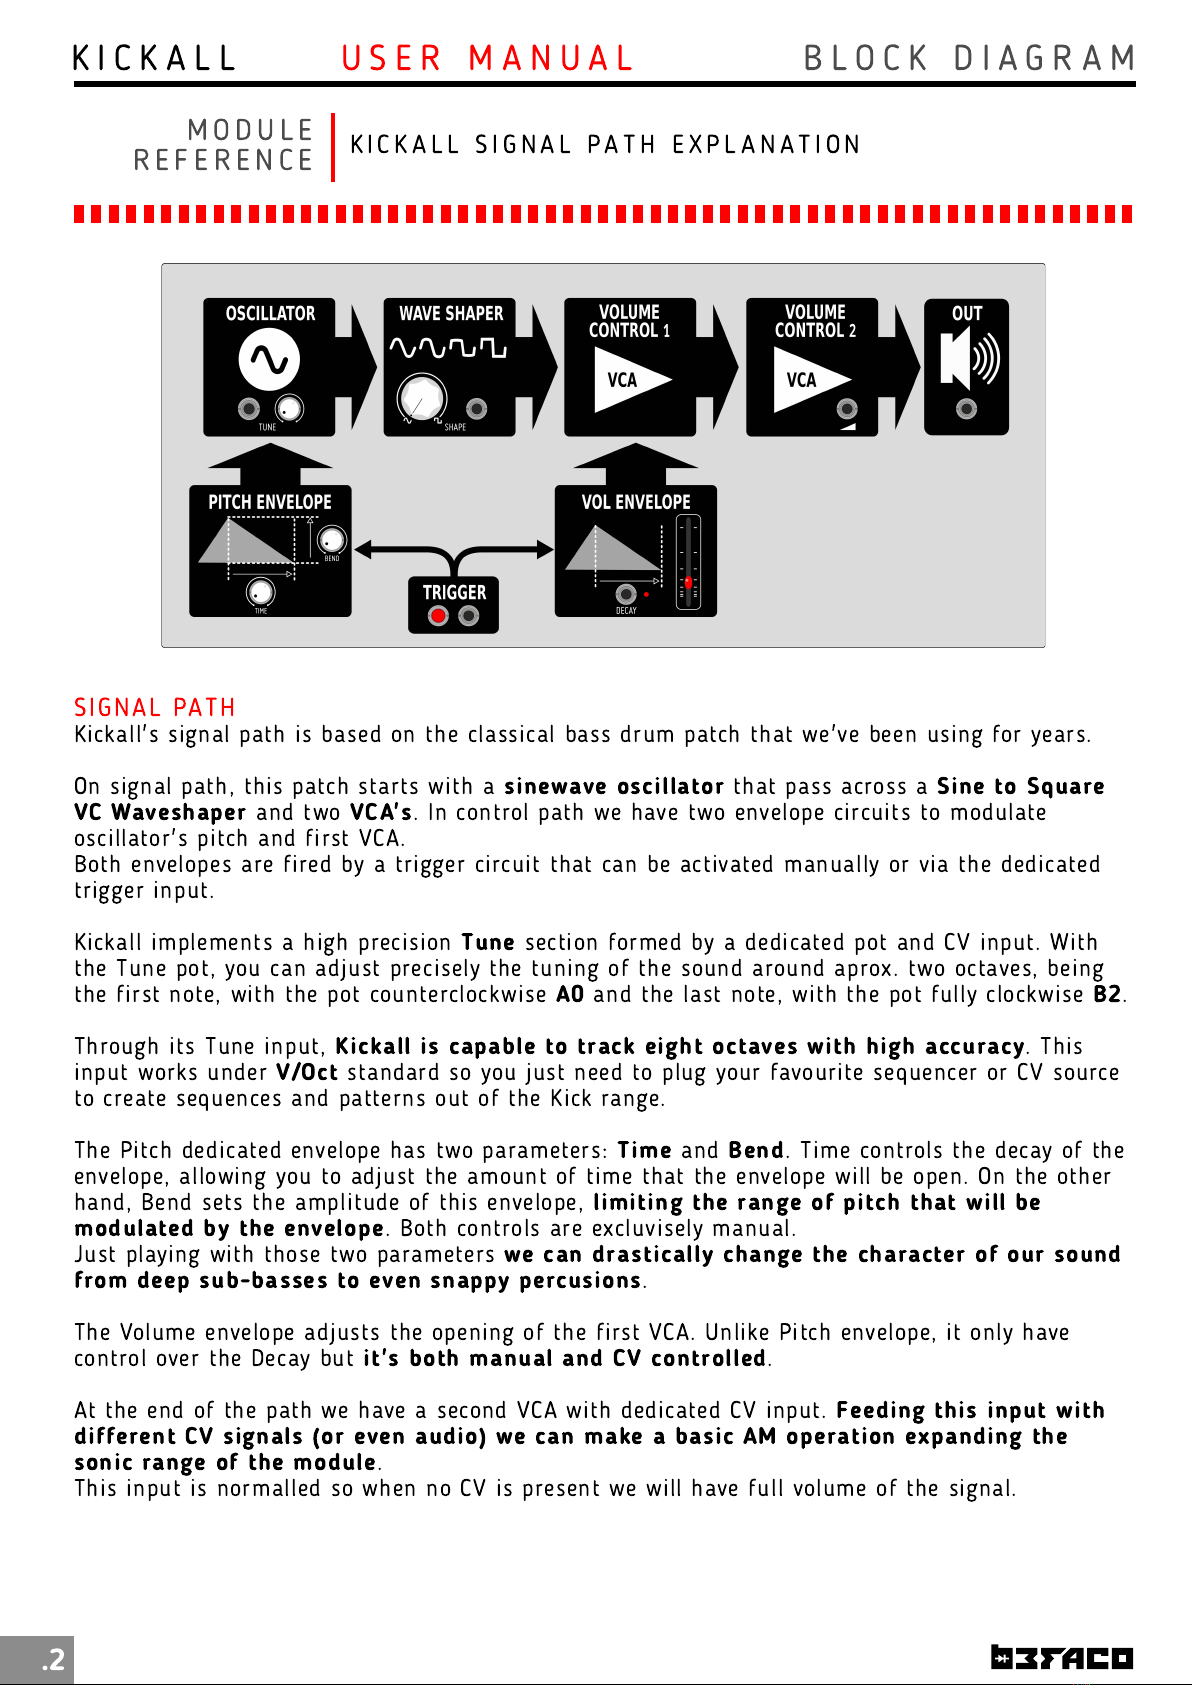
SI G N AL PATH
Kickall's signal path is based on the classical bass drum patch that we've been using for years.
On signal path, this patch starts with a
sinewave oscillator
that pass across a
ine to quare
VC Waveshaper
and two
VCA's
. In control path we have two envelope circuits to modulate
oscillator's pitch and first VCA.
Both envelopes are fired by a trigger circuit that can be activated manually or via the dedicated
trigger input.
Kickall implements a high precision
Tune
section formed by a dedicated pot and CV input. With
the Tune pot, you can adjust precisely the tuning of the sound around aprox. two octaves, being
the first note, with the pot counterclockwise
A0
and the last note, with the pot fully clockwise
B2
.
Through its Tune input,
Kickall is capable to track eight octaves with high accuracy
. This
input works under
V/Oct
standard so you just need to plug your favourite sequencer or CV source
to create sequences and patterns out of the Kick range.
The Pitch dedicated envelope has two parameters:
Time
and
Bend
. Time controls the decay of the
envelope, allowing you to adjust the amount of time that the envelope will be open. On the other
hand, Bend sets the amplitude of this envelope,
limiting the range of pitch that will be
modulated by the envelope
. Both controls are excluvisely manual.
Just playing with those two parameters
we can drastically change the character of our sound
from deep sub-basses to even snappy percusions
.
The Volume envelope adjusts the opening of the first VCA. Unlike Pitch envelope, it only have
control over the Decay but
it's both manual and CV controlled
.
At the end of the path we have a second VCA with dedicated CV input.
Feeding this input with
different CV signals (or even audio) we can make a basic AM operation expanding the
sonic range of the module
.
This input is normalled so when no CV is present we will have full volume of the signal.
.2
O D U L O I S C E L A N E AU S E R A N U A L
.3
A factory assembled module is shipped tuned to 1 V/oct. However, sometimes you may want to
make your own calibration.
The tuning procedure is an iteration of successive approximations. We will try in each iteration to
get closer to a perfect tune. Just follow the next steps and your Kickall will be ready to go in a
few minutes.
1 -
Turn the knobs to the following position:
TUNE:
Center
BEND
and
TIME:
inimum (counterclockwise)
DECAY:
aximum (slider upper position)
HAPE:
aximum (fully clockwise)
2 -
Feed the
TRIG
input with a
very fast trigger
signal (a square signal from an oscillator can
work too)
3 -
Plug a
V/Oct signal from a well calibrated CV source
like a sequencer or a keyboard into
the
TUNE
input and connect the
OUT of the module to a tuner
.
Note: if you don't have a hardware tuner you can connect the module to your audio interface and
use a software tuner as well.
4 -
Send a voltage of
0V from your CV source
and check the tuner, adjuts the
TUNE
knob till
your tuner shows
C1
note. Be patience on this step, on the low frequency range is a bit harder to
be precise.
5 -
Send a voltage of
4V from your CV source
and check the tuner, adjuts the
ZZZ
trimmer
located on the upper part of the module (the little blue one) with a small flat screw driver till
your tuner shows you a
C5
note.
6 -
Now send again a
0V
voltage and check the tuner.
You will notice that it is not showing
you the C1 note that we adjust before but we are closer than the first time. Let's repeat
steps 4 and 5 till we get C1 and C5 in both.
Once this is done, send other notes from the CV source and check the tuner, to make sure the
whole range is tracking. If not, repeat steps 4 and 5 again till you get it.
O D U L E
R E F E R E N C E C A LI B R A T I O N P R O C E D U R E
I S C E L A N E A S P E C S & C R E D I T S
* ize
: 6HP
* Depth
: 20mm
* +1 2v:
30mA
* -1 2v:
30mA
* Design
: Jaume Olivé & Befaco

Other Befaco Control Unit manuals

Befaco Chopping Kinky User manual

Befaco

Befaco Chopping Kinky User manual

Befaco PERCALL V1 User manual

Befaco

Befaco PERCALL V1 User manual

Befaco Quad-T User manual

Befaco

Befaco Quad-T User manual

Befaco Rebel Technology AC/DC User manual

Befaco

Befaco Rebel Technology AC/DC User manual

Befaco LICH User manual

Befaco

Befaco LICH User manual

Befaco A*B+C User manual

Befaco

Befaco A*B+C User manual

Befaco Trolley Bus V1 User manual

Befaco

Befaco Trolley Bus V1 User manual

Befaco 1U OUT User manual

Befaco

Befaco 1U OUT User manual

Popular Control Unit manuals by other brands

ABB Relion REM615 manual

ABB

ABB Relion REM615 manual

Motorline professional MC61BR installer and user manual

Motorline professional

Motorline professional MC61BR installer and user manual

GSD DCT2RM2501 quick start guide

GSD

GSD DCT2RM2501 quick start guide

EZ FLO Fertilize Responsibly CBV Series Installation and operating guide

EZ FLO

EZ FLO Fertilize Responsibly CBV Series Installation and operating guide

Schrack Technik HSEMRJ6GWS instruction sheet

Schrack Technik

Schrack Technik HSEMRJ6GWS instruction sheet

Hitachi PSC-5S Installation and operation manual

Hitachi

Hitachi PSC-5S Installation and operation manual

A.R.I. D-060M1 Installation operation & maintenance

A.R.I.

A.R.I. D-060M1 Installation operation & maintenance

CRU Wiebetech Wiebetech Ditto Expansion Module quick start guide

CRU

CRU Wiebetech Wiebetech Ditto Expansion Module quick start guide

ORTEA NEXT ICAR COM 485 instructions

ORTEA NEXT

ORTEA NEXT ICAR COM 485 instructions

IFM CompactLine AC2485 operating instructions

IFM

IFM CompactLine AC2485 operating instructions

Endress+Hauser Prosonic S FMU90 operating instructions

Endress+Hauser

Endress+Hauser Prosonic S FMU90 operating instructions

Danfoss TCBE installation guide

Danfoss

Danfoss TCBE installation guide

Eaton i-on30R installation instructions

Eaton

Eaton i-on30R installation instructions

pizzato CS MF201M0-P1 quick start guide

pizzato

pizzato CS MF201M0-P1 quick start guide

Coleman REVOLUTION REVFRGL Assembly manual

Coleman

Coleman REVOLUTION REVFRGL Assembly manual

pumpa PPC 22 Translation of the original instruction manual

pumpa

pumpa PPC 22 Translation of the original instruction manual

oventrop Cocon QTZ technical information

oventrop

oventrop Cocon QTZ technical information

Littfinski Daten Technik RM-88-N-O-B Assembly instruction

Littfinski Daten Technik

Littfinski Daten Technik RM-88-N-O-B Assembly instruction

manuals.online logo
manuals.online logoBrands
  • About & Mission
  • Contact us
  • Privacy Policy
  • Terms and Conditions

Copyright 2025 Manuals.Online. All Rights Reserved.