Beflye BFL100 User manual

Group I II III
Baby safety car seat

NOTICE
1) This is a “universal” child restraint. It is approved
to Regulation No. 44, 04 series of amendments,
for general use in vehicles and it will fit most,
but not all,car seats.
2) A correct fit is likely if the vehicle manufacturer has
declared in the vehicle handbook that the vehicle is
capable of accepting a “Universal” child restraint
for this age group.
3)This child restraint has been classified as
“Universal” under more stringent conditions than
those which applied to earlier designs which do
not carry this notice.
4) If in doubt, consult either the child restraint
manufacturer or the retailer.
Only suitable use in the listed vehicles fitted
with lap /3 point/static /with retractor safety-belts,
approved to ECE Regulation No.16 or other
equivalent standards.
Page 1 of 11

1. Warning....................................................................,.. 3
2. Structural of child seat................................................. 4
3. Installation location and adjustment of child seat…….5-7
4. Installation methods of child seat..................................8-10
5. Installation and Remove the backrest........................... 10
7. Daily Care and Maintenance..........................................11
8. Warranty...................................................................... ...11
Directory
Page 2 of 11
6. Removing and fitting of seat cover ........................... ... 11

Warning
1. The instruction can be kept in the reserved place of the child seat within
the usage period.
2. Do not use this child seat in home. It isn't designed for home use and
should only be used in your car.
3. Be sure that children are not left in their child restraint system unattended.
4. The child restraint system should be changed when it has been subject
to violent stresses in an accident.
5. Any straps holding the restraint to the vehicle should be tight; Restraining
the child should be adjusted to the child's body, and should not be twisted.
6. Any lap strap should be worn low down, so that the pelvis is firmly
engaged, shall be stressed.
7. Be sure any luggage or other objects liable to cause injuries in the event
of a collision shall be properly secured.
8. The rigid items and plastic parts of a child restraint shall be so located
and installed that they are not liable, during everyday use of the vehicle,
to become trapped by a movable seat or in a door of the vehicle.
9. It is danger to make any alterations or additions to the device without
the approval of the Type Approval Authority, and it is also danger not
following closely the installation instructions.
10. It is extremely dangerous to use any load bearing contact points other
than those described in the instructions and marked in the child restraint.
11. The child restraint shall not be used without the cover; The seat cover
should not be replaced with any other than the one recommended by the
manufacturer.
12. The child should be taken out from the car seat when it is being moved
or adjusted.(except adjusting the headrest)
13. Please do not buy a second hand safety car seat. Because you may
not know the using history of the child seat. It may have been in an
accident or lack some parts.
Page 3 of 11

hook
2.Structural of child seat
headrest
cushion
buckle
buckle
cushion
seat
cushion
seat base
harness adjuster strap
Adjuster
(under the cover)
seat belt
seat belt
pad
backrest
Page 4 of 11

3.2 Correct height of shoulder straps
too low correct
too high
Always check that the shoulder straps are at the correct height for your
child. The child's shoulder should always be below the slot for the
harness straps. (The right fitting is descripted in the picture above.)
right fitting wrong fitting
3.Installation location and adjustment of child seat
3.1 Right fitting position in car
This child seat can be used in the
seat with three point safety belt
which fulfills the requirements of
ECE R16; it can't be used in the
seat with two point safety belt.
The child seat should be used
in the second row of forward
facing seat.
Page 5 of 11

3.5 Loosen the harness restraint
Find the right position of harness strap
adjuster. (See position 1 as showed in
the left picture)
Keep pressing down the harness straps
adjuster by one hand, meanwhile grip
two shoulder straps and pull them
towards you by the other hand.
With the operation mentioned above,
you can loosen the harness restraint
and adjust as you required.
1
1.Put both side of together.the buckle clip
2.Put the metal plates into the button as the picture shows. when hear
a click, it shows it fits well. pull the metal to check whether the buckle is
fitting correct.
3.If need to release the straps, press the red button, The clip will be released.
3.3 Operation of buckle
First step Second step Third step
3.4 Adjust the harness straps
Pull the adjustment straps until the harness
straps are totally tight.
The shoulder restraint shall be adjusted as
tightly as possible without causing
discomfort to your child. Check whether
the straps are adjusted tightly enough and
not twisted when the child is placed in the
seat. Be sure the distance between the
shoulder straps and shoulder is less than 1
cm.The lab strap shall be worn low down,
so that the pelvis is firmly engaged.
The loose straps are very dangerous for
the child.
Page 6 of 11

Step 1: Firstly, open the buckle. Secondly, remove the buckle cushion
and seat cushion. Finally, take out the buckle from the slot under the
base of the child seat.
Step 2*: Find the right place for the metal hook connecting with harness strap.
Step 3*: Take one strap out from the metal hook, and pull it out from the slot.
Step 4: Repeat the same operation for the other strap, and take out the
straps from the slot under the base of child seat.If you want to reassemble
the harness straps, repeat the processed mentioned above in reverse.
Notice: Keep the harness with all parts in a safe place for future use.
123
3.6 Tighten the harness restraint
Step 1: Pull out the metal clip in the backside slot, turn it to line with
the strap, then pull the strap out from front side; then re-place the
strap through the proper slot.
Step 2: Repeat the same process for the other strap.
Step 3: Place both of the metal clips into the backside slot; make sure
both of the straps are at the same height.
3.7 Removing harness straps and buckle
Page 7 of 11

4. Installation methods of child seat
4.1 Group I (9-18KGS), installed with three point safety belt
Installation of child seat:
Step 1: Before install the child seat on
the car, firstly let the child sit on the
child seat, adjust child seat to the
correct status following the operations
of 3.2 and 3.6 .
Step 2: Put the child seat on the car seat.
Draw out the car seat belts, make the
diagonal seat belt go through the up
guide of the child seat, the lap belt go
through the guide under the armrest
of the child seat.
Step 3: Put the diagonal belt and lap
belt together through the guide slot of
the car seat, from one side to another
side. Then put the diagonal belt through
the up of the armrest, put the lap belt
through under the armrest, then buckle it.
Please notice, do not make the belts
twisted in the door of the car or other
parts of the car.
Step 4: Open the harness system, let the
child sit in the child seat, then wear the
harness belts, fasten the buckle.
Step 5: Tighten the harness restraint
following operation of 3.4.
Notice: Child seat for group I shall be used with headrest and seat cushion.
If you want to release the child seat:
Step 1: Loosen the harness restraint following operation of 3.5.
Step 2: Open the buckle and take your child out of child seat.
Step 3: Open the car seat buckle, take off the car safety belts.
Page 8 of 11
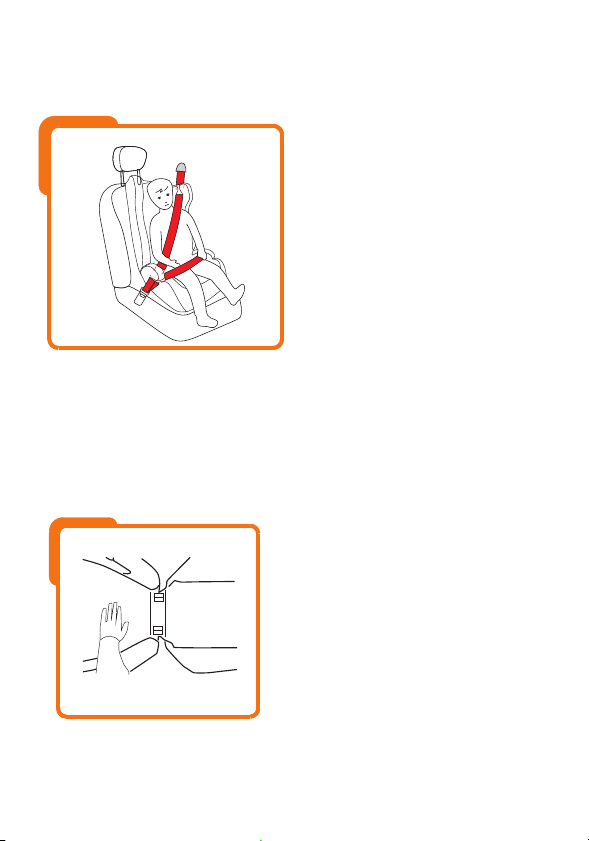
4.2 Group II (15-25KGS), installed with three point safety belt
Step 1: Remove the harness straps and
buckle following the operation of 3.7.
Step 2: Take off the headrest cushion
and seat cushion.
Step 3: Place the child seat on car seat,
and make sure that the backrest of child
seat should be firmly pressed against
car seat.
Step 4: Place your child in the child seat.
Step 5: Place the diagonal belt through
the guide hook on the backrest, and then
place the lap belt through the two guide
hooks under arm rest of child seat.
Step 6: Fasten the buckle of car seat until you hear a clear “Click”. Check
whether the buckle is locked safely by pulling the shoulder straps upwards.
Step 7: Tighten the vehicle seat belt by pulling on the diagonal section,
and remove the slack of seat belt to the retractor.
4.3 Group III (22-36KGS), installed with three point safety belt
Spin the backrest 180º to separate the
seat base and the backrest.
The seat base can be installed independently
in the car.
4.3.1 Remove the backrest
Page 9 of 11

Be sure the distance between main loading
point and Cr point must be more than 150 mm.
Please contact the child restraint
manufacturer if in doubt about this point.
4.4 Main loading point
Main loading point
150
Сr
4.3.2 Installation of child seat:
Spin the backrest 180º to separate the seat base
and the backrest. The seat base can be installed
independently in the car.
Remove the backrest
Make the two connector into the two base holes,
then make it stand upright.
Installation the backrest
5. Installation and Remove the backrest
Step 1: Remove the harness straps and
buckle following the operation of 3.7.
Step 2: Take off the headrest cushion and
seat cushion.
Step 3: Remove the backrest following the
operation of 4.3.1.
Step 4: Place your child in the child seat.
Step 5: Place the diagonal belt through
your child's chest, and then place the lap
belt through the two guide hooks under
arm rest of child seat.
Step 6: Fasten the buckle of car seat until
you hear a clear “Click”. Check whether the
buckle is locked safely by pulling the
shoulder straps upwards.
Page 10 of 11
8. Warranty
1. The warranty period starts from the date of purchase and is valid
for a period of 12 months.
2. The manufacturer is not liable for any damages other than those on
products supplied.
3. The following conditions are the warranty exceptions:
3.1. The device is not used in accordance with the instruction manual.
3.2. Users make alterations or demolition.
3.3. Use after accident.
3.4. Damage due to unexpected disasters, such as fire, floods, etc..
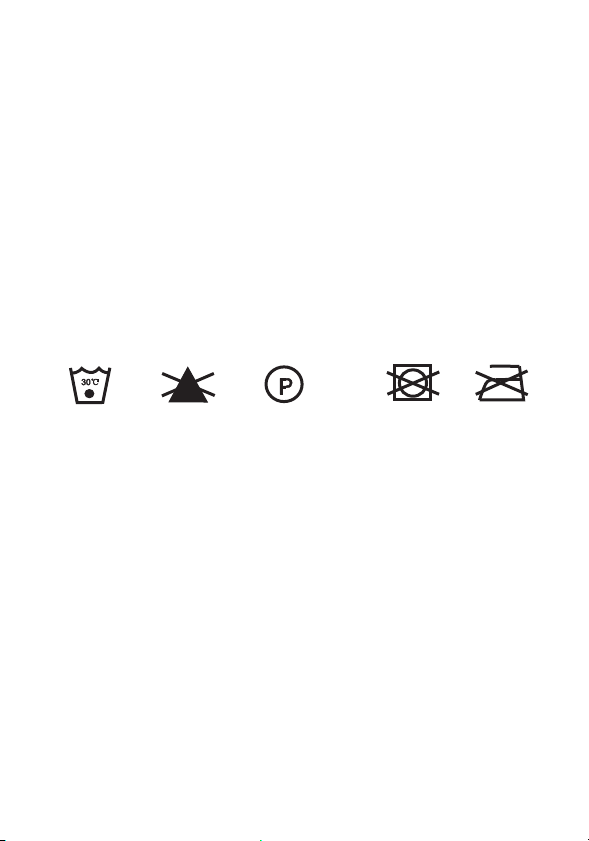
Hand washing ,
below 30
degrees
Do not
iron
do not
bleach
dry clean any
solvent except
trichloroethylene
Do not
tumble dry
7. Daily Care and Maintenance
1. In the daily using, you need to check the wear and tear situation of
the child seat.
2. The child seat should be kept in a dry, ventilated and cool place when
it is not used.
3. If the child seat is dirty, you can use the wet sponge to clean the
Y-shaped straps, buckle or cover.
4. Washing instructions are listed as below:
6. Removing and fitting of seat cover
1. Open the buckle of child seat.
2. Remove harness straps and buckle following operation of 3.11.
3. Take off the headrest cushion and seat cushion.
4. Open the buttons on the backrest, and then take off the cover.
Page 11 of 11
Table of contents
Other Beflye Car Seat manuals


