Nuna Pipa User manual

instruction manual
manual de instrucciones
car seat

2
Thanks for
choosing Nuna!
Nuna designs distinctive, smart and exciting
products.
Enjoy your Infant Car Seat

3
Contents
Information 1
Warnings 2
Parts list 7
Feature overview 9
Child requirements 11
Changing harness position 12
Securing child in carrier 14
Installation instructions 16
Cleaning and maintenance 27
Warranty and service 28
Where to find Nuna products 29
31
English (EN)
Spanish (ES)

1
Information
Model Number:
Manufactured in:
Manufactured Date:
Register Your Infant Restraint
Please fill in the above information. The model number and
the manufactured in (date) can be found on a label underneath
your infant restraint. Fill out the prepaid registration postcard
attached to the seat cover and mail it today.
Child restraints could be recalled for safety reasons. You must
register this restraint to be reached in a recall. Send your name,
address, and the restraint's model number and manufacturing
date to:
Nuna Baby Essentials Inc
70 Thousand Oaks Blvd
Morgantown, PA, 19543
or call 1-855-NUNA-USA (1-855-686-2872)
or register online at: nuna.eu/USA/product-registration-car-seat
Recall Information
• For recall information, call the U.S. Government’s
Vehicle Safety Hotline at
1-888-327-4236 (TTY: 1-800-424-9153)
or go to http://www.NHTSA.gov
• Nuna: 1-855-NUNA-USA or nuna.eu/USA
If You Need Help
In the U.S.A. , please contact our Customer Service Department
with any questions you may have concerning parts, use, or
maintenance. When you contact us, please have your product’s
model and serial numbers ready so that we may help you
efficiently. These numbers can be found on a sticker on the
underside of your infant restraint.
• USA: 1-855-NUNA-USA or nuna.eu/USA

2
Warnings
Read all instructions before use of the infant
carrier.
Keep instructions for future use.
Read instruction manual for child restraint
before installing. In addition, read the
vehicle owner's manual for information on
child restraint installation.
Do not allow anyone who has not read the
instruction manual to install or use this
child restraint.
Child requirements:
1 Weight: 4 to 32 lbs (2 to 14.5 kg).
2 Height: less than 32 inches ( 81 cm).
3 Top of child´s head
is at least 1” below
top of carrier.
4 Use infant insert only
if it is necessary to
achieve a snug fit.
This child restraint can ONLY be used in a
rear facing position when using in a vehicle.
According to accident statistics, children
are safer when properly restrained in rear
vehicle seating positions, rather than in the
front of the vehicle.
Never leave child unattended.
1in
25mm

3
Never leave child restraint and base or
other item unbelted
or unsecured in your
vehicle. Any unsecured
item when in motion
can harm
occupants.
Always check carrier
to base connection.
DO NOT allow carrier or handle to contact
interior of vehicle when installed on base.
Always check buckle and other parts for
hot surfaces. A carrier left uncovered in the
sun could burn a child. Cover with blanket if
leaving in car.
Never install Child
restraint in a seat with
a front airbag. DEATH
or SERIOUS INJURY may
occur. Refer to your
vehicle owner’s manual
or side airbag warnings
and information.
Do not use child restraint if any harness
straps are cut, frayed or damaged.
Do not use child restraint if base or
carrier are damaged in anyway. To find
out if damaged parts are replaceable, call
1-855-NUNA-USA.
Replace this child restraint if it has been
involved in a car accident, even if it was
minor and there appears to be no damage
to the child restraint.
CLICK
1
2
CHECK

4
Never modify any part of the child restraint.
Only disassemble child restraint if instructed
to by instruction manual.
Do not use any products or accessories
in conjunction with child restraint not
supplied with child restraint.
Do not use child restraint if it is more than
7 years old. Check the manufacturer´s label
or stamped ‘do not use after’ date on the
underside of the carrier and base.
NEVER use clothing or blankets that
interfere with providing a properly tightened
harness. An unsecured child can come
out of the restraint during a crash. Place
blankets over child AFTER harness has
been properly tightened.
Fall hazard: Child’s movement can slide
carrier. NEVER place carrier near edges of
countertops, tables or other high surfaces.
Always stay within arms reach whenever
carrier is not on floor/ground.
Suffocation hazard: Infant carrier can roll
over on soft surfaces and suffocate child.
Never place carrier on beds, sofas, or other
soft surfaces.
Strangulation hazard: Child can strangle in
loose restraint straps. Always use harness.
Never leave child in carrier when straps are
loose or undone.
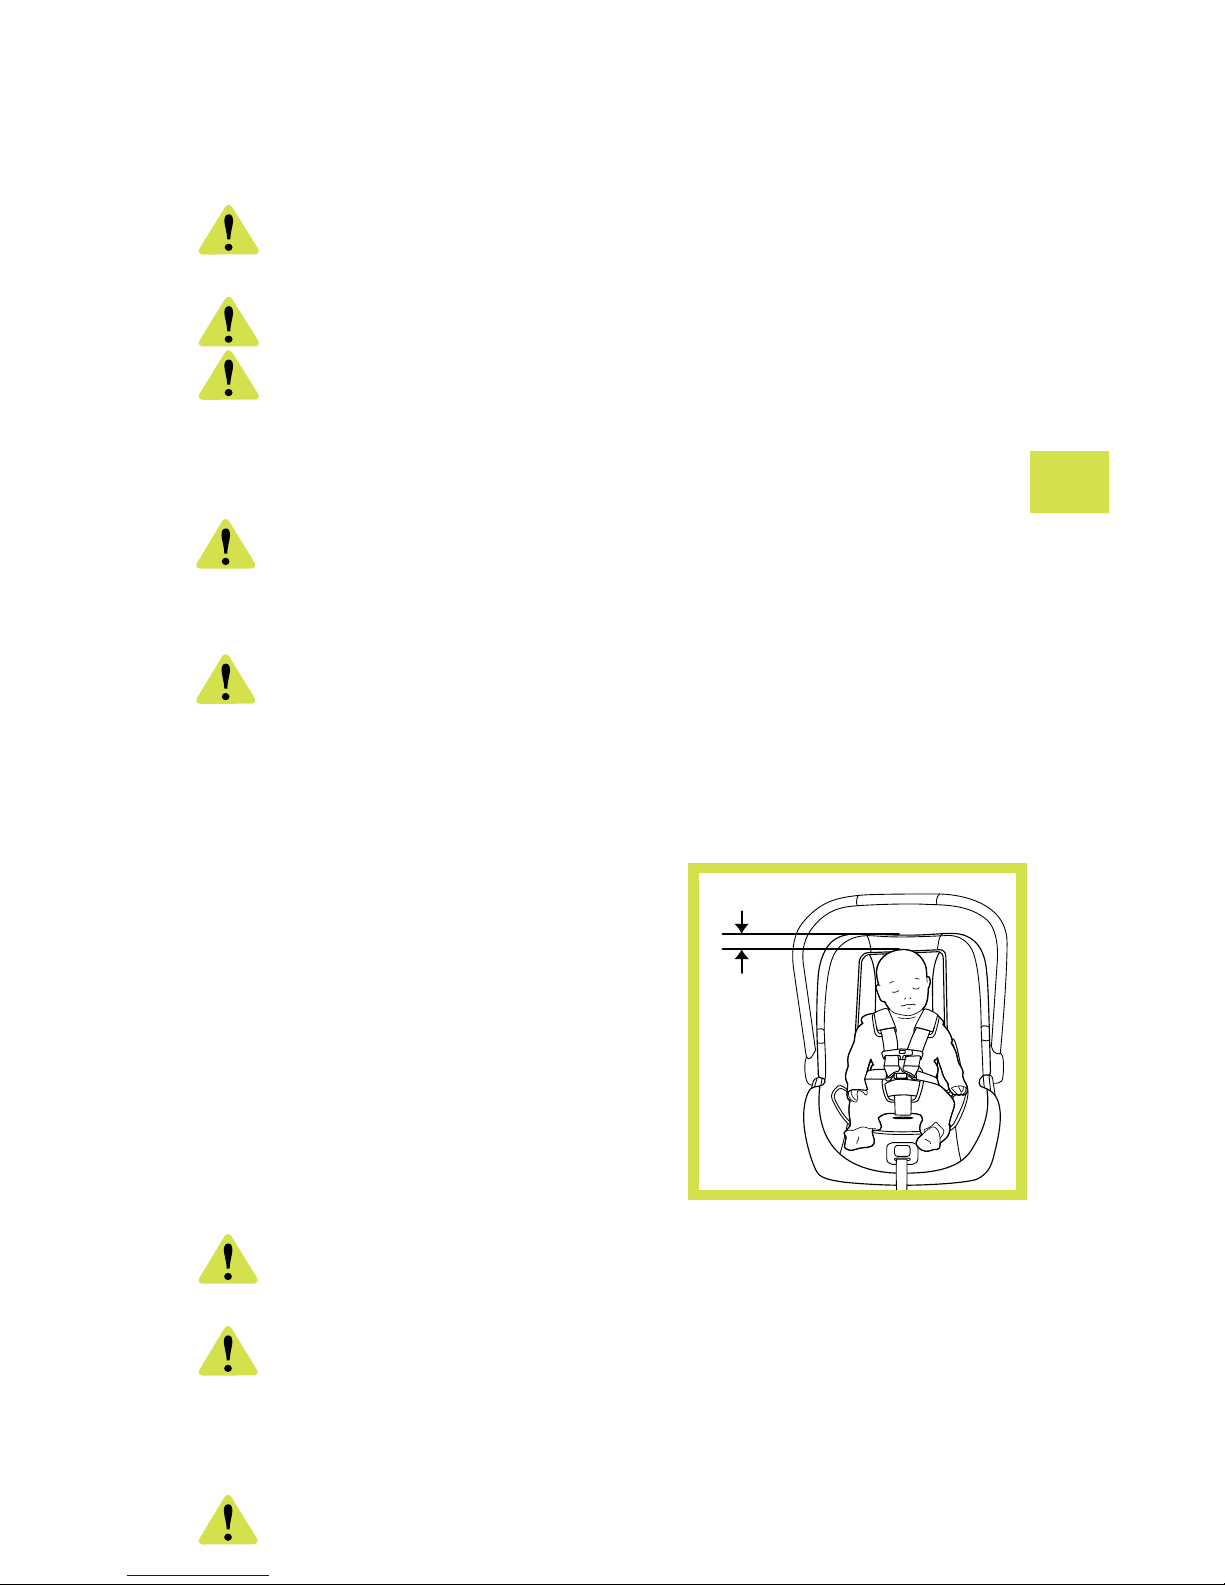
A snug strap should not allow any slack.
It lies in a relatively straight line without
sagging. It does not press on the child's
flesh or push the child's body into an
unnatural position.

5
Never place carrier on top of a shopping
cart. Carrier will not be properly secured
and could fall.
Do not use carrier if it is damaged or
broken.
Only use with Nuna strollers or appropriate
Nuna adapters designed for use with other
strollers.
This child seat can be properly installed in
most vehicles. However, there are some
vehicle belts and vehicle seats that are not
safe for use with this restraint.
Some vehicle belt issues:
1 Motorized / Automatic shoulder belts.
These should not be used unless the
shoulder belt can be removed, the lap belt
is locked and use is allowed by the vehicle
manufacturer.
2 Lap / Shoulder belt both with retractors.
If allowed by the manufacturer, the lap
belt only may be used to secure the child
restraint in accordance with this manual
and the vehicle's manual.
3 Lap Belt only with emergency locking
retractor (ELR). This belt locks in a crash or
sudden stop and should only be used with
a belt shortening clip. Contact your vehicle
manufacturer if needed.6
4 Door mounted lap or shoulder belts can
not be used to install this child restraint.
5 Lap belt forward of the seat bight (Where
the seat bottom and back meet) should not
be used to install this child restraint.

6
Only install child restraint in a forward fac-
ing vehicle seat. Never install in a seat that
faces the rear or the side of the vehicle.
Refer to your vehicles
owner’s manual for
detailed information
about vehicle belts,
LATCH (lower anchors),
and preferred restraint
installation positions.
Do not use stability
leg to recline base.
1
4 5
2 3

7
12 13
14
15
16
17
18
4
3
58
2
11
1
9
10
7
6
1 Canopy
2 Infant Insert
3 Chest Clip
4 Buckle and Crotch Belt
5 Adjuster Button
6 Adjuster Strap
7 Lap Belt Guides (Blue)
8 Handle Button
9 Shoulder Pads
10 Seat Cover
11 Handle
12 Shoulder belt Guide (Blue)
13 Stroller Release Handle
*only used with infant car seat
adapters
14 Harness Slots
15 Base Attachment Bar
16 Harness Straps
17 Splitter Plate
18 Base Attachment Bar

8
19 Lock off (Blue)
20 Rigid LATCH (lower
attachments)
21 Rigid LATCH Guides
22 Stability Leg
23 Stability Leg Indicator
24 Stability Leg Adjust
Button
25 Carrier Release Button
26 Bubble
27 Instruction Manual
Storage
28 Stability Leg Storage
29 Recline Adjustment
30 Locking Clip
19
20
21
22
26
25
24
23
27
28
29
30

9
Feature overview
Dream Drape™
1 Unzip the zipper behind
the front canopy bow.
2 Pull the dream drape out of
the compartment.
3 Attach the magnets on each corner to the
corner to the front of the
car seat.
Canopy removal
•To remove the canopy, press the
button in the canopy mount and
pull the canopy bow out.
Seat pad removal
1 Pull the fastening pieces
underneath the edge of the seat
out.

10
2 Remove the harness from
the splitter plate.
3 Remove the seat pad from
the adjustment button as
shown.
4 Remove the seat pad from
the stroller release button
as shown.
* Feature used only with infant car seat
adapters. Infant car seat adapters for
strollers sold separately.
Shoulder pads
•Shoulder pads are removable
and are not necessary for safety.
Handle adjustment
•The carrier handle can be adjusted to 3 positions.

11
1 To adjust the handle position,
squeeze handle buttons on both
sides and rotate.
2 Rotate handle until it clicks
into any of the 3 positions. Handle
can be used in vehicle in any
locked position.
Be sure handle is locked in the carry
position before lifting carrier by handle.
An unlocked handle could move
unexpectedly, causing injury to child.
Handle MUST NOT contact the vehicle
interior when installed.
Child requirements
1 Weight: 4 to 32 lbs
(2 to 14.5 kg).
2 Height: less than 32 inches
( 81 cm).
3 Top of child’s head is at least 1”
below top of carrier.
Infant insert
•The infant insert can be used as
necessary to provide a snug fit
for smaller babies. The low birth
weight pillow can be used in the
infant insert for even smaller
babies, but should be removed
once unnecessary. The low birth
weight pillow should be removed
BEFORE the crotch belt is moved into another position.
1
2
front back
1in
25mm

12
Changing harness
position
Shoulder belts
1 With child placed in car seat, identify harness slots at
or below shoulder level.
2 With child removed, loosen harness. Turn carrier over and
remove one harness loop from metal splitter plate.
3 Pull loose end of harness loop out through slot and place in
correct slot. Re-attach to splitter plate.

13
Always place harness between seat and
attachment bars.
4 Repeat process for second
shoulder harness strap.
Crotch belts
5 Identify crotch belt slot that
will achieve a snug fit. Change
crotch belt slot if necessary.
1) Smaller babies use this position.
Crotch belt is threaded through
rear slot and up through front
slot as shown.
2) Medium sized babies use this
position. Crotch belt is
threaded into rear slot as
shown.

14
3) Larger babies use this
position. Crotch belt is
threaded through front slot
as shown.
Securing
child in carrier
1 Loosen harness by pressing
on adjuster button while pulling
on the harness straps.
2 Press button to release the
buckles. Separate chest clip
and spread harness straps
apart.
3 Place child in carrier in
seated position, resting the
child against both the back
and bottom of the seat.
1
2
2

15
4 Gently guide child’s arms
through harness loops. Insert
buckle tonges into buckle. Listen
for clicks. Pull on buckle to verify
it is latched.
5 Snap the chest clip together
and temporarily slide towards
buckle for tightening of harness.
6 Tighten harness by pulling on the adjuster strap. Pull any
excess harness webbing through the buckle towards the
child’s shoulder and pull on the adjuster strap. This may
need to be repeated several times for proper fit.
7 Verify that the harness is snug around the child’s waist and
shoulders.
8 Position the chest clip so it is
at child’s armpit level.

16
9 Check that child is secure
a) Buckle is fastened.
b) Harness straps are not twisted.
c) Harness is snug – A snug harness cannot be pinched,
and should not allow any slack.
d) Chest clip is level with armpits.
If harness slots are not AT or BELOW
shoulder height, child could be ejected in a
crash or sudden stop. If harness slots need
to be moved, see section changing harness
slot position. (Page 12)
Make sure that nothing interferes with the
harness. Make sure harness is snug around
child and lays flat. Serious injury or death could
occur to a child that is not secured properly.
If child is not secured properly, child could
be ejected in a sudden stop or crash,
resulting in serious injury or death.
Installation
instructions
Base install - Rigid LATCH
(Lower Attachments)
1 Place vehicle in park and on
level ground.

17
2 Position base in a forward
facing vehicle seat. Use recline
adjustment to position bubble
in indicator. Adjust base so
bubble touches line.
3 Use recline adjustment to achieve
correct angle for installation
4 Recline adjustment
locks into position.
To release press down
on lock button.
5 When installing with the base,
additional stability can be achieved
by using the stability leg. For
instructions on using the
stability leg when installing the base,
see stability leg section. (Page 22)
6 If necessary, install plastic
connector guides on vehicle LATCH
lower anchor bars.
7 Hook Rigid LATCH (lower attachments)
onto vehicle LATCH lower anchor bars.
Confirm proper installation by pulling
on the base AND also seeing that green
is indicated on the connectors.
Other manuals for Pipa
8
Table of contents
Languages:
Other Nuna Car Seat manuals
Popular Car Seat manuals by other brands

Graco
Graco Snugride32 - Quattro Tour Deluxe Travel... user guide

STM Storchenmuehle
STM Storchenmuehle Twin 0+ Assembly and usage instructions

Chicco
Chicco GRO-UP 123 manual

FAIR
FAIR Bimbo Fix XL Instructions for use

Britax
Britax TRIFIX i-SIZE User instructions

Safety 1st
Safety 1st APEX AP quick start guide