Beka Hospitec CARLO Alu Classic 185 User manual
CARLO Alu Classic 185 &
Comfort EP 185
Sling lift
Version 2.10 / E
Subject to technical modifications
2019-08-20
Operating manual
Original operating manual

BEKA Hospitec GmbH
Operating manual CARLO EP & Classic V2.10 E Page 2 of 56
Table of contents
1Imprint ................................................................................................................... 4
1.1 Acknowledgement ........................................................................................... 4
1.2 Manufacturer’s address ................................................................................... 4
1.3 TÜV quality seal .............................................................................................. 4
2Introduction............................................................................................................ 5
2.1 Preface ............................................................................................................ 5
2.2 Liability and warranty....................................................................................... 5
3The operating manual............................................................................................ 6
3.1 Validity............................................................................................................. 6
3.2 Type plate........................................................................................................ 6
3.3 Designation...................................................................................................... 6
3.4 Variants ........................................................................................................... 7
3.4.1 CARLO Alu Variants ................................................................................. 7
3.4.2 Spreader Bar Variants............................................................................... 7
4Safety .................................................................................................................... 8
4.1 Intended and appropriate use.......................................................................... 8
4.2 Other prescriptions .......................................................................................... 8
4.3 Safety instructions ........................................................................................... 8
4.4 List of used safety instructions......................................................................... 9
4.5 Warnings ........................................................................................................10
5Transport ..............................................................................................................12
5.1 Unpacking the product....................................................................................12
5.1.1 Removing the cardboard..........................................................................12
5.1.2 Loosening the product from the pallet......................................................12
6Installation ............................................................................................................13
6.1 Electrical connection.......................................................................................13
6.2 First start-up ...................................................................................................13
7Operating elements and their function..................................................................14
7.1 Classic Spreader Bar Version.........................................................................15
7.2 Handset ..........................................................................................................15
7.3 Explanation of the LED-indications on the Handset........................................16
7.4 Connections and Functions of the Control Unit ..............................................16
7.4.1 7.3.1 European Control Unit....................................................................16
7.4.2 Canadian Control Unit..............................................................................17
7.5 24V-Battery Unit .............................................................................................17
7.6 External Charging Unit/Wall Charging Unit.....................................................18
7.7 Manual Emergency Lowering System ............................................................19
7.8 Electrical emergency lowering........................................................................19
7.9 Emergency stop switch...................................................................................20
7.10 Motor Safety Measures ...............................................................................21

BEKA Hospitec GmbH
Operating manual CARLO EP & Classic V2.10 E Page 3 of 56
7.11 Impact and Jamming Protection (hoist motor).............................................21
8Operation..............................................................................................................21
8.1 Sling Operating Manual ..................................................................................21
8.1.1 Prior to Use ..............................................................................................21
8.1.2 During Use...............................................................................................22
8.1.3 After Use..................................................................................................26
8.2 Operation of the CARLO Alu ..........................................................................26
8.2.1 Explanation of the Functions of the Handset............................................26
8.2.2 Lifting a patient/resident...........................................................................28
8.2.3 Putting the patient/resident down.............................................................29
8.3 Digital scale SLS (option) ...............................................................................29
8.4 Maintenance and Care of the 24-Volt Battery.................................................30
9Cleaning/Disinfection............................................................................................30
9.1 Cleaning the lift...............................................................................................30
9.2 Disinfecting the lift ..........................................................................................31
9.3Sterilising the lift .............................................................................................31
10 Checks/tests ......................................................................................................31
10.1 Prior to each use .........................................................................................32
11 Waste disposal ..................................................................................................32
11.1 Disposal of the packaging material..............................................................32
11.2 Disposal of the product................................................................................32
12 Troubleshooting/After-sales service...................................................................33
12.1 Troubleshooting help...................................................................................33
13 Appendix............................................................................................................35
13.1 Technical data.............................................................................................35
13.2 Dimensions CARLO Alu Classic 185 / EP 185............................................37
13.3 Declaration of Conformity............................................................................38
13.4 Accessories of the Sling Hoists CARLO Alu Classic 185Kg........................39
13.5 Accessories CARLO Alu Comfort EP 185 ...................................................40
13.6 Spare parts / Consumables.........................................................................43
13.7 Mounting instructions ..................................................................................44
13.7.1 Rear Castor Replacement ....................................................................44
13.7.2 Front Castor Replacement....................................................................45
13.7.3 Control including Handle, Mounting Plate and Battery Compartment ...46
13.7.4 Replacing the Battery ...........................................................................48
13.8 Electromagnetic Compatibility .....................................................................49
13.9 Journal ........................................................................................................53

Imprint
Operating manual CARLO EP & Classic V2.10 E Page 4 of 56
1 Imprint
1.1 Acknowledgement
Dear customer, we would like to express our sincere thanks for the trust you have
placed in us by purchasing this BEKA Hospitec GmbH product. Our products are
manufactured and tested according to stringent quality criteria.
1.2 Manufacturer’s address
BEKA Hospitec GmbH
Am Rübenmorgen 3
35582 Wetzlar
Phone: +49(0)641-9 22 22-0
Fax: +49(0)641-9 22-22-20
1.3 TÜV quality seal
BEKA Hospitec GmbH is certified according to DIN EN ISO
13485 by TÜV SÜD Product Service GmbH.
Therefore, the development, manufacturing, quality assurance
and service of our entire product range is subject to high
quality standards.

Introduction
Operating manual CARLO EP & Classic V2.10 E Page 5 of 56
2 Introduction
2.1 Preface
A correct use of the device is imperatively in order to ensure its proper and safe
functioning. Please read the provided operating manual carefully and observe in
particular the therein contained safety instructions.
The maintenance, inspection, assembly and installation as well as well as further
technical interventions on the product must only be executed by BEKA Hospitec either
by specialised companies authorised to this effect by BEKA Hospitec. The operation of
the product as well as technical interventions on the product must only be carried out
by specially trained personnel.
2.2 Liability and warranty
▪On the basis of the information contained in this manual, the publisher accepts
no liability for damages resulting from improper, incorrect or inappropriate use
of the product. The product must only be operated by persons, who are familiar
with the manual and the product as well as the national regulations, laws and
prescriptions related to work, safety and accident prevention.
▪The manufacturer of the product is only responsible for the safety and the
reliability of the product, if regular functional tests and checks are conducted.
Operate the product only with original accessories, otherwise the
manufacturer’s liability will expire.
▪In case of technical interventions, such as extensions and fittings to our
products, which are not carried out by BEKA Hospitec either by a specialist
company authorised by BEKA Hospitec, all warranty rights on the modifications
as well as on the device or on the device function, which are related to the
modification, shall expire.
▪For damages resulting from the use of spare parts and accessories, which are
not authorized by the manufacturer, any further liability of the manufacturer
shall be excluded.
▪Please note that there might be minor differences between the images and
explanations contained in this manual and the actually supplied device. Subject
to technical modifications and error.
▪The product is equipped with “B”-Type applied parts. All exposed, touchable,
conductive parts are thereby considered as applied part.

The operating manual
Operating manual CARLO EP & Classic V2.10 E Page 6 of 56
3 The operating manual
3.1 Validity
This operating manual contains information, which is required for the operation and
use of the product. In addition to the description of the equipment, the operating
manual also includes a number of abstractions and exemplary illustrations. The
equipment of the product therefore may differ in part from the descriptions and
illustrations. Furthermore, please observe also the manuals with regard to the cleaning
and the disinfection as well as the assembly and the disassembly of individual
components of the product.
Please read the operating manual and the safety instructions before starting to use the
product. Keep the operating manual near the device for future reference.
3.2 Type plate
This image shows the type plate.
The type plate is situated on the side of
the operating panel. The serial number
(SN) shown here, 0616123901, is
merely an example.
In case of queries, please mention the
serial number printed on the type plate
of your device.
Note: Because of legal regulations, it
might be required that the article
number and the serial number should
be computer-readable as well and
therefore they might be printed on the
type plate in the form of a bar code as
well.
3.3 Designation
The different types described in this instruction manual (4 point spreader bar, Classic
6 point spreader bar, Classic and Comfort EP) are variations of “ CARLO Alu”.
Any differences in use are given through extra references.

The operating manual
Operating manual CARLO EP & Classic V2.10 E Page 7 of 56
3.4 Variants
3.4.1 CARLO Alu Variants
Article number
Description
Spreader bar
924003100
CARLO Alu, Classic 185
4-point spreader bar
924002008
CARLO Alu Classic 185
4-point spreader bar
924002018
CARLO Alu Classic 185
4-point spreader bar
924003200
CARLO Alu Classic 185
6-point spreader bar
924003208
CARLO Alu Classic 185 IL
6-point spreader bar
924003218
CARLO Alu Classic 185
6-point spreader bar
925006000
CARLO Alu Comfort EP 185
4-point EP spreader bar
925006008
CARLO Alu Comfort EP 185 IL
4-point EP spreader bar
925006018
CARLO Alu Comfort EP 185
4-point EP spreader bar
3.4.2 Spreader Bar Variants
Classic version 4-point spreader bar
EP version, 4-point spreader bar
Classic version 6-point spreader bar
with optional scale
Safety
Operating manual CARLO EP & Classic V2.10 E Page 8 of 56
4 Safety
4.1 Intended and appropriate use
The product has been designed for transferring residents in hospitals, nursing homes,
care centers and facilities for the disabled. The resident can be lifted from a lying or
sitting position or even from the ground. The product is to be used exclusively for the
indoor transport of residents on smooth and level floorings.
The product is designed for a short-term use and any contact with injured skin must be
avoided.
Note
No side effects associated to a treatment are known. However, you must still respect
and observe the safety instructions and the contraindications.
WARNING:
Residents suffering from:
•Osteoporosis
•Spine disorders/spinal damage
•Osteogenesis imperfecta
•Mental confusion
•epileptic attacks
may only be treated with the CARLO Alu in consultation with
the attending physician.
4.2 Other prescriptions
The product meets the current VDE-prescriptions 0100 and 0100-710. However, have
a specialist company check the compliance of your electrical installation with the
applicable prescriptions prior to operating and using the product. This requirement is
only applicable for Germany. In other countries, other requirements might be
applicable. Ask a qualified electrician to install the wall charging unit in accordance
with the regulations applicable in your country.
4.3 Safety instructions
Please read the following safety instructions prior to using the product. All notes,
specifications and warnings mentioned on the device as well as in the present
operating manual must be imperatively respected and observed. The manufacturer
BEKA Hospitec shall not accept any liability for any damages, failures or faults caused
by improper operation or handling.
Safety
Operating manual CARLO EP & Classic V2.10 E Page 9 of 56
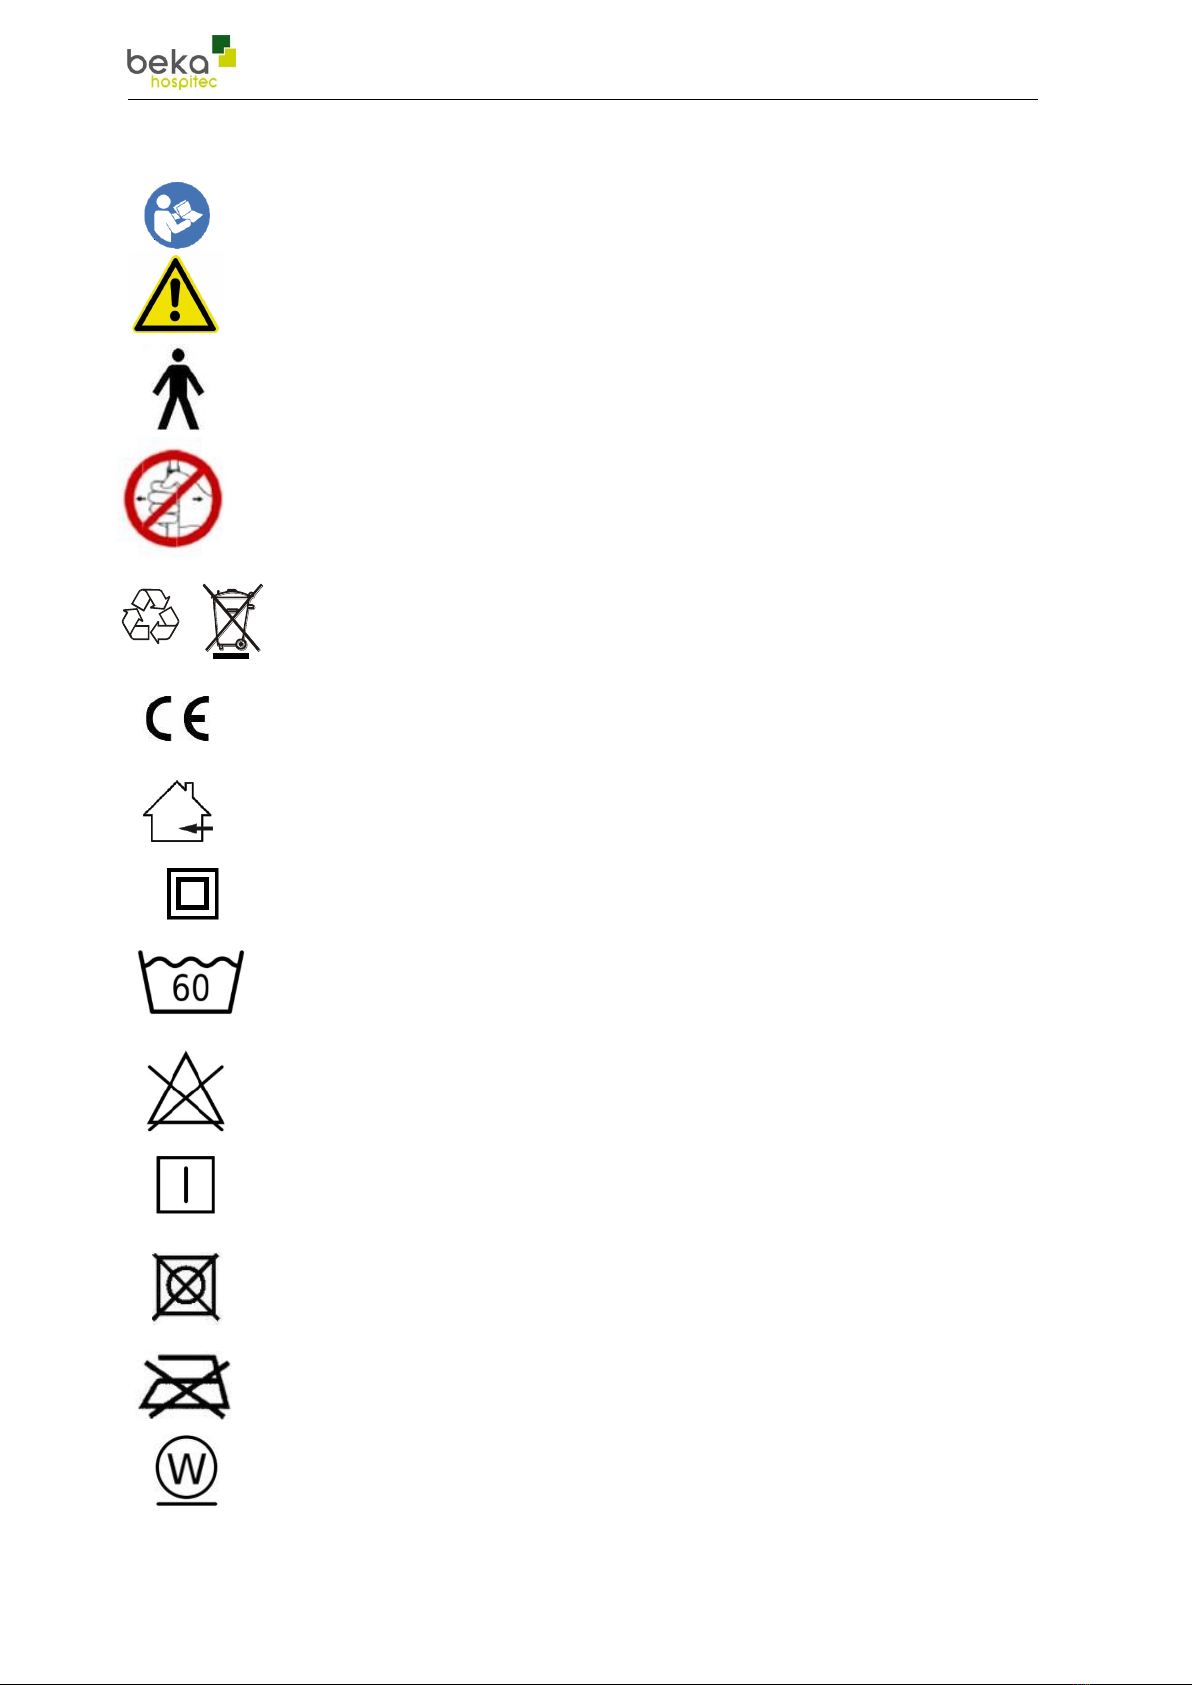
4.4 List of used safety instructions
Please observe the accompanying documents/operating manual.
Warning Hazardous Area.
Applied part “Type B” to DIN EN 60601-1.
Do not push/pull the motor.
Do not push/pull the spreader bar.
Special waste, no household waste.
The device and the packaging materials never must be disposed of
in the domestic waste stream.
CE-label in accordance with the EC-Directive on Medical Devices.
Solely intended for indoor use.
Protection class II.
Washing temperature max. 60 °C.
Normal cycle.
Do not bleach.
Line dry
Do not tumble dry.
Do not iron.
Professional wet clean.
Gentle cycle.

Safety
Operating manual CARLO EP & Classic V2.10 E Page 10 of 56
4.5 Warnings
Note
▪Please read the operating manual and the safety instructions before starting to
use the CARLO ALU. Keep the operating manual near the device for future
reference.
▪The product may only be used for the specified purpose.
▪In case of unusual noises, damages or malfunctions, the product no longer
must be used.
▪The product may only be used and operated by trained staff.
▪Check prior to each use that all visible parts are intact. Do not use the product if
any part is damaged.
▪The product must be disinfected after each use.
▪Avoid slippery surfaces and thresholds.
▪Do not move the lift over sloping or uneven floors.
▪The CARLO ALU is exclusively fit for indoor use.
▪Prior to each use of the device and its accessories, the user must check the
functional safety and the good condition of the device and its accessories (e.g.
visual check, functioning, etc.).
▪Supervision of the caregiver is required throughout the treatment.
▪Make sure that the sling form and size match the resident’s body.
▪Check prior to lifting that all clips or loops are correctly fixed to the spreader bar.
▪Only trained staff is authorized to use slings.
▪Please respect and observe the size and weight specifications for each sling.
▪Check prior to each lifting operation whether the help of a second assistant is
required.
▪Each lifting or transport procedure must be adequately planned in order to
ensure an optimal protection for the caregiver and the resident.
▪Please check before and during the height adjustment procedure that your feet
are not located in the area of the castors neither in the resident’s area.
▪Do not stand between the product and an obstacle during the transport
procedure.
▪During the movement of the product, the carrier frame must be closed.
▪Please check that no one grabs in the hazardous areas (spreader bar, carrier
frame) especially during the adjustment procedure - risk of crushing.
▪Make sure that the resident is not hurt by the door frame when passing through
doors.
▪Do not lift the resident higher than is necessary.

Safety
Operating manual CARLO EP & Classic V2.10 E Page 11 of 56
▪Activate the brakes of the castors of the wheelchair, the healthcare bed, the
stretcher, etc. to ensure a safe lifting and positioning of the resident. The brakes
of the CARLO ALU must be unbraked (released) during this operation.
▪Keep the transport of the resident as short as possible and never leave the
resident unattended in the sling.
▪Never tilt or pull the resident beyond the fixing point of the spreader bar.
▪Never exceed the duty cycle or the maximum load.
▪Make sure that the battery is charged in a well-ventilated room.
▪Do not use the product when the battery is charging.
▪Make sure that the resident crosses the arms on the chest instead of holding on
to the spreader bar.
▪When applying the sling, make sure that the spreader bar does not touch the
resident’s head.
▪Check the applied sling for visual damages prior to using it.
▪Move the CARLO ALU by means of the handles provided to that effect instead
of pulling the spreader bar.
▪Never cover up, oversticker or change the slots and holes of the device.
▪Please check the proper state and the functional safety of the system prior to
use. Never insert foreign bodies in the device.
CAUTION
In case of unusual noises, damages or malfunctions, the
product no longer must be used.
WARNING:
Any unauthorized repairs, modifications and additions are not
permitted for safety reasons and exclude any liability of the
manufacturer for resulting damage.
For damages resulting from the use of spare parts or
accessories not approved by the manufacturer, any further
liability of the manufacturer is excluded.
Note:
Repairs to components of the product are to be carried out
only by trained expert personnel. Please contact the after-
sales service.
Opening the device or other accessories will lead to the
expiration of all guarantee, warranty and liability claims.

Transport
Operating manual CARLO EP & Classic V2.10 E Page 12 of 56
5 Transport
Use a lift truck or similar for the transport.
5.1 Unpacking the product
To remove the packaging materials, you will need a cutter knife.
NOTE
Take care so as to not damage the product when using tools.
Do not cut with the cutter in the cardboard.
5.1.1 Removing the cardboard
Proceed in the following way to remove the cardboard:
•Cut the strap with the cutter knife
•Remove the strap
•Lift the cardboard up to remove it and put it aside
5.1.2 Loosening the product from the pallet
The product is on both sides strapped to the pallet.
Proceed in the following way to loosen the product from
the pallet:
•Unscrew the fixing screws of the straps
•Remove the straps
•Please take care not to demage the product
when unscrewing the screws.
•Please make sure that the brakes of the castors
are released.
brake
After all fixations have been removed, you can remove the product from the
pallet.
The accessories for your product are included in the supplied cardboard box.

Installation
Operating manual CARLO EP & Classic V2.10 E Page 13 of 56
6 Installation
The product is supplied ready for use.
6.1 Electrical connection
Before you start to use our products, your electrical installation must be checked in
accordance with the relevant VDE-regulations 0100 and 0100-710.
This requirement is only applicable in Germany. In other countries, other requirements
might be applicable.
Ask a qualified electrician to install the wall charging unit in accordance with the
regulations applicable in your country.
6.2 First start-up
WARNING
The equipment is to be used exclusively in accordance with
the accompanying documents.
Only when these conditions are met, the manufacturer
considers himself responsible for the impact on the safety, the
reliability and the function of the device.
In the event of a new connection of the product, the technical
data must be observed.
NOTE:
The battery must be completely charged prior to the first use
of the CARLO alu
(charging time approx. 4 hours).
Please check that the emergency stop switch is released prior
to moving the spreader bar.
The product is equipped with a 24V-electrical motor. This motor is self-locking and
therefore protected against unintentional lowering of the spreader bar in case of
malfunction or failure. The battery of the CARLO Alu must be completely charged
before starting to use the device.
Please check that the emergency stop switch is released (unlatched). To unlatch, turn
the emergency stop switch clockwise until it releases.
The emergency stop switch is released by turning the button to the right (i.e.
clockwise).
Operating elements and their function
Operating manual CARLO EP & Classic V2.10 E Page 14 of 56
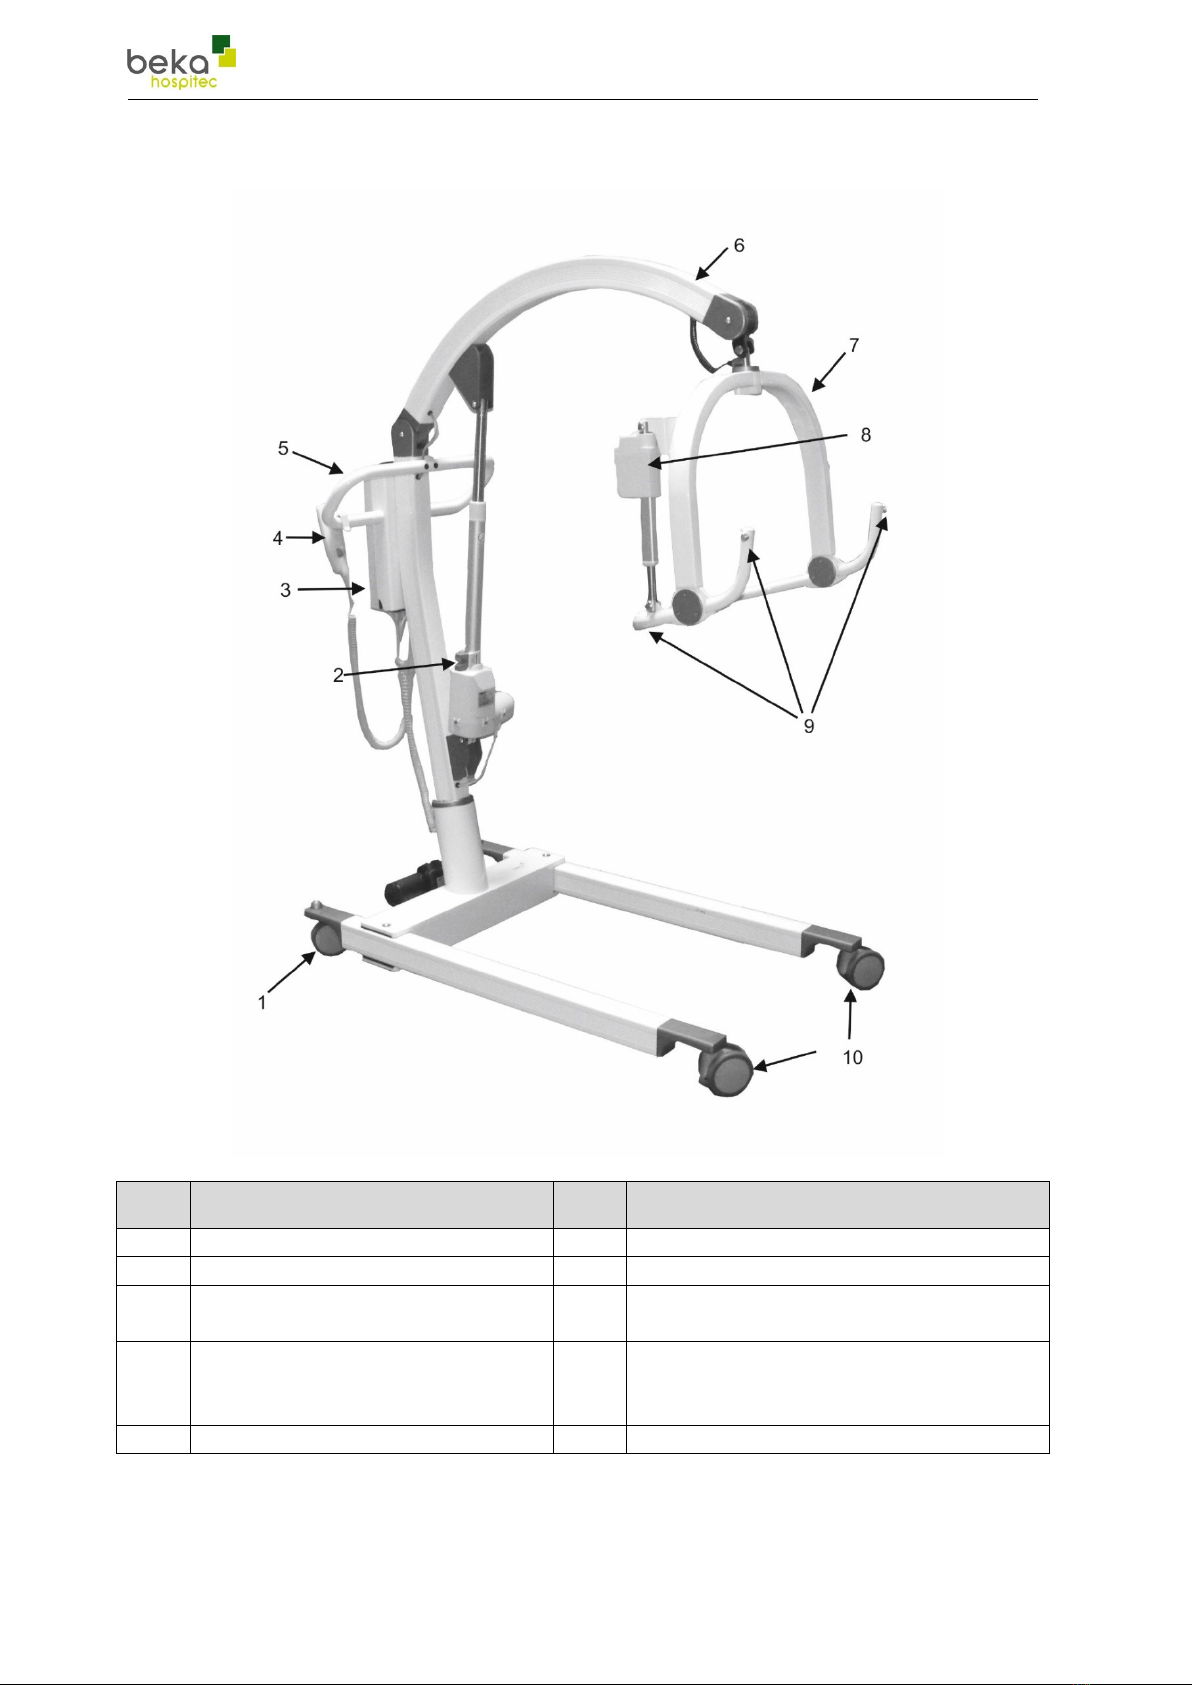
7 Operating elements and their function
No.
Description
No.
Description
1
Rear castors with brake
6
Arm
2
Emergency lowering system
7
Spreader bar
3
Control unit with battery
8
Motor for the spreader bar
adjustment (only EP)
4
Handset
9
Attachment point only for slings with
clips
Caution: no slings with loops
5
Spreader bar
10
Front castors
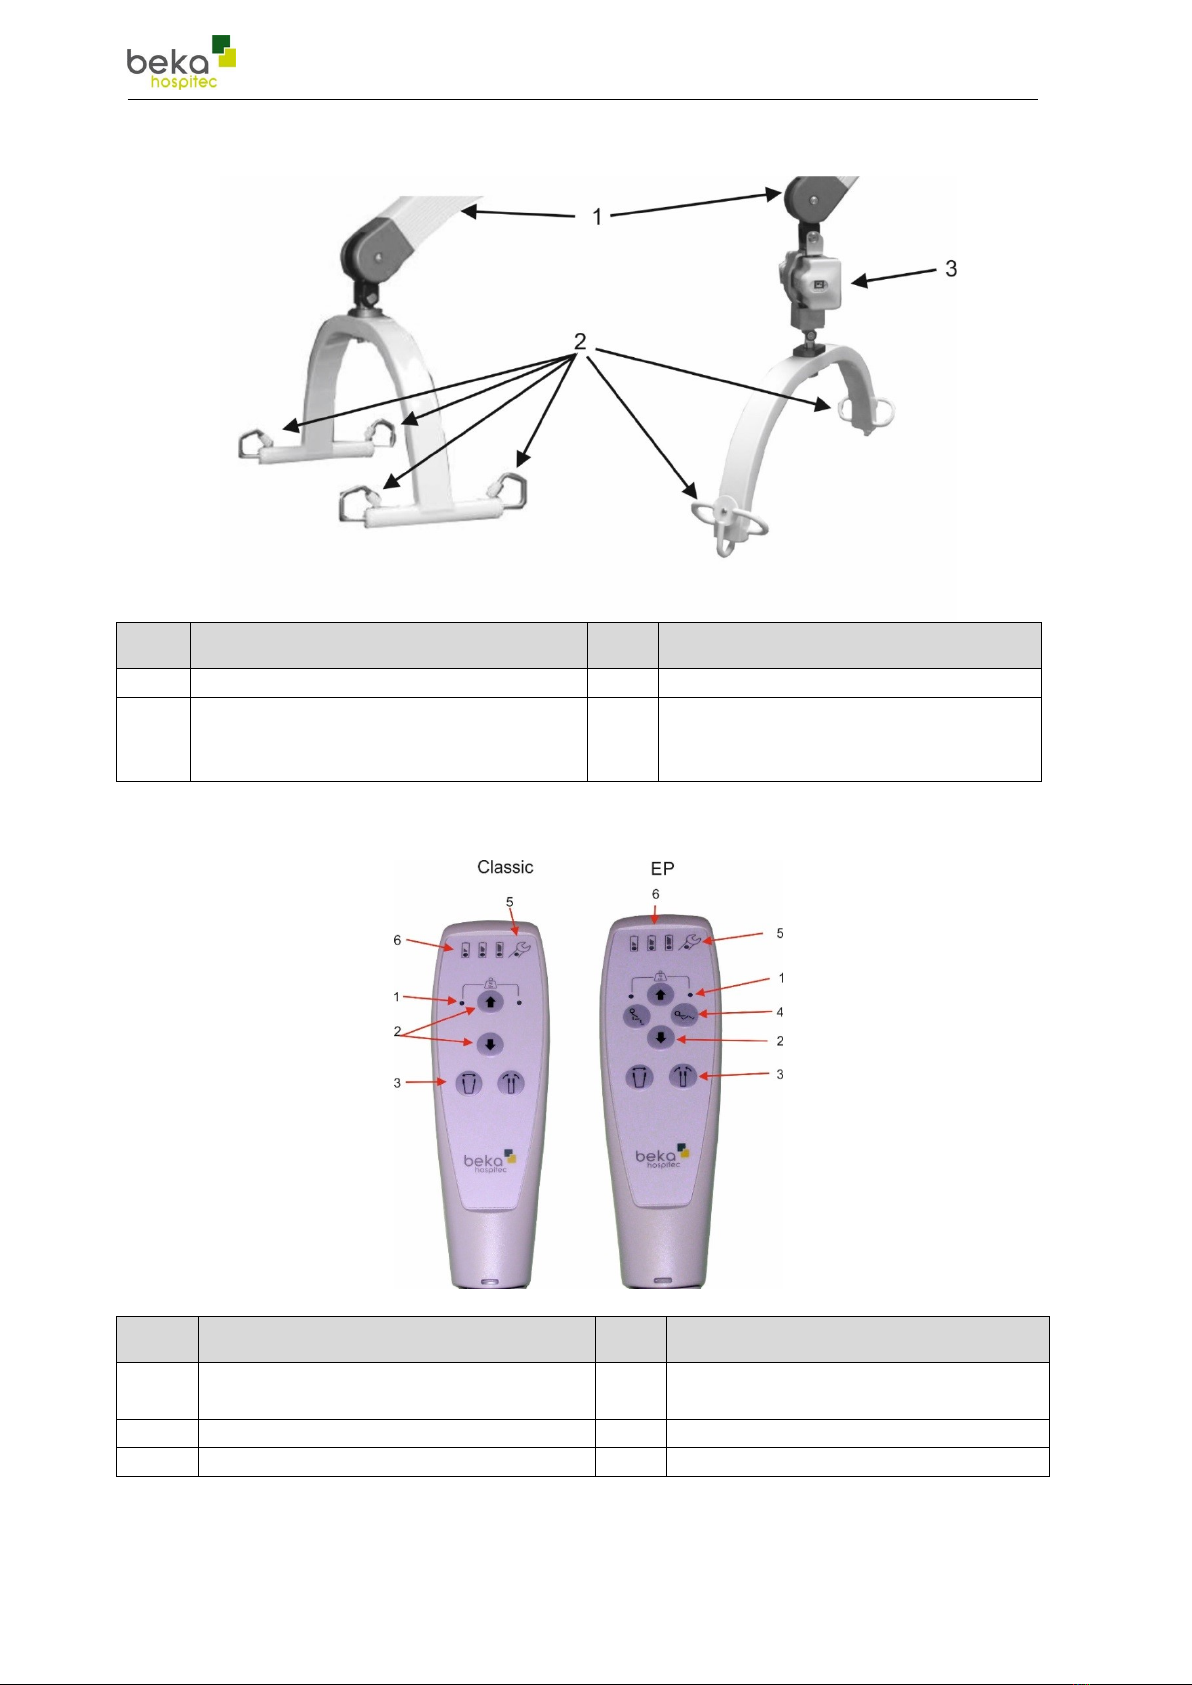
Operating elements and their function
Operating manual CARLO EP & Classic V2.10 E Page 15 of 56
7.1 Classic Spreader Bar Version
No.
Description
No.
Description
1
Arm
3
Scale, optionally available
2
Attachment points for slings with
loops
Caution: no slings with clips
7.2 Handset
No.
Description
No.
Description
1
Overload
4
Only EP spreader bar, sitting and
lying function
2
Spreader bar up/down
5
Service indication
3
Spreading the carrier frame
6
Battery charge level indication

Operating elements and their function
Operating manual CARLO EP & Classic V2.10 E Page 16 of 56
7.3 Explanation of the LED-indications on the Handset
Green LED: battery full, no charging required (100-50%)
Yellow LED: battery requires charging (50-25%)
Red LED: battery requires charging (less than 25%)
When you push a button, an audible signal will be emitted.
Service indication (orange LED flashes).
Please have your stand-up and raising aid checked!
Orange LED, overload, max. weight of 185 kg exceeded
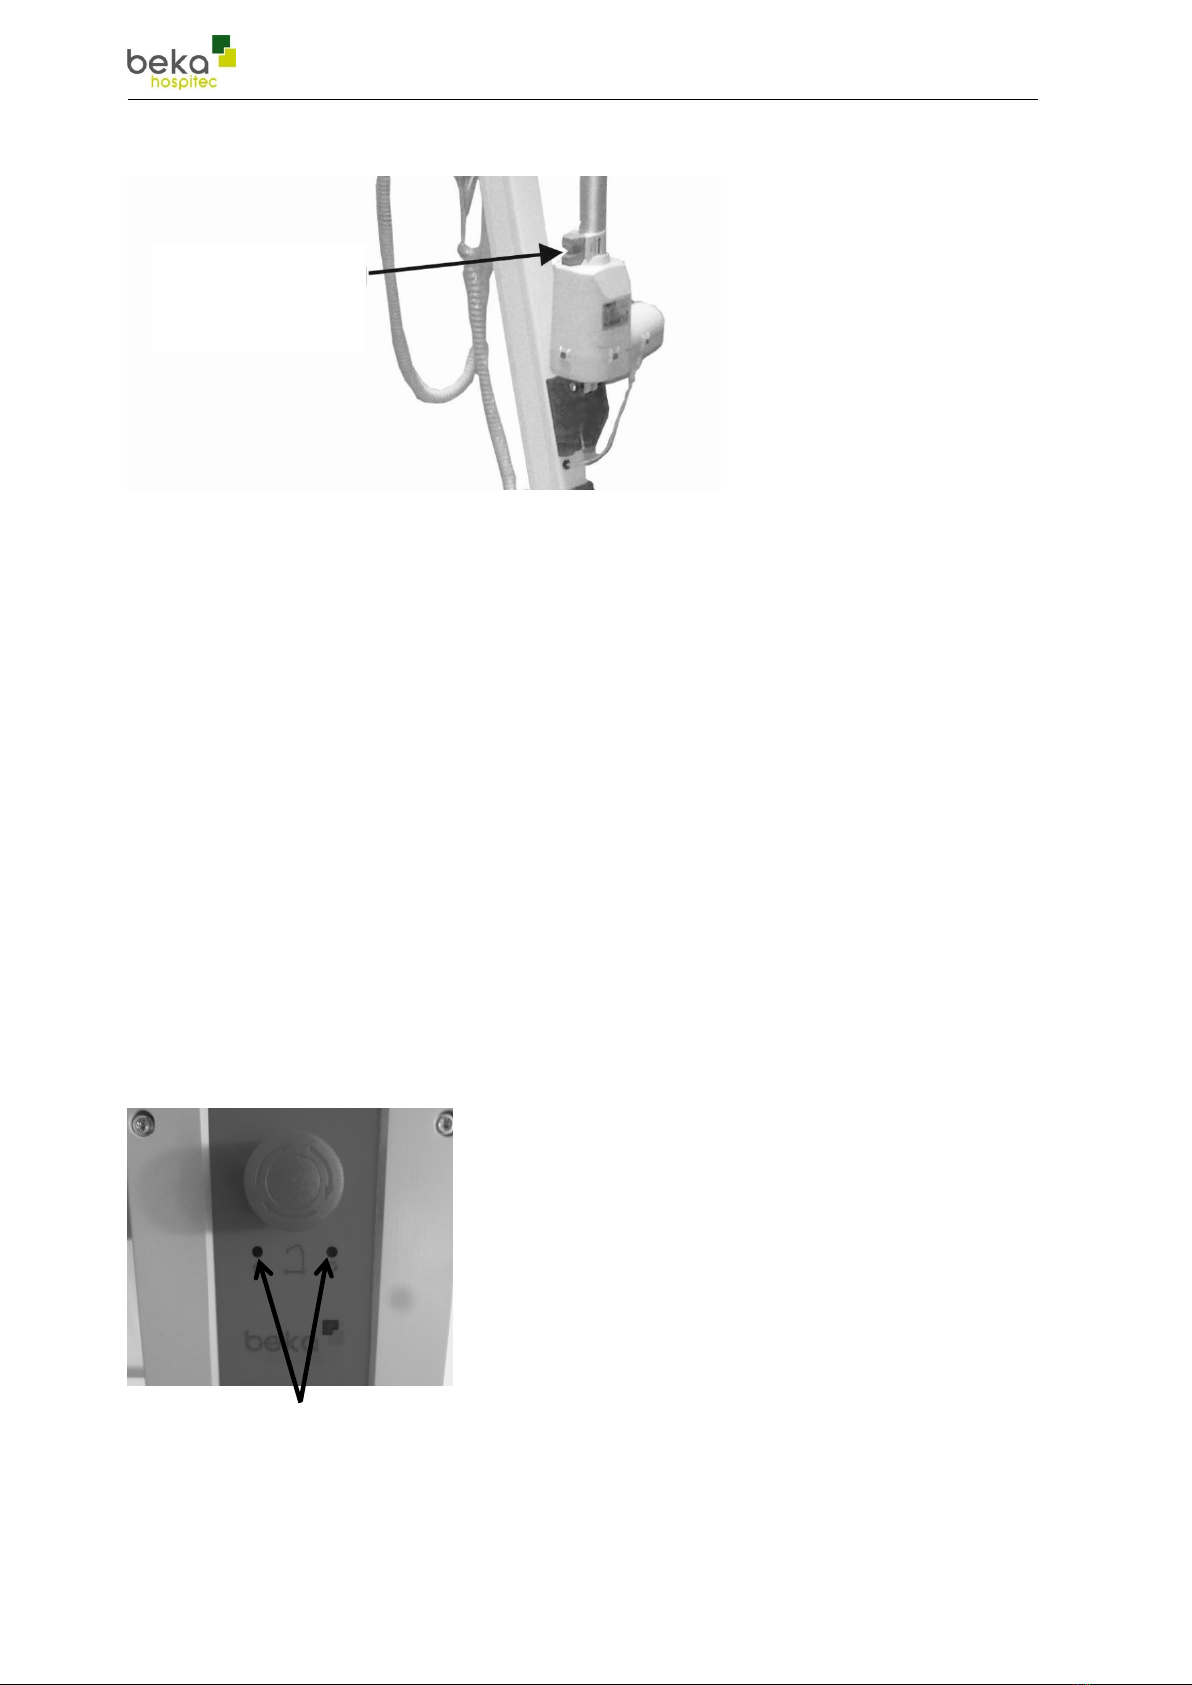
7.4 Connections and Functions of the Control Unit
7.4.1 7.3.1 European Control Unit
No.
Description
No.
Description
1
Emergency stop switch
3
Handset connection
2
Electrical emergency lowering
(in case of malfunction of the handset)
4
Lifting motor connection
5
Spreading motor connection

Operating elements and their function
Operating manual CARLO EP & Classic V2.10 E Page 17 of 56
7.4.2 Canadian Control Unit
No.
Description
No.
Description
1
Emergency stop switch
5
Handset connection
2
Electrical emergency lowering
(in case of failure of the handset)
6
Lifting motor connection
3
Adjustment of the spreading
(in case of failure of the handset)
7
Spreading motor connection
4
Power and charging indicator
8
Charger cable connection
Explanation of the LED-indications
Green LED
The LED is on when the control unit is supplied with
voltage through the power cable.
Yellow LED
The LED is on when the battery is charging.
Note: The battery can only be charged if the emergency stop switch is not actuated!
7.5 24V-Battery Unit
The CARLO ALU is equipped with a 24V-battery.
Please proceed as described in par. 13.7.4 to remove the battery.

Operating elements and their function
Operating manual CARLO EP & Classic V2.10 E Page 18 of 56
7.6 External Charging Unit/Wall Charging Unit
The external charging unit (wall charging unit) is a switch-mode charger and is
supplied ready assembled (on a mounting rail). It can be installed on any suitable wall.
The required power cable is included in the delivery.
The charging time for the battery units is approx. 4 hours.
No.
Description
No.
Description
1
Mains input socket
3
Charging indicator (yellow LED)
2
Mains operation indicator (green
LED)
4
Cable holder (optionally)
Explanation of the LED-indications
Green LED
The LED is on when the control unit is supplied with
voltage through the power cable.
Yellow LED
The LED is on when the battery is charging.
Operating elements and their function
Operating manual CARLO EP & Classic V2.10 E Page 19 of 56
7.7 Manual Emergency Lowering System
Activating the Emergency Lowering System:
1. Slide the red safety lock upwards in the direction of the arrow (PULL-
EMERGENCY label).
2. Now, the motor is lowering slowly (lowering weight approx. 20 kg).
3. The motor stops, when the safety lock is positioned back in its normal position =
release the safety lock.
Note:
The emergency lowering mechanism must not be treated with oil, grease or any other
lubricant, as this could cause the emergency lowering mechanism to run too smoothly!
In case of a failure of the emergency lowering system, a reset at the manufacturer’s is
required.
7.8 Electrical emergency lowering
Should your handset be defective or present a malfunction and provided that the
battery still has sufficient voltage, you can raise or lower the spreader bar by means of
the buttons located on the control unit.
Buttons of the control unit (European version)
Insert a ballpoint or a similar object into the holes to actuate the buttons. The spreader
bar is raised or lowered.
Emergency
Lowering
System

Operating elements and their function
Operating manual CARLO EP & Classic V2.10 E Page 20 of 56
Note:
The buttons of the Canadian version of the control unit can be activated manually.
Buttons of the control unit (Canadian version)
7.9 Emergency stop switch
When the emergency stop switch is pressed, the electrical motors are immediately
disconnected from the power supply. The motor stops immediately. The emergency
stop switch should be used only in case of immediate danger to the resident or the
caregivers.
The emergency stop switch can also be used to reduce discharging of the battery in
case of intermediate storage.
By pressing the emergency stop switch, you can lock the CARLO ALU sling hoist, thus
making any unauthorized use of the sling hoist more difficult.
Turn the button in the direction of the arrow to unlock.
NOTE:
In the Canadian version of the control unit, the battery
can only be charged when the emergency stop switch
is not actuated!
This manual suits for next models
12
Table of contents
Popular Sling manuals by other brands


Blueleaf
Blueleaf Steiss Pivot user manual

BabyBjorn
BabyBjorn COMFORT owner's manual

DHG
DHG SystemRoMedic BasicSling 40500002 Instructions for use

Handicare
Handicare Comfort Care Spacer Sling 8E4200 instruction sheet

Husqvarna
Husqvarna Multi Sling Operator's manual

STEIN
STEIN RGK26 Series User instructions


