Beko ASN541B User manual

EN
ASN541B
ASN541S
ASN541X
ASP341B
ASP341S
ASP341X
ASNL551B
ASGP342B
ASNL551X
ASPM341PX

Please read these nstructons frst before usng your applance
Thank you for choosing a Beko appliance.
Please take some time to read this user manual before using your appliance, to
ensure you know how to safely operate the controls and functions.
Carefully follow all unpacking and installation instructions to ensure the appliance is
correctly connected and fitted prior to use.
Please write your product model and serial number on the last page of this user
manual, and store in a safe location close to the appliance for easy future reference.
This user manual may also be applicable for several other models. Differences
between models will be listed.
If you have any questions or concerns, please call our contact centre or find help and
information online at www.beko.co.uk
Symbols and their descriptions
This instruction manual contains the following symbols:
CImportant information or useful usage tips.
AWarning against dangerous conditions for life and property.
BWarning against electric voltage.

2 / 41 EN Refrgerator / User Manual
1. Safety and environment
instructions 3
2 Your refrigerator 6
3 Installation 7
3.1. Appropriate installation location 7
3.2. Installing the plastic wedges. . . . 8
3.3. Electrical connection . . . . . . . . . . . . 8
3.4. Adjusting the feet . . . . . . . . . . . . . . . 8
3.5. Illumination lamp . . . . . . . . . . . . . . . . 9
3.6. Door open warning . . . . . . . . . . . . . . 9
3.7. Water connection . . . . . . . . . . . . . . . 9
3.8. Connecting the water hose to the
refrigerator . . . . . . . . . . . . . . . . . . . . .10
3.9. Connecting of the water hose to the
cold water mains line . . . . . . . . . . .10
3.10.Water filter . . . . . . . . . . . . . . . . . . . . . 11
3.11.Mounting the external filter onto the
wall. . . . . . . . . . . . . . . . . . . . . . . . . . . . . . 11
3.12 Activating water filter change
warning. . . . . . . . . . . . . . . . . . . . . . . . . 13
3.13.Before starting to use the water/ice
dispenser . . . . . . . . . . . . . . . . . . . . . . . 14
3.14.Transportation of the product . 14
4 Preparation 16
4.1. Things to be done for energy
saving. . . . . . . . . . . . . . . . . . . . . . . . . . . 16
4.2. Efficient operation . . . . . . . . . . . . . 16
4.3. Recommendations on the fridge
compartment . . . . . . . . . . . . . . . . . . .16
4.4. Initial use . . . . . . . . . . . . . . . . . . . . . . . 16
5 Operating the product 18
5.1. Indicator panel. . . . . . . . . . . . . . . . . .18
5.2. NeoFrost Cooling System . . . . . . 21
5.3. Freezing fresh food. . . . . . . . . . . . . 21
5.4. Recommendations for preserving the
frozen food . . . . . . . . . . . . . . . . . . . . .22
5.5. Placing the food . . . . . . . . . . . . . . . .22
5.6. Deep-freeze information. . . . . . .22
5.7. Chiller compartment. . . . . . . . . . . .23
5.8. Butter & cheese section . . . . . . .23
5.9. Egg section . . . . . . . . . . . . . . . . . . . . .23
5.10.Crisper . . . . . . . . . . . . . . . . . . . . . . . . . .23
5.11.Odour filter . . . . . . . . . . . . . . . . . . . . .23
5.12.Using the dispenser . . . . . . . . . . . .24
5.13.Filling the water dispenser’s tank24
5.14.Filling the water dispenser’s tank25
5.15.Drip tray . . . . . . . . . . . . . . . . . . . . . . . .25
5.16.Icematic and ice storage
container . . . . . . . . . . . . . . . . . . . . . . .27
5.17.Ice-maker . . . . . . . . . . . . . . . . . . . . . .27
5.18.Humidity controlled crisper . . . .28
6 Maintenance and cleaning30
6.1 Avoiding bad odours. . . . . . . . . . . .30
6.2 Protecting the plastic surfaces 30
6.3 Cleaning of Glass Water Tank . . 31
7. Troubleshooting 32

3 / 41EN
Refrgerator / User Manual
1. Safety and envronment nstructons
Ths secton provdes the safety
nstructons necessary to prevent
the rsk of njury and materal
damage. Falure to observe these
nstructons wll nvaldate all
types of product warranty.
Intended use
A
WARNING:
Keep ventlaton openngs,
n the applance enclosure
or n the bult-nstructure,
clear of obstructon.
A
WARNING:
Do not use mechancal
devces or other means
to accelerate the
defrostngprocess,
other than those
recommended by the
manufacturer.
AWARNING:
Do not damage the
refrgerant crcut.
A
WARNING:
Do not use electrcal
applances nsde
the food storage
compartments of
the applance, unless
they are of the type
recommended by the
manufacturer.
1.1.General safety
• Ths applance can be used
by chldren aged from 8 years
and above and persons wth
reduced physcal,sensory or
mental capabltes or lack of
experence and knowledge
f they have been gven
supervson or nstructon
concernng use of the
applance n a safe way and
understand the hazards
nvolved. Chldren shall not play
wth the applance.
• In case of malfuncton, unplug
the devce.
• After unpluggng, wat at least
5 mnutes before pluggng n
agan.
• Unplug the product when not
n use.
• Do not touch the plug wth wet
hands! Do not pull the cable to
plug off, always hold the plug.
• Do not plug n the refrgerator
f the socket s loose.
• Unplug the product durng
nstallaton, mantenance,
cleanng and repar.
• If the product wll not be used
for a whle, unplug the product
and remove any food nsde.
• Do not use the product when
the compartment wth crcut
cards located on the upper back
part of the product (electrcal
card box cover) (1) s open.
1
1

4 / 41 EN Refrgerator / User Manual
Important nstructons for safety and envronment
• Do not use steam or steamed
cleanng materals for cleanng
the refrgerator and meltng the
ce nsde. Steam may contact
the electrfed areas and cause
short crcut or electrc shock!
• Do not wash the product by
sprayng or pourng water on t!
Danger of electrc shock!
• In case of malfuncton, do
not use the product, as t may
cause electrc shock. Contact
the authorsed servce as soon
as possble.
• Plug the product nto an
earthed socket. Earthng
must be done by a qualfed
electrcan.
• If the product has LED type
lghtng, contact the authorsed
servce for replacng or n case
of any problem.
• Do not touch frozen food wth
wet hands! It may adhere to
your hands!
• Do not place lquds n bottles
and cans nto the freezer
compartment. They may burst.
• Place lquds n uprght poston
after tghtly closng the ld.
• Do not spray flammable
substances near the product, as
t may burn or explode.
• Do not keep flammable
materals and products wth
flammable gas (sprays, etc.) n
the refrgerator.
• Do not place contaners
holdng lquds on top of the
product. Splashng water on
an electrfed part may cause
electrc shock and rsk of fre.
• Exposng the product to ran,
snow, sunlght and wnd wll
cause electrcal danger. When
relocatng the product, do not
pull by holdng the door handle.
The handle may come off.
• Take care to avod trappng any
part of your hands or body n
any of the movng parts nsde
the product.
• Do not step or lean on the door,
drawers and smlar parts of the
refrgerator. Ths wll cause the
product to fall down and cause
damage to the parts.
• Take care not to trap the power
cable.
1.1.1 HC warning
If the product comprses a coolng
system usng R600a gas, take
care to avod damagng the
coolng system and ts ppe whle
usng and movng the product.
Ths gas s flammable. If the
coolng system s damaged, keep
the product away from sources
of fre and ventlate the room
mmedately.
C
The label on the nner
left sde ndcates the
type of gas used n the
product.
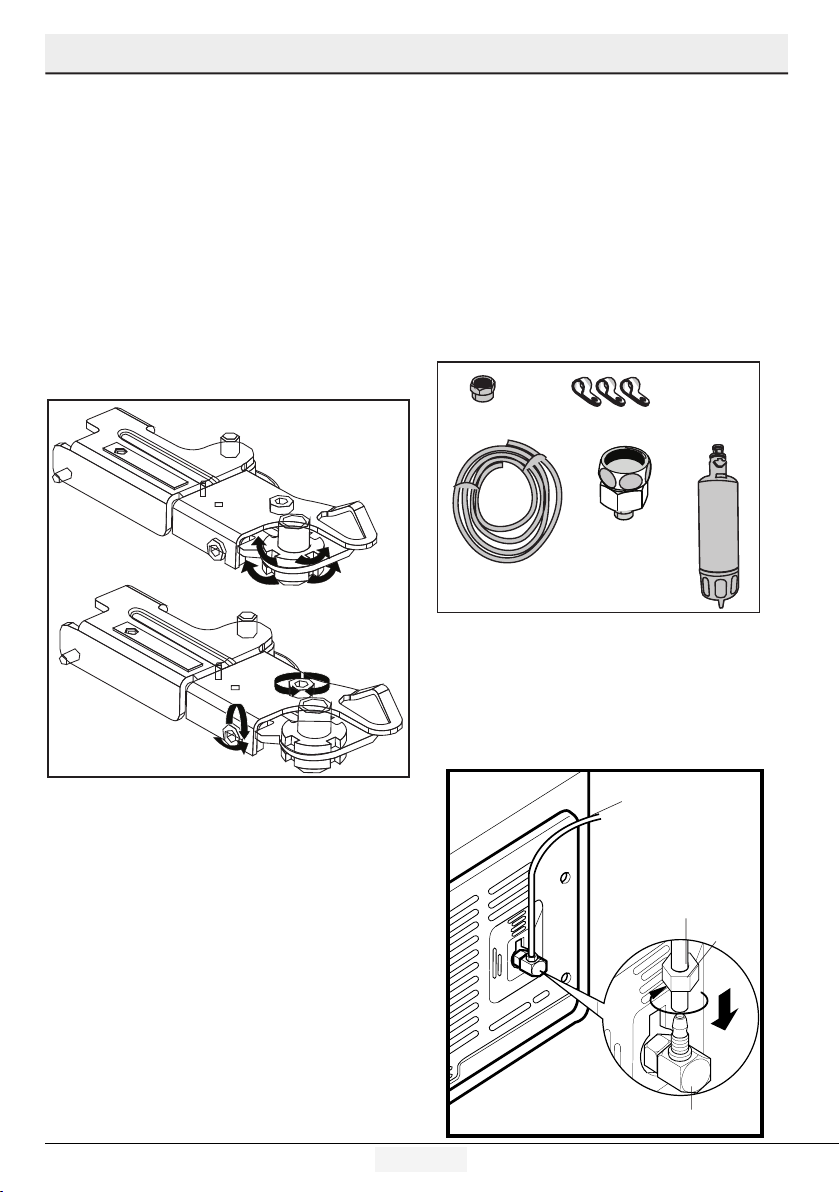
1.1.2 For models with
water dispenser
• Pressure for cold water nlet
shall be maxmum 90 ps (6.2

5 / 41EN
Refrgerator / User Manual
Important nstructons for safety and envronment
bar). If your water pressure
exceeds 80 ps (5.5 bar), use a
pressure lmtng valve n your
mans system. If you do not
know how to check your water
pressure, ask for the help of a
professonal plumber.
• If there s a rsk of water
hammer effect n your
nstallaton. Consult a plumber.
• Do not nstall on the hot water
nlet. Take precautons aganst
of the rsk of freezng of the
hoses. Water temperature
operatng nterval shall be 33°F
(0.6°C) mnmum and 100°F
(38°C) maxmum.
• Use drnkng water only.
1.2.Intended use
• Ths product s desgned for
home use. It s not ntended for
commercal use.
• The product should be used to
store food and beverages only.
• Do not keep senstve
products requrng controlled
temperatures (vaccnes,
heat senstve medcaton,
medcal supples, etc.) n the
refrgerator.
• The manufacturer assumes no
responsblty for any damage
due to msuse or mshandlng.
1.3.Child safety
• Keep packagng materals out of
chldren’s reach.
• Do not allow the chldren to play wth
the product.
• If the product’s door comprses a lock,
break off the lock when eventually
dsposng of the product.
1.4. Compliance
with WEEE Directive
and Disposing of the
Waste Product
Ths product comples wth
EU WEEE Drectve (2012/19/EU). Ths
product bears a classfcaton symbol for
waste electrcal and electronc equpment
(WEEE).
Ths product has been
manufactured wth hgh qualty
parts and materals whch can
be reused and are sutable for
recyclng. Do not dspose of the
waste product wth normal
domestc and other wastes at
the end of ts servce lfe. Take t to the
collecton center for the recyclng of
electrcal and electronc equpment. Please
consult your local authortes to learn
about these collecton centers.
1.5.Compliance with
RoHS Directive
• Ths product comples wth EU WEEE
Drectve (2011/65/EU). It does
not contan harmful and prohbted
materals specfed n the Drectve.
1.6.Package information
• Packagng materals of the product
are manufactured from recyclable
materals n accordance wth our
Natonal Envronment Regulatons. Do
not dspose of the packagng materals
together wth the domestc or other
wastes. Take them to the packagng
materal collecton ponts desgnated by
the local authortes.

6 / 41 EN Refrgerator / User Manual
2 Your refrgerator
C*Optonal: Fgures n ths user manual are schematc and may not match
the product exactly. If the relevant parts are not avalable n the product you
purchased, t apples to other models.
2
1
3*4
5*6
*7
*8
11
10
13
14
9
*15
*16
*17
1212
1- Freezer compartment
2- Fridge compartment
3- Fan
4- Butter-cheese compartments
5- Glass shelves
6- Fridge compartment door racks and
egg compartment
7- Minibar accessory
8- Water dispenser tank
9- Odour filter
10-Chiller compartment
11-Crisper compartment
12-Adjustable feet
13-Frozen food storage compartments
14-Freezer compartment door racks
15-Ice makers
16-Ice storage compartment
17-Ice maker decorative cover
Congratulations on your choice a Bekoquality Appliance which has been designed
to give you service for many years.

7 / 41EN
Refrgerator / User Manual
3 Installaton
Always have the repair procedures
carried out by the Authorised Service
Agent. Manufacturer shall not be held
liable for damages that may arise from
procedures carried out by unauthorised
persons.
To make the product ready for use, make
sure that the electricity installation
is appropriate before calling the
Authorised Service Agent. If not, call
a qualified electrician to have any
necessary arrangements carried out.
C
Preparaton of the locaton and
electrcal nstallaton at the
place of nstallaton s under
customer's responsblty.
B
Product must not be plugged n
durng nstallaton. Otherwse,
there s the rsk of death or
serous njury!
B
WARNING:Manufacturer shall
not be held lable for damages
that may arse from procedures
carred out by unauthorsed
persons.
A
WARNING:Pror to
nstallaton, vsually check f
the product has any defects on
t. If so, do not have t nstalled.
Damaged products cause rsks
for your safety.
C
Make sure that the power
cable s not pnched or crushed
whle pushng the product nto
ts place after nstallaton or
cleanng procedures.
3.1.Appropriate
installation location
A
WARNING:If the door of the
room where the product wll be
placed s too small for the product
to pass, then the product's doors
can be removed and the product
turned asde to pass t through.
use the product comfortably.
from heat sources such as hobs, ovens,
heater cores and stoves. Product must
not be subjected to drect sun lght and
kept n humd places after nstallaton.
provded around your product n order
to acheve an effcent operaton. If the
product s to be placed n a recess n
the wall, pay attenton to leave at least
5 cm dstance wth the celng and sde
walls.
materals such as rugs or carpets.
surface to prevent jolts.
where the temperature falls below
-5°C.
C
If two coolers are to be nstalled
sde by sde, there should be at
least 4 cm dstance between
them.

8 / 41 EN Refrgerator / User Manual
Installaton
3.2.Installing the
plastic wedges
Plastic wedges are used to create the
distance for the air circulation between
the product and the rear wall. Insert
the 2 plastic wedges onto the rear
ventilation cover as illustrated in the
figure. To install the wedges, remove
the screws on the product and use the
screws given in the same pouch with the
wedges.
3.3.Electrical connection
Connect the product to a grounded
outlet protected by a fuse complying
with the values in the rating plate.
Our company shall not be liable for
any damages that will arise when the
product is used without grounding in
accordance with the local regulations.
wth natonal regulatons.
reach after nstallaton.
breaker protecton are specfed n the
Ratng Plate whch s affxed to nteror
of the product. If the current value of
the fuse or breaker n the house does
not comply wth the value n the ratng
plate, have a qualfed electrcan
nstall a sutable fuse.
your mans voltage.
extenson cables or mult-plugs.
BWARNING:Damaged power
cable must be replaced by the
Authorised Servce Agents.
B
WARNING:If the product has a
falure, t should not be operated
unless t s repared by the
Authorised Servce Agent! There
s the rsk of electrc shock!
3.4. Adjusting the feet
If the product stands unbalanced after
installation adjust the feet. Taking
help from someone to slightly lift the
refrigerator will facilitate this process.
B
WARNING:Frst unplug the
product. Product must not be
plugged n when adjustng the
feet. There s the rsk of electrc
shock!
Turn the front feet to balance the
product. The corner where the foot
exists is lowered when you turn in the
direction of arrow and raised when you
turn it in the opposite direction.

9 / 41EN
Refrgerator / User Manual
Installaton
In order to adjust the doors vertically,
according to the position of the door
position
In order to adjust the doors horizontally,
• Loosen the fxng bolt on the top
• Screw the adjustng bolt (CW/CCW) on
the sde accordng to the poston of
the door
• Tghten the fxng bolt on the top for
the fnal poston.
3.7.Water connection
ASP341 models only
(Ths feature s optonal)
Water system installation of the
refrigerator must be performed by a
competent person.
Depending on the model of the
refrigerator, you may not have to
connect to water main.First you
must connect the water hose to the
refrigerator.
Check that following parts have been
delivered together with the product:
1.
Unon for connectng the water hose to
the rear of the refrgerator
2.
3 peces of ppe clps (used to secure
the water hose)
adjusting nut
fixing nut
fixing nut
adjusting nut
3.5.Illumination lamp
Do not attempt to repair yourself but call
the Authorised Service Agent if the LED
illumination lamps do not go on or are
out of order.
3.6. Door open warning
(Ths feature s optonal)
An audio warning signal will be given
when the door of your product is left
open for 1 minute. This warning will be
muted when the door is closed or any of
the display buttons (if any) are pressed.
3
1
4
2
*5
c
a
a
b
1
2

10 / 41 EN Refrgerator / User Manual
Installaton
3.
5-meter long water hose (1/4 nch n
dameter)
4.
(4) Cold mans water valve wth mesh
flter (tap adapter)
5.
(5) External water flter.
3.8. Connecting
the water hose to
the refrigerator
1.
Slp the unon (b) onto the water hose
(a).
2.
Push the water hose downwards frmly
to slp t onto the water nlet valve (c).
3.
Tghten the unon (c) by hand to secure
t onto the water nlet valve.
C
Normally, you are not requred
to tghten the unon wth a tool.
However, you can use a spanner or
plers to tghten the unon f there
s a leakage.
3.9. Connecting of
the water hose to the
cold water mains line
ASP341 models only
(Ths feature s optonal)
If you will use the refrigerator by
connecting it to the cold water mains
line, you must install a standard 1/2"
valve connector to the cold water
installation of your home. If this valve is
not present or you are not sure, consult a
qualified plumber.
1.
Separate the unon from the tap
adaptor.
2.
Install the tap adaptor to standard 1/2”
valve connector.
3.
After nsertng the water hose to the
unon, nstall t to the tap adaptor and
nsert to the unon to the tap adapter.
4.
Tghten the unon by hand.

11 / 41EN
Refrgerator / User Manual
Installaton
A
WARNING:Secure the water
hose to sutable ponts by means
of the clps suppled to avod
any damage or dsplacement or
accdental dsconnecton.
A
WARNING: After turnng on the
water valve, make sure that there
s no leakage at both connecton
ponts of the water hose. If there
s a leakage, turn off the valve
mmedately and tghten all jonts
agan usng a spanner or a plers.
A
WARNING: Make sure that
standard 1/2" valve connector s
avalable and completely turned
off on your cold water mans lne.
3.10. Water filter
(Ths feature s optonal)
Your refrigerator may be equipped with
an external or internal filter depending
on its model. To fit the water filter,
follow the instructions below referring
to the figures supplied:
3.11. Mounting
the external filter
onto the wall
ASP341 models only
1.
Frst, determne the locaton to mount
the external flter.
2.
Then, determne the dstance between
the flter and the tap and flter and the
water nlet respectvely. Prepare hoses
at requred lengths.
3.
Mount the flter connecton kt onto the
wall by usng a screwdrver and attach
the flter.
B
WARNING:Water flter must
be held uprght as shown n the
fgure. It s crtcal to connect the
water nlet and outlet hoses on
the flter correctly.

12 / 41 EN Refrgerator / User Manual
Installaton
C
After connecting the filter,
do not consume the first 10
glasses of water.
B
WARNING:Never mount
the flter onto the refrgerator.
Coolant ppes mght be perced!

13 / 41EN
Refrgerator / User Manual
Installaton
3.12. Activating water filter change warning
(For products connected to the mans water lne and equpped wth flter)
Water flter change warnng s actvated as follows:
Automatic filter usage time calculation is not enabled ex factory.
It must be enabled in products equipped with a filter.
The S4 display board we use in the refrigerator has a nine-key system.
*(pressng 3 seconds)
After energsng, press Alarm Off and Vacaton buttons for 3 seconds to enter the password
entry screen.
Password Screen(3sec.)
Press twce
Press once
Freezer Set Frdge Set
Quck Frdge
Alarm Off Ice On/Off Dspenser
Mode
When the Key Lock
Flter reset
Vacaton
Quck Freeze/
(Eco Fuzzy)

14 / 41 EN Refrgerator / User Manual
Installaton
3.13. Before starting
to use the water/
ice dispenser
(Ths feature s optonal)
• If the water pressure s below 1 bar
then a separate pump may need to be
used.
• Water system of the refrgerator must
be connected to the cold water lne. It
must not be connected to hot water
lne.
• No water may be obtaned n the
ntal start-up of the refrgerator.
Because there s ar n the system. To
dscharge ar from the system, press
dspenser latch for 1-2 mnutes untl
water comes from the dspenser.
Water flow may be rregular at the
begnnng. After the ar n the system
s dscharged, water flow wll return
to normal.
• Durng ntal use, you wll have to
wat approxmately 12 hours for the
water to cool down.
• It wll take around 1-2 days for the
system to produce the full amount of
ce.
• Water pressure must be between 1-8
bars for the operaton of ce/water
dspenser smoothly. For ths, check
that 1 glass of water (100 cc) can be
flled n 10 seconds.
• The frst 10 glasses of water should
not be consumed.
• You must wat approxmately 12
hours to obtan ce from the ce
dspenser for the frst tme. If there
s not enough ce n the ce contaner,
ce may not be obtaned from ce
dspenser.
• Do not consume the frst 30 peces
(3-4 Lters) of ce cubes.
• Frst several glasses of water may be
cloudy when the flter s used for the
frst tme. Therefore, do not consume
the frst several glasses of water.
• If the water dspenser s not used for
a long perod of tme, frst 1-2 glasses
of water can be not so cold.
• If a power outage or a temporary
falure occurs whle the refrgerator
s operatng, ce can melt down a
lttle bt and then get frozen agan.
In such a case, ce cubes can stck to
each other. If the outage or falure
prolongs, ce can melt down causng
water leakage. If you experence such
a problem, empty and clean the ce
contaner.
• Ice cubes can stck to each other f
they are left n the contaner for a
long tme.
• If the product s to be connected to
the water mans, make sure that you
use potable water.
• Water system of the product s
desgned to operate only wth water.
Do not use beverage such as soft
drnks and/or juces n the water
system.
• It s recommended that the water s
dsconnected f you wll not be usng
the refrgerator for a long perod
of tme due to vacaton or smlar
reasons.
• Do not attempt to dsmantle the ce
contaner group assembly parts.
• Do not attempt to clean the ce
contaner assembly wthout removng
t from the refrgerator.
3.14. Transportation
of the product
1.
Unplug the product before transportng
t.
2.
Remove water connectons.
3.
Secure the shelves, accessores, crsper
and etc. n the refrgerator by adhesve
tape before repackagng t.
CPackagng must be adequate and
the rules of transportaton prnted
on the package must be followed.

15 / 41EN
Refrgerator / User Manual
Installaton
COrgnal packagng and foam
materals should be kept for future
transportatons.
AWARNING:Packagng materals
are dangerous for the chldren.
Keep packagng materals n a
safe place away from reach of the
chldren.

16 / 41 EN Refrgerator / User Manual
4 Preparaton
4.1. Things to be done
for energy saving
AConnectng the product to
electrc energy savng systems s
rsky as t may restrct operaton
of the product.
• Do not leave the doors of your
refrgerator open for a long tme.
• Do not put hot food or drnks n your
refrgerator.
• Do not overload the refrgerator.
Coolng capacty wll fall when the ar
crculaton nsde s hndered.
• Do not place the refrgerator n
places subject to drect sunlght.
Install the product at least 30 cm
away from heat sources such as
hobs, ovens, heater cores.
• Store your food n refrgerator n
closed contaners.
• Thawng frozen food n frdge
compartment wll both provde
energy savng and preserve the food
qualty.
CThe ambent temperature of
the room where you nstall the
refrgerator should at least be
5°C. Operatng your refrgerator
under cooler condtons than ths
s not recommended.
CInsde of your refrgerator must
be cleaned.
CIf two coolers are to be nstalled
sde by sde, there should be at
least 4 cm dstance between
them.
4.2. Efficient operation
Specfed energy consumpton value of
your refrgerator s determned under
maxmum load by removng the freezer
compartment upper rack and whle other
racks and two bottom drawers are n place.
there s no harm to remove a shelf or
drawer to accommodate the shapes and
sze of food to be frozen.
4.3. Recommendations
on the fridge
compartment
• Do not allow the food to touch
the temperature sensor n frdge
compartment. To allow the frdge
compartment to keep ts deal
storage temperature, sensor must
not be hndered by food.
• Do not put hot food and beverages
nsde the product.
4.4. Initial use
Before startng to use the product,
check that all preparatons are made
n accordance wth the nstructons
n sectons "Important nstructons
for safety and envronment" and
"Installaton".
• Clean the nteror of the
refrgerator as recommended n the
“Mantenance and cleanng” secton.
Check that nsde of t s dry before
operatng t.
• Plug the refrgerator nto the
grounded wall outlet. When the door
s opened the nteror llumnaton
wll turn on.

17 / 41EN
Refrgerator / User Manual
Preparation
• Run the refrgerator wthout puttng
any food for 6 hours and do not open
ts door unless absolutely necessary.
CYou wll hear a nose when the
compressor starts up. The lquds
and gases sealed wthn the
refrgeraton system may also
gve rse to nose, even f the
compressor s not runnng and ths
s qute normal.
CFront edges of the refrgerator
may feel warm. Ths s normal.
These areas are desgned to be
warm to avod condensaton.

18 / 41 EN Refrgerator / User Manual
5 Operatng the product
C*Optonal:Figures in this user manual are schematic and may not match the
product exactly. If the subject parts are not included in the product you have
purchased, then those parts are valid for other models.
5.1.Indicator panel
Indicator panels may vary according to the product model.
1
1 2
23
4
56
7.1 7.2
8910
11
*3
4
(*)
13
12
5
6
78
9
1011.1
11.2
1.
Freezer compartment temperature settng
2.
Economy mode
3.
Energy savng functon (dsplay off)
4.
Power falure/Hgh temperature / error warnng ndcator
5.
Cooler compartment temperature settng
6.
Rapd coolng
7.
Vacaton functon
8.
Keypad lock / flter replacng alert cancellaton
9.
Water, fragmented ce, ce cubes selecton
10.
Ice makng on/off
11.
Dsplay on/off /Alarm off warnng
12.
Autoeco
13.
Rapd freezng

19 / 41EN
Refrgerator / User Manual
Operatng the product
1. Freezer compartment temperature
settng
Pressing the button ( ) number (1)
will enable the freezer compartment
temperature to be set at -18,-19,-20,-21
,-22,-23,-24,-18...
2. Economy mode
Indicates the refrigerator is running on
energy-saving mode. This indicator will
be active when the freezer compartment
temperature is set at -18 or the energy-
saving cooling is engaged by eco-extra
function. ( )
3.Energy savng functon (dsplay off)
If the product doors are kept closed for
a long time energy saving function is
automatically activated and energy saving
symbol is illuminated. When energy saving
function is activated, all symbols on the
display other than energy saving symbol will
turn off. When the Energy Saving function
is activated, if any button is pressed or the
door is opened, energy saving function will
be cancelled and the symbols on display will
return to normal.
Energy saving function is activated
during delivery from factory and cannot
be cancelled.
4. Power falure/Hgh temperature /
error warnng ndcator
This indicator ( ) will light up in case of
temperature faults or fault alerts. If you
see this indicator is lit up, please see the
"recommended solutions for problems"
section in this guide.
This indicator illuminates during power
failure, high temperature failures and
error warnings. During sustained power
failures, the highest temperature that
the freezer compartment reaches
will flash on the digital display. After
checking the food located in the freezer
compartment press the alarm off button
to clear the warning.
5. Cooler compartment temperature
settng
After pressing the button ( ), the
cooler compartment temperature can be
set to 8,7,6,5,4,3,2.. respectively.
6. Rapd coolng
For rapid cooling , press the button ; this
will activate the rapid cooling indicator
( ).
Press this button again to deactivate this
function.
Use this function when placing fresh
foods into the cooler compartment or to
rapidly cool the food items. When this
function is activated, the refrigerator will
be engaged for 1 hour.
7. Vacaton functon
When the Vacation function (
) is active, the cooler compartment
temperature indicator displays
the inscription "- -" and no cooling
process will be active in the cooling
compartment. This function is not
suitable to keep food in the cooler
compartment. Other compartments
will remain cooled with the respective
temperature set for each compartment.
Press the vacation function button again
to cancel this function. ( )
8. Keypad lock / Keypad lock / flter
replacng alert cancellaton
Press keypad lock button ( ) to activate the
keypad lock. You may also use this function
to prevent changing the refrigerator's
temperature settings. The refrigerator's
filter must be replaced every 6 months. If
you follow the instructions in the section
5.2, the refrigerator will automatically
calculate the remaining period and the filter
Other manuals for ASN541B
2
This manual suits for next models
9
Table of contents
Other Beko Refrigerator manuals

Beko
Beko CN237120S User manual

Beko
Beko SSA25321S User manual

Beko
Beko BRFNE214M23W User manual

Beko
Beko RB 12 User manual

Beko
Beko B5RDNE504LDXB User manual

Beko
Beko GNE114612X User manual

Beko
Beko RSNE445I31ZWN User manual

Beko
Beko BCNA306E4SN Instruction Manual

Beko
Beko CXFG1685DB User manual

Beko
Beko RDNT231I20XB User manual

Beko
Beko DSA25020T User manual

Beko
Beko RDNE505E20DZXP User manual

Beko
Beko GN163241XBRN User manual

Beko
Beko UL4823W User manual

Beko
Beko DSA25020 User manual

Beko
Beko RCNA400E40ZX User manual

Beko
Beko GN163130PTN User manual

Beko
Beko CS 134020 D User manual

Beko
Beko CNA340ED0X User manual

Beko
Beko RCSA330K21W User manual