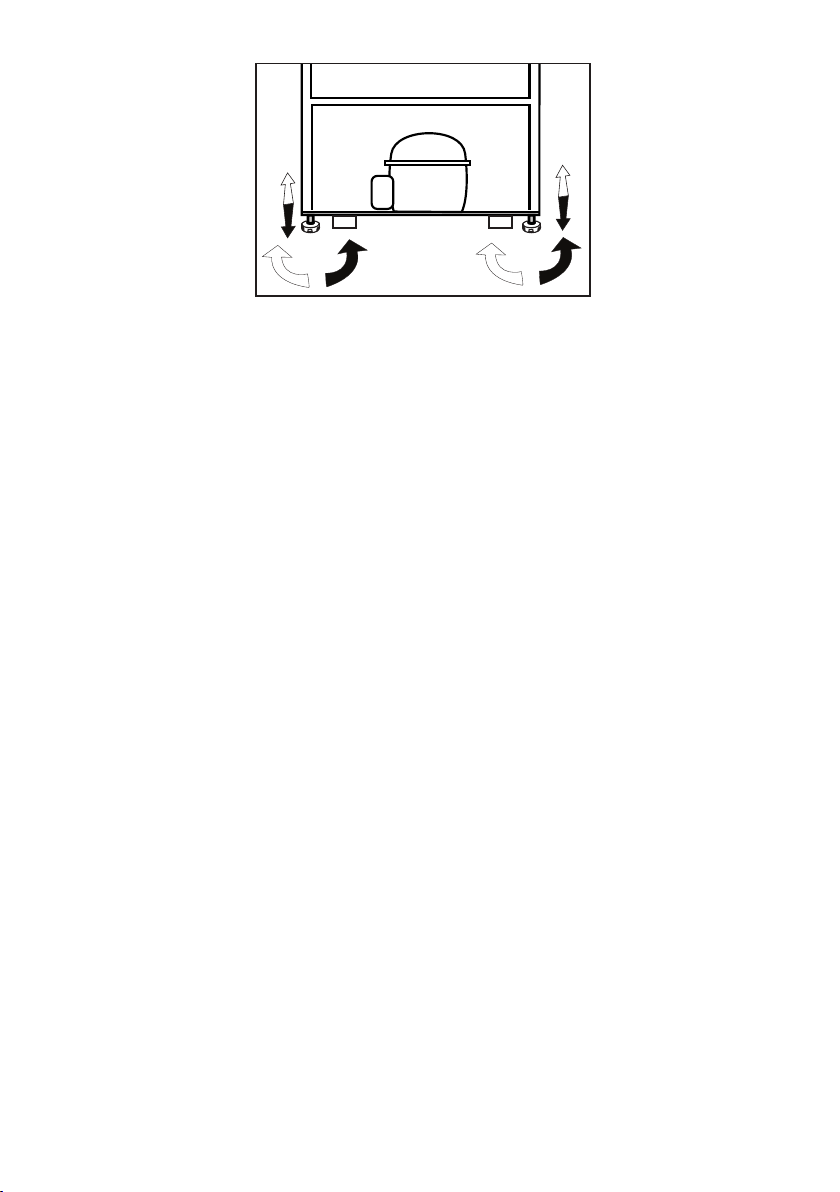
logo
Brands
  1. Home
  2. •
  3. Brands
  4. •
  5. Beko
  6. •
  7. Refrigerator
  8. •
  9. Beko K54306NEB User manual

Beko K54306NEB User manual

This manual suits for next models

5

Other Beko Refrigerator manuals

Beko CCFM3581VW Instruction Manual

Beko

Beko CCFM3581VW Instruction Manual

Beko GN162420X User manual

Beko

Beko GN162420X User manual

Beko CHA 33100 - ANNEXE 950 User manual

Beko

Beko CHA 33100 - ANNEXE 950 User manual

Beko RCSA1702XPS User manual

Beko

Beko RCSA1702XPS User manual

Beko RDNE510M20XB User manual

Beko

Beko RDNE510M20XB User manual

Beko B5RCNE365HG User manual

Beko

Beko B5RCNE365HG User manual

Beko RCNE520E32X User manual

Beko

Beko RCNE520E32X User manual

Beko DNE 65020 X User manual

Beko

Beko DNE 65020 X User manual

Beko RCNA365K20ZX User manual

Beko

Beko RCNA365K20ZX User manual

Beko DSE 30000 User manual

Beko

Beko DSE 30000 User manual

Beko 670560EI User manual

Beko

Beko 670560EI User manual

Beko CN236220X User manual

Beko

Beko CN236220X User manual

Beko B5RCNE594ZXB User manual

Beko

Beko B5RCNE594ZXB User manual

Beko CN228120 User manual

Beko

Beko CN228120 User manual

Beko LX 5053 W User manual

Beko

Beko LX 5053 W User manual

Beko BCSA285K2S User manual

Beko

Beko BCSA285K2S User manual

Beko RB501 User manual

Beko

Beko RB501 User manual

Beko RSO46WEUN User manual

Beko

Beko RSO46WEUN User manual

Beko BCNE400I35ZS User manual

Beko

Beko BCNE400I35ZS User manual

Beko RDNE350K30WN User manual

Beko

Beko RDNE350K30WN User manual

Beko RDNT371 Series User manual

Beko

Beko RDNT371 Series User manual

Beko FREEZ66FB Manual

Beko

Beko FREEZ66FB Manual

Beko D19485NEXK User manual

Beko

Beko D19485NEXK User manual

Beko RDSA43S Instruction Manual

Beko

Beko RDSA43S Instruction Manual

Popular Refrigerator manuals by other brands

Haier HRF-369NAA null

Haier

Haier HRF-369NAA null

Haier HRF-688FR null

Haier

Haier HRF-688FR null

Haier HRF-416KAASS null

Haier

Haier HRF-416KAASS null

Haier HRF-348E null

Haier

Haier HRF-348E null

Bonnet Neve SKYVIEW PLUS User instructions

Bonnet Neve

Bonnet Neve SKYVIEW PLUS User instructions

Zanussi Electrolux ZERB 8441 Instruction book

Zanussi Electrolux

Zanussi Electrolux ZERB 8441 Instruction book

Sharp SJ-BA31IEXW2-EU user manual

Sharp

Sharp SJ-BA31IEXW2-EU user manual

CORBERO CC2300MCW Instruction booklet

CORBERO

CORBERO CC2300MCW Instruction booklet

KitchenAid 2205264 Use and care guide

KitchenAid

KitchenAid 2205264 Use and care guide

NEFF KI181 Series user manual

NEFF

NEFF KI181 Series user manual

Hoshizaki Reach-In instruction manual

Hoshizaki

Hoshizaki Reach-In instruction manual

Amana ASD2524VES00 User instructions

Amana

Amana ASD2524VES00 User instructions

BOMANN KGC 213 instruction manual

BOMANN

BOMANN KGC 213 instruction manual

Danby DAR044A1SLDD Owner's use and care guide

Danby

Danby DAR044A1SLDD Owner's use and care guide

IKEA FROSTIG C 185 E manual

IKEA

IKEA FROSTIG C 185 E manual

Electrolux ER 6821 D Instruction book

Electrolux

Electrolux ER 6821 D Instruction book

True TS-28 Specifications

True

True TS-28 Specifications

Frigidaire FSC23R5DW9 installation guide

Frigidaire

Frigidaire FSC23R5DW9 installation guide

https://manuals.online logo
https://manuals.online logoBrands
  • About & Mission
  • Contact us
  • Privacy Policy
  • Terms and Conditions

Copyright 2026 Manuals.Online. All Rights Reserved.

Instructions d’installation
Istruzioni di installazione
Instrucțiuni de instalare
it
K54306NEB / HEB / EB - Hettich
4578347904/AA
1935 mm
629 mm 1159 mm
min. 200 cm2
1940-1950 mm
40 mm
min.
560 mm
1935 mm
32 mm
16 mm
No wooden
back wall
min
. 555 mm
1159 mm
71 mm
545 mm
540 mm
The back wall of the wooden cabinet must be left open completely to kitchen wall in order to allow sufficient
air circulation to cool down the condenser unit for energy efficiency.
Die Rückseite des Holzschranks muss zur Küchenwand hin vollständig offen bleiben, damit eine ausreichende
Luftzirkulation für die Abkühlung des Kondensators zur Gewährleistung der Energieeffizienz sorgt.
La paroi arrière du meuble en bois doit être laissée complètement ouverte contre le mur de la cuisine, afin
de permettre une circulation d’air suffisante pour refroidir le produit.
La parete posteriore dell’armadio in legno deve essere lasiata completamente aperta verso la parete della
cucina per consentire una circolazione d’aria sufficiente a raffreddare il condensatore per garantire una
sufficiente alimentazione.
Pentru a avea eficiență energetică, partea posterioară a dulapului către peretele bucătăriei trebuie să fie
lăsată complet deschisă, pentru a permite o circulație de aer suficientă care să răcească condensatorul.
Enerji tasarrufu için buzdolabı arkasında yeterli hava sirkülasyonu sağlanmalıdır. Bu amaçla buzdolabının
içine yerleștirileceği ahșap kabinin arka yüzeyi kapatılmamalıdır.
1
Adjusting the legs
If your refrigerator is unbalanced:
You can balance your refrigerator by turning the legs of it as illustrated in the figure. The corner where the leg
exists is lowered when you turn in the direction of black arrow and raised when you turn in the opposite
direction. Taking help from someone to slightly lift the refrigerator will facilitate this process.
Füße einstellen
Wenn Ihr Kühlschrank nicht absolut gerade steht:
Sie können den Kühlschrank – wie in der Abbildung gezeigt – durch Drehen der Füße ausbalancieren. Wenn
Sie in Richtung des schwarzen Pfeils drehen, senkt sich die Ecke, an der sich der Fuß befindet. Beim Drehen
in Gegenrichtung wird die Ecke angehoben. Diese Arbeit fällt erheblich leichter, wenn ein Helfer das Gerät
etwas anhebt.
Réglage des pieds
Si votre réfrigérateur est déséquilibré:
Vous pouvez l’équilibrer en tournant les pieds de celui-ci comme illustré sur le dessin ci-dessus. Pour abaisser
le produit, veuillez tourner les pieds dans le sens inverse des aiguilles d’une montre (flêches noires). Pour
monter le produit, veuillez tourner dans le sens contraire (flêches blanches). Lever légèrement l’avant du
produit, avec l’aide d’une personne tierce, vous faciltera le procesus.
Regolazione dei piedini
Se il frigorifero non è in equilibrio:
È possibile bilanciare il frigorifero ruotando i piedini come illustrato in figura. L’angolo in cui i piedini sono più
bassi quando girati in direzione della freccia nera e rialzati quando girati in direzione opposta. Un aiuto per
sollevare leggermente il frigorifero faciliterà tale processo.
Ajustarea picioarelor
Dacă frigiderul este neechilibrat:
Puteți echilibra frigiderul prin rotirea picioarelor sale așa cum este reprezentat în schiță.
Colțul unde există piciorul se coboară atunci când rotiți în direcția săgeții negre și se ridică atunci când rotiți în
direcția opusă. Acest procedeu va fi mai ușor dacă cineva vă ajută să ridicați ușor frigiderul.
Ayakların Ayarlanması
Buzdolabınız dengesiz duruyor ise:
Buzdolabınızın ayaklarını șekildeki gibi döndürerek dengeli durmasını sağlayabilirsiniz. Siyah ok yönüne
döndürüldüğünde ayağın bulunduğu köșe alçalır, diğer yöne döndürüldüğünde ise yükselir. Bu ișlem yapılırken
birinden dolabı hafifçe kaldırması için yardım almanız kolaylık sağlayacaktır.
2
71 mm
40 mm
200 cm2
629 mm 1159 mm
16 mm
1940-1950 mm
min 200 cm2
3
4 mm
L mm **
*If the subject parts are not included in the product you have purchased, then it is valid for other
models (see page 4/5).
*Falls Teile nicht zum Lieferumfang des erworbenen Produktes zählen, gelten sie für andere Modelle
(siehe Seite 4/5).
* Si les pièces concernées ne sont pas incluses dans le produit que vous avez acheté, elles sont
valables pour d'autres modèles (voir page 4/5).
*Se le parti in oggetto non sono incluse nell'apparecchio acquistato, significa che sono da intendersi
per altri modelli (vedi pagina 4/5).
*În cazul în care unele componente nu sunt incluse în produsul pe care l-ați achiziționat, atunci sunt
valabile pentru alte modele (vezi pagina 4/5).
*Satın almıș olduğunuz üründe ilgili parçalar yoksa bașka modeller için geçerlidir (sayfa 4/5'e bakın).
90°
1
PS
1
3
4
2
Torx
(T)
x2
Wood
(W)
x27
Plastic Sheet
(PS)
x4
Wood
(1TW)
x10
x 27 x10 x 2
x 4
(2T)
x2
'2T' x 2
Metric
4
*
Spares included
*
Ersatzteile inklusive
*
Pièces incluses
*
Ricambi inclusi
*
Piese incluse
*
Dahil olan parçalar
Note: Installation step for 2, screws for connecting top plastic part should not be screwed very hard, because of
moving the plastic part easily left or right side.
Hinweis: Installationsschritt 2, Die Schrauben zum Fixieren des Kunststoffteils sollten nicht zu fest angezogen
werden, da sich das Kunststoffteil ansonsten nach links oder rechts verschieben kann.
Remarque: A l'étape 2 de l'installation, les vis pour fixer l’accessoire en plastique sur la partie supérieure ne doivent
pas être vissées à fond, afin d’éviter tout déplacement latéral de cette pièce pendant le vissage.
Nota: Fase di installazione per 2, viti per connettere la parte in plastica superiore non devono essere serrate, per
consentire il movimento della parte in plastica a sinistra o a destra.
Notă: Instalare - pasul 2, șuruburile pentru conectarea părții superioare din plastic nu ar trebui să fie înșurubate
foarte tare, pentru ca aceasta să poată fi mișcată ușor de la stânga la dreapta.
Not: 2 numara ile gösterilen montaj adımında üst bağlantı plastiğini kaydırabilmek için bağlantının yapıldığı vidaları
tam sıkmayınız.
*
*
7
5
L>10 mm
L<10 mm *
1.A
1.B
see page 3
siehe Seite 3
voir page 3
vedi pagina 3
vezi pagina 3
sayfa 3'e bakın
**
**
**
1
6
(2T)
1.D 1.E
1.C
40,5
mm
(1TW)
1.F
1.F'
1.G 1.H
1
2
click
2
1
1. F''
40,5 mm
7
2
click
(T)
2.A 2. B
2.D
40,5 mm
(1TW)
2.C'
2.C
8
2.E
2.F
40,5mm
40,5 mm
(1TW)
40,5 mm
(1TW)
(W)
34
5
(in line with furniture)
(in der Reihe mit Möbel)
(en ligne avec les meubles)
(in linea con i mobili)
(in linie cu mobilierul)
(uygun olarak mobilya)
40
,
5 mm
40
,
5 mm
9
2 BOX x
1 x 2 x 2 x
2 x
2 x 2 x 2 x 1 x